Introduction
In this tutorial, How to use Ansible vault encrypt decrypt to secure sensitive data. you’ll learn how to use Ansible Vault to secure sensitive data within your configurations, an essential skill for maintaining robust security protocols. Ansible Vault encrypts variables and files to protect sensitive information like passwords and credentials from unauthorized access.
The guide covers the initial setup of Ansible Vault, including detailed steps to encrypt your data effectively. You’ll gain insights into the practical applications of these security measures in real-world scenarios.
Finally, the tutorial provides practical tips for decrypting data when necessary for your deployments. Whether you are new to Ansible or have advanced experience, understanding how to manage Vault’s encryption and decryption processes is crucial for enhancing your operational security.
Ansible vault encrypt decrypt
Encrypted files use Ansible Vault
Ansible uses the AES256 algorithm for encrypting sensitivity. We will create an encrypted file using the ansible-vault utility tool as shown.
ansible-vault create pass-file.xmlThe content before the Encrypted file is shown.
cat pass-file.xml
welcome to DevopsRoles.com site!
After the Encrypted file as shown.
cat pass-file.xml
$ANSIBLE_VAULT;1.1;AES256
37383139356630386365643264393833663535643534663962643664366634626334383735343861
6265633335646266363233333930303436633063373931380a613635373435366561353534663432
66366631336335393562333233363762633130393336646462633031383239363332616338376633
3630633835646238610a373431323839396636316463633564356535383065626663386135366338
3431
We will view an Encrypted file in Ansible using ansible-vault
ansible-vault view pass-file.xmlEdit an Encrypted file using ansible-vault
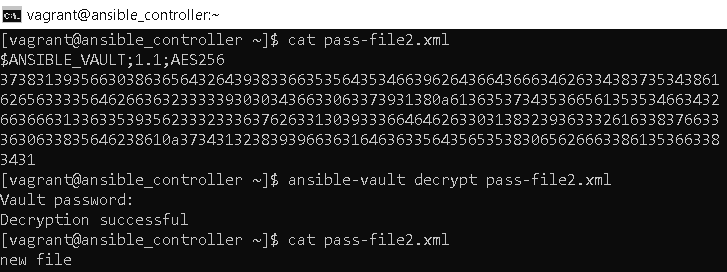
ansible-vault edit pass-file.xmlEncrypt an Existing file using the Ansible vault command
ansible-vault encrypt pass-file2.xmlFor example the picture below


Decrypting files Ansible
Use an ansible vault to decrypt a file or revert to plain text.
ansible-vault decrypt pass-file2.xml
Reset the Ansible vault password
ansible-vault rekey pass-file2.xmlEncrypt a playbook file in Ansible
Example Ansible Setup NFS server here. I will Encrypt file exports.j2 the content as below:
[vagrant@ansible_controller ~]$ cat ./ansible/exports.j2
# /etc/exports: the access control list for filesystems which may be exported
#   to NFS clients.  See exports(5).
/home/vagrant/nfs_test            192.168.1.0/24(rw,sync,no_root_squash,no_subtree_check)
Encryption with vault_pass.txt as below:
[vagrant@ansible_controller ~]$ cat vault_pass.txt
123456789@
[vagrant@ansible_controller ~]$ ansible-vault encrypt ./ansible/exports.j2 --vault-password-file vault_pass.txt
Encryption successful
[vagrant@ansible_controller ~]$ cat ./ansible/exports.j2
$ANSIBLE_VAULT;1.1;AES256
38376166636635393464306333653230663865303966626137346536393231623862333532313061
6334326531333734663936336436323034643261666462640a353833363437633761656136306433
30383331633836346563323962346663373664646538636135663866346435643834613937643664
3763383131363761370a363632613539303239366166613339663133653938646665613530633633
64613233636434323031326137376636613536396330623338326230366664376339653431643831
63386431633837643265343662643338626339656630336666613565303738643038373131383530
61383637666462376663306536333736623339346364653462633730383961353531613830343534
66393339363061643861373162663832333561663763313339626365353139376433303333373133
65373461313531323735623135616535363638353963343563643439363461613236646433313461
39653733633638396663636236346638393036323831386535333933373764616334343431316234
31376537653434653931613931646465393638373039363335616364613638633264356531323332
65336164333334303765393361616233373138663530386466383032333334393465363632303435
64383332313635326661333431613561666431356331363963633137623965323963666338393865
3235393266326566663463363861613166643130313430653736
As a result, run the Ansible playbook as below:
[vagrant@ansible_controller ~]$ ansible-playbook -i ansible/hosts nfs-server.yml --vault-password-file vault_pass.txt
[WARNING]: Invalid characters were found in group names but not replaced, use -vvvv to see details

PLAY [nfs-server] ***************************************************************************************************

TASK [Gathering Facts] **********************************************************************************************
ok: [servernfs]

TASK [install nfs-utils] ********************************************************************************************
ok: [servernfs]

TASK [Create a mountable directory if it does not exist] ************************************************************
ok: [servernfs]

TASK [enable rpcbind nfslock nfs] ***********************************************************************************
ok: [servernfs] => (item=rpcbind)
ok: [servernfs] => (item=nfslock)
ok: [servernfs] => (item=nfs)

TASK [Copy exports file.] *******************************************************************************************
changed: [servernfs]

TASK [NFS system start] *********************************************************************************************
changed: [servernfs]

PLAY RECAP **********************************************************************************************************
servernfs                  : ok=6    changed=2    unreachable=0    failed=0    skipped=0    rescued=0    ignored=0
File /etc/exports on server NFS as below:
[vagrant@servernfs ~]$ cat /etc/exports
# /etc/exports: the access control list for filesystems which may be exported
#   to NFS clients.  See exports(5).
/home/vagrant/nfs_test            192.168.1.0/24(rw,sync,no_root_squash,no_subtree_check)
Conclusion
In conclusion, using Ansible Vault for encryption and decryption is a key skill for safeguarding your sensitive data in DevOps environments. The examples provided in this guide illustrate practical applications of Ansible Vault, enhancing your security practices. We hope you find this information beneficial. Thank you for reading on the DevopsRoles page!