Tag Archives: Vagrant

Vagrant Virtual Machine: Simplify Your Virtualized Development Environment

Introduction

This guide explores how to use Vagrant Virtual Machine to its fullest potential, from setup to advanced scenarios. In the world of software development, virtualized environments play a crucial role in ensuring consistency, portability, and scalability. However, managing these environments can often feel daunting. Enter Vagrant, a powerful tool designed to simplify and streamline the process of creating and managing virtualized development environments. Whether you’re a seasoned developer or a beginner, Vagrant offers an intuitive and efficient solution to virtual machine (VM) management.

What is Vagrant?

Vagrant is an open-source tool developed by HashiCorp that provides a consistent workflow for building and managing virtualized environments. By leveraging simple configuration files, Vagrant automates the setup of virtual machines across different providers such as VirtualBox, VMware, or even cloud platforms like AWS.

Key Benefits of Using Vagrant:

  • Portability: Share the same development environment across teams.
  • Reproducibility: Consistently recreate environments to avoid the “it works on my machine” issue.
  • Ease of Use: Simple configuration files and commands make Vagrant beginner-friendly.
  • Integration: Works seamlessly with popular provisioning tools like Ansible, Puppet, or Chef.

How Vagrant Works

Vagrant relies on a configuration file, Vagrantfile, which describes the virtual environment, including the base operating system, resources, networking, and provisioning steps. With just a few commands, you can initialize, configure, and start a virtual machine.

Getting Started with Vagrant

Step 1: Install Vagrant

  1. Download Vagrant: Visit the official Vagrant website to download the installer for your operating system.
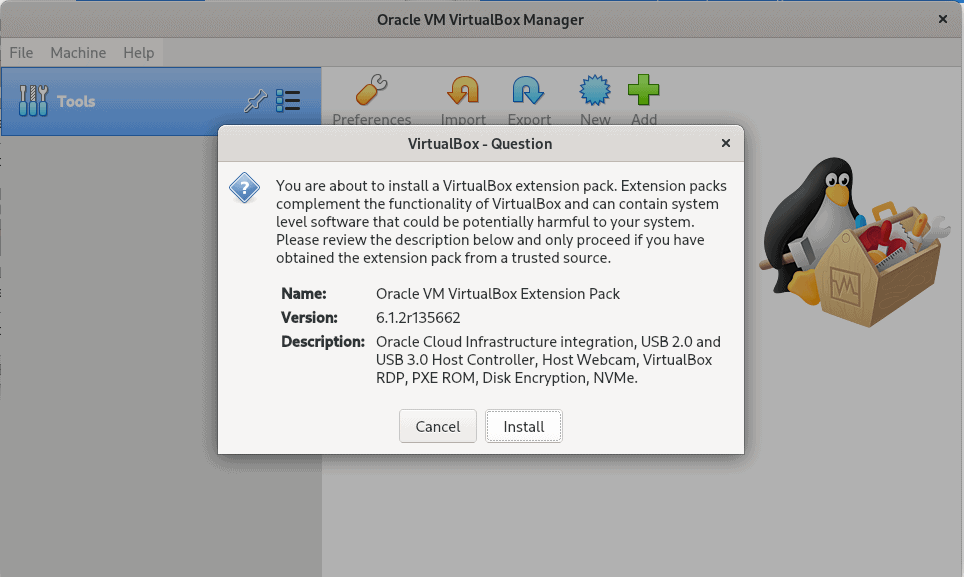
  2. Install a Virtualization Provider: Vagrant requires a provider like VirtualBox. Install it before proceeding.

Step 2: Initialize a New Vagrant Project

  1. Open a terminal and navigate to your project directory.
  2. Run:
vagrant init hashicorp/bionic64

This initializes a new Vagrantfile using Ubuntu 18.04 as the base box.

Step 3: Start the Virtual Machine

Run the following command to start your VM:
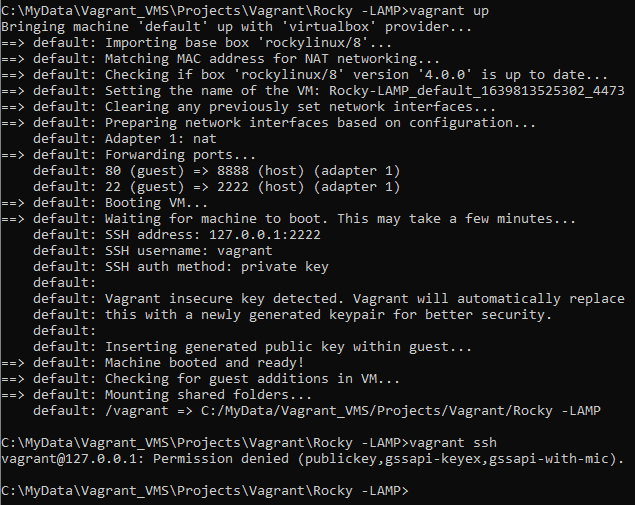
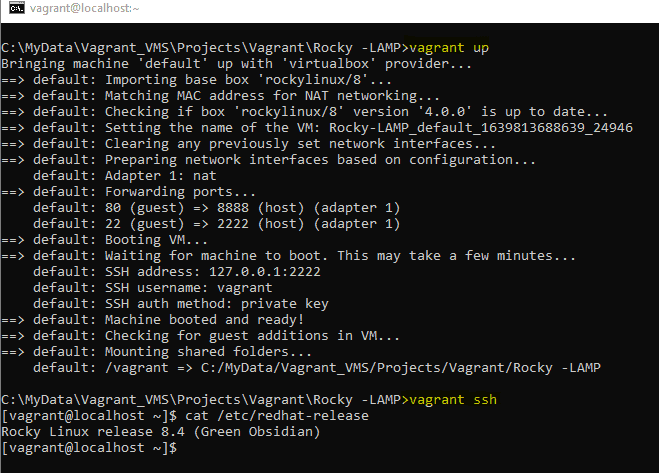
vagrant up

Step 4: Access Your Virtual Machine

To connect to your VM, use:

vagrant ssh

Configuring Vagrant Virtual Machine Environments

The Vagrantfile

The Vagrantfile is the core of any Vagrant project. Here’s a breakdown of its key components:

Example:

Vagrant.configure("2") do |config|
  # Define the base box
  config.vm.box = "hashicorp/bionic64"

  # Configure networking
  config.vm.network "forwarded_port", guest: 80, host: 8080

  # Allocate resources
  config.vm.provider "virtualbox" do |vb|
    vb.memory = "1024"
    vb.cpus = 2
  end

  # Provisioning
  config.vm.provision "shell", inline: <<-SHELL
    apt-get update
    apt-get install -y apache2
  SHELL
end

Networking Options

  • Port Forwarding: Forward ports from the host to the guest machine.
  • Private Networking: Assign a static IP address for local development.
  • Public Networking: Expose the VM to your local network.

Provisioning

Vagrant supports provisioning tools to automate software installation:

  • Shell Scripts:
    • config.vm.provision "shell", inline: "echo Hello, World!"
  • Ansible or Puppet: Integrate your favorite configuration management tools.

Advanced Use Cases

Multi-Machine Environments

Set up multiple VMs in a single project, ideal for microservices or testing clusters.

Example:

Vagrant.configure("2") do |config|
  config.vm.define "web" do |web|
    web.vm.box = "hashicorp/bionic64"
    web.vm.network "forwarded_port", guest: 80, host: 8080
  end

  config.vm.define "db" do |db|
    db.vm.box = "hashicorp/bionic64"
    db.vm.network "private_network", ip: "192.168.33.10"
  end
end

Running Cloud-Based VMs

Leverage Vagrant plugins like vagrant-aws to manage virtual machines on AWS.

Troubleshooting Common Issues

1. “Vagrant up” hangs

  • Ensure your virtualization provider is properly installed.
  • Verify your Vagrantfile syntax.

2. SSH connection errors

  • Run vagrant ssh-config to inspect SSH settings.

Frequently Asked Questions

What are Vagrant Boxes?

Vagrant boxes are pre-configured virtual machine images. Popular options include:

  • hashicorp/bionic64 (Ubuntu 18.04)
  • debian/buster64 (Debian)

Can I use Vagrant without VirtualBox?

Yes! Vagrant supports multiple providers, including VMware, Docker, and AWS.

How do I share my Vagrant environment with teammates?

Commit your Vagrantfile and any provisioning scripts to a version control system like Git.

External Resources

Conclusion

Vagrant revolutionizes the way developers manage virtualized environments, offering a streamlined and repeatable workflow. By mastering its configuration and tools, you can save time, enhance collaboration, and improve development consistency. Start your journey with Vagrant today and unlock the power of virtual machines for your projects!  Thank you for reading the DevopsRoles page!

Vagrant Tutorial: A Comprehensive Guide for DevOps Engineers

Introduction

In the fast-paced world of DevOps, efficiency and automation are critical. Vagrant is a powerful tool that simplifies creating, managing, and deploying virtualized environments. With Vagrant, developers can quickly spin up development environments that mirror production, improving consistency and reducing configuration time. Vagrant tutorial explores essential features, how it fits into DevOps workflows, and walks through setting up and using Vagrant in real-world scenarios.

What is Vagrant?

Vagrant is an open-source tool designed to create and configure lightweight, reproducible, and portable development environments. It automates the setup and configuration of virtual machines (VMs), making it easier to replicate environments across different machines. Vagrant is widely used in DevOps as it provides a streamlined approach for managing infrastructure as code (IaC), reducing inconsistencies between development, staging, and production environments.

Why Use Vagrant in DevOps?

  • Consistency: Ensures all team members work in identical environments.
  • Portability: Environments can be moved between machines seamlessly.
  • Automation: Automates VM setup, configuration, and provisioning.
  • Simplicity: Simplifies managing and destroying virtual environments with one command.

Prerequisites for Using Vagrant

Before we dive into using Vagrant, make sure you have the following installed:

  1. Vagrant: Download Vagrant.
  2. VirtualBox (or any provider supported by Vagrant): Download VirtualBox.
  3. Terminal or Command Prompt: For running Vagrant commands.

Getting Started with Vagrant Tutorial

Step 1: Install Vagrant and VirtualBox

To start, download and install Vagrant and VirtualBox, which Vagrant uses by default as the virtualization provider. After installation, verify that Vagrant is installed correctly by running:


vagrant --version

Step 2: Initialize a Vagrant Project

In a new directory, initialize a Vagrant project. This will create a Vagrantfile—a configuration file that defines the environment.

mkdir my-vagrant-project
cd my-vagrant-project
vagrant init

This creates a Vagrantfile in the project directory, which is essential for configuring your Vagrant environment.

Step 3: Edit the Vagrantfile

Open the Vagrantfile in your preferred text editor. Modify the following lines to specify the box (VM image) and networking options:

Vagrant.configure("2") do |config|
  config.vm.box = "ubuntu/bionic64"
  config.vm.network "private_network", type: "dhcp"
end

In this example, we are using the ubuntu/bionic64 box and setting up a private network. You can find other pre-built boxes at Vagrant Cloud.

Step 4: Start the Vagrant Environment

With the Vagrantfile configured, run the following command to start the Vagrant environment:

vagrant up

This command will download the specified box if it’s not already available locally and then create and configure the VM.

Step 5: SSH into the VM

To interact with your virtual machine, SSH into it with the command:

vagrant ssh

This opens a terminal session directly into the VM, where you can perform additional configurations or install software.

Step 6: Suspend, Halt, or Destroy the VM

When you’re done, you can suspend, halt, or destroy the VM to save resources.

  • Suspend: vagrant suspend
    • Saves the state of the VM to resume later.
  • Halt: vagrant halt
    • Shuts down the VM.
  • Destroy: vagrant destroy
    • Completely removes the VM.

Vagrant for DevOps: Advanced Use Cases

1. Provisioning with Shell Scripts

Vagrant supports provisioning using shell scripts, making it easy to install software and perform configurations during the VM setup.

Example Vagrantfile with shell provisioning:

Vagrant.configure("2") do |config|
  config.vm.box = "ubuntu/bionic64"
  config.vm.provision "shell", inline: <<-SHELL
    sudo apt-get update
    sudo apt-get install -y nginx
  SHELL
end

This setup will automatically install Nginx when the VM is created.

2. Multi-Machine Environments

Vagrant allows you to define multiple VMs within a single Vagrantfile, useful for simulating complex environments like microservices architectures.

Example Vagrantfile for multi-machine setup:

Vagrant.configure("2") do |config|
  config.vm.define "web" do |web|
    web.vm.box = "ubuntu/bionic64"
    web.vm.network "private_network", ip: "192.168.33.10"
    web.vm.provision "shell", inline: "sudo apt-get install -y nginx"
  end

  config.vm.define "db" do |db|
    db.vm.box = "ubuntu/bionic64"
    db.vm.network "private_network", ip: "192.168.33.11"
    db.vm.provision "shell", inline: "sudo apt-get install -y mysql-server"
  end
end

In this setup, we have two VMs: a web server and a database server, each with a private IP address.

3. Using Ansible with Vagrant

Vagrant can integrate with Ansible for more complex provisioning, ideal for larger DevOps environments.

Example Vagrantfile with Ansible provisioning:

Vagrant.configure("2") do |config|
  config.vm.box = "ubuntu/bionic64"
  config.vm.provision "ansible" do |ansible|
    ansible.playbook = "playbook.yml"
  end
end

The playbook.yml file defines the configuration managed by Ansible, making it easy to apply configurations across multiple VMs.

Common Vagrant Commands Cheat Sheet

CommandDescription
vagrant initInitialize a new Vagrant project
vagrant upStart and provision the VM
vagrant sshSSH into the VM
vagrant suspendSuspend the VM
vagrant haltHalt the VM
vagrant destroyDestroy the VM
vagrant provisionRe-run provisioning scripts on the VM
vagrant reloadRestart the VM and apply any configuration changes

Frequently Asked Questions

What is Vagrant used for?

Vagrant is used to create, configure, and manage virtualized environments for development and testing, ensuring consistency across different stages of software development.

How does Vagrant work with DevOps?

Vagrant allows DevOps teams to automate environment setup, streamline testing, and ensure consistent configurations between development, staging, and production.

Can Vagrant work with Docker?

Yes, Vagrant supports Docker as a provider, allowing users to create and manage Docker containers instead of virtual machines.

What are the system requirements for Vagrant?

Vagrant requires a 64-bit operating system and compatible virtualization software (e.g., VirtualBox, VMware, Docker).

How is Vagrant different from Docker?

Vagrant primarily manages virtual machines, while Docker manages containers. Vagrant is ideal for managing full VM environments, while Docker is optimized for lightweight, isolated containers.

External Resources

  • Vagrant Official Documentation
  • Vagrant Cloud – Find and use pre-built Vagrant boxes.
  • HashiCorp – The company behind Vagrant and other DevOps tools.

Conclusion

Vagrant is a powerful and versatile tool that has become an essential component of modern DevOps practices. It simplifies environment setup, promotes consistency across team members, and integrates well with other DevOps tools. By following this tutorial, you can leverage Vagrant to automate and manage virtualized environments effortlessly. Whether you are a developer looking to streamline local development or a DevOps engineer aiming for consistent deployments, Vagrant is a valuable asset in your toolkit. Thank you for reading the DevopsRoles page!

How to Add second drive in Vagrant

Introduction

In this article, we will guide you through the process of Add second drive in Vagrant. Adding an additional drive can be beneficial for various purposes, such as expanding storage space or separating application data. We will go through each step in detail so that you can easily implement and manage your new drive in the Vagrant environment.

Why Add a Second Drive in Vagrant?

Adding a second drive to your Vagrant environment can provide numerous benefits:

  • Increased Storage: Expand your VM’s storage capacity.
  • Data Segregation: Separate different types of data or applications.
  • Improved Performance: Enhance I/O performance by distributing data across multiple drives.
  • Backup and Recovery: Simplify backup and recovery processes by isolating critical data.

Prerequisites

Before you begin, ensure you have the following:

  • Vagrant installed on your system.
  • A Vagrant box is configured and running.
  • Basic knowledge of Vagrant commands and configuration.

Step-by-Step Guide to Add Second drive in Vagrant

Step 1: Check the Collected Data – Disk File

First, list the contents of your VirtualBox VM directory to check the existing disk files:

$ ls -l /home/huupv/VirtualBox\ VMs/build6_default_1464167769486_18523/

Step 2: Login and Check the Disks in the OS

Once logged in, you can check the existing disks in the OS itself with the following command:

# fdisk -l

Step 3: Stop the Vagrant Box

Before making any changes, halt the Vagrant box:

$ vagrant halt

Step 4: Edit the Vagrantfile

Edit your Vagrantfile to add the second drive. Include the following configuration:

config.vm.provider "virtualbox" do |vb|
# Display the VirtualBox GUI when booting the machine
# vb.gui = true

# Customize the amount of memory on the VM:
# vb.memory = "1024"

second_disk = "/tmp/build6box-disk2.vmdk"
vb.customize ['createhd', '--filename', second_disk, '--size', 500 * 1024]
vb.customize ['storageattach', :id, '--storagectl', 'SATA Controller', '--port', 1, '--device', 0, '--type', 'hdd', '--medium', second_disk]
end

Step 5: Run the Vagrant Box

Start the Vagrant box with the updated configuration:

$ vagrant up

Step 6: Verify the New Disk

Check the file of the new disk on the host machine:

$ file /tmp/build6box-disk2.vmdk

And verify the drive within the Vagrant box itself using fdisk:

# fdisk -l | grep Disk

Following these steps, you will successfully add a second drive to your Vagrant setup.

Conclusion

Adding a second drive in Vagrant is a straightforward process when you follow the specific instructions. From editing the Vagrantfile to restarting the Vagrant box, each step ensures that the new drive is created and attached successfully. With the ability to easily expand and customize, Vagrant helps you manage and develop your virtual environment efficiently. Try applying these steps to improve your system configuration today. Thank you for reading the DevopsRoles page!

vagrant ssh Permission denied fixed: A Comprehensive Guide

Introduction

In this tutorial, How to fix vagrant SSH permission denied. I use Host OS Windows 11 and Vagrant. I have to deploy a VM using Vagrant. Finish, login ssh to guest OS.

vagrant up command error as below:

vagrant@127.0.0.1: Permission denied (publickey,gssapi-keyex,gssapi-with-mic)

Understanding the Error

What is the “vagrant ssh Permission denied” Error?

The “vagrant SSH Permission denied” error occurs when the Vagrant fails to establish an SSH connection to the virtual machine. This can be caused by various issues such as incorrect SSH keys, misconfigured Vagrantfiles, or permission issues.

Common Causes

  1. Incorrect SSH Key Permissions: The SSH key file might not have the correct permissions.
  2. Missing or Incorrect SSH Keys: The SSH key might be missing or not properly configured.
  3. Vagrantfile Misconfiguration: The Vagrantfile may have incorrect settings.
  4. User Permissions: The user running Vagrant may not have the necessary permissions.

My Environment

  • Host OS: Windows 11 or Linux/Ubuntu/Redhat
  • Vagrant version: 2.2.18
  • Vagrant provider: VirtualBox
  • Boxes Vagrant: rockylinux/8

For example, My Vagrantfile

# -*- mode: ruby -*-
# vi: set ft=ruby :

Vagrant.configure("2") do |config|

  config.vm.box = "rockylinux/8"
  config.vm.network "forwarded_port", guest: 80, host: 8888
  config.vbguest.auto_update = false
end

Deploy a Virtual Machine

vagrant up

The output terminal is as follows:

How do fix vagrant SSH permission denied

I add configure “config.ssh.insert_key = false” into the Vagrantfile file

After changing my Vagrantfile as the content below

# -*- mode: ruby -*-
# vi: set ft=ruby :

Vagrant.configure("2") do |config|

  config.vm.box = "rockylinux/8"
  config.ssh.insert_key = false
  config.vm.network "forwarded_port", guest: 80, host: 8888
  config.vbguest.auto_update = false
end

The result

Frequently Asked Questions

Why am I getting a “vagrant SSH permission denied” error?

This error occurs when Vagrant fails to establish an SSH connection to the virtual machine, often due to incorrect SSH key permissions, missing keys, misconfigured Vagrantfiles, or user permission issues.

How do I fix SSH key permission issues in Vagrant?

You can fix SSH key permission issues by setting the correct permissions with the command chmod 600 ~/.ssh/id_rsa.

Can I regenerate the SSH key for Vagrant?

Yes, you can regenerate the SSH key for Vagrant by destroying the existing machine, removing the old key, and reinitializing Vagrant.

How do I manually add an SSH key to the SSH agent?

Start the SSH agent eval "$(ssh-agent -s)" and add your SSH key with ssh-add ~/.ssh/id_rsa.

Should I update Vagrant and its plugins?

Yes, updating Vagrant and its plugins can resolve many issues, including SSH connection problems. Use vagrant plugin update and vagrant box update to update them.

Conclusion

Encountering the “vagrant SSH Permission denied” error can be frustrating, but with the steps outlined in this guide, you should be able to resolve it efficiently. From checking SSH key permissions to updating Vagrant, these solutions cover both basic and advanced troubleshooting methods. Ensuring smooth operation of your Vagrant environments is crucial for a seamless development workflow. Thank you for reading the DevopsRoles page!

Vagrant provision inline: A Step-by-Step Guide for Developers

Introduction

In this tutorial, How to use vagrant provision inline. Use inline to execute on the remote machine. Explore the essentials of inline provisioning with Vagrant in our latest tutorial. This guide provides a practical walkthrough on setting up and configuring virtual environments directly through Vagrant’s inline commands. Perfect for developers and IT professionals, this tutorial simplifies the process of using inline scripts to manage complex configurations, ensuring a seamless and efficient setup for your development projects.

What is Vagrant Inline Provisioning?

Vagrant Inline Provisioning is a method used in Vagrant for automatically configuring and setting up virtual machines. Here’s a simple explanation in English, presented as a bulleted list:

  • Purpose: Automatically configures and sets up virtual machines.
  • Method: Uses simple scripts written directly in the Vagrantfile.
  • Functionality: Allows users to execute shell commands during the virtual machine setup process.
  • Benefits: Streamlines and automates the configuration of development environments efficiently.

Vagrant provision inline example as below


Vagrant.configure("2") do |config|

  config.vm.define :ansible_controller do |ansible_controller|
    ansible_controller.vm.hostname = "ansible"
    ansible_controller.vm.box = "centos/6.5"
    ENV["LC_ALL"] = "en_US.UTF-8"
    config.ssh.insert_key = false
    ansible_controller.vm.network "private_network", ip: "192.168.3.10", :netmask => "255.255.255.0"
    ansible_controller.vm.provision "shell", inline: <<-SHELL
      echo "hello"
      echo "192.168.3.11 centos8" >> /etc/hosts
      groupadd -g 20000 gadmin
      useradd -d /home/huupv -u 9999 -m huupv
      echo -e "huupv\nhuupv\n" |  passwd huupv
      echo "huupv ALL = (root) NOPASSWD:ALL" | tee /etc/sudoers.d/huupv
      chmod 0440 /etc/sudoers.d/huupv
      su - huupv -c "echo |ssh-keygen -t rsa"
      SHELL
  end

  config.vm.define :centos do |centos|
    centos.vm.hostname = "centos8"
    centos.vm.box = "centos/8"
    ENV["LC_ALL"] = "en_US.UTF-8"
    config.ssh.insert_key = false
    centos.vm.network "private_network", ip: "192.168.3.11", :netmask => "255.255.255.0"
    centos.vm.provision "shell", inline: <<-SHELL
      echo "hello"
      groupadd -g 20000 gadmin
      useradd -d /home/huupv -u 9999 -m huupv
      echo -e "huupv\nhuupv\n" |  passwd huupv
      echo "huupv ALL = (root) NOPASSWD:ALL" | tee /etc/sudoers.d/huupv
      chmod 0440 /etc/sudoers.d/huupv
      useradd -m -d /home/user001 -s  /bin/bash   -g gadmin -u 8889  user001; echo -e "user001\nuser001\n"  |  passwd  user001
	  su - huupv -c "mkdir /home/huupv/.ssh"
      su - huupv -c "touch /home/huupv/.ssh/authorized_keys"
      su - huupv -c "chmod 600 /home/huupv/.ssh/authorized_keys"
      su - huupv -c "chmod 700 /home/huupv/.ssh"
    SHELL
  end
  end

Conclusion

You have to use a vagrant inline to execute on the remote machine. Mastering Vagrant’s inline provisioning can significantly streamline your development workflow. We’ve covered the key steps to execute scripts within your Vagrantfile, enhancing your capability to manage and automate your virtual environments. Keep experimenting with different configurations and scripts to fully leverage the power of Vagrant in your projects. I hope will this your helpful. Thank you for reading the DevopsRoles page!

Vagrant No VirtualBox Guest Additions installation found [Fixed]

Introduction

In this tutorial, How to fix the error Vagrant No VirtualBox Guest Additions installation is found. I use a laptop and run the command vagrant up for the NFS server then the error “umount: /mnt: not mounted

ERROR umount: /mnt: not mounted

E:\Vagrant_VMS\NFS_server>vagrant up 

Error: Nothing to do
Unmounting Virtualbox Guest Additions ISO from: /mnt
umount: /mnt: not mounted
==> servernfs: Checking for guest additions in VM...
    servernfs: No guest additions were detected on the base box for this VM! Guest
    servernfs: additions are required for forwarded ports, shared folders, host only
    servernfs: networking, and more. If SSH fails on this machine, please install
    servernfs: the guest additions and repackage the box to continue.
    servernfs:
    servernfs: This is not an error message; everything may continue to work properly,
    servernfs: in which case you may ignore this message.
The following SSH command responded with a non-zero exit status.
Vagrant assumes that this means the command failed!

umount /mnt

Stdout from the command:


Stderr from the command:

umount: /mnt: not mounted

Vagrant No VirtualBox Guest Additions installation found fixed

I have uninstalled vagrant-vbguest and installed vagrant-vbguest.

vagrant plugin uninstall vagrant-vbguest
vagrant plugin install vagrant-vbguest --plugin-version 0.21

The output uninstall and install vagrant-vbguest as below

E:\Vagrant_VMS\NFS_server>vagrant plugin uninstall vagrant-vbguest
Uninstalling the 'vagrant-vbguest' plugin...
Successfully uninstalled micromachine-3.0.0
Successfully uninstalled vagrant-vbguest-0.27.0

E:\Vagrant_VMS\NFS_server>vagrant plugin install vagrant-vbguest --plugin-version 0.21
Installing the 'vagrant-vbguest --version '0.21'' plugin. This can take a few minutes...
Fetching micromachine-3.0.0.gem
Fetching vagrant-vbguest-0.21.0.gem
Installed the plugin 'vagrant-vbguest (0.21.0)'!

As a result, I have to fix it!

E:\Vagrant_VMS\NFS_server>vagrant reload
==> servernfs: Attempting graceful shutdown of VM...
==> servernfs: Checking if box 'centos/7' version '2004.01' is up to date...
==> servernfs: Clearing any previously set forwarded ports...
==> servernfs: Clearing any previously set network interfaces...
==> servernfs: Preparing network interfaces based on configuration...
    servernfs: Adapter 1: nat
    servernfs: Adapter 2: hostonly
==> servernfs: Forwarding ports...
    servernfs: 22 (guest) => 2222 (host) (adapter 1)
==> servernfs: Booting VM...
==> servernfs: Waiting for machine to boot. This may take a few minutes...
    servernfs: SSH address: 127.0.0.1:2222
    servernfs: SSH username: vagrant
    servernfs: SSH auth method: private key
    servernfs: Warning: Connection aborted. Retrying...
==> servernfs: Machine booted and ready!
[servernfs] GuestAdditions 6.1.14 running --- OK.
==> servernfs: Checking for guest additions in VM...
==> servernfs: Configuring and enabling network interfaces...
==> servernfs: Rsyncing folder: /cygdrive/e/MyData/Vagrant_VMS/NFS_server/ => /vagrant
==> servernfs: Rsyncing folder: /cygdrive/e/MyData/Vagrant_VMS/NFS_server/NFS_Volumn/ => /home/vagrant/nfs_test
==> servernfs: Machine already provisioned. Run `vagrant provision` or use the `--provision`
==> servernfs: flag to force provisioning. Provisioners marked to run always will still run.

Youtube Vagrant No VirtualBox Guest Additions installation found [Fixed]

Conclusion

You have fixed Vagrant No VirtualBox. I hope will this your helpful. Thank you for reading the DevopsRoles page!

Install Vagrant and VirtualBox on Fedora

Introduction

In this tutorial, How to Install Vagrant and VirtualBox on Fedora. You use Vagrant for DevOps professionals and coder sysadmin. I will be installing VirtualBox and Vagrant on My Laptop is Fedora 32.

How to Install Vagrant and VirtualBox

Check CPU has Intel VT or AMD-V Virtualization extensions

sudo lscpu | grep Virtualization

Add VirtualBox RPM repository

dnf -y install wget
wget http://download.virtualbox.org/virtualbox/rpm/fedora/virtualbox.repo
mv virtualbox.repo /etc/yum.repos.d/virtualbox.repo

Install VirtualBox

[root@localhost ~]# dnf install -y VirtualBox*

The output on my terminal is below

[root@localhost ~]# dnf install -y  VirtualBox*
Last metadata expiration check: 0:06:53 ago on Mon 05 Oct 2020 09:32:56 PM +07.
Dependencies resolved.
======================================================================================================================
 Package                         Architecture      Version                                Repository             Size
======================================================================================================================
Installing:
 VirtualBox-6.1                  x86_64            6.1.14_140239_fedora32-1               virtualbox             88 M
Installing dependencies:
 SDL                             x86_64            1.2.15-43.fc32                         fedora                213 k
 annobin                         x86_64            9.27-1.fc32                            updates                98 k
 dwz                             x86_64            0.13-2.fc32                            fedora                109 k
 efi-srpm-macros                 noarch            4-4.fc32                               fedora                 22 k
 fonts-srpm-macros               noarch            2.0.3-1.fc32                           fedora                 26 k
 fpc-srpm-macros                 noarch            1.3-1.fc32                             fedora                7.6 k
 ghc-srpm-macros                 noarch            1.5.0-2.fc32                           fedora                7.7 k
 gnat-srpm-macros                noarch            4-11.fc32                              fedora                8.2 k
 go-srpm-macros                  noarch            3.0.9-1.fc32                           updates                25 k
 nim-srpm-macros                 noarch            3-2.fc32                               fedora                8.3 k
 ocaml-srpm-macros               noarch            6-2.fc32                               fedora                7.7 k
 openblas-srpm-macros            noarch            2-7.fc32                               fedora                7.2 k
 perl-srpm-macros                noarch            1-34.fc32                              fedora                8.3 k
 python-srpm-macros              noarch            3-59.fc32                              updates                17 k
 python27                        x86_64            2.7.18-2.fc32                          updates                11 M
 qt5-srpm-macros                 noarch            5.14.2-3.fc32                          updates               8.4 k
 redhat-rpm-config               noarch            150-1.fc32                             fedora                 63 k
 rust-srpm-macros                noarch            14-1.fc32                              updates               9.6 k
 tix                             x86_64            1:8.4.3-27.fc31                        fedora                246 k
 tk                              x86_64            1:8.6.10-3.fc32                        fedora                1.6 M

Transaction Summary
======================================================================================================================
Install  21 Packages

Total download size: 101 M
Installed size: 257 M
Downloading Packages:
(1/21): go-srpm-macros-3.0.9-1.fc32.noarch.rpm                                         82 kB/s |  25 kB     00:00    
(2/21): python-srpm-macros-3-59.fc32.noarch.rpm                                        49 kB/s |  17 kB     00:00    
(3/21): qt5-srpm-macros-5.14.2-3.fc32.noarch.rpm                                      130 kB/s | 8.4 kB     00:00    
(4/21): annobin-9.27-1.fc32.x86_64.rpm                                                210 kB/s |  98 kB     00:00    
(5/21): rust-srpm-macros-14-1.fc32.noarch.rpm                                          75 kB/s | 9.6 kB     00:00    
(6/21): SDL-1.2.15-43.fc32.x86_64.rpm                                                 217 kB/s | 213 kB     00:00    
(7/21): efi-srpm-macros-4-4.fc32.noarch.rpm                                            72 kB/s |  22 kB     00:00    
(8/21): dwz-0.13-2.fc32.x86_64.rpm                                                     82 kB/s | 109 kB     00:01    
(9/21): fpc-srpm-macros-1.3-1.fc32.noarch.rpm                                          67 kB/s | 7.6 kB     00:00    
(10/21): fonts-srpm-macros-2.0.3-1.fc32.noarch.rpm                                    116 kB/s |  26 kB     00:00    
(11/21): ghc-srpm-macros-1.5.0-2.fc32.noarch.rpm                                       44 kB/s | 7.7 kB     00:00    
(12/21): gnat-srpm-macros-4-11.fc32.noarch.rpm                                         47 kB/s | 8.2 kB     00:00    
(13/21): nim-srpm-macros-3-2.fc32.noarch.rpm                                           40 kB/s | 8.3 kB     00:00    
(14/21): ocaml-srpm-macros-6-2.fc32.noarch.rpm                                         37 kB/s | 7.7 kB     00:00    
(15/21): python27-2.7.18-2.fc32.x86_64.rpm                                            4.8 MB/s |  11 MB     00:02    
(16/21): openblas-srpm-macros-2-7.fc32.noarch.rpm                                      35 kB/s | 7.2 kB     00:00    
(17/21): perl-srpm-macros-1-34.fc32.noarch.rpm                                         40 kB/s | 8.3 kB     00:00    
(18/21): redhat-rpm-config-150-1.fc32.noarch.rpm                                      631 kB/s |  63 kB     00:00    
(19/21): tix-8.4.3-27.fc31.x86_64.rpm                                                 866 kB/s | 246 kB     00:00    
(20/21): tk-8.6.10-3.fc32.x86_64.rpm                                                  811 kB/s | 1.6 MB     00:01    
(21/21): VirtualBox-6.1-6.1.14_140239_fedora32-1.x86_64.rpm                           5.1 MB/s |  88 MB     00:17    
----------------------------------------------------------------------------------------------------------------------
Total                                                                                 4.9 MB/s | 101 MB     00:20     
warning: /var/cache/dnf/virtualbox-a644194517384f93/packages/VirtualBox-6.1-6.1.14_140239_fedora32-1.x86_64.rpm: Header V4 DSA/SHA1 Signature, key ID 98ab5139: NOKEY
Fedora 32 - x86_64 - VirtualBox                                                       945  B/s | 1.7 kB     00:01    
Importing GPG key 0x98AB5139:
 Userid     : "Oracle Corporation (VirtualBox archive signing key) <info@virtualbox.org>"
 Fingerprint: 7B0F AB3A 13B9 0743 5925 D9C9 5442 2A4B 98AB 5139
 From       : https://www.virtualbox.org/download/oracle_vbox.asc
Key imported successfully
Running transaction check
Transaction check succeeded.
Running transaction test
Transaction test succeeded.
Running transaction
  Preparing        :                                                                                              1/1 
  Running scriptlet: tk-1:8.6.10-3.fc32.x86_64                                                                   1/21 
  Installing       : tk-1:8.6.10-3.fc32.x86_64                                                                   1/21 
  Installing       : tix-1:8.4.3-27.fc31.x86_64                                                                  2/21 
  Running scriptlet: tix-1:8.4.3-27.fc31.x86_64                                                                  2/21 
  Installing       : perl-srpm-macros-1-34.fc32.noarch                                                           3/21 
  Installing       : openblas-srpm-macros-2-7.fc32.noarch                                                        4/21 
  Installing       : ocaml-srpm-macros-6-2.fc32.noarch                                                           5/21 
  Installing       : nim-srpm-macros-3-2.fc32.noarch                                                             6/21 
  Installing       : gnat-srpm-macros-4-11.fc32.noarch                                                           7/21 
  Installing       : ghc-srpm-macros-1.5.0-2.fc32.noarch                                                         8/21 
  Installing       : fpc-srpm-macros-1.3-1.fc32.noarch                                                           9/21 
  Installing       : efi-srpm-macros-4-4.fc32.noarch                                                            10/21 
  Installing       : dwz-0.13-2.fc32.x86_64                                                                     11/21 
  Installing       : SDL-1.2.15-43.fc32.x86_64                                                                  12/21 
  Installing       : rust-srpm-macros-14-1.fc32.noarch                                                          13/21 
  Installing       : qt5-srpm-macros-5.14.2-3.fc32.noarch                                                       14/21 
  Installing       : annobin-9.27-1.fc32.x86_64                                                                 15/21 
  Installing       : go-srpm-macros-3.0.9-1.fc32.noarch                                                         16/21 
  Installing       : python-srpm-macros-3-59.fc32.noarch                                                        17/21 
  Installing       : fonts-srpm-macros-2.0.3-1.fc32.noarch                                                      18/21 
  Installing       : redhat-rpm-config-150-1.fc32.noarch                                                        19/21 
  Installing       : python27-2.7.18-2.fc32.x86_64                                                              20/21 
  Running scriptlet: VirtualBox-6.1-6.1.14_140239_fedora32-1.x86_64                                             21/21 
  Installing       : VirtualBox-6.1-6.1.14_140239_fedora32-1.x86_64                                             21/21 
  Running scriptlet: VirtualBox-6.1-6.1.14_140239_fedora32-1.x86_64                                             21/21 

Creating group 'vboxusers'. VM users must be member of that group!


  Verifying        : annobin-9.27-1.fc32.x86_64                                                                  1/21 
  Verifying        : go-srpm-macros-3.0.9-1.fc32.noarch                                                          2/21 
  Verifying        : python-srpm-macros-3-59.fc32.noarch                                                         3/21 
  Verifying        : python27-2.7.18-2.fc32.x86_64                                                               4/21 
  Verifying        : qt5-srpm-macros-5.14.2-3.fc32.noarch                                                        5/21 
  Verifying        : rust-srpm-macros-14-1.fc32.noarch                                                           6/21 
  Verifying        : SDL-1.2.15-43.fc32.x86_64                                                                   7/21 
  Verifying        : dwz-0.13-2.fc32.x86_64                                                                      8/21 
  Verifying        : efi-srpm-macros-4-4.fc32.noarch                                                             9/21 
  Verifying        : fonts-srpm-macros-2.0.3-1.fc32.noarch                                                      10/21 
  Verifying        : fpc-srpm-macros-1.3-1.fc32.noarch                                                          11/21 
  Verifying        : ghc-srpm-macros-1.5.0-2.fc32.noarch                                                        12/21 
  Verifying        : gnat-srpm-macros-4-11.fc32.noarch                                                          13/21 
  Verifying        : nim-srpm-macros-3-2.fc32.noarch                                                            14/21 
  Verifying        : ocaml-srpm-macros-6-2.fc32.noarch                                                          15/21 
  Verifying        : openblas-srpm-macros-2-7.fc32.noarch                                                       16/21 
  Verifying        : perl-srpm-macros-1-34.fc32.noarch                                                          17/21 
  Verifying        : redhat-rpm-config-150-1.fc32.noarch                                                        18/21 
  Verifying        : tix-1:8.4.3-27.fc31.x86_64                                                                 19/21 
  Verifying        : tk-1:8.6.10-3.fc32.x86_64                                                                  20/21 
  Verifying        : VirtualBox-6.1-6.1.14_140239_fedora32-1.x86_64                                             21/21 

Installed:
  SDL-1.2.15-43.fc32.x86_64                            VirtualBox-6.1-6.1.14_140239_fedora32-1.x86_64                
  annobin-9.27-1.fc32.x86_64                           dwz-0.13-2.fc32.x86_64                                        
  efi-srpm-macros-4-4.fc32.noarch                      fonts-srpm-macros-2.0.3-1.fc32.noarch                         
  fpc-srpm-macros-1.3-1.fc32.noarch                    ghc-srpm-macros-1.5.0-2.fc32.noarch                           
  gnat-srpm-macros-4-11.fc32.noarch                    go-srpm-macros-3.0.9-1.fc32.noarch                            
  nim-srpm-macros-3-2.fc32.noarch                      ocaml-srpm-macros-6-2.fc32.noarch                             
  openblas-srpm-macros-2-7.fc32.noarch                 perl-srpm-macros-1-34.fc32.noarch                             
  python-srpm-macros-3-59.fc32.noarch                  python27-2.7.18-2.fc32.x86_64                                 
  qt5-srpm-macros-5.14.2-3.fc32.noarch                 redhat-rpm-config-150-1.fc32.noarch                           
  rust-srpm-macros-14-1.fc32.noarch                    tix-1:8.4.3-27.fc31.x86_64                                    
  tk-1:8.6.10-3.fc32.x86_64                           

Complete!

Configure VirtualBox Drivers

/usr/lib/virtualbox/vboxdrv.sh setup

The output my terminal as below

[root@localhost ~]# /usr/lib/virtualbox/vboxdrv.sh setup
vboxdrv.sh: Stopping VirtualBox services.
vboxdrv.sh: Starting VirtualBox services.
vboxdrv.sh: Building VirtualBox kernel modules.

Download Extension Pack

cd /tmp/
wget https://download.virtualbox.org/virtualbox/6.1.2/Oracle_VM_VirtualBox_Extension_Pack-6.1.2.vbox-extpack

Install the extension pack by clicking on the Downloaded file. The picture below

Install Vagrant on Fedora

Run command on your terminal as below

dnf -y install vagrant

Test Vagrant and Virtualbox

Create a minimal Vagrantfile

$ mkdir vagrant-test
$ cd vagrant-test
$ vi Vagrantfile

An example that also sets the amount of memory and number of CPUs in the Vagrantfile file

[huupv@localhost vagrant-test]$ cat Vagrantfile 
Vagrant.configure("2") do |config|
  config.ssh.insert_key = false
  config.vm.provider :virtualbox do |vb|
    vb.memory = 256
    vb.cpus = 1
  end
  
  config.vm.define "DevopsRoles" do |server01|
    server01.vm.hostname = "DevopsRoles.com"
    server01.vm.box = "centos/7"
    #server01.vm.network :private_network, ip: "192.168.3.4"
  end
end

The output on my terminal as below

huupv@localhost vagrant-test]$ vagrant up
Bringing machine 'DevopsRoles' up with 'virtualbox' provider...
==> DevopsRoles: Box 'centos/7' could not be found. Attempting to find and install...
    DevopsRoles: Box Provider: virtualbox
    DevopsRoles: Box Version: >= 0
==> DevopsRoles: Loading metadata for box 'centos/7'
    DevopsRoles: URL: https://vagrantcloud.com/centos/7
==> DevopsRoles: Adding box 'centos/7' (v2004.01) for provider: virtualbox
    DevopsRoles: Downloading: https://vagrantcloud.com/centos/boxes/7/versions/2004.01/providers/virtualbox.box
Download redirected to host: cloud.centos.org
    DevopsRoles: Calculating and comparing box checksum...
==> DevopsRoles: Successfully added box 'centos/7' (v2004.01) for 'virtualbox'!
==> DevopsRoles: Importing base box 'centos/7'...
==> DevopsRoles: Matching MAC address for NAT networking...
==> DevopsRoles: Checking if box 'centos/7' version '2004.01' is up to date...
==> DevopsRoles: Setting the name of the VM: vagrant-test_DevopsRoles_1601910055210_96696
==> DevopsRoles: Clearing any previously set network interfaces...
==> DevopsRoles: Preparing network interfaces based on configuration...
    DevopsRoles: Adapter 1: nat
==> DevopsRoles: Forwarding ports...
    DevopsRoles: 22 (guest) => 2222 (host) (adapter 1)
==> DevopsRoles: Running 'pre-boot' VM customizations...
==> DevopsRoles: Booting VM...
==> DevopsRoles: Waiting for machine to boot. This may take a few minutes...
    DevopsRoles: SSH address: 127.0.0.1:2222
    DevopsRoles: SSH username: vagrant
    DevopsRoles: SSH auth method: private key
==> DevopsRoles: Machine booted and ready!
==> DevopsRoles: Checking for guest additions in VM...
    DevopsRoles: No guest additions were detected on the base box for this VM! Guest
    DevopsRoles: additions are required for forwarded ports, shared folders, host only
    DevopsRoles: networking, and more. If SSH fails on this machine, please install
    DevopsRoles: the guest additions and repackage the box to continue.
    DevopsRoles: 
    DevopsRoles: This is not an error message; everything may continue to work properly,
    DevopsRoles: in which case you may ignore this message.
==> DevopsRoles: Setting hostname...
==> DevopsRoles: Rsyncing folder: /home/huupv/vagrant-test/ => /vagrant

Conclusion

You have to install and run Vagrant using VirtualBox. I hope will this your helpful. Thank you for reading the DevopsRoles page!

Vagrant SSH key pair Setup: Essential Guide for DevOps Professionals

Introduction

In this tutorial, I will guide you through setting up an Vagrant ssh key pair. We’ll generate the SSH keys, where vagrant_rsa will the private key and vagrant_rsa.pub will serve as the public key. This allows you to log into the Virtual Machine without needing a password. Setting up Vagrant is crucial for those in DevOps roles.

Understanding SSH Key Management in Vagrant

When working with Vagrant, a tool that streamlines the creation and management of virtual development environments, it’s crucial to understand how SSH keys are handled. SSH keys play a vital role in securing access to your Vagrant virtual machines (VMs).

Vagrant SSH Key Location

By default, when you initiate a new Vagrant environment, Vagrant automatically generates an SSH key pair if none exists. This is done to ensure secure, password-less access to the created VM. The location of these SSH keys is typically within the Vagrant project directory .vagrant/machines/<machine-name>/virtualbox/private_key for VirtualBox users. This path might vary slightly depending on the provider you are using, such as VMware or Hyper-V.

Managing Vagrant SSH Keys

It’s important to know that Vagrant configures its VMs to use these automatically generated keys. However, for enhanced security or personal preference, you can configure Vagrant to use a custom SSH key pair. This involves specifying your private key in the Vagrantfile and ensuring the corresponding public key is authorized in the VM. Managing these keys properly ensures that access to your VM is both secure and restricted to authorized users only.

Below is the folder structure for the Vagrant project:

/home/huupv/project
/home/huupv/project/keys/.ssh

Vagrant SSH key pair

The first is to create a vagrant SSH key

Using the ssh-keygen command to create the private key and public key for a vagrant.

ssh-keygen

The output private key and public key files in “/home/huupv/project/keys/.ssh” folder as below:

vagrant_rsa vagrant_rsa.pub

To configure vagrant ssh key in Vagrantfile

To add the lines in the Vagrantfile file as below:

Vagrant.configure("2") do |config|
config.vm.box = "centos/6"
config.ssh.insert_key = false
config.vm.boot_timeout = 800
config.ssh.private_key_path = ["keys/.ssh/vagrant_rsa", "~/.vagrant.d/insecure_private_key"]
config.vm.provision "file", source: "keys/.ssh/vagrant_rsa.pub", destination: "~/.ssh/authorized_keys"
end
  • ~/.vagrant.d/insecure_private_key: You should append this default key. The use config.ssh.insert_key = false to Vagrant not generate a random key.
  • config.ssh.private_key_path: Changing Insecure Key To My Own Key On Vagrant box.

Conclusion

Finishing, We are customizing the vagrant SSH key with a Private/Public key. What you need to Private key saves in the host and the Public key copies authorized_keys into a vagrant box for Virtual Machine. Reference to configure vagrant SSH of the vagrant main site. Thank you for reading the DevopsRoles page!

How to set up a wordpress vagrant: A Comprehensive Guide

Introduction

Setting up WordPress with Vagrant has become a go-to solution for developers seeking a reliable, consistent, and portable environment for web development. Vagrant simplifies the process of creating and configuring virtual environments, ensuring that your WordPress projects are not only portable but also identical across various systems. This guide walks you through the step-by-step process of setting up WordPress Vagrant, from basic installation to advanced configurations.

In this tutorial, I’m set up a WordPress Vagrant, using vagrant box ubuntu with Nginx + MariaDB + WordPress. Vagrant the essential for DevOps Roles.

Benefits of Using Vagrant for WordPress Development

1. Consistent Environments

  • Ensures uniformity between development, staging, and production environments.
  • Avoids the common “works on my machine” problem.

2. Portable and Reproducible

  • Easily share development environments across teams.
  • Rapidly recreate environments in case of errors or new projects.

3. Integration with Popular Tools

  • Works seamlessly with VirtualBox, Docker, and other virtualization tools.
  • Supports provisioning tools like Ansible, Chef, and Puppet.

Prerequisites

Before diving into the setup, ensure you have the following:

Required Tools

System Requirements

  • At least 8GB of RAM.
  • 20GB of free disk space.
  • A stable internet connection.

Step-by-Step Guide to Setting Up WordPress with Vagrant

The structures files and folders wordpress vagrant as below:

[huupv@localhost project]$ pwd
/home/huupv/project
[huupv@localhost project]$ ls -F
keys/ nginx/ Vagrantfile var/
mysql/ php/ VAGRANT_ENV/ wp/

To configure Vagrantfile

vim Vagrantfile

The content as below:

VAGRANTFILE_API_VERSION = "2"
Vagrant.configure(VAGRANTFILE_API_VERSION) do |config|
config.vm.box = "ubuntu/xenial64"
config.vm.hostname = "wp"
config.ssh.insert_key = false
#config.vm.boot_timeout = 800
#config.ssh.username = vagrant
#config.ssh.password = vagrant
#config.ssh.private_key_path = ["keys/.ssh/vagrant_rsa", "~/.vagrant.d/insecure_private_key"]
#config.vm.provision "file", source: "keys/.ssh/vagrant_rsa.pub", destination: "~/.ssh/authorized_keys"
config.vm.provision :shell, path: "VAGRANT_ENV/bootstrap.sh"
config.vm.network "forwarded_port", guest: 80, host: 8888
config.vm.network :public_network, :bridge => "eth1", :auto_config => false
config.vm.provider :virtualbox do |vb|
# Set VM memory size
vb.customize ["modifyvm", :id, "--memory", "512"]
# these 2 commands massively speed up DNS resolution, which means outbound
# connections don't take forever (eg the WP admin dashboard and update page)
vb.customize ["modifyvm", :id, "--natdnshostresolver1", "on"]
vb.customize ["modifyvm", :id, "--natdnsproxy1", "on"]
end
end

To configure file vagrant bootstrap.sh

vim VAGRANT_ENV/bootstrap.sh

The content as below:

#!/bin/bash
echo "Vagrant box (Ubuntu 16.04 + nginx + php7.0 + MariaDB + WordPress."
 echo "Updating apt-get"
 sudo apt-get -y update
# Nginx
 echo "Installing Nginx"
 sudo apt-get install -y nginx
# MySQL
 echo "Preparing for MySQL Installation"
 sudo apt-get install -y debconf-utils
 sudo debconf-set-selections << "mysql-server mysql-server/root_password password root"
 sudo debconf-set-selections << "mysql-server mysql-server/root_password_again password root" echo "Installing MySQL" #sudo apt-get install -y mysql-server-5.7
 sudo apt-get install -y mariadb-server mariadb-client php7.0-mysql
 sudo rm -f /etc/mysql/my.cnf
 sudo rm -f /etc/alternatives/my.cnf
 sudo cp /vagrant/mysql/my.cnf /etc/alternatives/my.cnf
 sudo ln -s /etc/alternatives/my.cnf /etc/mysql/my.cnf
 ls -ll /etc/mysql/my.cnf
 echo "Installing PHP and MySQL module"
 sudo apt-get install -y php-fpm php-mysql
# Nginx Config
 echo "Overwriting default Nginx config to work with PHP"
 sudo rm -rf /etc/nginx/sites-available/default
 cp /vagrant/nginx/default.conf /etc/nginx/sites-available/default
# php cli
 sudo sed -i "s/error_reporting = .*/error_reporting = E_ALL/" /etc/php/7.0/fpm/php.ini
 sudo sed -i "s/display_errors = .*/display_errors = On/" /etc/php/7.0/cli/php.ini
 sudo sed -i "s/memory_limit = .*/memory_limit = 30M/" /etc/php/7.0/cli/php.ini
 sudo sed -i "s/;date.timezone.*/date.timezone = UTC/" /etc/php/7.0/cli/php.ini
# php fpm
 sudo sed -i "s/error_reporting = .*/error_reporting = E_ALL/" /etc/php/7.0/fpm/php.ini
 sudo sed -i "s/display_errors = .*/display_errors = On/" /etc/php/7.0/fpm/php.ini
 sudo sed -i "s/;cgi.fix_pathinfo=1/cgi.fix_pathinfo=0/" /etc/php/7.0/fpm/php.ini
 sudo sed -i "s/memory_limit = .*/memory_limit = 30M/" /etc/php/7.0/fpm/php.ini
 sudo sed -i "s/upload_max_filesize = .*/upload_max_filesize = 100M/" /etc/php/7.0/fpm/php.ini
 sudo sed -i "s/post_max_size = .*/post_max_size = 100M/" /etc/php/7.0/fpm/php.ini
 sudo sed -i "s/;date.timezone.*/date.timezone = UTC/" /etc/php/7.0/fpm/php.ini
# Restarting Nginx for config to take effect
 echo "Restarting Nginx for changes to take effect"
 sudo service nginx restart

echo "Setting Ubuntu (user) password to \"vagrant\""
echo "ubuntu:vagrant" | chpasswd
# Services restart
 sudo systemctl restart mysql.service
 sudo systemctl restart nginx.service
 sudo systemctl restart php7.0-fpm.service
sudo mysql -u root -p -e 'show databases'
 #Create wordpress databases
 bash /vagrant/mysql/create_database.sh
 #To install and configure wordpress
 cd /tmp
 curl -O https://wordpress.org/latest.tar.gz
 tar xzvf latest.tar.gz
 sudo cp /tmp/wordpress/wp-config-sample.php /tmp/wordpress/wp-config.php
 mkdir /tmp/wordpress/wp-content/upgrade
 sudo cp -a /tmp/wordpress/* /var/www/html
 sudo find /var/www/html -type d -exec chmod g+s {} \;
 sudo chmod g+w /var/www/html/wp-content
 sudo chmod -R g+w /var/www/html/wp-content/themes
 sudo chmod -R g+w /var/www/html/wp-content/plugins
 sudo rm -f /var/www/html/wp-config.php
 sudo cp /vagrant/wp/wp-config.php /var/www/html/wp-config.php
 sudo usermod -a -G www-data ubuntu
 sudo chown -R ubuntu:www-data /var/www/html
 sudo systemctl restart nginx.service
 echo "Cleaning up additional setup files and logs"
 #sudo rm -r /var/www/html
 #sudo rm /var/www/ubuntu-xenial-16.04-cloudimg-console.log

To configure MySQL my.cf file

vim mysql/my.cnf

The content as below:


[client]
port = 3306
socket = /var/run/mysqld/mysqld.sock
[mysqld_safe]
socket = /var/run/mysqld/mysqld.sock
nice = 0

[mysqld]
user = mysql
pid-file = /var/run/mysqld/mysqld.pid
socket = /var/run/mysqld/mysqld.sock
port = 3306
basedir = /usr
datadir = /var/lib/mysql
tmpdir = /tmp
lc-messages-dir = /usr/share/mysql
skip-external-locking
bind-address = 0.0.0.0
key_buffer_size = 16M
max_allowed_packet = 16M
thread_stack = 192K
thread_cache_size = 8
myisam-recover = BACKUP
query_cache_limit = 1M
query_cache_size = 16M
log_error = /var/log/mysql/error.log
expire_logs_days = 10
max_binlog_size = 100M
[mysqldump]
quick
quote-names
max_allowed_packet = 16M

[mysql]
[isamchk]
key_buffer_size = 16M
!includedir /etc/mysql/conf.d/

To create a database for WordPress

vim mysql/create_database.sh

The content as below:

#!/usr/bin/env bash
if [ ! -z "wordpress" ] ; then
echo "creating database"
 sudo mysql -u root -p'root' -e "CREATE DATABASE IF NOT EXISTS wordpress;"
if [ ! -z "wp_db_user" ]; then
 echo " adding custom user"
 sudo mysql -u root -p'root' -e "GRANT ALL ON wordpress.* TO 'wp_db_user'@'localhost' IDENTIFIED BY '123456789'"
 sudo mysql -u root -p'root' -e "FLUSH PRIVILEGES;"
 sudo mysql -u root -p'root' -e 'show databases;'
 fi
else
 echo "No database name specified - skipping db creation"
fi

To configure file wp-config.php for WordPress vagrant

vim wp/wp-config.php

The content as below:

<?php
define('DB_NAME', 'wordpress');
/** MySQL database username */
 define('DB_USER', 'wp_db_user');
/** MySQL database password */
 define('DB_PASSWORD', '123456789');
/** MySQL hostname */
 define('DB_HOST', 'localhost');
/** Database Charset to use in creating database tables. */
 define('DB_CHARSET', 'utf8');
/** The Database Collate type. Don't change this if in doubt. */
 define('DB_COLLATE', '');
 define('AUTH_KEY', 'put your unique phrase here');
 define('SECURE_AUTH_KEY', 'put your unique phrase here');
 define('LOGGED_IN_KEY', 'put your unique phrase here');
 define('NONCE_KEY', 'put your unique phrase here');
 define('AUTH_SALT', 'put your unique phrase here');
 define('SECURE_AUTH_SALT', 'put your unique phrase here');
 define('LOGGED_IN_SALT', 'put your unique phrase here');
 define('NONCE_SALT', 'put your unique phrase here');
 $table_prefix = 'wp_';
 define('WP_DEBUG', false);
 /** Absolute path to the WordPress directory. */
 if ( !defined('ABSPATH') )
 define('ABSPATH', dirname(__FILE__) . '/');
/** Sets up WordPress vars and included files. */
 require_once(ABSPATH . 'wp-settings.php');
 define('FS_METHOD', 'direct');

To configure file nginx.conf

vim nginx/default.conf

The content as below:

server {
 listen 80 default_server;
 listen [::]:80 default_server ipv6only=on;
 root /var/www/html/;
 index index.php index.html index.htm;
 client_max_body_size 20M;
 server_name devopsroles.com;
 location / {
 try_files $uri $uri/ /index.php?$args;
 }
 error_page 404 /404.html;
 error_page 500 502 503 504 /50x.html;
 location = /50x.html {
 root /usr/share/nginx/html;
 }
 location ~ \.php$ {
 try_files $uri =404;
 fastcgi_split_path_info ^(.+\.php)(/.+)$;
 fastcgi_pass unix:/var/run/php/php7.0-fpm.sock;
 fastcgi_index index.php;
 include fastcgi_params;
 fastcgi_param SCRIPT_FILENAME $document_root$fastcgi_script_name;
 }
 }

Vagrant up running for WordPress

[huupv@localhost ~]$ cd /home/huupv/project/
[huupv@localhost project]$ vagrant up

FAQs

Q1: Why use Vagrant over Docker for WordPress?

While Docker is lightweight, Vagrant provides a full virtualized environment, making it suitable for developers needing an environment closer to production.

Q2: Can I use a different Linux distribution?

Yes, replace ubuntu/bionic64 in the Vagrantfile with the desired box name from Vagrant Cloud.

Q3: How do I update the Vagrant environment?

Use the following commands:

  • To apply updates: vagrant provision
  • To rebuild the environment: vagrant destroy -f && vagrant up

Q4: How do I troubleshoot Vagrant errors?

  • Check the Vagrant logs in the project directory.
  • Refer to the Vagrant Documentation.

External Resources

Conclusion

You have to set up a Vagrant WordPress Nginx + MariaDB. Setting up WordPress with Vagrant is a powerful way to ensure consistency and efficiency in web development. By following this guide, you can create a robust development environment tailored to your needs. Whether you’re a solo developer or part of a team, Vagrant offers the flexibility and reliability to elevate your WordPress projects. I hope will this your helpful. Thank you for reading the DevopsRoles page!

Your Complete Guide to Useful vagrant commands line

Introduction

Master the essentials of Useful vagrant commands line. Whether you’re starting, stopping, or managing virtual machines, this article provides the necessary commands to efficiently control your Vagrant environments. Ideal for developers and IT professionals looking to streamline their workflow in virtual machine management.

In this tutorial, I guide using the useful Vagrant commands line for Virtual Machines such as: Starting and Stopping a VM so forth. Vagrant the essential for DevOps Roles.

Useful vagrant commands line

Vagrant commands for Virtual Machine

Initialize Vagrant with a Vagrantfile

# vagrant init

Initialize the vagrant with a specific box. To find a box, https://app.vagrantup.com/boxes/search
Vagrant commands for starting a Virtual Machine
To run the first vagrant up a Virtual Machine, to start vagrant environment

# vagrant up

To resume a Virtual Machine

# vagrant resume

Restarting a Virtual Machine

# vagrant reload

Vagrant commands for stopping a Virtual Machine
To stop a Virtual Machine

# vagrant halt

To suspend a Virtual Machine

# vagrant suspend

Vagrant commands cleaning up a Virtual Machine
To stop and delete all traces of the Virtual Machine

# vagrant destroy

Vagrant commands for Boxes
To list all installed boxes on your computer

# vagrant box list

To download a box image to your computer

# vagrant box add

Checking for updates vagrant box update

# vagrant box outdated

To delete a box from the machine

# vagrant boxes remove

The packages a running Virtualbox environment in a reusable box

# vagrant package

To snapshot a Virtual Machine
The VM-name often defaults. To roll back at a later time.

# vagrant snapshot save [options] [vm-name]

The useful vagrant commands
To get the vagrant version

# vagrant -v

The output status of the vagrant machine

# vagrant status

The output status of all vagrant machines

# vagrant global-status

The same as above, but prunes invalid entries

# vagrant global-status --prune

To use the debug flag to increase the verbosity of the output

# vagrant provision --debug

Vagrant can be configured to deploy code!

# vagrant push

To Runs vagrant up, forces provisioning and logs all output to a file

# vagrant up --provision | tee provision_2017.log

Conclusion

This compilation of useful Vagrant commands will empower you to manage your virtual machines more effectively. By familiarizing yourself with these commands, you can optimize your development environment and enhance your productivity. For a detailed exploration of each command, refer to the full guide. I hope will this your helpful. Thank you for reading the DevopsRoles page!