Category Archives: Jenkins

Master Jenkins with DevOpsRoles.com. Explore detailed guides and tutorials to automate your CI/CD pipelines and enhance your DevOps practices with Jenkins.

7 Secrets: Building an AI-Powered CI/CD Copilot (Jenkins & AWS)

Introduction: Building an AI-Powered CI/CD Copilot is no longer a luxury; it is a tactical survival mechanism for modern engineering teams.

I remember the dark days of 3 AM pager duties, staring at an endless, blinding sea of red Jenkins console outputs.

It drains your soul, kills your team’s velocity, and burns through your infrastructure budget.

Why Your Team Desperately Needs an AI-Powered CI/CD Copilot Today

Let’s talk raw facts. Developers waste countless hours debugging trivial build errors.

Missing dependencies. Syntax typos. Obscure npm registry timeouts. Sound familiar?

That is wasted money. Pure and simple.

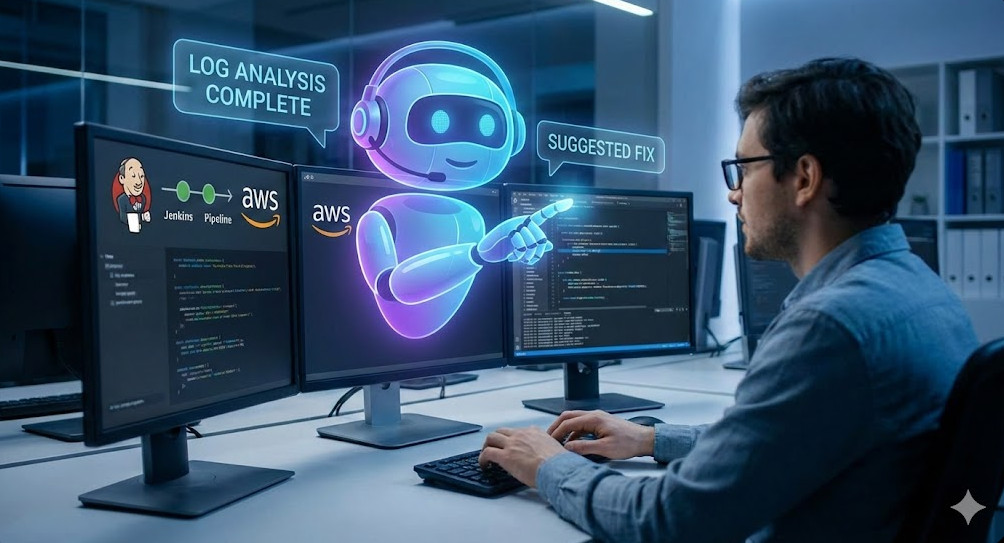
An AI-Powered CI/CD Copilot acts as your tirelessly vigilant senior DevOps engineer.

It reads the logs, finds the exact error, cuts through the noise, and immediately suggests the fix.

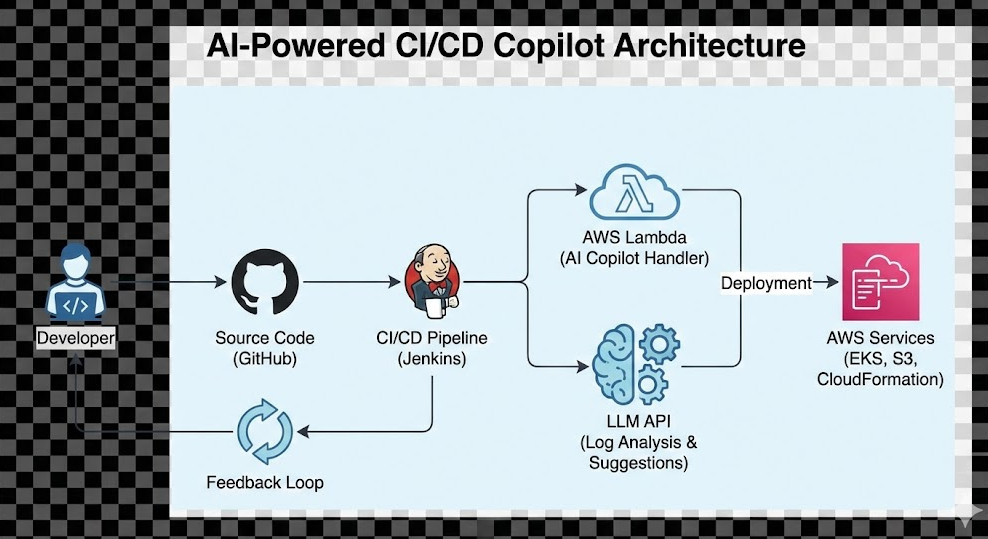
The Architecture Behind the AI-Powered CI/CD Copilot

We are gluing together two massive cloud powerhouses here: Jenkins and AWS Lambda.

Jenkins handles the heavy lifting of your pipeline execution. When it fails, it screams for help.

That scream is a webhook payload sent directly over the wire to AWS.

AWS Lambda is the brain of the operation. It catches the webhook, parses the failure, and interfaces with a Large Language Model.

Read the inspiration for this architecture in the original AWS Builders documentation.

Building the AWS Lambda Brain for your AI-Powered CI/CD Copilot

You need a runtime environment that is ridiculously fast and lightweight.

Python is my absolute go-to for Lambda engineering.

We will use the standard `json` library and standard HTTP requests to keep dependencies at zero.

Check the official AWS Lambda documentation if you need to brush up on handler structures.


import json
import urllib.request
import os

def lambda_handler(event, context):
    # The AI-Powered CI/CD Copilot execution starts here
    body = json.loads(event.get('body', '{}'))
    build_url = body.get('build_url')
    
    print(f"Analyzing failed build: {build_url}")
    
    # 1. Fetch raw console logs from Jenkins API
    # 2. Sanitize and send logs to LLM API (OpenAI/Anthropic)
    # 3. Return parsed analysis to Slack or Teams
    
    return {
        'statusCode': 200,
        'body': json.dumps('Copilot analysis successfully triggered.')
    }

Pretty standard stuff, right? But the real magic happens in the prompt engineering.

You must give the LLM incredibly strict context. Tell it to be a harsh, uncompromising expert.

It needs to spit out the exact CLI commands or code changes needed to fix the Jenkins pipeline, nothing else.

Connecting Jenkins to the AI-Powered CI/CD Copilot

Now, let’s look at the Jenkins side of this battlefield.

You are probably using declarative pipelines. If you aren’t, you need to migrate yesterday.

We need to surgically modify the `post` block in your Jenkinsfile.

Read up on Jenkins Pipeline Syntax to master post-build webhooks.


pipeline {
    agent any
    stages {
        stage('Build & Test') {
            steps {
                sh 'make build'
            }
        }
    }
    post {
        failure {
            script {
                echo "Critical Failure! Engaging the AI Copilot..."
                // Send secure webhook to AWS API Gateway -> Lambda
                sh """
                    curl -X POST -H 'Content-Type: application/json' \
                    -d '{"build_url": "${env.BUILD_URL}"}' \
                    https://your-api-gateway-id.execute-api.us-east-1.amazonaws.com/prod/analyze
                """
            }
        }
    }
}

When the build crashes and burns, Jenkins automatically fires the payload.

The Lambda wakes up, pulls the console text via the Jenkins API, and gets to work immediately.

Advanced Prompt Engineering for your AI-Powered CI/CD Copilot

Let’s dig deeper into the actual prompt engineering mechanics.

A naive prompt will yield absolute garbage. You can’t just send a log and say “Fix this.”

LLMs are incredibly smart, but they lack your specific repository’s historical context.

You must spoon-feed them the boundaries of reality.

Here is a blueprint for the system prompt I use in production environments:

“You are a Senior Principal DevOps engineer. Analyze the following Jenkins build log. Identify the exact root cause of the failure. Provide a step-by-step fix. Format the exact shell commands needed in Markdown code blocks. Keep the explanation under 3 sentences and be brutally concise.”

See what I did there? Ruthless constraints.

By forcing the AI-Powered CI/CD Copilot to output strictly in code blocks, you can programmatically parse them.

Securing Your AI-Powered CI/CD Copilot

Security is not an afterthought. Not when an AI is reading your proprietary stack traces.

Let’s talk about AWS IAM (Identity and Access Management).

Your Lambda function must run under a draconian principle of least privilege.

It only needs permission to write logs to CloudWatch and perhaps invoke the LLM API.

If you are pulling Jenkins API tokens, use AWS Secrets Manager. Never, ever hardcode your keys.

  1. Create a dedicated, isolated IAM role for the Lambda execution.
  2. Attach inline policies strictly limited to necessary ARNs.
  3. Implement a rigorous log scrubber before sending data to the outside world.

That last point is absolutely critical to your company’s survival.

Jenkins logs often leak environment variables, database passwords, or AWS access keys.

You must write a regex function in your Python script to sanitize the payload.

If an API token leaks into an LLM training dataset, you are having a very bad day.

The AI-Powered CI/CD Copilot must be entirely blind to your cryptographic secrets.

Cost Analysis: Running an AI-Powered CI/CD Copilot

Let’s talk dollars and cents, because executives love ROI.

How much does this serverless architecture actually cost to run at enterprise scale?

Shockingly little. The compute overhead is practically a rounding error.

AWS Lambda offers one million free requests per month on the free tier.

Unless your team is failing a million builds a month (in which case, you have bigger problems), the compute is free.

The real cost comes from the LLM API tokens.

You are looking at fractions of a single cent per log analysis.

Compare that to a Senior Engineer making $150k a year spending 40 minutes debugging a YAML typo.

The AI-Powered CI/CD Copilot pays for itself on the very first day of deployment.

Check out my other guide on [Internal Link: Scaling AWS Lambda for Enterprise DevOps] to see how to handle high throughput.

War Story: How the AI-Powered CI/CD Copilot Saved a Friday Deployment

I remember a massive, high-stakes migration project last October.

We were porting a legacy monolithic application over to an EKS Kubernetes cluster.

The Helm charts were a tangled mess. Node dependencies were failing silently in the background.

Jenkins was throwing generic exit code 137 errors. Out of memory. But why?

We spent four hours staring at Grafana dashboards, application logs, and pod metrics.

Then, I hooked up the first raw prototype of our AI-Powered CI/CD Copilot.

Within 15 seconds, it parsed 10,000 lines of logs and highlighted a hidden Java memory leak in the integration test suite.

It suggested adding `-XX:+HeapDumpOnOutOfMemoryError` to the Maven options to catch the heap.

We found the memory leak in the very next automated run.

That is the raw power of having a tireless, instant pair of eyes on your pipelines.

FAQ Section

  • Is this architecture expensive to maintain? No. Serverless functions require zero patching. The LLM APIs cost pennies per pipeline run.
  • Can it automatically commit code fixes? Technically, yes. But I strongly recommend keeping a human in the loop. Approvals matter for compliance.
  • What if the Jenkins logs exceed token limits? Excellent question. You must truncate the logs. Send only the last 200 lines to the AI, where the actual stack trace lives.

Conclusion: Your engineering time is vastly better spent building revenue-generating features, not parsing cryptic Jenkins errors. Building an AI-Powered CI/CD Copilot is the highest ROI infrastructure project you can tackle this quarter. Stop doing manual log reviews and let the machines do what they do best. Thank you for reading the DevopsRoles page!

The Future of DevOps: Trends Shaping 2025

Introduction

DevOps has revolutionized software development and IT operations, fostering seamless collaboration, continuous integration, and automation. As we move into 2025, emerging technologies and evolving industry demands are reshaping DevOps practices. This article explores the key trends shaping the future of DevOps and how organizations can leverage them to enhance efficiency, security, and scalability.

Key DevOps Trends in 2025

1. AI-Driven Automation and AIOps

The Role of AI in DevOps

Artificial Intelligence (AI) and Machine Learning (ML) are redefining DevOps workflows. With AIOps (Artificial Intelligence for IT Operations), teams can:

  • Automate anomaly detection and root cause analysis.
  • Enhance predictive maintenance and incident response.
  • Optimize CI/CD pipelines with intelligent recommendations.

How to Implement AI in DevOps

  • Utilize AI-powered log analysis tools like Splunk and ELK Stack.
  • Implement predictive analytics to foresee potential failures.
  • Integrate AI with CI/CD for automated code reviews and testing.

2. GitOps: The Future of Infrastructure Management

Understanding GitOps

GitOps is an operational framework that applies DevOps best practices using Git repositories as the single source of truth.

Benefits of GitOps

  • Version Control: Maintain a history of infrastructure changes.
  • Faster Deployments: Automate infrastructure updates with Git workflows.
  • Enhanced Security: Reduce human intervention and manual errors.

Tools for GitOps Implementation

  • FluxCD
  • ArgoCD
  • Jenkins X

3. DevSecOps: Security-First Approach

Why DevSecOps Matters in 2025

With increasing cyber threats, security must be integrated into DevOps from the start. DevSecOps ensures:

  • Continuous Security Testing: Automated vulnerability scans within CI/CD pipelines.
  • Shift-Left Security: Address security risks early in development.
  • Zero Trust Architectures: Implement strict access controls and authentication mechanisms.

Best Practices for DevSecOps

  • Use Infrastructure as Code (IaC) security policies.
  • Employ automated security tools like Snyk and Checkmarx.
  • Conduct regular penetration testing.

4. Multi-Cloud and Hybrid Cloud Adoption

The Rise of Multi-Cloud Strategies

Organizations are increasingly leveraging multiple cloud providers (AWS, Azure, GCP) to prevent vendor lock-in and optimize performance.

Key Benefits

  • Scalability: Dynamically allocate resources across multiple clouds.
  • Cost Optimization: Select the most cost-effective cloud services.
  • Resilience: Enhance redundancy and fault tolerance.

How to Implement Multi-Cloud DevOps

  • Utilize Kubernetes for container orchestration.
  • Adopt cloud-agnostic DevOps tools like Terraform and Pulumi.
  • Automate cloud deployment with CI/CD pipelines.

5. Edge Computing and IoT in DevOps

Why Edge Computing Matters

With the proliferation of IoT devices, edge computing allows real-time data processing closer to the source, reducing latency and bandwidth usage.

DevOps in Edge Computing

  • Deploying microservices to edge locations.
  • Automating updates for IoT devices.
  • Using lightweight containerization tools like K3s.

6. Serverless Computing in DevOps

The Shift to Serverless Architectures

Serverless computing enables developers to build applications without managing infrastructure. Popular serverless platforms include AWS Lambda, Azure Functions, and Google Cloud Functions.

DevOps Benefits of Serverless

  • Reduced Operational Overhead: No need to manage servers.
  • Cost Efficiency: Pay only for actual execution time.
  • Scalability: Automatic scaling based on demand.

7. Observability and Monitoring Evolution

Why Observability is Essential

Modern applications generate vast amounts of data, requiring advanced observability solutions for real-time monitoring and troubleshooting.

Tools for Observability

  • Prometheus & Grafana
  • New Relic
  • Datadog

Best Practices

  • Implement centralized logging with ELK Stack.
  • Use distributed tracing to diagnose performance issues.
  • Automate alerts with AI-driven monitoring systems.

Examples of DevOps Trends in Action

Example 1: AI-Driven Incident Response

A leading e-commerce company integrated AI-powered monitoring tools to automatically detect anomalies and predict system failures, reducing downtime by 40%.

Example 2: GitOps for Infrastructure Management

A financial services firm adopted GitOps, allowing automated rollbacks and controlled infrastructure updates, enhancing security and compliance.

Example 3: Serverless for Scalable Applications

A startup utilized AWS Lambda for microservices, reducing cloud costs by 60% while ensuring high availability.

FAQ Section

1. What is the future of DevOps in 2025?

The future of DevOps will be shaped by AI-driven automation, GitOps, security enhancements, and the growing adoption of multi-cloud and edge computing.

2. How does AI impact DevOps?

AI enhances DevOps by automating repetitive tasks, improving predictive maintenance, and optimizing CI/CD workflows.

3. What is GitOps, and why is it important?

GitOps is a DevOps methodology that uses Git repositories as the source of truth for infrastructure management, improving security and deployment efficiency.

4. How does DevSecOps improve security?

DevSecOps integrates security into the DevOps lifecycle, automating security testing and enforcing compliance through Infrastructure as Code.

5. What are the key DevOps tools for 2025?

Some leading DevOps tools include Kubernetes, Terraform, ArgoCD, Prometheus, Jenkins, and AI-powered monitoring solutions.

External Links

Conclusion

As DevOps continues to evolve in 2025, AI-driven automation, security integration, GitOps, and multi-cloud adoption will define the industry’s future. Organizations must embrace these trends to stay competitive, enhance operational efficiency, and deliver high-quality software at scale. By leveraging cutting-edge technologies and best practices, DevOps teams can build resilient, secure, and scalable applications for the digital future. Thank you for reading the DevopsRoles page!

DevSecOps: What Is Security in the DevOps Process and Why Is It Important?

Introduction

In today’s fast-paced software development landscape, security is no longer an afterthought. DevSecOps-short for Development, Security, and Operations-ensures that security is embedded into every stage of the DevOps process. This proactive approach minimizes vulnerabilities, reduces risks, and streamlines compliance. But why is DevSecOps essential, and how can organizations implement it effectively? This article explores the concept, benefits, implementation strategies, and best practices of DevSecOps.

What Is DevSecOps?

Understanding DevSecOps

DevSecOps is an extension of DevOps that integrates security into the entire software development lifecycle (SDLC). It promotes collaboration between development, security, and operations teams to identify and mitigate security threats early in the development process.

Key Principles of DevSecOps

  • Security as Code: Automating security policies and configurations.
  • Shift-Left Approach: Implementing security measures early in the SDLC.
  • Continuous Monitoring: Detecting and responding to threats in real-time.
  • Collaboration and Shared Responsibility: Encouraging cross-functional teams to address security proactively.

Why Is Security Important in DevOps?

The Growing Need for DevSecOps

With cyber threats evolving rapidly, traditional security approaches are no longer sufficient. DevSecOps addresses security concerns by embedding protective measures throughout the DevOps pipeline, reducing the risk of vulnerabilities reaching production.

Benefits of DevSecOps

  1. Enhanced Security Posture: Identifying vulnerabilities early minimizes security risks.
  2. Faster Development Cycles: Automated security checks reduce delays.
  3. Compliance Assurance: Aligns with regulatory requirements such as GDPR, HIPAA, and ISO 27001.
  4. Cost Savings: Fixing security issues earlier is more cost-effective than post-deployment remediation.
  5. Improved Collaboration: Fosters a security-first culture across teams.

How to Implement DevSecOps

1. Integrating Security into CI/CD Pipelines

DevSecOps involves incorporating security controls into Continuous Integration/Continuous Deployment (CI/CD) workflows.

  • Static Application Security Testing (SAST): Scans code for vulnerabilities before deployment.
  • Dynamic Application Security Testing (DAST): Identifies runtime vulnerabilities.
  • Software Composition Analysis (SCA): Detects risks in open-source components.

2. Automating Security Testing

Automated security tools ensure that vulnerabilities are detected and mitigated efficiently.

  • Popular Security Automation Tools:
    • SonarQube (SAST)
    • OWASP ZAP (DAST)
    • Dependabot (SCA)

3. Using Infrastructure as Code (IaC) Security

  • Terraform Security Best Practices: Apply security policies in infrastructure configurations.
  • Cloud Security Posture Management (CSPM): Tools like Prisma Cloud and AWS Config monitor cloud environments.

4. Enforcing Access Control and Identity Management

  • Implement Role-Based Access Control (RBAC) to restrict unauthorized access.
  • Utilize Multi-Factor Authentication (MFA) for additional security.

5. Continuous Monitoring and Incident Response

  • Utilize Security Information and Event Management (SIEM) solutions for real-time threat detection.
  • Automate incident response workflows using SOAR (Security Orchestration, Automation, and Response) tools.

Real-World Examples of DevSecOps

Example 1: Securing a Web Application

  • Challenge: A fintech company deploying a banking app faces security vulnerabilities.
  • Solution: Integrating DevSecOps tools like SAST, DAST, and container security scans into the CI/CD pipeline.
  • Outcome: Early detection of security flaws reduces the risk of data breaches.

Example 2: Cloud Security in a DevOps Environment

  • Challenge: A SaaS provider migrates its services to the cloud but struggles with misconfigured permissions.
  • Solution: Implementing Infrastructure as Code (IaC) security scans and automated compliance checks.
  • Outcome: Reduced misconfiguration risks, ensuring compliance with security standards.

FAQs on DevSecOps

1. How is DevSecOps different from traditional security?

Unlike traditional security, which is applied at the end of development, DevSecOps integrates security throughout the SDLC, ensuring continuous risk mitigation.

2. Which tools are commonly used in DevSecOps?

Some popular DevSecOps tools include:

  • SAST: SonarQube, Checkmarx
  • DAST: OWASP ZAP, Burp Suite
  • Container Security: Aqua Security, Trivy
  • SIEM: Splunk, ELK Stack

3. Can DevSecOps be applied in small teams?

Yes. Small teams can leverage automated security tools and cloud-based security services to implement DevSecOps efficiently.

4. What are the challenges in implementing DevSecOps?

  • Resistance to change in development teams
  • Complexity in integrating security tools
  • Skills gap in security expertise
  • Balancing security with speed in deployments

5. How does DevSecOps support compliance?

DevSecOps ensures adherence to security regulations by automating compliance checks and maintaining audit logs for security assessments.

External Resources

Conclusion

DevSecOps is a transformative approach to secure software development. By embedding security into the DevOps lifecycle, organizations can proactively detect and mitigate vulnerabilities, reduce risks, and improve compliance. Implementing DevSecOps requires cultural, technical, and procedural changes, but the long-term benefits outweigh the challenges. Businesses looking to secure their DevOps processes should start by integrating security automation, enforcing access controls, and adopting continuous monitoring. Embracing DevSecOps is the key to achieving resilient, secure, and agile software development. Thank you for reading the DevopsRoles page!

Top 10 Best DevOps Tools of 2025 – Don’t Miss Out

Introduction

DevOps has become an integral part of modern software development, enabling teams to enhance efficiency, automate workflows, and ensure seamless deployment. As technology evolves, new tools emerge to optimize DevOps pipelines. In this article, we explore the Top 10 Best DevOps Tools of 2025 that are reshaping the industry, covering their features, use cases, and why they stand out.

Top 10 Best DevOps Tools of 2025

1. Jenkins – The Continuous Integration Pioneer

Jenkins remains a cornerstone in DevOps, offering extensive automation capabilities for continuous integration and continuous deployment (CI/CD).

Key Features:

  • Open-source with a vast plugin ecosystem
  • Supports parallel builds
  • Integration with popular DevOps tools

Use Case:

Automating code testing and deployment to improve development speed.

2. Docker – Revolutionizing Containerization

Docker simplifies application deployment by packaging software into lightweight containers that run consistently across environments.

Key Features:

  • Platform-independent containerization
  • Scalable microservices architecture
  • Seamless CI/CD integration

Use Case:

Ensuring consistency in development, testing, and production environments.

3. Kubernetes – The Ultimate Container Orchestration Tool

Kubernetes automates the deployment, scaling, and operation of containerized applications.

Key Features:

  • Self-healing and auto-scaling
  • Rolling updates for zero-downtime deployments
  • Service discovery and load balancing

Use Case:

Managing large-scale containerized applications with minimal manual intervention.

4. Terraform – Infrastructure as Code (IaC) Leader

Terraform enables automated infrastructure provisioning using declarative configuration files.

Key Features:

  • Multi-cloud support (AWS, Azure, GCP)
  • Immutable infrastructure
  • Version control integration

Use Case:

Automating cloud resource provisioning and managing infrastructure efficiently.

5. GitHub Actions – CI/CD Directly in Your Repository

GitHub Actions allows DevOps teams to automate workflows within GitHub repositories.

Key Features:

  • Native CI/CD for GitHub repositories
  • Event-driven automation
  • Secure, fast, and scalable builds

Use Case:

Automating software testing and deployment with minimal configuration.

6. Ansible – Simplifying IT Automation

Ansible is an agentless automation tool that simplifies configuration management and application deployment.

Key Features:

  • YAML-based playbooks
  • Scalable automation
  • Security and compliance enforcement

Use Case:

Managing server configurations across multiple environments with ease.

7. Prometheus – Advanced Monitoring and Alerting

Prometheus is a leading open-source monitoring and alerting toolkit designed for reliability.

Key Features:

  • Time-series data collection
  • Powerful querying language (PromQL)
  • Integrates with Grafana for visualization

Use Case:

Monitoring cloud-based applications and infrastructure performance.

8. Grafana – Real-time Data Visualization

Grafana provides beautiful, interactive dashboards for monitoring and analytics.

Key Features:

  • Supports multiple data sources
  • Customizable alerts
  • User-friendly UI

Use Case:

Creating real-time dashboards for DevOps observability and insights.

9. Splunk – Log Management and Security

Splunk enables organizations to analyze machine data and logs for performance optimization and security.

Key Features:

  • AI-driven analytics
  • Security Information and Event Management (SIEM)
  • Automated alerting and insights

Use Case:

Detecting and mitigating security threats using AI-powered log analysis.

10. CircleCI – Scalable CI/CD for Teams

CircleCI accelerates software development with robust CI/CD pipelines and performance optimizations.

Key Features:

  • Container-native builds
  • Fast caching for speed improvements
  • Integrated debugging tools

Use Case:

Boosting software delivery speed through automated builds and deployments.

Frequently Asked Questions (FAQ)

1. What is the best DevOps tool for CI/CD?

Jenkins and GitHub Actions are the most widely used CI/CD tools, offering automation and seamless integration.

2. How does Kubernetes improve DevOps?

Kubernetes automates container orchestration, ensuring high availability, scalability, and self-healing infrastructure.

3. Which tool is best for infrastructure automation?

Terraform is the top choice for Infrastructure as Code (IaC), enabling automated cloud resource provisioning.

4. Why is monitoring important in DevOps?

Tools like Prometheus and Grafana provide real-time insights into system performance, helping teams proactively detect issues.

5. How can DevOps tools enhance security?

Splunk and Ansible offer security features such as automated compliance enforcement and AI-driven threat detection.

Conclusion

The Top 10 Best DevOps Tools of 2025 are transforming how teams develop, deploy, and manage software. Whether you need CI/CD, infrastructure automation, monitoring, or security solutions, these tools help streamline your DevOps workflows. By integrating these cutting-edge tools, organizations can improve efficiency, reliability, and innovation in software development. Thank you for reading the DevopsRoles page!

Recommended Readings:

Jenkins Security: Ensuring Safe CI/CD Pipelines

Introduction

Jenkins is one of the most widely used open-source automation tools for building, testing, and deploying software. However, as a cornerstone of continuous integration and delivery (CI/CD) pipelines, Jenkins must be properly secured to prevent potential breaches. In this guide, we’ll explore the essential aspects of Jenkins security, from setup best practices to advanced configurations, ensuring your pipelines are robust and safe.

Why Jenkins Security Matters

The Importance of CI/CD Security In today’s DevOps landscape, securing CI/CD pipelines is paramount. Breaches in Jenkins can lead to:

  • Unauthorized code changes.
  • Data leaks through exposed secrets.
  • Disruption of deployment processes.

A well-secured Jenkins environment mitigates these risks and ensures uninterrupted delivery.

Getting Started with Jenkins Security

Basic Security Configurations

Securing Jenkins Installation

  1. Install the Latest Version:
    • Always use the latest stable Jenkins release to leverage security patches.
    • Download from the official Jenkins site.
  2. Run Jenkins as a Dedicated User:
    • Avoid running Jenkins as a root user.
    • Set up a dedicated Jenkins user with limited permissions.

Network Security Basics

  • Restrict Jenkins to internal networks where possible.
  • Use a reverse proxy (e.g., NGINX or Apache) with SSL termination to encrypt traffic.

Authentication and Authorization

  1. Enable Matrix-based Security:
    • Go to Manage Jenkins > Configure Global Security.
    • Use the matrix-based security model to control user and group permissions.
  2. Integrate with an external authentication system:
    • Use LDAP, SSO, or Active Directory for centralized user management.

Advanced Jenkins Security Practices

Protecting Sensitive Data

Secrets Management

  • Use the Jenkins Credentials Plugin to securely store API keys, passwords, and certificates.
  • Avoid embedding secrets in job configurations or scripts.

Securing Build Nodes

  1. Limit build node access:
    • Restrict node connection through firewalls.
  2. Use agent-to-controller security:
    • Ensure that agents only communicate with the Jenkins controller over secured channels.

Sandbox Script Execution

  • Use the Groovy Sandbox to restrict the execution of untrusted code in pipeline scripts.
  • Regularly review pipeline scripts for security vulnerabilities.

Auditing and Monitoring Jenkins

Enable Audit Trails

  • Install the Audit Trail Plugin to log user actions.
  • Regularly review logs for suspicious activity.

Monitoring Plugins

  • Use the Prometheus Plugin for real-time monitoring and alerts.
  • Continuously update plugins to fix known vulnerabilities.

Jenkins Security in Action

Examples

Setting Up Role-Based Access Control (RBAC)

  1. Install the Role-Based Authorization Strategy Plugin.
  2. Create roles such as Admin, Developer, and Viewer.
  3. Assign roles based on the principle of least privilege.

Enforcing Secure Agent Connections

  1. Go to Manage Jenkins > Configure Global Security.
  2. Enable Agent-to-Controller Security.
  3. Use SSH for agent connections, ensuring private key authentication.

Securing Artifacts

  • Store build artifacts in a secure repository (e.g., Nexus or Artifactory).
  • Use encryption for sensitive artifacts.

FAQ Section

Frequently Asked Questions

How do I update Jenkins securely?

  • Use the Jenkins Update Center for plugin and core updates.
  • Verify the integrity of downloads using checksums.

Can I integrate Jenkins with a vulnerability scanner?

  • Yes, integrate tools like OWASP Dependency-Check or SonarQube to detect vulnerabilities during builds.

What is the best way to secure Jenkins pipelines?

  • Use the Groovy Sandbox, restrict pipeline script execution, and review pipeline configurations regularly.

External Resources

Additional Reading and Tools

Conclusion

Securing Jenkins is an ongoing process that requires regular updates, strict access controls, and proactive monitoring. By following the practices outlined in this guide, you can create a robust Jenkins environment, safeguarding your CI/CD pipelines against potential threats.

Take action today to enhance your Jenkins security and ensure a resilient software delivery process. Thank you for reading the DevopsRoles page!

Jenkins Automation with Groovy Scripting

Introduction

Jenkins, a widely-used automation server, is a cornerstone of DevOps and Continuous Integration/Continuous Delivery (CI/CD) pipelines. Leveraging Groovy scripting, a dynamic language for the Java platform, empowers users to automate complex tasks, optimize workflows, and extend Jenkins functionalities seamlessly. This guide explores how to utilize Jenkins Automation with Groovy Scripting, providing practical insights and actionable examples.

Why Use Groovy Scripting in Jenkins?

Key Benefits

  • Flexibility: Groovy’s dynamic nature simplifies scripting tasks in Jenkins.
  • Integration: Seamlessly integrates with Jenkins plugins and Java libraries.
  • Efficiency: Automates repetitive tasks, reducing manual intervention.
  • Customization: Extends Jenkins’ default capabilities to fit unique project requirements.

Setting Up Jenkins for Groovy Scripting

Prerequisites

  1. Jenkins Installed: Ensure Jenkins is installed and running.
  2. Groovy Plugin: Install the Groovy plugin via Jenkins’ Plugin Manager.
  3. Java Development Kit (JDK): Groovy requires Java to function.

Configuring Jenkins

  1. Navigate to Manage Jenkins > Manage Plugins.
  2. Search for “Groovy” in the Available Plugins tab.
  3. Install and restart Jenkins to enable the plugin.

Groovy Scripting Basics

Syntax Overview

Groovy scripts are concise and easy to learn, especially if you’re familiar with Java. Below are basic constructs:

  • Variables: def message = "Hello, Jenkins!"
  • Loops: for (int i = 0; i < 10; i++) { println i }
  • Functions:
def greet(name) {
    return "Hello, $name!"
}
println greet("Jenkins User")

Automating Jenkins Tasks with Groovy

Example 1: Creating and Configuring a Job

Groovy Script:

import jenkins.model.*

// Create a new job
def jenkins = Jenkins.instance
String jobName = "MyFirstGroovyJob"
def job = jenkins.createProject(hudson.model.FreeStyleProject, jobName)

// Configure job properties
job.description = "This is a job created with Groovy scripting."
job.save()
println "Job $jobName created successfully!"

Example 2: Automating Build Trigger Configurations

Groovy Script:

import hudson.triggers.*

def job = Jenkins.instance.getItem("MyFirstGroovyJob")
job.addTrigger(new SCMTrigger("H/15 * * * *")) // Poll SCM every 15 minutes
job.save()
println "SCM trigger added to job successfully!"

Example 3: Deleting Old Build Artifacts

Groovy Script:

import jenkins.model.*

// Delete build artifacts older than 30 days
Jenkins.instance.getAllItems(Job).each { job ->
    job.builds.findAll { it.getTimeInMillis() < System.currentTimeMillis() - (30 * 24 * 60 * 60 * 1000) }.each {
        it.delete()
        println "Deleted build #${it.number} from ${job.name}"
    }
}

Advanced Jenkins Automation with Groovy

Scenario: Dynamic Parameterized Builds

Groovy Script:

import hudson.model.ParametersDefinitionProperty
import hudson.model.StringParameterDefinition

def job = Jenkins.instance.getItem("MyFirstGroovyJob")

def paramsDef = new ParametersDefinitionProperty(
    new StringParameterDefinition("ENV", "Development", "Target environment")
)

job.addProperty(paramsDef)
job.save()
println "Added dynamic parameters to job successfully!"

Scenario: Automating Plugin Installations

Groovy Script:

import jenkins.model.Jenkins
import jenkins.plugins.PluginManager

def plugins = ["git", "pipeline"]
def pm = Jenkins.instance.pluginManager

plugins.each { plugin ->
    if (!pm.getPlugin(plugin)) {
        pm.install(plugin)
        println "Installed plugin: $plugin"
    } else {
        println "Plugin already installed: $plugin"
    }
}

FAQ: Jenkins Automation with Groovy Scripting

What is Groovy scripting used for in Jenkins?

Groovy is used to automate tasks, customize jobs, and extend Jenkins’ functionalities beyond its GUI capabilities.

Can I run Groovy scripts directly in Jenkins?

Yes, you can execute scripts using Jenkins’ Script Console (Manage Jenkins > Script Console).

How do I debug Groovy scripts in Jenkins?

Use println statements for debugging and check logs under Manage Jenkins > System Log.

Is Groovy scripting secure?

Always validate and review scripts for security vulnerabilities, especially when handling sensitive data or running on shared servers.

External Resources

Conclusion

Groovy scripting transforms Jenkins from a robust CI/CD tool into a highly customizable automation powerhouse. Whether creating jobs, managing plugins, or automating workflows, Groovy empowers DevOps professionals to achieve unparalleled efficiency and scalability. Start integrating Groovy into your Jenkins pipelines today to unlock its full potential. Thank you for reading the DevopsRoles page!

Jenkins Plugins: Unlocking the Power of CI/CD Pipelines

Introduction

In today’s fast-paced software development environment, achieving continuous integration and continuous delivery (CI/CD) is essential. Jenkins, a powerful open-source automation server, lies at the heart of many DevOps workflows. But to truly unlock its potential, Jenkins plugins are indispensable. These plugins expand Jenkins’ capabilities, enabling teams to build, test, and deploy with greater efficiency. This article explores how Jenkins plugins can improve your CI/CD pipelines, from basic configurations to advanced integrations.

Why Use Jenkins Plugins for CI/CD Pipelines?

Jenkins plugins act as extensions that enhance its functionality. With over 1,800 plugins available, developers can:

  • Integrate with version control systems like Git and Subversion.
  • Automate testing with tools like Selenium.
  • Enable containerized builds with Docker.
  • Secure pipelines with credential management tools.
  • Optimize workflows with real-time monitoring and reporting.

Whether you’re building a simple pipeline or managing complex deployments, plugins provide the flexibility and scalability to meet diverse needs.

Top Jenkins Plugins for CI/CD Pipelines

1. Git Plugin

The Git Plugin is essential for integrating Git repositories with Jenkins. It allows:

  • Pulling code from GitHub, GitLab, or Bitbucket.
  • Supporting branch-specific builds.
  • Triggering builds based on changes.

2. Pipeline Plugin

This plugin enables users to define jobs using code. Key features include:

  • Writing pipelines as code using Jenkinsfile.
  • Supporting complex workflows with parallel stages.
  • Enabling version-controlled pipeline configurations.

3. Blue Ocean Plugin

Blue Ocean offers a modern UI for Jenkins, simplifying pipeline visualization. Benefits include:

  • Intuitive interface for pipeline creation and monitoring.
  • Real-time feedback on pipeline status.
  • Easy debugging of failed stages.

4. Docker Plugin

For teams leveraging containerization, the Docker Plugin provides:

  • Building and publishing Docker images.
  • Running Jenkins agents in containers.
  • Managing Docker hosts directly from Jenkins.

5. Email Extension Plugin

This plugin enhances notification capabilities. Features include:

  • Configurable email templates.
  • Automated alerts for build statuses.
  • Integration with multiple mail servers.

6. Slack Notification Plugin

Communicate build statuses directly in Slack channels. Highlights:

  • Instant notifications for builds and deployments.
  • Customizable alerts.
  • Support for multiple Slack workspaces.

7. Credentials Binding Plugin

Enhance pipeline security by:

  • Managing secrets like API keys and passwords.
  • Injecting credentials into pipelines securely.
  • Supporting multiple credential formats.

Setting Up Jenkins Plugins for Your Pipeline

Step 1: Install a Plugin

  1. Navigate to Manage Jenkins > Plugin Manager.
  2. Search for the desired plugin in the “Available” tab.
  3. Click “Install without restart” or “Install and restart” for activation.

Step 2: Configure the Plugin

  • Go to Manage Jenkins > Configure System.
  • Locate the plugin’s configuration section.
  • Input required details like API tokens, repository URLs, or Docker configurations.

Step 3: Integrate with Your Pipeline

  • Update your Jenkinsfile to include plugin-specific stages or commands. For example:
pipeline {
    agent any
    stages {
        stage('Build') {
            steps {
                git branch: 'main', url: 'https://github.com/example/repo.git'
                docker.build('my-app')
            }
        }
        stage('Test') {
            steps {
                sh 'mvn test'
            }
        }
    }
}

Examples: From Basic to Advanced Scenarios

Basic Example: Git Integration

pipeline {
    agent any
    stages {
        stage('Clone Repository') {
            steps {
                git branch: 'main', url: 'https://github.com/example/repo.git'
            }
        }
        stage('Build') {
            steps {
                sh 'make build'
            }
        }
    }
}

Advanced Example: Multi-Container Deployment with Docker

pipeline {
    agent any
    stages {
        stage('Build Docker Image') {
            steps {
                script {
                    docker.build('my-app:latest')
                }
            }
        }
        stage('Deploy to Kubernetes') {
            steps {
                sh 'kubectl apply -f deployment.yaml'
            }
        }
    }
}

FAQ: Jenkins Plugins for Improved CI/CD Pipelines

1. What are Jenkins plugins?

Jenkins plugins are extensions that enhance its functionality, allowing integration with tools like Git, Docker, and Kubernetes.

2. How do I know which plugins to use?

Identify your CI/CD pipeline needs. Common requirements include version control, testing, containerization, and notifications.

3. Are plugins secure?

Official Jenkins plugins undergo rigorous testing. However, always review documentation and community feedback before installation.

4. Can plugins slow down Jenkins?

Excessive or poorly configured plugins may impact performance. Regularly audit and remove unused plugins.

5. How do I update plugins?

Go to Manage Jenkins > Plugin Manager, then check the “Updates” tab for available updates.

External Resources

Conclusion

Jenkins plugins are the cornerstone of efficient CI/CD pipelines. From version control integration to advanced container orchestration, they provide the tools necessary for modern DevOps workflows. By carefully selecting and configuring plugins, teams can achieve seamless automation, improved collaboration, and faster delivery cycles. Start exploring the vast ecosystem of Jenkins plugins today and elevate your CI/CD pipeline to new heights! Thank you for reading the DevopsRoles page!

Jenkins Install SSL Certificate: A Comprehensive Guide

Introduction

In today’s digital landscape, security is a critical concern for every application and service, especially when sensitive data is involved. Jenkins, a popular open-source automation server, is no exception. Whether you’re managing continuous integration or automating deployment pipelines, ensuring that Jenkins communicates securely over HTTPS is essential.

To achieve this, you need to jenkins install ssl certificate to secure your Jenkins server and protect data from unauthorized access. Installing an SSL certificate on Jenkins not only helps defend against potential attacks but also builds trust with users by ensuring data integrity during transmission. This guide will walk you through the process of jenkins install ssl certificate, from basic setup to more advanced configurations, while also addressing common issues and troubleshooting steps.

Why You Need SSL for Jenkins

Benefits of SSL/TLS Encryption

Before diving into the installation process, it’s important to understand the benefits of using SSL (Secure Sockets Layer) or TLS (Transport Layer Security) for Jenkins:

  • Data Encryption: SSL ensures that all data transferred between the Jenkins server and clients is encrypted, making it inaccessible to malicious actors.
  • Authentication: SSL certificates verify the identity of the server, ensuring users connect to the correct Jenkins instance.
  • Integrity: SSL guarantees that the data has not been tampered with during transmission.
  • Trust and Compliance: Many organizations require SSL to comply with data protection regulations and security best practices.

Now that we’ve established why SSL is necessary, let’s move on to the steps involved in installing an SSL certificate on Jenkins.

Prerequisites for Installing SSL on Jenkins

Before beginning the installation process, ensure that you meet the following prerequisites:

  • Access to Jenkins Server: You should have administrative access to the Jenkins server, either via SSH or the Jenkins web interface.
  • Java Keystore (JKS): Jenkins runs on Java, and SSL certificates are typically stored in a Java Keystore. You’ll need to have Java installed on your server.
  • SSL Certificate: You can either purchase an SSL certificate from a certificate authority (CA) or generate a self-signed certificate for testing purposes.

If you don’t already have an SSL certificate, you can generate a self-signed one using tools like OpenSSL or get a certificate from a trusted CA like Let’s Encrypt, Comodo, or DigiCert.

How to Install an SSL Certificate on Jenkins

Step 1: Generate or Obtain an SSL Certificate

If you don’t have an SSL certificate yet, follow these instructions:

Generating a Self-Signed SSL Certificate (for Testing)

If you only need SSL for internal use or testing, you can generate a self-signed certificate using OpenSSL. Here’s how:

  1. Open a terminal window on your Jenkins server.
  2. Run the following OpenSSL command to create a self-signed certificate:
    • openssl req -newkey rsa:2048 -nodes -keyout jenkins.key -x509 -days 365 -out jenkins.crt
    • This command generates two files: jenkins.key (the private key) and jenkins.crt (the certificate).

Purchasing and Installing a Certificate from a CA

If you’re using a certificate from a certificate authority, you’ll typically receive a .crt file and a private key. You may also receive intermediate certificates that need to be included in your keystore.

Step 2: Convert the SSL Certificate to a Java Keystore (JKS)

Jenkins requires that the SSL certificate be stored in a Java Keystore (JKS) format. You can convert your .crt and .key files into a keystore using the following steps:

  1. Combine the certificate and private key into a PKCS12 file (a format supported by Java):
    • openssl pkcs12 -export -in jenkins.crt -inkey jenkins.key -out jenkins.p12
    • This command will create a .p12 file containing both the certificate and the private key.
  2. Convert the .p12 file to a Java Keystore (JKS) format:
    • keytool -importkeystore -srckeystore jenkins.p12 -srcstoretype PKCS12 -destkeystore jenkins.jks
  3. Set the keystore password when prompted. The keystore will be created as jenkins.jks.

Step 3: Configure Jenkins to Use the SSL Certificate

Now that you have the keystore (jenkins.jks), you can configure Jenkins to use the SSL certificate.

  1. Locate Jenkins Configuration File: The Jenkins configuration file is usually located at /etc/default/jenkins or /etc/sysconfig/jenkins depending on your system.
  2. Edit the Jenkins Configuration File: Open the file in a text editor:
    • sudo nano /etc/default/jenkins
  3. Modify the Jenkins Port Configuration: Look for the following line and modify it to specify the keystore location and password:
    • JENKINS_ARGS="--httpPort=-1 --httpsPort=8443 --httpsKeyStore=/path/to/jenkins.jks --httpsKeyStorePassword=your_keystore_password"
    • Replace /path/to/jenkins.jks with the actual path to your keystore, and your_keystore_password with the password you set during the keystore creation.
  4. Restart Jenkins: After saving the configuration, restart Jenkins to apply the changes:
    • sudo systemctl restart jenkins

Advanced SSL Configuration for Jenkins

Setting Up SSL with Reverse Proxy (Nginx)

If you’re running Jenkins behind a reverse proxy like Nginx, you can handle SSL termination at the proxy level instead of configuring Jenkins directly.

  1. Install Nginx:
    • sudo apt-get install nginx
  2. Configure Nginx: Open the Nginx configuration file for your Jenkins server:
    • sudo nano /etc/nginx/sites-available/jenkins
  3. Add the following SSL configuration:
server {
    listen 443 ssl;
    server_name jenkins.yourdomain.com;

    ssl_certificate /etc/ssl/certs/jenkins.crt;
    ssl_certificate_key /etc/ssl/private/jenkins.key;

    location / {
        proxy_pass http://127.0.0.1:8080;
        proxy_set_header Host $host;
        proxy_set_header X-Real-IP $remote_addr;
        proxy_set_header X-Forwarded-For $proxy_add_x_forwarded_for;
        proxy_set_header X-Forwarded-Proto $scheme;
    }
}

Restart Nginx:

sudo systemctl restart nginx

Now, Jenkins will be available over HTTPS through the Nginx proxy.

    Troubleshooting Jenkins Install SSL Certificate Issues

    While SSL certificates are crucial for secure communication, the installation process might encounter issues. Here are some common problems and their solutions:

    Common Issues and Fixes

    1. Certificate Not Trusted: If your browser shows a security warning, ensure that you’ve added the correct intermediate certificates or are using a certificate from a trusted CA.
    2. Keystore Password Issues: Double-check that the password you provided in the Jenkins configuration matches the one used to create the keystore.
    3. Port Conflicts: Ensure that port 8443 (or the port you selected for HTTPS) is open and not being used by another service.

    FAQ: Jenkins SSL Certificate Installation

    1. Do I need an SSL certificate for Jenkins?

    Yes, especially if you are handling sensitive information. SSL ensures that data transferred between Jenkins and clients is encrypted and secure.

    2. Can I use a self-signed certificate?

    Yes, but it’s generally recommended to use a certificate from a trusted certificate authority for production environments to avoid security warnings in browsers.

    3. How do I configure Jenkins to redirect HTTP to HTTPS?

    You can configure Jenkins to redirect all HTTP traffic to HTTPS by modifying the jenkins.xml file or using a reverse proxy like Nginx.

    4. How can I verify that Jenkins is using SSL correctly?

    After installation, access Jenkins via https://your-jenkins-domain:8443 and check if the SSL certificate is properly recognized and secured by the browser.

    Conclusion

    Installing an SSL certificate on Jenkins is a crucial step to secure your automation environment. Whether you’re using a self-signed certificate for testing or a trusted certificate from a CA for production, following these steps will ensure that Jenkins communicates securely with clients. Always test your SSL setup to avoid common issues like certificate trust errors or port conflicts.

    By implementing SSL correctly, you’ll improve the security and trustworthiness of your Jenkins instance, protect sensitive data, and ensure compliance with industry best practices.

    For further reading and additional resources, consider exploring the official Jenkins documentation and SSL configuration guides on Let’s Encrypt. Thank you for reading the DevopsRoles page!

    Jenkins vs GitLab CI: Which to Choose?

    Introduction

    In the world of DevOps and continuous integration/continuous delivery (CI/CD), tools like Jenkins and GitLab CI have emerged as industry leaders. Both platforms streamline software development, automate workflows, and enhance team collaboration. But which one is better suited for your needs? In this article, we will dive deep into Jenkins vs GitLab CI, exploring their features, use cases, pros, and cons, to help you make an informed decision.

    Jenkins vs GitLab CI: An Overview

    What is Jenkins?

    Jenkins is an open-source automation server widely used for building, testing, and deploying applications. Known for its flexibility and extensive plugin ecosystem, Jenkins supports almost every programming language and toolchain. It’s an excellent choice for organizations seeking a customizable CI/CD solution.

    Key Features of Jenkins:

    • Open-source and highly extensible.
    • Over 1,800 plugins for diverse integrations.
    • Supports distributed builds across multiple nodes.
    • Active community support.

    What is GitLab CI?

    GitLab CI is a built-in CI/CD tool in GitLab, a web-based DevOps platform. Fully integrated with GitLab’s repository management system, it provides a seamless workflow for code versioning, testing, and deployment. GitLab CI is particularly appealing to teams already using GitLab for source control.

    Key Features of GitLab CI:

    • Native integration with GitLab repositories.
    • YAML-based pipeline configuration.
    • Built-in container registry and Kubernetes support.
    • Comprehensive analytics and monitoring tools.

    Key Differences Between Jenkins and GitLab CI

    FeatureJenkinsGitLab CI
    Ease of SetupRequires manual setup and configuration.Seamless setup as part of GitLab.
    Plugin EcosystemExtensive plugin ecosystem.Limited to GitLab’s native capabilities.
    ScalabilityHighly scalable with multiple nodes.Limited by GitLab’s infrastructure.
    User InterfaceLess intuitive, dated UI.Modern and user-friendly.
    IntegrationIntegrates with various tools via plugins.Limited to GitLab’s ecosystem.
    CostFree, but hosting can be costly.Free tier available; premium plans exist.

    Use Cases: When to Choose Jenkins or GitLab CI

    When to Use Jenkins

    1. Large, Complex Projects: Jenkins excels in managing large-scale pipelines with distributed builds.
    2. Diverse Toolchains: If your team uses multiple languages, frameworks, or custom tools, Jenkins’ plugin library ensures compatibility.
    3. Custom Solutions: Jenkins is ideal for teams that require highly customized CI/CD workflows.

    When to Use GitLab CI

    1. Small to Medium Projects: GitLab CI is a great choice for teams looking for simplicity and seamless integration.
    2. GitLab Users: Teams already using GitLab for version control benefit from its native CI/CD capabilities.
    3. Kubernetes Deployments: GitLab CI simplifies containerized deployments with its built-in Kubernetes support.

    Setting Up Jenkins and GitLab CI: Step-by-Step

    Setting Up Jenkins

    1. Install Jenkins:
    1. Install Required Plugins:
    • Use Jenkins’ Plugin Manager to install essential plugins like Git, Docker, and Pipeline.
    1. Configure Jenkins:
    • Create new jobs and define build pipelines using the DSL (Domain-Specific Language).
    1. Run Your Pipeline:
    • Test and execute your build pipelines on Jenkins.

    Setting Up GitLab CI

    1. Create a Repository:
    • Create or use an existing repository on GitLab.
    1. Define a .gitlab-ci.yml File:
    • Write pipeline configurations in the YAML file.
    1. Run the Pipeline:
    • Commit the file to trigger the pipeline.
    1. Monitor Pipelines:
    • Use GitLab’s UI to view pipeline statuses and logs.

    Examples: Jenkins vs GitLab CI in Action

    Jenkins Pipeline Example

    pipeline {
        agent any
        stages {
            stage('Build') {
                steps {
                    echo 'Building...'
                }
            }
            stage('Test') {
                steps {
                    echo 'Testing...'
                }
            }
            stage('Deploy') {
                steps {
                    echo 'Deploying...'
                }
            }
        }
    }

    GitLab CI Pipeline Example

    stages:
      - build
      - test
      - deploy
    
    build_job:
      stage: build
      script:
        - echo "Building..."
    
    test_job:
      stage: test
      script:
        - echo "Testing..."
    
    deploy_job:
      stage: deploy
      script:
        - echo "Deploying..."
    

    FAQ: Frequently Asked Questions

    Is Jenkins free to use?

    Yes, Jenkins is open-source and free to use. However, hosting and maintenance costs may apply.

    Does GitLab CI support third-party integrations?

    While GitLab CI has fewer integrations than Jenkins, it supports popular tools like Docker, Kubernetes, and Prometheus.

    Can Jenkins work with GitLab repositories?

    Yes, Jenkins can integrate with GitLab repositories using the GitLab plugin.

    Which is better for Kubernetes deployments?

    GitLab CI provides built-in Kubernetes support, making it more straightforward for containerized environments.

    Conclusion

    Choosing between Jenkins and GitLab CI depends on your project’s complexity, team size, and existing infrastructure. Jenkins shines in flexibility and scalability, making it perfect for complex projects. On the other hand, GitLab CI offers a seamless, user-friendly experience for teams already using GitLab. By understanding their strengths and limitations, you can select the CI/CD tool that best suits your needs.

    For further reading, explore the official Jenkins documentation and GitLab CI documentation.  Thank you for reading the DevopsRoles page!

    Jenkins Setup: A Comprehensive Guide to Installation and Configuration

    Introduction

    Jenkins, a powerful automation server, is widely used in software development for continuous integration (CI) and continuous delivery (CD). With Jenkins, teams can automate build, test, and deployment workflows, ensuring faster and more efficient development cycles. This guide provides a step-by-step approach to Jenkins setup and installation, tailored for both beginners and advanced users.

    Why Jenkins?

    Jenkins plays a pivotal role in CI/CD pipelines, helping teams deploy code faster, reduce errors, and maintain consistency. This guide will cover the installation, configuration, and best practices for Jenkins, making it easier for development teams to automate processes effectively.

    Prerequisites for Jenkins Installation

    Before starting the installation, ensure your system meets the following prerequisites:

    • Java Development Kit (JDK): Jenkins requires Java to run. Install the latest JDK (Java Development Kit) for compatibility.
    • Server Access: For production environments, ensure you have root or admin access for installation.
    • Ports and Firewalls: Jenkins typically runs on port 8080, so ensure this port is open in your firewall settings.

    Installing Jenkins on Different Platforms

    Installing Jenkins on Windows

    1. Download Jenkins: Visit the Jenkins download page and select the Windows installer.
    2. Run the Installer: Open the installer and follow the instructions. Jenkins will install as a Windows service.
    3. Set Java Path: If required, configure your Java path to ensure Jenkins can locate the JDK.
    4. Access Jenkins: Once installation is complete, Jenkins can be accessed at http://localhost:8080 in your browser.

    Installing Jenkins on macOS

    Install Homebrew: For a simplified installation, use Homebrew on macOS.

    /bin/bash -c "$(curl -fsSL https://raw.githubusercontent.com/Homebrew/install/HEAD/install.sh)"

    Install Jenkins: Use Homebrew to install Jenkins.

    brew install jenkins-lts

    Start Jenkins:

    brew services start jenkins-lts

    Verify Installation: Access Jenkins via http://localhost:8080 in your web browser.

    Installing Jenkins on Linux

    For Debian/Ubuntu and Red Hat-based systems, the steps differ slightly.

    Debian/Ubuntu

    Add Jenkins Repository:

    curl -fsSL https://pkg.jenkins.io/debian/jenkins.io.key | sudo tee \
      /usr/share/keyrings/jenkins-keyring.asc > /dev/null
    sudo sh -c 'echo deb [signed-by=/usr/share/keyrings/jenkins-keyring.asc] \
      https://pkg.jenkins.io/debian binary/ > \
      /etc/apt/sources.list.d/jenkins.list'
    

    Update Packages and Install Jenkins:

    sudo apt update
    sudo apt install jenkins
    

    Start Jenkins:

    sudo systemctl start jenkins
    

    Verify Installation: Access Jenkins at http://localhost:8080

    Red Hat/CentOS

    Add Jenkins Repository:

    sudo wget -O /etc/yum.repos.d/jenkins.repo \
      https://pkg.jenkins.io/redhat-stable/jenkins.repo
    sudo rpm --import https://pkg.jenkins.io/redhat-stable/jenkins.io.key
    

    Install Jenkins:

    sudo yum install jenkins
    

    Start Jenkins:

    sudo systemctl start jenkins

    Configuring Jenkins

    Initial Setup Wizard

    When you access Jenkins for the first time, an initial setup wizard will guide you through basic configurations:

    1. Unlock Jenkins: Use the administrator password found in /var/lib/jenkins/secrets/initialAdminPassword.
    2. Install Suggested Plugins: Jenkins offers a list of essential plugins to install by default, such as Git, Maven, and Pipeline.
    3. Create an Admin User: Set up an admin account for secure access.
    4. Configure Instance Settings: Define your Jenkins instance settings, such as URL, mail server, and security settings.

    Configuring Security

    1. Enable Authentication: Set up user accounts to restrict access.
    2. Configure Authorization: Use Jenkins’s matrix-based security for fine-grained access control.
    3. Enable HTTPS: Secure Jenkins with HTTPS by configuring SSL certificates.

    Setting Up Jenkins for Continuous Integration

    1. Install CI/CD Plugins: Go to Manage Jenkins > Manage Plugins and install necessary CI/CD plugins, like Git, Docker, and Kubernetes.
    2. Configure Build Jobs:
      • Go to New Item > Freestyle project.
      • Configure the source code repository, build triggers, and steps.
    3. Automate Builds:
      • Set up automated builds on code changes using GitHub or GitLab webhooks.
      • Configure post-build actions, such as email notifications or automated deployment.

    Jenkins Advanced Setup

    Pipeline as Code with Jenkinsfile

    The Jenkins Pipeline allows you to define CI/CD steps in a Jenkinsfile:

    pipeline {
        agent any
        stages {
            stage('Build') {
                steps {
                    echo 'Building...'
                    sh 'mvn clean install'
                }
            }
            stage('Test') {
                steps {
                    echo 'Testing...'
                    sh 'mvn test'
                }
            }
            stage('Deploy') {
                steps {
                    echo 'Deploying...'
                }
            }
        }
    }
    

    Integrating Jenkins with Kubernetes

    To set up Jenkins in Kubernetes, use Jenkins’s Helm chart, which simplifies deployment in a Kubernetes environment. This allows Jenkins to scale based on workload demands.

    Troubleshooting Jenkins Setup Issues

    • Port Conflicts: Ensure port 8080 is available or configure Jenkins to use an alternative port.
    • Java Version Issues: Verify Jenkins is compatible with your installed JDK version.
    • Plugin Conflicts: Occasionally, incompatible plugins can cause issues. Disable unnecessary plugins and update regularly.

    FAQ Section

    How do I install Jenkins?

    Refer to the platform-specific installation steps provided in this guide for detailed instructions.

    What is a Jenkinsfile?

    A Jenkinsfile is a text file containing the instructions for Jenkins Pipeline, enabling pipeline-as-code functionality.

    Can Jenkins integrate with Docker?

    Yes, Jenkins has a Docker plugin that allows it to build and deploy Docker images.

    Conclusion

    This guide covered everything from Jenkins installation to advanced configurations for CI/CD pipelines. Jenkins is a powerful tool that enhances software delivery, and by following this guide, you can optimize your workflows and streamline your development processes.

    For further details, consult the official Jenkins documentation, which provides in-depth tutorials and resources for advanced setups. Thank you for reading the DevopsRoles page!