In this tutorial, How to install Let’s Encrypt SSL on CentOS 7. Let’s Encrypt is a free, automated TLS/SSL certificate web server. In the previous post, I have installed Let’s Encrypt SSL on Centos 6 here.
# Setting up crontab
crontab -e

# Append the below line to the end of crontab
0 0 * * * /usr/local/sbin/certbot-auto renew --renew-hook "/sbin/service nginx reload" --quiet --agree-tos
Authentication information generated by the following method
echo -n 'admin:admin123123' | openssl base64
Output
YWRtaW46YWRtaW4xMjMxMjM=
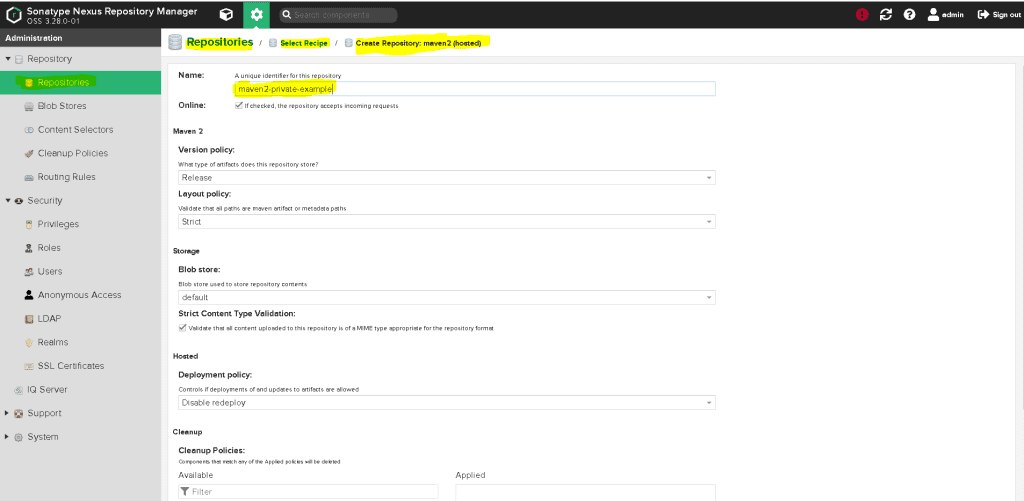
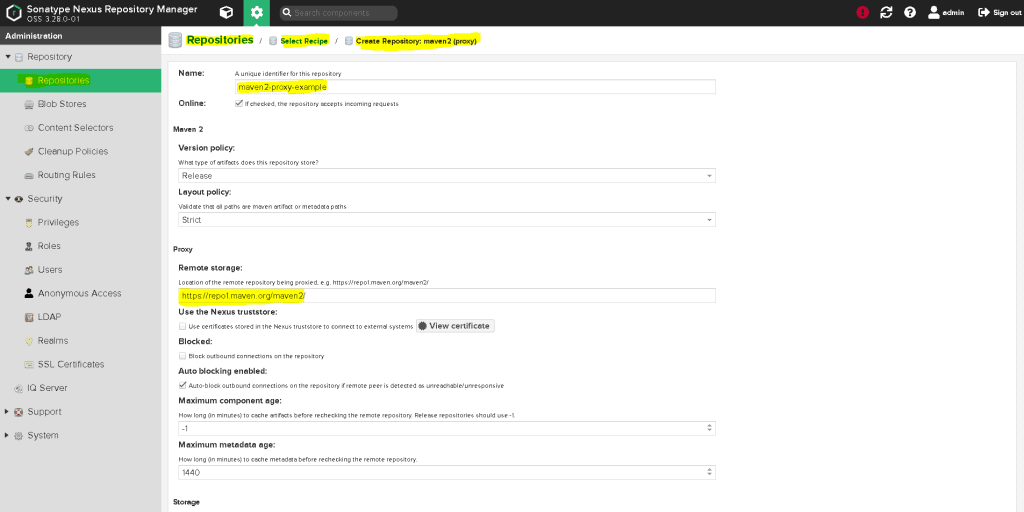
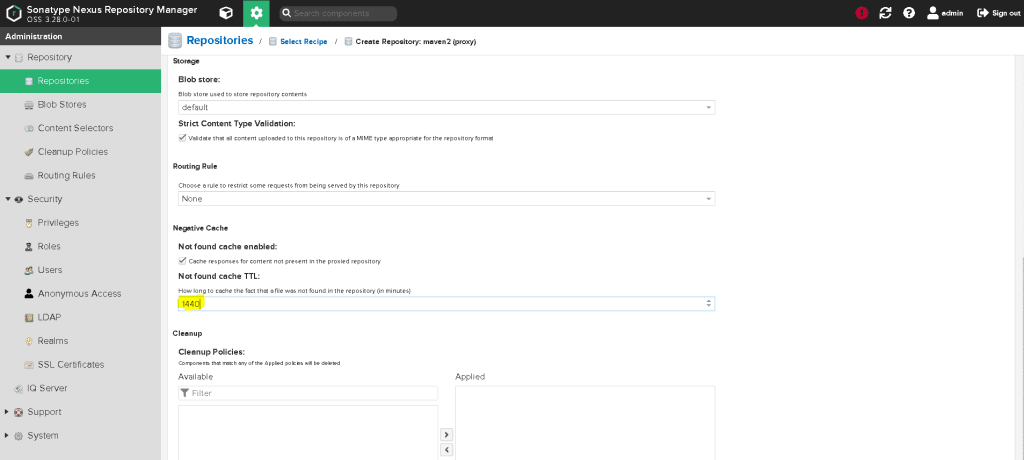
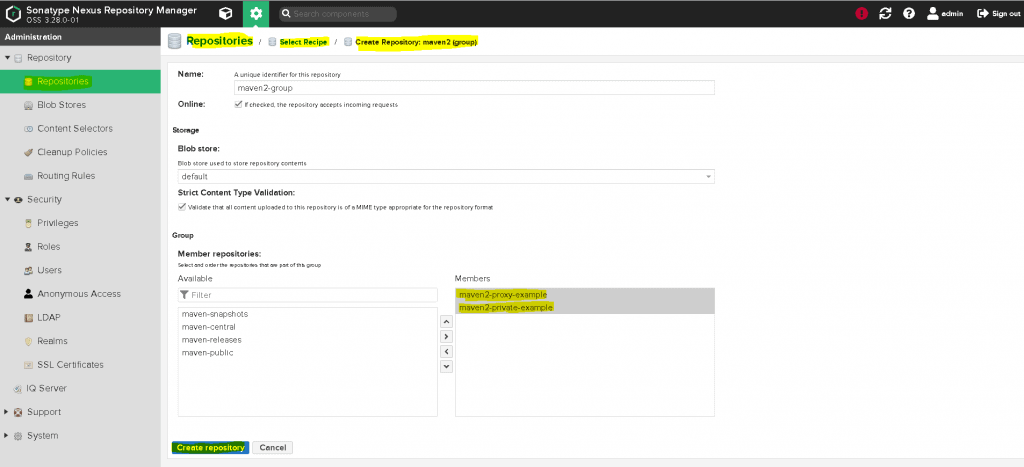
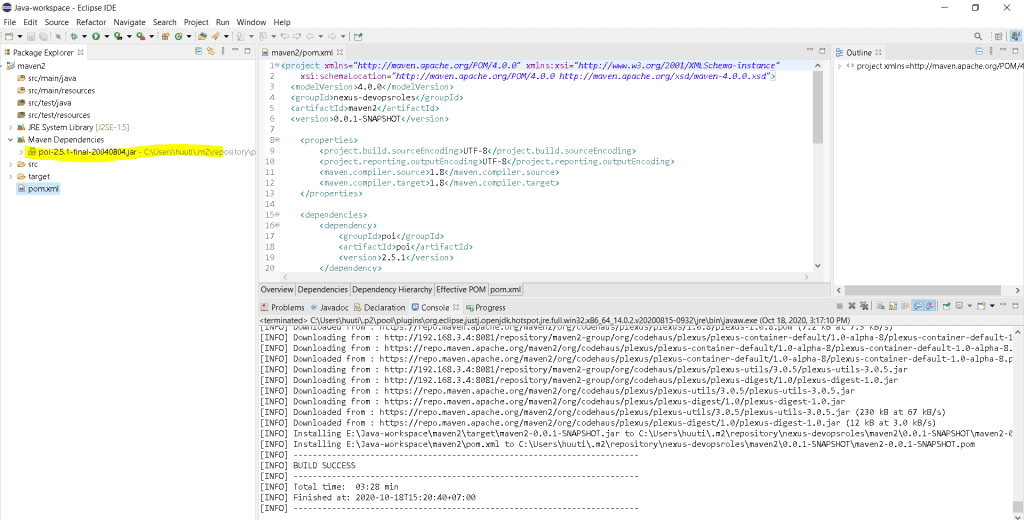
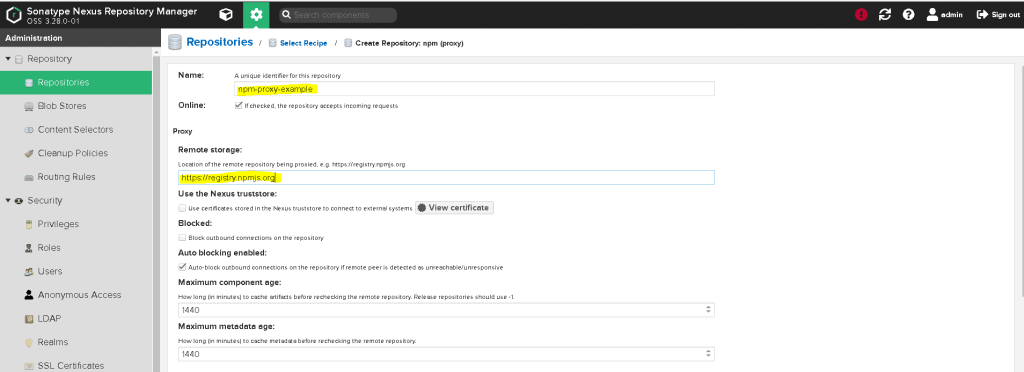
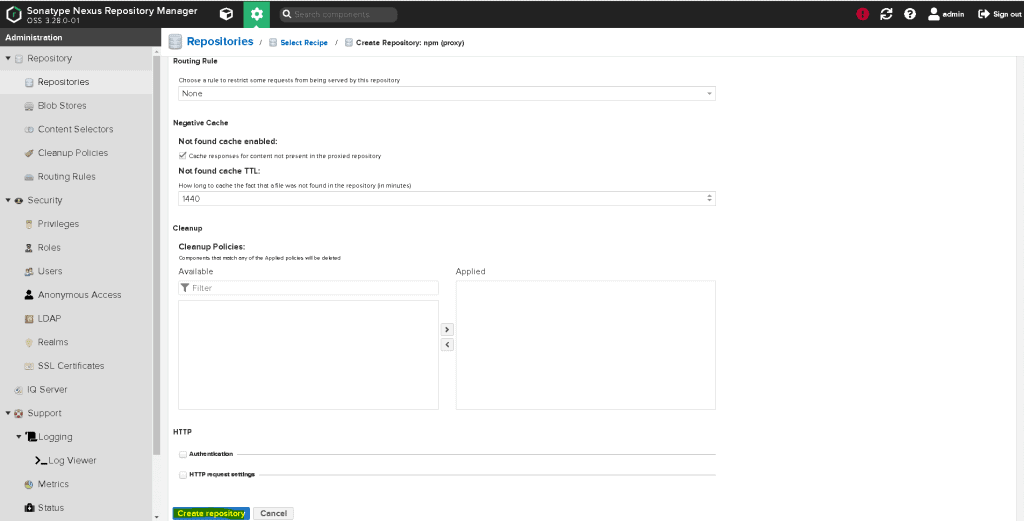
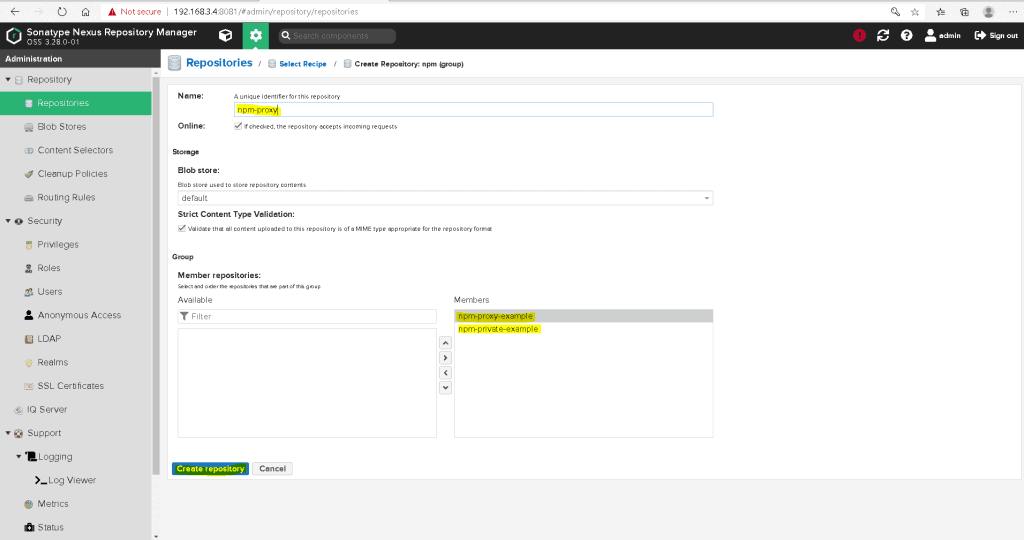
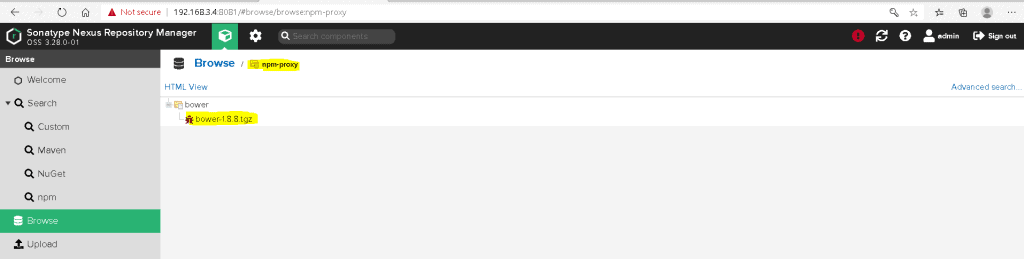
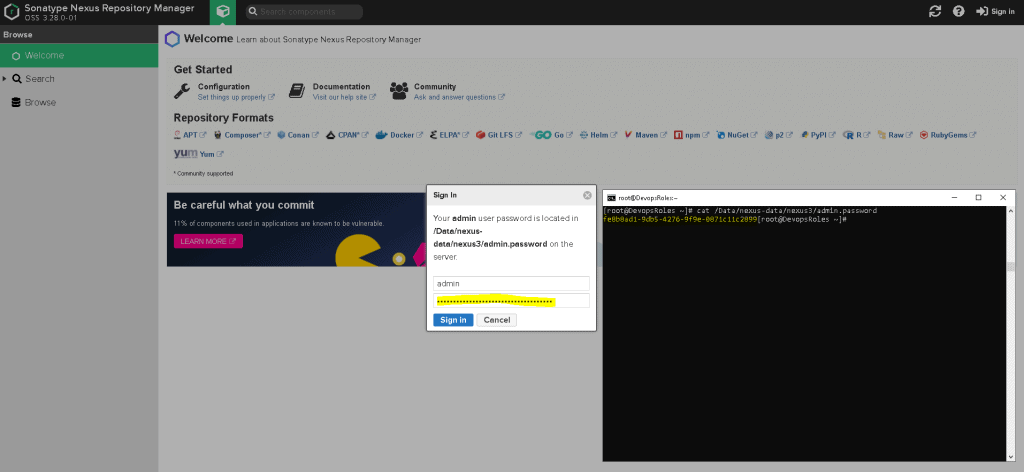
Get the required packages from a repository on the Internet via the Nexus3 proxy repository. By acquiring via the proxy repository, it is automatically saved to Nexus3 as well as downloaded.
[root@DevopsRoles ~]# cat /etc/sysconfig/selinux

# This file controls the state of SELinux on the system.
# SELINUX= can take one of these three values:
#     enforcing - SELinux security policy is enforced.
#     permissive - SELinux prints warnings instead of enforcing.
#     disabled - No SELinux policy is loaded.
SELINUX=disabled
# SELINUXTYPE= can take one of three values:
#     targeted - Targeted processes are protected,
#     minimum - Modification of targeted policy. Only selected processes are protected.
#     mls - Multi Level Security protection.
SELINUXTYPE=targeted
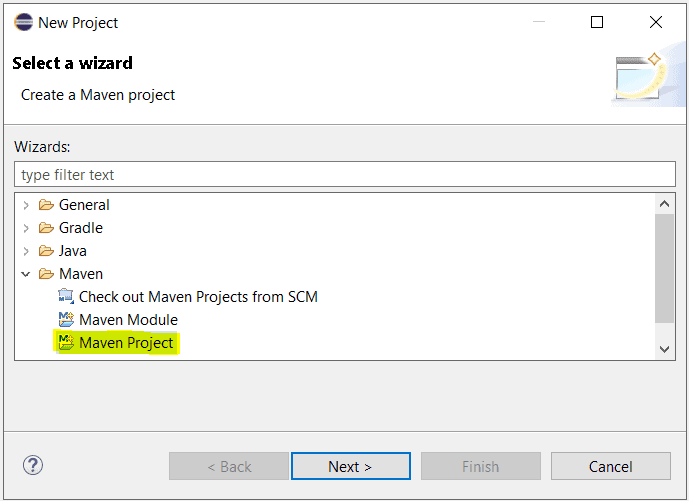
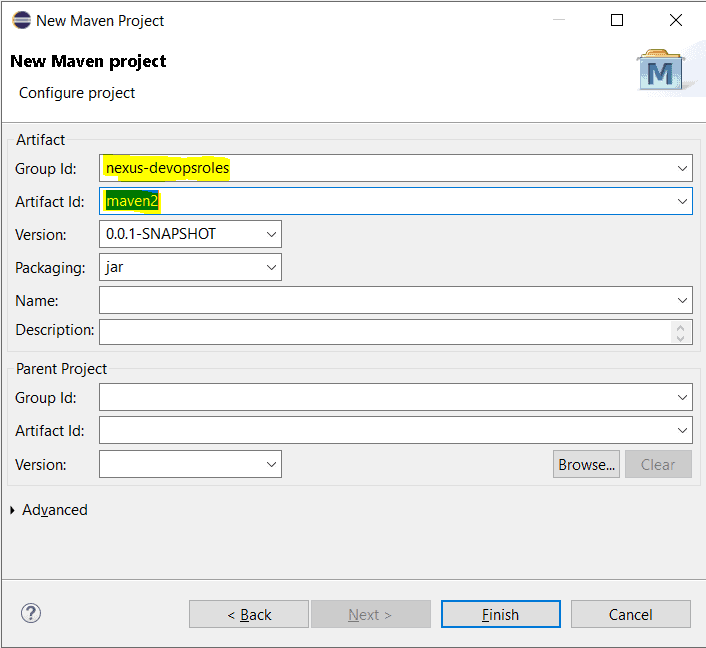
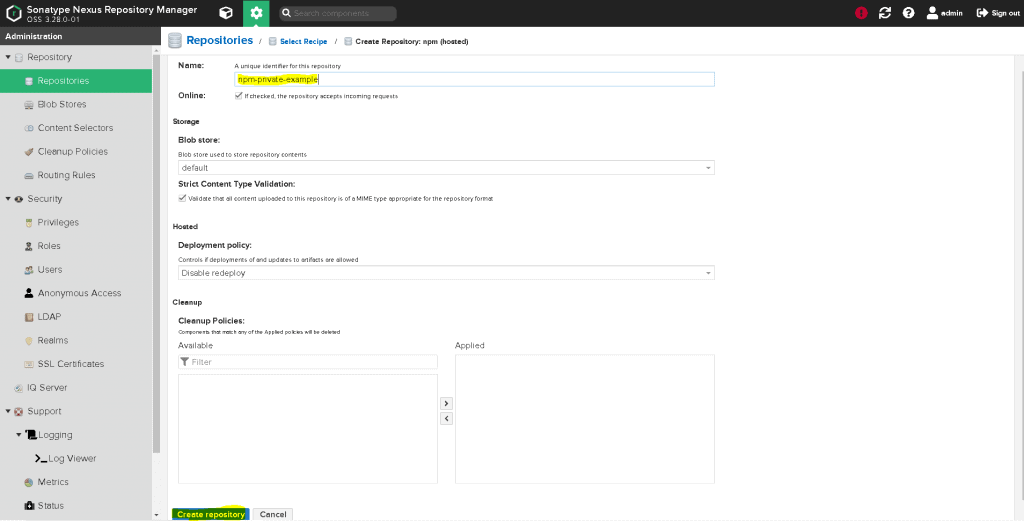
Install Nexus Repository OSS on Centos 7
# Creating necessory folder structure
mkdir -p /Data/nexus-data /opt/nexus

# Download latest Nexus artifact
wget -O /tmp/nexus.tar.gz http://download.sonatype.com/nexus/3/latest-unix.tar.gz

# Extract it to /opt/nexus
tar xvfz /tmp/nexus.tar.gz -C /opt/nexus --strip-components 1

# Adding a service account for nexus
useradd --system --no-create-home nexus

# Provide necessory folder permissions
chown -R nexus:nexus /opt/nexus
chown -R nexus:nexus /Data/nexus-data
Configure environment for Nexus repository OSS on CentOS 7
# Setting up the default JDK
alternatives --config java

# Setting up JAVA_HOME and NEXUS_HOME
export JAVA_HOME=/usr/lib/jvm/java-1.8.0-openjdk-1.8.0.262.b10-0.el7_8.x86_64
export NEXUS_HOME=/opt/nexus
source /etc/bashrc

# Check the JAVA version
java -version
You have to Install Nexus Repository OSS and configure Nexus Repository OSS on CentOS 7. I hope will this your helpful. Thank you for reading the DevopsRoles page!
In this tutorial, How to Install Vagrant and VirtualBox on Fedora. You use Vagrant for DevOps professionals and coder sysadmin. I will be installing VirtualBox and Vagrant on My Laptop is Fedora 32.
How to Install Vagrant and VirtualBox
Check CPU has Intel VT or AMD-V Virtualization extensions
cd /tmp/
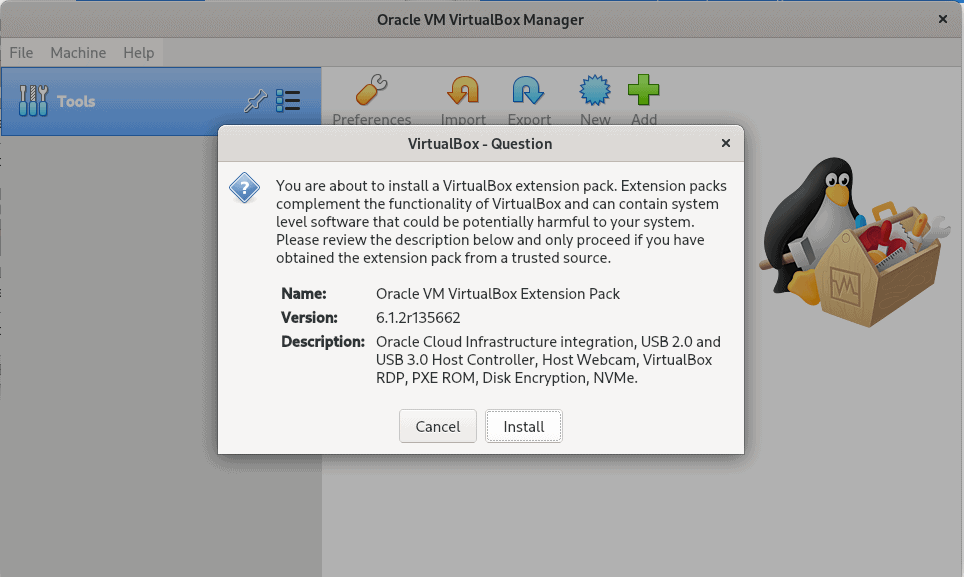
wget https://download.virtualbox.org/virtualbox/6.1.2/Oracle_VM_VirtualBox_Extension_Pack-6.1.2.vbox-extpack
Install the extension pack by clicking on the Downloaded file. The picture below
Install Vagrant on Fedora
Run command on your terminal as below
dnf -y install vagrant
Test Vagrant and Virtualbox
Create a minimal Vagrantfile
$ mkdir vagrant-test
$ cd vagrant-test
$ vi Vagrantfile
An example that also sets the amount of memory and number of CPUs in the Vagrantfile file
[huupv@localhost vagrant-test]$ cat Vagrantfile
Vagrant.configure("2") do |config|
  config.ssh.insert_key = false
  config.vm.provider :virtualbox do |vb|
    vb.memory = 256
    vb.cpus = 1
  end

  config.vm.define "DevopsRoles" do |server01|
    server01.vm.hostname = "DevopsRoles.com"
    server01.vm.box = "centos/7"
    #server01.vm.network :private_network, ip: "192.168.3.4"
  end
end
The output on my terminal as below
huupv@localhost vagrant-test]$ vagrant up
Bringing machine 'DevopsRoles' up with 'virtualbox' provider...
==> DevopsRoles: Box 'centos/7' could not be found. Attempting to find and install...
    DevopsRoles: Box Provider: virtualbox
    DevopsRoles: Box Version: >= 0
==> DevopsRoles: Loading metadata for box 'centos/7'
    DevopsRoles: URL: https://vagrantcloud.com/centos/7
==> DevopsRoles: Adding box 'centos/7' (v2004.01) for provider: virtualbox
    DevopsRoles: Downloading: https://vagrantcloud.com/centos/boxes/7/versions/2004.01/providers/virtualbox.box
Download redirected to host: cloud.centos.org
    DevopsRoles: Calculating and comparing box checksum...
==> DevopsRoles: Successfully added box 'centos/7' (v2004.01) for 'virtualbox'!
==> DevopsRoles: Importing base box 'centos/7'...
==> DevopsRoles: Matching MAC address for NAT networking...
==> DevopsRoles: Checking if box 'centos/7' version '2004.01' is up to date...
==> DevopsRoles: Setting the name of the VM: vagrant-test_DevopsRoles_1601910055210_96696
==> DevopsRoles: Clearing any previously set network interfaces...
==> DevopsRoles: Preparing network interfaces based on configuration...
    DevopsRoles: Adapter 1: nat
==> DevopsRoles: Forwarding ports...
    DevopsRoles: 22 (guest) => 2222 (host) (adapter 1)
==> DevopsRoles: Running 'pre-boot' VM customizations...
==> DevopsRoles: Booting VM...
==> DevopsRoles: Waiting for machine to boot. This may take a few minutes...
    DevopsRoles: SSH address: 127.0.0.1:2222
    DevopsRoles: SSH username: vagrant
    DevopsRoles: SSH auth method: private key
==> DevopsRoles: Machine booted and ready!
==> DevopsRoles: Checking for guest additions in VM...
    DevopsRoles: No guest additions were detected on the base box for this VM! Guest
    DevopsRoles: additions are required for forwarded ports, shared folders, host only
    DevopsRoles: networking, and more. If SSH fails on this machine, please install
    DevopsRoles: the guest additions and repackage the box to continue.
    DevopsRoles:
    DevopsRoles: This is not an error message; everything may continue to work properly,
    DevopsRoles: in which case you may ignore this message.
==> DevopsRoles: Setting hostname...
==> DevopsRoles: Rsyncing folder: /home/huupv/vagrant-test/ => /vagrant
Conclusion
You have to install and run Vagrant using VirtualBox. I hope will this your helpful. Thank you for reading the DevopsRoles page!
In this tutorial, I’ll guide you on installing and running Vagrant use KVM provider. Whether you’re a DevOps professional, coder, or sysadmin, Vagrant proves invaluable. I’ll walk you through the installation and setup process on my Fedora 32 laptop. Together, we’ll explore the seamless integration of Vagrant with the Qemu-KVM provider, opening up new possibilities for efficient development environments. Let’s dive into the steps to harness the power of Vagrant and enhance your workflow on Fedora 32.
[HuuPV@DevopsRoles vagrant-test]$ vagrant box add centos/7 --provider=libvirt

==> box: Loading metadata for box 'centos/7'
    box: URL: https://vagrantcloud.com/centos/7
==> box: Adding box 'centos/7' (v2004.01) for provider: libvirt
    box: Downloading: https://vagrantcloud.com/centos/boxes/7/versions/2004.01/providers/libvirt.box
Download redirected to host: cloud.centos.org
    box: Calculating and comparing box checksum...
==> box: Successfully added box 'centos/7' (v2004.01) for 'libvirt'!
Test: Create a minimal Vagrantfile
$ mkdir vagrant-test
$ cd vagrant-test
$ vi Vagrantfile
# An example which also sets the amount memory and number of CPUs in Vagrantfile file

Vagrant.configure("2") do |config|
  config.vm.box = "centos/7"
  config.vm.provider :libvirt do |libvirt|
    libvirt.cpus = 1
    libvirt.memory = 1024
  end
end
Start the box
vagrant up
The output is an example below:
[HuuPV@DevopsRoles vagrant-test]$ vagrant up
Bringing machine 'default' up with 'libvirt' provider...
==> default: Checking if box 'centos/7' version '2004.01' is up to date...
==> default: Uploading base box image as volume into libvirt storage...
==> default: Creating image (snapshot of base box volume).
==> default: Creating domain with the following settings...
==> default:  -- Name:              vagrant-test_default
==> default:  -- Domain type:       kvm
==> default:  -- Cpus:              1
==> default:  -- Feature:           acpi
==> default:  -- Feature:           apic
==> default:  -- Feature:           pae
==> default:  -- Memory:            1024M
==> default:  -- Management MAC:
==> default:  -- Loader:
==> default:  -- Nvram:
==> default:  -- Base box:          centos/7
==> default:  -- Storage pool:      default
==> default:  -- Image:             /home/HuuPV/.local/share/libvirt/images/vagrant-test_default.img (41G)
==> default:  -- Volume Cache:      default
==> default:  -- Kernel:
==> default:  -- Initrd:
==> default:  -- Graphics Type:     vnc
==> default:  -- Graphics Port:     -1
==> default:  -- Graphics IP:       127.0.0.1
==> default:  -- Graphics Password: Not defined
==> default:  -- Video Type:        cirrus
==> default:  -- Video VRAM:        9216
==> default:  -- Sound Type:
==> default:  -- Keymap:            en-us
==> default:  -- TPM Path:
==> default:  -- INPUT:             type=mouse, bus=ps2
==> default: Creating shared folders metadata...
==> default: Starting domain.
==> default: Waiting for domain to get an IP address...
==> default: Waiting for SSH to become available...
    default:
    default: Vagrant insecure key detected. Vagrant will automatically replace
    default: this with a newly generated keypair for better security.
    default:
    default: Inserting generated public key within guest...
    default: Removing insecure key from the guest if it's present...
    default: Key inserted! Disconnecting and reconnecting using new SSH key...
==> default: Configuring and enabling network interfaces...
    default: SSH address: 192.168.122.97:22
    default: SSH username: vagrant
    default: SSH auth method: private key
==> default: Rsyncing folder: /home/HuuPV/Vagrant_VMS/vagrant-test/ => /vagrant
Install and run Vagrant with Qemu-KVM for an enhanced experience. This step-by-step guide aims to be a valuable resource for your journey. Your support is appreciated. Thank you for exploring the DevopsRoles page!
In this tutorial, How to commit and push an empty Git folder or directory to the Git repository. Git cannot add a completely empty directory. Git doesn’t like empty folders. Using .gitkeep to commit or push an empty directory to GitHub or GitLab.
What is .gitkeep?
It solves the problem of Git not pushing empty folders to remote DVCS Repos like GitHub or GitLab. To get Git to recognize an empty directory, the unwritten rule is to put a file named .gitkeep in it.
What are the differences between .gitignore and .gitkeep?
.gitkeep to track empty directories.
.gitignore file is used to list files that should be ignored by the git when looking for untracked files.
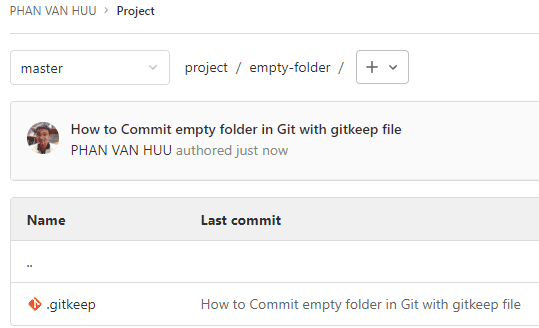
How to commit and push an empty git folder
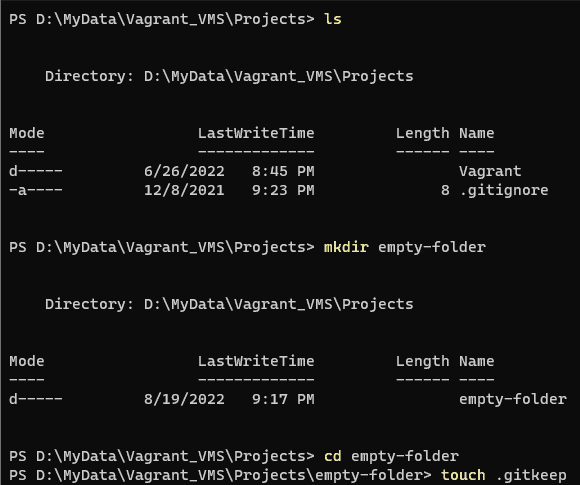
Follow these steps to use the .gitkeep file.
$ mkdir empty-folder
$ cd empty-folder
$ touch .gitkeep
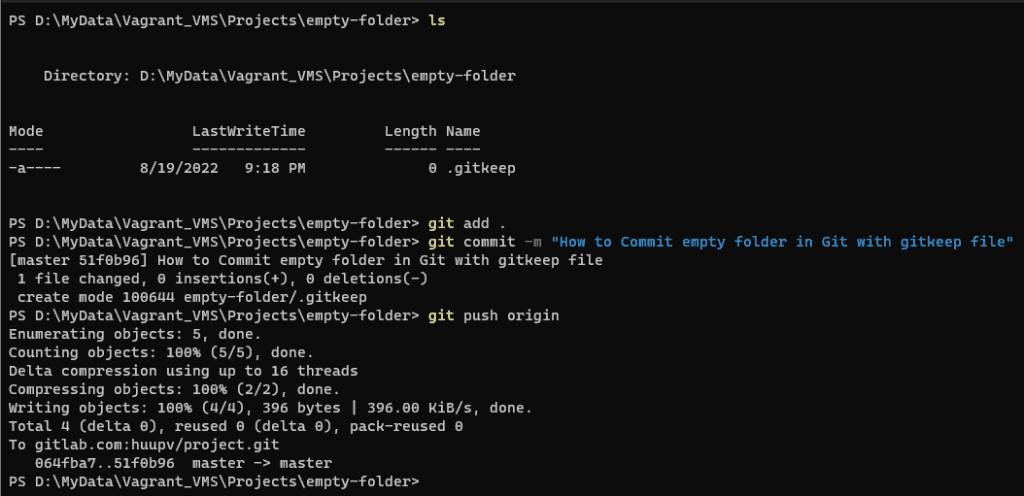
$ git add .
$ git commit -m "How to Commit empty folder in Git with gitkeep file"
$ git push origin
The result of GitLab
Conclusion
You have committed and pushed an empty folder or directory to the Git repository. I hope will this your helpful. Thank you for reading the DevopsRoles page!
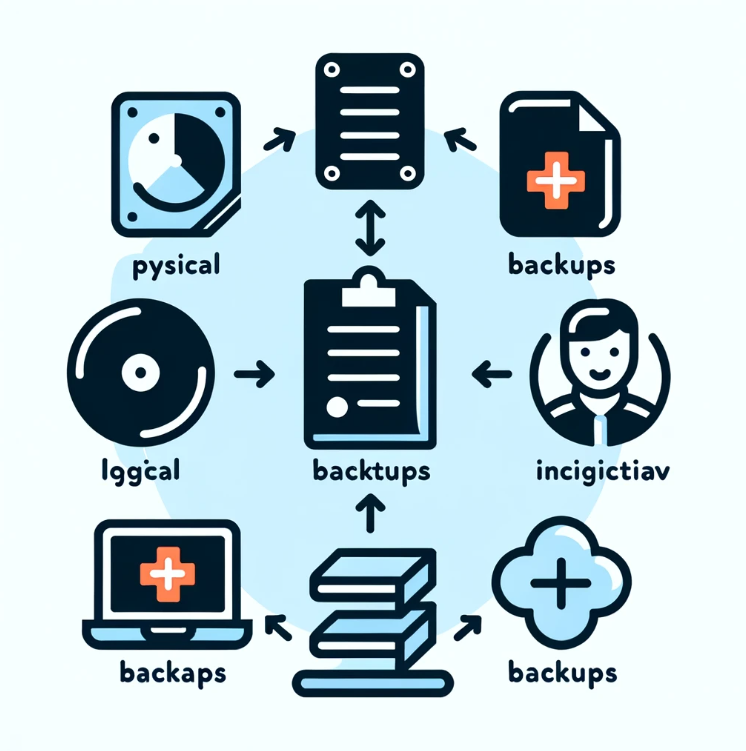
Physical Backups: Directly copying the database files. Fast recovery but requires downtime.
Logical Backups: Extracting data as SQL statements, allowing for portability but slower to restore.
Incremental Backups: Only saving changes since the last backup, reducing time and storage needs.
Automation: Using tools like cron for regular and consistent backups without manual intervention.
Verification: Regularly checking backups for integrity to ensure they are usable.
Recovery Testing: Regularly testing the recovery process to ensure minimal downtime during actual data loss.
Here’s an illustrated image representing MySQL backup strategies.
Backup a Single MySQL Database
To back up a single MySQL database, utilize the command line. Here’s how you can perform the backup using the root user and save it to a specific folder:
mysql -u root -p -e "create database LINUXOPERATINGSYSTEM";
mysql -u root -p LINUXOPERATINGSYSTEM < /tmp/LINUXOPERATINGSYSTEM-$(date +%Y%m%d).sql
mysqldump syntax
mysqldump <OPTIONS> > dumpfile.sql
Where OPTIONS include backing up restoring, and dumpfile.sql is the name of the file to store the database backup.
Conclusion
Following these steps, you can effectively back up and restore MySQL databases using the mysqldump command line. This knowledge is crucial for database management and ensuring that your data is securely backed up. Thank you for following this tutorial from DevopsRoles page!
In this tutorial, How to Change WordPress URLs in MySQL Database using the command line. WordPress uses the MySQL database to store all its data, including site URLs.
Determining the Name of WordPress MySQL Database
WordPress stores the MySQL database name and its credentials in the wp-config.php file. Example below
[devopsroles@server1 ~]$ egrep -A 10 DB_NAME /Wordpress/web/wp-config.php
define('DB_NAME', 'wordpressdb');

/** MySQL database username */
define('DB_USER', 'HuuPV');

/** MySQL database password */
define('DB_PASSWORD', 'devopsroles.com');

/** MySQL hostname */
define('DB_HOST', 'localhost');
Change WordPress URLs
I will change from the Old site:https://linuxoperatingsystem.net to the New site: http://192.168.122.229
Determining the site URL currently with the command below
mysql> SELECT * FROM wp_options WHERE option_name='siteurl';
+-----------+-------------+----------------------------------+----------+
| option_id | option_name | option_value                     | autoload |
+-----------+-------------+----------------------------------+----------+
|         1 | siteurl     | https://linuxoperatingsystem.net | yes      |
+-----------+-------------+----------------------------------+----------+
1 row in set (0.00 sec)

mysql>
Command-line change WordPress URLs in MySQL Database
mysql -u root -p Database_Name
mysql> UPDATE wp_options SET option_value = replace(option_value, 'https://linuxoperatingsystem.net', 'http://192.168.122.229') WHERE option_name = 'home' OR option_name = 'siteurl';
mysql> UPDATE wp_posts SET guid = replace(guid, 'https://linuxoperatingsystem.net','http://192.168.122.229');
mysql> UPDATE wp_posts SET post_content = replace(post_content, 'https://linuxoperatingsystem.net', 'http://192.168.122.229');
mysql> UPDATE wp_postmeta SET meta_value = replace(meta_value,'https://linuxoperatingsystem.net','http://192.168.122.229');
If you’re managing a WordPress site, you may find yourself needing to change the URLs directly in the MySQL database, especially after a migration or domain change. This process involves accessing your MySQL database through a command line interface and using SQL commands to update the site URL across different tables such as wp_options, wp_posts, and wp_postmeta. It’s a crucial skill for maintaining the integrity of your WordPress site links. Always back up your database before making such changes to avoid any potential data loss. For detailed guidance, consider visiting DevOpsRoles for tutorials.