Become a Database Administrator with DevOpsRoles.com. Access expert guides and tutorials to master database management, optimization, and security for DevOps.
Oracle Customer Relationship Management (CRM) is widely used by businesses seeking robust tools for managing customer interactions, analyzing data, and enhancing customer satisfaction. Running Oracle CRM in Docker not only simplifies deployment but also enables consistent environments across development, testing, and production.
This deep guide covers the essential steps to set up Oracle CRM in Docker, from basic setup to advanced configurations and performance optimizations. It is structured for developers and IT professionals, providing both beginner-friendly instructions and expert tips to maximize Docker’s capabilities for Oracle CRM.
Why Run Oracle CRM in Docker?
Using Docker for Oracle CRM has several unique advantages:
Consistency Across Environments: Docker provides a consistent runtime environment, reducing discrepancies across different stages (development, testing, production).
Simplified Deployment: Docker enables easier deployments by encapsulating dependencies and configurations in containers.
Scalability: Docker Compose and Kubernetes make it easy to scale your Oracle CRM services horizontally to handle traffic surges.
Key Requirements
Oracle CRM License: A valid Oracle CRM license is required.
Docker Installed: Docker Desktop for Windows/macOS or Docker CLI for Linux.
Basic Docker Knowledge: Familiarity with Docker commands and concepts.
Running Oracle CRM in Docker is a powerful approach to managing CRM environments with flexibility and consistency. This guide covered essential steps, advanced configurations, performance tuning, and security practices to help you deploy Oracle CRM effectively in Docker.
Whether you’re managing a single instance or scaling Oracle CRM across multiple containers, Docker offers tools to streamline your workflow, optimize resource use, and simplify updates.
To expand your knowledge, visit Docker’s official documentation and Oracle’s resources on Docker support. Thank you for reading the DevopsRoles page!
Managing users in a MySQL database is a fundamental task for database administrators. Whether you’re granting privileges, ensuring security, or auditing your database environment, knowing how to list users is essential. This article will guide you through the process of Show Users in MySQL Database on Linux system, providing examples ranging from basic to advanced.
Basic Command to Show Users
To show the users in a MySQL database, you can use the following basic command:
SELECT user FROM mysql.user;
This command retrieves a list of all users from the mysql.user table.
Step-by-Step Guide
Open MySQL Command Line: Access your MySQL database using the MySQL command line client:
mysql -u root -p
Enter your root password when prompted.
Run the Query
SELECT user FROM mysql.user;
This will display a list of all users in your MySQL database.
Advanced User Listing Techniques
Filtering User Lists
To filter the user list based on specific criteria, you can use the WHERE clause. For example, to list users with a specific host, you can use:
SELECT user, host
FROM mysql.user
WHERE host = 'localhost';
Using Information Schema
The INFORMATION_SCHEMA is another useful way to list users. This method is especially helpful for more detailed information about user privileges and roles.
SELECT user, host
FROM INFORMATION_SCHEMA.USER_PRIVILEGES;
This query provides detailed information about user privileges.
Practical Examples
Listing Users with Specific Privileges
To find users with specific privileges, such as SELECT privileges, use the following query:
SELECT grantee, privilege_type
FROM INFORMATION_SCHEMA.USER_PRIVILEGES
WHERE privilege_type = 'SELECT';
Exporting User List to a File
To export the list of users to a file for auditing purposes, follow these steps:
Open MySQL Command Line:
mysql -u root -p
Run the Query and Export:
SELECT user, host
INTO OUTFILE '/path/to/exported_users.csv'
FIELDS TERMINATED BY ','
LINES TERMINATED BY '\n'
FROM mysql.user;

Ensure the MySQL server has the appropriate permissions to write to the specified path.
Common Issues and Troubleshooting
When listing users, you might encounter some common issues:
Permissions Issues
Ensure you have the necessary permissions to view the mysql.user table:
SHOW GRANTS FOR 'your_username'@'your_host';
No Results Returned
If no results are returned, check the MySQL version and ensure the mysql.user table exists:
SELECT VERSION();
SHOW TABLES FROM mysql;
FAQs
How do I list all users in MySQL?
Use the query:
SELECT user
FROM mysql.user;
How can I list users with specific privileges?
Use:
SELECT grantee, privilege_type
FROM INFORMATION_SCHEMA.USER_PRIVILEGES
WHERE privilege_type = 'SELECT';
Can I export the user list to a file?
Yes, use:
SELECT user, host
INTO OUTFILE '/path/to/exported_users.csv'
FIELDS TERMINATED BY ','
LINES TERMINATED BY '\n'
FROM mysql.user;
What should I do if I encounter permissions issues?
Check your grants with:
SHOW GRANTS FOR 'your_username'@'your_host';
Conclusion
Managing and auditing users in a MySQL database is a critical task for database administrators. By following the steps and examples provided, you can effectively list users in a MySQL database on a Linux system, whether you’re performing basic queries or advanced filtering. Remember to ensure you have the necessary permissions and to handle any common issues promptly. This guide aims to provide you with a comprehensive understanding and practical approach to listing users in MySQL, enhancing your database management skills. Thank you for reading the DevopsRoles page!
In this tutorial on Memcached, you will learn how to create an ElastiCache for Redis instance and manage it using the AWS CLI.
Prerequisites
Before starting, you should have the following prerequisites configured
An AWS account
AWS CLI on your computer
Memcached tutorial
Creating a Redis cluster with AWS CLI
Modifying a Redis cluster with AWS CLI
Viewing the elements in a Redis cluster with AWS CLI
Discovering the endpoints of Redis cluster with AWS CLI
Adding nodes to a Redis cluster with AWS CLI
Removing nodes from a Redis cluster with AWS CLI
Auto Scaling ElastiCache for Redis clusters
Redis clusters manual failover with Global datastore
Deleting a Redis cluster with AWS CLI
Creating a Redis cluster with AWS CLI
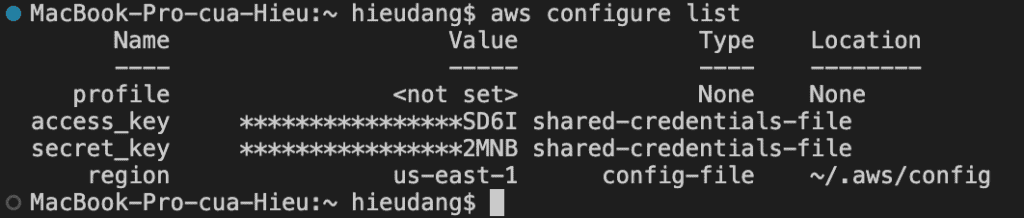
Before you begin, If you have not installed the AWS CLI, see Setting up the Amazon Redshift CLI. This tutorial uses the us-ease-1 region.
Now we’re ready to launch a Redis cluster by using the AWS CLI.
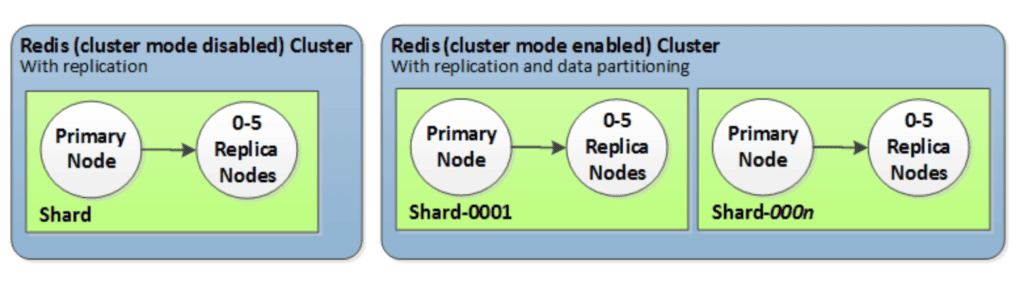
Typical cluster configurations:
Redis (cluster mode enabled): can have up to 500 shards, with your data partitioned across the shards.
Redis (cluster mode disabled):always contain just one shard (in the API and CLI, one node group). A Redis shard contains one to six nodes. If there is more than one node in a shard, the shard supports replication. In this case, one node is the read/write primary node and the others are read-only replica nodes.
In this tutorial we will create a Redis (cluster mode enabled) using AWS CLI.
Before you create a cluster, you first create a subnet group. A cache subnet group is a collection of subnets that you may want to designate for your cache clusters in a VPC.
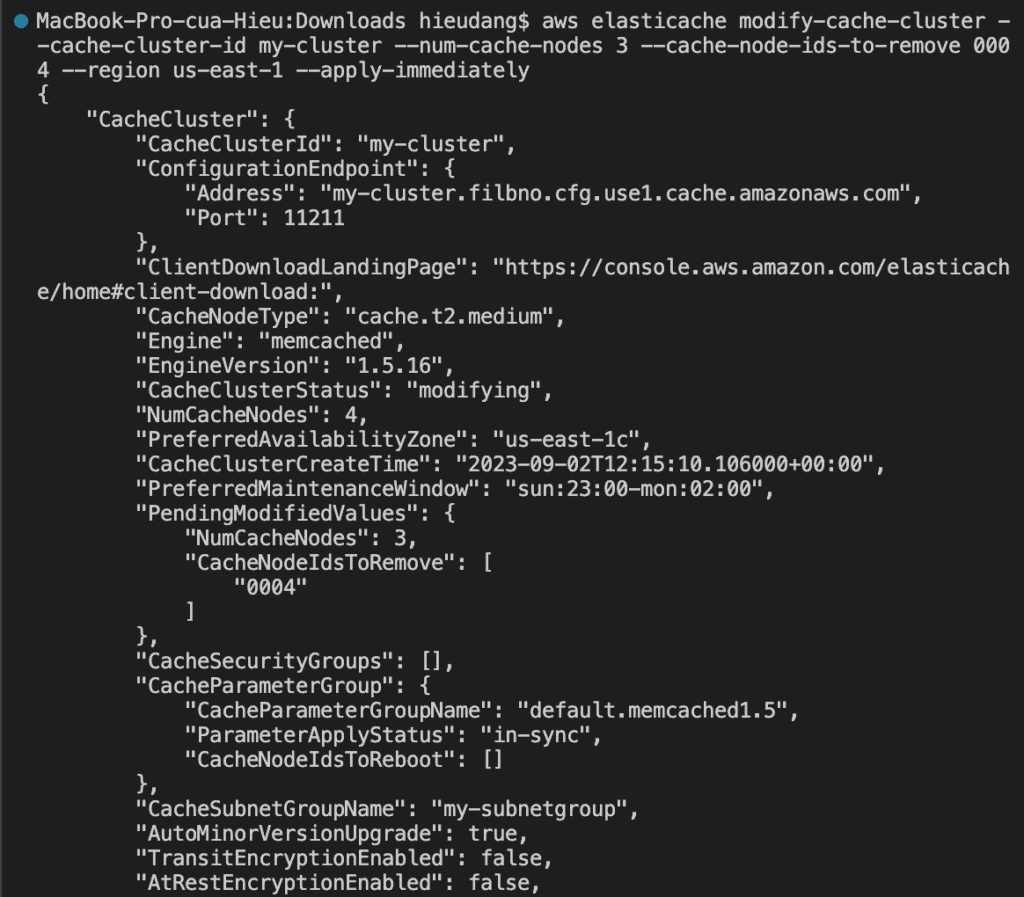
You can modify an existing cluster using the AWS CLI modify-cache-cluster operation. To modify a cluster’s configuration value, specify the cluster’s ID, the parameter to change and the parameter’s new value. Refer Memcached tutorial to know this command.
Viewing the elements in a Redis cluster with AWS CLI
The following command to view details for my-cluster:
Discovering the endpoints of Redis cluster with AWS CLI
You can use the AWS CLI to discover the endpoints for a replication group and its clusters with the describe-replication-groups command. The command returns the replication group’s primary endpoint and a list of all the clusters (nodes) in the replication group with their endpoints, along with the reader endpoint.
You can online resharding with Regis cluster (there is some degradation in performance, nevertheless, your cluster continues to serve requests throughout the scaling operation). When you add shards to a Redis (cluster mode enabled) cluster, any tags on the existing shards are copied over to the new shards.
There are two ways to scale your Redis (cluster mode enabled) cluster; horizontal and vertical scaling.
Horizontal scaling allows you to change the number of node groups (shards) in the replication group by adding or removing node groups (shards). The online resharding process allows scaling in/out while the cluster continues serving incoming requests. Configure the slots in your new cluster differently than they were in the old cluster. Offline method only.
Vertical Scaling – Change the node type to resize the cluster. The online vertical scaling allows scaling up/down while the cluster continues serving incoming requests.
The following process describes how to reconfigure the shards in your Redis (cluster mode enabled) cluster by adding shards using the AWS CLI.
Data tiering (cluster mode enabled) clusters running Redis engine version 7.0.7 onwards
Instance type families – R7g, R6g, R5, M7g, M6g, M5
Instance sizes – Large, XLarge, 2XLarge
Auto Scaling in ElastiCache for Redis is not supported for clusters running in Global datastores, Outposts or Local Zones.
AWS Auto Scaling for ElastiCache for Redis is not available in the following regions: China (Beijing), China (Ningxia), AWS GovCloud (US-West) and AWS GovCloud (US-East).
ElastiCache for Redis auto scaling is the ability to increase or decrease the desired shards or replicas in your ElastiCache for Redis service automatically. ElastiCache for Redis leverages the Application Auto Scaling service to provide this functionality. For more information, see Application Auto Scaling. To use automatic scaling, you define and apply a scaling policy that uses CloudWatch metrics and target values that you assign. ElastiCache for Redis auto scaling uses the policy to increase or decrease the number of instances in response to actual workloads.
ElastiCache for Redis supports scaling for the following dimensions:
Shards – Automatically add/remove shards in the cluster similar to manual online resharding. In this case, ElastiCache for Redis auto scaling triggers scaling on your behalf.
Replicas – Automatically add/remove replicas in the cluster similar to manual Increase/Decrease replica operations. ElastiCache for Redis auto scaling adds/removes replicas uniformly across all shards in the cluster.
ElastiCache for Redis supports the following types of automatic scaling policies:
Target tracking scaling policies – Increase or decrease the number of shards/replicas that your service runs based on a target value for a specific metric. This is similar to the way that your thermostat maintains the temperature of your home. You select a temperature and the thermostat does the rest.
Currently, ElastiCache for Redis supports the following predefined metrics in ElastiCache for Redis NodeGroup Auto Scaling:
ElastiCachePrimaryEngineCPUUtilization – The average value of the EngineCPUUtilization metric in CloudWatch across all primary nodes in the ElastiCache for Redis cluster.
ElastiCacheDatabaseMemoryUsageCountedForEvictPercentage – The average value of the DatabaseMemoryUsageCountedForEvictPercentage metric in CloudWatch across all primary nodes in the ElastiCache for Redis cluster.
ElastiCacheDatabaseCapacityUsageCountedForEvictPercentage – The average value of the ElastiCacheDatabaseCapacityUsageCountedForEvictPercentage metric in CloudWatch across all primary nodes in the ElastiCache for Redis cluster.
The following example cpuscalablepolicy.json describes a target-tracking configuration for a scaling policy for EngineCPUUtilization metric.
In the following example, you apply a target-tracking scaling policy named cpuscalablepolicy to an ElastiCache for Redis cluster named myscalablecluster with ElastiCache for Redis auto scaling. To do so, you use a policy configuration saved in a file named cpuscalablepolicy.json.
Before you can use Auto Scaling with an ElastiCache for Redis cluster, you register your cluster with ElastiCache for Redis auto scaling.
In the following example, you register an ElastiCache for Redis cluster named myscalablecluster. The registration indicates that the cluster should be dynamically scaled to have from one to ten shards.
--max-capacity – The maximum number of shards to be managed by ElastiCache for Redis auto scaling. For information about the relationship between --min-capacity, --max-capacity, and the number of shards in your cluster, see Minimum and maximum capacity.
--min-capacity – The minimum number of shards to be managed by ElastiCache for Redis auto scaling. For information about the relationship between --min-capacity, --max-capacity, and the number of shards in your cluster, see Minimum and maximum capacity.
Deleting a scaling policy using the AWS CLI
In the following example, you delete a target-tracking scaling policy named myscalablepolicy from an ElastiCache for Redis cluster named myscalablecluster.
These steps provide an example to manage Memcached cluster. The specific configuration details may vary depending on your environment and setup. It’s recommended to consult the relevant documentation from AWS for detailed instructions on setting up. I hope will this your helpful. Thank you for reading the DevopsRoles page!
In this tutorial, you will create an Amazon DocumentDB cluster. Operations on the cluster using CLI commands using CLI commands. For more information about Amazon DocumentDB, see Amazon DocumentDB Developer Guide.
Prerequisites
Before starting, you should have the following prerequisites configured
An AWS account
AWS CLI on your computer
Amazon DocumentDB tutorial
Create an Amazon DocumentDB cluster using AWS CLI
Adding an Amazon DocumentDB instance to a cluster using AWS CLI
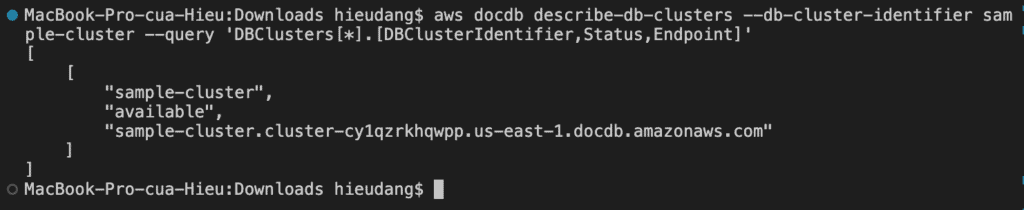
Describing Clusters and Instances using AWS CLI
Install the mongo shell on MacOS
Connecting to Amazon DocumentDB
Performing Amazon DocumentDB CRUD operations using Mongo Shell
Performing Amazon DocumentDB CRUD operations using python
Adding a Replica to an Amazon DocumentDB Cluster using AWS CLI
Amazon DocumentDB High Availability Failover using AWS CLI
Creating an Amazon DocumentDB global cluster using AWS CLI
Delete an Instance from a Cluster using AWS CLI
Delete an Amazon DocumentDB global cluster using AWS CLI
Removing Global Clusters using AWS CLI
Create an Amazon DocumentDB cluster using AWS CLI
Before you begin, If you have not installed the AWS CLI, see Setting up the Amazon Redshift CLI. This tutorial uses the us-east-1 region.
Now we’re ready to launch a Amazon DocumentDB cluster by using the AWS CLI.
An Amazon DocumentDB cluster consists of instances and a cluster volume that represents the data for the cluster. The cluster volume is replicated six ways across three Availability Zones as a single, virtual volume. The cluster contains a primary instance and, optionally, up to 15 replica instances.
The following sections show how to create an Amazon DocumentDB cluster using the AWS CLI. You can then add additional replica instances for that cluster.
When you use the console to create your Amazon DocumentDB cluster, a primary instance is automatically created for you at the same time.
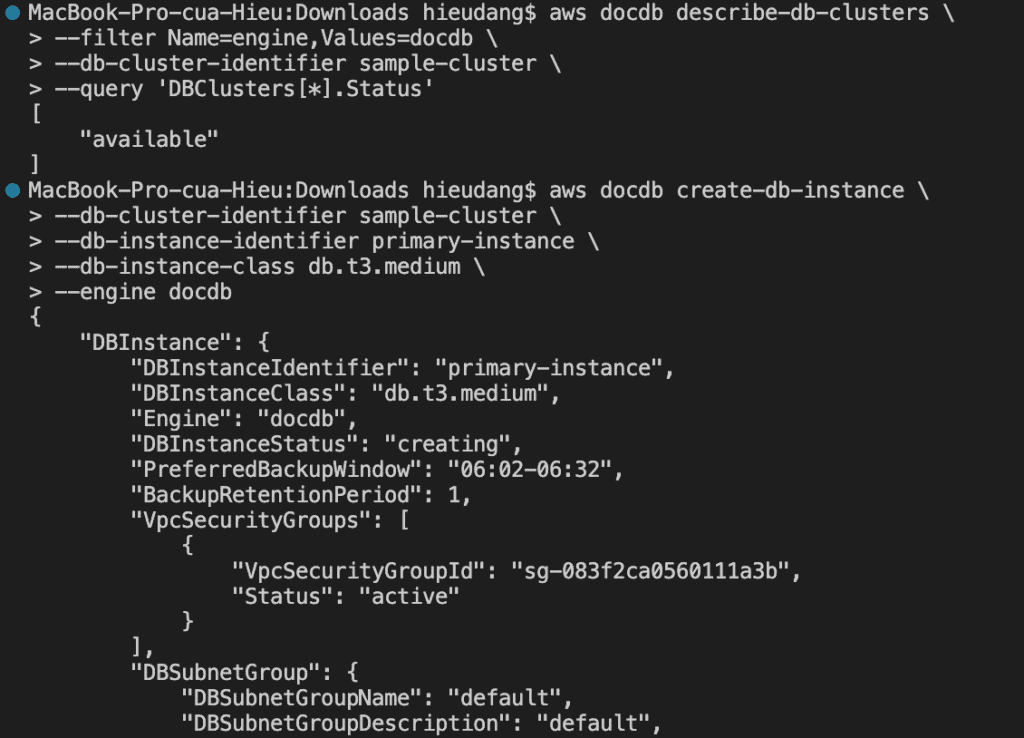
When you use the AWS CLI to create your Amazon DocumentDB cluster, after the cluster’s status is available, you must then create the primary instance for that cluster.
The following procedures describe how to use the AWS CLI to launch an Amazon DocumentDB cluster and create an Amazon DocumentDB replica.
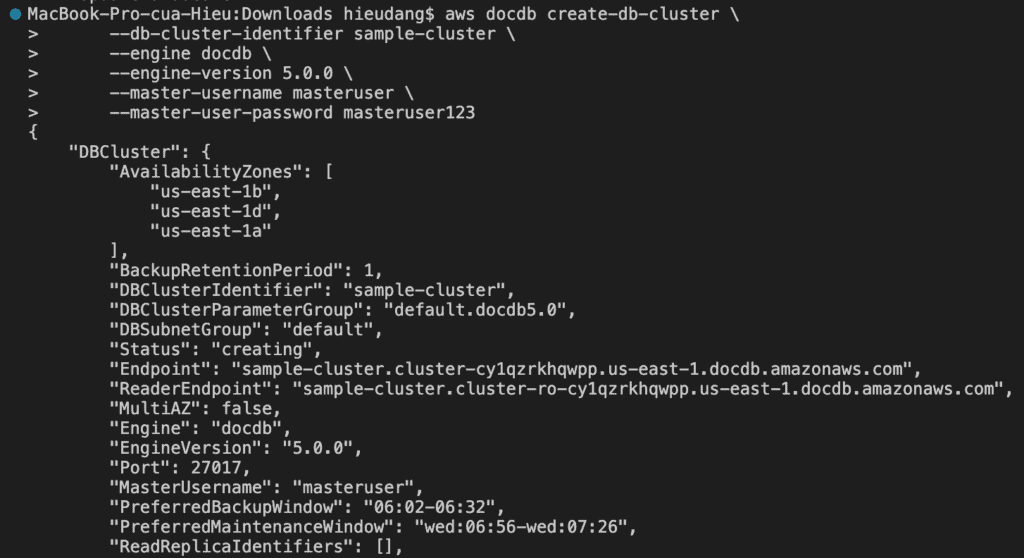
To create an Amazon DocumentDB cluster, call the create-db-cluster AWS CLI.
The db-subnet-group-name or vpc-security-group-id parameter is not specified, Amazon DocumentDB will use the default subnet group and Amazon VPC security group for the given region.
This command returns the following result.
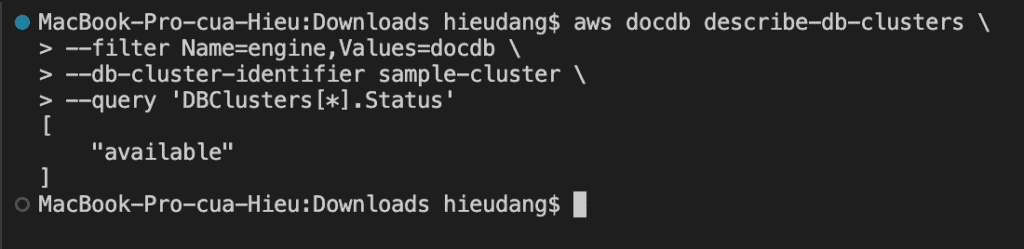
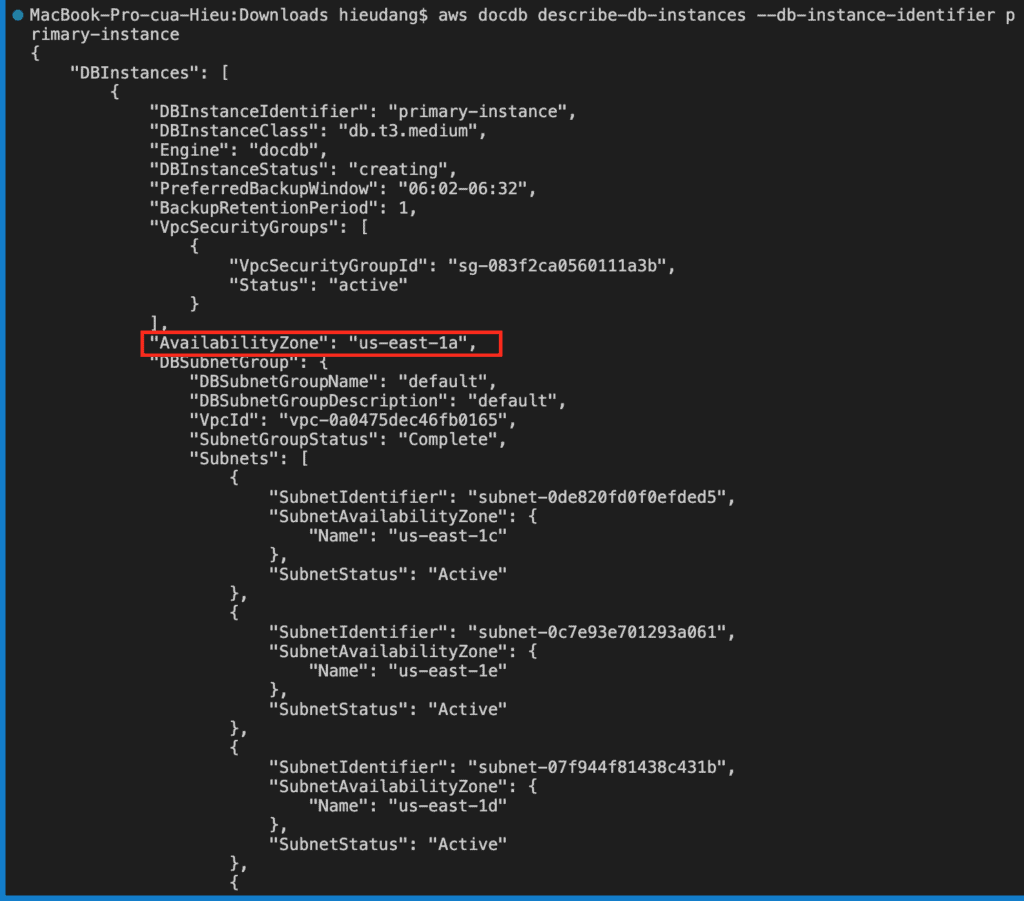
It takes several minutes to create the cluster. You can use the following AWS CLI to monitor the status of your cluster.
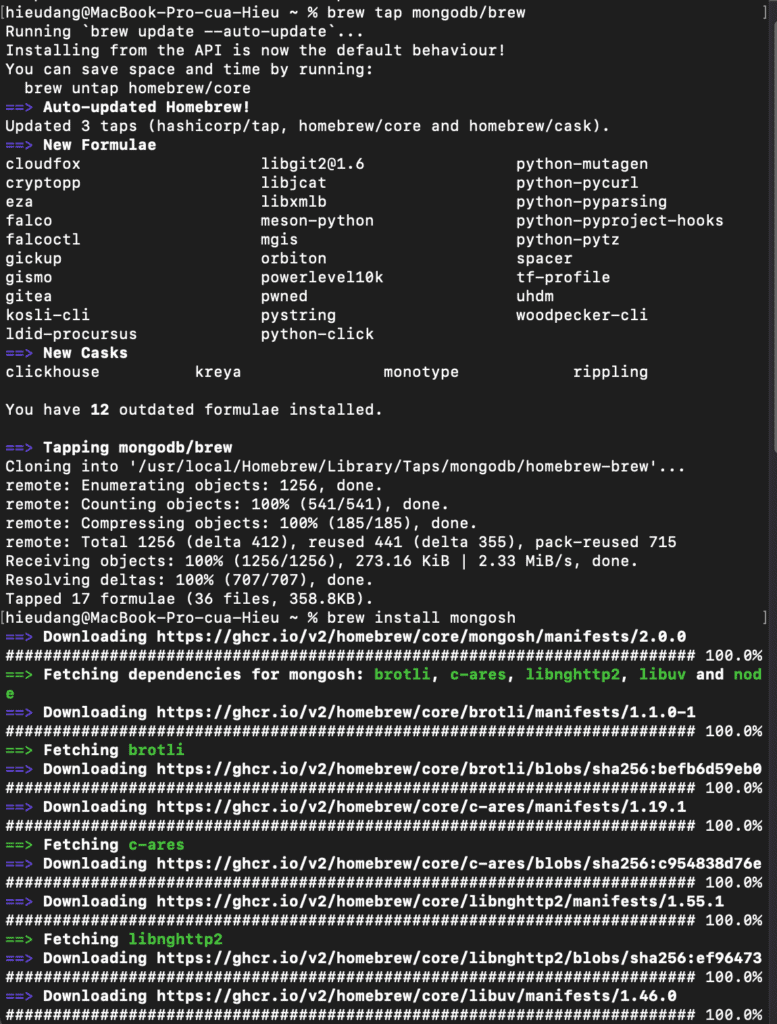
Install the mongo shell with the following command:
brew tap mongodb/brew
brew install mongosh
To encrypt data in transit, download the public key for Amazon DocumentDB. The following command downloads a file named global-bundle.pem:
cd Downloads
curl -O https://truststore.pki.rds.amazonaws.com/global/global-bundle.pem
You must explicitly grant inbound access to your client in order to connect to the cluster. When you created a cluster in the previous step, because you did not specify a security group, you associated the default cluster security group with the cluster.
The default cluster security group contains no rules to authorize any inbound traffic to the cluster. To access the new cluster, you must add rules for inbound traffic, which are called ingress rules, to the cluster security group. If you are accessing your cluster from the Internet, you will need to authorize a Classless Inter-Domain Routing IP (CIDR/IP) address range.
Run the following command to enable your computer to connect to your Redshift cluster. Then login into your cluster using mongo shell.
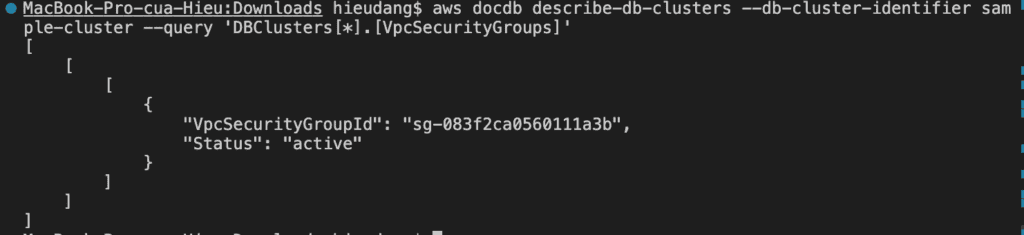
#get VpcSecurityGroupId
aws docdb describe-clusters --cluster-identifier sample-cluster --query 'DBClusters[*].[VpcSecurityGroups]'
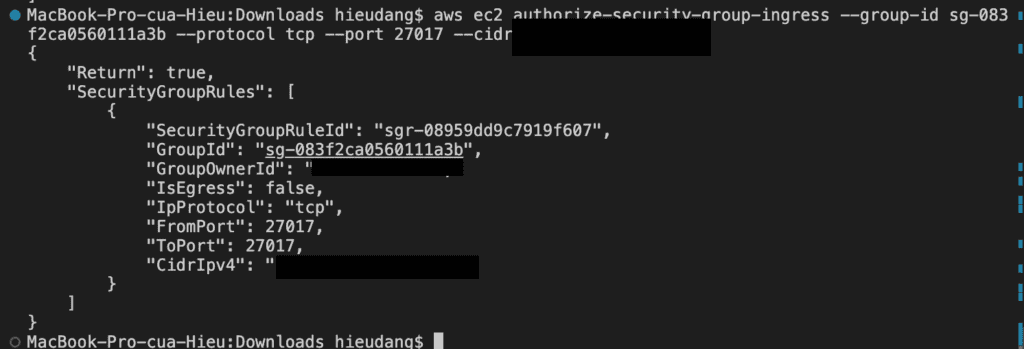
#allow connect to DocumentDB cluster from my computer
aws ec2 authorize-security-group-ingress --group-id sg-083f2ca0560111a3b --protocol tcp --port 27017 --cidr 111.111.111.111/32
This command returns the following result.
Connecting to Amazon DocumentDB
Run the following command to connect the Amazon DocumentDB cluster
Use the below command to view the available databases in the your Amazon DocumentDB cluster
show dbs
Performing Amazon DocumentDB CRUD operations using Mongo Shell
MongoDB database concepts:
A record in MongoDB is a document, which is a data structure composed of field and value pairs, similar to JSON objects. The value of a field can include other documents, arrays, and arrays of documents. A document is roughly equivalent to a row in a relational database table.
A collection in MongoDB is a group of documents, and is roughly equivalent to a relational database table.
A database in MongoDB is a group of collections, and is similar to a relational database with a group of related tables.
To show current database name
db
To create a database in Amazon DocumentDB, execute the use command, specifying a database name. Create a new database called docdbdemo.
use docdbdemo
When you create a new database in Amazon DocumentDB, there are no collections created for you. You can see this on your cluster by running the following command.
show collections
Creating Documents
You will now insert a document to a new collection called products in your docdbdemo database using the below query.
db.products.insert({
  "name":"java cookbook",
  "sku":"222222",
  "description":"Problems and Solutions for Java Developers",
  "price":200
})
You should see output that looks like this
You can insert multiple documents in a single batch to bulk load products. Use the insertMany command below.
db.products.insertMany([
{
  "name":"Python3 boto",
  "sku":"222223",
  "description":"basic boto3 and python for everyone",
  "price":100
},
{
  "name":"C# Programmer's Handbook",
  "sku":"222224",
  "description":"complete coverage of features of C#",
  "price":100
}
])
Reading Documents
Use the below query to read data inserted to Amazon DocumentDB. The find command takes a filter criteria and returns the document matching the criteria. The pretty command is appended to display the results in an easy-to-read format.
db.products.find({"sku":"222223"}).pretty()
The matched document is returned as the output of the above query.
Use the find() command to return all the documents in the profiles collection. Input the following:
db.products.find().pretty()
Updating Documents
You will now update a document to add reviews using the $set operator with the update command. Reviews is a new array containing review and rating fields.
Amazon DocumentDB High Availability Failover using AWS CLI
A failover for a cluster promotes one of the Amazon DocumentDB replicas (read-only instances) in the cluster to be the primary instance (the cluster writer).When the primary instance fails, Amazon DocumentDB automatically fails over to an Amazon DocumentDB replica
The following operation forces a failover of the sample-cluster cluster.
Creating an Amazon DocumentDB global cluster using AWS CLI
To create an Amazon DocumentDB regional cluster, call the create-db-clusterAWS CLI. The following AWS CLI command creates an Amazon DocumentDB cluster named global-cluster-id
To delete a global cluster, run the delete-global-cluster CLI command with the name of the AWS Region and the global cluster identifier, as shown in the following example.
These steps provide an example to manage Amazon DocumentDB cluster. The specific configuration details may vary depending on your environment and setup. It’s recommended to consult the relevant documentation from AWS for detailed instructions on setting up. I hope will this your helpful. Thank you for reading the DevopsRoles page!
In this tutorial, you will create a Lambda to access ElastiCache cluster. When you create the Lambda function, you provide subnet IDs in your Amazon VPC and a VPC security group to allow the Lambda function to access resources in your VPC. For illustration in this tutorial, the Lambda function generates a UUID, writes it to the cache, and retrieves it from the cache.
Invoke the Lambda function and verify that it accessed the ElastiCache cluster in your VPC.
Prerequisites
Before starting, you should have the following prerequisites configured
An AWS account
AWS CLI on your computer
A Memcached cluster (refer Memcached tutorial to create a Memcached cluster )
Create a Lambda to access ElastiCache in an Amazon VPC
Create the execution role
Create an ElastiCache cluster
Create a deployment package
Create the Lambda function
Test the Lambda function
Clean up
Create the execution role
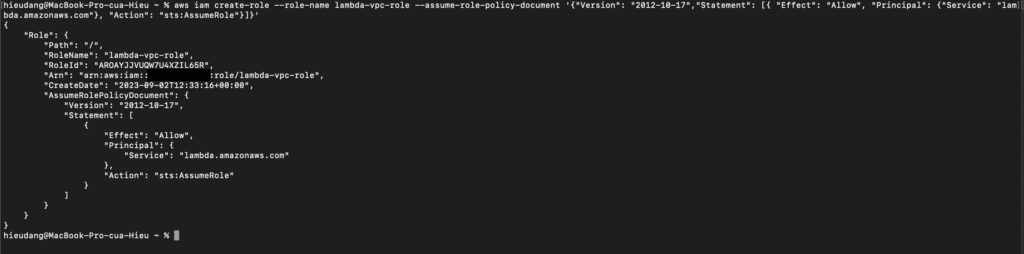
Create the execution role that gives your function permission to access AWS resources. To create an execution role with the AWS CLI, use the create-role command.
In the following example, you specify the trust policy inline.
You can also define the trust policy for the role using a JSON file. In the following example, trust-policy.json is a file in the current directory. Example trust-policy.json
In the following example, create app.py a file in the current directory. Example app.py
from __future__ import print_function
import time
import uuid
import sys
import socket
import elasticache_auto_discovery
from pymemcache.client.hash import HashClient

#elasticache settings
elasticache_config_endpoint = "your-elasticache-cluster-endpoint:port"
nodes = elasticache_auto_discovery.discover(elasticache_config_endpoint)
nodes = map(lambda x: (x[1], int(x[2])), nodes)
memcache_client = HashClient(nodes)

def handler(event, context):
    """
    This function puts into memcache and get from it.
    Memcache is hosted using elasticache
    """

    #Create a random UUID... this will be the sample element we add to the cache.
    uuid_inserted = uuid.uuid4().hex
    #Put the UUID to the cache.
    memcache_client.set('uuid', uuid_inserted)
    #Get item (UUID) from the cache.
    uuid_obtained = memcache_client.get('uuid')
    if uuid_obtained.decode("utf-8") == uuid_inserted:
        # this print should go to the CloudWatch Logs and Lambda console.
        print ("Success: Fetched value %s from memcache" %(uuid_inserted))
    else:
        raise Exception("Value is not the same as we put :(. Expected %s got %s" %(uuid_inserted, uuid_obtained))

    return "Fetched value from memcache: " + uuid_obtained.decode("utf-8")
Dependencies
elasticache-auto-discovery – The Lambda function uses this library to get the nodes in your Amazon ElastiCache cluster.
pymemcache – The Lambda function code uses this library to create an HashClientobject to set and get items from memcache.
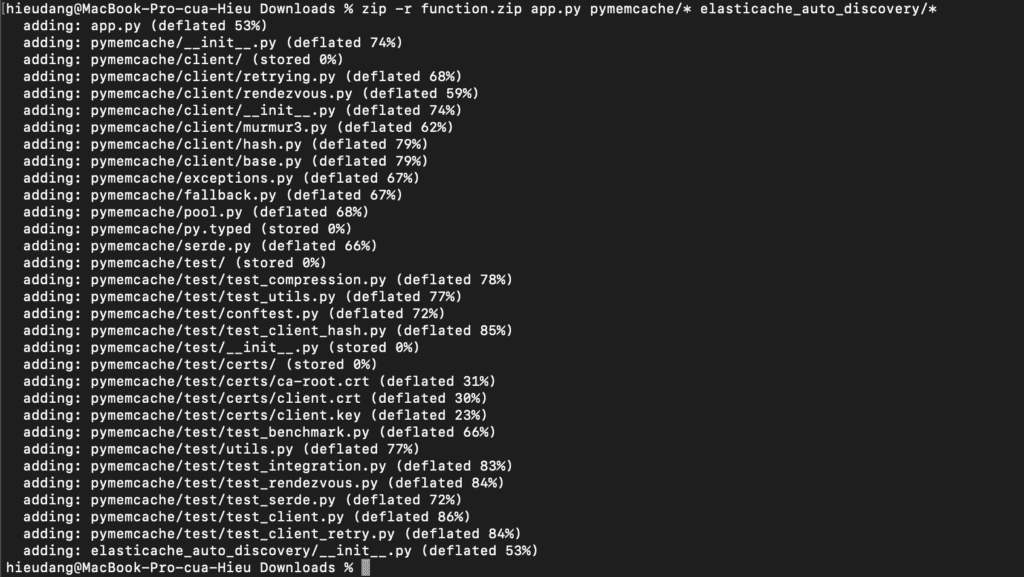
Create a deployment package.
zip -r function.zip app.py pymemcache/* elasticache_auto_discovery/*
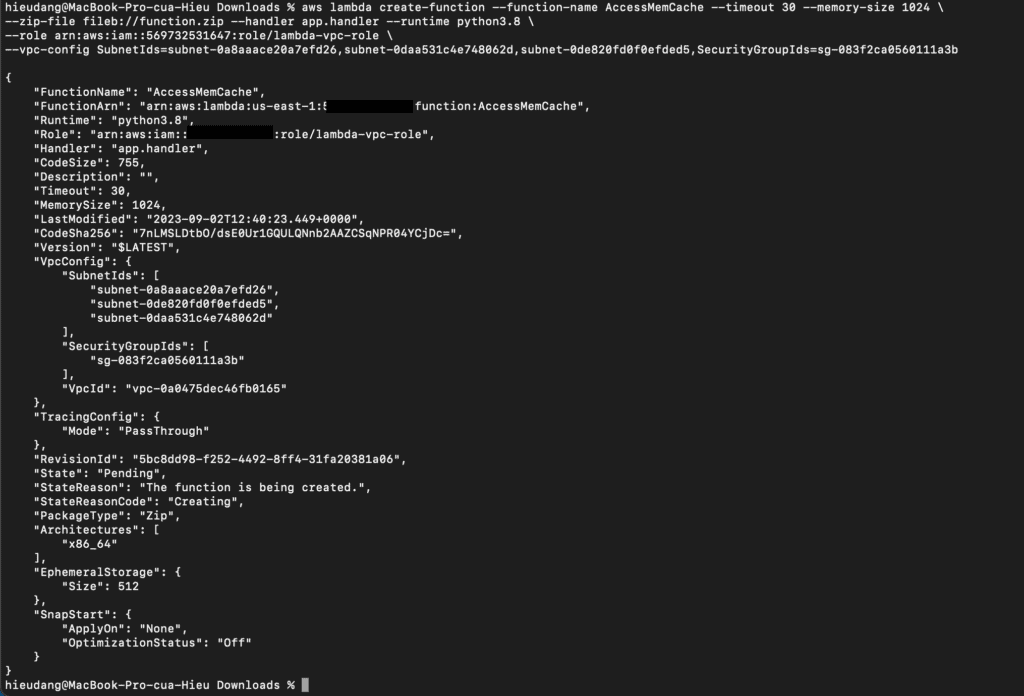
Create the Lambda function
Create the Lambda function with the create-function command.
In this step, you invoke the Lambda function manually using the invoke command. When the Lambda function runs, it generates a UUID and writes it to the ElastiCache cluster specified in your Lambda code. The Lambda function then retrieves the item from the cache.
Invoke the Lambda function with the invoke the command includes getting log stream from CloudWatch
aws iam list-attached-role-policies --role-name lambda-vpc-role
aws iam detach-role-policy --role-name lambda-vpc-role --policy-arn arn:aws:iam::aws:policy/service-role/AWSLambdaVPCAccessExecutionRole
aws iam delete-role --role-name lambda-vpc-role
Conclusion
These steps provide an example to manage the Memcached cluster. The specific configuration details may vary depending on your environment and setup. It’s recommended to consult the relevant documentation from AWS for detailed instructions on setting up. I hope this will your helpful. Thank you for reading the DevopsRoles page!
In this Memcached tutorial, you will create an Amazon ElastiCache for the Memcached cluster in your default Amazon Virtual Private Cloud. Operations on the cluster using CLI commands and node management using CLI commands. For more information about Amazon ElastiCache, see Amazon ElastiCache.
Prerequisites
Before starting, you should have the following prerequisites configured
An AWS account
AWS CLI on your computer
Memcached tutorial
Creating a Memcached cluster with AWS CLI
Modifying a Memcached cluster with AWS CLI
Viewing the elements in a Memcached cluster with AWS CLI
Rebooting a Memcached cluster with AWS CLI
Discovering the endpoints of Memcached cluster with AWS CLI
Adding nodes to a Memcached cluster with AWS CLI
Removing nodes from a Memcached cluster with AWS CLI
Scaling Memcached vertically
Configuring a Lambda function to access Amazon ElastiCache in an Amazon VPC
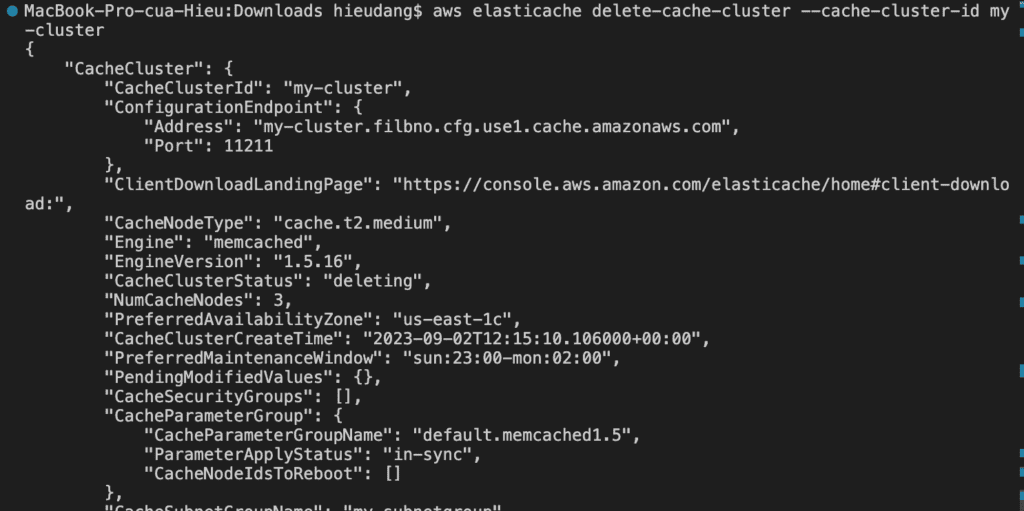
Deleting a Memcached cluster with AWS CLI
Creating a Memcached cluster with AWS CLI
Before you begin, If you have not installed the AWS CLI, see Setting up the Amazon Redshift CLI. This tutorial uses the us-ease-1 region.
Now we’re ready to launch a Memcached cluster by using the AWS CLI.
You can set up a cluster with a specific number of nodes and a parameter group that controls the properties for each node. All nodes within a cluster are designed to be of the same node type and have the same parameter and security group settings.
Every cluster must have a cluster identifier. The cluster identifier is a customer-supplied name for the cluster. This identifier specifies a particular cluster when interacting with the ElastiCache API and AWS CLI commands. The cluster identifier must be unique for that customer in an AWS Region. For more information, see create-cache-cluster
–cache-parameter-group-name: If this argument is omitted, the default parameter group for the specified engine is used. Or you can use create-cache-parameter-group command to create a parameter group.
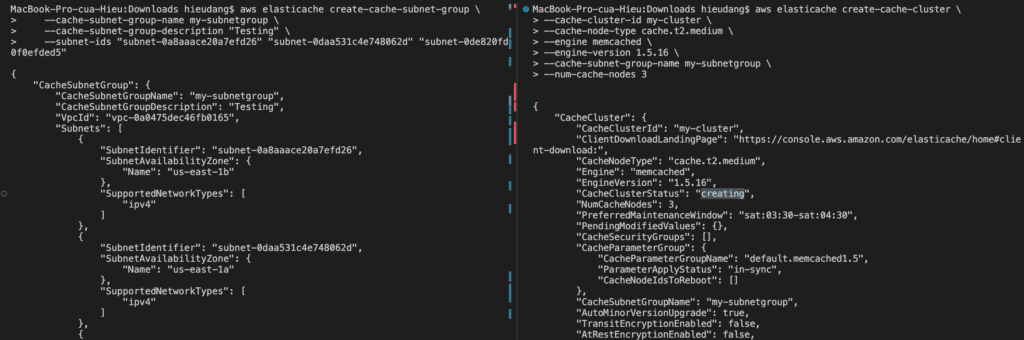
If you’re going to launch your cluster in a VPC, make sure to create a subnet group in the same VPC before you start creating a cluster.
The following CLI code creates a Memcached cache cluster with 3 nodes.
In addition to adding or removing nodes from a cluster, there can be times when you need to make other changes to an existing cluster, such as, adding a security group, changing the maintenance window, or a parameter group.
You can modify an existing cluster using the AWS CLI modify-cache-cluster operation. To modify a cluster’s configuration value, specify the cluster’s ID, the parameter to change, and the parameter’s new value.
The --apply-immediately parameter applies only to modifications in the engine version and changing the number of nodes in a cluster. If you want to apply any of these changes immediately, use the --apply-immediately parameter. If you prefer postponing these changes to your next maintenance window, use the --no-apply-immediately parameter. Other modifications, such as changing the maintenance window, are applied immediately.
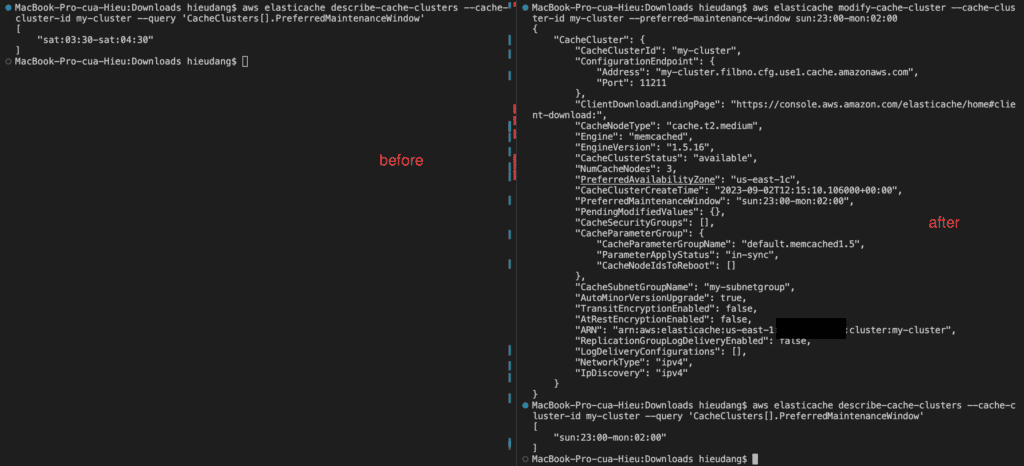
The following example changes the maintenance window for a cluster named my-cluster and applies the change immediately.
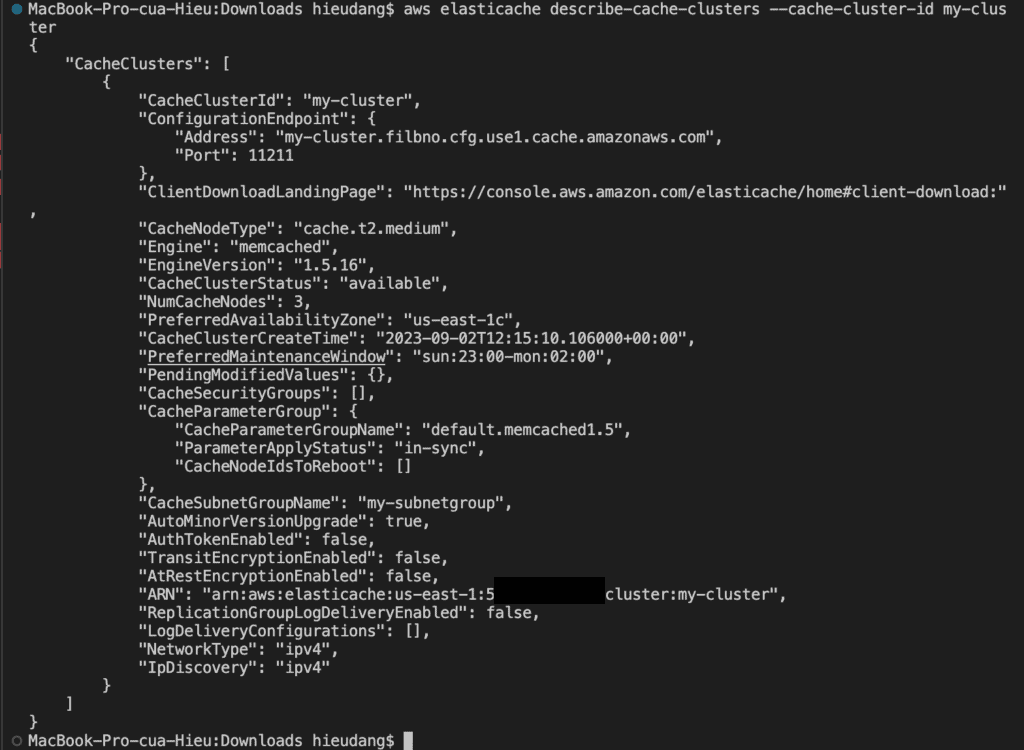
By default, abbreviated information about the clusters is returned. You can use the optional ShowCacheNodeInfo flag to retrieve detailed information about the cache nodes associated with the clusters. These details include the DNS address and port for the cache node endpoint.
The following code lists the details for my-cluster
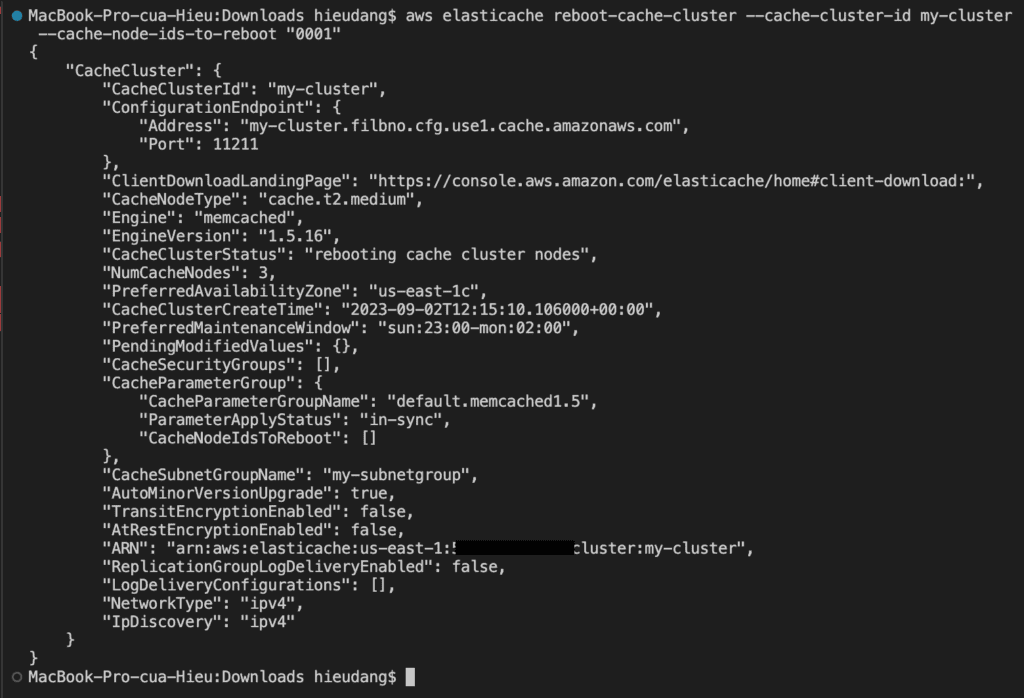
Some changes require that the cluster be rebooted for the changes to be applied. For example, for some parameters, changing the parameter value in a parameter group is only applied after a reboot.
When you reboot a cluster, the cluster flushes all its data and restarts its engine. During this process, you cannot access the cluster. Because the cluster flushed all its data, when it is available again, you start with an empty cluster.
To reboot specific nodes in the cluster, use the --cache-node-ids-to-reboot to list the specific clusters to reboot.
Discovering the endpoints of the Memcached cluster with AWS CLI
Your application connects to your cluster using endpoints. An endpoint is a node or cluster’s unique address. Which endpoints to use
If you use Automatic Discovery, you can use the cluster’s configuration endpoint to configure your Memcached client. This means you must use a client that supports Automatic Discovery.
If you don’t use Automatic Discovery, you must configure your client to use the individual node endpoints for reads and writes. You must also keep track of them as you add and remove nodes.
You can use the AWS CLI to discover the endpoints for a cluster and its nodes with the describe-cache-clusterscommand. For more information, see the topic describe-cache-clusters.
The following command retrieves the configuration endpoint (ConfigurationEndpoint)
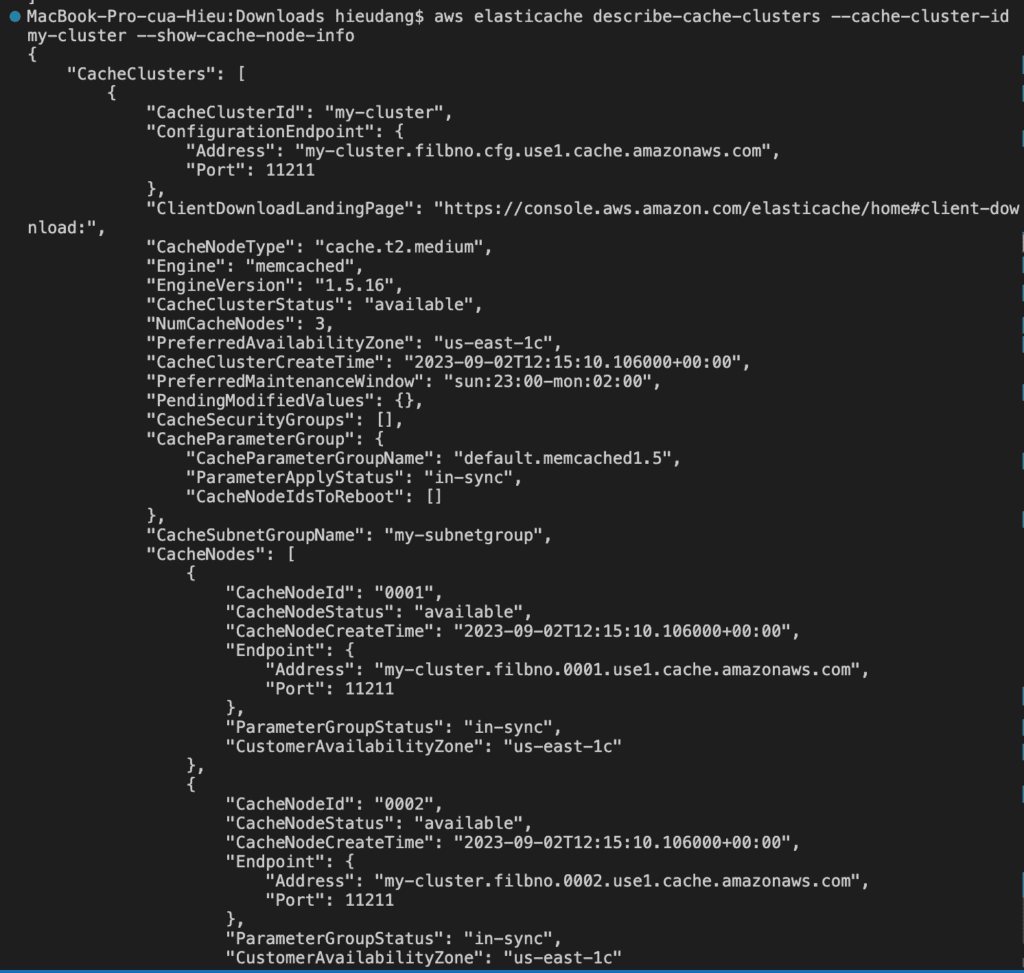
For Memcached clusters, the command returns the configuration endpoint. If you include the optional parameter --show-cache-node-info, the following command retrieves the configuration endpoint (ConfigurationEndpoint) and individual node endpoints (Endpoint) for the Memcached cluster.
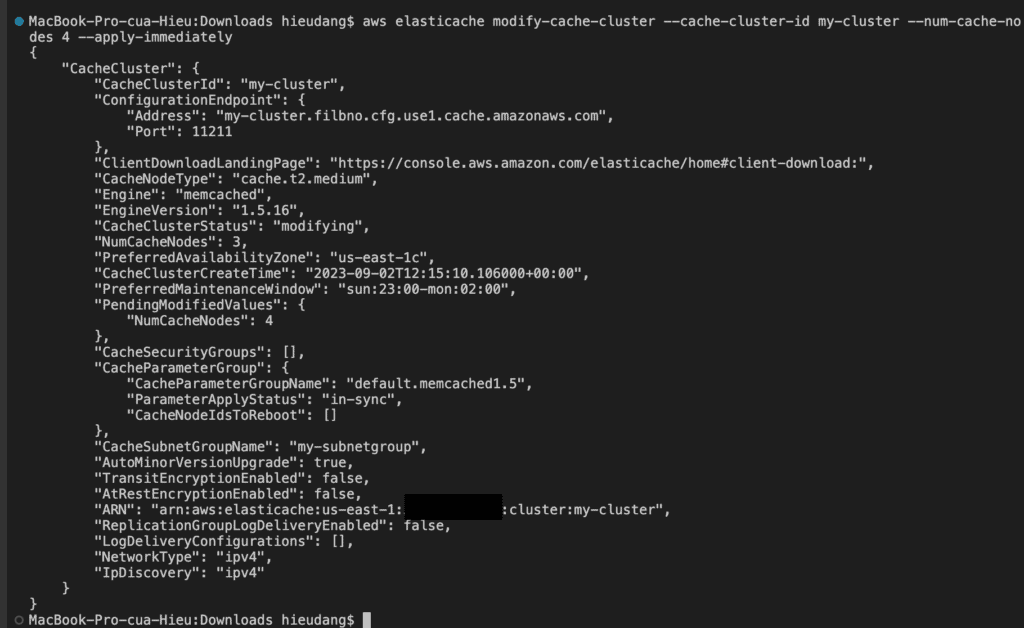
Adding nodes to a Memcached cluster increases the number of your cluster’s partitions.
To add nodes to a cluster using the AWS CLI, use the AWS CLI operation modify-cache-cluster. For more information, see the AWS CLI topic modify-cache-cluster.
Run the following command to add nodes to a cluster
These steps provide an example to manage the Memcached cluster. The specific configuration details may vary depending on your environment and setup. It’s recommended to consult the relevant documentation from AWS for detailed instructions on setting up. I hope will this be helpful. Thank you for reading the DevopsRoles page!
This tutorial shows you how to create a Redshift cluster resource, connect to Amazon Redshift, load sample data from S3 to Redshift into Redshift, and run queries with data usage command line tools.
You can use SQL Workbench or Amazon Redshift Query Editor v2.0 (web-based analyst workbench). In this tutorial, we choose to load sample data from an Amazon S3 bucket to Amazon Redshift using the PLSQL command-line tool.
psql is a terminal-based front-end to PostgreSQL. It enables you to type in queries interactively, issue them to PostgreSQL, and see the query results. Alternatively, input can be from a file or command line arguments. In addition, psql provides several meta-commands and various shell-like features to facilitate writing scripts and automating a wide variety of tasks.
Prerequisites
Before starting, you should have the following prerequisites configured
An AWS account
AWS CLI on your computer
Load data from S3 to Redshift into Redshift example with AWS CLI
Install PSQL on MacOS
Creating a data warehouse with Amazon Redshift using AWS CLI
Connect to the Redshift cluster using PSQL
Create Redshift cluster tables using PSQL
Redshift default role setting uses AWS Console manage
Loading sample data from S3 to Redshift with PSQL
Delete the sample cluster using AWS CLI
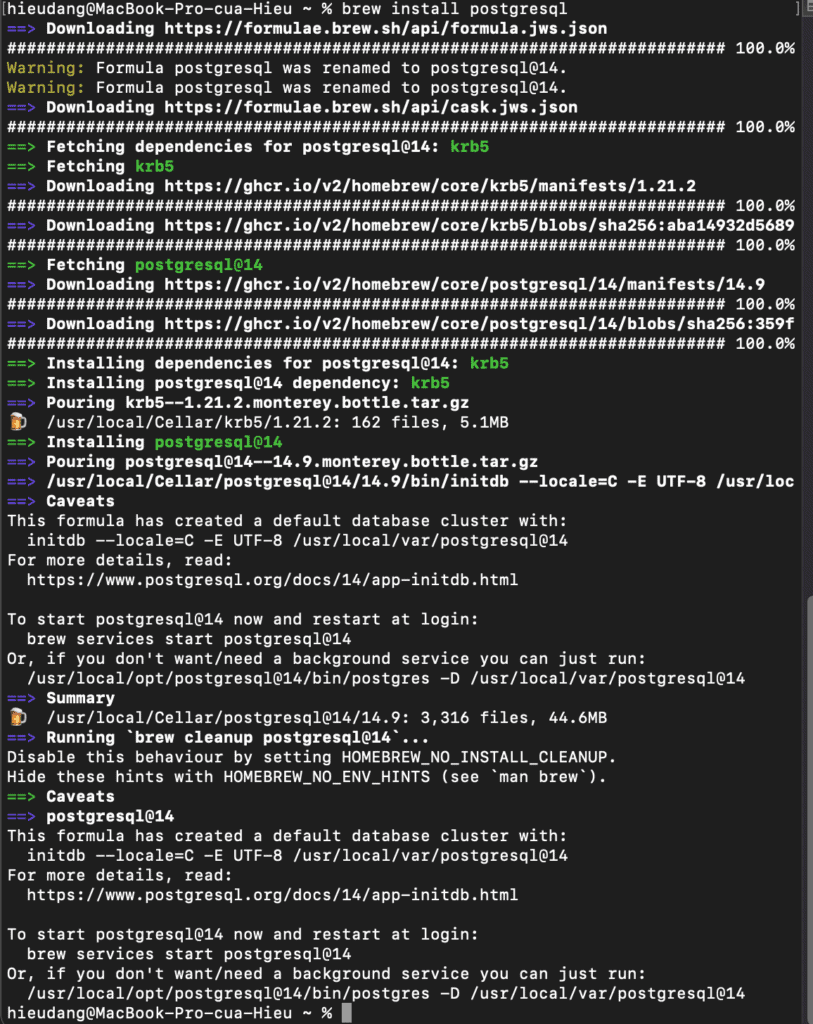
Install PSQL on MacOS
We can choose a version from PostgresSQL page or execute the following command on MacOS
brew install postgresql
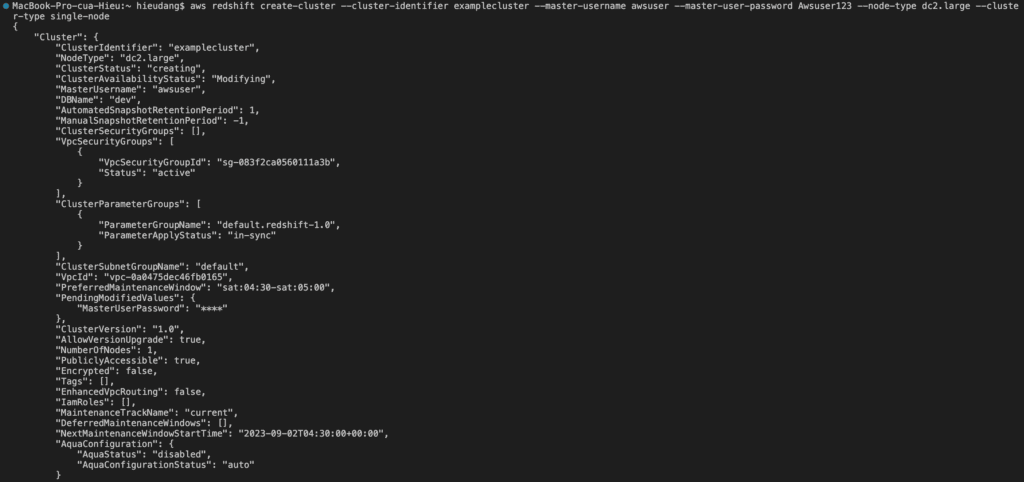
Creating a data warehouse with Amazon Redshift using AWS CLI
Before you begin, If you have not installed the AWS CLI, see Setting up the Amazon Redshift CLI. This tutorial uses the us-east-1 region.
Now we’re ready to launch a cluster by using the AWS CLI.
The create-cluster the command has a large number of parameters. For this tutorial, you will use the parameter values that are described in the following table. Before you create a cluster in a production environment, we recommend that you review all the required and optional parameters so that your cluster configuration matches your requirements. For more information, see create-cluster
When the ClusterStatus field changes from creating to available, the cluster is ready for use.
Connect to the Redshift cluster using PSQL
Run the following command to connect to the Redshift cluster.
psql -h examplecluster.ccfmryooawwy.us-east-1.redshift.amazonaws.com -U awsuser -d dev -p 5439
You must explicitly grant inbound access to your client to connect to the cluster. When you created a cluster in the previous step, because you did not specify a security group, you associated the default cluster security group with the cluster.
The default cluster security group contains no rules to authorize any inbound traffic to the cluster. To access the new cluster, you must add rules for inbound traffic, which are called ingress rules, to the cluster security group. If you are accessing your cluster from the Internet, you will need to authorize a Classless Inter-Domain Routing IP (CIDR/IP) address range.
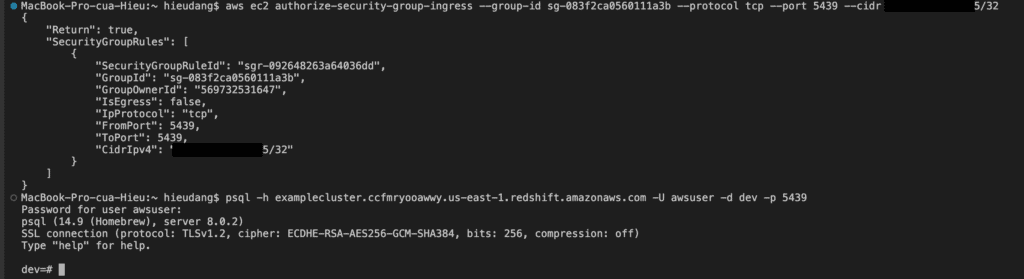
Run the following command to enable your computer to connect to your Redshift cluster. Then login into your cluster using psql.
#allow connect to cluster from my computer
aws ec2 authorize-security-group-ingress --group-id sg-083f2ca0560111a3b --protocol tcp --port 5439 --cidr 111.111.111.111/32
This command returns the following result.
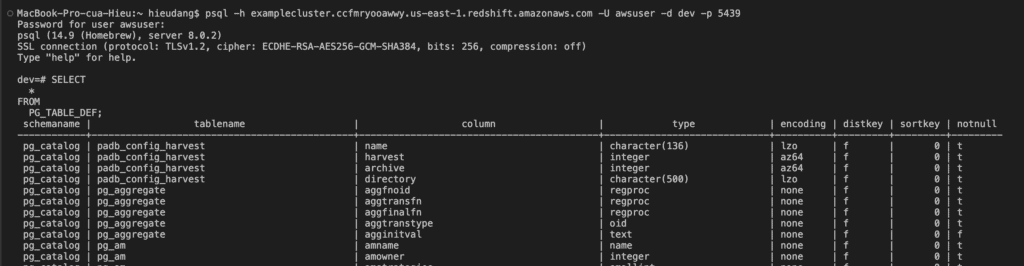
Now test the connection by querying the system table
Create Redshift cluster tables using PSQL
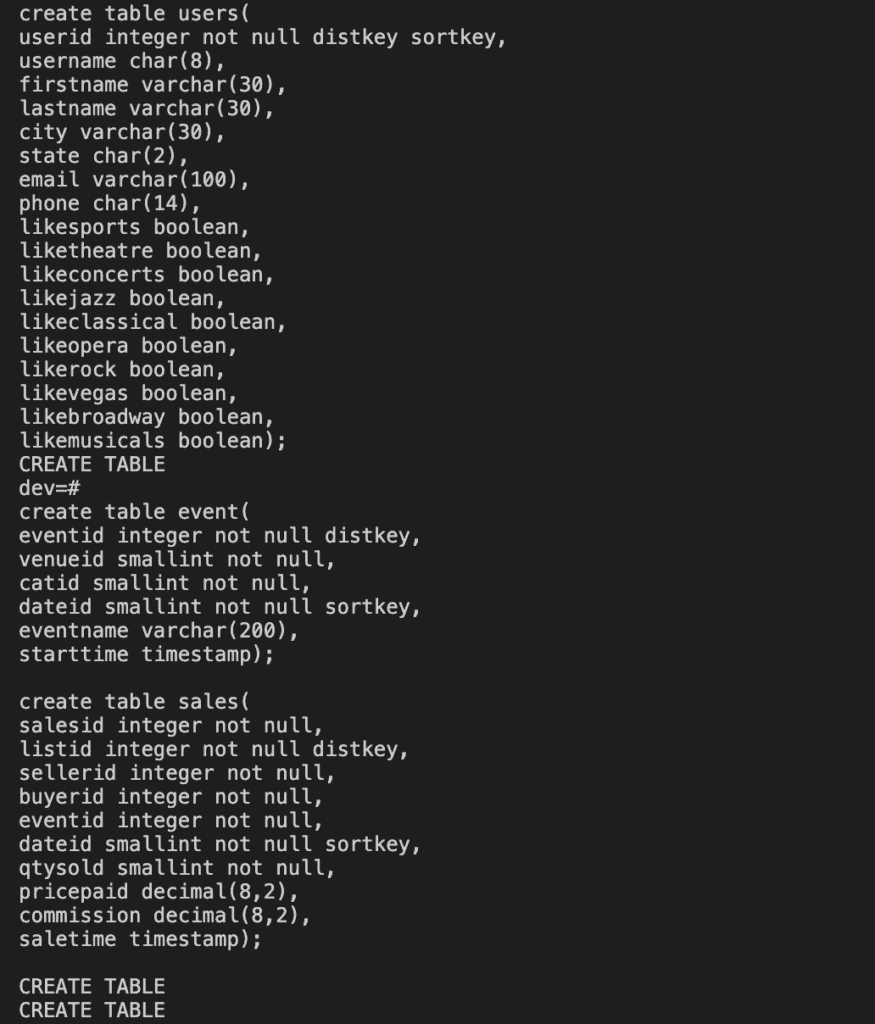
In this tutorial, I use sample data from AWS. Run the following command to create Redshift tables.
create table users(
userid integer not null distkey sortkey,
username char(8),
firstname varchar(30),
lastname varchar(30),
city varchar(30),
state char(2),
email varchar(100),
phone char(14),
likesports boolean,
liketheatre boolean,
likeconcerts boolean,
likejazz boolean,
likeclassical boolean,
likeopera boolean,
likerock boolean,
likevegas boolean,
likebroadway boolean,
likemusicals boolean);

create table event(
eventid integer not null distkey,
venueid smallint not null,
catid smallint not null,
dateid smallint not null sortkey,
eventname varchar(200),
starttime timestamp);

create table sales(
salesid integer not null,
listid integer not null distkey,
sellerid integer not null,
buyerid integer not null,
eventid integer not null,
dateid smallint not null sortkey,
qtysold smallint not null,
pricepaid decimal(8,2),
commission decimal(8,2),
saletime timestamp);
This command returns the following result.
Test by querying the public.sales table as follows
select * from public.sales;
Redshift default role setting uses AWS Console manage
Before you can load data from Amazon S3, you must first create an IAM role with the necessary permissions and attach it to your cluster. To do this refer to AWS document
Loading sample data from S3 to Redshift with PSQL
Use the COPY command to load large datasets from Amazon S3 into Amazon Redshift. For more information about COPY syntax, see COPY in the Amazon Redshift Database Developer Guide.
Run the following SQL commands in PSQL to load data from S3 to Redshift
COPY users
FROM 's3://redshift-downloads/tickit/allusers_pipe.txt'
DELIMITER '|'
TIMEFORMAT 'YYYY-MM-DD HH:MI:SS'
IGNOREHEADER 1
REGION 'us-east-1'
IAM_ROLE default;
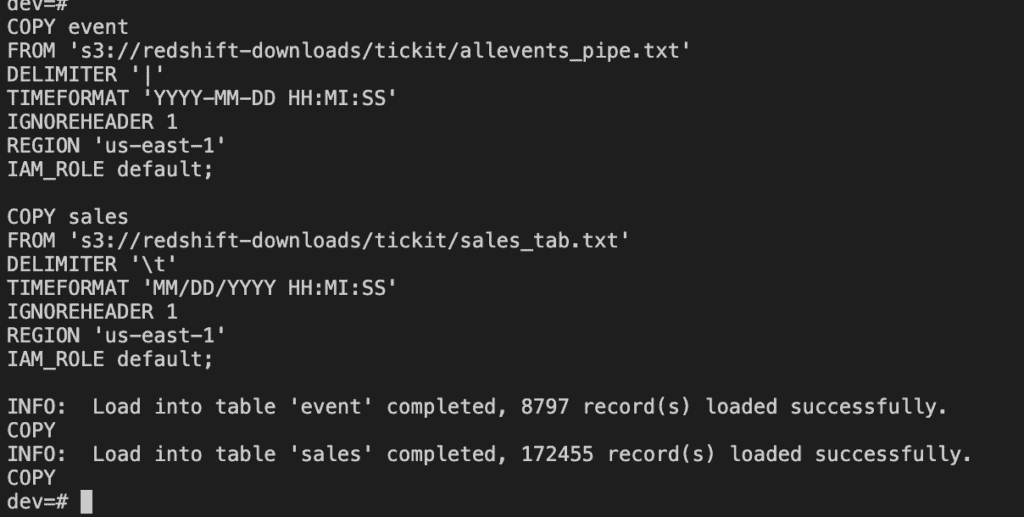
COPY event
FROM 's3://redshift-downloads/tickit/allevents_pipe.txt'
DELIMITER '|'
TIMEFORMAT 'YYYY-MM-DD HH:MI:SS'
IGNOREHEADER 1
REGION 'us-east-1'
IAM_ROLE default;
COPY sales
FROM 's3://redshift-downloads/tickit/sales_tab.txt'
DELIMITER '\t'
TIMEFORMAT 'MM/DD/YYYY HH:MI:SS'
IGNOREHEADER 1
REGION 'us-east-1'
IAM_ROLE default;
After loading data, try some example queries.
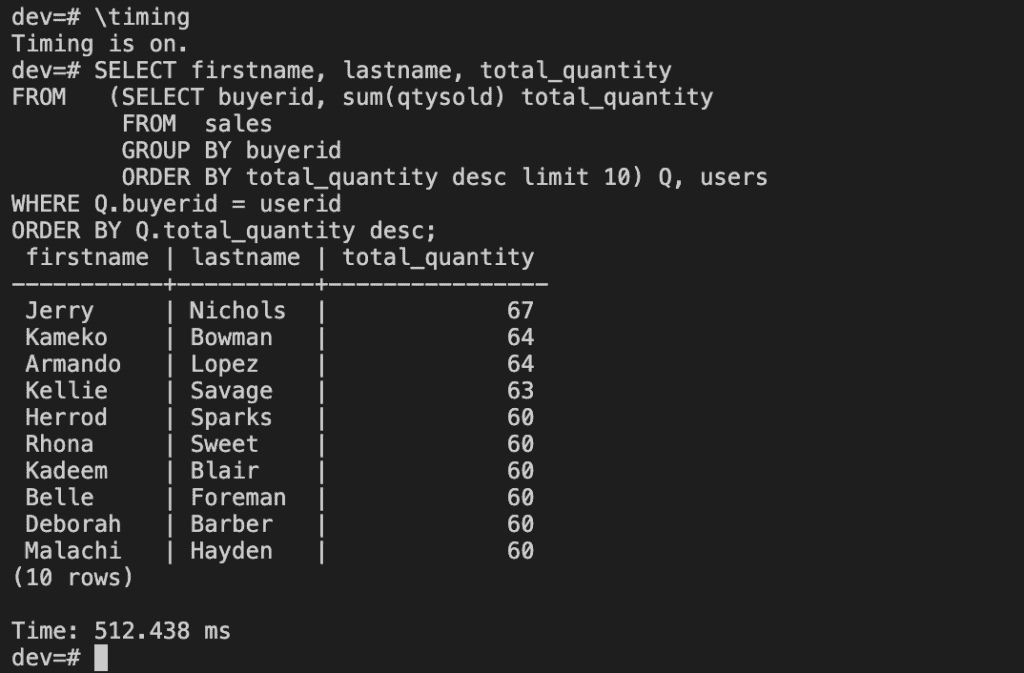
\timing

SELECT firstname, lastname, total_quantity
FROM   (SELECT buyerid, sum(qtysold) total_quantity
        FROM  sales
        GROUP BY buyerid
        ORDER BY total_quantity desc limit 10) Q, users
WHERE Q.buyerid = userid
ORDER BY Q.total_quantity desc;
Now that you’ve loaded data into Redshift.
Delete the sample cluster using AWS CLI
When you delete a cluster, you must decide whether to create a final snapshot. Because this is an exercise and your test cluster should not have any important data in it, you can skip the final snapshot.
To delete your cluster, enter the following command.
Congratulations! You successfully launched, authorized access to, connected to, and terminated a cluster.
Conclusion
These steps provide an example of loading data from S3 to Redshift into Redshift with the PSQL tool. The specific configuration details may vary depending on your environment and setup. It’s recommended to consult the relevant documentation from AWS for detailed instructions on setting up. I hope will this be helpful. Thank you for reading the DevopsRoles page!
In this Boto3 DynamoDB tutorial, we’ll walk through the process of creating tables, loading data, and executing fundamental CRUD operations in AWS DynamoDB using Python and the Boto3 library.
Boto3, the Python SDK for AWS, is primarily known for its two widely used features: Clients and Resources.
boto3 dynamodb client provides a low-level interface to the AWS service. It maps 1:1 with the actual AWS service API.
In another way, boto3 dynamodbresource are a higher-level abstraction compared to clients. It provides an object-oriented interface for interacting with various AWS services. Resources aren’t available for all AWS services.
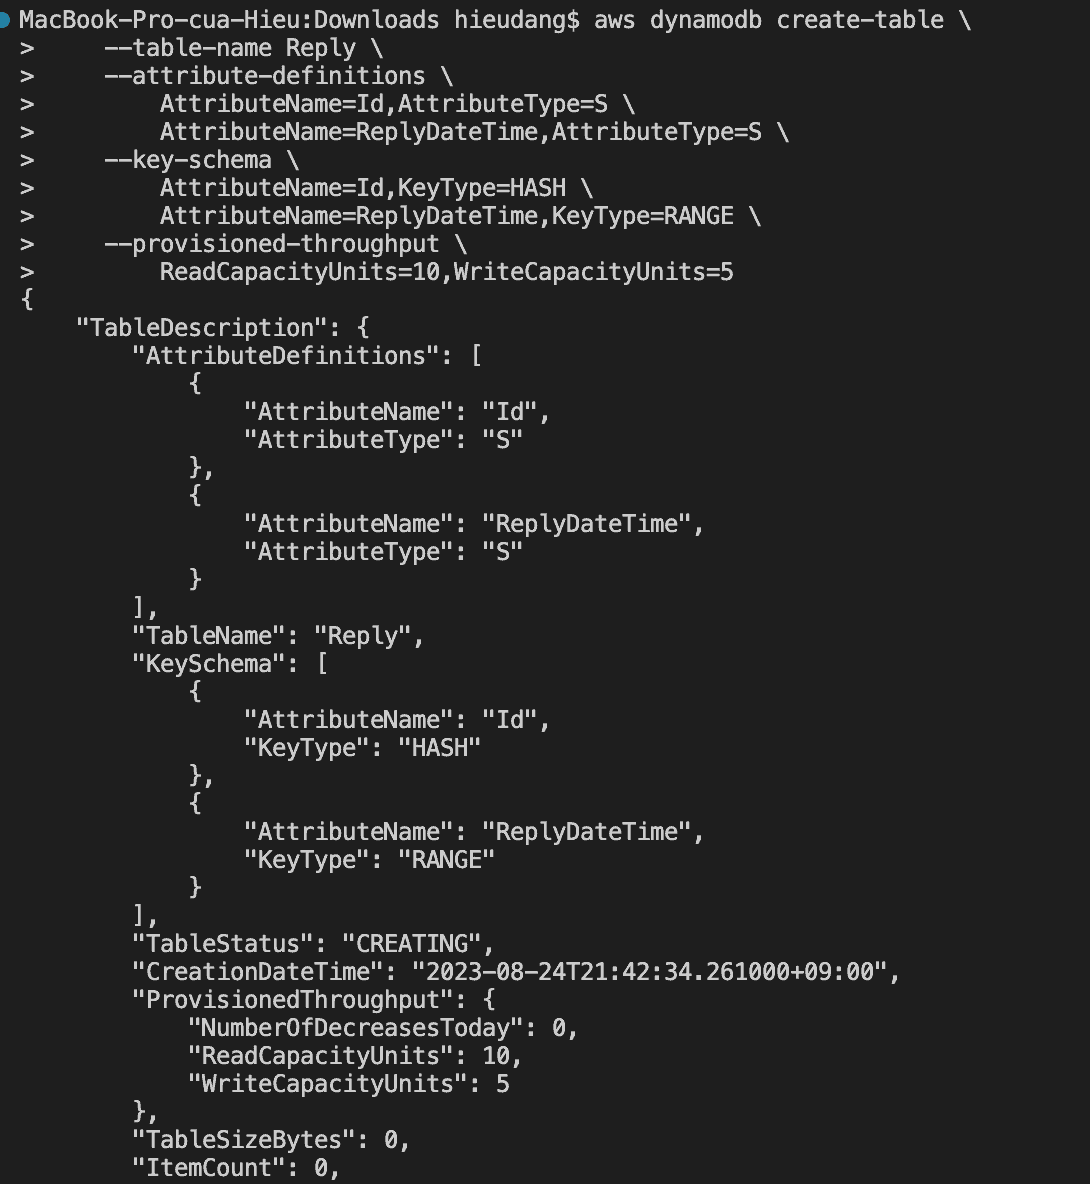
The CreateTable operation adds a new table to your account. In an Amazon Web Services account, table names must be unique within each Region. That is, you can have two tables with the same name if you create the tables in different Regions.
CreateTable is an asynchronous operation. We can wait to create a process with wait_until_exists() method Upon receiving a CreateTable request, DynamoDB immediately returns a response with a TableStatus of CREATING. After the table is created, DynamoDB sets the TableStatus to ACTIVE. You can perform read-and-write operations only on an ACTIVE table.
The following code example shows how to create a DynamoDB table.
Python (Boto3)
def create_table(self, table_name):
        """
        Creates an Amazon DynamoDB table that can be used to store forum data.
        The table partition key(S): Name

        :param table_name: The name of the table to create.
        :return: The newly created table.
        """
        try:
            self.table = self.dyn_resource.create_table(
                TableName=table_name,
                KeySchema=[
                    {'AttributeName': 'Name', 'KeyType': 'HASH'},  # Partition key
                ],
                AttributeDefinitions=[
                    {'AttributeName': 'Name', 'AttributeType': 'S'}
                ],
                ProvisionedThroughput={'ReadCapacityUnits': 10, 'WriteCapacityUnits': 5})
            self.table.wait_until_exists()
        except ClientError as err:
            logger.error(
                "Couldn't create table %s. Here's why: %s: %s", table_name,
                err.response['Error']['Code'], err.response['Error']['Message'])
            raise
        else:
            return self.table
Call function to create table as bellow
forums = Forum(dynamodb)
#Check for table existence, create table if not found
forums_exists = forums.exists(table_name)
if not forums_exists:
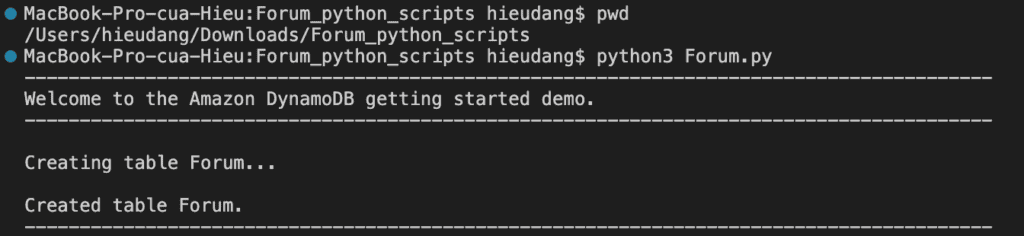
print(f"\nCreating table {table_name}...")
forums.create_table(table_name)
print(f"\nCreated table {forums.table.name}.")
This command returns the following result.
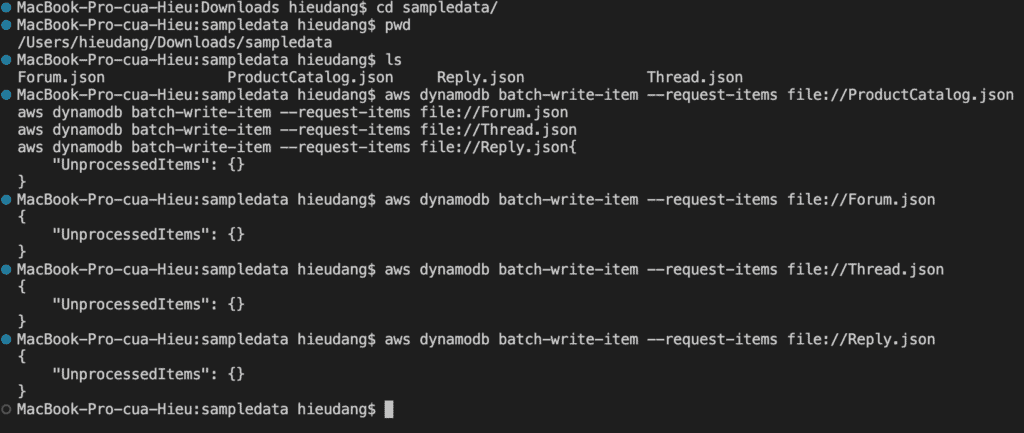
Batch Write Items
The BatchWriteItem operation puts or deletes multiple items in one or more tables. A single call BatchWriteItem can transmit up to 16MB of data over the network, consisting of up to 25 item put or delete operations. While individual items can be up to 400 KB once stored, it’s important to note that an item’s representation might be greater than 400KB while being sent in DynamoDB’s JSON format for the API call.
BatchWriteItem cannot update items.
If DynamoDB returns any unprocessed items, you should retry the batch operation on those items. However, AWS strongly recommends that you use an exponential backoff algorithm. If you retry the batch operation immediately, the underlying read or write requests can still fail due to throttling on the individual tables. If you delay the batch operation using exponential backoff, the individual requests in the batch are much more likely to succeed.
The following code example shows how to write a batch of DynamoDB items.
def write_batch(self, forums):
        """
        Fills an Amazon DynamoDB table with the specified data, using the Boto3
        Table.batch_writer() function to put the items in the table.
        Inside the context manager, Table.batch_writer builds a list of
        requests. On exiting the context manager, Table.batch_writer starts sending
        batches of write requests to Amazon DynamoDB and automatically
        handles chunking, buffering, and retrying.

        :param forums: The data to put in the table. Each item must contain at least
                       the keys required by the schema that was specified when the
                       table was created.
        """
        try:
            with self.table.batch_writer() as writer:
                for forum in forums:
                    writer.put_item(Item=forum)
        except ClientError as err:
            logger.error(
                "Couldn't load data into table %s. Here's why: %s: %s", self.table.name,
                err.response['Error']['Code'], err.response['Error']['Message'])
            raise
Call function to write data to DynamoDB as below
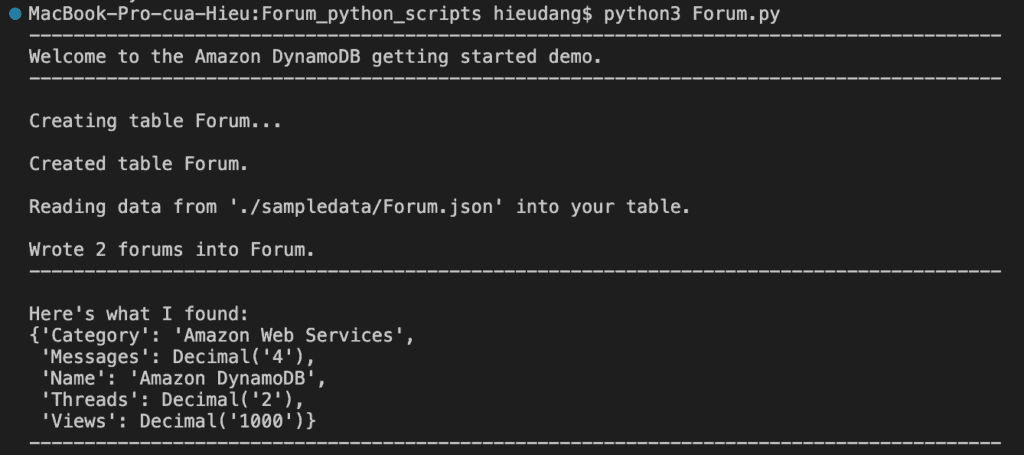
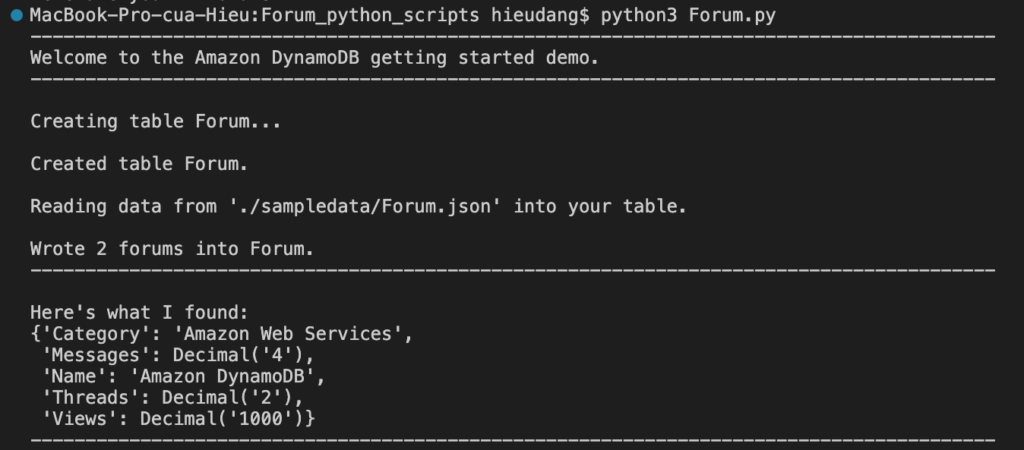
#Load data into the created table
forum_data = forums.get_sample_forum_data(forum_file_name)
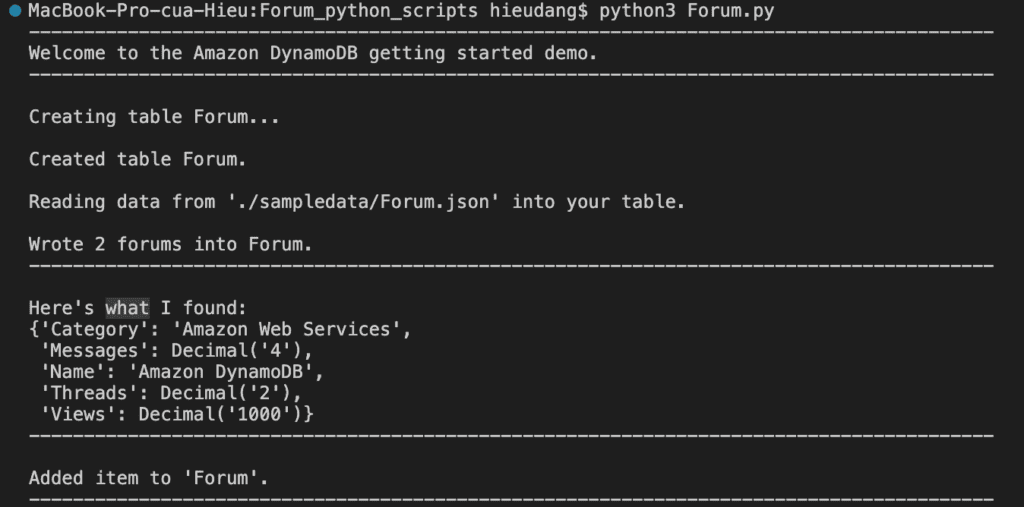
print(f"\nReading data from '{forum_file_name}' into your table.")
forums.write_batch(forum_data)
print(f"\nWrote {len(forum_data)} forums into {forums.table.name}.")
print('-'*88)
This command returns the following result.
Read Item
The GetItem operation returns a set of attributes for the item with the given primary key. If there is no matching item, GetItem do not return any data and there will be no Item element in the response.
GetItem provides an eventually consistent read by default. If your application requires a strongly consistent read, set ConsistentRead to true
The following code example shows how to get an item from a DynamoDB table.
    def get_forum(self, name):
        """
        Gets forum data from the table for a specific forum.

        :param name: The name of the forum.
        :return: The data about the requested forum.
        """
        try:
            response = self.table.get_item(Key={'Name': name})
        except ClientError as err:
            logger.error(
                "Couldn't get forum %s from table %s. Here's why: %s: %s",
                name, self.table.name,
                err.response['Error']['Code'], err.response['Error']['Message'])
            raise
        else:
            return response['Item']
Call function to get data items from DynamoDB as below
    #Get forum data with hash key = 'Amazon DynamoDB'
    forum = forums.get_forum("Amazon DynamoDB")
    print("\nHere's what I found:")
    pprint(forum)
    print('-'*88)
This command returns the following result.
Add new item
Creates a new item, or replaces an old item with a new item. If an item that has the same primary key as the new item already exists in the specified table, the new item completely replaces the existing item. You can perform a conditional put operation (add a new item if one with the specified primary key doesn’t exist), or replace an existing item if it has certain attribute values. You can return the item’s attribute values in the same operation, using the ReturnValuesparameter.
The following code example shows how to put an item in a DynamoDB table.
    def add_forum(self, name, category, messages, threads, views):
        """
        Adds a forum to the table.

        :param name: The name of the forum.
        :param category: The category of the forum.
        :param messages: The messages of the forum.
        :param threads: The quality threads of the forum.
        :param views: The quality views of the forum.
        """
        try:
            self.table.put_item(
                Item={
                    'Name': name,
                    'Category': category,
                    'Messages': messages,
                    'Threads': threads,
                    'Views': views
                    })
        except ClientError as err:
            logger.error(
                "Couldn't add forum %s to table %s. Here's why: %s: %s",
                name, self.table.name,
                err.response['Error']['Code'], err.response['Error']['Message'])
            raise
Call function to add item from DynamoDB as below
    #Add new forum data with hash key = 'SQL server'
    forums.add_forum("SQL server","Amazon Web Services",4,2,1000)
    print(f"\nAdded item to '{forums.table.name}'.")
    print('-'*88)
This command returns the following result.
Full scan table
The Scan operation returns one or more items and item attributes by accessing every item in a table or a secondary index. To have DynamoDB return fewer items, you can provide an FilterExpression operation.
If the total size of scanned items exceeds the maximum dataset size limit of 1 MB, the scan completes and results are returned to the user. The LastEvaluatedKey value is also returned and the requestor can use the LastEvaluatedKey to continue the scan in a subsequent operation.
The following code example shows how to scan a DynamoDB table.
   def scan_forums(self):
        """
        Scans for forums.

        :param n/a
        :return: The list of forums.
        """
        forums = []
        scan_kwargs = {}
        try:
            done = False
            start_key = None
            while not done:
                if start_key:
                    scan_kwargs['ExclusiveStartKey'] = start_key
                response = self.table.scan(**scan_kwargs)
                forums.extend(response.get('Items', []))
                start_key = response.get('LastEvaluatedKey', None)
                done = start_key is None
        except ClientError as err:
            logger.error(
                "Couldn't scan for forums. Here's why: %s: %s",
                err.response['Error']['Code'], err.response['Error']['Message'])
            raise

        return forums
Call function to scan items from DynamoDB as below
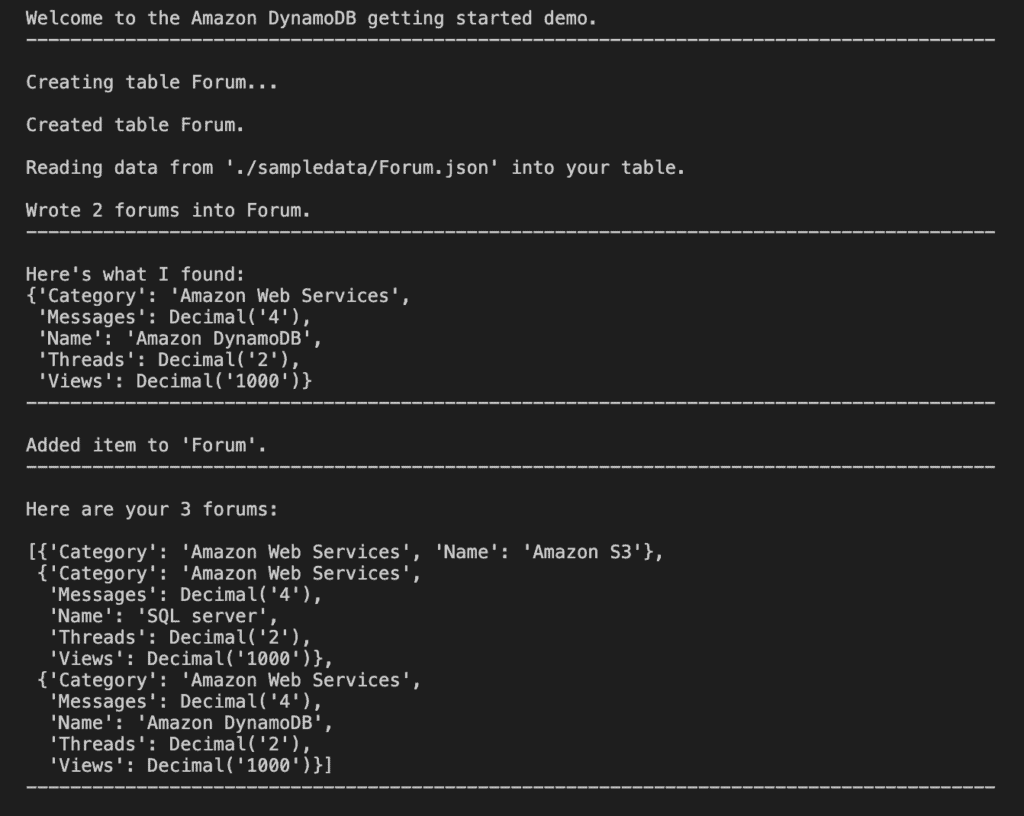
    #Full scan table
    releases = forums.scan_forums()
    if releases:
        print(f"\nHere are your {len(releases)} forums:\n")
        pprint(releases)
    else:
        print(f"I don't know about any forums released\n")
    print('-'*88)
This command boto3 dynamodb scan returns the following result.
Update item
Edits an existing item’s attributes, or adds a new item to the table if it does not already exist. We can put, delete, or add attribute values. We can also perform a conditional update on an existing item (insert a new attribute name-value pair if it doesn’t exist, or replace an existing name-value pair if it has certain expected attribute values).
We can also return the item’s attribute values in the same UpdateItem operation using the ReturnValues parameter.
The following code example shows how to update an item in a DynamoDB table.
    def update_forum(self, name, category, messages, threads, views):
        """
        Updates rating and plot data for a forum in the table.

        :param name: The name of the forum.
        :param category: The category of the forum.
        :param messages: The messages of the forum.
        :param threads: The quality threads of the forum.
        :param views: The quality views of the forum.
        :return: The fields that were updated, with their new values.
        """
        try:
            response = self.table.update_item(
                Key={'Name': name},
                UpdateExpression="set Category=:c, Messages=:m, Threads=:t, #Views=:v",
                ExpressionAttributeValues={
                    ':c': category,
                    ':m': messages,
                    ':t': threads,
                    ':v': views
                    },
                ExpressionAttributeNames={"#Views" : "Views"},
                ReturnValues="UPDATED_NEW")
        except ClientError as err:
            logger.error(
                "Couldn't update forum %s in table %s. Here's why: %s: %s",
                name, self.table.name,
                err.response['Error']['Code'], err.response['Error']['Message'])
            raise
        else:
            return response['Attributes']
Call function to update an item of DynamoDB as below
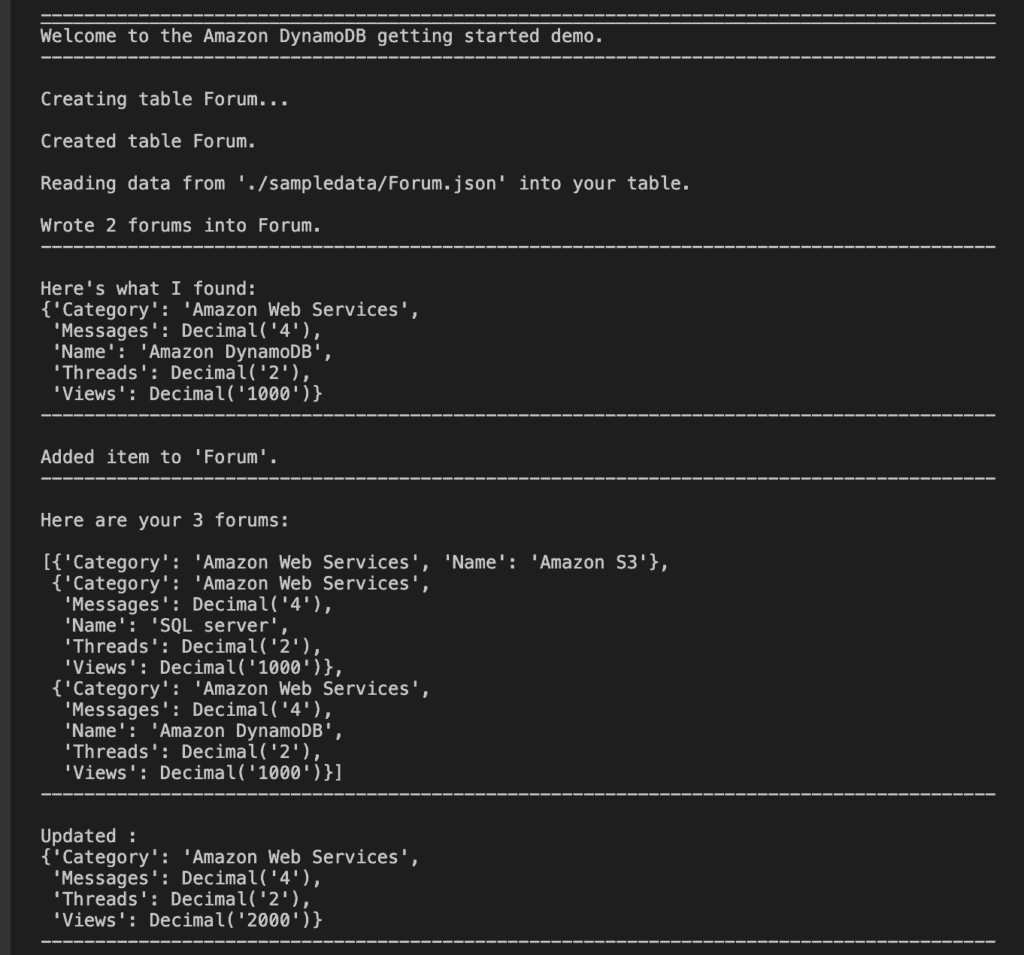
    #Update data: update forum quality views from 1000 to 2000
    updated = forums.update_forum("SQL server","Amazon Web Services",4,2,2000)
    print(f"\nUpdated :")
    pprint(updated)
    print('-'*88)
This command returns the following result.
Delete item
Deletes a single item in a table by primary key. You can perform a conditional delete operation that deletes the item if it exists, or if it has an expected attribute value.
In addition to deleting an item, you can also return the item’s attribute values in the same operation, using the ReturnValues parameter.
Unless you specify conditions, the DeleteItem is an idempotent operation; running it multiple times on the same item or attribute does not result in an error response.
The following code example shows how to delete an item from a DynamoDB table.
    def delete_forum(self, name):
        """
        Deletes a forum from the table.

        :param name: The title of the forum to delete.
        """
        try:
            self.table.delete_item(Key={'Name': name})
        except ClientError as err:
            logger.error(
                "Couldn't delete forum %s. Here's why: %s: %s", name,
                err.response['Error']['Code'], err.response['Error']['Message'])
            raise
Call function to delete the item of DynamoDB as below
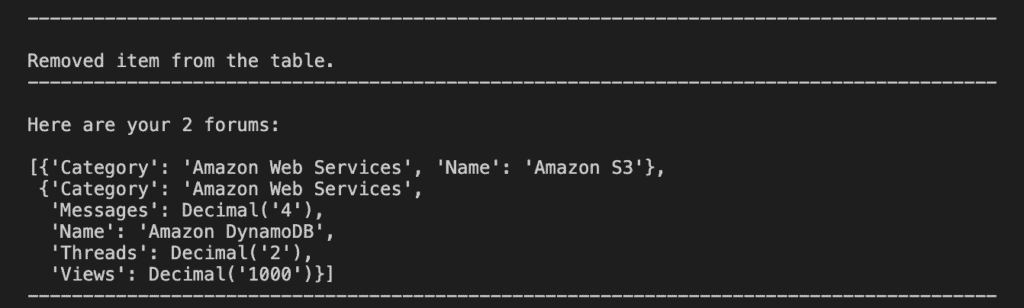
    #Delete data
    forums.delete_forum("SQL server")
    print(f"\nRemoved item from the table.")
    print('-'*88)
    ##Full scan table
    releases = forums.scan_forums()
    if releases:
        print(f"\nHere are your {len(releases)} forums:\n")
        pprint(releases)
    else:
        print(f"I don't know about any forums released\n")
    print('-'*88)
This command returns the following result.
List all table
Returns an array of table names associated with the current account and endpoint. The output from ListTables is paginated, with each page returning a maximum of 100 table names default.
The following code example shows how to list DynamoDB tables.
    #List all table
    print('-'*88)
    print(f"Table list:\n")
    print(list(dynamodb.tables.all()))
This command returns the following result.
Delete table
Deletes a single item in a table by primary key. You can perform a conditional delete operation that deletes the item if it exists, or if it has an expected attribute value.
In addition to deleting an item, you can also return the item’s attribute values in the same operation, using the ReturnValues parameter.
Unless you specify conditions, the DeleteItem is an idempotent operation; running it multiple times on the same item or attribute does not result in an error response.
The following code example shows how to delete an item from a DynamoDB table.
These steps provide an example CRUD Operations using Boto3 DynamoDB. The specific configuration details may vary depending on your environment and setup. It’s recommended to consult the relevant documentation from AWS for detailed instructions on setting up. I hope this will your helpful. Thank you for reading the DevopsRoles page!
This command returns the following result. After each data load, you should get this message saying that there were no Unprocessed Items
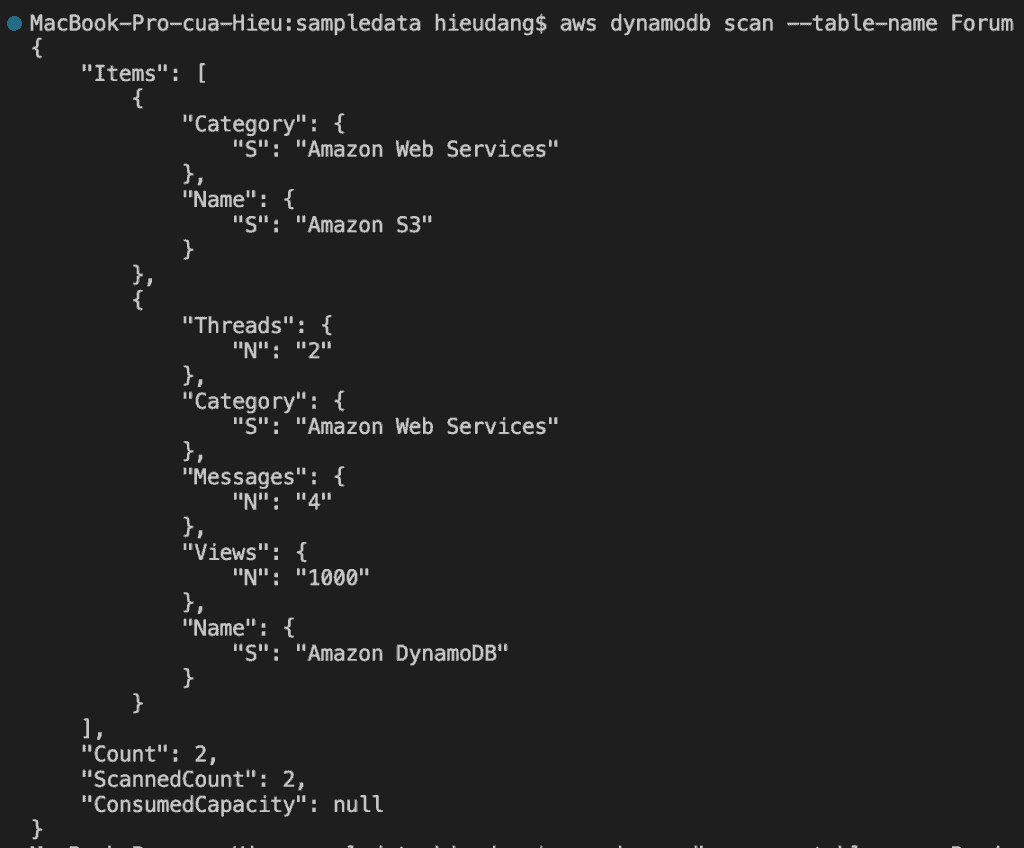
DynamoDB table scan CLI command
The scan will do a full table scan and return the items in 1MB chunks. Scanning is the slowest and most expensive way to get data out of DynamoDB. Try running a scan on the DynamoDB table
aws dynamodb scan --table-name Forum
This command returns the following result.
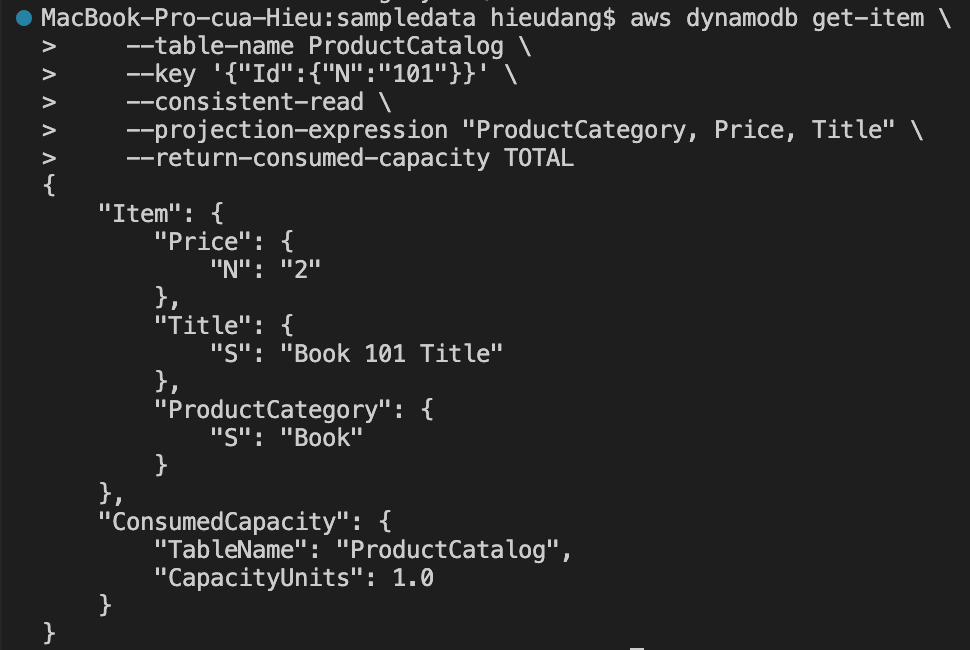
Read data from a DynamoDB table with the CLI command
GetItem is the fastest and cheapest way to get data out of DynamoDB as you must specify the full Primary Key so the command is guaranteed to match at most one item in the table.
The default behavior for DynamoDB is eventually consistent reads.
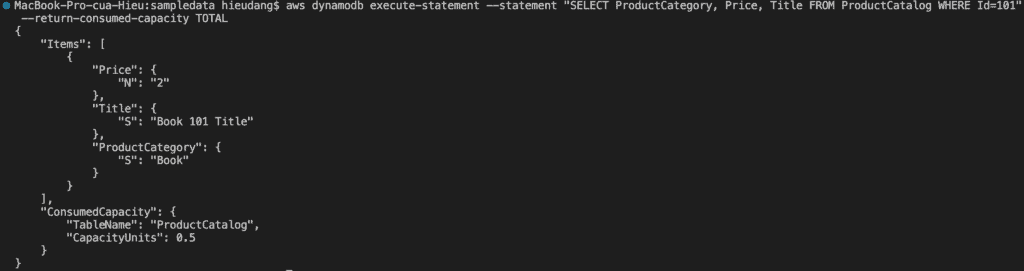
The following AWS CLI example reads an item from the ProductCatalog
Performing this request consume 1.0 RCU, because this item is less than 4KB. If we run the command again but remove the –consistent-read option, this command returns the following result.
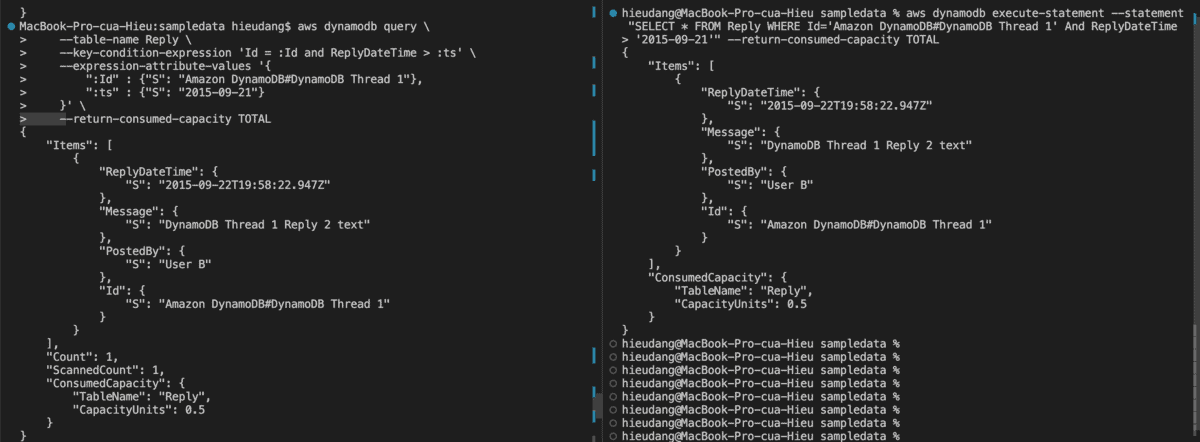
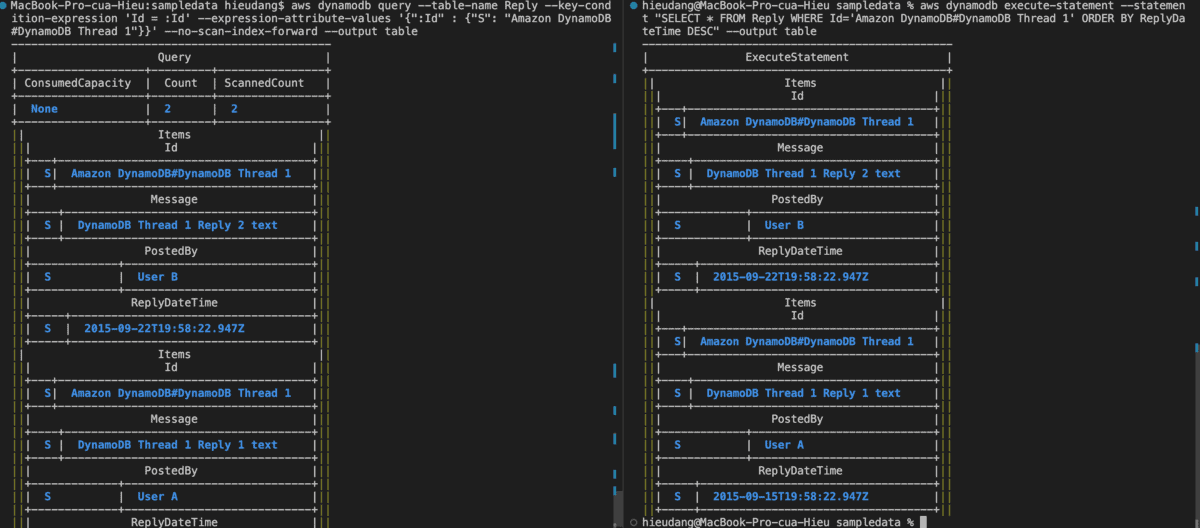
aws dynamodb execute-statement --statement "SELECT * FROM Reply WHERE Id='Amazon DynamoDB#DynamoDB Thread 1' And ReplyDateTime > '2015-09-21'" --return-consumed-capacity TOTAL
With Id is Primary Key and ReplyDateTime is Sort Key
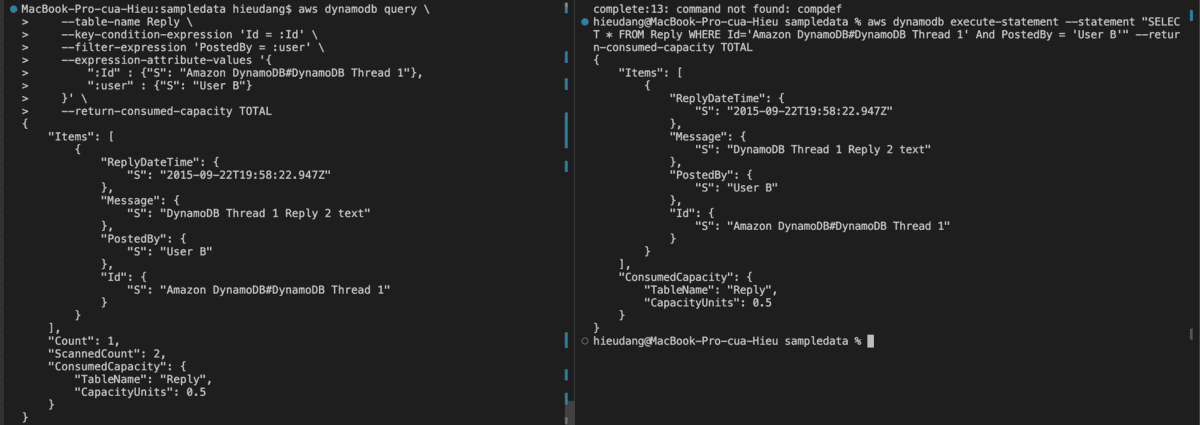
If you want to limit results based on non-key attributes, we can use Filter Expressions
aws dynamodb execute-statement --statement "SELECT * FROM Reply WHERE Id='Amazon DynamoDB#DynamoDB Thread 1' And PostedBy = 'User B'" --return-consumed-capacity TOTAL
With PostedBy attributes at the filter-expression option, this command returns the following result.
DynamoDB table Query and Sort CLI command
–scan-index-forward : order items in ascending order of the sort key. This would be analogous in SQL to “ORDER BY ReplyDateTime ASC”
–no-scan-index-forward : order items in descending order of the sort key. This would be analogous in SQL to “ORDER BY ReplyDateTime DESC”
aws dynamodb execute-statement --statement "SELECT * FROM Reply WHERE Id='Amazon DynamoDB#DynamoDB Thread 1' ORDER BY ReplyDateTime ASC" --limit 1 --return-consumed-capacity TOTAL
This command returns the following result.
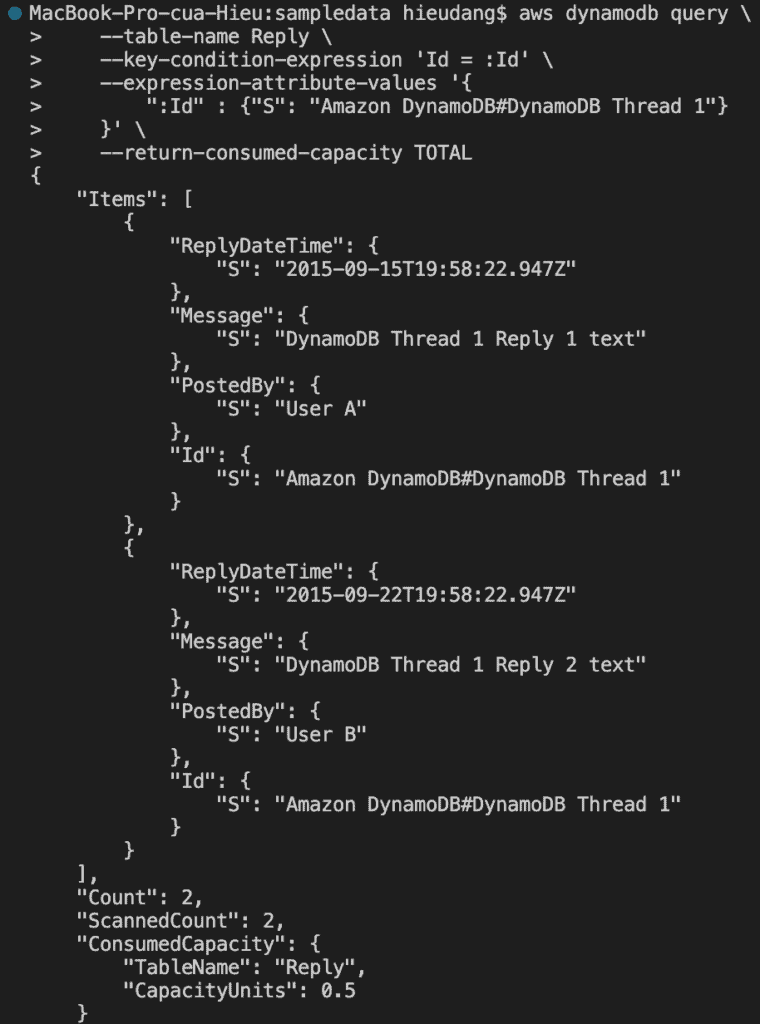
Now let’s try without setting a limit on the number of items
#DynamoDB API
aws dynamodb query --table-name Reply --key-condition-expression 'Id = :Id' --expression-attribute-values '{":Id" : {"S": "Amazon DynamoDB#DynamoDB Thread 1"}}' --no-scan-index-forward --output table

#PartiQL
aws dynamodb execute-statement --statement "SELECT * FROM Reply WHERE Id='Amazon DynamoDB#DynamoDB Thread 1' ORDER BY ReplyDateTime DESC" --output table
This is sorted in descending order by sort key ReplyDateTime.
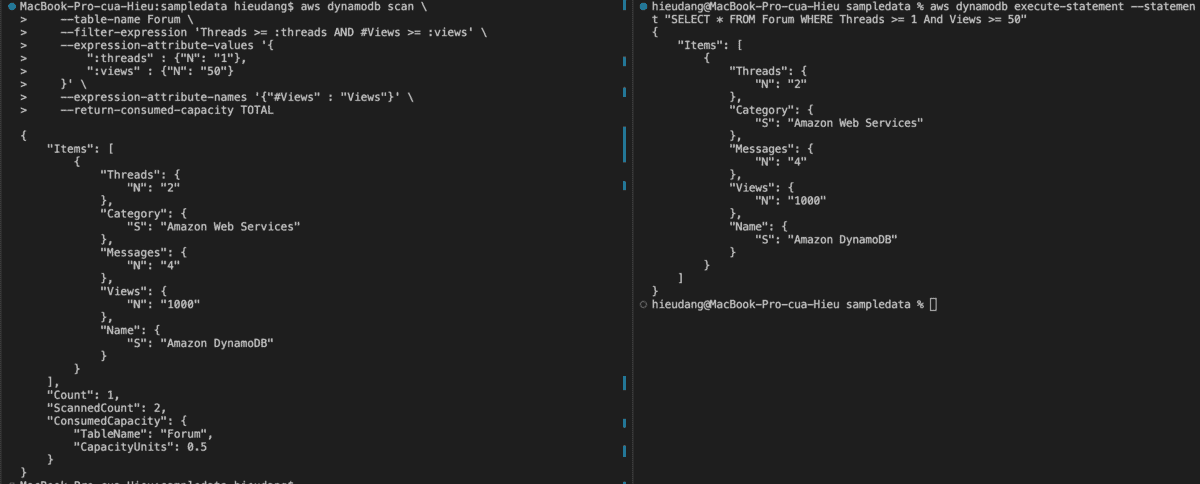
DynamoDB table Scan and filter with CLI command
Scan will do a full table scan, however, we can specify a Filter Expression which will reduce the size of the result set, but it will not reduce the amount of capacity consumed.
#DynamoDB API
aws dynamodb scan \
    --table-name Forum \
    --filter-expression 'Threads >= :threads AND #Views >= :views' \
    --expression-attribute-values '{
        ":threads" : {"N": "1"},
        ":views" : {"N": "50"}
    }' \
    --expression-attribute-names '{"#Views" : "Views"}' \
    --return-consumed-capacity TOTAL
#PartiQL
aws dynamodb execute-statement --statement "SELECT * FROM Forum WHERE Threads >= 1 And Views >= 50"
This command returns the following result.
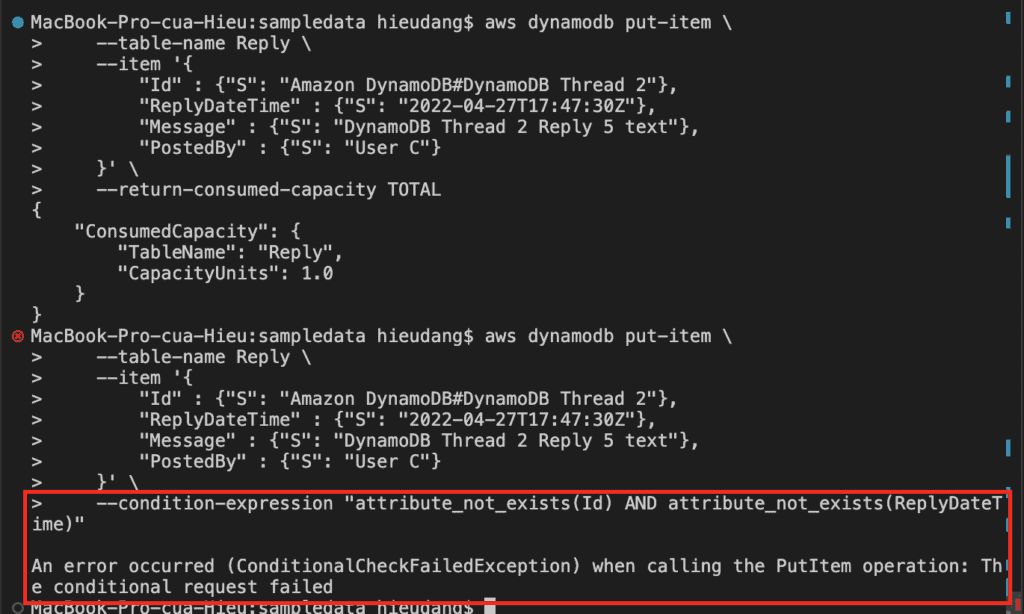
Insert data to DynamoDB table with CLI command
Creates a new item, or replaces an old item with a new item. If an item that has the same primary key as the new item already exists in the specified table, the new item completely replaces the existing item.
With put-item, if an item that has the same primary key as the new item already exists in the specified table, the new item completely replaces the existing item. But with PartiQL, if the table already has an item with the same primary key as the primary key of the item being inserted, DuplicateItemException is returned.
With put-item, to prevent a new item from replacing an existing item, use a conditional expression that contains the attribute_not_exists function with the name of the attribute being used as the partition key for the table.
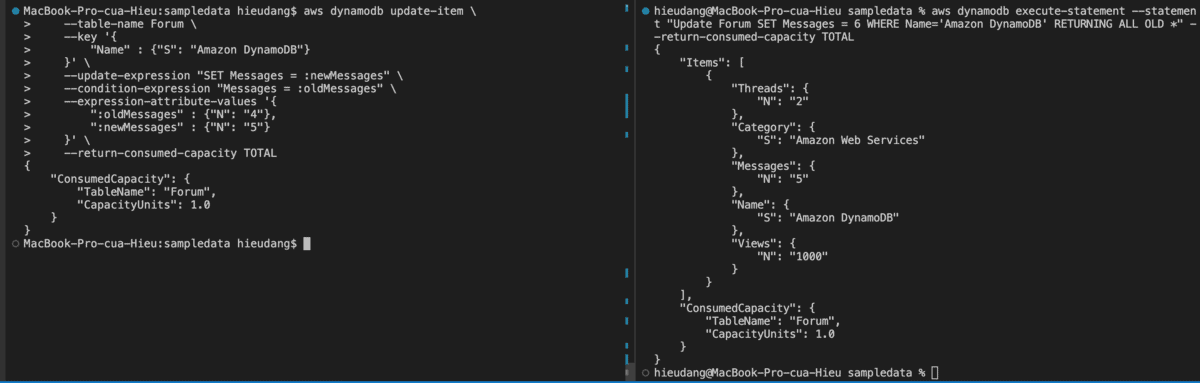
With the update-item command, we can edit an existing item’s attributes, or add a new item to the table if it does not already exist.
#DynamoDB API
aws dynamodb update-item \
    --table-name Forum \
    --key '{
        "Name" : {"S": "Amazon DynamoDB"}
    }' \
    --update-expression "SET Messages = :newMessages" \
    --condition-expression "Messages = :oldMessages" \
    --expression-attribute-values '{
        ":oldMessages" : {"N": "4"},
        ":newMessages" : {"N": "5"}
    }' \
    --return-consumed-capacity TOTAL

#PartiQL(update and show value before update)
aws dynamodb execute-statement --statement "Update Forum SET Messages = 6 WHERE Name='Amazon DynamoDB' RETURNING ALL OLD *" --return-consumed-capacity TOTAL
This command returns the following result.
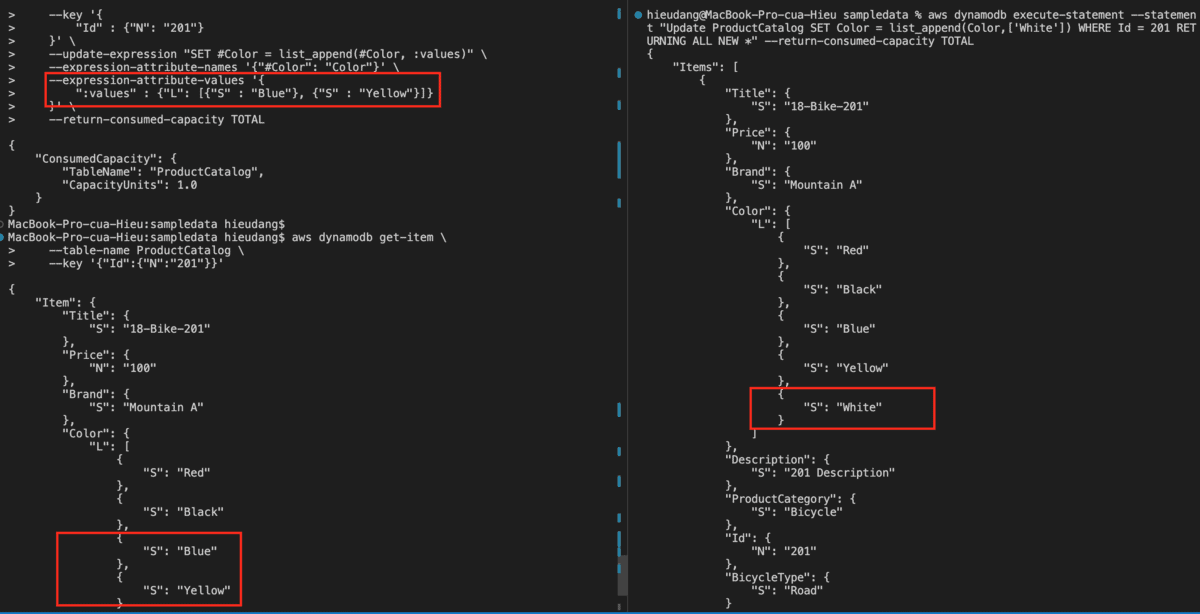
Let’s update the attribute of the type map with the CLI
#DynamoDB API
aws dynamodb update-item \
    --table-name ProductCatalog \
    --key '{
        "Id" : {"N": "201"}
    }' \
    --update-expression "SET #Color = list_append(#Color, :values)" \
    --expression-attribute-names '{"#Color": "Color"}' \
    --expression-attribute-values '{
        ":values" : {"L": [{"S" : "Blue"}, {"S" : "Yellow"}]}
    }' \
    --return-consumed-capacity TOTAL

#PartiQL
aws dynamodb execute-statement --statement "Update ProductCatalog SET Color = list_append(Color,['White']) WHERE Id = 201 RETURNING ALL NEW *" --return-consumed-capacity TOTAL
This command returns the following result.
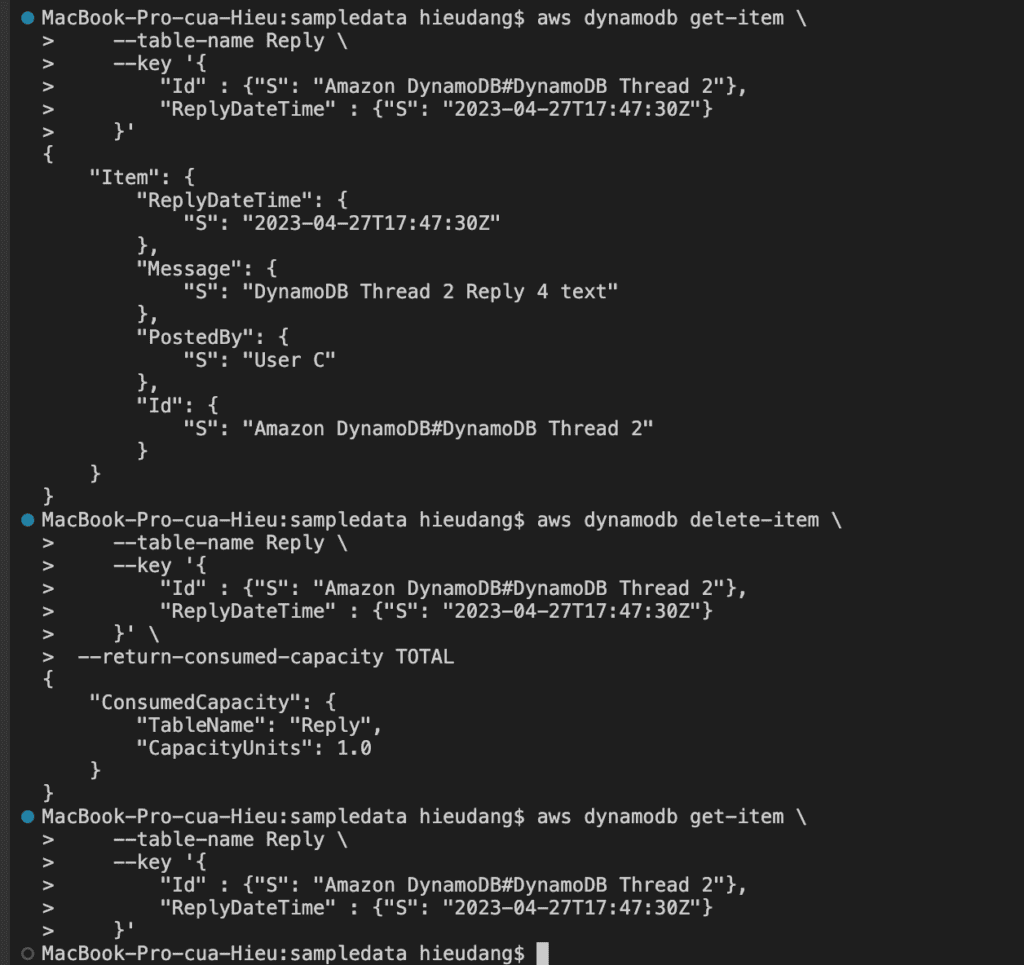
Delete data of DynamoDB table with CLI command
The delete-item the command is used command to delete an item from the DynamoDB table. Because it won’t report an error if the key doesn’t exist, we can use the delete-item command to confirm the existence of an item before deleting it.
If the DynamoDB table does not have any item with the same primary key as that of the item for which the DELETE is issued, SUCCESS is returned with 0 items deleted. If the table has an item with same primary key, but the condition in the WHERE clause of the DELETE statement evaluates to false, ConditionalCheckFailedException is returned.
#PartiQL delete
aws dynamodb get-item --table-name Reply --key '{
        "Id" : {"S": "Amazon DynamoDB#DynamoDB Thread 2"},
        "ReplyDateTime" : {"S": "2022-04-27T17:47:30Z"}
    }'
aws dynamodb execute-statement --statement "DELETE FROM Reply WHERE Id = 'Amazon DynamoDB#DynamoDB Thread 2' AND ReplyDateTime = '2022-04-27T17:47:30Z'"
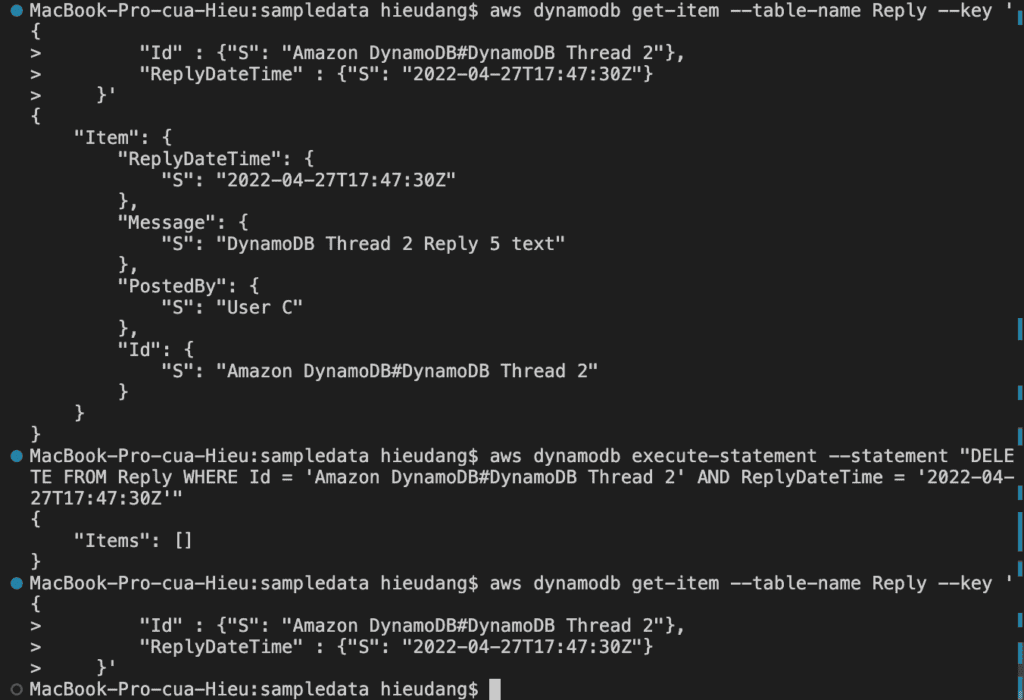
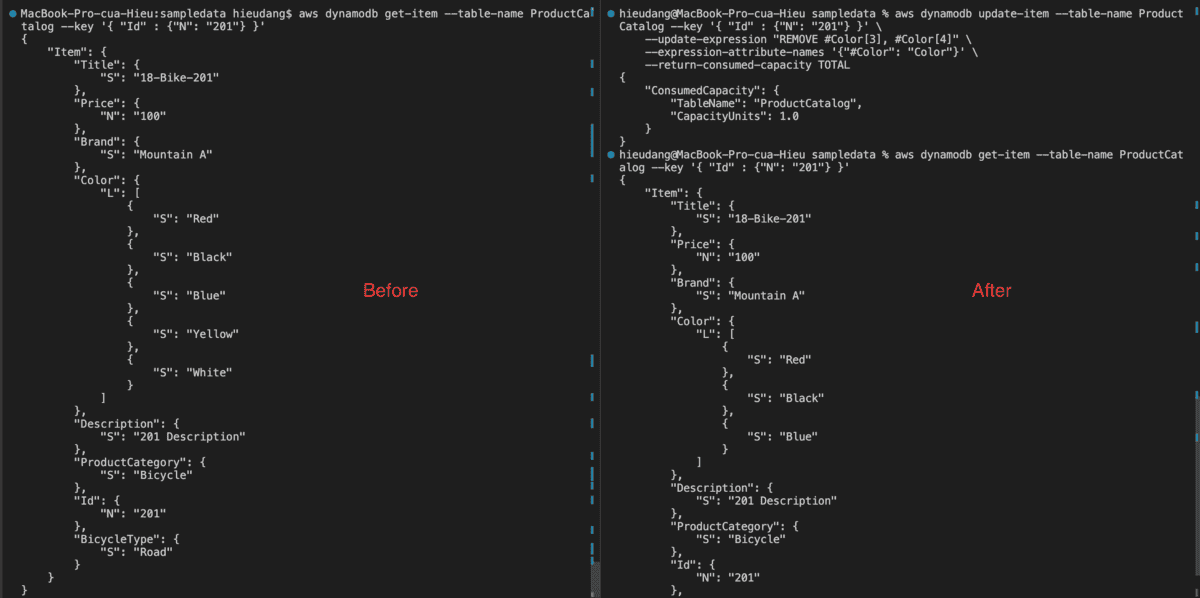
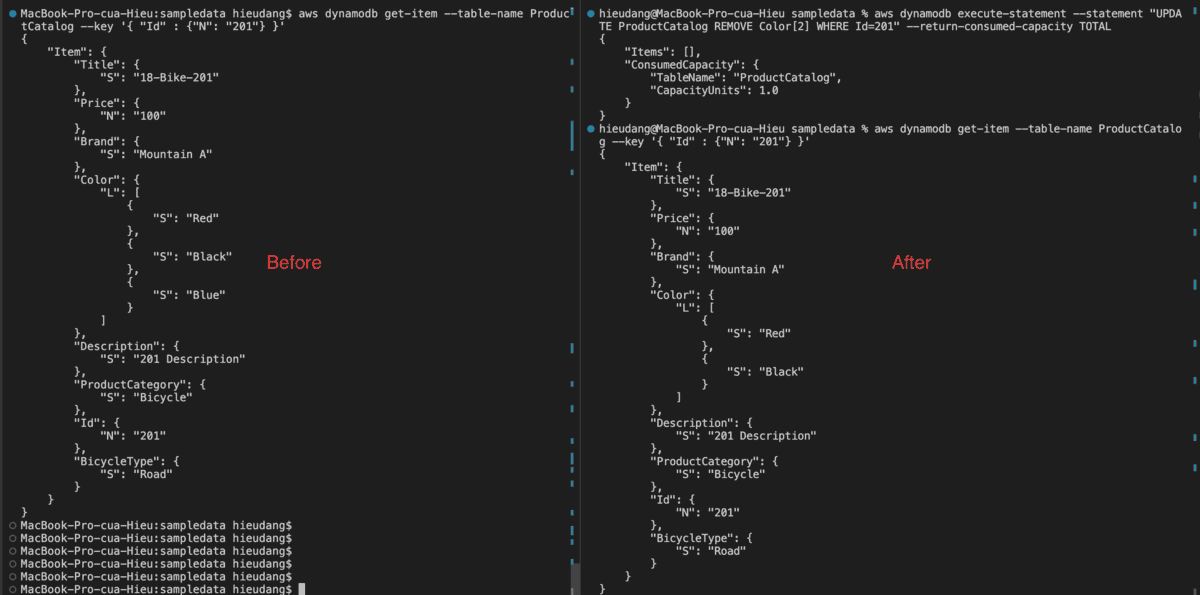
Delete a value from a list type with the CLI command
Delete from a list type use PartiQL update statements
#Confirm
aws dynamodb get-item --table-name ProductCatalog --key '{ "Id" : {"N": "201"} }'

#Delete 'Blue' from Color list
aws dynamodb execute-statement --statement "UPDATE ProductCatalog REMOVE Color[2] WHERE Id=201" --return-consumed-capacity TOTAL
This command returns the following result.
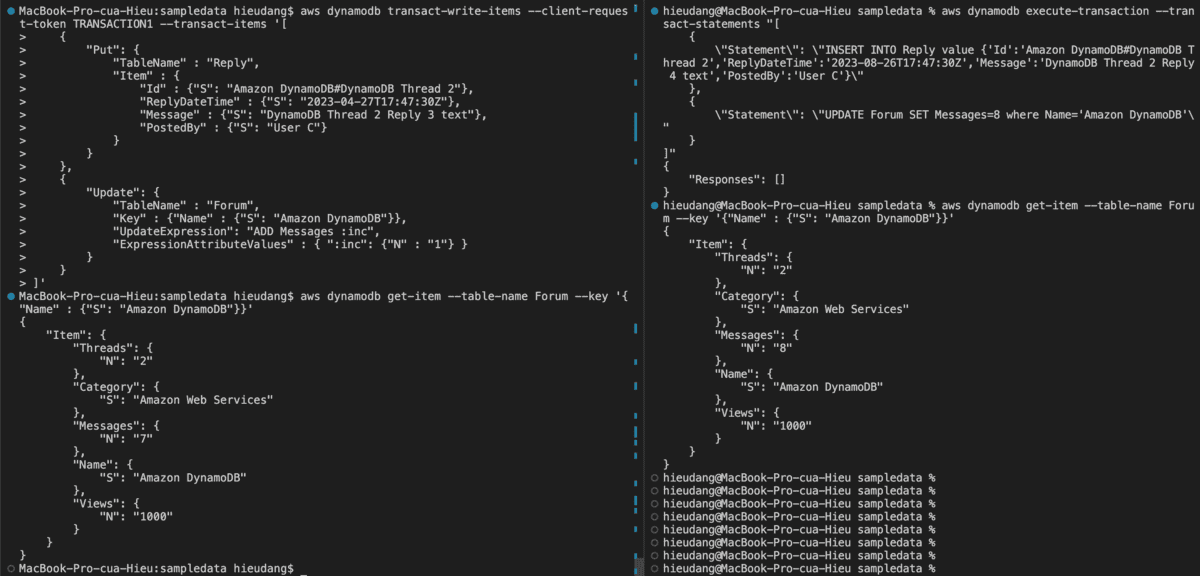
DynamoDB transaction with CLI command
DynamoDB API TransactWriteItems is a synchronous write operation that groups up to 100 action requests. These actions can target items in different tables, but not in different Amazon Web Services accounts or Regions, and no two actions can target the same item. For example, you cannot both ConditionCheck and Update the same item. The aggregate size of the items in the transaction cannot exceed 4 MB.
The following example runs multiple statements as a transaction.
PartiQL allows you to save your JSON code to a file and pass it to the –transact-statements parameter. Alternatively, you can enter it directly on the command line.
This command returns the following result.
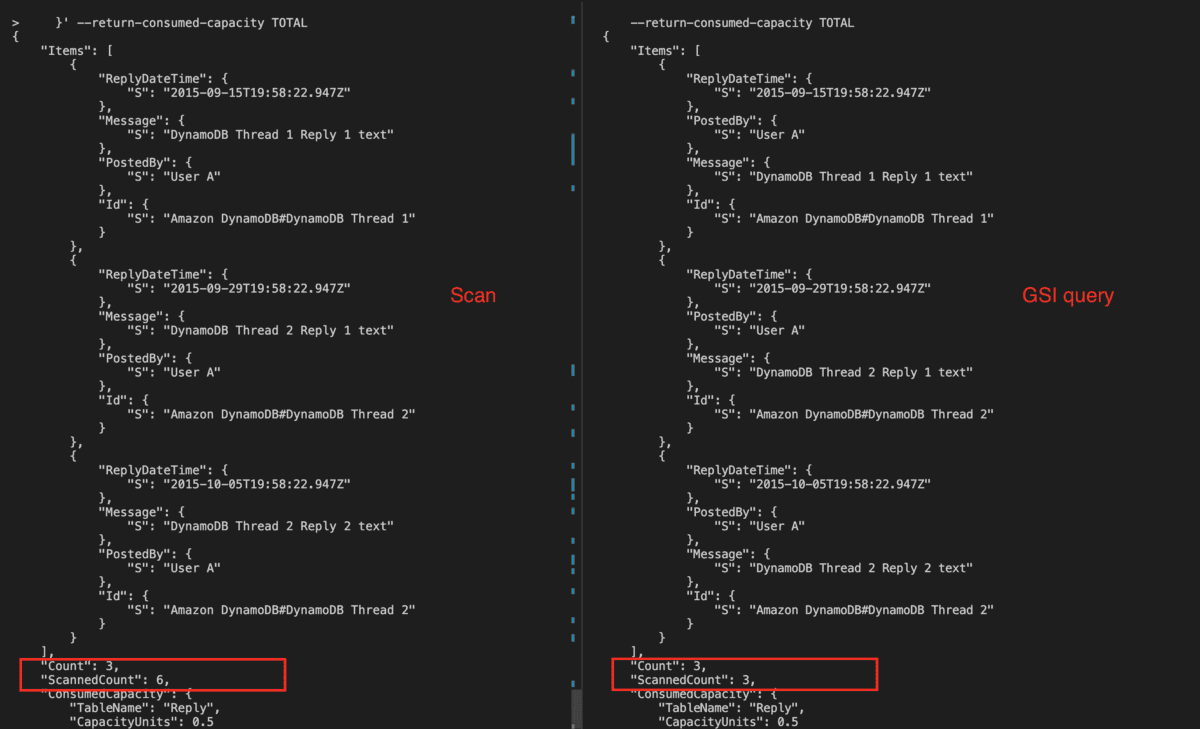
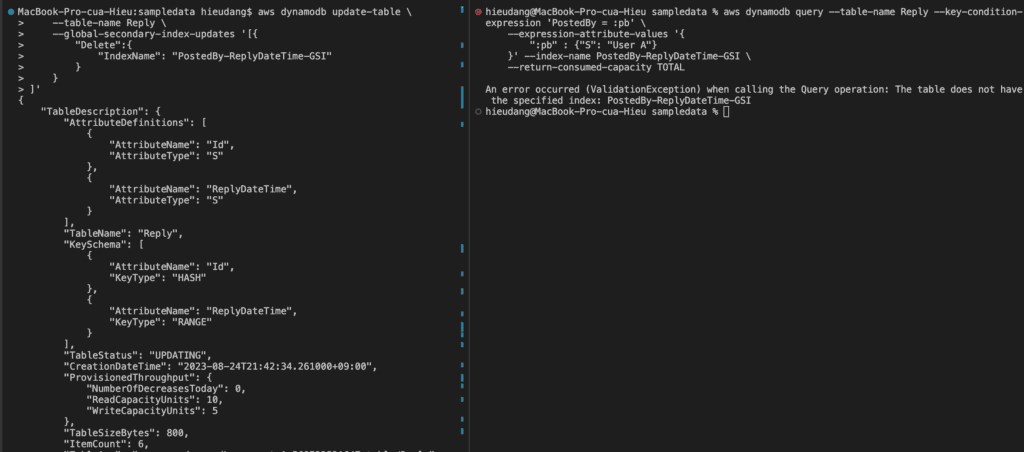
Using the Global Secondary Index
To speed up queries on non-key attributes, you can create a global secondary index. A global secondary index contains a selection of attributes from the base table, but they are organized by a primary key that is different from that of the table.
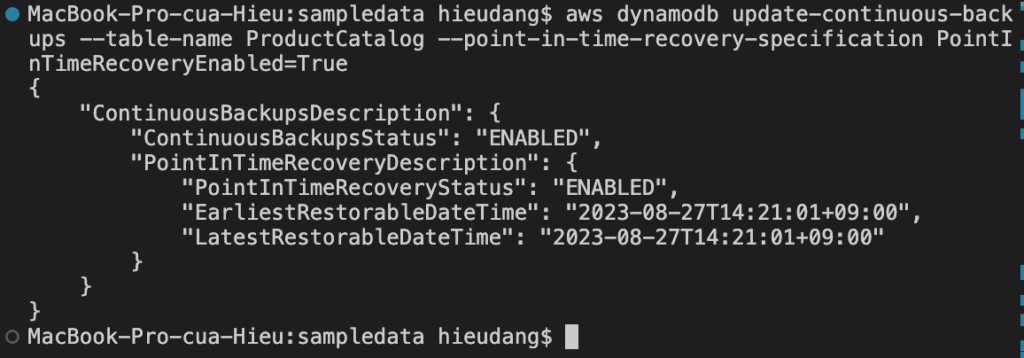
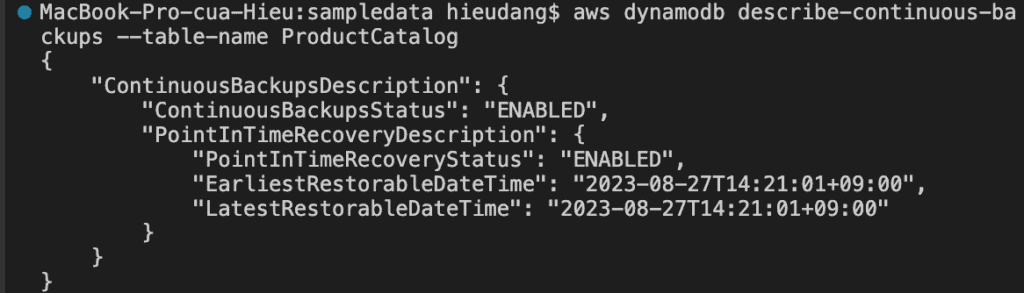
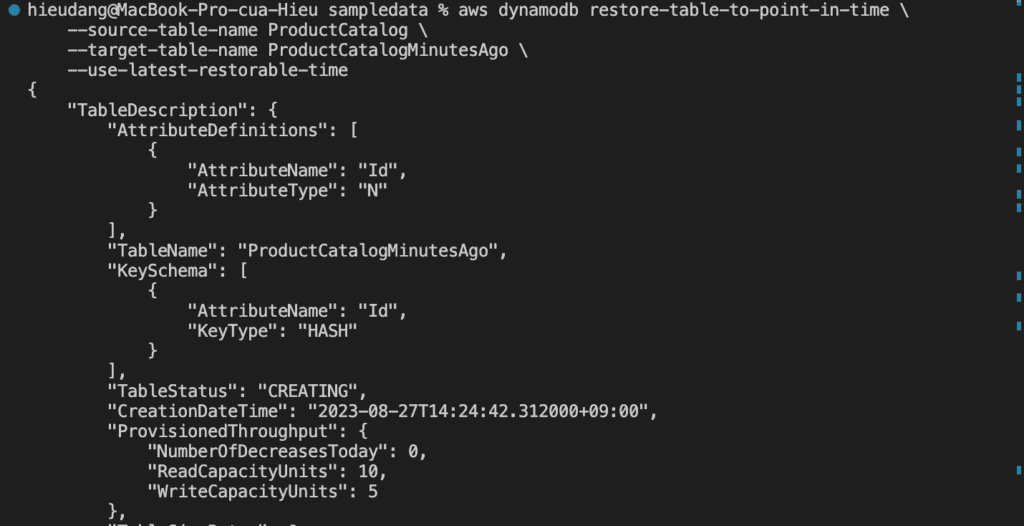
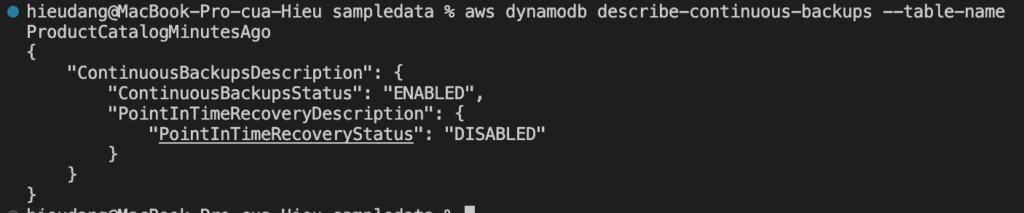
Restore the table to a point in time. In this case, the ProductCatalog table is restored to the LatestRestorableDateTime (~5 minutes ago) to the same AWS Region.
We must manually set the following on the restored table:
Auto scaling policies
AWS Identity and Access Management (IAM) policies
Amazon CloudWatch metrics and alarms
Tags
Stream settings
Time to Live (TTL) settings
Point-in-time recovery settings
Delete Amazon DynamoDB table CLI command
The delete-table operation deletes a table and all of its items, any indexes on that table are also deleted. If you have DynamoDB Streams enabled on the table, then the corresponding stream on that table goes into the DISABLED state and the stream is automatically deleted after 24 hours.
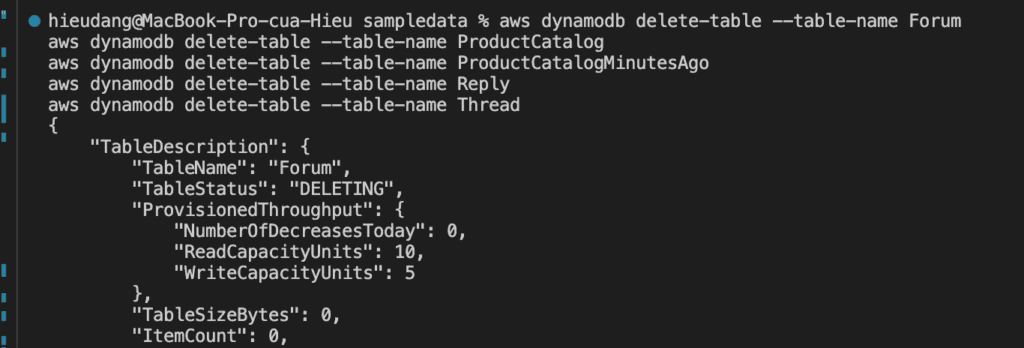
aws dynamodb delete-table --table-name Forum
We can use the describe-table action to check the status of the table.
Conclusion
These steps provide a general AWS CLI (DynamoDB API and PartiQL for DynamoDB) of the process to manage DynamoDB. The specific configuration details may vary depending on your environment and setup. It’s recommended to consult the relevant documentation from AWS for detailed instructions on setting up. I hope will this be helpful. Thank you for reading the DevopsRoles page!
You can use the AWS Console Manager to manage the Aurora PostgreSQL global database, alternatively, you can manage the Aurora PostgreSQL global database using the AWS CLI in Linux(AWS Cloud9 for my lab) as below.
Guide to creating and managing the Aurora PostgreSQL global database using the AWS CLI.
This lab contains the following tasks
Create Aurora Postgresql global database from a Regional cluster using AWS CLI
Add reader instances in the Secondary Aurora DB cluster using AWS CLI
Perform a Managed Planned Failover to the secondary region using AWS CLI
Detaches an Aurora secondary cluster from an Aurora global database cluster using AWS CLI
Prerequisites
For this walkthrough, you should have the following prerequisites configured:
Amazon Aurora PostgreSQL cluster in a single region
AWS CLI environment deployed
Cluster Parameter Group Name, VPC Security Group, and DB Subnet Group were deployed into the primary region and the secondary region
Detail Steps
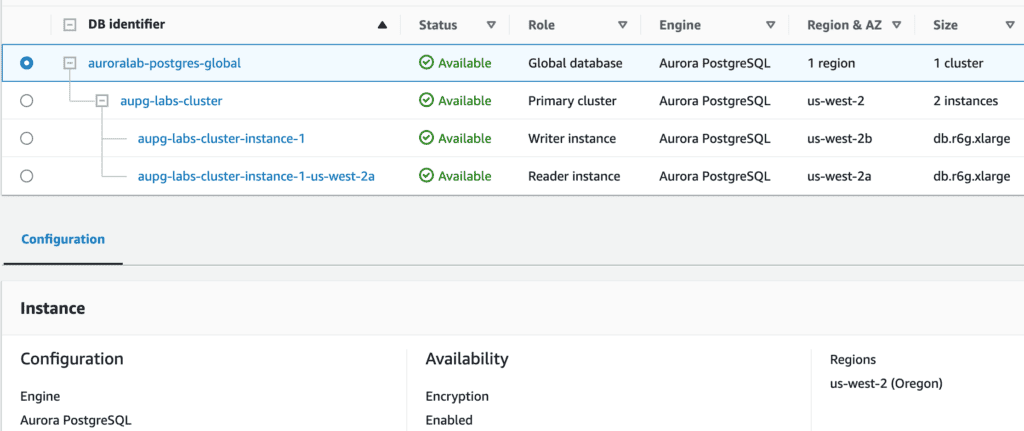
Create Aurora Postgresql global database from a Regional cluster using AWS CLI
On the primary AWS Region, execute the below code using AWS CLI
# Get current cluster ARN
CLUSTER_ID=`aws rds describe-db-clusters --db-cluster-identifier aupg-labs-cluster --query 'DBClusters[*].DBClusterArn' | jq -r '.[0]'`

# convert the Aurora Provisioned cluster to global
aws rds create-global-cluster  --global-cluster-identifier auroralab-postgres-global --source-db-cluster-identifier $CLUSTER_ID
This operation will take 2-5 minutes to complete.
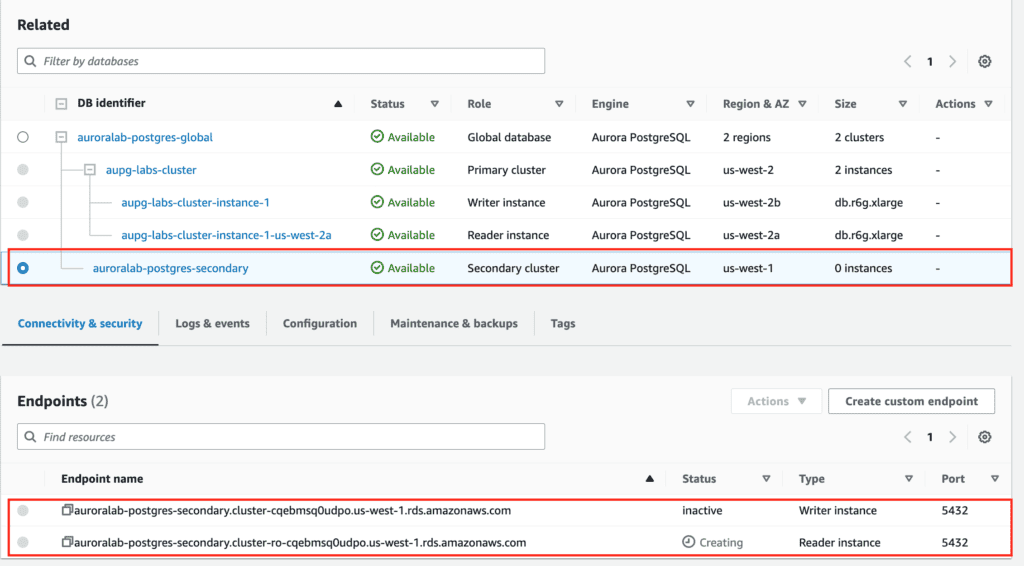
In the next step, perform the following actions using AWS CLI to add a secondary region.
# obtain KeyID of the KMS key in the secondary region
aws kms describe-key --key-id alias/aws/rds --region us-west-1 --query 'KeyMetadata.KeyId'

# create the secondary cluster
aws rds --region us-east-1 \
  create-db-cluster \
     --db-cluster-identifier auroralab-postgres-secondary \
     --global-cluster-identifier auroralab-postgres-global \
     --engine aurora-postgresql \
     --kms-key-id d71e19d3-24a3-48cb-9e7f-10fbd28ef271 \
     --engine-version 15.3 \
     --db-cluster-parameter-group-name rds-apgcustomclusterparamgroup \
     --db-subnet-group-name aupg-labs-db-subnet-group \
     --vpc-security-group-ids sg-0cdcd29e64fd436c6 \
     --backup-retention-period 7 --region us-west-1
This operation will take 5-10 minutes to complete.
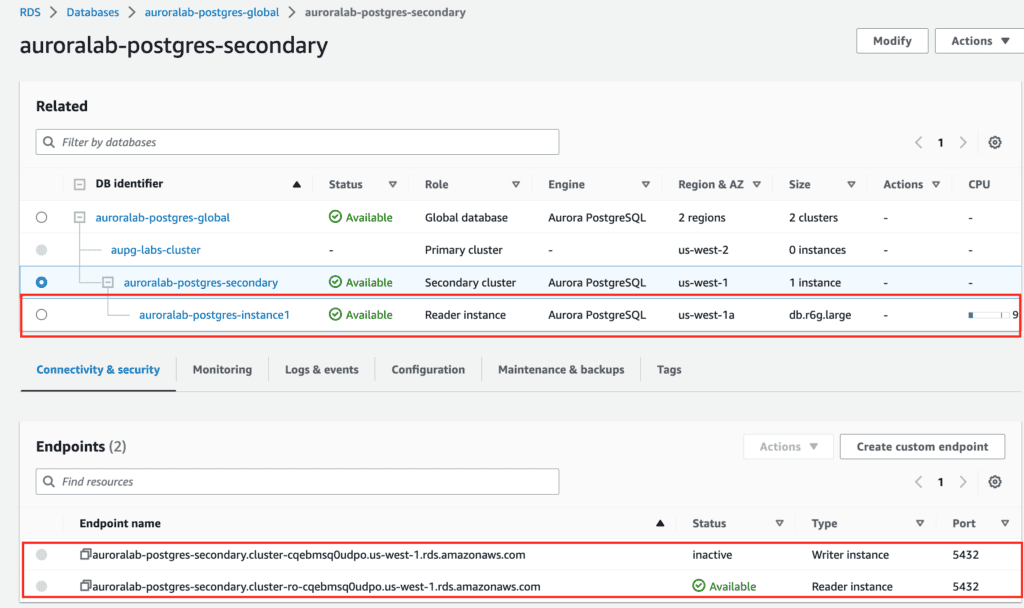
Add reader instances in the Secondary Aurora DB cluster using AWS CLI
This operation will take 5-10 minutes to complete.
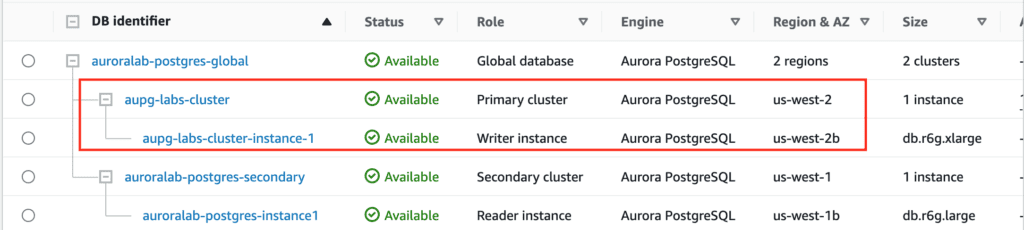
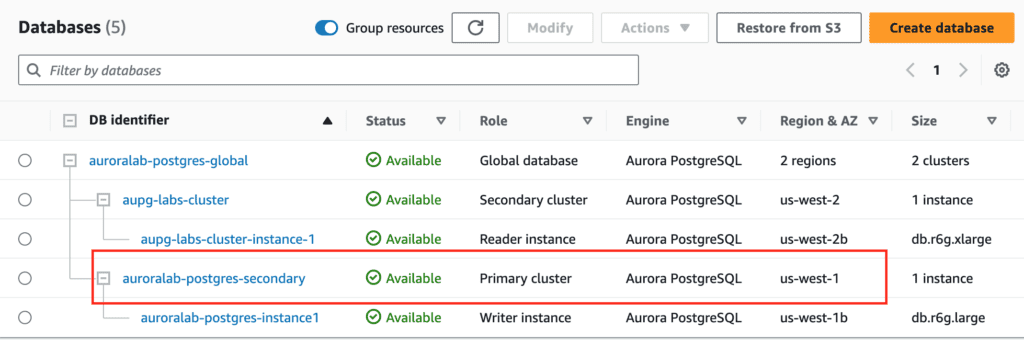
Perform a Managed Planned Failover to the secondary region using AWS CLI
This method is recommended for disaster recovery. When you use this method, Aurora automatically adds back the old primary Region to the global database as a secondary Region when it becomes available again. Thus, the original topology of your global cluster is maintained.
This alternative method can be used when managed failover isn’t an option, for example, when your primary and secondary Regions are running incompatible engine versions.
Detaches an Aurora secondary cluster from an Aurora global database cluster using AWS CLI
These steps provide a general AWS CLI of the process of managing the Aurora global Postgresql instance. The specific configuration details may vary depending on your environment and setup. It’s recommended to consult the relevant documentation from AWS for detailed instructions on setting up.
Manage the Aurora PostgreSQL global database
I hope will this be helpful. Thank you for reading the DevopsRoles page!