In this tutorial, How to fix the Unknown configuration section vbguest on Vagrant. Now, let’s fix Vagrant: Unknown configuration section vbguest.
Environment: CentOS 6x.
Vagrant version 2.2.18
My Vagrantfile
Vagrant.configure("2") do |config|
-----
config.vbguest.auto_update = false
-----
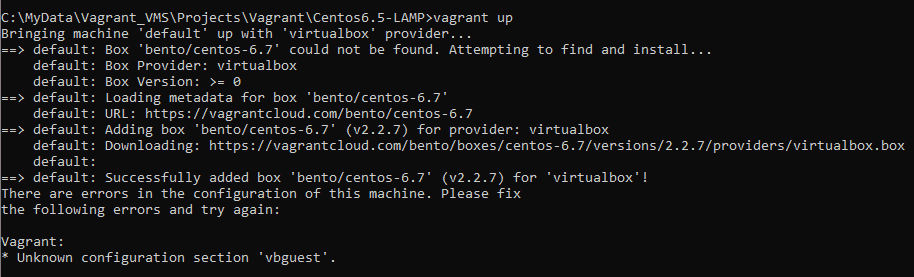
Error: Unknown configuration section vbguest
The reason is because of the missing vagrant.vbguest plugin.
Check plugin for Vagrant
C:\Users\HuuPV>vagrant plugin list
not found
1.If not, install “vagrant-vbguest“
C:\MyData\Vagrant_VMS\Projects\Vagrant\Centos6.5-LAMP>vagrant plugin install vagrant-vbguest
Installing the 'vagrant-vbguest' plugin. This can take a few minutes...
Fetching micromachine-3.0.0.gem
Fetching vagrant-vbguest-0.30.0.gem
Installed the plugin 'vagrant-vbguest (0.30.0)'!
2. If exist, uninstall and reinstall “vagrant-vbguest“
How to use the git command every day. Git Cheat Sheet I use it every day. Git has become an essential tool for developers, allowing them to efficiently manage version control and collaborate on projects.
this guide will provide you with a comprehensive overview of Git’s essential commands and workflow. Let’s dive in!
What does Git mean?
Git is software for tracking changes in any set of files, usually used for coordinating work among programmers collaboratively developing source code during software development. Quote from Wikipedia.
Git Cheat Sheet Example
Check my git configure
git config -l
Configuration
Before you start using Git, it’s crucial to set up your configuration. You can configure your username and email globally using the git config command. For example Setup my Git username and Email Id
Username and EmailID assigned to commit from local computer.
Creating and Cloning Repositories
git init
Add a file to the staging area in Git
git add file_name
Add all files in your project to the staging area in Git
git add .
Commit changes for the files in a local repo.
git commit
git commit -m "first commit"
Shows the commit history for the current repository
git log
Show if a file is in the staging area, but not committed
git status
Remove tracked files from the current working tree
git rm filename
Rename files
git mv oldfile newfile
Branches
Branches are a powerful feature in Git, allowing you to work on different versions of your code simultaneously.
Create a new branch
git branch branch_name
Switch to a newly created branch
git checkout branch_name
Create a new branch and switch it immediately
git checkout -b branch_name
List branches
git branch
Merge and Remote Repositories
Merge two branches
git merge branch_name
Add a remote repository to your local repository
git add remote https://repo_url_here
Git clone
git clone
download updates from a remote repository.
git pull
After committing your changes, the next you send changes to the remote server.
git push
#or force push
git push -f
History and Logs
Git provides extensive tools to explore commit history. The git log the command shows the commit history
git log
The display presents a more compact view
git log --oneline
If you prefer a graphical representation, git log --graph creates a commit history graph.
git log --graph
To view the details of a specific commit
git show <commit>
Conclusion
Git is a powerful version control system that enables efficient collaboration and project management. This guide has provided an overview of essential Git commands and workflows, giving you a solid foundation to start using Git effectively
You have used Git Cheat Sheet every day. I hope will this your helpful. Thank you for reading the DevopsRoles page!
egularly backing up and, if necessary, restoring your PostgreSQL database is essential for data protection and disaster recovery. Remember to schedule automated backups, keep your backup files in a secure location, and test your backup and restore procedures periodically to ensure they work as expected.
By following these steps, you can safeguard your data and have peace of mind knowing that your PostgreSQL database is protected against data loss and system failures.
You have Backup and restore a Postgres database. I hope will this your helpful. Thank you for reading the DevopsRoles page!
In today’s fast-paced development environments, the ability to quickly deploy and manage databases is crucial. Docker provides a powerful solution for running PostgreSQL databases in isolated containers, making it easier to develop, test, and deploy your applications. In this tutorial, you will learn how to use Docker run PostgreSQL databases and connect to them, enabling you to efficiently manage your database environments with minimal setup. Whether you’re new to Docker or looking to streamline your database management, this guide will equip you with the essential knowledge to get started.
PostgreSQL is a powerful, open-source object-relational database
Docker is an open platform that runs an application in an isolated environment called a container.
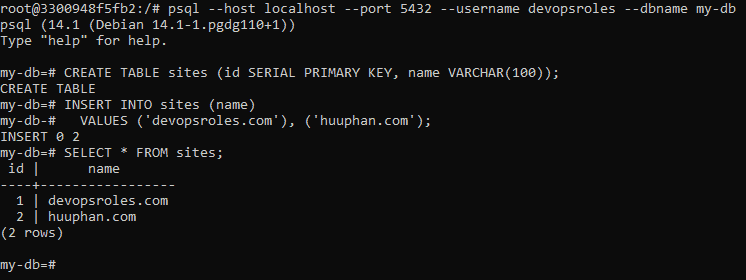
Your database is currently empty. I will create a table as an example
CREATE TABLE sites (id SERIAL PRIMARY KEY, name VARCHAR(100));
INSERT INTO sites (name)
  VALUES ('devopsroles.com'), ('huuphan.com');
I will run a command to query the table created.
SELECT * FROM sites;
The output terminal is below
Docker Manage data persistence
The problem is that we stop and start the container with the commands “docker stop my-postgres-db” and “docker start my-postgres-db” when creating a new container will not allow us to access the database that you are created, as it was isolated in your container.
Create a new volume with the following command. The solution stores the database outside of the container
docker volume create my-postgres-db-db
You will stop and remove your current container and create a new one.
How to know where the database is stored on your computer
docker inspect my-postgres-db-db
The output terminal is below
Link Youtube: Docker run PostgreSQL
Conclusion
Using Docker to run PostgreSQL databases offers a streamlined approach to managing your database environments with ease and efficiency. I hope this tutorial has provided you with the necessary insights and steps to confidently set up and connect to PostgreSQL using Docker. Thank you for reading the DevopsRoles page and I hope this guide proves helpful in your journey toward optimizing your development and deployment processes.
As experienced DevOps engineers, we often treat Docker image cleanup as a routine garbage collection task. However, the Docker daemon occasionally halts this process with a specific conflict error that prevents the removal of an image ID. If you have attempted to remove a base image and encountered the error conflict: unable to delete [IMAGE_ID] (cannot be forced) - image has dependent child images, you are dealing with Docker’s layered filesystem architecture in action.
This guide dives into the mechanics of UnionFS layers to explain why this happens and provides production-ready strategies to delete docker image with dependent child images safely and effectively.
To fix the problem, we must first respect the underlying architecture. Docker images are not monolithic files; they are a stack of read-only layers. When you build Image B using FROM Image A, Image B becomes a “child” of Image A. Docker uses storage drivers (like overlay2) to reference the layers of the parent image rather than duplicating them.
The error occurs because deleting the parent image (Image A) would render the child image (Image B) corrupt, as its base layers would vanish from the filesystem.
Technical Context: Unlike a running container conflict—which blocks deletion because a read-write layer is active—a dependent child conflict is purely about filesystem integrity. The Docker daemon protects the Directed Acyclic Graph (DAG) of your image layers.
Today, I can’t delete docker images with dependent child images. How to delete docker image with dependent child images.
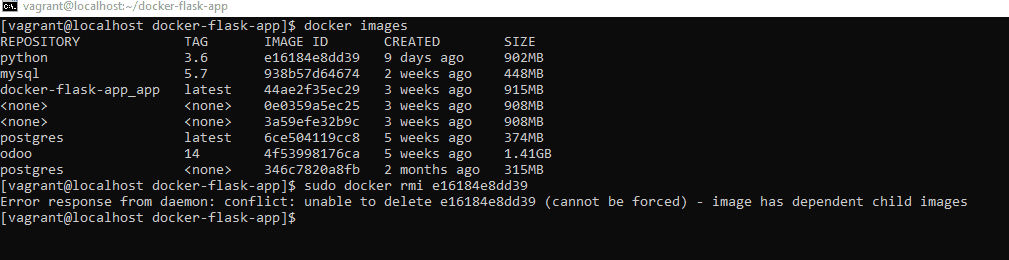
I want to delete image e16184e8dd39
[vagrant@localhost docker-flask-app]$ docker images
REPOSITORY             TAG       IMAGE ID       CREATED        SIZE
python                 3.6       e16184e8dd39   9 days ago     902MB
mysql                  5.7       938b57d64674   2 weeks ago    448MB
docker-flask-app_app   latest    44ae2f35ec29   3 weeks ago    915MB
<none>                 <none>    0e0359a5ec25   3 weeks ago    908MB
<none>                 <none>    3a59efe32b9c   3 weeks ago    908MB
postgres               latest    6ce504119cc8   5 weeks ago    374MB
odoo                   14        4f53998176ca   5 weeks ago    1.41GB
postgres               <none>    346c7820a8fb   2 months ago   315MB
I am trying with command as below
sudo docker rmi e16184e8dd39
Error delete docker image with dependent child images
[vagrant@localhost docker-flask-app]$ sudo docker rmi e16184e8dd39
Error response from daemon: conflict: unable to delete e16184e8dd39 (cannot be forced) - image has dependent child images
[vagrant@localhost docker-flask-app]$
I can not delete an image with the -f flag.
How to Fixed it
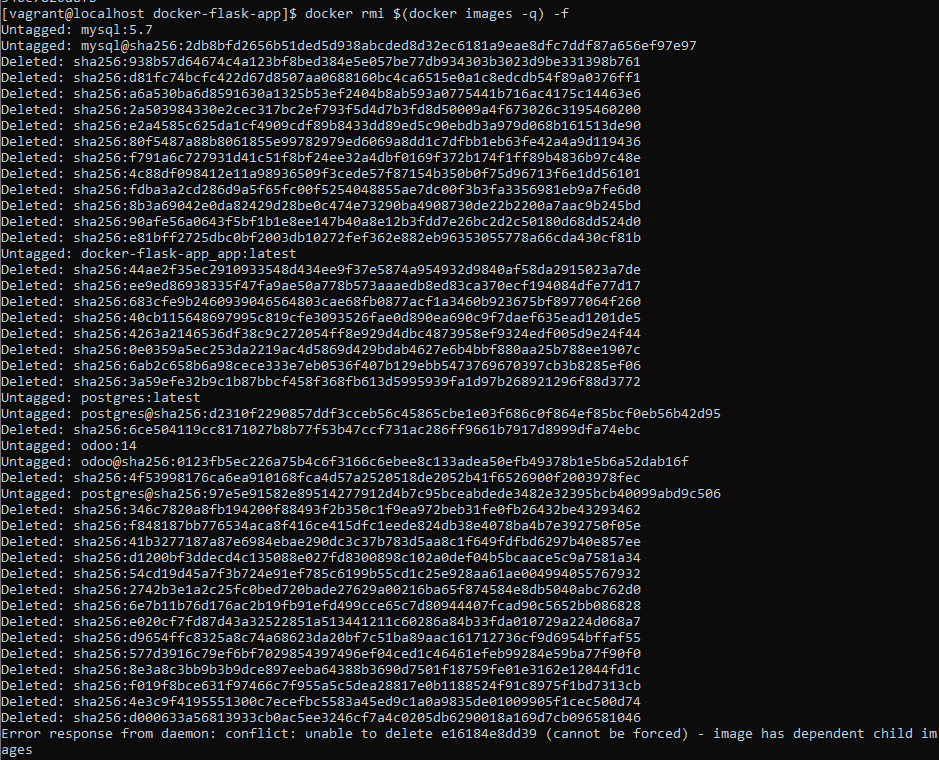
You should try to remove unnecessary images before removing the image:
Expert Troubleshooting: Why `docker rmi` Still Fails
Sometimes, even after following the steps above to delete docker image with dependent child images, the daemon persists with errors. Here are the edge cases:
Stopped Containers: A stopped container still holds a reference to the image. Ensure you run docker ps -a to catch exited containers.
Build Cache: Modern Docker BuildKit uses a separate cache. If you are seeing space usage issues not resolved by rmi, you may need to prune the build cache specifically.
What is the difference between a dependent child image and a container?
A container is a runtime instance of an image (a read-write layer on top). A dependent child image is a separate static image that was built FROM the parent image. docker rm handles containers, while docker rmi handles images.
Why do I see so many <none> images?
These are usually dangling images (layers that have no relationship to any tagged images) or intermediate layers. They frequently cause dependency errors when you try to delete their parents. Using docker image prune is the standard maintenance procedure for this.
Is it safe to delete the /var/lib/docker folder directly?
This is the “nuclear option” and should be avoided unless the daemon is completely corrupted. Manually deleting files in /var/lib/docker bypasses the Docker daemon’s database, which can lead to inconsistent states and require a full reinstall of the Docker engine.
Conclusion
Managing the lifecycle of container artifacts is a core competency for any DevOps engineer. The error regarding dependent child images is a safety mechanism, ensuring that the shared layers required by your ecosystem remain intact.
To successfully delete docker image with dependent child images, prioritize identifying the child image using docker inspect. Use force flags judiciously, and lean on docker system prune for maintaining hygiene in your build environments. By understanding the parent-child relationship in UnionFS, you can keep your registry clean without breaking production dependencies . Thank you for reading the DevopsRoles page!
In this tutorial, How to deploy Flask-MySQL app with docker-compose. From the official docs. Compose is a tool for defining and running multi-container Docker applications. With Compose, you use a YAML file to configure your application’s services. Then, with a single command, you create and start all the services from your configuration. The fist, You need to install Docker and docker-compose. Next, we will Deploy Flask-MySQL app.
[vagrant@localhost docker-flask-app]$ cat db/init.sql
create database devopsroles;
use devopsroles;

CREATE TABLE test_table (
  name VARCHAR(20),
  color VARCHAR(10)
);

INSERT INTO test_table
  (name, color)
VALUES
  ('dev', 'blue'),
  ('pro', 'yellow');
Create a Docker image for Flask app
Create a Dockerfile file in the app folder.
[vagrant@localhost docker-flask-app]$ cat app/Dockerfile
# Use an official Python runtime as an image
FROM python:3.6

# The EXPOSE instruction indicates the ports on which a container
EXPOSE 5000

# Sets the working directory for following COPY and CMD instructions
# Notice we haven’t created a directory by this name - this instruction
# creates a directory with this name if it doesn’t exist
WORKDIR /app

COPY requirements.txt /app
RUN python -m pip install --upgrade pip
RUN pip install --trusted-host pypi.org --trusted-host pypi.python.org --trusted-host=files.pythonhosted.org --no-cache-dir -r requirements.txt

# Run app.py when the container launches
COPY app.py /app
CMD python app.py
You need dependencies Flask and mysql-connector in File requirements.txt
[vagrant@localhost docker-flask-app]$ docker-compose up -d
The result, after running the Flask app
FAQs
1. What is Docker-Compose?
Docker-Compose is a tool for defining and running multi-container Docker applications. It allows you to configure your application’s services in a YAML file and start all services with a single command.
2. How can I persist data in MySQL?
In the Docker-Compose file, the db_data volume ensures that the data in MySQL is persisted even if the container is stopped.
3. Can I use a different database with Flask?
Yes, Flask can work with various databases like PostgreSQL, SQLite, and more. You need to adjust the connection setup in your Flask app and Docker-Compose file accordingly.
Conclusion
You have Deploy Flask-MySQL app with docker-compose. I hope will this your helpful. Thank you for reading the DevopsRoles page!
xargs Command powerful tool that can revolutionize the way you handle various tasks on your system. Whether it’s processing files, executing commands in parallel, or manipulating data streams, xargs is a versatile Swiss Army knife for any Linux enthusiast.
What does the xargs command in Linux?
xargs is a great command that reads streams of data from standard input, then generates and executes command lines.
In this blog, we will explore the ins and outs of the xargs command, its practical applications, and how it can make your life as a Linux user much easier.
Syntax
xargs [options] [command]
Here are some common options used with the xargs command:
-n: Specifies the maximum number of items to be passed as arguments to the command.
-I: Allows you to specify a placeholder (usually {}) for the argument, which is replaced by each item from the input.
-t: Prints the command being executed before running it.
-p: Asks for confirmation before executing each command.
-r: Prevents the command from running if there is no input.
-a: Specifies the input file from which xargs should read the items instead of STDIN.
-P: Sets the maximum number of parallel processes to run at once.
xargs command Tips and Tricks
How to create multiple files with xargs command in Linux.
Check the most recent four logins for each currently logged-in user.
who | awk '{print $1}' | xargs -I x last -4 x
The output terminal is below
Conclusion
You have to use xargs command for your work daily. The xargs command is an indispensable tool that empowers Linux users to streamline their tasks and increase productivity.
The xargs command is a versatile tool that can greatly enhance your command-line productivity. Whether you’re processing files, running commands in parallel, or performing batch operations, xargs can simplify and automate many tasks. However, it’s important to use it with care, especially when dealing with commands that modify or delete files.
Its ability to handle large sets of data, parallelize operations, and simplify complex tasks makes it a valuable asset in any Linux user’s toolkit. I hope will this your helpful. Thank you for reading the DevopsRoles page!
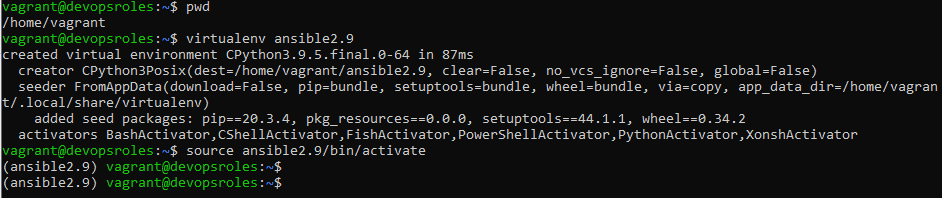
You need to create a “virtual environment” to host your local copy of Ansible.
virtualenv ansible2.9
This command creates a directory called ansible2.9 in your current working directory.
You must activate it
source ansible2.9/bin/activate
You should see the prompt change to include the virtualenv name.
(ansible2.9) $
The output terminal is as below
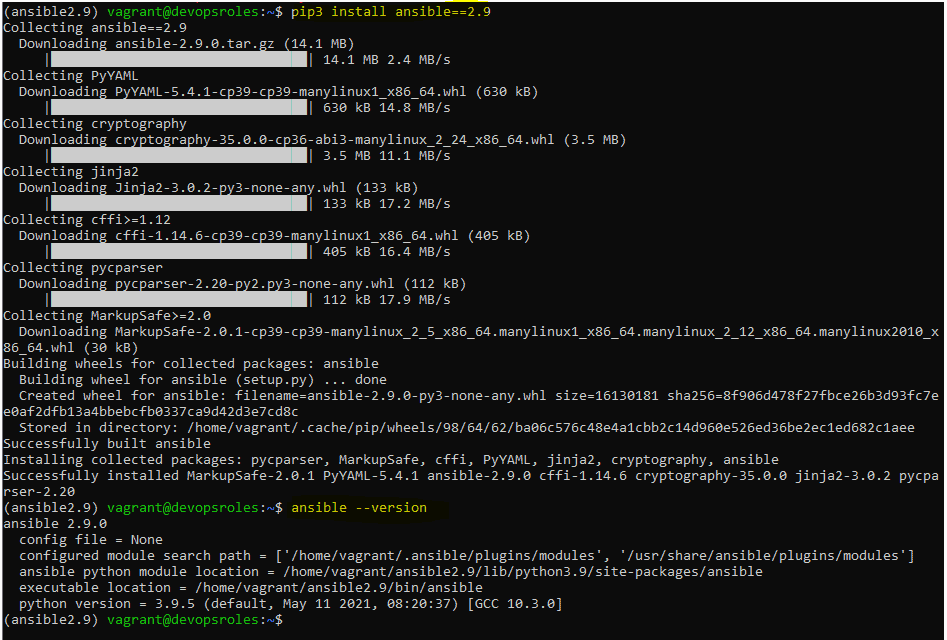
Let’s install Ansible
pip3 install ansible==2.9
The output terminal is as below
Conclusion
Congratulations! You’ve successfully installed Ansible using Virtualenv. This setup allows you to manage Ansible and its dependencies separately, ensuring a clean and controlled environment for your automation tasks. Activate the virtual environment whenever you need to work with Ansible and deactivate it when you’re done to keep your system Python environment tidy. I hope will this your helpful. Thank you for reading the DevopsRoles page!