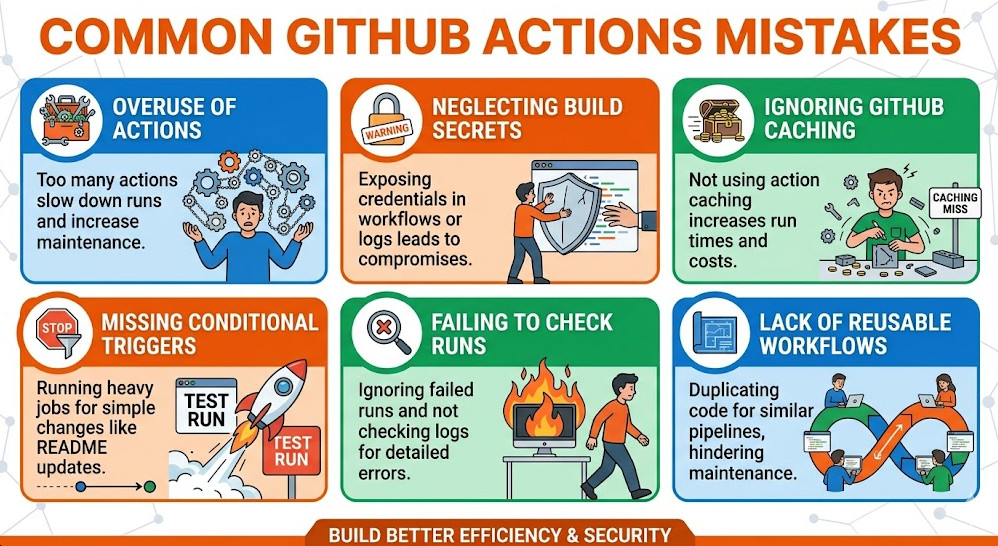
Tag Archives: Git

GitLab vs GitHub for DevOps: Which is Better for Your Development Workflow?

Introduction

In the fast-paced world of DevOps, where Continuous Integration (CI) and Continuous Delivery (CD) are vital for smooth and efficient software development, choosing the right platform for managing code and automating workflows can significantly impact your project’s success. GitLab and GitHub are two of the most popular Git repositories that cater to the needs of modern DevOps teams, but each platform comes with its unique features, strengths, and trade-offs.

In this article, we will dive deep into the GitLab vs GitHub debate, comparing both platforms from a DevOps perspective. Whether you’re just getting started with DevOps or looking to optimize your existing workflows, this guide will help you decide which platform best fits your needs.

GitLab vs GitHub: Key Differences for DevOps

1. Overview of GitLab and GitHub

GitHub is primarily known for its open-source community and widely-used version control hosting service. It started as a platform for developers to collaborate on open-source projects but has since evolved to cater to private repositories and teams. GitHub offers several powerful features, including GitHub Actions for CI/CD, GitHub Packages, and various integrations with third-party tools.

GitLab, on the other hand, is an integrated DevOps platform that provides version control, CI/CD pipelines, monitoring, and security all within a single interface. It’s designed to support the entire software development lifecycle (SDLC) and is often used by teams looking for a more comprehensive, all-in-one solution. GitLab’s built-in CI/CD and robust project management tools set it apart from GitHub, which requires third-party integrations to match some of those capabilities.

2. CI/CD Integration: GitLab vs GitHub

GitLab

GitLab’s most significant advantage in the DevOps space is its built-in CI/CD capabilities. It offers a seamless experience for automating your build, test, and deployment pipelines. GitLab CI/CD allows developers to create complex workflows using .gitlab-ci.yml files, which define the stages of the CI/CD pipeline, from compiling code to running tests and deploying the application.

Key features of GitLab CI/CD:

  • Built-in Continuous Integration: No need for third-party tools.
  • Auto DevOps: GitLab offers an Auto DevOps feature that automates the entire CI/CD pipeline.
  • Advanced security features: Integrated security scanning tools (SAST, DAST, Container Scanning, etc.) built directly into the CI/CD pipelines.
  • Real-time monitoring and reporting: Track the performance of your pipelines and deployments with detailed insights.

GitHub

GitHub also offers CI/CD capabilities, primarily through GitHub Actions, which allows you to define workflows to automate software development tasks, including CI/CD. While GitHub Actions is a powerful tool, it is a relatively new addition compared to GitLab’s long-established CI/CD pipeline. GitHub Actions offers flexibility but requires more configuration and setup.

Key features of GitHub Actions:

  • Customizable workflows: Define your own CI/CD pipelines using YAML files.
  • Extensive marketplace: GitHub Actions has a rich marketplace for pre-built actions that streamline the CI/CD process.
  • Cross-platform support: GitHub Actions works across multiple platforms, including Linux, macOS, and Windows.
  • Third-party integrations: While GitHub Actions is a great tool, it often requires additional integrations for full CI/CD functionality, like security scanning and deployment.

3. Ease of Use: GitLab vs GitHub

GitLab

GitLab is known for its user-friendly interface and highly integrated DevOps tools. The platform focuses on providing everything developers need in a single place. The UI is intuitive, with clearly defined areas for source code management, CI/CD pipelines, issue tracking, and project monitoring.

  • Integrated experience: Everything from version control to deployment and monitoring is handled within the same interface.
  • Robust documentation: GitLab’s documentation is comprehensive and user-friendly, making it easier for teams to adopt and use the platform effectively.
  • Single platform: You don’t need to juggle multiple tools or third-party integrations to manage your workflows.

GitHub

GitHub’s interface is also very user-friendly and is designed to be intuitive for developers familiar with Git version control. It is widely considered the best platform for open-source collaboration, with a simple and efficient interface for managing repositories and issues.

  • Third-party integrations: GitHub’s reliance on external tools and services for advanced DevOps features may make the setup process a bit more complex for teams looking to integrate CI/CD pipelines and other tools.
  • GitHub Actions UI: While it has improved over time, the UI for managing GitHub Actions workflows may still be considered more complex than GitLab’s built-in tools.

4. Project Management Features

Both GitLab and GitHub offer tools to help manage and organize software development projects, but there are key differences in how these tools are implemented.

GitLab

GitLab provides robust project management tools that allow teams to manage tasks, track issues, and organize work in a highly integrated way. Features include:

  • Issue tracking and Kanban boards: For organizing tasks and sprints.
  • Milestones and epics: Plan and track large features or project timelines.
  • Integrated Wiki and Documentation: GitLab allows you to maintain project documentation directly within the platform.

GitHub

While GitHub has made strides in adding project management features, it is still somewhat lacking compared to GitLab. GitHub offers:

  • GitHub Issues and Project Boards: Simple tools for task tracking and sprint management.
  • GitHub Projects: Allows you to use Kanban-style boards for task management, though it’s not as feature-rich as GitLab’s project management tools.

5. Security and Compliance

GitLab

GitLab has a comprehensive security-first approach that integrates security checks into the CI/CD pipeline. This includes:

  • Static Application Security Testing (SAST) and Dynamic Application Security Testing (DAST) to identify vulnerabilities early.
  • Container Scanning for Docker images to ensure they meet security standards.
  • Secret Detection to scan for sensitive data like API keys or passwords in the codebase.
  • Compliance Management: GitLab helps teams adhere to industry compliance standards such as HIPAA, SOC 2, and GDPR.

GitHub

GitHub also offers security features but generally requires third-party integrations for some of the advanced security checks.

  • GitHub Dependabot: Automatically alerts you to outdated dependencies and potential vulnerabilities.
  • Security Advisories: Allows teams to report and fix security vulnerabilities.
  • Code scanning: Available through GitHub Advanced Security, but this is a premium feature.

6. Pricing Comparison: GitLab vs GitHub

Both GitLab and GitHub offer free and paid tiers, but the specifics of each platform’s pricing structure vary.

GitLab

  • Free tier: Includes unlimited private repositories, basic CI/CD features, and 400 minutes of CI/CD pipeline usage per month.
  • Premium/Ultimate plans: Offer more advanced CI/CD features, security tools, and better support for larger teams.

GitHub

  • Free tier: Unlimited public and private repositories, with 2,000 CI/CD minutes per month.
  • GitHub Team/Enterprise: Includes more CI/CD minutes, advanced security features, and team management tools.

Examples of Using GitLab vs GitHub in DevOps

Scenario 1: Setting Up a Basic CI/CD Pipeline

In GitLab, you can set up a simple CI/CD pipeline in minutes. Here’s an example of a basic .gitlab-ci.yml file:

stages:
  - build
  - test
  - deploy

build:
  script:
    - echo "Building the project..."

test:
  script:
    - echo "Running tests..."

deploy:
  script:
    - echo "Deploying to production..."

In GitHub, this would require setting up GitHub Actions in the .github/workflows directory:

name: CI/CD Pipeline

on:
  push:
    branches:
      - main

jobs:
  build:
    runs-on: ubuntu-latest
    steps:
      - name: Checkout repository
        uses: actions/checkout@v2
      - name: Build
        run: echo "Building the project..."
  test:
    runs-on: ubuntu-latest
    steps:
      - name: Test
        run: echo "Running tests..."
  deploy:
    runs-on: ubuntu-latest
    steps:
      - name: Deploy
        run: echo "Deploying to production..."

Scenario 2: Security Scanning in CI/CD

GitLab provides integrated security scanning directly in the pipeline with features like SAST, DAST, and Container Scanning. To implement security scans, you simply enable these tools in your pipeline configuration.

GitHub users, on the other hand, may need to configure third-party security tools or use GitHub’s advanced security features, available in paid tiers.

FAQ: GitLab vs GitHub for DevOps

1. Which platform is better for Continuous Integration?

Both GitLab and GitHub offer solid CI/CD support, but GitLab’s built-in CI/CD tools provide a more streamlined and integrated experience, making it a better choice for teams focused on DevOps.

2. Does GitHub support DevOps?

Yes, GitHub supports DevOps through GitHub Actions, but it often requires additional integrations or third-party tools to match GitLab’s all-in-one DevOps features.

3. Which platform is more suitable for enterprise use?

GitLab’s comprehensive suite of features for security, monitoring, and project management makes it a better choice for enterprise-level DevOps workflows. GitHub is more commonly used for open-source projects but can be scaled for enterprise use with GitHub Enterprise.

Conclusion

When it comes to GitLab vs GitHub for DevOps, both platforms offer valuable tools for modern software development. However, the choice between GitLab and GitHub largely depends on your team’s needs.

  • GitLab is the ideal choice for teams that require an integrated DevOps platform with built-in CI/CD pipelines, security scanning, and project management features.
  • GitHub remains a solid choice for developers who prioritize ease of use and community-driven development but may need third-party tools for full DevOps functionality.

Ultimately, the best platform for your DevOps needs depends on the complexity of your workflows, your security requirements, and the tools your team already uses. Consider these factors carefully to make an informed decision that aligns with your development goals. Thank you for reading the DevopsRoles page!

Learn more about GitLab CI/CD Explore GitHub Actions documentation

Git Tutorial: Getting Started with Git for Version Control

Introduction

Git is a vital tool for developers and teams in software development, enabling powerful version control for code and project management. Created by Linus Torvalds in 2005, Git offers a distributed version control system where everyone can maintain a complete copy of the project history, enhancing collaboration and reducing risks. In this Git tutorial, we’ll cover the basics, dive into key commands, and look at how to use Git effectively, whether you’re a beginner or an advanced user.

Getting Started with Git

What is Git?

Git is an open-source version control system that tracks changes in files, allowing developers to coordinate work on projects and manage changes over time. Its distributed nature means each user has a full copy of the project history, ensuring better control, collaboration, and faster integration of code.

Why Use Git?

  • Version Control: Easily manage code changes and revert back to previous versions.
  • Collaboration: Multiple people can work on the same project without conflicts.
  • Backup and Recovery: Git serves as a backup for your code and allows you to recover past versions.
  • Efficiency: Git makes it easy to test and merge new features or bug fixes without disrupting the main project.

Installing Git

Before starting with Git, you’ll need to install it on your computer.

Steps to Install Git on Different OS

  1. Windows:
    • Download the installer from git-scm.com.
    • Run the installer and follow the setup instructions.
  2. macOS:
    • Use Homebrew: Open Terminal and run brew install git.
    • Alternatively, download the Git installer from git-scm.com.
  3. Linux:
    • On Ubuntu/Debian: sudo apt install git
    • On Fedora: sudo dnf install git

To confirm the installation, open a terminal and type:

git --version

Setting Up Git

Once Git is installed, the next step is to configure it.

  1. Configure Your Identity
    Set your username and email, which will be associated with every commit.
    • git config --global user.name "Your Name"
    • git config --global user.email "your.email@example.com"
  2. Check Configuration Settings
    To verify, use:
    • git config --list
  3. Setting Up a Repository
    A repository is a project’s directory managed by Git. You can either create a new repository or clone an existing one.
    • To create a new repository:
      • git init
    • To clone an existing repository:
      • git clone [repository-url]

Basic Git Commands

Below are some essential Git commands to help you manage projects effectively.

1. Adding Files to Staging Area

To stage files for commit:

git add [filename]

Or, to add all files:

git add .

2. Committing Changes

Commits are snapshots of your project. Once files are added to the staging area, you can commit them:

git commit -m "Your commit message"

3. Viewing Commit History

To see the history of commits:

git log

4. Branching and Merging

Branches allow you to work on different versions of your project simultaneously.

  • Create a New Branch:
    • git branch [branch-name]
  • Switch to a Branch:
    • git checkout [branch-name]
  • Merge Branches: Switch to the main branch and merge your feature branch:
    • git checkout main git merge [branch-name]

5. Pushing and Pulling Changes

Git works with remote repositories like GitHub or GitLab to allow others to view or contribute.

  • Push Changes to Remote:
    • git push origin [branch-name]
  • Pull Changes from Remote:
    • git pull origin [branch-name]

Advanced Git Commands

1. Resetting Changes

If you need to undo changes, Git provides several reset options:


git reset --soft HEAD~1  # Keeps changes in staging
git reset --hard HEAD~1  # Discards changes completely

2. Reverting Commits

To reverse a commit while retaining history:

git revert [commit-id]

3. Stashing Changes

Stashing lets you save changes for later without committing:

git stash
git stash pop  # To retrieve stashed changes

Example Scenarios

Scenario 1: Initializing a New Project

  1. Create a new project directory and navigate to it.
  2. Run git init to start a repository.
  3. Add files with git add .
  4. Commit changes with git commit -m "Initial commit"

Scenario 2: Collaborating with Team Members

  1. Clone a shared repository with git clone [repo-url].
  2. Create a new branch for your feature: git branch feature-branch.
  3. Make changes, stage, and commit.
  4. Push your branch to the remote repository: git push origin feature-branch.

Git Best Practices

  1. Commit Often: Regular commits make it easier to track changes.
  2. Use Descriptive Messages: Write clear and meaningful commit messages.
  3. Branching Strategy: Use separate branches for new features or fixes.
  4. Pull Frequently: Regularly pull changes from the remote repository to avoid conflicts.
  5. Avoid Pushing Broken Code: Ensure your code works before pushing.

FAQ Section

1. What is Git?

Git is a version control system that tracks file changes, allowing developers to manage and collaborate on code efficiently.

2. How is Git different from GitHub?

Git is a tool for version control, while GitHub is a platform that hosts Git repositories, allowing collaboration and code sharing.

3. What is a branch in Git?

A branch is an independent line of development. It allows you to work on different project versions without affecting the main codebase.

4. How do I undo the last commit?

To undo the last commit, use git reset --soft HEAD~1 to keep changes or git reset --hard HEAD~1 to discard them.

5. How can I merge branches in Git?

First, switch to the branch you want to merge into (often main), then run git merge [branch-name].

6. What is Git stash used for?

Git stash temporarily saves changes without committing, allowing you to work on other things without losing progress.

7. How can I view the commit history?

Use git log to see the commit history, including commit messages, authors, and timestamps.

8. How can I recover deleted files in Git?

If the deletion was committed, use git checkout HEAD~1 -- [filename] to recover it.

External Resources

For further reading on Git, check out these resources:

Conclusion

Git is an essential tool for any developer, from hobbyists to professionals. Its version control capabilities offer enhanced collaboration, secure backup, and a streamlined workflow. This Git tutorial covers everything you need to know to get started, from installation to advanced features. Whether you’re working solo or as part of a team, mastering Git will improve your productivity and project management skills. Keep practicing these commands and explore additional resources to deepen your understanding. Thank you for reading the DevopsRoles page!

Resolve Refusing to Merge Git unrelated histories error

Introduction

Let’s get started by diving deep into “Git unrelated histories” error, so you’ll be equipped to handle it in your projects.

One of the most frustrating experiences for developers working with Git is encountering the error message:

fatal: refusing to merge unrelated histories

This error is confusing at first, especially for those who are new to Git or who haven’t dealt with complex repository histories before. It often happens when attempting to merge two branches, repositories, or directories that do not share a common commit history. When this occurs, Git refuses the merge and leaves you wondering what went wrong.

In this in-depth guide, we’ll explore why Git refuses to merge unrelated histories, provide detailed solutions, and cover best practices for avoiding this error in the future. From simple merge commands to advanced techniques like rebasing and squash merging, you’ll learn how to maintain clean, organized repositories.

What Is the “Refusing to Merge Unrelated Histories” Error?

Understanding Git Histories

Git is a distributed version control system that tracks changes to files over time. When two branches or repositories share a common history, it means they originate from the same initial commit or at least share a common ancestor commit. Git uses these common ancestors as the basis for merging changes between branches.

In the case of unrelated histories, Git cannot find this common commit, so it refuses the merge to prevent potential issues like conflicts or loss of data. This safeguard ensures that developers don’t accidentally combine two completely unrelated projects.

When Does the Error Occur?

You will encounter the “refusing to merge unrelated histories” error in scenarios such as:

  • Merging Two Separate Repositories: If two Git repositories were initialized separately and now need to be combined, Git will refuse to merge them since there’s no shared commit history.
  • Pulling Changes into a Newly Initialized Repository: If you pull from a remote repository into a fresh local repository that doesn’t have any commits, Git sees the histories as unrelated.
  • Merging Branches Without Shared History: Sometimes, you may work with branches that, due to reinitialization or incomplete history sharing, do not have a common base. Git cannot merge them without manual intervention.

Here’s the exact error message you may see:

fatal: refusing to merge unrelated histories

This error tells you that Git cannot automatically merge the histories of the two branches or repositories involved.

Common Causes of Git unrelated histories

1. Initializing Two Separate Repositories

When developers initialize two different Git repositories and later try to merge them into one, the histories are completely independent. For example, one developer might start working on a project and initialize a repository, while another does the same on a separate machine. When they try to merge the two repositories later, Git refuses due to the lack of shared history.

2. Cloning or Pulling into a Fresh Local Repository

If you clone or pull from a remote repository into a newly initialized local directory, Git may treat the histories as unrelated because the local repository doesn’t yet have any commit history.

3. Migrating from a Different Version Control System

When migrating a project from another version control system (like Subversion or Mercurial) to Git, the commit histories might not align properly. This can cause Git to refuse merging repositories or branches, since the histories were originally managed in different systems.

4. Merging Forked Repositories

In some cases, a developer forks a repository, makes significant changes, and later tries to merge the fork back into the original repository. If the two have drifted apart without common commits, Git will refuse to merge their histories.

How to Resolve the “Refusing to Merge Unrelated Histories” Error

Now that we understand the causes, let’s look at how to fix the error. Here are several methods to resolve it, from basic to advanced.

Solution 1: Use the –allow-unrelated-histories Flag

The simplest way to resolve the issue is to instruct Git to allow merging unrelated histories using the --allow-unrelated-histories flag. This flag tells Git to bypass its usual checks and merge the branches or repositories, even if they don’t have a shared commit history.

Step-by-Step Instructions

  1. Navigate to the Branch You Want to Merge Into: First, make sure you are on the branch where you want the changes to be merged.
    • git checkout [branch_name]
  2. Merge with --allow-unrelated-histories: Use the following command to merge the branches or repositories, allowing unrelated histories to be combined.
    • git merge [branch_to_merge] --allow-unrelated-histories
    • Example:
      • git checkout main git merge feature --allow-unrelated-histories
  3. Commit the Changes: After the merge, review the changes and commit them if needed.
    • git commit -m "Merge branch 'feature' with unrelated histories"

Solution 2: Use Git Rebase

Rebasing is a powerful technique to apply commits from one branch onto another. This method effectively rewrites the commit history, making it as though your changes were built directly on top of the branch you’re rebasing onto.

Steps to Use Rebase

  1. Checkout the Branch to Rebase:
    • git checkout [branch_name]
  2. Rebase onto the Target Branch:
    • git rebase [target_branch]

For example, if you want to rebase a feature branch onto main:

git checkout feature
git rebase main

Rebasing effectively avoids the issue of unrelated histories by creating a linear history. However, rebasing can be complex, and if there are many conflicts, you may need to resolve them manually.

Solution 3: Squash Merging

Squash merging consolidates all the changes from one branch into a single commit. This technique is particularly useful when merging many small changes from a feature branch into the main branch, avoiding messy commit histories.

Steps to Perform Squash Merge

  1. Check Out the Target Branch:
    • git checkout [target_branch]
  2. Merge Using Squash:
    • git merge --squash [branch_to_merge]
  3. Commit the Squashed Changes: Once the squash merge is complete, you can commit the single squashed commit.
    • git commit -m "Squash merge of [branch_to_merge] into [target_branch]"

Solution 4: Manual Fix by Adding Remotes

If the issue involves merging unrelated histories from different repositories, such as when working with forks, you can manually add the remote repository and perform the merge with --allow-unrelated-histories.

Steps for Merging Forks or Different Repositories

  1. Add the Original Repository as a Remote:
    • git remote add upstream [repository_URL]
  2. Fetch the Latest Changes:
    • git fetch upstream
  3. Merge with --allow-unrelated-histories:
    • git merge upstream/main --allow-unrelated-histories

This allows you to merge a forked repository back into the original, even though the histories might not align initially.

Frequently Asked Questions

1. Why does Git refuse to merge unrelated histories?

Git requires a common commit history to merge branches or repositories. If the histories do not share any common commits, Git assumes the two are unrelated and refuses to merge them to prevent potential conflicts or data loss.

2. What does –allow-unrelated-histories do in Git?

The --allow-unrelated-histories flag tells Git to merge two branches or repositories, even if they do not share a common history. This bypasses Git’s usual merge behavior and allows the operation to proceed despite the unrelated histories.

3. Is it safe to merge unrelated histories?

Merging unrelated histories can sometimes lead to a tangled commit history, making it harder to track changes over time. It is important to carefully review the result of the merge to ensure no important data is lost or conflicts introduced. In many cases, it’s safer to rebase or squash merge.

4. How do I prevent unrelated histories in Git?

To avoid unrelated histories, ensure all contributors work from the same repository from the beginning. Always clone the repository before starting new development work, and avoid initializing new Git repositories for projects that should share history with an existing repository.

Conclusion

The “fatal: refusing to merge unrelated histories” error is a common issue that can arise when working with Git, particularly in more complex repository setups. Fortunately, with the solutions outlined in this guide-from using the --allow-unrelated-histories flag to leveraging more advanced techniques like rebasing and squash merging-you now have a full toolkit for resolving this issue.

By following best practices and ensuring that all developers work from a common base, you can prevent this error from occurring in the future and maintain a clean, consistent Git history across your projects. Thank you for reading the DevopsRoles page!

How to Resolve ‘Could Not Read From Remote Repository’ Error in Git: A Deep Guide

Introduction

Git is a powerful version control system essential for modern software development, allowing teams to collaborate on projects. Despite its robustness, developers occasionally run into errors that disrupt their workflow. One of the most common and frustrating issues is the “fatal: Could not read from remote repository” error. Whether you’re pushing, pulling, or cloning a Git repository, this error can occur for several reasons.

In this blog, we’ll break down what causes this issue, from basic to advanced troubleshooting solutions, to help you quickly resolve it and get back to work.

What Is the ‘Could Not Read From Remote Repository’ Error?

Overview

The “Could Not Read From Remote Repository” error happens when Git fails to establish a connection to the remote repository. Typically, this error occurs during actions like git push, git pull, or git clone. Git relies on this connection to perform operations with remote repositories hosted on services like GitHub, GitLab, or Bitbucket.

Example Error Message

You might see this error message:

fatal: Could not read from remote repository.
Please make sure you have the correct access rights
and the repository exists.

This message implies that Git is unable to access the remote repository, either due to an invalid URL, connection failure, or insufficient access permissions.

Common Causes of the ‘Could Not Read From Remote Repository’ Error

1. Incorrect Repository URL

An incorrect or outdated repository URL can prevent Git from communicating with the remote repository. This could happen if the URL was manually input incorrectly or if it has changed after the initial setup.

2. SSH Key Configuration Problems

If you use SSH to communicate with Git, SSH keys authenticate your connection. Any misconfiguration or missing SSH key will cause Git to fail when accessing the repository.

3. Insufficient Permissions

Private repositories require explicit access. If you don’t have permission or aren’t added as a collaborator, Git will be unable to connect to the repository.

4. Network Issues

Firewalls, proxies, or VPNs may block Git from reaching the remote repository, preventing it from reading or writing data.

5. Outdated Git Version

Older versions of Git may not support modern authentication methods required by platforms like GitHub. Updating Git could resolve connection problems.

Beginner-Level Troubleshooting

1. Verifying the Repository URL

Step 1: Check Your Remote URL

First, verify that the repository URL is correct. Use the following command to list the URLs associated with your remote repositories:

git remote -v

Check if the listed URL matches the one provided by your Git hosting service.

Step 2: Update the Remote URL

If the URL is incorrect, use this command to update it:

git remote set-url origin <correct-URL>

Ensure that the URL uses the correct protocol (HTTPS or SSH), depending on your configuration.

2. Check Your Internet Connection

A simple but often overlooked issue is your internet connection. Before diving deeper, confirm that your internet connection is stable and you can access other websites.

Intermediate-Level Troubleshooting

3. Fixing SSH Key Issues

Step 1: Add Your SSH Key to the SSH Agent

Ensure that your SSH key is correctly added to the SSH agent with this command:

ssh-add ~/.ssh/id_rsa

If your private key file has a different name, replace id_rsa accordingly.

Step 2: Test SSH Connectivity

Check if your SSH configuration is working by testing the connection to GitHub (or any other service):

ssh -T git@github.com

If successful, you’ll see a message like:

vbnetCopy codeHi username! You've successfully authenticated, but GitHub does not provide shell access.

Step 3: Check SSH Key in GitHub/GitLab

Make sure your SSH key is correctly added to your account on the Git platform (GitHub, GitLab, Bitbucket). You can find instructions on managing SSH keys in your platform’s documentation.

4. Fixing Permission Issues

Step 1: Verify Access to the Repository

Ensure you have the necessary permissions to access the repository, especially if it’s private. You need to be added as a collaborator or have the right access privileges.

Step 2: Re-authenticate if Using HTTPS

If you’re using HTTPS, incorrect or outdated credentials might be cached. Clear the stored credentials and re-authenticate using:

git credential-manager-core erase

Next, attempt to push or pull, and Git will prompt you for new credentials.

Advanced-Level Troubleshooting

5. Configuring Multiple SSH Keys

If you work with repositories on multiple platforms (e.g., GitHub and GitLab), you might need multiple SSH keys to handle different accounts.

Step 1: Generate Multiple SSH Keys

Generate an additional SSH key for each platform:

ssh-keygen -t rsa -b 4096 -C "youremail@example.com"

Step 2: Configure SSH Config File

Next, edit your ~/.ssh/config file to assign different SSH keys for different platforms:

Host github.com
  HostName github.com
  User git
  IdentityFile ~/.ssh/github_rsa

Host gitlab.com
  HostName gitlab.com
  User git
  IdentityFile ~/.ssh/gitlab_rsa

This ensures that the correct SSH key is used when accessing each platform.

6. Resolving Network Issues

Step 1: Disable VPN/Proxy

VPNs or proxies can block Git from communicating with remote repositories. Try disabling them temporarily to see if it resolves the issue.

Step 2: Adjust Firewall Settings

Check your firewall settings and ensure that traffic on port 22 (for SSH) or port 443 (for HTTPS) is allowed.

7. Updating Git

Using an outdated version of Git can cause compatibility issues with modern authentication methods. To update Git:

On macOS (via Homebrew):

brew update
brew upgrade git

On Ubuntu/Debian:

sudo apt update
sudo apt install git

Frequently Asked Questions (FAQs)

1. Why am I seeing the “Could Not Read From Remote Repository” error in Git?

This error usually occurs due to incorrect repository URLs, SSH key misconfigurations, insufficient permissions, or network issues. Following the troubleshooting steps in this guide should help you resolve the issue.

2. How do I know if my SSH key is working?

You can test your SSH key by running the following command:

ssh -T git@github.com

If your SSH key is correctly configured, you’ll see a message confirming successful authentication.

3. How do I reset my Git credentials?

You can clear stored credentials by using the command:

git credential-manager-core erase

This will prompt Git to ask for credentials again when you next push or pull from the remote repository.

Conclusion

The “Could Not Read From Remote Repository” error is a common issue when using Git, but it’s not impossible to fix. By following the steps outlined in this guide – starting with simple checks like verifying the repository URL and SSH key configuration, to more advanced solutions such as updating Git or configuring multiple SSH keys – you’ll be well on your way to resolving this error.

Remember, solving these kinds of errors is an excellent learning opportunity. The more you work with Git, the better you’ll get at diagnosing and fixing problems efficiently. Thank you for reading the DevopsRoles page!

Fixing the ‘Git Filename Too Long’ Error: A Deep Guide

Introduction

One of the common errors that Git users, especially on Windows, encounter is the error: unable to create file (Filename too long). This error occurs when Git tries to create or access files with path lengths that exceed the system’s limits, leading to problems in cloning, pulling, or checking out branches. In this in-depth guide, we will explore the root causes of this error, focusing on how the “Git filename too long” issue manifests and how you can fix it with a variety of approaches, from basic settings to advanced solutions.

What Causes the ‘Git Filename Too Long’ Error?

The Git filename too long error occurs when the length of a file path exceeds the limit imposed by the operating system or file system. While Git itself doesn’t restrict file path lengths, operating systems like Windows do.

1. Windows Path Length Limitations

On Windows, the maximum length for a path (file name and directory structure combined) is 260 characters by default. This is called the MAX_PATH limit. When a repository has files or folders with long names, or a deeply nested structure, the total path length might exceed this limit, causing Git to fail when creating or accessing those files.

2. Deeply Nested Directory Structures

If your Git repository contains deeply nested directories, the combined length of folder names and file names can quickly surpass the path length limit, resulting in the error.

3. Automatically Generated Filenames

Certain tools or build processes might generate long file names automatically, which are often difficult to shorten manually.

How to Fix ‘Git Filename Too Long’ Error

There are multiple ways to fix the ‘Git filename too long’ error. Depending on your use case and the system you’re working on, you can opt for simple configuration changes or more advanced methods to resolve this issue.

1. Enable Long Paths in Windows 10 and Later

Windows 10 and later versions support long paths, but the feature is disabled by default. You can enable it through Group Policy or the Registry Editor.

Steps to Enable Long Paths in Windows 10:

Via Group Policy (Windows Pro and Enterprise):

  1. Press Win + R and type gpedit.msc to open the Group Policy Editor.
  2. Navigate to Computer Configuration > Administrative Templates > System > Filesystem.
  3. Double-click on “Enable Win32 long paths”.
  4. Set the policy to Enabled and click OK.

Via Registry (Windows Home and Other Editions):

  1. Press Win + R, type regedit, and press Enter.
  2. Navigate to the following key:
    HKEY_LOCAL_MACHINE\SYSTEM\CurrentControlSet\Control\FileSystem
  3. Create a new DWORD (32-bit) entry and name it LongPathsEnabled.
  4. Set its value to 1.
  5. Restart your system to apply the changes.

Enabling long paths ensures that Git can handle file paths longer than 260 characters, fixing the error for most Git operations.

2. Set core.longpaths in Git Configuration

Git offers a built-in configuration option to allow it to handle long file paths. This solution is ideal for users who cannot or do not wish to modify their system’s configuration.

Steps to Enable Long Paths in Git:

  1. Open Git Bash or the Command Prompt.
  2. Run the following command:
    • git config --system core.longpaths true

This command configures Git to support long file paths on your system. Once enabled, Git can work with file paths exceeding the 260-character limit, eliminating the filename too long error.

3. Shorten File and Directory Names

A straightforward method to solve the Git filename too long issue is to reduce the length of directory and file names in your repository. This may require some restructuring, but it is effective, particularly for projects with very deep directory nesting or unnecessarily long filenames.

Example:

Instead of using a long folder path like:

C:/Users/huupv/Documents/Projects/Work/Repositories/SuperLongProjectName/this/is/an/example/of/a/very/deep/folder/structure/index.js

You could simplify it by moving the project closer to the root of your drive:

C:/Repos/SimpleProject/index.js

Shortening directory names helps you avoid exceeding the 260-character limit, fixing the error without altering system settings.

4. Clone Repository to a Shorter Path

The location where you clone your repository can contribute to the path length. If the directory into which you’re cloning your project has a long path, it adds to the overall file path length.

Steps to Shorten Path for Git Cloning:

Instead of cloning the repository to a deeply nested directory, try cloning it closer to the root directory:

git clone https://github.com/username/repository.git C:/Repos/MyRepo

By reducing the initial directory path length, you decrease the chances of encountering the Git filename too long error.

5. Use Git Submodules to Manage Large Repositories

If your project contains a massive directory structure or very long filenames, you might consider breaking it up into smaller repositories using Git submodules. This solution helps to divide large projects into manageable parts, reducing the chance of hitting path length limitations.

Example Workflow:

  1. Identify large directories in your repository that can be separated into individual repositories.
  2. Create new repositories for these sections.
  3. Use Git submodules to link these repositories back into your main project:
git submodule add https://github.com/username/large-repo-part.git

This method is more advanced but is useful for developers managing large, complex repositories.

6. Using Git Bash with Windows and Long Path Support

When using Git on Windows, Git Bash offers some relief from the file path limitation by handling symlinks differently. Installing Git for Windows with certain options can help resolve long path issues.

Steps:

  1. Download the latest Git for Windows installer.
  2. During the installation process, choose the option --no-symlinks under the “Select Components” section.
  3. Proceed with the installation.

This configuration change helps Git handle longer file paths more effectively in certain scenarios.

7. Change File System (Advanced)

For advanced users who frequently encounter path length issues, switching the file system from NTFS (which has the 260-character limit) to ReFS (Resilient File System) can offer relief. ReFS supports longer file paths but is only available on Windows Server and certain editions of Windows.

Caution:

Switching file systems is a complex task and should only be done by experienced users or system administrators.

Frequently Asked Questions (FAQs)

1. What is the ‘Git filename too long’ error?

The “Git filename too long” error occurs when the combined length of a file’s name and its directory path exceeds the limit imposed by the operating system, usually 260 characters on Windows.

2. How do I fix the ‘Git filename too long’ error?

You can fix this error by enabling long paths in Windows, configuring Git to handle long paths, shortening file or directory names, or cloning repositories to a shorter path.

3. Can I avoid the ‘Git filename too long’ error without modifying system settings?

Yes, you can use Git’s core.longpaths configuration setting to enable support for long file paths without needing to modify your system settings.

4. Does this error occur on Linux or macOS?

No, Linux and macOS do not impose the same path length limitations as Windows. Therefore, this error is predominantly encountered by Git users on Windows.

5. Why does this error only happen on Windows?

Windows has a default path length limit of 260 characters, which leads to this error when file paths in Git repositories exceed that limit. Linux and macOS do not have this restriction, allowing longer file paths.

Conclusion

The “Git filename too long” error is a common obstacle, particularly for Git users on Windows, where the operating system limits file path lengths to 260 characters. Fortunately, this issue can be resolved with a variety of approaches, from enabling long paths in Windows to adjusting Git configurations, shortening file paths, or using Git submodules for large repositories.

Understanding the root causes of this error and applying the right solutions can save you significant time and effort when working with Git repositories. Whether you’re managing large-scale projects or just trying to clone a deeply nested repository, these solutions will help you overcome the “Git filename too long” issue efficiently.

By following this guide, you’ll be well-equipped to handle filename length limitations in Git, ensuring a smoother development workflow. Thank you for reading the DevopsRoles page!

How to Fix Local Changes Would Be Overwritten by Git merge conflict: A Deep Guide

Introduction

Git is an incredibly powerful tool for managing code versions, especially when working in teams. However, one of the common frustrations developers face when using Git is dealing with merge conflicts. One such conflict is the “error: Your local changes to the following files would be overwritten by Git merge conflict” message, which halts your workflow and requires immediate resolution.

This deep guide will walk you through how to fix the “Local changes would be overwritten by merge” error in Git, offering detailed insights from basic solutions to advanced techniques. You’ll also learn how to prevent merge conflicts and manage your code effectively, ensuring smoother collaboration in future projects.

By the end of this guide, you’ll understand:

  • What causes the error and why it occurs
  • The basics of handling merge conflicts in Git
  • Practical strategies for preventing merge conflicts
  • Advanced techniques for resolving conflicts when they arise

What Causes the “Local Changes Would Be Overwritten by Merge” Error?

The error “Your local changes to the following files would be overwritten by merge” occurs when Git detects that the files in your local working directory have been modified but are not yet committed, and a merge would overwrite those changes.

This typically happens when:

  • You modify files in your local branch but haven’t committed or stashed those changes.
  • The files you modified are also updated in the branch you’re trying to merge from.
  • Git cannot automatically resolve these differences and raises the error to prevent unintentional loss of your local changes.

Why does Git do this?
Git tries to safeguard your work by stopping the merge and preventing your local, uncommitted changes from being lost. As a result, Git expects you to either save those changes (by committing or stashing) or discard them.

Understanding Git Merge Conflicts

What is a Git Merge Conflict?

A merge conflict happens when Git encounters changes in multiple branches that it cannot automatically reconcile. For instance, if two developers modify the same line of code in different branches, Git will ask you to manually resolve the conflict.

In this case, the error is triggered when uncommitted local changes are detected, meaning that Git is trying to protect these changes from being lost in the merge process. When the error occurs, Git is essentially saying, “I can’t merge because doing so would overwrite your local changes, and I’m not sure if that’s what you want.”

Step-by-Step Solutions to Fix ‘Local Changes Would Be Overwritten by Merge’ Error

1. Commit Your Local Changes

The most straightforward way to resolve this error is to commit your local changes before attempting the merge.

Why Commit First?

By committing your local changes, you signal to Git that these changes are now part of the history. This allows Git to safely merge the new incoming changes without losing your modifications.

Steps:

  1. Check the status of your current working directory:
    • git status
    • This will list all the files that have been modified and not yet committed.
  2. Stage your changes:
    • git add .
  3. Commit your changes:
    • git commit -m "Saving local changes before merge"
  4. Now, attempt the merge again:
    • git merge <branch-name>

This method is the cleanest and safest, ensuring that your local work is preserved before the merge proceeds.

2. Stash Your Changes

If you don’t want to commit your local changes yet because they might be incomplete or experimental, you can stash them temporarily. Stashing stores your changes in a stack, allowing you to reapply them later.

When to Use Stashing?

  • You want to merge incoming changes first, but don’t want to commit your local work yet.
  • You’re in the middle of something and want to test out a merge without committing.

Steps:

  1. Stash your local changes:
    • git stash
  2. Perform the merge:
    • git merge <branch-name>
  3. After completing the merge, reapply your stashed changes:
    • git stash apply
  4. If conflicts arise after applying the stash, resolve them manually.

Pro Tip: Using git stash pop

If you want to apply and remove the stash in one step:

git stash pop

This command will reapply the stashed changes and remove them from the stash list.

3. Discard Your Local Changes

In some cases, you may decide that the local changes are not necessary or can be discarded. If that’s the case, you can simply discard your local changes and proceed with the merge.

Steps:

  1. Discard changes in a specific file:
    • git checkout -- <file-name>
  2. Discard changes in all files:
    • git checkout -- .
  3. Now, attempt the merge:
    • git merge <branch-name>

Warning: This will delete your local changes permanently. Make sure you really don’t need them before proceeding.

4. Use git merge --abort to Cancel the Merge

If you’re already in the middle of a merge and encounter this error, you can use git merge --abort to stop the merge and revert your working directory to the state it was in before the merge started.

Steps:

  1. Abort the merge:
    • git merge --abort
  2. After aborting, either commit, stash, or discard your local changes.
  3. Retry the merge:
    • git merge <branch-name>

5. Handle Untracked Files

Sometimes, the merge conflict might involve untracked files. Git treats untracked files as local changes, which can also lead to this error. In this case, you can either add the untracked files or remove them.

Steps:

  1. Identify untracked files:
    • git status
  2. To add an untracked file:
    • git add <file-name>
  3. If you don’t need the untracked files, remove them:
    • rm <file-name>
  4. Retry the merge:
    • git merge <branch-name>

Advanced Techniques for Resolving Merge Conflicts

Using git mergetool for Conflict Resolution

When facing more complex conflicts, it might be helpful to use Git mergetool, which provides a visual way to resolve merge conflicts by showing you the differences between files side by side.

Steps:

  1. Invoke Git mergetool:
    • git mergetool
  2. Use the mergetool interface to manually resolve conflicts.
  3. After resolving conflicts in each file, save and commit your changes:
    • git commit

Reset to a Previous Commit

In rare cases, you might want to reset your repository to a previous commit, discarding all changes since that commit.

Steps:

  1. Reset your repository:
    • git reset --hard <commit-hash>
  2. After resetting, attempt the merge again:
    • git merge <branch-name>

How to Prevent Git Merge Conflicts

Preventing merge conflicts is just as important as resolving them. Below are some best practices to avoid encountering these issues in the future:

1. Pull Changes Frequently

Pull changes from the remote repository frequently to ensure your local branch is up-to-date. This minimizes the chances of encountering conflicts.

2. Commit Often

Commit small and frequent changes to your local repository. The more often you commit, the less likely you are to encounter large, unmanageable conflicts.

3. Use Feature Branches

Isolate your work in separate feature branches and merge them only when your changes are ready. This helps keep your main branch stable and reduces the likelihood of conflicts.

4. Review Changes Before Merging

Before merging, review the changes in both branches to anticipate and prevent conflicts.

Frequently Asked Questions (FAQ)

What Should I Do If a Git Merge Conflict Arises?

If a merge conflict arises, follow these steps:

  1. Use git status to identify the conflicting files.
  2. Manually resolve conflicts in each file.
  3. Use git add to mark the conflicts as resolved.
  4. Commit the changes with git commit.

Can I Merge Without Committing Local Changes?

No, you cannot merge without committing or stashing your local changes. You must resolve your local changes first to avoid data loss.

Is git merge --abort Safe to Use?

Yes, git merge --abort is safe and reverts your working directory to its previous state before the merge. It’s especially useful when you want to cancel a problematic merge.

Conclusion

Handling the “Local changes would be overwritten by merge” error in Git may seem daunting, but with the right tools and techniques, it can be resolved effectively. Whether you choose to commit, stash, or discard your changes, Git offers multiple solutions to handle merge conflicts gracefully. By practicing preventive measures like frequent commits, using feature branches, and reviewing changes before merging, you can reduce the occurrence of merge conflicts and keep your development workflow smooth and productive. Thank you for reading the DevopsRoles page!

Resolve ‘Not a Git Repository’ Error: A Deep Dive into Solutions

Introduction

Git is an incredibly powerful tool for version control, but like any tool, it comes with its own set of challenges. One of the most common errors developers encounter is:
fatal: not a git repository (or any of the parent directories): .git.

Whether you’re new to Git or have been using it for years, encountering this error can be frustrating. In this deep guide, we will examine the underlying causes of the error, and provide a range of solutions from basic to advanced.

If you’re ready to dive deep and understand how Git works in the context of this error, this guide is for you.

Understanding the ‘Not a Git Repository’ Error

When Git displays this error, it’s essentially saying that it cannot locate the .git directory in your current working directory or any of its parent directories. This folder, .git, is critical because it contains all the necessary information for Git to track changes in your project, including the history of commits and the configuration.

Without a .git directory, Git doesn’t recognize the folder as a repository, so it refuses to execute any version control commands, such as git status or git log. Let’s dive into the common causes behind this error.

Common Causes of the Error

1. The Directory Isn’t a Git Repository

The most straightforward cause: you’ve never initialized Git in the directory you’re working in, or you haven’t cloned a repository. Without running git init or git clone, Git doesn’t know that you want to track files in the current folder.

2. You’re in the Wrong Directory

Sometimes you’re simply in the wrong directory, either above or below the actual repository. If you navigate to a subfolder that doesn’t have Git initialized or doesn’t inherit the Git settings from the parent directory, Git will throw this error.

3. The .git Folder Was Deleted or Moved

Accidentally deleting the .git folder, or moving files in a way that disrupts the folder’s structure, can lead to this error. Even if the project files are intact, Git needs the .git directory to track the project’s history.

4. Cloning Issues

Sometimes cloning a repository doesn’t go as planned, especially if you’re dealing with large or complex repositories. If the .git folder isn’t copied over during the clone process, Git will fail to recognize it.

5. A Misconfigured Git Client

A less common but possible issue is an incorrect Git installation or misconfiguration. This can lead to errors in recognizing repositories even if they’re correctly set up.

How to Resolve the “Not a Git Repository” Error

Solution 1: Initializing a Git Repository

If your current directory isn’t yet a Git repository, you’ll need to initialize it. Here’s how you do it:

git init

Steps:

  1. Open your terminal.
  2. Navigate to the directory where you want to initialize Git.
  3. Run git init.

Result:
This command creates a .git folder in your directory, enabling Git to start tracking changes. From here, you can start adding files to your repository and make your first commit.

Solution 2: Navigate to the Correct Directory

If you’re simply in the wrong folder, the solution is to move into the correct Git repository directory.

cd /path/to/your/repository

Steps:

  1. Use the pwd command (in Unix-based systems) or cd (in Windows) to check your current directory.
  2. Navigate to the correct directory where your repository is located.
  3. Run your Git commands again.

Tip: Use git status after navigating to ensure Git recognizes the repository.

Solution 3: Reclone the Repository

If you’ve accidentally deleted the .git folder or moved files incorrectly, the easiest solution might be to reclone the repository.

git clone https://github.com/your-repository-url.git

Steps:

  1. Remove the corrupted or incomplete repository folder.
  2. Run the git clone command with the repository URL.
  3. Move into the new folder with cd and continue working.

Solution 4: Restore the .git Folder

If you’ve deleted the .git folder but still have all the other project files, try to restore the .git folder from a backup or reclone the repository.

Using a Backup:

  1. Locate a recent backup that contains the .git folder.
  2. Copy it back into your project directory.
  3. Use git status to ensure the repository is working.

Solution 5: Check Your Git Configuration

If none of the above solutions work, there might be a misconfiguration in your Git setup.

git config --list

Steps:

  1. Run git config --list to see your current Git configuration.
  2. Ensure that your username, email, and repository URL are correctly configured.
  3. If something seems off, fix it using the git config command.

Advanced Solutions for Complex Cases

In more advanced cases, especially when working with large teams or complex repositories, the basic solutions may not suffice. Here are some additional strategies.

1. Rebuilding the Git Index

If your repository is recognized but you’re still getting errors, your Git index might be corrupted. Rebuilding the index can solve this issue.

rm -f .git/index
git reset

This removes the corrupted index and allows Git to rebuild it.

2. Using Git Bisect

When the .git folder is moved or deleted and you’re unsure when this happened, Git’s bisect tool can help you find the exact commit where the issue occurred.

git bisect start
git bisect bad
git bisect good <last known good commit>

Steps:

  1. Start the bisect process with git bisect start.
  2. Mark the current commit as bad with git bisect bad.
  3. Mark the last known working commit with git bisect good.

Git will now help you find the exact commit that introduced the issue, making it easier to fix.

Frequently Asked Questions

What does “fatal: not a git repository” mean?

This error means Git cannot find the .git folder in your current directory, which is required for Git to track the project’s files and history.

How do I initialize a Git repository?

Run the git init command in your project directory to create a new Git repository.

What if I accidentally deleted the .git folder?

If you deleted the .git folder, you can either restore it from a backup, run git init to reinitialize the repository (you’ll lose history), or reclone the repository.

Why do I keep getting this error even after initializing a Git repository?

Make sure you are in the correct directory by using the cd command and check if the .git folder exists using ls -a. If the problem persists, check your Git configuration with git config --list.

Can I recover lost Git history if I accidentally deleted the .git folder?

Unfortunately, without a backup, recovering the .git folder and its history can be difficult. Your best option may be to reclone the repository or use a backup if available.

Conclusion

The “not a git repository” error is a common but solvable issue for both beginner and advanced Git users. By understanding the underlying causes and following the solutions outlined in this guide, you can resolve the error and continue using Git for version control effectively.

Whether it’s initializing a new repository, navigating to the correct directory, or resolving more advanced issues like corrupted Git indexes, the solutions provided here will help you navigate through and fix the problem efficiently.

Keep in mind that as you grow more familiar with Git, handling errors like this will become second nature, allowing you to focus on what truly matters – building great software Thank you for reading the DevopsRoles page!

Failed to Push Some Refs to GitLab: A Deep Guide to Fixing the Issue

Introduction

Have you ever been greeted by the dreaded “failed to push some refs to GitLab” message while trying to push your changes? This error can stop your workflow dead in its tracks, but the good news is, it’s usually straightforward to resolve.

In this guide, we’ll explore what the error means, why it happens, and how you can fix it. Whether you’re a beginner looking to solve this for the first time or an advanced user seeking deeper insights, we’ve got you covered.

What Does “Failed to Push Some Refs to GitLab” Mean?

The message “failed to push some refs to GitLab” means that Git has encountered an issue when trying to push your changes to the remote repository on GitLab. Refs (short for references) in Git are pointers to specific commits, such as branches or tags. The error suggests that Git cannot update the refs on the remote repository because of a conflict or misalignment between the state of your local repository and the remote.

In simple terms, your local changes can’t be pushed because there’s a mismatch between your local repository and the remote repository on GitLab.

Why Does “Failed to Push Some Refs to GitLab” Occur?

There are several reasons why you might run into this error. Let’s explore each one:

1. Outdated Local Repository

Your local branch is outdated compared to the remote branch. When you try to push your changes, Git rejects it because it would overwrite the changes on the remote repository.

2. Non-fast-forward Updates

Git prefers non-destructive changes to the repository history. If your local branch is not a simple extension of the remote branch, Git cannot perform a “fast-forward” update and will refuse to push your changes without manual intervention.

3. Protected Branches

In GitLab, some branches might be protected, meaning that only specific users can push changes, or changes must follow specific rules (e.g., they require a merge request to be reviewed and merged).

4. Merge Conflicts

When the same lines of code are modified in both the local and remote repositories, Git can’t merge the changes automatically, leading to a push failure.

Step-by-Step Guide to Fixing “Failed to Push Some Refs to GitLab”

Now that we understand why the error occurs, let’s dive into the steps to resolve it.

1. Update Your Local Repository

The first step when you encounter this error is to ensure that your local branch is up-to-date with the remote branch.

Run the following command to pull the latest changes from the remote repository:

git pull origin <branch-name>

This will fetch and merge the changes from the remote branch into your local branch. After this, you should be able to push your changes.

2. Handle Non-fast-forward Updates

If the changes in your local branch conflict with the remote branch, Git won’t be able to perform a fast-forward update. You can resolve this by either merging or rebasing.

2.1 Merge the Changes

You can merge the remote branch into your local branch to resolve conflicts and create a new commit that combines the changes.

git merge origin/<branch-name>

After merging, resolve any conflicts if needed, commit the changes, and then push:

git push origin <branch-name>

2.2 Rebase Your Changes

Alternatively, you can rebase your changes onto the latest version of the remote branch. Rebasing rewrites your commit history to make it as though your work was built directly on top of the latest remote changes.

git pull --rebase origin <branch-name>

Resolve any conflicts during the rebase, and then continue:

git rebase --continue
git push origin <branch-name>

3. Force Push (With Caution)

If you’re sure your local changes should overwrite the remote changes (for example, when you’re working in an isolated branch or project), you can use a force push.

git push --force origin <branch-name>

⚠️ Warning: Force pushing is dangerous because it can overwrite the remote repository’s history, potentially removing other contributors’ work.

4. Check Branch Protection Rules

If you’re pushing to a protected branch, GitLab may block the push. This is a common setup to prevent accidental changes to important branches like main or develop.

You can check the protection rules by navigating to the Settings > Repository section in GitLab, then scrolling to Protected Branches. If the branch is protected, you may need to:

  • Use a merge request to submit your changes.
  • Get the required permissions to push to the protected branch.

5. Resolve Merge Conflicts

If there are merge conflicts when pulling changes, Git will mark the conflicting files for you to resolve manually. Here’s how to resolve conflicts:

Open the conflicted file(s) in your text editor. Git will insert conflict markers like these:

<<<<<<< HEAD
Your changes
=======
Changes from origin
>>>>>>> origin/<branch-name>

Manually edit the file(s) to combine the changes or choose which changes to keep.

Add the resolved file(s) back to the staging area:

git add <file-name>

Continue the merge:

git commit

Push the changes:

git push origin <branch-name>

Advanced Techniques to Prevent “Failed to Push Some Refs to GitLab”

Once you’ve fixed the issue, it’s a good idea to adopt practices that can help you avoid encountering the error in the future. Here are some advanced strategies:

1. Regularly Pull Changes from the Remote Repository

One of the easiest ways to avoid conflicts is to keep your local branch in sync with the remote branch. Make it a habit to pull the latest changes from the remote repository before starting new work.

git pull origin <branch-name>

2. Use Feature Branches

To minimize conflicts and improve team collaboration, use feature branches. Instead of committing directly to main or develop, create a separate branch for each feature or bug fix.

git checkout -b feature/new-feature

After completing the work, create a merge request to integrate your changes.

3. Rebase Instead of Merging

Rebasing is a powerful technique for keeping your commit history clean. By rebasing, you apply your changes on top of the latest commits from the remote branch.

git pull --rebase origin <branch-name>

This approach avoids the merge commit that comes with a regular pull and helps prevent unnecessary conflicts.

4. Automate with Pre-push Hooks

Git hooks are scripts that are triggered by Git commands. You can create a pre-push hook to automatically pull changes from the remote before pushing, ensuring your local branch is always up-to-date.

Here’s an example of a pre-push hook script:

#!/bin/sh
git pull origin <branch-name>

Save this script in the .git/hooks/ directory as pre-push.

5. Leverage GitLab CI/CD

By setting up a CI/CD pipeline in GitLab, you can automate testing and code quality checks before changes are merged. This reduces the risk of conflicts by ensuring that only valid and compatible code gets pushed to the main repository.

Frequently Asked Questions (FAQs)

Q1: Can I avoid using git push --force?

Yes, in most cases, you should avoid using git push --force because it can overwrite the remote history and delete changes made by other contributors. Instead, use git pull or git pull --rebase to synchronize your changes with the remote repository.

Q2: How do I know if a branch is protected in GitLab?

In GitLab, go to Settings > Repository > Protected Branches to see which branches are protected. You may need additional permissions to push to these branches.

Q3: What’s the difference between a merge and a rebase?

A merge combines the changes from two branches into one, creating a new merge commit. A rebase, on the other hand, re-applies your changes on top of the latest commits from the remote branch, resulting in a cleaner commit history without a merge commit.

Q4: Can I recover lost commits after a force push?

Yes, you can recover lost commits if you have the commit hash. Use git reflog to find the commit hash and then use git checkout <commit-hash> to restore it.

Conclusion

The “failed to push some refs to GitLab” error is a common issue that developers encounter when working with Git and GitLab. By following the steps outlined in this guide, you should be able to resolve the issue and push your changes smoothly.

Whether it’s a simple pull, resolving merge conflicts, or dealing with protected branches, mastering these Git techniques will make you more efficient and avoid future problems. Adopting advanced strategies like regular rebasing, using feature branches, and setting up CI/CD pipelines can help you avoid this error entirely. Thank you for reading the DevopsRoles page!

Step-by-Step Guide to Merging Feature Branches in Git From feature/xxx_2020 to develop/xxx

Introduction

Merging Feature Branches in Git, allowing developers to integrate changes from one branch into another. This process is essential for maintaining a clean and organized codebase, especially in collaborative projects where multiple developers work on different features simultaneously. In this guide, we will walk you through the step-by-step process of merging the feature/xxx_2020 branch into the develop/xxx branch. We will cover everything from setting up your working environment to resolving conflicts, ensuring that your merge is smooth and error-free. Whether you’re new to Git or looking to refine your merging skills, this guide has you covered.

Merging Feature Branches in Git From feature/xxx_2020 to develop/xxx

Step 1: Create a Working Directory

Before starting the merge process, it’s essential to create a separate working directory to prevent any unintended changes in your current workspace.

$ mkdir ${Working directory}
$ cd ${Working directory}

Step 2: Clone the Git Repository

Next, clone the Git repository to your local machine to ensure that you have the latest code base.

$ git clone https://domain.com/XXX/xxx.git
$ cd xxx

Step 3: Check the Remote and Fetch the Data

To ensure you are working with the most up-to-date branches, check the remote repository and fetch the latest data.

$ git remote show origin
$ git fetch origin

Step 4: Checkout the Merge Source Branch

Now, switch to the source branch feature/xxx_2020 that you plan to merge from.

$ git checkout feature/xxx_2020

Step 5: Perform a Fast-Forward Merge on the Source Branch

To ensure the source branch is up-to-date with its remote counterpart, perform a fast-forward merge.

$ git merge --ff origin/feature/xxx_2020

Step 6: Checkout the Merge Destination Branch

After updating the source branch, switch to the destination branch develop/xxx.

$ git checkout develop/xxx

Step 7: Perform a Fast-Forward Merge on the Destination Branch

Update the destination branch by performing a fast-forward merge to ensure it is current.

$ git merge --ff origin/develop/xxx

Step 8: Merge the Source Branch into the Destination Branch

Now, merge the feature/xxx_2020 branch into develop/xxx. Use the --no-commit and --no-ff options to ensure that you have control over the commit process and can handle any conflicts that arise.

$ git merge --no-commit --no-ff feature/xxx_2020

Step 9: Check Git Status for Conflicts

Before finalizing the merge, check the status of your Git repository to identify any conflicts that need to be resolved.

$ git status

Step 10: Resolve Merge Conflicts (If Any)

If there are conflicts, you’ll need to manually resolve them. Open the conflicted files, edit them as necessary, and then mark them as resolved.

Step 11: Commit the Merge with Conflict Resolution

Once all conflicts have been resolved, commit the merge with a detailed message describing the conflicts and how they were resolved.

$ git commit -F- <<EOM
>Merge branch 'feature/xxx_2020' into 'develop/xxx'
>Auto-merging src/main/java/H6789.java
>CONFLICT (content): Merge conflict in src/main/java/F6789.java
>Auto-merging src/main/etc/Test_message.properties
>EOM

Merge conflict resolution FAQs

What should I do if I encounter a merge conflict?

If you encounter a merge conflict, carefully review the conflicting files, resolve the conflicts, and then commit the changes. Use Git’s conflict markers (<<<<<<<, =======, >>>>>>>) to identify the differences between the branches.

Why should I use --no-commit and --no-ff during a merge?

Using --no-commit and --no-ff gives you more control over the merge process. It allows you to review the changes before finalizing the merge and ensures that a merge commit is created even if the merge could be resolved as a fast-forward.

How can I avoid merge conflicts?

To minimize the chances of conflicts, regularly pull the latest changes from the remote repository into your local branches and communicate with your team to coordinate when and how merges are performed.

Conclusion

Merging branches in Git is a critical skill for developers, particularly when working on collaborative projects. By following the steps outlined in this guide, you can successfully merge the feature/xxx_2020 branch into the develop/xxx branch, resolve any conflicts, and maintain a clean and functional codebase. Thank you for reading the DevopsRoles page!

References

Integrating Trivy with GitHub Actions for CI/CD Security Scanning

Ensuring security within your Continuous Integration and Continuous Deployment (CI/CD) pipeline is crucial for modern software development. This detailed guide will help you integrate Trivy with GitHub Actions to automate CI/CD Security Scanning in your workflow.

What is Trivy?

It is a comprehensive vulnerability scanner for container images, file systems, and Git repositories. It can detect vulnerabilities, misconfigurations, secrets, and licenses across various platforms. Trivy is simple to use and integrates well with CI/CD tools like GitHub Actions.

Setting Up GitHub Actions for CI/CD

GitHub Actions is a powerful automation tool that allows you to create custom workflows for your projects. These workflows can run on events such as pushes, pull requests, and merges. To integrate Trivy into your GitHub Actions workflow, follow these steps:

Step 1: Create a GitHub Repository

Start by creating a GitHub repository if you don’t already have one. Initialize it with your project files and include a .github/workflows directory for your GitHub Actions workflows.

Step 2: Define Your Workflow File

Create a workflow file in the .github/workflows directory and name it ci.yml. This file will define the steps GitHub Actions will follow to build, test, and deploy your project.

name: CI/CD Pipeline

on: 
  push:
    branches: [ main ]
  pull_request:
    branches: [ main ]

jobs:
  build:
    runs-on: ubuntu-latest

    steps:
    - name: Checkout code
      uses: actions/checkout@v2

    - name: Set up Docker Buildx
      uses: docker/setup-buildx-action@v1

    - name: Build Docker image
      run: docker build -t my-app .

    - name: Scan image with Trivy
      uses: aquasecurity/trivy-action@master
      with:
        image-ref: my-app

    - name: Deploy to production
      run: echo "Deploying application..."

Step 3: Workflow Breakdown

  • Checkout Code: This step uses the actions/checkout@v2 action to clone your repository.
  • Set up Docker Buildx: This step sets up Docker Buildx to enable multi-platform builds.
  • Build Docker Image: This step builds your Docker image using the Dockerfile in your repository.
  • Scan Image with Trivy: This step is the aquasecurity/trivy-action to scan the built Docker image for vulnerabilities.
  • Deploy to Production: This is a placeholder step where you can add your deployment commands.

Step 4: Commit and Push Your Workflow

Commit your ci.yml workflow file to your repository and push the changes. This will trigger the GitHub Actions workflow to run.

git add .github/workflows/ci.yml
git commit -m "Add CI/CD workflow with Trivy scanning"
git push origin main

Monitoring and Reviewing Results

After pushing your workflow file, navigate to the “Actions” tab in your GitHub repository. You will see your workflow running. GitHub Actions provides logs and details for each step, including the Trivy scan results.

Benefits of Integrating Trivy in CI/CD

1. Automated Security Scanning

By integrating Trivy into your CI/CD pipeline, you ensure that every code change is automatically scanned for vulnerabilities. This helps in identifying and addressing security issues early in the development process.

2. Continuous Compliance

Automated scanning helps maintain compliance with security standards and regulations. It ensures that your software meets security requirements before deployment.

3. Improved Security Posture

Regular scanning and fixing vulnerabilities improve the overall security posture of your application. This reduces the risk of security breaches and ensures a more secure deployment.

FAQs

Q1: What is Trivy?
A1: Trivy is a comprehensive vulnerability scanner for container images, file systems, and Git repositories that detects vulnerabilities, misconfigurations, secrets, and licenses across different platforms.

Q2: How does Trivy integrate with GitHub Actions?
A2: Trivy integrates with GitHub Actions by adding a step in your GitHub Actions workflow file to scan Docker images for vulnerabilities.

Q3: What are the benefits of using Trivy in a CI/CD pipeline?
A3: Using Trivy in a CI/CD pipeline ensures automated security scanning, continuous compliance, and improved security posture by identifying and fixing vulnerabilities early in the development process.

Q4: How can I monitor the results of Trivy scans in GitHub Actions?
A4: You can monitor the results of Trivy scans in GitHub Actions by navigating to the “Actions” tab in your GitHub repository and reviewing the logs and details for each step of the workflow.

Conclusion

Integrating Trivy with GitHub Actions for CI/CD security scanning is a straightforward process that provides significant benefits. By automating vulnerability scanning, you can ensure that your applications are secure and compliant from the earliest stages of development. Follow the steps outlined in this guide to set up your own secure CI/CD pipeline using Trivy and GitHub Actions.

For more detailed documentation and advanced configurations, refer to the official Trivy and GitHub Actions documentation. I hope will this your helpful. Thank you for reading the DevopsRoles page!