Azure Kubernetes Service (AKS) is a powerful managed Kubernetes service, simplifying the deployment and management of containerized applications. However, setting up an AKS cluster, especially within a pre-existing virtual network, can be a complex and time-consuming process. This article provides a comprehensive guide to AKS Cluster Provisioning using Terraform, a popular Infrastructure-as-Code (IaC) tool, ensuring efficiency and repeatability. We’ll navigate the intricacies of networking configurations and resource allocation, empowering you to streamline your Kubernetes deployments.
Understanding the Need for Automated AKS Cluster Provisioning
Manually provisioning AKS clusters is prone to errors and inconsistencies. It’s a tedious process involving numerous steps across multiple Azure portals and command-line interfaces. This approach is inefficient, especially when dealing with multiple environments or frequent cluster updates. Automating AKS Cluster Provisioning with Terraform offers several advantages:
- Increased Efficiency: Automate the entire process, significantly reducing manual effort and time.
- Improved Consistency: Ensure consistent cluster configurations across different environments.
- Enhanced Reproducibility: Easily recreate clusters from a defined state, simplifying testing and deployment.
- Version Control: Track changes to your infrastructure configurations using Git and other version control systems.
- Reduced Errors: Minimize human errors associated with manual configuration.
Setting up the Environment for Terraform and AKS Provisioning
Before embarking on AKS Cluster Provisioning, ensure you have the necessary prerequisites:
1. Azure Subscription and Resource Group:
You need an active Azure subscription and a resource group where your AKS cluster and related resources will be created. Create a resource group using the Azure portal, Azure CLI, or PowerShell.
2. Terraform Installation:
Download and install Terraform on your local machine. Refer to the official Terraform documentation for installation instructions here.
3. Azure CLI Installation:
Install the Azure CLI to authenticate with your Azure subscription. Instructions are available on the official Microsoft documentation website. This allows Terraform to interact with your Azure environment.
4. Azure Authentication:
Authenticate with Azure using the Azure CLI. This step is crucial to allow Terraform to access and manage your Azure resources.
az loginTerraform Code for AKS Cluster Provisioning in a Virtual Network
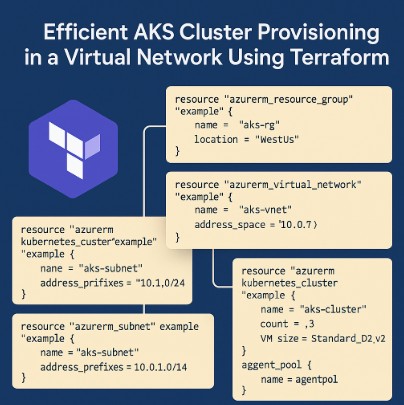
This section presents a Terraform configuration to provision an AKS cluster within a pre-existing virtual network. We’ll focus on key aspects, including network configuration, node pools, and Kubernetes version.
resource "azurerm_resource_group" "example" {
  name     = "aks-rg"
  location = "WestUS"
}

resource "azurerm_virtual_network" "example" {
  name                = "aks-vnet"
  address_space       = ["10.0.0.0/16"]
  location            = azurerm_resource_group.example.location
  resource_group_name = azurerm_resource_group.example.name
}

resource "azurerm_subnet" "example" {
  name                 = "aks-subnet"
  resource_group_name  = azurerm_resource_group.example.name
  virtual_network_name = azurerm_virtual_network.example.name
  address_prefixes     = ["10.0.1.0/24"]
}

resource "azurerm_kubernetes_cluster" "example" {
  name                = "aks-cluster"
  location            = azurerm_resource_group.example.location
  resource_group_name = azurerm_resource_group.example.name
  kubernetes_version  = "1.24.7"

  network_profile {
    network_plugin     = "azure"
    pod_cidr           = "10.244.0.0/16"
    service_cidr       = "10.0.0.0/16"
    dns_service_ip     = "10.0.0.10"
  }

  node_resource_group = azurerm_resource_group.example.name
  node_subnet_id      = azurerm_subnet.example.id

  agent_pool {
    name            = "agentpool"
    count           = 3
    vm_size         = "Standard_D2_v2"
    os_disk_size_gb = 100
    max_pods        = 110
  }
}
This code snippet demonstrates the core components. Remember to adapt it to your specific requirements, including the Kubernetes version, VM size, node count, and network configurations. You should also configure appropriate security rules and network policies within your Virtual Network.
Advanced AKS Cluster Provisioning with Terraform
Building upon the foundation established above, let’s explore advanced techniques for AKS Cluster Provisioning using Terraform:
1. Custom Node Pools:
Create specialized node pools for different application requirements, such as dedicated pools for specific workloads or with different VM sizes.
2. Auto-Scaling:
Configure auto-scaling for your node pools to automatically adjust the number of nodes based on demand, ensuring optimal resource utilization and cost efficiency.
3. Network Policies:
Implement network policies to control the communication between pods within your cluster, enhancing security and isolation.
4. Integration with other Azure Services:
Integrate your AKS cluster with other Azure services such as Azure Monitor for logging and monitoring, Azure Active Directory for authentication, and Azure Key Vault for secret management.
AKS Cluster Provisioning Best Practices
- Use descriptive resource names.
- Implement proper version control for your Terraform code.
- Leverage Terraform modules for reusability.
- Test your Terraform configurations thoroughly before applying them to production.
- Regularly update your Terraform and Azure CLI versions.
Frequently Asked Questions
Q1: Can I use Terraform to manage existing AKS clusters?
Yes, Terraform can manage existing AKS clusters. You can import existing resources into your Terraform state, allowing you to manage them through your IaC configuration.
Q2: What are the security considerations when using Terraform for AKS provisioning?
Security is paramount. Employ appropriate access control mechanisms, including managing Azure service principals and utilizing least privilege principles. Securely store and manage secrets using Azure Key Vault integration within your Terraform configuration.
Q3: How can I handle updates to my AKS cluster using Terraform?
Terraform’s state management makes updating your AKS cluster straightforward. Simply modify your Terraform configuration to reflect the desired changes, and apply the configuration using terraform apply. Terraform will intelligently manage the changes, minimizing disruption to your running applications.
Q4: What happens if my Terraform configuration fails?
Terraform provides robust error handling. If a configuration step fails, Terraform will report the error and prevent any further changes. You can review the logs to troubleshoot the issue and correct your configuration.

Conclusion
Automating AKS Cluster Provisioning with Terraform is a powerful way to streamline your Kubernetes deployments. This guide has walked you through the essential steps, from setting up the environment to implementing advanced techniques. By leveraging Terraform’s capabilities, you can significantly improve the efficiency, consistency, and reproducibility of your AKS deployments. Remember to prioritize security best practices and thoroughly test your configurations before applying them to production. Efficient and reliable AKS Cluster Provisioning is crucial for smooth operation and scalable cloud-native applications. Thank you for reading the DevopsRoles page!