Tag Archives: DevOps

Revolutionizing Infrastructure as Code: HashiCorp Terraform AI Integration

The world of infrastructure as code (IaC) is constantly evolving, driven by the need for greater efficiency, automation, and scalability. HashiCorp, a leader in multi-cloud infrastructure automation, has significantly advanced the field with the launch of its Terraform Cloud Managed Private Cloud (MCP) server, enabling seamless integration with AI and machine learning (ML) capabilities. This article delves into the exciting possibilities offered by HashiCorp Terraform AI, exploring how it empowers developers and DevOps teams to build, manage, and secure their infrastructure more effectively than ever before. We will address the challenges traditional IaC faces and demonstrate how HashiCorp Terraform AI solutions overcome these limitations, paving the way for a more intelligent and automated future.

Understanding the Power of HashiCorp Terraform AI

Traditional IaC workflows, while powerful, often involve repetitive tasks, manual intervention, and a degree of guesswork. Predicting resource needs, optimizing configurations, and troubleshooting issues can be time-consuming and error-prone. HashiCorp Terraform AI changes this paradigm by leveraging the power of AI and ML to automate and enhance several critical aspects of the infrastructure lifecycle.

Enhanced Automation with AI-Driven Predictions

HashiCorp Terraform AI introduces intelligent features that significantly reduce the manual effort associated with infrastructure management. For instance, AI-powered predictive analytics can anticipate future resource requirements based on historical data and current trends, enabling proactive scaling and preventing performance bottlenecks. This predictive capacity minimizes the risk of resource exhaustion and ensures optimal infrastructure utilization.

Intelligent Configuration Optimization

Configuring infrastructure can be complex, often requiring extensive expertise and trial-and-error to achieve optimal performance and security. HashiCorp Terraform AI employs ML algorithms to analyze configurations and suggest improvements. This intelligent optimization leads to more efficient resource allocation, reduced costs, and enhanced system reliability. It helps to avoid common configuration errors and ensure compliance with best practices.

Streamlined Troubleshooting and Anomaly Detection

Identifying and resolving infrastructure issues can be a major challenge. HashiCorp Terraform AI excels in this area by employing advanced anomaly detection techniques. By continuously monitoring infrastructure performance, it can identify unusual patterns and potential problems before they escalate into significant outages or security breaches. This proactive approach significantly improves system stability and reduces downtime.

Implementing HashiCorp Terraform AI: A Practical Guide

Integrating AI into your Terraform workflows is not as daunting as it might seem. The process leverages existing Terraform features and integrates seamlessly with the Terraform Cloud MCP server. While specific implementation details depend on your chosen AI/ML services and your existing infrastructure, the core principles remain consistent.

Step-by-Step Integration Process

  1. Set up Terraform Cloud MCP Server: Ensure you have a properly configured Terraform Cloud MCP server. This provides a secure and controlled environment for deploying and managing your infrastructure.
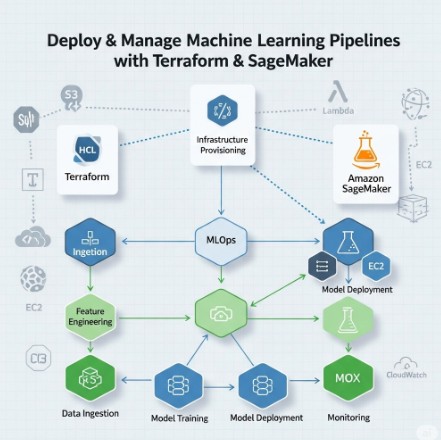
  2. Choose AI/ML Services: Select suitable AI/ML services to integrate with Terraform. Options range from cloud-based offerings (like AWS SageMaker, Google AI Platform, or Azure Machine Learning) to on-premises solutions, depending on your requirements and existing infrastructure.
  3. Develop Custom Modules: Create custom Terraform modules to interface between Terraform and your chosen AI/ML services. These modules will handle data transfer, model execution, and integration of AI-driven insights into your infrastructure management workflows.
  4. Implement Data Pipelines: Establish robust data pipelines to feed relevant information from your infrastructure to the AI/ML models. This ensures the AI models receive the necessary data to make accurate predictions and recommendations.
  5. Monitor and Iterate: Continuously monitor the performance of your AI-powered infrastructure management system. Regularly evaluate the results, iterate on your models, and refine your integration strategies to maximize effectiveness.

Example Code Snippet (Conceptual):

This is a conceptual example and might require adjustments based on your specific AI/ML service and setup. It illustrates how you might integrate predictions into your Terraform configuration:

resource "aws_instance" "example" {
  ami           = "ami-0c55b31ad2299a701" # Replace with your AMI
  instance_type = data.aws_instance_type.example.id
  count         = var.instance_count + jsondecode(data.aws_lambda_function_invocation.prediction.result).predicted_instances
}

data "aws_lambda_function_invocation" "prediction" {
  function_name = "prediction-lambda" # Replace with your lambda function name
  input         = jsonencode({ instance_count = var.instance_count })
}

# The aws_instance_type data source is needed since you're using it in the resource block
data "aws_instance_type" "example" {
  instance_type = "t2.micro" # Example instance type
}

# The var.instance_count variable needs to be defined
variable "instance_count" {
  type    = number
  default = 1
}

Addressing Security Concerns with HashiCorp Terraform AI

Security is paramount when integrating AI into infrastructure management. HashiCorp Terraform AI addresses this by emphasizing secure data handling, access control, and robust authentication mechanisms. The Terraform Cloud MCP server offers features to manage access rights and encrypt sensitive data, ensuring that your infrastructure remains protected.

Best Practices for Secure Integration

  • Secure Data Transmission: Utilize encrypted channels for all communication between Terraform, your AI/ML services, and your infrastructure.
  • Role-Based Access Control: Implement granular access control to limit access to sensitive data and resources.
  • Regular Security Audits: Conduct regular security audits to identify and mitigate potential vulnerabilities.
  • Data Encryption: Encrypt all sensitive data both in transit and at rest.

Frequently Asked Questions

What are the benefits of using HashiCorp Terraform AI?

HashiCorp Terraform AI offers numerous advantages, including enhanced automation, improved resource utilization, proactive anomaly detection, streamlined troubleshooting, reduced costs, and increased operational efficiency. It empowers organizations to manage their infrastructure with greater speed, accuracy, and reliability.

How does HashiCorp Terraform AI compare to other IaC solutions?

While other IaC solutions exist, HashiCorp Terraform AI distinguishes itself through its seamless integration with AI and ML capabilities. This allows for a level of automation and intelligent optimization not readily available in traditional IaC tools. It streamlines operations, improves resource allocation, and enables proactive issue resolution.

What are the prerequisites for implementing HashiCorp Terraform AI?

Prerequisites include a working knowledge of Terraform, access to a Terraform Cloud MCP server, and a chosen AI/ML service. You’ll also need expertise in developing custom Terraform modules and setting up data pipelines to feed information to your AI/ML models. Familiarity with relevant cloud platforms is beneficial.

Is HashiCorp Terraform AI suitable for all organizations?

The suitability of HashiCorp Terraform AI depends on an organization’s specific needs and resources. Organizations with complex infrastructures, demanding scalability requirements, and a need for advanced automation capabilities will likely benefit most. Those with simpler setups might find the overhead unnecessary. However, the long-term advantages often justify the initial investment.

What is the cost of implementing HashiCorp Terraform AI?

The cost depends on several factors, including the chosen AI/ML services, the complexity of your infrastructure, and the level of customization required. Factors like cloud service provider costs, potential for reduced operational expenses, and increased efficiency must all be weighed.

Conclusion

The advent of HashiCorp Terraform AI marks a significant step forward in the evolution of infrastructure as code. By leveraging the power of AI and ML, it addresses many of the challenges associated with traditional IaC, offering enhanced automation, intelligent optimization, and proactive problem resolution. Implementing HashiCorp Terraform AI requires careful planning and execution, but the resulting improvements in efficiency, scalability, and reliability are well worth the investment. Embrace this powerful tool to build a more robust, resilient, and cost-effective infrastructure for your organization. Remember to prioritize security throughout the integration process. For more detailed information, refer to the official HashiCorp documentation https://www.hashicorp.com/docs/terraform and explore the capabilities of various cloud-based AI/ML platforms. https://aws.amazon.com/machine-learning/ https://cloud.google.com/ai-platform. Thank you for reading the DevopsRoles page!

Deploy & Manage Machine Learning Pipelines with Terraform & SageMaker

Deploying and managing machine learning (ML) pipelines efficiently and reliably is a critical challenge for organizations aiming to leverage the power of AI. The complexity of managing infrastructure, dependencies, and the iterative nature of ML model development often leads to operational bottlenecks. This article focuses on streamlining this process using Machine Learning Pipelines Terraform and Amazon SageMaker, providing a robust and scalable solution for deploying and managing your ML workflows.

Understanding the Need for Infrastructure as Code (IaC) in ML Pipelines

Traditional methods of deploying ML pipelines often involve manual configuration and provisioning of infrastructure, leading to inconsistencies, errors, and difficulty in reproducibility. Infrastructure as Code (IaC), using tools like Terraform, offers a solution by automating the provisioning and management of infrastructure resources. By defining infrastructure in code, you gain version control, improved consistency, and the ability to easily replicate environments across different cloud providers or on-premises setups. This is particularly crucial for Machine Learning Pipelines Terraform deployments, where the infrastructure needs can fluctuate depending on the complexity of the pipeline and the volume of data being processed.

Leveraging Terraform for Infrastructure Management

Terraform, a popular IaC tool, allows you to define and manage your infrastructure using a declarative configuration language called HashiCorp Configuration Language (HCL). This allows you to define the desired state of your infrastructure, and Terraform will manage the creation, modification, and deletion of resources to achieve that state. For Machine Learning Pipelines Terraform deployments, this means you can define all the necessary components, such as:

  • Amazon SageMaker instances (e.g., training instances, processing instances, endpoint instances).
  • Amazon S3 buckets for storing data and model artifacts.
  • IAM roles and policies to manage access control.
  • Amazon EC2 instances for custom components (if needed).
  • Networking resources such as VPCs, subnets, and security groups.

Example Terraform Configuration for SageMaker Instance

The following code snippet shows a basic example of creating a SageMaker training instance using Terraform:

resource "aws_sagemaker_notebook_instance" "training" {
  name          = "my-sagemaker-training-instance"
  instance_type = "ml.m5.xlarge"
  role_arn      = aws_iam_role.sagemaker_role.arn
}

resource "aws_iam_role" "sagemaker_role" {
  name               = "SageMakerTrainingRole"
  assume_role_policy = jsonencode({
    Version = "2012-10-17"
    Statement = [
      {
        Action = "sts:AssumeRole"
        Effect = "Allow"
        Principal = {
          Service = "sagemaker.amazonaws.com"
        }
      }
    ]
  })
}

This example demonstrates how to define a SageMaker notebook instance with a specific instance type and an associated IAM role. The full configuration would also include the necessary S3 buckets, VPC settings, and security configurations. More complex pipelines might require additional resources and configurations.

Building and Deploying Machine Learning Pipelines with SageMaker

Amazon SageMaker provides a managed service for building, training, and deploying ML models. By integrating SageMaker with Terraform, you can automate the entire process, from infrastructure provisioning to model deployment. SageMaker supports various pipeline components, including:

  • Processing jobs for data preprocessing and feature engineering.
  • Training jobs for model training.
  • Model building and evaluation.
  • Model deployment and endpoint creation.

Integrating SageMaker Pipelines with Terraform

You can manage SageMaker pipelines using Terraform by utilizing the AWS provider’s resources related to SageMaker pipelines and other supporting services. This includes defining the pipeline steps, dependencies, and the associated compute resources.

Remember to define IAM roles with appropriate permissions to allow Terraform to interact with SageMaker and other AWS services.

Managing Machine Learning Pipelines Terraform for Scalability and Maintainability

One of the key advantages of using Machine Learning Pipelines Terraform is the improved scalability and maintainability of your ML infrastructure. By leveraging Terraform’s capabilities, you can easily scale your infrastructure up or down based on your needs, ensuring optimal resource utilization. Furthermore, version control for your Terraform configuration provides a history of changes, allowing you to easily revert to previous states if necessary. This facilitates collaboration amongst team members working on the ML pipeline.

Monitoring and Logging

Comprehensive monitoring and logging are crucial for maintaining a robust ML pipeline. Integrate monitoring tools such as CloudWatch to track the performance of your SageMaker instances, pipelines, and other infrastructure components. This allows you to identify and address issues proactively.

Frequently Asked Questions

Q1: What are the benefits of using Terraform for managing SageMaker pipelines?

Using Terraform for managing SageMaker pipelines offers several advantages: Infrastructure as Code (IaC) enables automation, reproducibility, version control, and improved scalability and maintainability. It simplifies the complex task of managing the infrastructure required for machine learning workflows.

Q2: How do I handle secrets management when using Terraform for SageMaker?

For secure management of secrets, such as AWS access keys, use tools like AWS Secrets Manager or HashiCorp Vault. These tools allow you to securely store and retrieve secrets without hardcoding them in your Terraform configuration files. Integrate these secret management solutions into your Terraform workflow to access sensitive information safely.

Q3: Can I use Terraform to manage custom containers in SageMaker?

Yes, you can use Terraform to manage custom containers in SageMaker. You would define the necessary ECR repositories to store your custom container images and then reference them in your SageMaker training or deployment configurations managed by Terraform. This allows you to integrate your custom algorithms and dependencies seamlessly into your automated pipeline.

Q4: How do I handle updates and changes to my ML pipeline infrastructure?

Use Terraform’s `plan` and `apply` commands to preview and apply changes to your infrastructure. Terraform’s state management ensures that only necessary changes are applied, minimizing disruptions. Version control your Terraform code to track changes and easily revert if needed. Remember to test changes thoroughly in a non-production environment before deploying to production.

Conclusion

Deploying and managing Machine Learning Pipelines Terraform and SageMaker provides a powerful and efficient approach to building and deploying scalable ML workflows. By leveraging IaC principles and the capabilities of Terraform, organizations can overcome the challenges of managing complex infrastructure and ensure the reproducibility and reliability of their ML pipelines. Remember to prioritize security best practices, including robust IAM roles and secret management, when implementing this solution. Consistent use of Machine Learning Pipelines Terraform ensures efficient and reliable ML operations. Thank you for reading the DevopsRoles page!

For further information, refer to the official Terraform and AWS SageMaker documentation:

Terraform Documentation
AWS SageMaker Documentation
AWS Provider for Terraform

AWS SAM and HashiCorp Terraform: Now Generally Available

The convergence of serverless technologies and infrastructure-as-code (IaC) has revolutionized the way we deploy and manage applications. Two leading players in this space, AWS Serverless Application Model (AWS SAM) and HashiCorp Terraform, have significantly impacted cloud deployment strategies. This article delves into the now generally available integration of AWS SAM and HashiCorp Terraform, exploring how this combination empowers developers and DevOps engineers to streamline their workflows and improve application deployment efficiency. We’ll cover the benefits, potential challenges, and best practices for effectively leveraging AWS SAM HashiCorp Terraform in your cloud infrastructure.

Understanding AWS SAM and HashiCorp Terraform

Before diving into their integration, let’s briefly review each technology individually. AWS SAM simplifies the definition and deployment of serverless applications on AWS. It uses a YAML-based template language to define the resources needed for your application, including Lambda functions, API Gateway endpoints, DynamoDB tables, and more. This declarative approach makes it easier to manage and version your serverless infrastructure.

HashiCorp Terraform, on the other hand, is a powerful IaC tool supporting a wide range of cloud providers and infrastructure services. It uses a declarative configuration language (HCL) to define and manage infrastructure resources. Terraform’s strength lies in its ability to manage diverse infrastructure components, not just serverless applications. Its extensive provider ecosystem enables consistent management across various platforms.

Integrating AWS SAM with HashiCorp Terraform

The integration of AWS SAM HashiCorp Terraform brings together the best of both worlds. You can now define your serverless application using AWS SAM’s YAML templates and manage the deployment of those templates, along with other infrastructure components, using Terraform. This allows for a more holistic approach to infrastructure management, enabling consistent management of serverless applications alongside other infrastructure elements.

Benefits of Using AWS SAM with Terraform

  • Improved Workflow Efficiency: Centralize management of serverless and non-serverless infrastructure within a single IaC framework.
  • Enhanced Version Control: Leverage Terraform’s state management capabilities to track infrastructure changes and roll back to previous versions.
  • Simplified Infrastructure Provisioning: Automate the deployment of complex serverless applications and associated resources in a repeatable and consistent manner.
  • Enhanced Collaboration: Facilitates collaboration amongst developers, DevOps engineers, and infrastructure teams through a shared IaC approach.
  • Increased Reusability: Develop reusable Terraform modules for common serverless components, boosting productivity.

Implementing AWS SAM with Terraform: A Practical Example

Let’s consider a simple example. We’ll deploy a Lambda function using AWS SAM, managed by Terraform. This example assumes you have already installed Terraform and configured AWS credentials.

1. AWS SAM Template (template.yaml):

AWSTemplateFormatVersion: '2010-09-09'
Transform: AWS::Serverless-2016-10-31
Description: A simple Lambda function deployed via Terraform.
Resources:
  MyLambdaFunction:
    Type: AWS::Serverless::Function
    Properties:
      Handler: index.handler
      Runtime: nodejs16.x
      CodeUri: s3://my-bucket/my-lambda-function.zip
      Policies:
        - AWSLambdaBasicExecutionRole

2. Terraform Configuration (main.tf):

terraform {
  required_providers {
    aws = {
      source  = "hashicorp/aws"
      version = "~> 4.0"
    }
  }
}

provider "aws" {
  region = "us-east-1"
}

resource "aws_s3_bucket" "lambda_code" {
  bucket = "my-bucket"
}

resource "aws_s3_bucket_object" "lambda_code" {
  bucket = aws_s3_bucket.lambda_code.id
  key    = "my-lambda-function.zip"
  source = "my-lambda-function.zip"
}

resource "aws_s3_bucket_object" "sam_template" {
  bucket = "my-bucket"
  key    = "template.yaml"
  source = "template.yaml"
}

resource "aws_lambda_function" "my_lambda" {
  filename      = "template.yaml"
  s3_bucket     = aws_s3_bucket.lambda_code.id
  s3_key        = "template.yaml"
  function_name = "MyLambdaFunction"
}

This example shows how Terraform manages the deployment of the SAM template. Remember to replace placeholders like bucket names and file paths with your actual values. This simplified example omits error handling and advanced features. A real-world application might require more intricate configurations.

Advanced Considerations for AWS SAM HashiCorp Terraform

While the integration simplifies many aspects, certain nuances deserve attention.

Managing SAM Template Updates

Efficiently handling updates to your SAM template within the Terraform workflow requires careful planning. Using proper version control for both the SAM template and Terraform configuration is crucial. Strategically using Terraform’s `count` or `for_each` meta-arguments can aid in managing multiple SAM templates or environments.

Security Best Practices

Security is paramount. Avoid hardcoding sensitive information into your SAM templates and Terraform configurations. Utilize AWS Secrets Manager or similar services to store and securely access credentials. Employ infrastructure-as-code security scanning tools to identify potential vulnerabilities.

Addressing Potential Challenges

Integrating AWS SAM HashiCorp Terraform might present some challenges, particularly for complex serverless applications. Thorough testing is essential to ensure the smooth operation of the entire infrastructure. Effective error handling and logging within both the SAM template and the Terraform configuration can assist in debugging and troubleshooting.

Frequently Asked Questions

Q1: Can I use Terraform to manage all aspects of a serverless application built with AWS SAM?

A1: Yes, Terraform can manage the deployment and updates of the AWS SAM template, along with any supporting AWS resources such as IAM roles, S3 buckets, and other infrastructure components required by the serverless application.

Q2: What are the advantages of using AWS SAM and Terraform together compared to using only SAM?

A2: Using both provides better infrastructure management. Terraform offers features like state management, improved version control, and support for infrastructure beyond serverless components that SAM alone doesn’t offer. This ensures better governance, consistency, and easier integration with other parts of your infrastructure.

Q3: How can I handle dependency management when using both AWS SAM and Terraform?

A3: Terraform’s dependency management features handle the ordering of resource creation. For example, you would ensure that necessary IAM roles are created before deploying your SAM template. The `depends_on` meta-argument can be effectively used to specify dependencies between resources in your Terraform configuration.

Q4: Are there any limitations to integrating AWS SAM and Terraform?

A4: The primary limitation is the potential complexity for very large, intricate serverless applications. Proper planning, modular design, and robust testing are crucial to mitigating this. Also, understanding the nuances of both SAM and Terraform is necessary to avoid common pitfalls. Thorough testing and clear understanding of the technologies are critical to success.

Conclusion

The general availability of the integration between AWS SAM and HashiCorp Terraform marks a significant step forward in serverless application deployment and management. By combining the strengths of both technologies, you gain a powerful and streamlined approach to building and operating your cloud infrastructure. Mastering the interplay between AWS SAM HashiCorp Terraform allows for increased efficiency, scalability, and maintainability of your serverless applications. Remember to leverage best practices, thorough testing, and a modular approach for optimal results when utilizing this powerful combination. Successful integration requires a deep understanding of both AWS SAM and Terraform’s functionalities and capabilities.

For further information, refer to the official documentation: AWS SAM Documentation and HashiCorp Terraform Documentation. Additionally, consider exploring best practices from reputable sources such as HashiCorp’s blog for further insights. Thank you for reading the DevopsRoles page!

Deploy EKS Cluster using Terraform: A Comprehensive Guide

Managing Kubernetes clusters can be complex, requiring significant expertise in networking, security, and infrastructure. This complexity often leads to operational overhead and delays in deploying applications. This comprehensive guide will show you how to streamline this process by leveraging Terraform, a powerful Infrastructure as Code (IaC) tool, to automate the Deploy EKS Cluster Terraform process. We’ll cover everything from setting up your environment to configuring advanced cluster features, empowering you to build robust and scalable EKS clusters efficiently.

Prerequisites

Before embarking on this journey, ensure you have the following prerequisites in place:

  • An AWS account with appropriate permissions.
  • Terraform installed and configured with AWS credentials.
  • The AWS CLI installed and configured.
  • Basic understanding of Kubernetes concepts and EKS.
  • Familiarity with Terraform’s configuration language (HCL).

Refer to the official Terraform and AWS documentation for detailed installation and configuration instructions.

Setting up the Terraform Configuration

Our Deploy EKS Cluster Terraform approach begins by defining the infrastructure requirements in a Terraform configuration file (typically named main.tf). This file will define the VPC, subnets, IAM roles, and the EKS cluster itself.

Defining the VPC and Subnets

We’ll start by creating a VPC and several subnets to host our EKS cluster. This ensures network isolation and security. The following code snippet demonstrates this:

# Data source to get available availability zones
data "aws_availability_zones" "available" {
  state = "available"
}

# Main VPC resource
resource "aws_vpc" "main" {
  cidr_block           = "10.0.0.0/16"
  enable_dns_hostnames = true
  enable_dns_support   = true

  tags = {
    Name = "eks-vpc"
  }
}

# Private subnets
resource "aws_subnet" "private" {
  count = 2
  
  vpc_id                  = aws_vpc.main.id
  cidr_block              = cidrsubnet(aws_vpc.main.cidr_block, 8, count.index)
  availability_zone       = data.aws_availability_zones.available.names[count.index]
  map_public_ip_on_launch = false

  tags = {
    Name = "eks-private-subnet-${count.index}"
    Type = "Private"
  }
}

# Optional: Public subnets (commonly needed for EKS)
resource "aws_subnet" "public" {
  count = 2
  
  vpc_id                  = aws_vpc.main.id
  cidr_block              = cidrsubnet(aws_vpc.main.cidr_block, 8, count.index + 10)
  availability_zone       = data.aws_availability_zones.available.names[count.index]
  map_public_ip_on_launch = true

  tags = {
    Name = "eks-public-subnet-${count.index}"
    Type = "Public"
  }
}

# Internet Gateway for public subnets
resource "aws_internet_gateway" "main" {
  vpc_id = aws_vpc.main.id

  tags = {
    Name = "eks-igw"
  }
}

# Route table for public subnets
resource "aws_route_table" "public" {
  vpc_id = aws_vpc.main.id

  route {
    cidr_block = "0.0.0.0/0"
    gateway_id = aws_internet_gateway.main.id
  }

  tags = {
    Name = "eks-public-rt"
  }
}

# Associate public subnets with public route table
resource "aws_route_table_association" "public" {
  count = length(aws_subnet.public)
  
  subnet_id      = aws_subnet.public[count.index].id
  route_table_id = aws_route_table.public.id
}

Creating IAM Roles

IAM roles are crucial for granting the EKS cluster and its nodes appropriate permissions to access AWS services. We’ll create roles for the cluster’s nodes and the EKS service itself:

# IAM policy document for EC2 to assume the role
data "aws_iam_policy_document" "assume_role" {
  statement {
    actions = ["sts:AssumeRole"]
    
    principals {
      type        = "Service"
      identifiers = ["ec2.amazonaws.com"]
    }
  }
}

# EKS Node Instance Role
resource "aws_iam_role" "eks_node_instance_role" {
  name               = "eks-node-instance-role"
  assume_role_policy = data.aws_iam_policy_document.assume_role.json

  tags = {
    Name = "EKS Node Instance Role"
  }
}

# Required AWS managed policies for EKS worker nodes
resource "aws_iam_role_policy_attachment" "eks_worker_node_policy" {
  policy_arn = "arn:aws:iam::aws:policy/AmazonEKSWorkerNodePolicy"
  role       = aws_iam_role.eks_node_instance_role.name
}

resource "aws_iam_role_policy_attachment" "eks_cni_policy" {
  policy_arn = "arn:aws:iam::aws:policy/AmazonEKS_CNI_Policy"
  role       = aws_iam_role.eks_node_instance_role.name
}

resource "aws_iam_role_policy_attachment" "ec2_container_registry_read_only" {
  policy_arn = "arn:aws:iam::aws:policy/AmazonEC2ContainerRegistryReadOnly"
  role       = aws_iam_role.eks_node_instance_role.name
}

# Optional: Additional policy for CloudWatch logging
resource "aws_iam_role_policy_attachment" "cloudwatch_agent_server_policy" {
  policy_arn = "arn:aws:iam::aws:policy/CloudWatchAgentServerPolicy"
  role       = aws_iam_role.eks_node_instance_role.name
}

# Instance profile for EC2 instances
resource "aws_iam_instance_profile" "eks_node_instance_profile" {
  name = "eks-node-instance-profile"
  role = aws_iam_role.eks_node_instance_role.name

  tags = {
    Name = "EKS Node Instance Profile"
  }
}

# Output the role ARN for use in other resources
output "eks_node_instance_role_arn" {
  description = "ARN of the EKS node instance role"
  value       = aws_iam_role.eks_node_instance_role.arn
}

output "eks_node_instance_profile_name" {
  description = "Name of the EKS node instance profile"
  value       = aws_iam_instance_profile.eks_node_instance_profile.name
}

Deploying the EKS Cluster

Finally, we define the EKS cluster itself. This includes specifying the cluster name, version, VPC configuration, and node group details:


resource "aws_eks_cluster" "main" {
name = "my-eks-cluster"
role_arn = aws_iam_role.eks_node_instance_role.arn
vpc_config {
subnet_ids = aws_subnet.private.*.id
}
enabled_cluster_log_types = ["api", "audit", "authenticator"]
}

Deploying the EKS Cluster Terraform Configuration

After defining the configuration, we can deploy the cluster using Terraform. This involves initializing the project, planning the deployment, and finally applying the changes:

  1. terraform init: Initializes the Terraform project and downloads the necessary providers.
  2. terraform plan: Creates an execution plan, showing the changes that will be made.
  3. terraform apply: Applies the changes, creating the infrastructure defined in the configuration file.

Configuring Kubernetes Resources (Post-Deployment)

Once the EKS cluster is deployed, you can utilize tools like kubectl to manage Kubernetes resources within the cluster. This includes deploying applications, managing pods, and configuring services. You’ll need to configure your kubeconfig file to connect to the newly created cluster. This is typically downloaded after the EKS cluster is created through the AWS console or using the AWS CLI.

Advanced Configurations

This basic setup provides a functional EKS cluster. However, more advanced configurations can be implemented to enhance security, scalability, and manageability. Some examples include:

  • Node Groups: Terraform allows for managing multiple node groups with different instance types and configurations for better resource allocation.
  • Auto-Scaling Groups: Integrating with AWS Auto Scaling Groups allows for dynamically scaling the number of nodes based on demand.
  • Kubernetes Add-ons: Deploying add-ons like the Amazon EKS managed node groups for easier node management can improve cluster efficiency and reduce operational overhead.
  • Security Groups: Implement stringent security rules to control network traffic in and out of the cluster.

Frequently Asked Questions

Q1: How do I handle updates and upgrades of the EKS cluster using Terraform?

Terraform can manage updates to your EKS cluster. After upgrading the Kubernetes version through the AWS console or CLI, re-running `terraform apply` will reflect the changes in your Terraform configuration. However, ensure your Terraform configuration is up-to-date with the latest AWS provider version.

Q2: What happens if I destroy the cluster using `terraform destroy`?

Running `terraform destroy` will remove all the infrastructure created by Terraform, including the EKS cluster, VPC, subnets, and IAM roles. This action is irreversible, so proceed with caution.

Q3: Can I use Terraform to manage other AWS services related to my EKS cluster?

Yes, Terraform’s versatility extends to managing various AWS services associated with your EKS cluster, such as CloudWatch for monitoring, IAM roles for fine-grained access control, and S3 for persistent storage. This allows for comprehensive infrastructure management within a single IaC framework.

Q4: How can I integrate CI/CD with my Terraform deployment of an EKS cluster?

Integrate with CI/CD pipelines (like GitLab CI, Jenkins, or GitHub Actions) by triggering Terraform execution as part of your deployment process. This automates the creation and updates of your EKS cluster, enhancing efficiency and reducing manual intervention.

Conclusion

This guide provides a solid foundation for deploying and managing EKS clusters using Terraform. By leveraging Infrastructure as Code, you gain significant control, repeatability, and efficiency in your infrastructure management. Remember to continuously update your Terraform configurations and integrate with CI/CD pipelines to maintain a robust and scalable EKS cluster. Mastering the Deploy EKS Cluster Terraform process allows for streamlined deployment and management of your Kubernetes environments, minimizing operational burdens and maximizing efficiency.

For more in-depth information, consult the official Terraform documentation and AWS EKS documentation. Additionally, explore advanced topics like using Terraform modules and state management for enhanced organization and scalability.

Further exploration of using AWS provider for Terraform will be greatly beneficial. Thank you for reading the DevopsRoles page!

Automating Cloudflare Infrastructure with the Cloudflare Terraform Provider

Managing cloud infrastructure efficiently is paramount for any organization. The sheer scale and complexity of modern cloud deployments necessitate automation, and Terraform has emerged as a leading Infrastructure as Code (IaC) tool. This article delves into the intricacies of the Cloudflare Terraform provider, demonstrating how to automate the creation and management of your Cloudflare resources. We’ll explore various aspects of using this provider, from basic configurations to more advanced scenarios, addressing common challenges and providing best practices along the way. Mastering the Cloudflare Terraform provider significantly streamlines your workflow and ensures consistency across your Cloudflare deployments.

Understanding the Cloudflare Terraform Provider

The Cloudflare Terraform provider acts as a bridge between Terraform and the Cloudflare API. It allows you to define your Cloudflare infrastructure as code, using Terraform’s declarative configuration language. This means you describe the desired state of your Cloudflare resources (e.g., zones, DNS records, firewall rules), and Terraform handles the creation, modification, and deletion of those resources automatically. This approach drastically reduces manual effort, minimizes errors, and promotes reproducibility. The provider offers a rich set of resources covering most aspects of the Cloudflare platform, enabling comprehensive infrastructure management.

Key Features of the Cloudflare Terraform Provider

  • Declarative Configuration: Define your infrastructure using human-readable code.
  • Version Control Integration: Track changes to your infrastructure configuration using Git or similar systems.
  • Automation: Automate the entire lifecycle of your Cloudflare resources.
  • Idempotency: Apply the same configuration multiple times without unintended side effects.
  • Extensive Resource Coverage: Supports a wide range of Cloudflare resources, including DNS records, zones, firewall rules, and more.

Installing and Configuring the Cloudflare Terraform Provider

Before you can start using the Cloudflare Terraform provider, you need to install it. This usually involves adding it to your Terraform configuration file. The process involves specifying the provider’s source and configuring your Cloudflare API token.

Installation

The provider is installed by specifying it within your Terraform configuration file (typically main.tf). This usually looks like this:

terraform {
  required_providers {
    cloudflare = {
      source  = "cloudflare/cloudflare"
      version = "~> 2.0"
    }
  }
}

provider "cloudflare" {
  api_token = "YOUR_CLOUDFLARE_API_TOKEN"
}

Replace "YOUR_CLOUDFLARE_API_TOKEN" with your actual Cloudflare API token. You can obtain this token from your Cloudflare account settings.

Authentication and API Token

The api_token attribute is crucial. Ensure its secrecy; avoid hardcoding it directly into your configuration. Consider using environment variables or a secrets management system for enhanced security. Incorrectly managing your API token can expose your Cloudflare account to unauthorized access.

Creating Cloudflare Resources with Terraform

Once the provider is configured, you can begin defining and managing Cloudflare resources. This section provides examples for some common resources.

Managing DNS Records

Creating and managing DNS records is a fundamental aspect of DNS management. The following example demonstrates adding an A record.


resource "cloudflare_dns_record" "example" {
zone_id = "YOUR_ZONE_ID"
name = "www"
type = "A"
content = "192.0.2.1"
ttl = 300
}

Remember to replace YOUR_ZONE_ID with your actual Cloudflare zone ID.

Working with Cloudflare Zones

Managing zones is equally important. While the Cloudflare Terraform provider doesn’t allow zone creation directly (as this implies domain ownership verification outside of Terraform’s scope), it enables configuration management of existing zones.


resource "cloudflare_zone" "example" {
zone_id = "YOUR_ZONE_ID"
paused = false #Example - change to toggle zone pause status.
# other settings as needed
}

Advanced Usage: Firewall Rules

Implementing complex firewall rules is another powerful use case. This example demonstrates the creation of a basic firewall rule.


resource "cloudflare_firewall_rule" "example" {
zone_id = "YOUR_ZONE_ID"
action = "block"
expression = "ip.src eq 192.0.2.1"
description = "Block traffic from 192.0.2.1"
}

This showcases the power and flexibility of the Cloudflare Terraform provider. Complex expressions and multiple rules can be implemented to manage your firewall robustly.

Utilizing the Cloudflare Terraform Provider: Best Practices

For effective and secure management of your infrastructure, adopt these best practices:

  • Modularize your Terraform code: Break down large configurations into smaller, manageable modules.
  • Version control your Terraform code: Use Git or a similar version control system to track changes and facilitate collaboration.
  • Securely store your API token: Avoid hardcoding your API token directly into your Terraform files. Use environment variables or a secrets management solution instead.
  • Use a state management system: Store your Terraform state in a remote backend (e.g., AWS S3, Azure Blob Storage) for collaboration and redundancy.
  • Regularly test your Terraform configurations: Conduct thorough testing before deploying changes to your production environment. This includes using Terraform’s `plan` command to preview changes and the `apply` command for execution.

Frequently Asked Questions

What are the prerequisites for using the Cloudflare Terraform provider?

You need a Cloudflare account, a Cloudflare API token, and Terraform installed on your system. Familiarization with Terraform’s configuration language is highly beneficial.

How can I troubleshoot issues with the Cloudflare Terraform provider?

Refer to the official Cloudflare Terraform provider documentation for troubleshooting guides. The documentation often includes common errors and their solutions. Pay close attention to error messages as they provide valuable diagnostic information.

What is the best way to manage my Cloudflare API token for security?

Avoid hardcoding the API token directly into your Terraform files. Instead, use environment variables or a dedicated secrets management solution such as HashiCorp Vault, AWS Secrets Manager, or Azure Key Vault. These solutions provide enhanced security and centralized management of sensitive information.

Can I use the Cloudflare Terraform Provider for other Cloudflare products?

The Cloudflare Terraform provider supports a wide range of Cloudflare services. Check the official documentation for the latest list of supported resources. New integrations are continually added.

How do I update the Cloudflare Terraform Provider to the latest version?

Updating the provider typically involves modifying the version constraint in your required_providers block in your Terraform configuration file. After updating the version, run `terraform init` to download the latest version of the provider.

Conclusion

The Cloudflare Terraform provider empowers you to automate the management of your Cloudflare infrastructure efficiently and reliably. By leveraging IaC principles, you can streamline your workflows, reduce errors, and ensure consistency in your deployments. Remember to prioritize security and follow the best practices outlined in this article to optimize your use of the Cloudflare Terraform provider. Mastering this tool is a significant step toward achieving a robust and scalable Cloudflare infrastructure.

For further details and the latest updates, refer to the official Cloudflare Terraform Provider documentation and the official Cloudflare documentation. Understanding and implementing these resources will further enhance your ability to manage your cloud infrastructure effectively.Thank you for reading the DevopsRoles page!

Mastering Docker Swarm: A Beginner’s Guide to Container Orchestration

Containerization has revolutionized software development and deployment, and Docker has emerged as the leading platform for managing containers. However, managing numerous containers across multiple hosts can quickly become complex. This is where Docker Swarm, a native clustering solution for Docker, comes in. This in-depth guide will serve as your comprehensive resource for understanding and utilizing Docker Swarm, specifically tailored for the Docker Swarm beginner. We’ll cover everything from basic concepts to advanced techniques, empowering you to efficiently orchestrate your containerized applications.

Understanding Docker Swarm: A Swarm of Containers

Docker Swarm is a clustering and orchestration tool built directly into Docker Engine. Unlike other orchestration platforms like Kubernetes, it’s designed for simplicity and ease of use, making it an excellent choice for beginners. It allows you to turn a group of Docker hosts into a single, virtual Docker host, managing and scheduling containers across the cluster transparently. This significantly simplifies the process of scaling your applications and ensuring high availability.

Key Components of Docker Swarm

  • Manager Nodes: These nodes manage the cluster, scheduling tasks, and maintaining the overall state of the Swarm.
  • Worker Nodes: These nodes run the containers scheduled by the manager nodes.
  • Swarm Mode: This is the clustering mode enabled on Docker Engine to create and manage a Docker Swarm cluster.

Getting Started: Setting up Your First Docker Swarm Cluster

Before diving into complex configurations, let’s build a basic Docker Swarm cluster. This section will guide you through the process, step by step. We’ll assume you have Docker Engine installed on at least two machines (one manager and one worker, at minimum). You can even run both on a single machine for testing purposes, although this isn’t recommended for production environments.

Step 1: Initialize a Swarm on the Manager Node

On your designated manager node, execute the following command:

docker swarm init --advertise-addr 

Replace with the IP address of your manager node. The output will provide join commands for your worker nodes.

Step 2: Join Worker Nodes to the Swarm

On each worker node, execute the join command provided by the manager node in step 1. This command will typically look something like this:

docker swarm join --token  :

Replace with the token provided by the manager node, with the manager’s IP address, and with the manager’s port (usually 2377).

Step 3: Verify the Swarm Cluster

On the manager node, run docker node ls to verify that all nodes are correctly joined and functioning.

Deploying Your First Application with Docker Swarm: A Practical Example

Now that your Swarm is operational, let’s deploy a simple application. We’ll use a Nginx web server as an example. This will demonstrate the fundamental workflow of creating and deploying services in Docker Swarm for a Docker Swarm beginner.

Creating a Docker Compose File

First, create a file named docker-compose.yml with the following content:


version: "3.8"
services:
web:
image: nginx:latest
ports:
- "80:80"
deploy:
mode: replicated
replicas: 3

This file defines a service named “web” using the latest Nginx image. The deploy section specifies that three replicas of the service should be deployed across the Swarm. The ports section maps port 80 on the host machine to port 80 on the containers.

Deploying the Application

Navigate to the directory containing your docker-compose.yml file and execute the following command:

docker stack deploy -c docker-compose.yml my-web-app

This command deploys the stack named “my-web-app” based on the configuration in your docker-compose.yml file.

Scaling Your Application

To scale your application, simply run:

docker service scale my-web-app_web=5

This will increase the number of replicas to 5, distributing the load across your worker nodes.

Advanced Docker Swarm Concepts for the Ambitious Beginner

While the basics are crucial, understanding some advanced concepts will allow you to leverage the full potential of Docker Swarm. Let’s explore some of these.

Networks in Docker Swarm

Docker Swarm provides built-in networking capabilities, allowing services to communicate seamlessly within the Swarm. You can create overlay networks that span multiple nodes, simplifying inter-service communication.

Secrets Management

Securely managing sensitive information like passwords and API keys is vital. Docker Swarm offers features for securely storing and injecting secrets into your containers, enhancing the security of your applications. You can use the docker secret command to manage these.

Rolling Updates

Updating your application without downtime is crucial for a production environment. Docker Swarm supports rolling updates, allowing you to gradually update your services with minimal disruption. This process is managed through service updates and can be configured to control the update speed.

Docker Swarm vs. Kubernetes: Choosing the Right Tool

While both Docker Swarm and Kubernetes are container orchestration tools, they cater to different needs. Docker Swarm offers simplicity and ease of use, making it ideal for smaller projects and teams. Kubernetes, on the other hand, is more complex but provides greater scalability and advanced features. The best choice depends on your project’s scale, complexity, and your team’s expertise.

  • Docker Swarm: Easier to learn and use, simpler setup and management, suitable for smaller-scale deployments.
  • Kubernetes: More complex to learn and manage, highly scalable, offers advanced features like self-healing and sophisticated resource management, ideal for large-scale, complex deployments.

Frequently Asked Questions

Q1: Can I run Docker Swarm on a single machine?

Yes, you can run a Docker Swarm cluster on a single machine for testing and development purposes. However, this does not represent a production-ready setup. For production, you should utilize multiple machines to take advantage of Swarm’s inherent scalability and fault tolerance.

Q2: What are the benefits of using Docker Swarm over managing containers manually?

Docker Swarm provides numerous advantages, including automated deployment, scaling, and rolling updates, improved resource utilization, and enhanced high availability. Manually managing a large number of containers across multiple hosts is significantly more complex and error-prone. For a Docker Swarm beginner, this automation is key to simplified operations.

Q3: How do I monitor my Docker Swarm cluster?

Docker Swarm provides basic monitoring capabilities through the docker node ls and docker service ls commands. For more comprehensive monitoring, you can integrate Docker Swarm with tools like Prometheus and Grafana, providing detailed metrics and visualizations of your cluster’s health and performance.

Q4: Is Docker Swarm suitable for production environments?

While Docker Swarm is capable of handling production workloads, its features are less extensive than Kubernetes. For complex, highly scalable production environments, Kubernetes might be a more suitable choice. However, for many smaller- to medium-sized production applications, Docker Swarm provides a robust and efficient solution.

Conclusion

This guide has provided a thorough introduction to Docker Swarm, equipping you with the knowledge to effectively manage and orchestrate your containerized applications. From setting up your first cluster to deploying and scaling applications, you now possess the foundation for utilizing this powerful tool. Remember, starting with a small, manageable cluster and gradually expanding your knowledge and skills is the key to mastering Docker Swarm. As a Docker Swarm beginner, don’t be afraid to experiment and explore the various features and configurations available. Understanding the core principles will allow you to build and maintain robust and scalable applications within your Docker Swarm environment. For more advanced topics and deeper dives into specific areas, consult the official Docker documentation.https://docs.docker.com/engine/swarm/ and other reliable sources like the Docker website. Thank you for reading the DevopsRoles page!

Mastering 10 Essential Docker Commands for Data Engineering

Data engineering, with its complex dependencies and diverse environments, often necessitates robust containerization solutions. Docker, a leading containerization platform, simplifies the deployment and management of data engineering pipelines. This comprehensive guide explores 10 essential Docker Commands Data Engineering professionals need to master for efficient workflow management. We’ll move beyond the basics, delving into practical applications and addressing common challenges faced when using Docker in data engineering projects. Understanding these commands will significantly streamline your development process, improve collaboration, and ensure consistency across different environments.

Understanding Docker Fundamentals for Data Engineering

Before diving into the specific commands, let’s briefly recap essential Docker concepts relevant to data engineering. Docker uses images (read-only templates) and containers (running instances of an image). Data engineering tasks often involve various tools and libraries (Spark, Hadoop, Kafka, etc.), each requiring specific configurations. Docker allows you to package these tools and their dependencies into images, ensuring consistent execution across different machines, regardless of their underlying operating systems. This eliminates the “it works on my machine” problem and fosters reproducible environments for data pipelines.

Key Docker Components in a Data Engineering Context

  • Docker Images: Pre-built packages containing the application, libraries, and dependencies. Think of them as blueprints for your containers.
  • Docker Containers: Running instances of Docker images. These are isolated environments where your data engineering applications execute.
  • Docker Hub: A public registry where you can find and share pre-built Docker images. A crucial resource for accessing ready-made images for common data engineering tools.
  • Docker Compose: A tool for defining and running multi-container applications. Essential for complex data pipelines that involve multiple interacting services.

10 Essential Docker Commands Data Engineering Professionals Should Know

Now, let’s explore 10 essential Docker Commands Data Engineering tasks frequently require. We’ll provide practical examples to illustrate each command’s usage.

1. `docker run`: Creating and Running Containers

This command is fundamental. It creates a new container from an image and runs it.

docker run -it  bash

This command runs a bash shell inside a container created from the specified image. The -it flags allocate a pseudo-TTY and keep stdin open, allowing interactive use.

2. `docker ps`: Listing Running Containers

Useful for checking the status of your running containers.

docker ps

This lists all currently running containers. Adding the -a flag (docker ps -a) shows all containers, including stopped ones.

3. `docker stop`: Stopping Containers

Gracefully stops a running container.

docker stop 

Replace with the container’s ID or name. It’s crucial to stop containers properly to avoid data loss and resource leaks.

4. `docker rm`: Removing Containers

Removes stopped containers.

docker rm 

Remember, you can only remove stopped containers. Use docker stop first if the container is running.

5. `docker images`: Listing Images

Displays the list of images on your system.

docker images

Useful for managing disk space and identifying unused images.

6. `docker rmi`: Removing Images

Removes images from your system.

docker rmi 

Be cautious when removing images, as they can be large and take up considerable disk space. Always confirm before deleting.

7. `docker build`: Building Custom Images

This is where you build your own customized images based on a Dockerfile. This is crucial for creating reproducible environments for your data engineering applications. A Dockerfile specifies the steps needed to build the image.

docker build -t  .

This command builds an image from a Dockerfile located in the current directory. The -t flag tags the image with a specified name.

8. `docker exec`: Executing Commands in Running Containers

Allows running commands within a running container.

docker exec -it  bash

This command opens a bash shell inside a running container. This is extremely useful for troubleshooting or interacting with the running application.

9. `docker commit`: Creating New Images from Container Changes

Saves changes made to a running container as a new image.

docker commit  

Useful for creating customized images based on existing ones after making modifications within the container.

10. Essential Docker Commands Data Engineering: `docker inspect`: Inspecting Container Details

Provides detailed information about a container or image.

docker inspect 

This command is invaluable for debugging and understanding the container’s configuration and status. It reveals crucial information like ports, volumes, and network settings.

Frequently Asked Questions

Q1: What are Docker volumes, and why are they important for data engineering?

Docker volumes provide persistent storage for containers. Data stored in volumes persists even if the container is removed or stopped. This is critical for data engineering because it ensures that your data isn’t lost when containers are restarted or removed. You can use volumes to mount external directories or create named volumes specifically designed for data persistence within your Docker containers.

Q2: How can I manage large datasets with Docker in a data engineering context?

For large datasets, avoid storing data directly *inside* the Docker containers. Instead, leverage Docker volumes to mount external storage (like cloud storage services or network-attached storage) that your containers can access. This allows for efficient management and avoids performance bottlenecks caused by managing large datasets within containers. Consider using tools like NFS or shared cloud storage to effectively manage data access across multiple containers in a data pipeline.

Q3: How do I handle complex data pipelines with multiple containers using Docker?

Docker Compose is your solution for managing complex, multi-container data pipelines. Define your entire pipeline’s architecture in a docker-compose.yml file. This file describes all containers, their dependencies, and networking configurations. You then use a single docker-compose up command to start the entire pipeline, simplifying deployment and management.

Conclusion

Mastering these 10 essential Docker Commands Data Engineering projects depend on provides a significant advantage for data engineers. From building reproducible environments to managing complex pipelines, Docker simplifies the complexities inherent in data engineering. By understanding these commands and their applications, you can streamline your workflow, improve collaboration, and ensure consistent execution across different environments. Remember to leverage Docker volumes for persistent storage and explore Docker Compose for managing sophisticated multi-container applications. This focused understanding of Docker Commands Data Engineering empowers you to build efficient and scalable data pipelines.

For further learning, refer to the official Docker documentation and explore resources like Docker’s website for advanced topics and best practices. Additionally, Kubernetes can be explored for orchestrating Docker containers at scale. Thank you for reading the DevopsRoles page!

Docker Tutorial Examples: A Practical Guide to Containerization

Are you struggling to understand Docker and its practical applications? This comprehensive Docker Tutorial Examples guide will walk you through the basics and advanced concepts of Docker, providing practical examples to solidify your understanding. We’ll cover everything from creating simple containers to managing complex applications, ensuring you gain the skills needed to leverage the power of Docker in your development workflow. Whether you’re a DevOps engineer, developer, or system administrator, this Docker Tutorial Examples guide will equip you with the knowledge to effectively utilize Docker in your projects. This tutorial will help you overcome the common challenges associated with setting up and managing consistent development environments.

Understanding Docker Fundamentals

Before diving into practical Docker Tutorial Examples, let’s establish a foundational understanding of Docker’s core components. Docker uses containers, isolated environments that package an application and its dependencies. This ensures consistent execution regardless of the underlying infrastructure.

Key Docker Components

  • Docker Images: Read-only templates that serve as blueprints for creating containers.
  • Docker Containers: Running instances of Docker images.
  • Docker Hub: A public registry containing a vast library of pre-built Docker images.
  • Dockerfile: A text file containing instructions for building a Docker image.

Docker Tutorial Examples: Your First Container

Let’s create our first Docker container using a pre-built image from Docker Hub. We’ll use the official Nginx web server image. This Docker Tutorial Examples section focuses on the most basic application.

Steps to Run Your First Container

  1. Pull the Nginx image: Open your terminal and run docker pull nginx. This downloads the Nginx image from Docker Hub.
  2. Run the container: Execute docker run -d -p 8080:80 nginx. This creates and starts a container in detached mode (-d), mapping port 8080 on your host machine to port 80 on the container (-p 8080:80).
  3. Access the Nginx server: Open your web browser and navigate to http://localhost:8080. You should see the default Nginx welcome page.
  4. Stop and remove the container: To stop the container, run docker stop (replace with the actual ID). To remove it, use docker rm .

Docker Tutorial Examples: Building a Custom Image

Now, let’s create a more complex example with a Docker Tutorial Examples focusing on building a custom Docker image from a Dockerfile. This will showcase the power of Docker for consistent application deployments.

Creating a Simple Python Web Application

We’ll build a basic Python web application using Flask and package it into a Docker image.

Step 1: Project Structure

Create the following files:

  • app.py (Python Flask application)
  • Dockerfile (Docker image instructions)
  • requirements.txt (Python dependencies)

Step 2: app.py

from flask import Flask
app = Flask(__name__)

@app.route("/")
def hello():
    return "Hello from Docker!"

if __name__ == "__main__":
    app.run(debug=True, host='0.0.0.0', port=5000)

Step 3: requirements.txt

Flask

Step 4: Dockerfile

FROM python:3.9-slim-buster

WORKDIR /app

COPY requirements.txt requirements.txt
RUN pip install --no-cache-dir -r requirements.txt

COPY . .

EXPOSE 5000

CMD ["python", "app.py"]

Step 5: Build and Run

  1. Navigate to the project directory in your terminal.
  2. Build the image: docker build -t my-python-app .
  3. Run the container: docker run -d -p 8000:5000 my-python-app
  4. Access the application: http://localhost:8000

Docker Tutorial Examples: Orchestration with Docker Compose

For more complex applications involving multiple services, Docker Compose simplifies the management of multiple containers. This section will illustrate a practical example using Docker Compose.

Let’s imagine a web application with a database and a web server. We’ll use Docker Compose to manage both.

Docker Compose Configuration (docker-compose.yml)


version: "3.9"
services:
  web:
    image: nginx:latest
    ports:
      - "80:80"
    depends_on:
      - db
  db:
    image: postgres:13
    ports:
      - "5432:5432"
    environment:
      - POSTGRES_USER=myuser
      - POSTGRES_PASSWORD=mypassword
      - POSTGRES_DB=mydb

Running with Docker Compose

  1. Save the above configuration as docker-compose.yml.
  2. Run docker-compose up -d to start the containers in detached mode.
  3. Access the Nginx server at http://localhost.
  4. Stop and remove the containers with docker-compose down.

Docker Tutorial Examples: Docker Volumes

Data persistence is crucial. Docker volumes provide a mechanism to separate data from the container’s lifecycle, allowing data to persist even if the container is removed. This is a very important section in our Docker Tutorial Examples guide.

Creating and Using a Docker Volume

  1. Create a volume: docker volume create my-data-volume
  2. Run a container with the volume: docker run -d -v my-data-volume:/var/www/html nginx
  3. The data in /var/www/html will persist even after the container is removed.

Docker Tutorial Examples: Networking with Docker

Docker’s networking capabilities allow containers to communicate with each other. Let’s explore some key networking aspects in this part of our Docker Tutorial Examples.

Understanding Docker Networks

  • Default Network: Containers on the default network can communicate using their container names.
  • Custom Networks: Create custom networks for more organized communication between containers.

Frequently Asked Questions

What are the benefits of using Docker?

Docker offers several benefits, including improved consistency across development, testing, and production environments, simplified application deployment, resource efficiency through containerization, and enhanced scalability and maintainability.

How does Docker differ from virtual machines?

Docker containers share the host operating system’s kernel, resulting in significantly lower overhead compared to virtual machines which have their own full operating system instances. This makes Docker containers much more lightweight and faster.

Is Docker suitable for all applications?

While Docker is highly versatile, it might not be ideal for all applications. Applications with significant system-level dependencies or those requiring direct access to the underlying hardware might be better suited to virtual machines.

How do I troubleshoot Docker issues?

Docker provides extensive logging capabilities. Checking the logs using commands like docker logs is crucial for debugging. Additionally, Docker’s documentation and community forums are invaluable resources for resolving issues.

What are some best practices for using Docker?

Employing a well-structured Dockerfile, utilizing multi-stage builds to reduce image sizes, implementing robust container networking, and effectively managing data persistence with Docker volumes are key best practices.

Conclusion

This in-depth Docker Tutorial Examples guide has provided a comprehensive overview of Docker, covering fundamental concepts and advanced techniques illustrated with practical examples. From creating simple containers to managing complex applications with Docker Compose, you’ve gained the foundational skills to effectively utilize Docker in your projects. Remember to leverage the wealth of resources available, including official documentation and online communities, to continue learning and mastering Docker. Thank you for reading the DevopsRoles page!

Revolutionizing Automation: Red Hat Launches Ansible Automation Platform on Google Cloud

The convergence of automation and cloud computing is reshaping IT operations, and Red Hat’s recent launch of the Ansible Automation Platform on Google Cloud signifies a major leap forward. This integration offers a powerful solution for streamlining IT workflows, enhancing efficiency, and accelerating digital transformation. For DevOps engineers, developers, and IT administrators, understanding how to leverage Ansible Automation Google Cloud is crucial for staying competitive. This comprehensive guide delves into the benefits, functionalities, and implementation details of this game-changing integration, empowering you to harness its full potential.

Understanding the Synergy: Ansible Automation and Google Cloud

Ansible, a leading automation engine, simplifies IT infrastructure management through its agentless architecture and intuitive YAML-based configuration language. Its ability to automate provisioning, configuration management, and application deployment across diverse environments makes it a favorite amongst IT professionals. Google Cloud Platform (GCP), on the other hand, provides a scalable and robust cloud infrastructure encompassing compute, storage, networking, and a vast array of managed services. The combination of Ansible Automation Platform on Google Cloud offers a compelling proposition: the power of Ansible’s automation capabilities seamlessly integrated with the scalability and flexibility of GCP.

Benefits of Using Ansible Automation Google Cloud

  • Simplified Infrastructure Management: Automate the provisioning, configuration, and management of resources across your entire GCP infrastructure with ease.
  • Increased Efficiency: Reduce manual effort and human error, leading to faster deployment cycles and improved operational efficiency.
  • Enhanced Scalability: Leverage GCP’s scalability to manage infrastructure changes efficiently, allowing for rapid scaling up or down based on demand.
  • Improved Security: Implement and enforce consistent security policies across your GCP environment, minimizing vulnerabilities and risks.
  • Cost Optimization: Optimize resource utilization and reduce cloud spending by automating resource provisioning and decommissioning.

Deploying Ansible Automation Platform on Google Cloud

Deploying Ansible Automation Platform on Google Cloud can be achieved through various methods, each offering different levels of control and management. Here’s a breakdown of common approaches:

Deploying on Google Kubernetes Engine (GKE)

Leveraging GKE provides a highly scalable and managed Kubernetes environment for deploying the Ansible Automation Platform. This approach offers excellent scalability and resilience. The official documentation provides detailed instructions on deploying the platform on GKE. You’ll need to create a GKE cluster, configure necessary networking settings, and deploy the Ansible Automation Platform using Helm charts.

Steps for GKE Deployment

  1. Create a GKE cluster with appropriate node configurations.
  2. Set up necessary network policies and access control.
  3. Deploy the Ansible Automation Platform using Helm charts, customizing values as needed.
  4. Configure authentication and authorization for Ansible.
  5. Verify the deployment by accessing the Ansible Automation Platform web UI.

Deploying on Google Compute Engine (GCE)

For more control, you can deploy the Ansible Automation Platform on virtual machines within GCE. This approach requires more manual configuration but offers greater customization flexibility. You’ll need to manually install and configure the necessary components on your GCE instances.

Steps for GCE Deployment

  1. Create GCE instances with appropriate specifications.
  2. Install the Ansible Automation Platform components on these instances.
  3. Configure necessary network settings and security rules.
  4. Configure the Ansible Automation Platform database and authentication mechanisms.
  5. Verify the deployment and functionality.

Automating Google Cloud Services with Ansible Automation Google Cloud

Once deployed, you can leverage the power of Ansible Automation Google Cloud to automate a vast array of GCP services. Here are some examples:

Automating Compute Engine Instance Creation

This simple Ansible playbook creates a new Compute Engine instance:


- hosts: localhost
tasks:
- name: Create Compute Engine instance
google_compute_instance:
name: my-new-instance
zone: us-central1-a
machine_type: n1-standard-1
boot_disk_type: pd-standard
network_interface:
- network: default

Automating Cloud SQL Instance Setup

This example shows how to create and configure a Cloud SQL instance:


- hosts: localhost
tasks:
- name: Create Cloud SQL instance
google_sql_instance:
name: my-sql-instance
region: us-central1
database_version: MYSQL_5_7
settings:
tier: db-n1-standard-1

Remember to replace placeholders like instance names, zones, and regions with your actual values. These are basic examples; Ansible’s capabilities extend to managing far more complex GCP resources and configurations.

Ansible Automation Google Cloud: Advanced Techniques

Beyond basic deployments and configurations, Ansible offers advanced features for sophisticated automation tasks within Google Cloud.

Using Ansible Roles for Reusability and Modularity

Ansible roles promote code reusability and maintainability. Organizing your Ansible playbooks into roles allows you to manage and reuse configurations effectively across different projects and environments. This is essential for maintaining consistent infrastructure configurations across your GCP deployment.

Implementing Inventory Management for Scalability

Efficiently managing your GCP instances and other resources through Ansible inventory files is crucial for scalable automation. Dynamic inventory scripts can automatically discover and update your inventory, ensuring your automation always reflects the current state of your infrastructure.

Integrating with Google Cloud’s APIs

Ansible can directly interact with Google Cloud’s APIs through dedicated modules. This provides fine-grained control and allows you to automate complex operations not covered by built-in modules. This allows you to interact with various services beyond the basics shown earlier.

Frequently Asked Questions

Q1: What are the prerequisites for deploying Ansible Automation Platform on Google Cloud?

A1: You will need a Google Cloud project with appropriate permissions, a working understanding of Ansible, and familiarity with either GKE or GCE, depending on your chosen deployment method. You’ll also need to install the necessary Google Cloud SDK and configure authentication.

Q2: How secure is using Ansible Automation Platform on Google Cloud?

A2: Security is a paramount concern. Ansible itself utilizes SSH for communication, and proper key management is essential. Google Cloud offers robust security features, including network policies, access control lists, and Identity and Access Management (IAM) roles, which must be configured effectively to protect your GCP environment and your Ansible deployments. Best practices for secure configuration and deployment are critical.

Q3: Can I use Ansible Automation Platform on Google Cloud for hybrid cloud environments?

A3: Yes. One of Ansible’s strengths lies in its ability to manage diverse environments. You can use it to automate tasks across on-premises infrastructure and your Google Cloud environment, simplifying management for hybrid cloud scenarios.

Q4: What are the costs associated with using Ansible Automation Platform on Google Cloud?

A4: Costs depend on your chosen deployment method (GKE or GCE), the size of your instances, the amount of storage used, and other resources consumed. It’s essential to carefully plan your deployment to optimize resource utilization and minimize costs. Google Cloud’s pricing calculator can help estimate potential expenses.

Conclusion

Red Hat’s Ansible Automation Platform on Google Cloud represents a significant advancement in infrastructure automation. By combining the power of Ansible’s automation capabilities with the scalability and flexibility of GCP, organizations can streamline IT operations, improve efficiency, and accelerate digital transformation. Mastering Ansible Automation Google Cloud is a key skill for IT professionals looking to enhance their capabilities in the ever-evolving landscape of cloud computing. Remember to prioritize security best practices throughout the deployment and configuration process. This comprehensive guide provided a starting point; remember to refer to the official Red Hat and Google Cloud documentation for the most up-to-date information and detailed instructions. Ansible Automation Platform Documentation Google Cloud Documentation Red Hat Ansible. Thank you for reading the DevopsRoles page!

Unlocking Project Wisdom with Red Hat Ansible: An Introduction

Automating infrastructure management is no longer a luxury; it’s a necessity. In today’s fast-paced IT landscape, efficiency and consistency are paramount. This is where Red Hat Ansible shines, offering a powerful and agentless automation solution. However, effectively leveraging Ansible’s capabilities requires a strategic approach. This guide delves into the core principles of Project Wisdom Ansible, empowering you to build robust, scalable, and maintainable automation workflows. We’ll explore best practices, common pitfalls to avoid, and advanced techniques to help you maximize the potential of Ansible in your projects.

Understanding the Foundations of Project Wisdom Ansible

Before diving into advanced techniques, it’s crucial to establish a solid foundation. Project Wisdom Ansible isn’t just about writing playbooks; it’s about architecting your automation strategy. This includes:

1. Defining Clear Objectives and Scope

Before writing a single line of Ansible code, clearly define your project goals. What problems are you trying to solve? What systems need to be automated? A well-defined scope prevents scope creep and ensures your automation efforts remain focused and manageable. For example, instead of aiming to “automate everything,” focus on a specific task like deploying a web application or configuring a database cluster.

2. Inventory Management: The Heart of Ansible

Ansible’s inventory file is the central hub for managing your target systems. A well-structured inventory makes managing your infrastructure far easier. Consider using dynamic inventory scripts for larger, more complex environments. This allows your inventory to update automatically based on data from configuration management databases or cloud provider APIs.

  • Static Inventory: Simple, text-based inventory file (hosts file).
  • Dynamic Inventory: Scripts that generate inventory data on the fly.

3. Role-Based Architecture for Reusability and Maintainability

Ansible roles are fundamental to Project Wisdom Ansible. They promote modularity, reusability, and maintainability. Each role should focus on a single, well-defined task, such as installing a specific application or configuring a particular service. This modular approach simplifies complex automation tasks, making them easier to understand, test, and update.

Example directory structure for an Ansible role:

  • roles/webserver/
  • tasks/main.yml
  • vars/main.yml
  • handlers/main.yml
  • templates/
  • files/

Implementing Project Wisdom Ansible: Best Practices

Following best practices is essential for creating robust and maintainable Ansible playbooks. These practices will significantly improve your automation workflows.

1. Idempotency: The Key to Reliable Automation

Idempotency means that running a playbook multiple times should produce the same result. This is critical for ensuring that your automation is reliable and doesn’t accidentally make unwanted changes. Ansible is designed to be idempotent, but you need to write your playbooks carefully to ensure this property is maintained.

2. Version Control: Track Changes and Collaborate Effectively

Use a version control system (like Git) to manage your Ansible playbooks and roles. This allows you to track changes, collaborate with other team members, and easily revert to previous versions if necessary. This is a cornerstone of Project Wisdom Ansible.

3. Thorough Testing: Prevent Errors Before Deployment

Testing is crucial. Ansible offers various testing mechanisms, including:

  • --check mode: Dry-run to see the changes Ansible *would* make without actually executing them.
  • Unit Tests: Test individual modules or tasks in isolation (using tools like pytest).
  • Integration Tests: Test the complete automation workflow against a test environment.

4. Documentation: For Maintainability and Collaboration

Well-documented Ansible playbooks and roles are easier to understand and maintain. Clearly explain the purpose of each task, the variables used, and any dependencies. Use comments generously in your code.

Project Wisdom Ansible: Advanced Techniques

As your automation needs grow, you can leverage Ansible’s advanced features to enhance your workflows.

1. Utilizing Ansible Galaxy for Reusable Roles

Ansible Galaxy is a repository of Ansible roles created by the community. Leveraging pre-built, well-tested roles from Galaxy can significantly accelerate your automation projects. Remember to always review the code and ensure it meets your security and quality standards before integrating it into your projects.

2. Implementing Ansible Tower for Centralized Management

Ansible Tower (now Red Hat Ansible Automation Platform) provides a centralized interface for managing Ansible playbooks, users, and inventories. This makes managing your automation workflows in large, complex environments much simpler. Tower offers features like role-based access control, scheduling, and detailed reporting.

3. Integrating with CI/CD Pipelines

Integrate Ansible into your Continuous Integration/Continuous Deployment (CI/CD) pipelines for automated infrastructure provisioning and application deployments. This ensures consistency and reduces manual intervention.

Frequently Asked Questions

Q1: What are the main benefits of using Ansible?

Ansible offers several benefits, including agentless architecture (simplifying management), idempotency (reliable automation), and a simple YAML-based language (easy to learn and use). Its strong community support and extensive module library further enhance its usability.

Q2: How do I handle errors and exceptions in my Ansible playbooks?

Ansible provides mechanisms for handling errors gracefully. Use handlers to address specific issues, and utilize error handling blocks (e.g., rescue, always) within tasks to manage exceptions and prevent failures from cascading. Proper logging is crucial for debugging and monitoring.

Q3: What are some common pitfalls to avoid when using Ansible?

Common pitfalls include neglecting proper inventory management, not using roles effectively, insufficient testing, and inadequate documentation. Avoid overly complex playbooks and prioritize modularity and reusability to ensure maintainability. Always thoroughly test your playbooks in a staging environment before deploying to production.

Q4: How can I improve the performance of my Ansible playbooks?

Optimize performance by using Ansible features like become and become_method judiciously. Avoid unnecessary tasks and utilize efficient modules. Consider optimizing network connectivity between the Ansible control node and managed hosts. Properly configure the Ansible settings to leverage multiple connections and speed up the execution.

Conclusion

Mastering Project Wisdom Ansible is crucial for building efficient and scalable automation workflows. By following best practices, utilizing advanced techniques, and consistently improving your approach, you can unlock the true potential of Ansible. Remember that Project Wisdom Ansible is an iterative process. Start with a well-defined scope, prioritize clear documentation, and continuously refine your approach based on experience and feedback. This ongoing refinement will ensure your automation strategy remains robust and adaptive to the ever-evolving demands of your IT infrastructure. Investing time in building a strong foundation will pay dividends in the long run, leading to increased efficiency, reduced errors, and improved operational reliability.

For further reading, refer to the official Red Hat Ansible documentation: https://docs.ansible.com/ and the Ansible Galaxy website: https://galaxy.ansible.com/.  Thank you for reading the DevopsRoles page!