In this tutorial, How to run a single command on multiple Linux machines at once. I will create a script on the Linux servers to send commands to multiple servers.
Prerequisites
2 Virtual Machine
ssh Connectivity Between 2 Servers
Configure SSH on Server 1
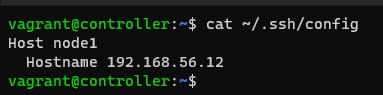
For example, The Server calls the name controller. This server is using the operating system Ubuntu.
create the SSH config file with the command:
cat ~/.ssh/config
For example, the content as output below
Create the script to run a single command on multiple Linux machines at once
We will create 1 script to run a command for a remote Linux server.
sudo vi /usr/local/bin/script_node1
In that file, paste the following:
#!/bin/bash

# Get the user's input as command
[[ -z ${@} ]] && exit || CMD_EXEC="${@}"

# Get the hosts from ~/.ssh/config
HOSTS=$(grep -Po 'Host\s\Knode1' "$HOME/.ssh/config")

# Test weather the input command uses sudo
if [[ $CMD_EXEC =~ ^sudo ]]
then
    # Ask for password
    read -sp '[sudo] password for remote_admin: ' password; echo

    # Rewrite the command
    CMD_EXEC=$(sed "s/^sudo/echo '$password' | sudo -S/" <<< "$CMD_EXEC")
fi

# loop over the hosts and execute the SSH command, remove `-a` to override the>
while IFS= read -r host
do
   echo -e '\n\033[1;33m'"HOST: ${host}"'\033[0m'
   ssh -n "$host" "$CMD_EXEC 2>&1" | tee -a "/tmp/$(basename "${0}").${host}"
done <<< "$HOSTS"
Save and close the file.
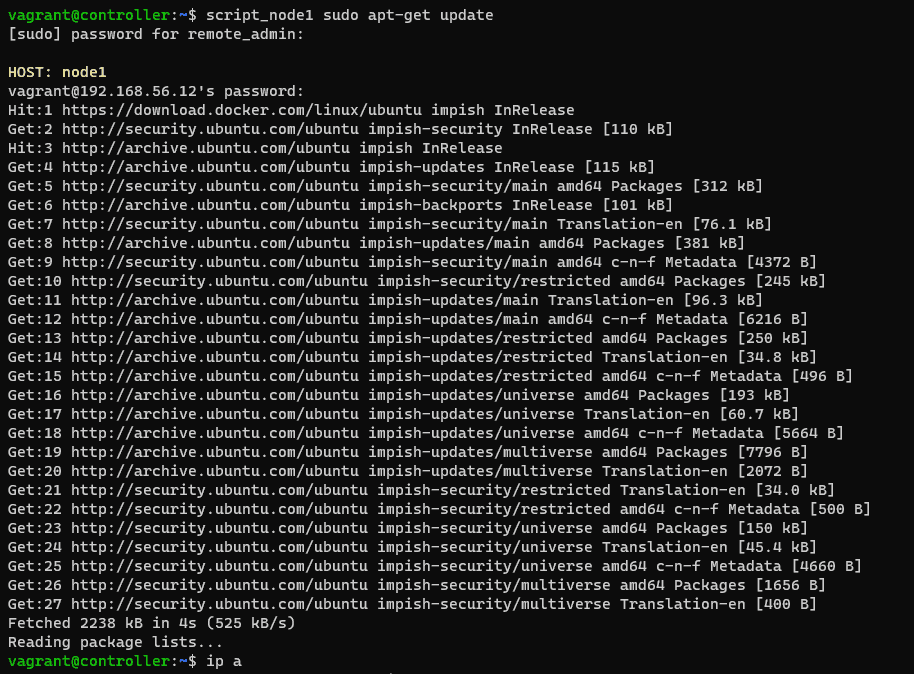
Now, We will update the package for server calls name node1 as command below:
script_node1 sudo apt-get update
Via youtube
Conclusion
You have to run a single command on multiple Linux machines at once. I hope will this your helpful. Thank you for reading the DevopsRoles page!
Here’s a Docker Swarm cheat sheet to help you with common commands and operations:
Docker Swarm is a powerful tool for container management and application orchestration. For those working in the DevOps field, mastering Docker Swarm commands and techniques is essential for effective system deployment and management.
This article provides a detailed cheat sheet, compiling important commands and useful tips, to help you quickly master Docker Swarm and optimize your workflow.
docker service ps --filter desired-state=running <service id|name>
print console log of a service
docker service logs --follow <service id|name>
Promote a worker node to the manager
docker node promote node_name
The output terminal Promote a worker node to the manager as below
vagrant@controller:~$ docker node ls
ID                            HOSTNAME     STATUS    AVAILABILITY   MANAGER STATUS   ENGINE VERSION
9b2211c8l1bmhu3h2ij3kthxv *   controller   Ready     Active         Leader           20.10.14
0j0pslqf4g6xkki8ajydvc123     node1        Ready     Active                          20.10.14
f4cxubqg0wqdxsaj8pe4qsqlg     node2        Ready     Active                          20.10.14

vagrant@controller:~$ docker node promote f4cxubqg0wqdxsaj8pe4qsqlg
Node f4cxubqg0wqdxsaj8pe4qsqlg promoted to a manager in the swarm.

vagrant@controller:~$ docker node ls
ID                            HOSTNAME     STATUS    AVAILABILITY   MANAGER STATUS   ENGINE VERSION
9b2211c8l1bmhu3h2ij3kthxv *   controller   Ready     Active         Leader           20.10.14
0j0pslqf4g6xkki8ajydvc123     node1        Ready     Active                          20.10.14
f4cxubqg0wqdxsaj8pe4qsqlg     node2        Ready     Active         Reachable        20.10.14
You now have the Docker Swarm cheat sheet, which includes some of the most essential commands used in Docker Swarm.
For a more comprehensive list of options and additional commands, please refer to the official Docker documentation:
For a more detailed list of options and additional commands, you can refer to the official Docker documentation. I hope you find this helpful. Thank you for visiting the DevopsRoles page!
In this tutorial, How to Deploy Services to a Docker Swarm Cluster. First, You need to install the Docker swarm cluster here. In today’s world of distributed systems, containerization has become a popular choice for deploying and managing applications.
Docker Swarm, a native clustering and orchestration solution for Docker, allows you to create a swarm of Docker nodes that work together as a cluster.
In this blog post, we will explore the steps to deploy a service to a Docker Swarm cluster and take advantage of its powerful features for managing containerized applications.
Deploying Services to a Docker Swarm Cluster
The simple, I will deploy the NGINX container service.
Log into Controller. Run the following command.
docker service create --name nginx_test nginx
To check the service status as command below
vagrant@controller:~$ docker service ls
ID             NAME         MODE         REPLICAS   IMAGE          PORTS
44sp9ig3k65o   nginx_test   replicated   1/1        nginx:latest
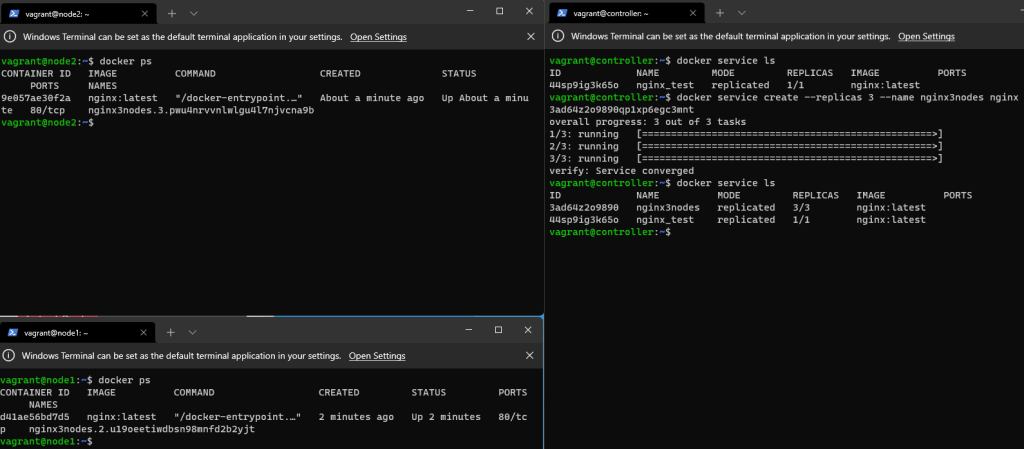
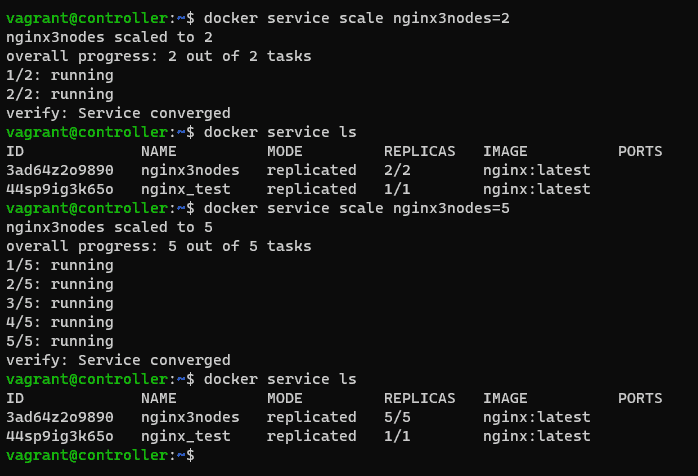
We will deploy that service to all three nodes as commanded below
docker service create --replicas 3 --name nginx3nodes nginx
The result is Deploy service to the swarm as the picture below
You want to scale the service to all five nodes.
docker service scale nginx3nodes=5
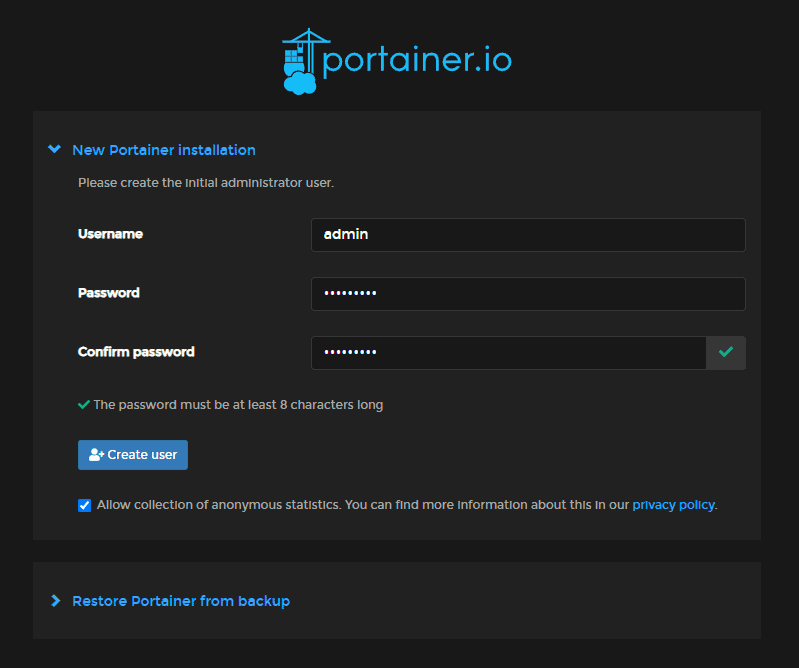
We deploy Portainer on the controller to easily manage the swarm.
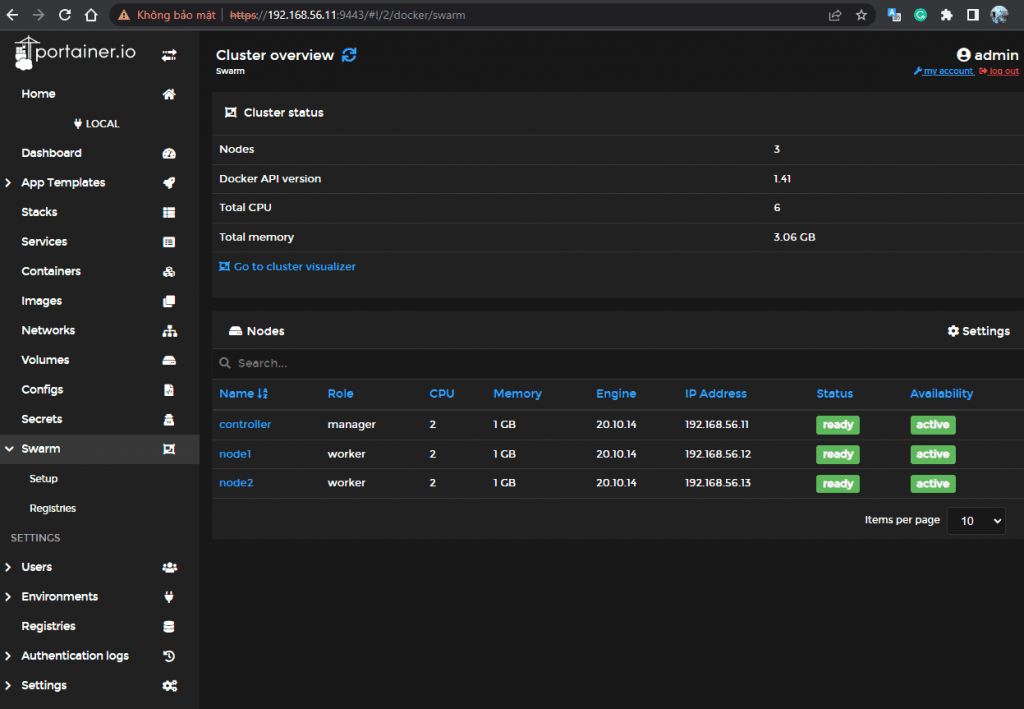
Open the browser, and go to http://SERVER:9443 (Where SERVER is the IP address of the server). you should see Swarm listed in the left navigation
Swarm on portainer
Conclusion
You have to Deploy the service to the swarm. Docker Swarm will take care of scheduling the service across the Swarm nodes and managing its lifecycle. Docker Swarm simplifies the management and scaling of containerized applications, providing fault tolerance and high availability. By following the steps outlined in this blog post, you can easily deploy your services to a Docker Swarm cluster and take advantage of its powerful orchestration capabilities. I hope will this your helpful. Thank you for reading the DevopsRoles page!
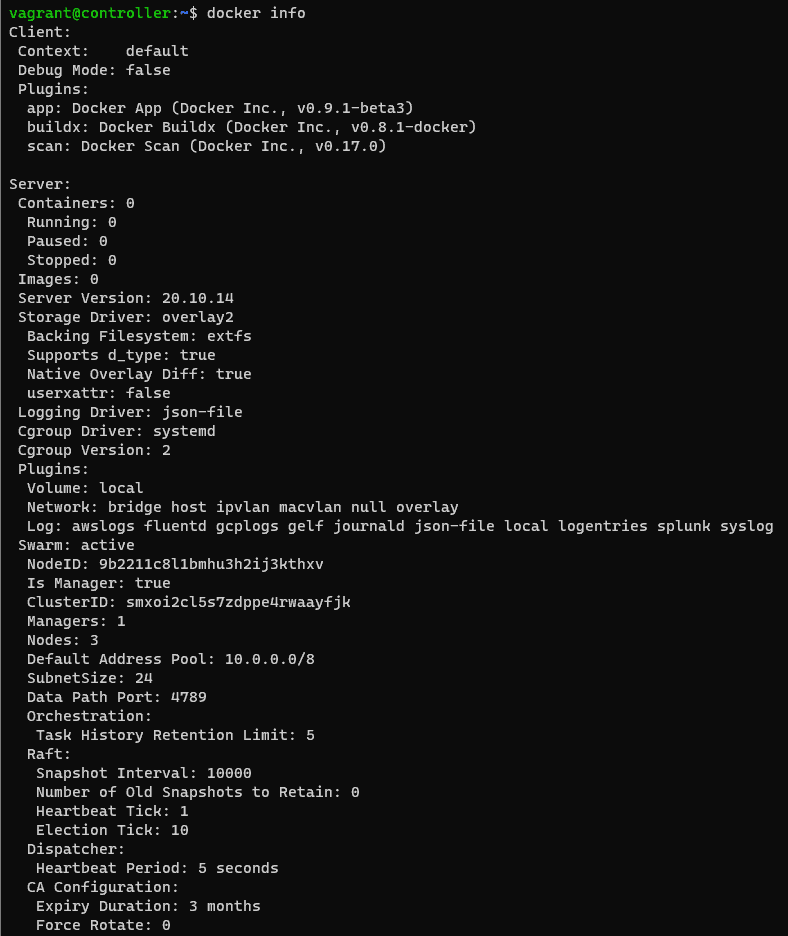
We will verify the result on the Server controller:
docker info
Conclusion
You have successfully installed a Docker Swarm cluster and deployed services to it. You can continue exploring Docker Swarm features to manage and scale your applications effectively. I hope will this your helpful. Thank you for reading the DevopsRoles page!
In this tutorial, we will explore the steps to implement Vagrant proxy configuration on a virtual machine. Configuring a proxy for Vagrant involves utilizing the various options provided by the Vagrant Proxy Configuration.
Vagrant proxy configuration is a crucial aspect of managing virtualized development environments seamlessly. Vagrant, a powerful tool for building and managing virtualized development environments, allows developers to create consistent and reproducible environments across different machines. When it comes to networking in these environments, proxy configuration plays a vital role, ensuring smooth communication between the virtual machine and external resources.
Configuring a proxy in Vagrant involves specifying the necessary settings to enable the virtual machine to access the internet through a proxy server. This is particularly useful in corporate environments or other scenarios where internet access is controlled through a proxy. The flexibility of Vagrant Proxy Configuration allows users to tailor settings according to their specific proxy server requirements.
One key element of Vagrant proxy configuration is the ability to set up a generic HTTP proxy. This enables the virtual machine to route its internet requests through the specified proxy server, facilitating internet connectivity for software installations, updates, and other online interactions within the virtual environment.
Moreover, Vagrant extends its proxy support to various tools commonly used in development workflows. Users can configure proxy settings for Docker, Git, npm, Subversion, Yum, and more. This comprehensive proxy integration ensures that all the components of the development stack can seamlessly operate within the virtualized environment, regardless of the network restrictions imposed by the proxy server.
Users need to adapt the proxy settings to match the specific configuration of their proxy servers. This adaptability ensures that the virtualized environment aligns with the network policies in place, enabling a smooth and uninterrupted development experience.
The Vagrant plugin allows you to set up the following:
generic http_proxy
proxy configuration for Docker
proxy configuration for Git
proxy configuration for npm
proxy configuration for Subversion
proxy configuration for Yum
etc.
Install the Vagrant plugin called vagrant-proxyconf
This plugin requires Vagrant version 1.2 or newer
vagrant plugin install vagrant-proxyconf
The output terminal is as below:
To set up configurations for all Vagrant VMs
Vagrant.configure("2") do |config|
  if Vagrant.has_plugin?("vagrant-proxyconf")
    config.proxy.http     = "http://IP-ADDRESS:3128/"
    config.proxy.https    = "http://IP-ADDRESS:3128/"
    config.proxy.no_proxy = "localhost,127.0.0.1,devopsroles.com,huuphan.com"
  end
  # ... other stuff
end
Environment variables
VAGRANT_HTTP_PROXY
VAGRANT_HTTPS_PROXY
VAGRANT_FTP_PROXY
VAGRANT_NO_PROXY
These also override the Vagrantfile configuration.
As an illustration, Vagrant executes the following command:
VAGRANT_HTTP_PROXY="http://devopsroles.com:8080" vagrant up
Turning off the plugin
config.proxy.enabled         # => all applications enabled(default)
config.proxy.enabled = true  # => all applications enabled
config.proxy.enabled = { svn: false, docker: false }  # => specific applications disabled
config.proxy.enabled = ""    # => all applications disabled
config.proxy.enabled = false # => all applications disabled
For example Vagrantfile file
Vagrant.configure("2") do |config|
  config.proxy.http = "http://192.168.3.7:8080/"

  config.vm.provider :my_devopsroles do |cloud, override|
    override.proxy.enabled = false
  end
  # ... other stuff
end
An illustration of Vagrant proxy configuration in my setup.
# -*- mode: ruby -*-
# vi: set ft=ruby :

Vagrant.configure("2") do |config|

  config.vm.define "myserver" do |myserver|
    myserver.vm.box = "ubuntu/impish64"
    myserver.vm.hostname = "devopsroles.com.local"
    myserver.vm.network "private_network", ip: "192.168.56.10"
    myserver.vm.network "forwarded_port", guest: 80, host: 8080
    myserver.vm.provider :virtualbox do |v|
	  v.customize ["modifyvm", :id, "--natdnshostresolver1", "on"]
	  v.customize ["modifyvm", :id, "--memory", 1024]
	  v.customize ["modifyvm", :id, "--name", "myserver"]
	  end
    if Vagrant.has_plugin?("vagrant-proxyconf")
      config.proxy.http     = "http://192.168.4.7:8080/"
      config.proxy.https    = "http://192.168.4.7:8080/"
      config.proxy.no_proxy = "localhost,127.0.0.1,devopsroles.com,huuphan.com"
    end
  end

end
Through Youtube
Conclusion
You’ve successfully set up a proxy for your Vagrant environment. Be sure to adjust the proxy settings based on your specific proxy server configuration. I hope you find this information helpful.
Vagrant proxy configuration is a fundamental aspect of creating robust and consistent development environments. By providing users with the tools to tailor proxy settings and support for various development tools, Vagrant empowers developers to overcome network constraints and focus on building and testing their applications efficiently.
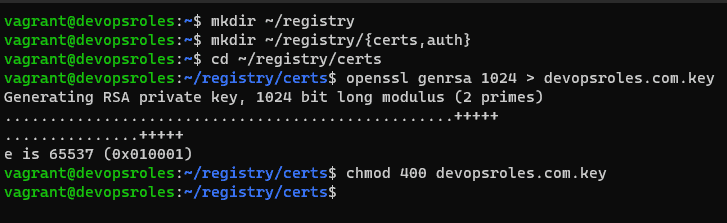
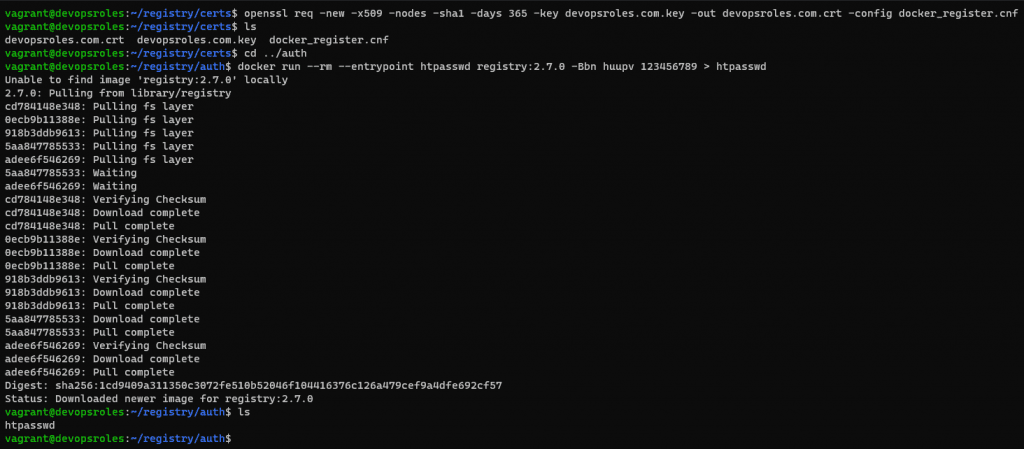
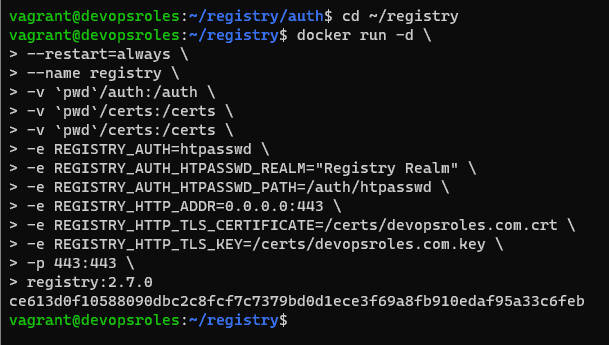
Now, you can access it from the local machine. however, you want to access it from a remote system. we need to add a ca.crt file. you need the copy the contents of the ~/registry/certs/devopsroles.com.crt file.
Login into your second machine
Create folder
sudo mkdir -p /etc/docker/certs.d/SERVER:443
where SERVER is the IP address of the machine hosting the registry.
Create the new file with:
sudo nano /etc/docker/certs.d/SERVER:443/ca.crt
paste the contents from devopsroles.com.crt ( from the hosting server) save and close the file.
How to do login into the new registry
From the second machine.
docker login -u USER -p https://SERVER:443
Where USER is the user you added when you generated the htpasswd file above.
Conclusion
You have successfully deployed a self-hosted Docker registry. You can now use it to store and share your Docker images within your network. I hope will this your helpful. Thank you for reading the DevopsRoles page!
This tutorial, How to Deploy Redash data visualization dashboard helps use Docker.
You can deploy the powerful data visualization tool Redash as a Docker container.
Redash is a powerful data visualization tool that is built for fast access to data collected from various sources. Redash helps you make sense of your data
Requirements
Running instance of Ubuntu Server.
A user with sudo privileges.
To deploy Redash, a data visualization dashboard, you can follow these steps:
Install Docker
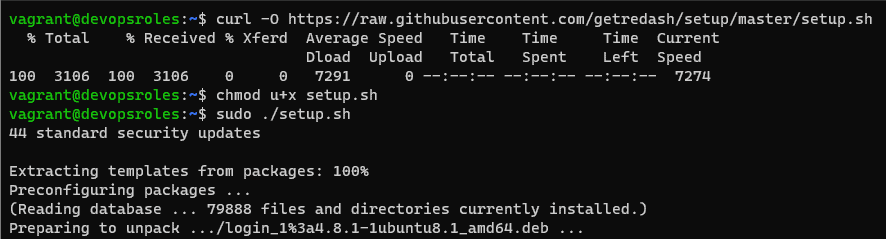
First, You need to install Docker on the Ubuntu server. Refer to How to install docker on Ubuntu Server. and Install Docker-compose on the Ubuntu Server. Refer to here.
The deployment will take anywhere from 2-10 minutes.
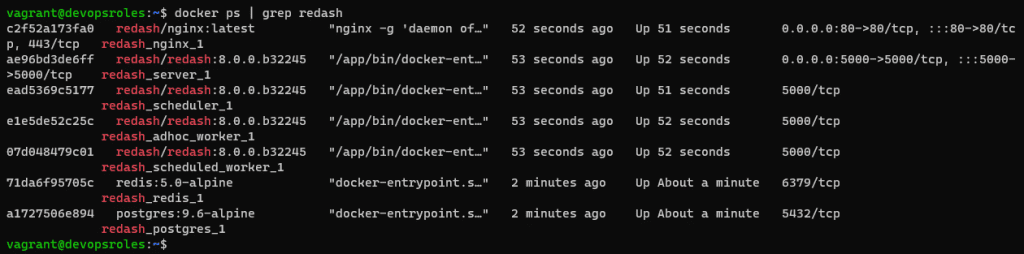
The output terminal is as below:
Docker containers running Redash data visualization dashboard
How to access Redash
Open a web browser, and type http://ipaddress as in the picture below:
The Redash main page
You now have to deploy a data visualization tool. Next time, How to connect a data source to Redash.
Conclusion
You have successfully deployed the Redash data visualization dashboard and can now start creating visualizations and dashboards for your data. Continue exploring the Redash documentation and features to leverage its full capabilities for data visualization and analysis.
I hope will this your helpful. Thank you for reading the DevopsRoles page!
In this tutorial, How to Install Kubernetes Cluster with KubeKey. I will deploy a Kubernetes Cluster using KubeKey Quickstart.
You can use KubeKey to spin up a Kubernetes deployment for development/testing purposes. As Kubernetes is the de-facto standard in container orchestration.
Requirements install Kubernetes Cluster with KubeKey
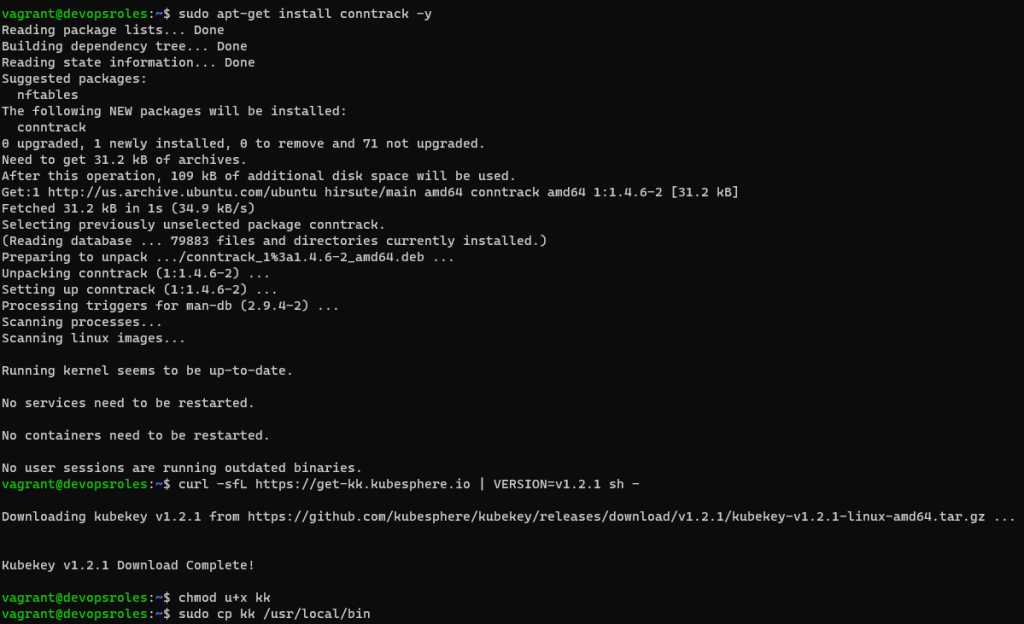
You need to download KubeKey and make it executable as the command below:
sudo apt-get install conntrack -y
curl -sfL https://get-kk.kubesphere.io | VERSION=v1.2.1 sh -
chmod u+x kk
The output terminal is the picture below:
Make the kk executable to run from any directory by copying the file to /user/local/bin directory with the command below:
sudo cp kk /usr/local/bin
Verify the install it
kk -h
The output terminal is as below:
vagrant@devopsroles:~$ kk -h
Deploy a Kubernetes or KubeSphere cluster efficiently, flexibly and easily. There are three scenarios to use KubeKey.
1. Install Kubernetes only
2. Install Kubernetes and KubeSphere together in one command
3. Install Kubernetes first, then deploy KubeSphere on it using https://github.com/kubesphere/ks-installer

Usage:
  kk [command]

Available Commands:
  add         Add nodes to kubernetes cluster
  certs       cluster certs
  completion  Generate shell completion scripts
  create      Create a cluster or a cluster configuration file
  delete      Delete nodes or cluster
  help        Help about any command
  init        Initializes the installation environment
  upgrade     Upgrade your cluster smoothly to a newer version with this command
  version     print the client version information

Flags:
      --debug        Print detailed information (default true)
  -h, --help         help for kk
      --in-cluster   Running inside the cluster

Use "kk [command] --help" for more information about a command.
Deploy the Cluster
You need to deploy the cluster with the command below:
sudo kk create cluster
This process will take some time.
The output terminal is as below:
vagrant@devopsroles:~$ sudo kk create cluster
+-------------+------+------+---------+----------+-------+-------+-----------+----------+------------+-------------+------------------+--------------+
| name        | sudo | curl | openssl | ebtables | socat | ipset | conntrack | docker   | nfs client | ceph client | glusterfs client | time         |
+-------------+------+------+---------+----------+-------+-------+-----------+----------+------------+-------------+------------------+--------------+
| devopsroles | y    | y    | y       | y        |       |       | y         | 20.10.12 |            |             |                  | UTC 14:06:10 |
+-------------+------+------+---------+----------+-------+-------+-----------+----------+------------+-------------+------------------+--------------+

This is a simple check of your environment.
Before installation, you should ensure that your machines meet all requirements specified at
https://github.com/kubesphere/kubekey#requirements-and-recommendations

Continue this installation? [yes/no]: yes
INFO[14:06:20 UTC] Downloading Installation Files
INFO[14:06:20 UTC] Downloading kubeadm ...
INFO[14:06:24 UTC] Downloading kubelet ...
INFO[14:06:32 UTC] Downloading kubectl ...
INFO[14:06:36 UTC] Downloading helm ...
INFO[14:06:38 UTC] Downloading kubecni ...
INFO[14:06:43 UTC] Downloading etcd ...
INFO[14:06:48 UTC] Downloading docker ...
INFO[14:06:52 UTC] Downloading crictl ...
INFO[14:06:55 UTC] Configuring operating system ...
[devopsroles 10.0.2.15] MSG:
net.ipv4.ip_forward = 1
net.bridge.bridge-nf-call-arptables = 1
net.bridge.bridge-nf-call-ip6tables = 1
net.bridge.bridge-nf-call-iptables = 1
net.ipv4.ip_local_reserved_ports = 30000-32767
vm.max_map_count = 262144
vm.swappiness = 1
fs.inotify.max_user_instances = 524288
no crontab for root
INFO[14:06:56 UTC] Get cluster status
INFO[14:06:56 UTC] Installing Container Runtime ...
INFO[14:06:56 UTC] Start to download images on all nodes
[devopsroles] Downloading image: kubesphere/pause:3.4.1
[devopsroles] Downloading image: kubesphere/kube-apiserver:v1.21.5
[devopsroles] Downloading image: kubesphere/kube-controller-manager:v1.21.5
[devopsroles] Downloading image: kubesphere/kube-scheduler:v1.21.5
[devopsroles] Downloading image: kubesphere/kube-proxy:v1.21.5
[devopsroles] Downloading image: coredns/coredns:1.8.0
[devopsroles] Downloading image: kubesphere/k8s-dns-node-cache:1.15.12
[devopsroles] Downloading image: calico/kube-controllers:v3.20.0
[devopsroles] Downloading image: calico/cni:v3.20.0
[devopsroles] Downloading image: calico/node:v3.20.0
[devopsroles] Downloading image: calico/pod2daemon-flexvol:v3.20.0
INFO[14:08:42 UTC] Getting etcd status
[devopsroles 10.0.2.15] MSG:
Configuration file will be created
INFO[14:08:42 UTC] Generating etcd certs
INFO[14:08:43 UTC] Synchronizing etcd certs
INFO[14:08:43 UTC] Creating etcd service
Push /home/vagrant/kubekey/v1.21.5/amd64/etcd-v3.4.13-linux-amd64.tar.gz to 10.0.2.15:/tmp/kubekey/etcd-v3.4.13-linux-amd64.tar.gz   Done
INFO[14:08:43 UTC] Starting etcd cluster
INFO[14:08:44 UTC] Refreshing etcd configuration
[devopsroles 10.0.2.15] MSG:
Created symlink /etc/systemd/system/multi-user.target.wants/etcd.service → /etc/systemd/system/etcd.service.
INFO[14:08:47 UTC] Backup etcd data regularly
INFO[14:08:54 UTC] Installing kube binaries
Push /home/vagrant/kubekey/v1.21.5/amd64/kubeadm to 10.0.2.15:/tmp/kubekey/kubeadm   Done
Push /home/vagrant/kubekey/v1.21.5/amd64/kubelet to 10.0.2.15:/tmp/kubekey/kubelet   Done
Push /home/vagrant/kubekey/v1.21.5/amd64/kubectl to 10.0.2.15:/tmp/kubekey/kubectl   Done
Push /home/vagrant/kubekey/v1.21.5/amd64/helm to 10.0.2.15:/tmp/kubekey/helm   Done
Push /home/vagrant/kubekey/v1.21.5/amd64/cni-plugins-linux-amd64-v0.9.1.tgz to 10.0.2.15:/tmp/kubekey/cni-plugins-linux-amd64-v0.9.1.tgz   Done
INFO[14:09:01 UTC] Initializing kubernetes cluster
[devopsroles 10.0.2.15] MSG:
W0323 14:09:02.442567    4631 utils.go:69] The recommended value for "clusterDNS" in "KubeletConfiguration" is: [10.233.0.10]; the provided value is: [169.254.25.10]
[init] Using Kubernetes version: v1.21.5
[preflight] Running pre-flight checks
        [WARNING IsDockerSystemdCheck]: detected "cgroupfs" as the Docker cgroup driver. The recommended driver is "systemd". Please follow the guide at https://kubernetes.io/docs/setup/cri/
        [WARNING FileExisting-socat]: socat not found in system path
[preflight] Pulling images required for setting up a Kubernetes cluster
[preflight] This might take a minute or two, depending on the speed of your internet connection
[preflight] You can also perform this action in beforehand using 'kubeadm config images pull'
[certs] Using certificateDir folder "/etc/kubernetes/pki"
[certs] Generating "ca" certificate and key
[certs] Generating "apiserver" certificate and key
[certs] apiserver serving cert is signed for DNS names [devopsroles devopsroles.cluster.local kubernetes kubernetes.default kubernetes.default.svc kubernetes.default.svc.cluster.local lb.kubesphere.local localhost] and IPs [10.233.0.1 10.0.2.15 127.0.0.1]
[certs] Generating "apiserver-kubelet-client" certificate and key
[certs] Generating "front-proxy-ca" certificate and key
[certs] Generating "front-proxy-client" certificate and key
[certs] External etcd mode: Skipping etcd/ca certificate authority generation
[certs] External etcd mode: Skipping etcd/server certificate generation
[certs] External etcd mode: Skipping etcd/peer certificate generation
[certs] External etcd mode: Skipping etcd/healthcheck-client certificate generation
[certs] External etcd mode: Skipping apiserver-etcd-client certificate generation
[certs] Generating "sa" key and public key
[kubeconfig] Using kubeconfig folder "/etc/kubernetes"
[kubeconfig] Writing "admin.conf" kubeconfig file
[kubeconfig] Writing "kubelet.conf" kubeconfig file
[kubeconfig] Writing "controller-manager.conf" kubeconfig file
[kubeconfig] Writing "scheduler.conf" kubeconfig file
[kubelet-start] Writing kubelet environment file with flags to file "/var/lib/kubelet/kubeadm-flags.env"
[kubelet-start] Writing kubelet configuration to file "/var/lib/kubelet/config.yaml"
[kubelet-start] Starting the kubelet
[control-plane] Using manifest folder "/etc/kubernetes/manifests"
[control-plane] Creating static Pod manifest for "kube-apiserver"
[control-plane] Creating static Pod manifest for "kube-controller-manager"
[control-plane] Creating static Pod manifest for "kube-scheduler"
[wait-control-plane] Waiting for the kubelet to boot up the control plane as static Pods from directory "/etc/kubernetes/manifests". This can take up to 4m0s
[apiclient] All control plane components are healthy after 7.502071 seconds
[upload-config] Storing the configuration used in ConfigMap "kubeadm-config" in the "kube-system" Namespace
[kubelet] Creating a ConfigMap "kubelet-config-1.21" in namespace kube-system with the configuration for the kubelets in the cluster
[upload-certs] Skipping phase. Please see --upload-certs
[mark-control-plane] Marking the node devopsroles as control-plane by adding the labels: [node-role.kubernetes.io/master(deprecated) node-role.kubernetes.io/control-plane node.kubernetes.io/exclude-from-external-load-balancers]
[mark-control-plane] Marking the node devopsroles as control-plane by adding the taints [node-role.kubernetes.io/master:NoSchedule]
[bootstrap-token] Using token: w6uaty.abpybmw8jhw1tdlg
[bootstrap-token] Configuring bootstrap tokens, cluster-info ConfigMap, RBAC Roles
[bootstrap-token] configured RBAC rules to allow Node Bootstrap tokens to get nodes
[bootstrap-token] configured RBAC rules to allow Node Bootstrap tokens to post CSRs in order for nodes to get long term certificate credentials
[bootstrap-token] configured RBAC rules to allow the csrapprover controller automatically approve CSRs from a Node Bootstrap Token
[bootstrap-token] configured RBAC rules to allow certificate rotation for all node client certificates in the cluster
[bootstrap-token] Creating the "cluster-info" ConfigMap in the "kube-public" namespace
[kubelet-finalize] Updating "/etc/kubernetes/kubelet.conf" to point to a rotatable kubelet client certificate and key
[addons] Applied essential addon: CoreDNS
[addons] Applied essential addon: kube-proxy

Your Kubernetes control-plane has initialized successfully!

To start using your cluster, you need to run the following as a regular user:

  mkdir -p $HOME/.kube
  sudo cp -i /etc/kubernetes/admin.conf $HOME/.kube/config
  sudo chown $(id -u):$(id -g) $HOME/.kube/config

Alternatively, if you are the root user, you can run:

  export KUBECONFIG=/etc/kubernetes/admin.conf

You should now deploy a pod network to the cluster.
Run "kubectl apply -f [podnetwork].yaml" with one of the options listed at:
  https://kubernetes.io/docs/concepts/cluster-administration/addons/

You can now join any number of control-plane nodes by copying certificate authorities
and service account keys on each node and then running the following as root:

  kubeadm join lb.kubesphere.local:6443 --token w6uaty.abpybmw8jhw1tdlg \
        --discovery-token-ca-cert-hash sha256:98d31447eb6457d74c0d13088aceed7ae8dd1fd0b8e98cb1a15683fcbb5ef4d5 \
        --control-plane

Then you can join any number of worker nodes by running the following on each as root:

kubeadm join lb.kubesphere.local:6443 --token w6uaty.abpybmw8jhw1tdlg \
        --discovery-token-ca-cert-hash sha256:98d31447eb6457d74c0d13088aceed7ae8dd1fd0b8e98cb1a15683fcbb5ef4d5
[devopsroles 10.0.2.15] MSG:
node/devopsroles untainted
[devopsroles 10.0.2.15] MSG:
node/devopsroles labeled
[devopsroles 10.0.2.15] MSG:
service "kube-dns" deleted
[devopsroles 10.0.2.15] MSG:
service/coredns created
Warning: resource clusterroles/system:coredns is missing the kubectl.kubernetes.io/last-applied-configuration annotation which is required by kubectl apply. kubectl apply should only be used on resources created declaratively by either kubectl create --save-config or kubectl apply. The missing annotation will be patched automatically.
clusterrole.rbac.authorization.k8s.io/system:coredns configured
[devopsroles 10.0.2.15] MSG:
serviceaccount/nodelocaldns created
daemonset.apps/nodelocaldns created
[devopsroles 10.0.2.15] MSG:
configmap/nodelocaldns created
INFO[14:09:34 UTC] Get cluster status
INFO[14:09:35 UTC] Joining nodes to cluster
INFO[14:09:35 UTC] Deploying network plugin ...
[devopsroles 10.0.2.15] MSG:
configmap/calico-config created
customresourcedefinition.apiextensions.k8s.io/bgpconfigurations.crd.projectcalico.org created
customresourcedefinition.apiextensions.k8s.io/bgppeers.crd.projectcalico.org created
customresourcedefinition.apiextensions.k8s.io/blockaffinities.crd.projectcalico.org created
customresourcedefinition.apiextensions.k8s.io/clusterinformations.crd.projectcalico.org created
customresourcedefinition.apiextensions.k8s.io/felixconfigurations.crd.projectcalico.org created
customresourcedefinition.apiextensions.k8s.io/globalnetworkpolicies.crd.projectcalico.org created
customresourcedefinition.apiextensions.k8s.io/globalnetworksets.crd.projectcalico.org created
customresourcedefinition.apiextensions.k8s.io/hostendpoints.crd.projectcalico.org created
customresourcedefinition.apiextensions.k8s.io/ipamblocks.crd.projectcalico.org created
customresourcedefinition.apiextensions.k8s.io/ipamconfigs.crd.projectcalico.org created
customresourcedefinition.apiextensions.k8s.io/ipamhandles.crd.projectcalico.org created
customresourcedefinition.apiextensions.k8s.io/ippools.crd.projectcalico.org created
customresourcedefinition.apiextensions.k8s.io/kubecontrollersconfigurations.crd.projectcalico.org created
customresourcedefinition.apiextensions.k8s.io/networkpolicies.crd.projectcalico.org created
customresourcedefinition.apiextensions.k8s.io/networksets.crd.projectcalico.org created
clusterrole.rbac.authorization.k8s.io/calico-kube-controllers created
clusterrolebinding.rbac.authorization.k8s.io/calico-kube-controllers created
clusterrole.rbac.authorization.k8s.io/calico-node created
clusterrolebinding.rbac.authorization.k8s.io/calico-node created
daemonset.apps/calico-node created
serviceaccount/calico-node created
deployment.apps/calico-kube-controllers created
serviceaccount/calico-kube-controllers created
Warning: policy/v1beta1 PodDisruptionBudget is deprecated in v1.21+, unavailable in v1.25+; use policy/v1 PodDisruptionBudget
poddisruptionbudget.policy/calico-kube-controllers created
INFO[14:09:36 UTC] Congratulations! Installation is successful.
To verify Kubectl has been installed with the command below:
kubectl --help
The output terminal is as below:
vagrant@devopsroles:~$ kubectl --help
kubectl controls the Kubernetes cluster manager.

 Find more information at: https://kubernetes.io/docs/reference/kubectl/overview/

Basic Commands (Beginner):
  create        Create a resource from a file or from stdin.
  expose        Take a replication controller, service, deployment or pod and expose it as a new Kubernetes Service
  run           Run a particular image on the cluster
  set           Set specific features on objects

Basic Commands (Intermediate):
  explain       Documentation of resources
  get           Display one or many resources
  edit          Edit a resource on the server
  delete        Delete resources by filenames, stdin, resources and names, or by resources and label selector

Deploy Commands:
  rollout       Manage the rollout of a resource
  scale         Set a new size for a Deployment, ReplicaSet or Replication Controller
  autoscale     Auto-scale a Deployment, ReplicaSet, StatefulSet, or ReplicationController

Cluster Management Commands:
  certificate   Modify certificate resources.
  cluster-info  Display cluster info
  top           Display Resource (CPU/Memory) usage.
  cordon        Mark node as unschedulable
  uncordon      Mark node as schedulable
  drain         Drain node in preparation for maintenance
  taint         Update the taints on one or more nodes

Troubleshooting and Debugging Commands:
  describe      Show details of a specific resource or group of resources
  logs          Print the logs for a container in a pod
  attach        Attach to a running container
  exec          Execute a command in a container
  port-forward  Forward one or more local ports to a pod
  proxy         Run a proxy to the Kubernetes API server
  cp            Copy files and directories to and from containers.
  auth          Inspect authorization
  debug         Create debugging sessions for troubleshooting workloads and nodes

Advanced Commands:
  diff          Diff live version against would-be applied version
  apply         Apply a configuration to a resource by filename or stdin
  patch         Update field(s) of a resource
  replace       Replace a resource by filename or stdin
  wait          Experimental: Wait for a specific condition on one or many resources.
  kustomize     Build a kustomization target from a directory or URL.

Settings Commands:
  label         Update the labels on a resource
  annotate      Update the annotations on a resource
  completion    Output shell completion code for the specified shell (bash or zsh)

Other Commands:
  api-resources Print the supported API resources on the server
  api-versions  Print the supported API versions on the server, in the form of "group/version"
  config        Modify kubeconfig files
  plugin        Provides utilities for interacting with plugins.
  version       Print the client and server version information

Usage:
  kubectl [flags] [options]

Use "kubectl <command> --help" for more information about a given command.
Use "kubectl options" for a list of global command-line options (applies to all commands).
Next, you must run the kubectl proxy command as below:
sudo kubectl proxy
While the proxy is running, open a web browser and point it to the IP address and port number listed in the results from the sudo kubectl get svc -n kubernetes-dashboard command.
vagrant@devopsroles:~$ sudo kubectl get svc -n kubernetes-dashboard
NAME                        TYPE        CLUSTER-IP      EXTERNAL-IP   PORT(S)         AGE
dashboard-metrics-scraper   ClusterIP   10.233.19.190   <none>        8000/TCP        47h
kubernetes-dashboard        NodePort    10.233.23.203   <none>        443:32469/TCP   47h
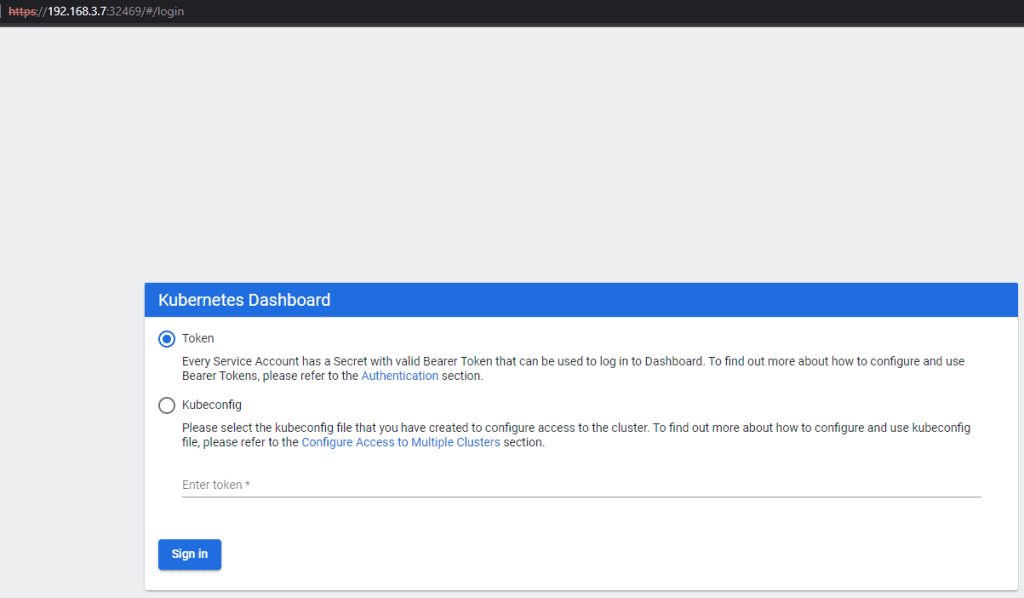
Open a web browser:
https://192.168.3.7:32469/
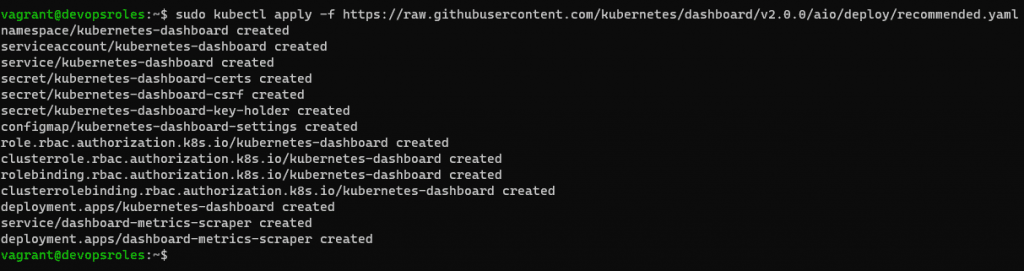
To log in to the dashboard. You need to create a ServiceAccount object and a ClusterRoleBinding object. Create the account with the name admin-user in the namespace kubernetes-dashboard
In this quick-start tutorial, learn how to Docker install Oracle 12c. This guide provides straightforward steps for setting up Oracle 12c in a Docker container, allowing you to leverage the benefits of a virtualized environment for database management. Perfect for those seeking a practical approach to deploying Oracle 12c with Docker.
Requirements
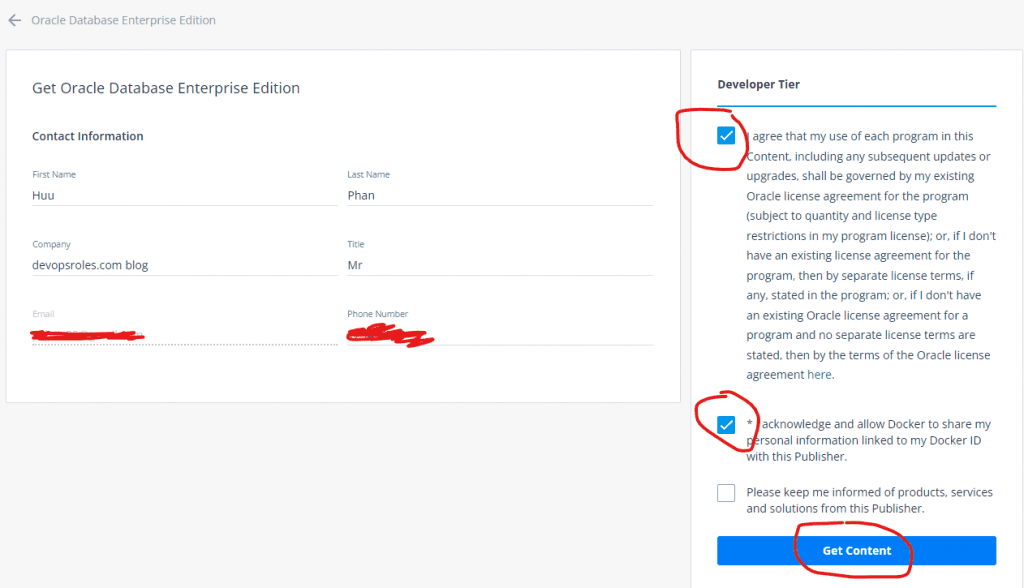
You need an account on Docker. Create an account here.
Install or update Docker on your PC
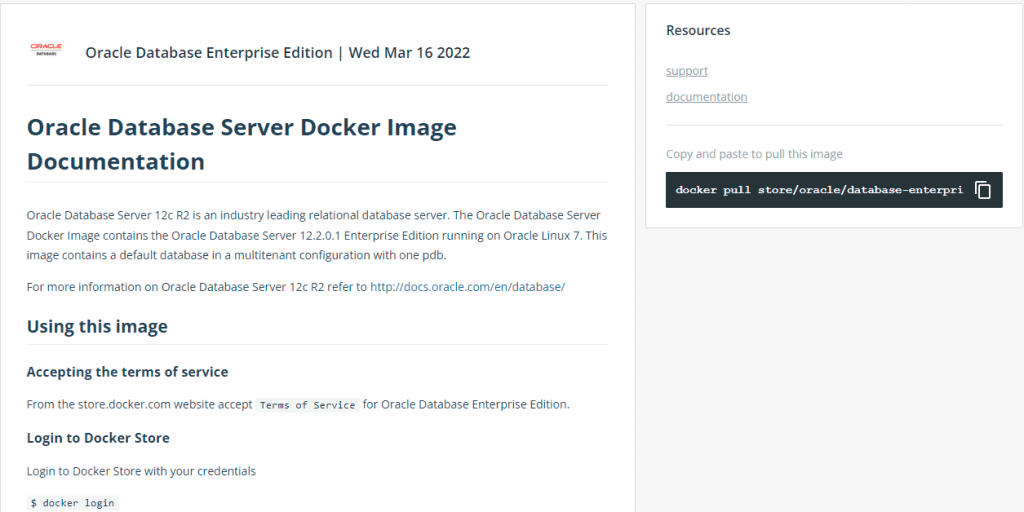
Oracle Database 12c Docker Image
Oracle Database Enterprise Edition 12c is available as an image in the Docker Store.
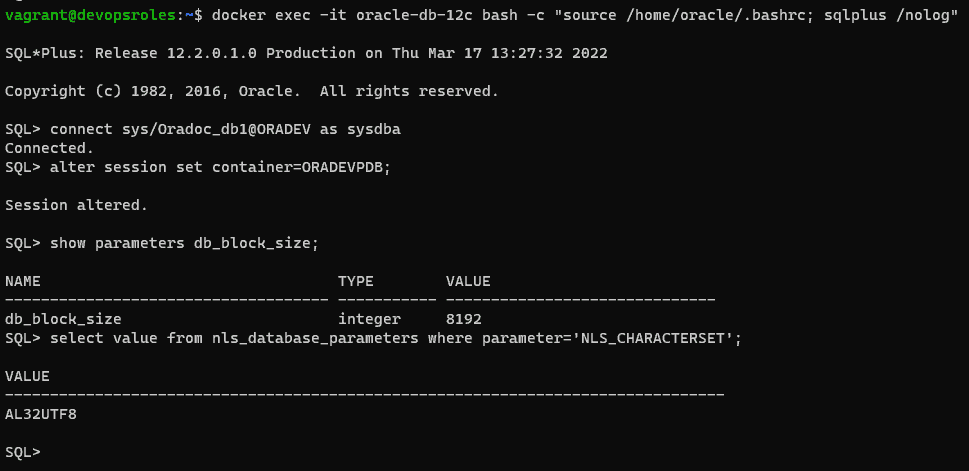
The default password to connect to the database with the sys user is Oradoc_db1. Check the character set which should be AL32UTF8
docker exec -it oracle-db-12c bash -c "source /home/oracle/.bashrc; sqlplus /nolog"

SQL> connect sys/Oradoc_db1@ORADEV as sysdba
SQL> alter session set container=ORADEVPDB;
SQL> show parameters db_block_size;
SQL> select value from nls_database_parameters where parameter='NLS_CHARACTERSET';
Create data and temp tablespace
SQL>
--Create tablespace for new devopsroles Project
CREATE TABLESPACE huupv_devopsroles_data DATAFILE '/u01/app/oracle/product/12.2.0/dbhome_1/data/huupv_devopsroles_data.db' SIZE 64M AUTOEXTEND ON NEXT 32M MAXSIZE 4096M EXTENT MANAGEMENT LOCAL;

--Create temp tablespace for new devopsroles Project
CREATE TEMPORARY TABLESPACE huupv_devopsroles_temp TEMPFILE '/u01/app/oracle/product/12.2.0/dbhome_1/data/huupv_devopsroles_temp.db' SIZE 64M  AUTOEXTEND ON NEXT 32M MAXSIZE 4096M EXTENT MANAGEMENT LOCAL;
Do not start with too large an initial size, because it can waste space.
Use a single block size (8K) for the whole DB
Do not allow individual data files to grow large (beyond 8-10Gb)
Create a user and assign a grant
SQL>
--Create user for devopsroles schema
CREATE USER huupv_devopsroles IDENTIFIED BY huupv_devopsroles DEFAULT TABLESPACE huupv_devopsroles_data TEMPORARY TABLESPACE huupv_devopsroles_temp PROFILE default ACCOUNT UNLOCK;

--Assign grant to user
GRANT CONNECT TO huupv_devopsroles;
GRANT RESOURCE TO huupv_devopsroles;
GRANT UNLIMITED TABLESPACE TO huupv_devopsroles;
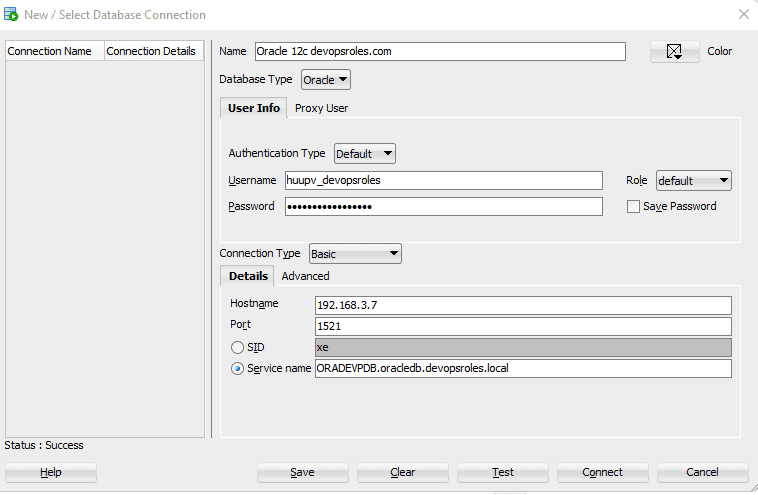
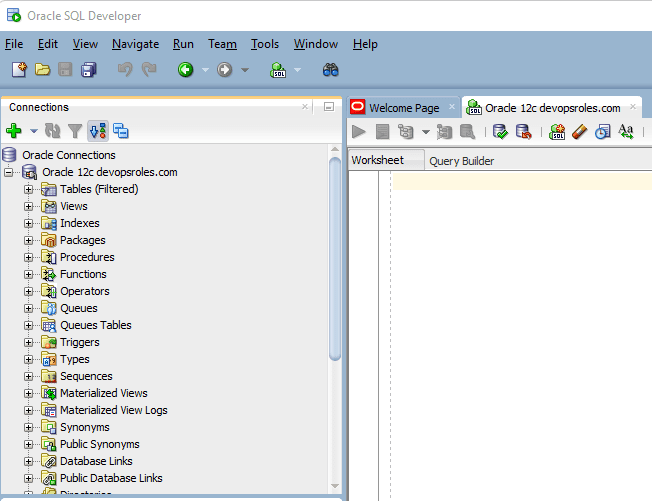
Test the new scheme using a tool such as Oracle SQLDeveloper
Service Name: ORADEVPDB.oracledb.devopsroles.local
Via youtube
Conclusions
While installing Oracle Database 12c on Docker is not officially supported by Oracle, which only offers Docker images for Database 18c and later, you can still proceed by following the outlined steps in this guide.
Keep in mind that these steps are unofficial and might present certain limitations or compatibility issues. For optimal results and support, consider using the officially provided Oracle Database versions on Docker. I hope will this your helpful. Thank you for reading the DevopsRoles page!
In this tutorial, How to use Docker deploy MySQL cluster and connect to the nodes from your local machine. We will be deploying the MySQL server with docker.
To deploy a MySQL cluster using Docker, you can use the MySQL official Docker images and Docker Compose. Here’s a step-by-step guide:
1 Management node
2 Data nodes
2 SQL nodes
The nodes in the cluster are running on separate hosts in a network.
The SQL nodes are created initially, with a random password. Get the default password.
docker logs mysql1 2>&1 | grep PASSWORD
To change the password, first, Input the password default at Step 7
docker exec -it mysql1 mysql -uroot -p
ALTER USER 'root'@'localhost' IDENTIFIED BY 'root';
FLUSH PRIVILEGES;
MySQL node 2:
The SQL nodes are created initially, with a random password. Get the default password.
docker logs mysql2 2>&1 | grep PASSWORD
To change the password, first, Input the password default at Step 7
docker exec -it mysql2 mysql -uroot -p
ALTER USER 'root'@'localhost' IDENTIFIED BY 'root';
FLUSH PRIVILEGES;
Step 8: Login and create a new database.
For example, I will create huupv an account on mysql1 and mysql2 containers and access any hosts.
# For mysql1
docker exec -it mysql1 mysql -uroot -p
CREATE USER 'huupv'@'%' IDENTIFIED BY '123456789';
GRANT ALL ON *.* TO 'huupv'@'%';
FLUSH PRIVILEGES;

# For mysql2
docker exec -it mysql2 mysql -uroot -p
CREATE USER 'huupv'@'%' IDENTIFIED BY '123456789';
GRANT ALL ON *.* TO 'huupv'@'%';
FLUSH PRIVILEGES;
Create new a database.
create schema test_db;
The output terminal is as below:
vagrant@devopsroles:~/mysql-docker$ docker exec -it mysql1 mysql -uroot -p
Enter password:
Welcome to the MySQL monitor.  Commands end with ; or \g.
Your MySQL connection id is 15
Server version: 8.0.28-cluster MySQL Cluster Community Server - GPL

Copyright (c) 2000, 2022, Oracle and/or its affiliates.

Oracle is a registered trademark of Oracle Corporation and/or its
affiliates. Other names may be trademarks of their respective
owners.

Type 'help;' or '\h' for help. Type '\c' to clear the current input statement.

mysql> CREATE USER 'huupv'@'%' IDENTIFIED BY '123456789';
Query OK, 0 rows affected (0.02 sec)

mysql> GRANT ALL ON *.* TO 'huupv'@'%';
Query OK, 0 rows affected (0.11 sec)

mysql> FLUSH PRIVILEGES;
Query OK, 0 rows affected (0.02 sec)

mysql> exit
Bye
vagrant@devopsroles:~/mysql-docker$ docker exec -it mysql2 mysql -uroot -p
Enter password:
Welcome to the MySQL monitor.  Commands end with ; or \g.
Your MySQL connection id is 16
Server version: 8.0.28-cluster MySQL Cluster Community Server - GPL

Copyright (c) 2000, 2022, Oracle and/or its affiliates.

Oracle is a registered trademark of Oracle Corporation and/or its
affiliates. Other names may be trademarks of their respective
owners.

Type 'help;' or '\h' for help. Type '\c' to clear the current input statement.

mysql> CREATE USER 'huupv'@'%' IDENTIFIED BY '123456789';
ERROR 1396 (HY000): Operation CREATE USER failed for 'huupv'@'%'
mysql> GRANT ALL ON *.* TO 'huupv'@'%';
Query OK, 0 rows affected (0.10 sec)

mysql> FLUSH PRIVILEGES;
Query OK, 0 rows affected (0.01 sec)

mysql> exit
Bye
vagrant@devopsroles:~/mysql-docker$
Login from my machine.
 mysql -h192.168.4.10 -uhuupv -p
 mysql -h192.168.4.11 -uhuupv -p
Via My Youtube
Conclusion
You have successfully deployed a MySQL cluster using Docker. You can now use the cluster for your applications or explore additional configuration options for MySQL clustering, such as replication and high availability. I hope will this your helpful. Thank you for reading the DevopsRoles page!