Docker offers an efficient way to establish a Python data science environment, ensuring a smooth workflow from development to deployment.
Begin by creating a Dockerfile that precisely defines the environment’s specifications, dependencies, and configurations, serving as a blueprint for the Docker data science image.
Use the Docker command to build the image by incorporating the Dockerfile along with your data science code and necessary requirements.
Once the image is constructed, initiate a container to execute your analysis, maintaining environment consistency across various systems.
Docker simplifies sharing your work by encapsulating the entire environment, eliminating compatibility issues that can arise from varied setups.
For larger-scale collaboration or deployment needs, Docker Hub provides a platform to store and distribute your Docker images.
Pushing your image to Docker Hub makes it readily available to colleagues and collaborators, allowing effortless integration into their workflows.
This comprehensive process of setting up, building, sharing, and deploying a Python data science environment using Docker significantly enhances reproducibility, collaboration, and the efficiency of deployment.
Why Docker for Data Science?
Here are some reasons why Docker is commonly used in the data science field:
Reproducibility: Docker allows you to package your entire data science environment, including dependencies, libraries, and configurations, into a single container. This ensures that your work can be reproduced exactly as you intended, even across different machines or platforms.
Isolation: Docker containers provide a level of isolation, ensuring that the dependencies and libraries used in one project do not interfere with those used in another. This is especially important in data science, where different projects might require different versions of the same library.
Portability: With Docker, you can package your entire data science stack into a container, making it easy to move your work between different environments, such as from your local machine to a cloud server. This is crucial for collaboration and deployment.
Dependency Management: Managing dependencies in traditional environments can be challenging and error-prone. Docker simplifies this process by allowing you to specify dependencies in a Dockerfile, ensuring consistent and reliable setups.
Version Control: Docker images can be versioned, allowing you to track changes to your environment over time. This can be especially helpful when sharing projects with collaborators or when you need to reproduce an older version of your work.
Collaboration: Docker images can be easily shared with colleagues or the broader community. Instead of providing a list of instructions for setting up an environment, you can share a Docker image that anyone can run without worrying about setup complexities.
Easy Setup: Docker simplifies the process of setting up complex environments. Once the Docker image is created, anyone can run it on their system with minimal effort, eliminating the need to manually install libraries and dependencies.
Security: Docker containers provide a degree of isolation, which can enhance security by preventing unwanted interactions between your data science environment and your host system.
Scalability: Docker containers can be orchestrated and managed using tools like Kubernetes, allowing you to scale your data science applications efficiently, whether you’re dealing with large datasets or resource-intensive computations.
Consistency: Docker helps ensure that the environment you develop in is the same environment you’ll deploy to. This reduces the likelihood of “it works on my machine” issues.
Create A Simple Docker Data Science Image
Step 1: Create a Project Directory
Create a new directory for your Docker project and navigate into it:
mkdir data-science-docker
cd data-science-docker
Step 2: Create a Dockerfile for Docker data science
Create a file named Dockerfile (without any file extensions) in the project directory. This file will contain instructions for building the Docker image. You can use any text editor you prefer.
# Use an official Python runtime as a parent image
FROM python:3.8-slim

# Set the working directory to /app
WORKDIR /app

# Copy the current directory contents into the container at /app
COPY . /app

# Install any needed packages specified in requirements.txt
RUN pip install --no-cache-dir -r requirements.txt

# Make port 8888 available to the world outside this container
EXPOSE 8888

# Define environment variable
ENV NAME DataScienceContainer

# Run jupyter notebook when the container launches
CMD ["jupyter", "notebook", "--ip=0.0.0.0", "--port=8888", "--no-browser", "--allow-root"]
Step 3: Create requirements.txt
Create a file named requirements.txt in the same directory and list the Python libraries you want to install. For this example, we’ll include pandas and numpy:
pandas==1.3.3
numpy==1.21.2
Step 4: Build the Docker Image
Open a terminal and navigate to the project directory (data-science-docker). Run the following command to build the Docker image:
docker build -t data-science-image .
Step 5: Run the Docker Container
After the image is built, you can run a container based on it:
docker run -p 8888:8888 -v $(pwd):/app --name data-science-container data-science-image
Here:
-p 8888:8888 maps port 8888 from the container to the host.
-v $(pwd):/app mounts the current directory from the host to the /app directory in the container.
–name data-science-container assigns a name to the running container.
In your terminal, you’ll see a URL with a token that you can copy and paste into your web browser to access the Jupyter Notebook interface. This will allow you to start working with data science libraries like NumPy and pandas.
Remember, this is a simple example. Depending on your specific requirements, you might need to add more configurations, libraries, or dependencies to your Docker image.
Step 6: Sharing and Deploying the Image
To save an image to a tar archive
docker save -o data-science-container.tar data-science-container
This tarball can then be loaded on any other system with Docker installed via
docker load -i data-science-container.tar
Push to Docker hub to share with others publicly or privately within an organization.
To push the image to Docker Hub:
Create a Docker Hub account if you don’t already have one
Log in to Docker Hub from the command line using docker login
Tag the image with your Docker Hub username: docker tag data-science-container yourusername/data-science-container
Push the image: docker push yourusername/data-science-container
The data-science-container image is now hosted on Docker Hub. Other users can pull the image by running:
docker pull yourusername/data-science-container
Conclusion
The process of creating a simple Docker data science image provides a powerful solution to some of the most pressing challenges in the field. By encapsulating the entire data science environment within a Docker container, practitioners can achieve reproducibility, ensuring that their work remains consistent across different systems and environments. The isolation and dependency management offered by Docker addresses the complexities of library versions, enhancing the stability of projects.
I hope will this your helpful. Thank you for reading the DevopsRoles page!
In this Boto3 DynamoDB tutorial, we’ll walk through the process of creating tables, loading data, and executing fundamental CRUD operations in AWS DynamoDB using Python and the Boto3 library.
Boto3, the Python SDK for AWS, is primarily known for its two widely used features: Clients and Resources.
boto3 dynamodb client provides a low-level interface to the AWS service. It maps 1:1 with the actual AWS service API.
In another way, boto3 dynamodbresource are a higher-level abstraction compared to clients. It provides an object-oriented interface for interacting with various AWS services. Resources aren’t available for all AWS services.
The CreateTable operation adds a new table to your account. In an Amazon Web Services account, table names must be unique within each Region. That is, you can have two tables with the same name if you create the tables in different Regions.
CreateTable is an asynchronous operation. We can wait to create a process with wait_until_exists() method Upon receiving a CreateTable request, DynamoDB immediately returns a response with a TableStatus of CREATING. After the table is created, DynamoDB sets the TableStatus to ACTIVE. You can perform read-and-write operations only on an ACTIVE table.
The following code example shows how to create a DynamoDB table.
Python (Boto3)
def create_table(self, table_name):
        """
        Creates an Amazon DynamoDB table that can be used to store forum data.
        The table partition key(S): Name

        :param table_name: The name of the table to create.
        :return: The newly created table.
        """
        try:
            self.table = self.dyn_resource.create_table(
                TableName=table_name,
                KeySchema=[
                    {'AttributeName': 'Name', 'KeyType': 'HASH'},  # Partition key
                ],
                AttributeDefinitions=[
                    {'AttributeName': 'Name', 'AttributeType': 'S'}
                ],
                ProvisionedThroughput={'ReadCapacityUnits': 10, 'WriteCapacityUnits': 5})
            self.table.wait_until_exists()
        except ClientError as err:
            logger.error(
                "Couldn't create table %s. Here's why: %s: %s", table_name,
                err.response['Error']['Code'], err.response['Error']['Message'])
            raise
        else:
            return self.table
Call function to create table as bellow
forums = Forum(dynamodb)
#Check for table existence, create table if not found
forums_exists = forums.exists(table_name)
if not forums_exists:
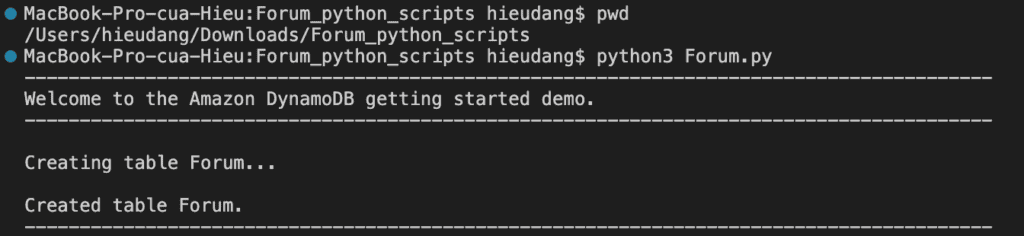
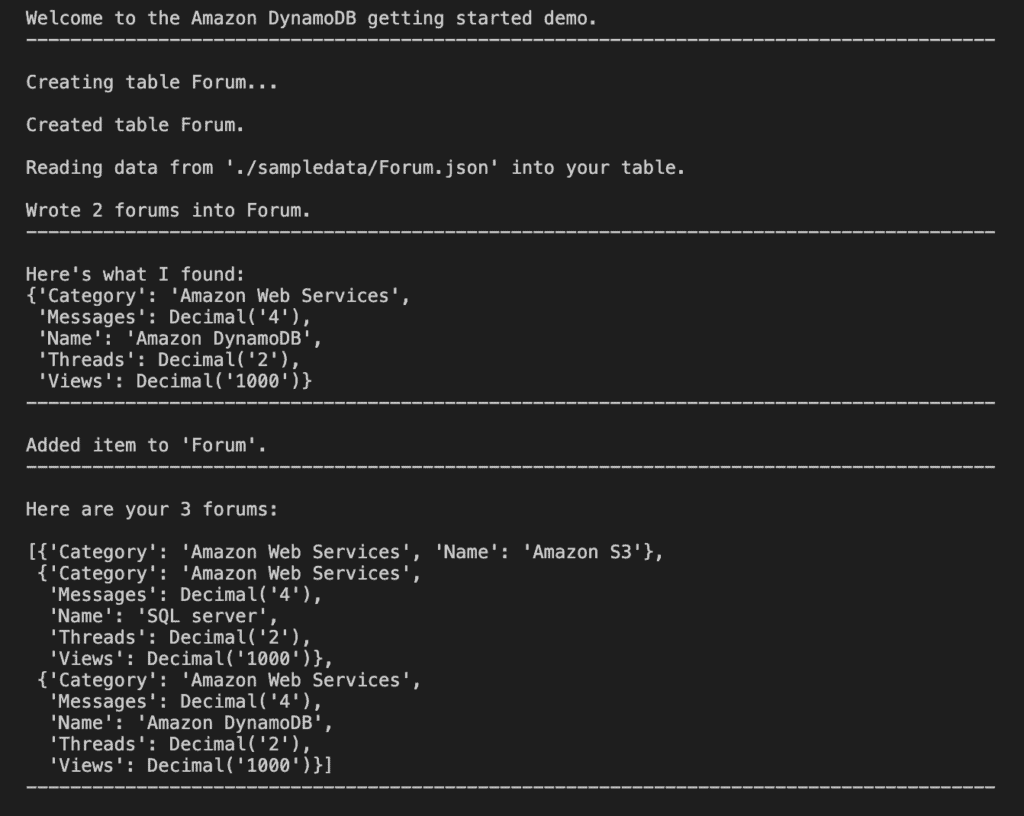
print(f"\nCreating table {table_name}...")
forums.create_table(table_name)
print(f"\nCreated table {forums.table.name}.")
This command returns the following result.
Batch Write Items
The BatchWriteItem operation puts or deletes multiple items in one or more tables. A single call BatchWriteItem can transmit up to 16MB of data over the network, consisting of up to 25 item put or delete operations. While individual items can be up to 400 KB once stored, it’s important to note that an item’s representation might be greater than 400KB while being sent in DynamoDB’s JSON format for the API call.
BatchWriteItem cannot update items.
If DynamoDB returns any unprocessed items, you should retry the batch operation on those items. However, AWS strongly recommends that you use an exponential backoff algorithm. If you retry the batch operation immediately, the underlying read or write requests can still fail due to throttling on the individual tables. If you delay the batch operation using exponential backoff, the individual requests in the batch are much more likely to succeed.
The following code example shows how to write a batch of DynamoDB items.
def write_batch(self, forums):
        """
        Fills an Amazon DynamoDB table with the specified data, using the Boto3
        Table.batch_writer() function to put the items in the table.
        Inside the context manager, Table.batch_writer builds a list of
        requests. On exiting the context manager, Table.batch_writer starts sending
        batches of write requests to Amazon DynamoDB and automatically
        handles chunking, buffering, and retrying.

        :param forums: The data to put in the table. Each item must contain at least
                       the keys required by the schema that was specified when the
                       table was created.
        """
        try:
            with self.table.batch_writer() as writer:
                for forum in forums:
                    writer.put_item(Item=forum)
        except ClientError as err:
            logger.error(
                "Couldn't load data into table %s. Here's why: %s: %s", self.table.name,
                err.response['Error']['Code'], err.response['Error']['Message'])
            raise
Call function to write data to DynamoDB as below
#Load data into the created table
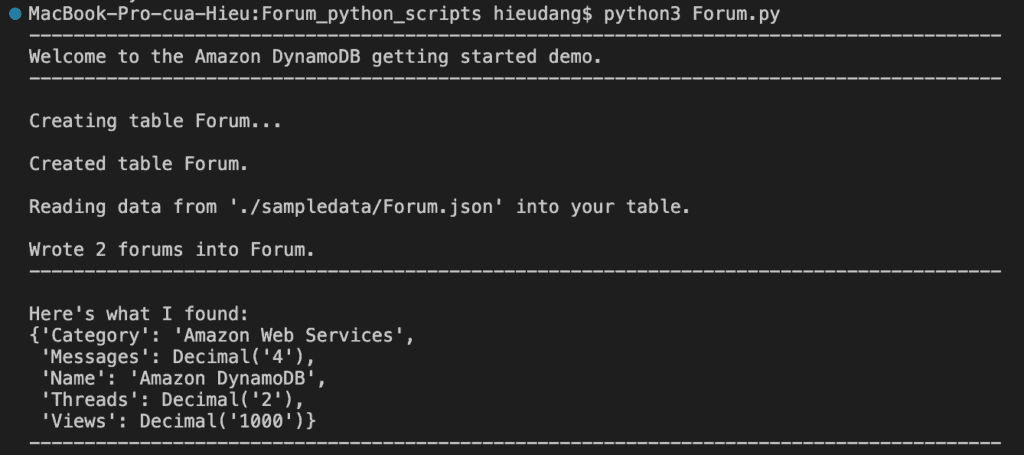
forum_data = forums.get_sample_forum_data(forum_file_name)
print(f"\nReading data from '{forum_file_name}' into your table.")
forums.write_batch(forum_data)
print(f"\nWrote {len(forum_data)} forums into {forums.table.name}.")
print('-'*88)
This command returns the following result.
Read Item
The GetItem operation returns a set of attributes for the item with the given primary key. If there is no matching item, GetItem do not return any data and there will be no Item element in the response.
GetItem provides an eventually consistent read by default. If your application requires a strongly consistent read, set ConsistentRead to true
The following code example shows how to get an item from a DynamoDB table.
    def get_forum(self, name):
        """
        Gets forum data from the table for a specific forum.

        :param name: The name of the forum.
        :return: The data about the requested forum.
        """
        try:
            response = self.table.get_item(Key={'Name': name})
        except ClientError as err:
            logger.error(
                "Couldn't get forum %s from table %s. Here's why: %s: %s",
                name, self.table.name,
                err.response['Error']['Code'], err.response['Error']['Message'])
            raise
        else:
            return response['Item']
Call function to get data items from DynamoDB as below
    #Get forum data with hash key = 'Amazon DynamoDB'
    forum = forums.get_forum("Amazon DynamoDB")
    print("\nHere's what I found:")
    pprint(forum)
    print('-'*88)
This command returns the following result.
Add new item
Creates a new item, or replaces an old item with a new item. If an item that has the same primary key as the new item already exists in the specified table, the new item completely replaces the existing item. You can perform a conditional put operation (add a new item if one with the specified primary key doesn’t exist), or replace an existing item if it has certain attribute values. You can return the item’s attribute values in the same operation, using the ReturnValuesparameter.
The following code example shows how to put an item in a DynamoDB table.
    def add_forum(self, name, category, messages, threads, views):
        """
        Adds a forum to the table.

        :param name: The name of the forum.
        :param category: The category of the forum.
        :param messages: The messages of the forum.
        :param threads: The quality threads of the forum.
        :param views: The quality views of the forum.
        """
        try:
            self.table.put_item(
                Item={
                    'Name': name,
                    'Category': category,
                    'Messages': messages,
                    'Threads': threads,
                    'Views': views
                    })
        except ClientError as err:
            logger.error(
                "Couldn't add forum %s to table %s. Here's why: %s: %s",
                name, self.table.name,
                err.response['Error']['Code'], err.response['Error']['Message'])
            raise
Call function to add item from DynamoDB as below
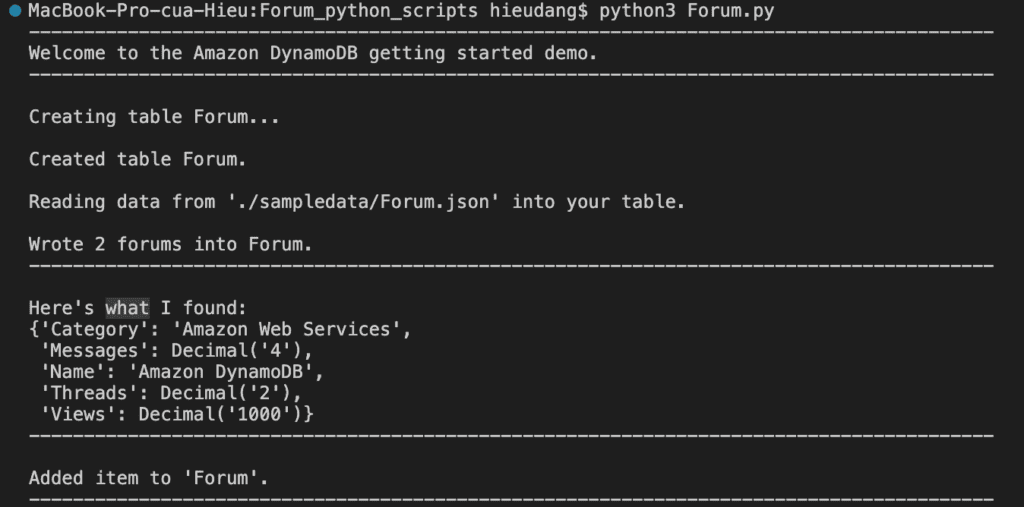
    #Add new forum data with hash key = 'SQL server'
    forums.add_forum("SQL server","Amazon Web Services",4,2,1000)
    print(f"\nAdded item to '{forums.table.name}'.")
    print('-'*88)
This command returns the following result.
Full scan table
The Scan operation returns one or more items and item attributes by accessing every item in a table or a secondary index. To have DynamoDB return fewer items, you can provide an FilterExpression operation.
If the total size of scanned items exceeds the maximum dataset size limit of 1 MB, the scan completes and results are returned to the user. The LastEvaluatedKey value is also returned and the requestor can use the LastEvaluatedKey to continue the scan in a subsequent operation.
The following code example shows how to scan a DynamoDB table.
   def scan_forums(self):
        """
        Scans for forums.

        :param n/a
        :return: The list of forums.
        """
        forums = []
        scan_kwargs = {}
        try:
            done = False
            start_key = None
            while not done:
                if start_key:
                    scan_kwargs['ExclusiveStartKey'] = start_key
                response = self.table.scan(**scan_kwargs)
                forums.extend(response.get('Items', []))
                start_key = response.get('LastEvaluatedKey', None)
                done = start_key is None
        except ClientError as err:
            logger.error(
                "Couldn't scan for forums. Here's why: %s: %s",
                err.response['Error']['Code'], err.response['Error']['Message'])
            raise

        return forums
Call function to scan items from DynamoDB as below
    #Full scan table
    releases = forums.scan_forums()
    if releases:
        print(f"\nHere are your {len(releases)} forums:\n")
        pprint(releases)
    else:
        print(f"I don't know about any forums released\n")
    print('-'*88)
This command boto3 dynamodb scan returns the following result.
Update item
Edits an existing item’s attributes, or adds a new item to the table if it does not already exist. We can put, delete, or add attribute values. We can also perform a conditional update on an existing item (insert a new attribute name-value pair if it doesn’t exist, or replace an existing name-value pair if it has certain expected attribute values).
We can also return the item’s attribute values in the same UpdateItem operation using the ReturnValues parameter.
The following code example shows how to update an item in a DynamoDB table.
    def update_forum(self, name, category, messages, threads, views):
        """
        Updates rating and plot data for a forum in the table.

        :param name: The name of the forum.
        :param category: The category of the forum.
        :param messages: The messages of the forum.
        :param threads: The quality threads of the forum.
        :param views: The quality views of the forum.
        :return: The fields that were updated, with their new values.
        """
        try:
            response = self.table.update_item(
                Key={'Name': name},
                UpdateExpression="set Category=:c, Messages=:m, Threads=:t, #Views=:v",
                ExpressionAttributeValues={
                    ':c': category,
                    ':m': messages,
                    ':t': threads,
                    ':v': views
                    },
                ExpressionAttributeNames={"#Views" : "Views"},
                ReturnValues="UPDATED_NEW")
        except ClientError as err:
            logger.error(
                "Couldn't update forum %s in table %s. Here's why: %s: %s",
                name, self.table.name,
                err.response['Error']['Code'], err.response['Error']['Message'])
            raise
        else:
            return response['Attributes']
Call function to update an item of DynamoDB as below
#Update data: update forum quality views from 1000 to 2000
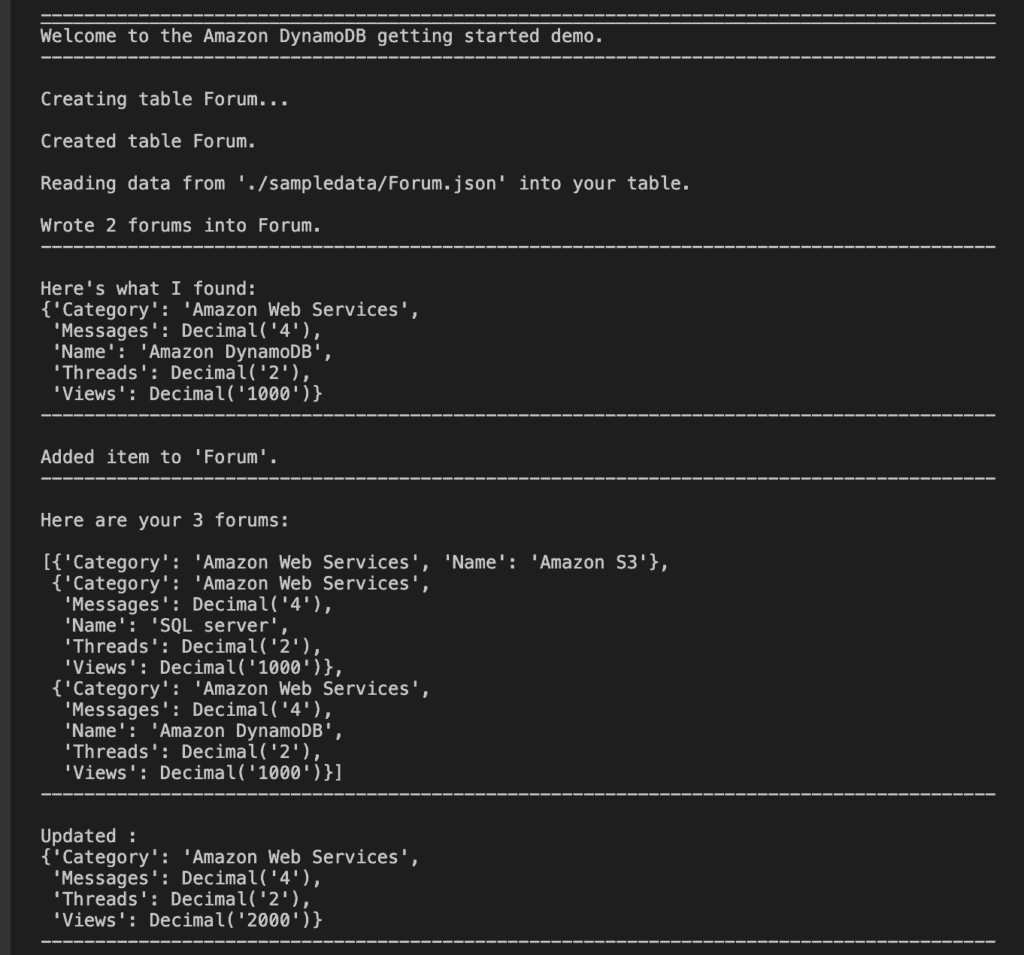
updated = forums.update_forum("SQL server","Amazon Web Services",4,2,2000)
print(f"\nUpdated :")
pprint(updated)
print('-'*88)
This command returns the following result.
Delete item
Deletes a single item in a table by primary key. You can perform a conditional delete operation that deletes the item if it exists, or if it has an expected attribute value.
In addition to deleting an item, you can also return the item’s attribute values in the same operation, using the ReturnValues parameter.
Unless you specify conditions, the DeleteItem is an idempotent operation; running it multiple times on the same item or attribute does not result in an error response.
The following code example shows how to delete an item from a DynamoDB table.
    def delete_forum(self, name):
        """
        Deletes a forum from the table.

        :param name: The title of the forum to delete.
        """
        try:
            self.table.delete_item(Key={'Name': name})
        except ClientError as err:
            logger.error(
                "Couldn't delete forum %s. Here's why: %s: %s", name,
                err.response['Error']['Code'], err.response['Error']['Message'])
            raise
Call function to delete the item of DynamoDB as below
#Delete data
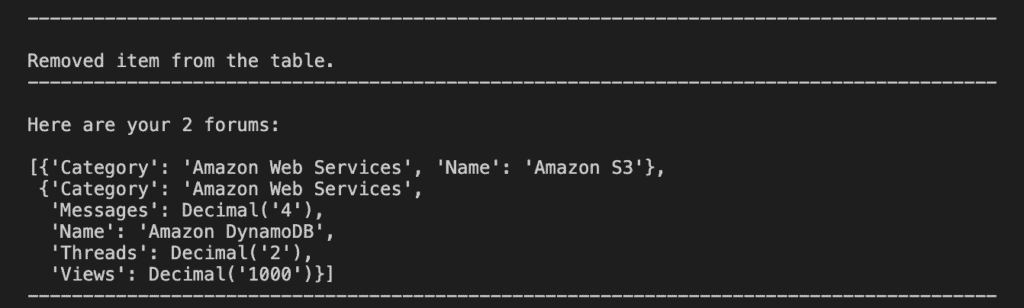
forums.delete_forum("SQL server")
print(f"\nRemoved item from the table.")
print('-'*88)
##Full scan table
releases = forums.scan_forums()
if releases:
print(f"\nHere are your {len(releases)} forums:\n")
pprint(releases)
else:
print(f"I don't know about any forums released\n")
print('-'*88)
This command returns the following result.
List all table
Returns an array of table names associated with the current account and endpoint. The output from ListTables is paginated, with each page returning a maximum of 100 table names default.
The following code example shows how to list DynamoDB tables.
    #List all table
    print('-'*88)
    print(f"Table list:\n")
    print(list(dynamodb.tables.all()))
This command returns the following result.
Delete table
Deletes a single item in a table by primary key. You can perform a conditional delete operation that deletes the item if it exists, or if it has an expected attribute value.
In addition to deleting an item, you can also return the item’s attribute values in the same operation, using the ReturnValues parameter.
Unless you specify conditions, the DeleteItem is an idempotent operation; running it multiple times on the same item or attribute does not result in an error response.
The following code example shows how to delete an item from a DynamoDB table.
These steps provide an example CRUD Operations using Boto3 DynamoDB. The specific configuration details may vary depending on your environment and setup. It’s recommended to consult the relevant documentation from AWS for detailed instructions on setting up. I hope this will your helpful. Thank you for reading the DevopsRoles page!
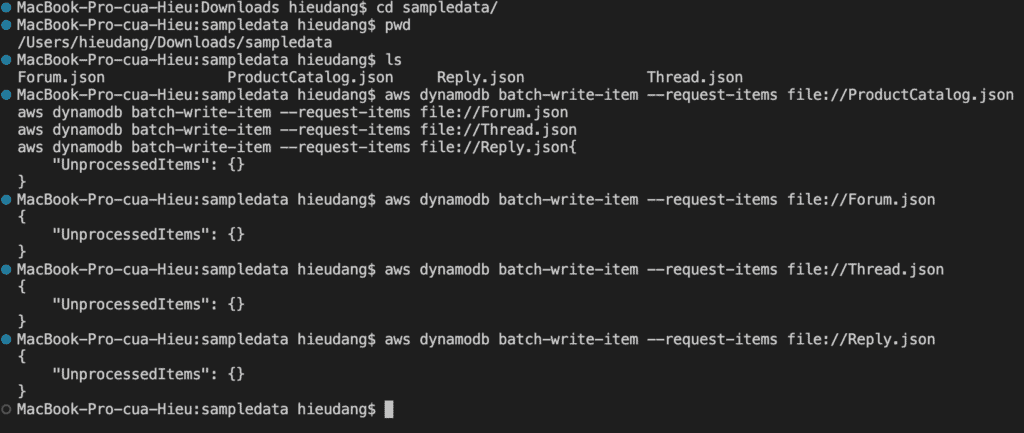
This command returns the following result. After each data load, you should get this message saying that there were no Unprocessed Items
DynamoDB table scan CLI command
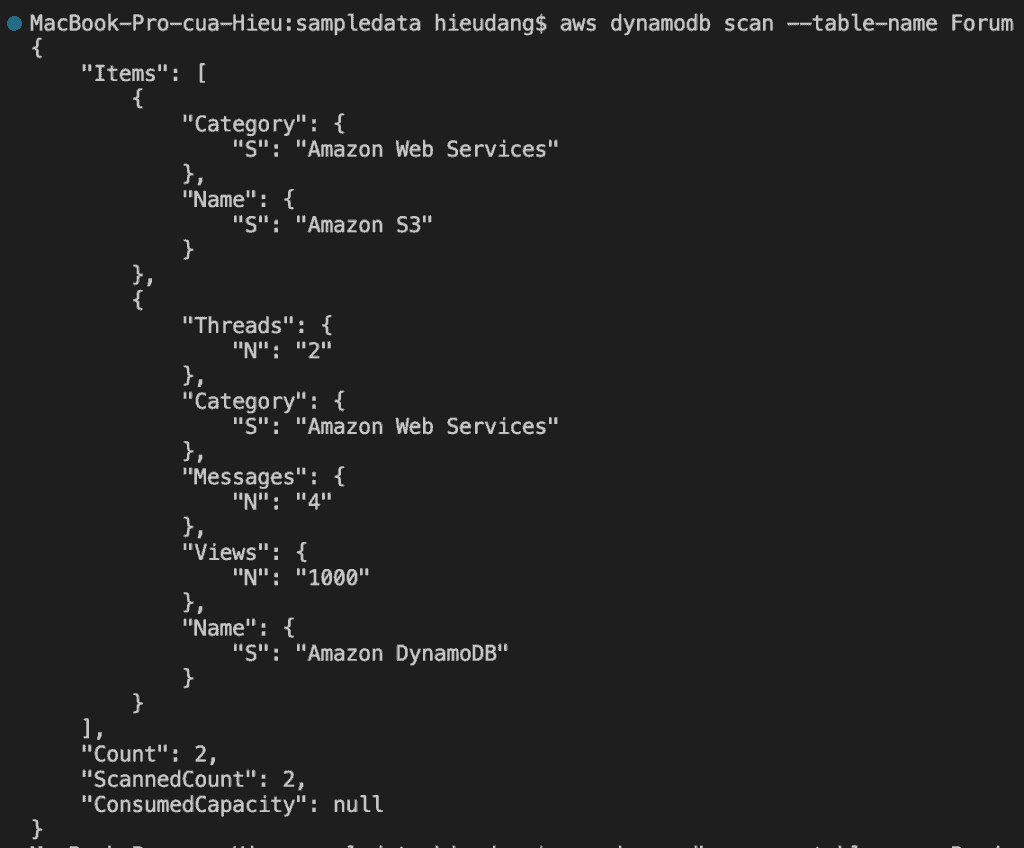
The scan will do a full table scan and return the items in 1MB chunks. Scanning is the slowest and most expensive way to get data out of DynamoDB. Try running a scan on the DynamoDB table
aws dynamodb scan --table-name Forum
This command returns the following result.
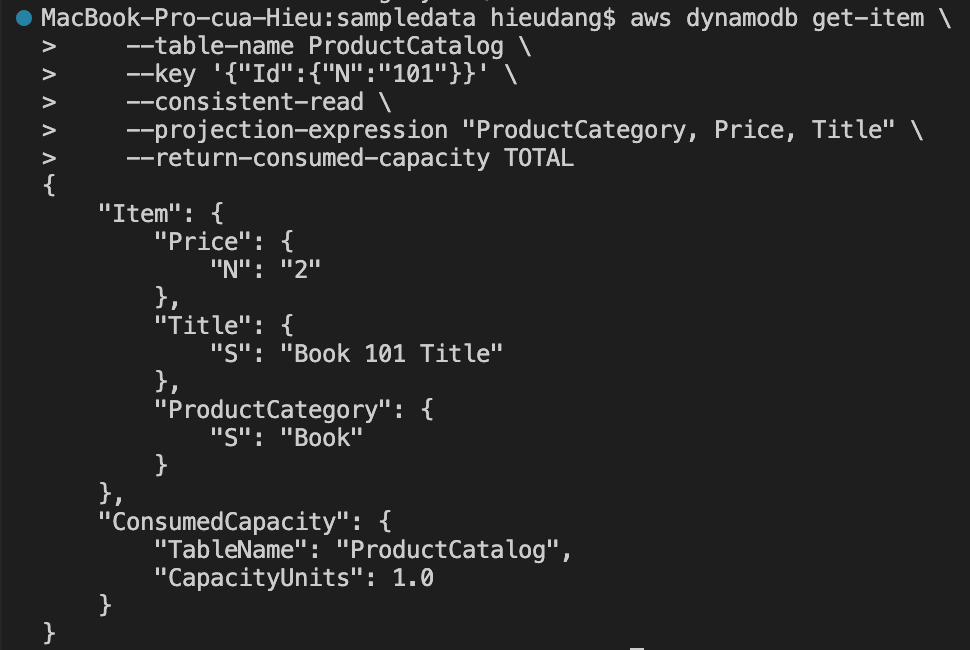
Read data from a DynamoDB table with the CLI command
GetItem is the fastest and cheapest way to get data out of DynamoDB as you must specify the full Primary Key so the command is guaranteed to match at most one item in the table.
The default behavior for DynamoDB is eventually consistent reads.
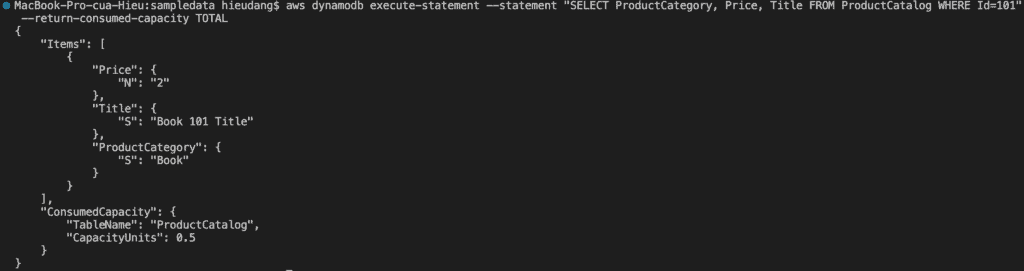
The following AWS CLI example reads an item from the ProductCatalog
Performing this request consume 1.0 RCU, because this item is less than 4KB. If we run the command again but remove the –consistent-read option, this command returns the following result.
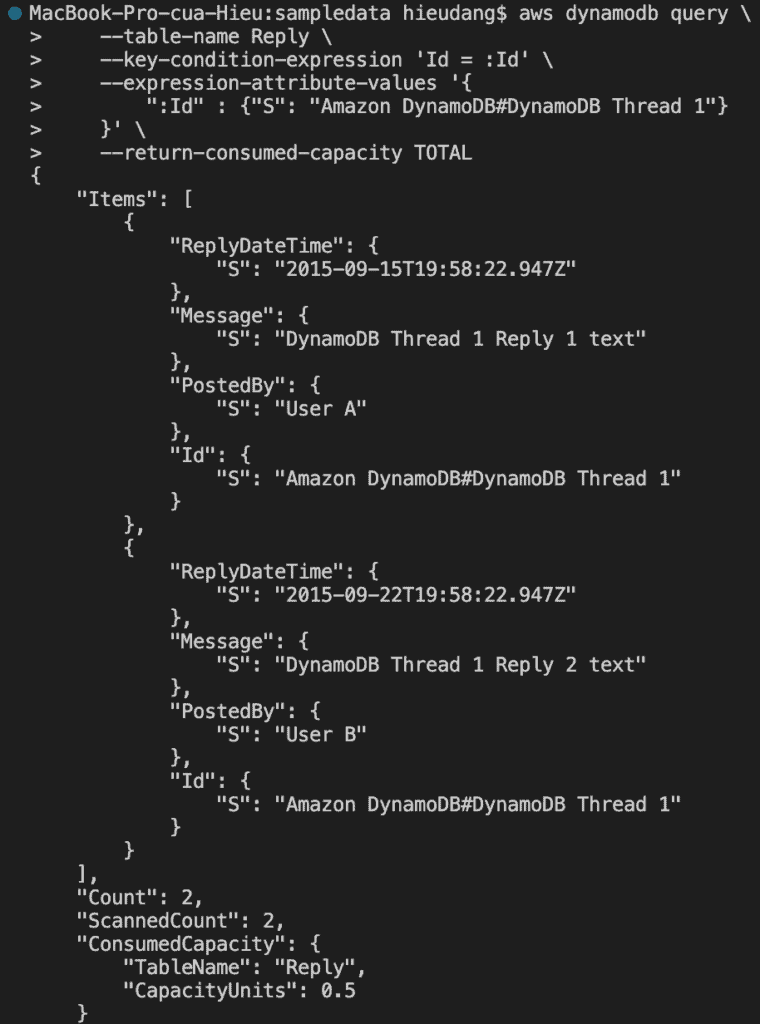
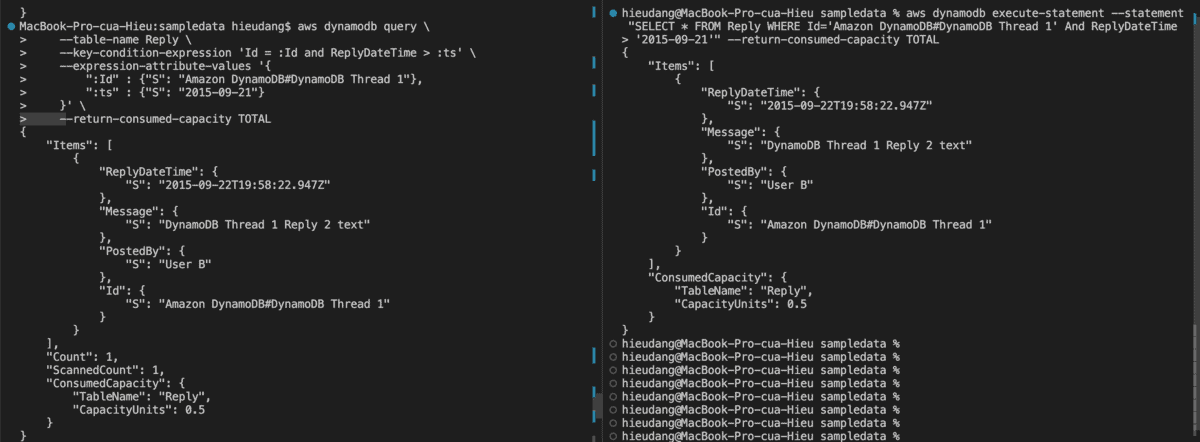
aws dynamodb execute-statement --statement "SELECT * FROM Reply WHERE Id='Amazon DynamoDB#DynamoDB Thread 1' And ReplyDateTime > '2015-09-21'" --return-consumed-capacity TOTAL
With Id is Primary Key and ReplyDateTime is Sort Key
If you want to limit results based on non-key attributes, we can use Filter Expressions
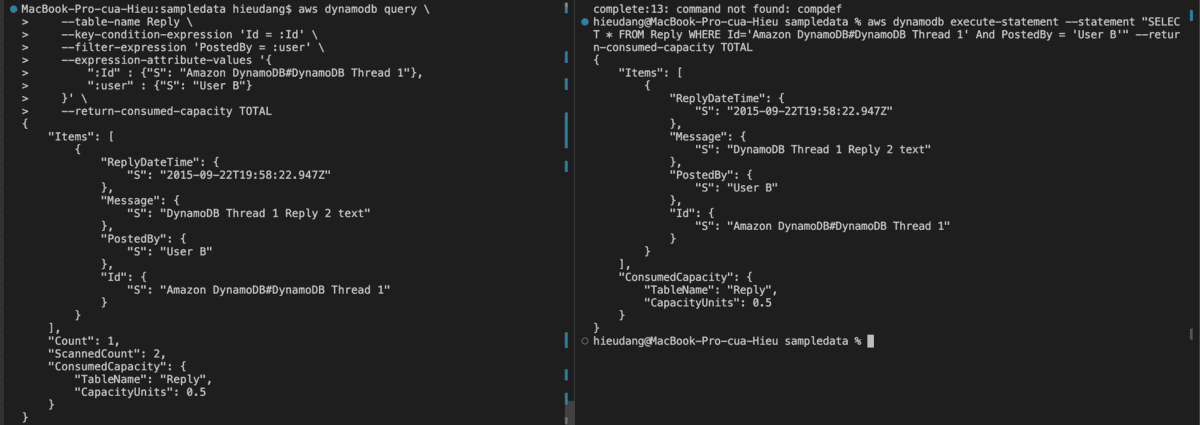
aws dynamodb execute-statement --statement "SELECT * FROM Reply WHERE Id='Amazon DynamoDB#DynamoDB Thread 1' And PostedBy = 'User B'" --return-consumed-capacity TOTAL
With PostedBy attributes at the filter-expression option, this command returns the following result.
DynamoDB table Query and Sort CLI command
–scan-index-forward : order items in ascending order of the sort key. This would be analogous in SQL to “ORDER BY ReplyDateTime ASC”
–no-scan-index-forward : order items in descending order of the sort key. This would be analogous in SQL to “ORDER BY ReplyDateTime DESC”
aws dynamodb execute-statement --statement "SELECT * FROM Reply WHERE Id='Amazon DynamoDB#DynamoDB Thread 1' ORDER BY ReplyDateTime ASC" --limit 1 --return-consumed-capacity TOTAL
This command returns the following result.
Now let’s try without setting a limit on the number of items
#DynamoDB API
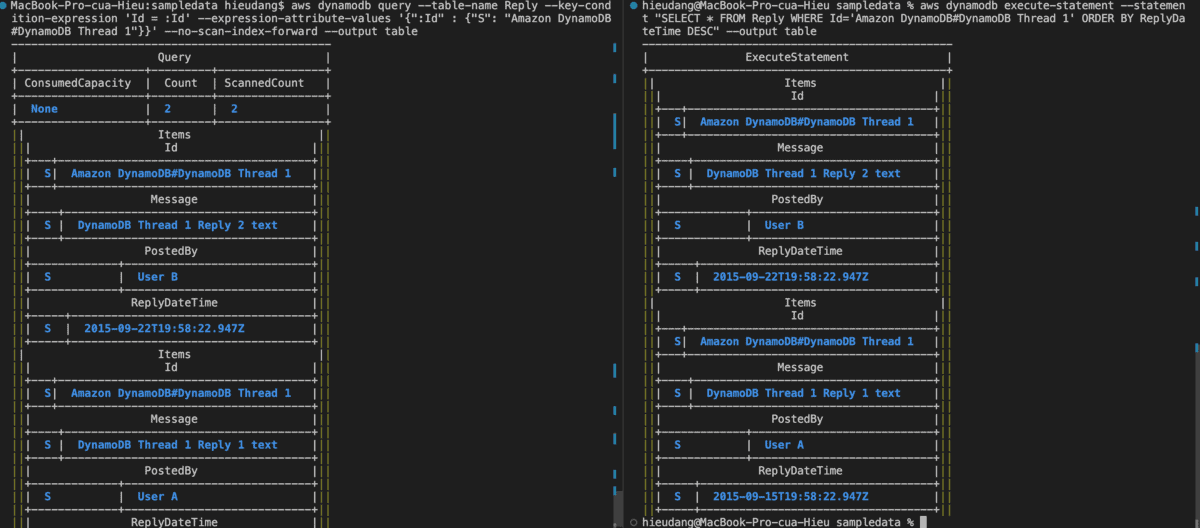
aws dynamodb query --table-name Reply --key-condition-expression 'Id = :Id' --expression-attribute-values '{":Id" : {"S": "Amazon DynamoDB#DynamoDB Thread 1"}}' --no-scan-index-forward --output table
#PartiQL
aws dynamodb execute-statement --statement "SELECT * FROM Reply WHERE Id='Amazon DynamoDB#DynamoDB Thread 1' ORDER BY ReplyDateTime DESC" --output table
This is sorted in descending order by sort key ReplyDateTime.
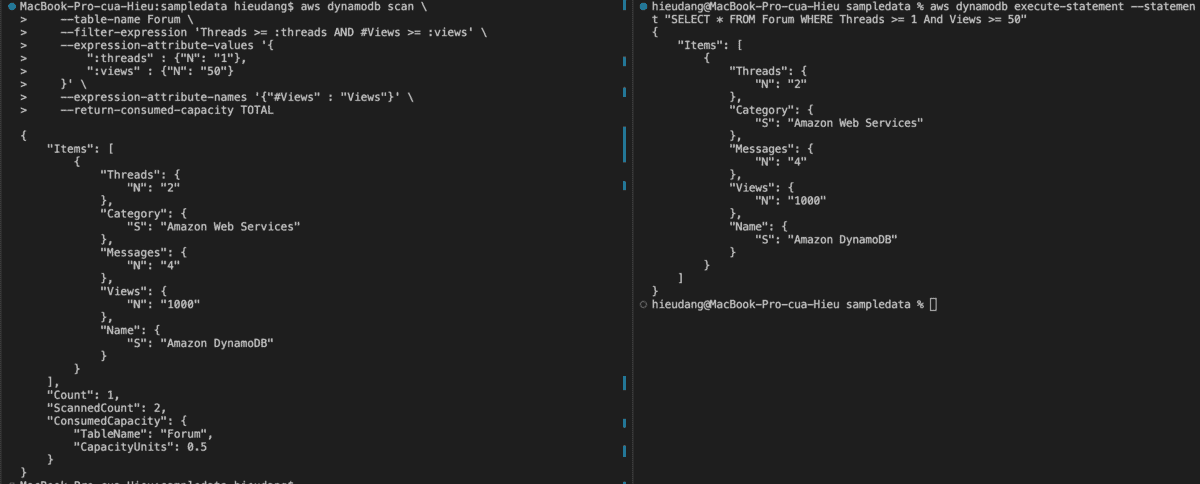
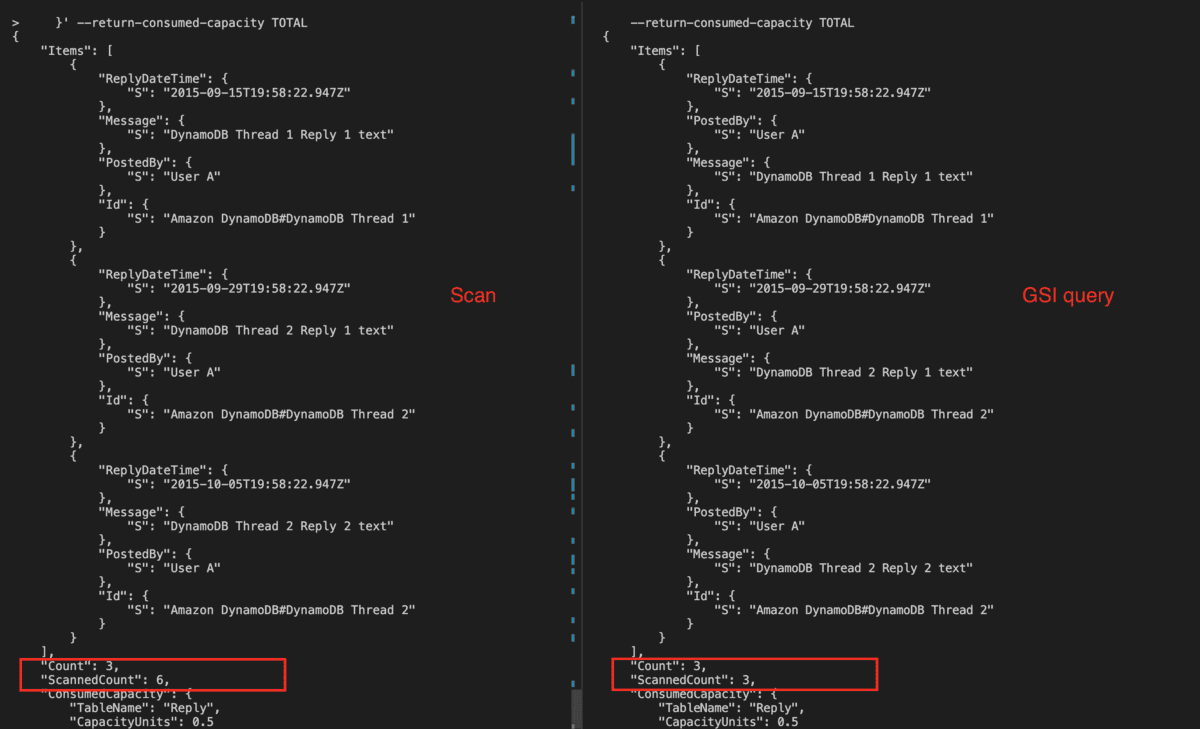
DynamoDB table Scan and filter with CLI command
Scan will do a full table scan, however, we can specify a Filter Expression which will reduce the size of the result set, but it will not reduce the amount of capacity consumed.
#DynamoDB API
aws dynamodb scan \
    --table-name Forum \
    --filter-expression 'Threads >= :threads AND #Views >= :views' \
    --expression-attribute-values '{
        ":threads" : {"N": "1"},
        ":views" : {"N": "50"}
    }' \
    --expression-attribute-names '{"#Views" : "Views"}' \
    --return-consumed-capacity TOTAL
#PartiQL
aws dynamodb execute-statement --statement "SELECT * FROM Forum WHERE Threads >= 1 And Views >= 50"
This command returns the following result.
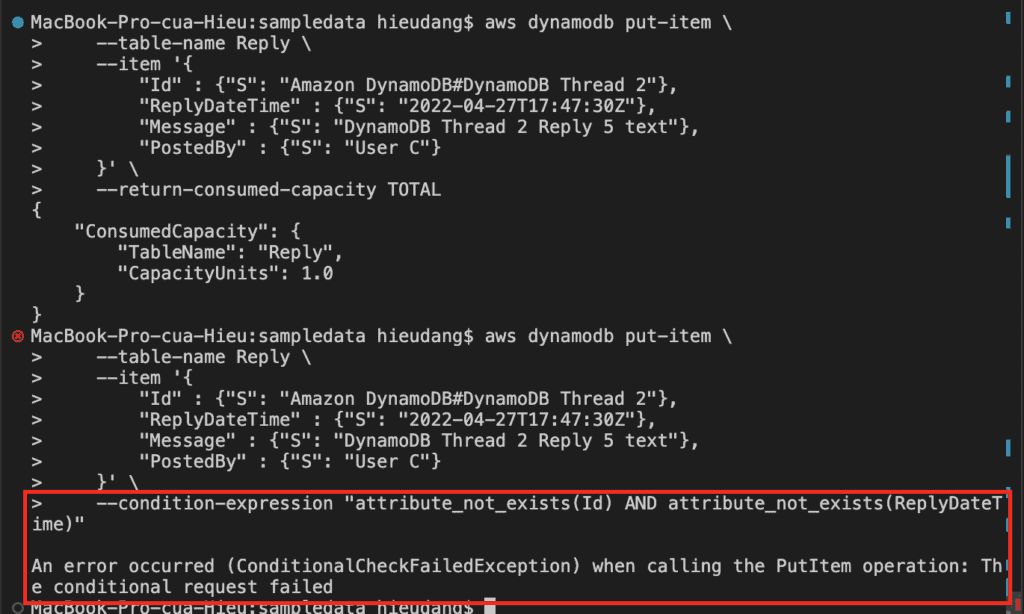
Insert data to DynamoDB table with CLI command
Creates a new item, or replaces an old item with a new item. If an item that has the same primary key as the new item already exists in the specified table, the new item completely replaces the existing item.
With put-item, if an item that has the same primary key as the new item already exists in the specified table, the new item completely replaces the existing item. But with PartiQL, if the table already has an item with the same primary key as the primary key of the item being inserted, DuplicateItemException is returned.
With put-item, to prevent a new item from replacing an existing item, use a conditional expression that contains the attribute_not_exists function with the name of the attribute being used as the partition key for the table.
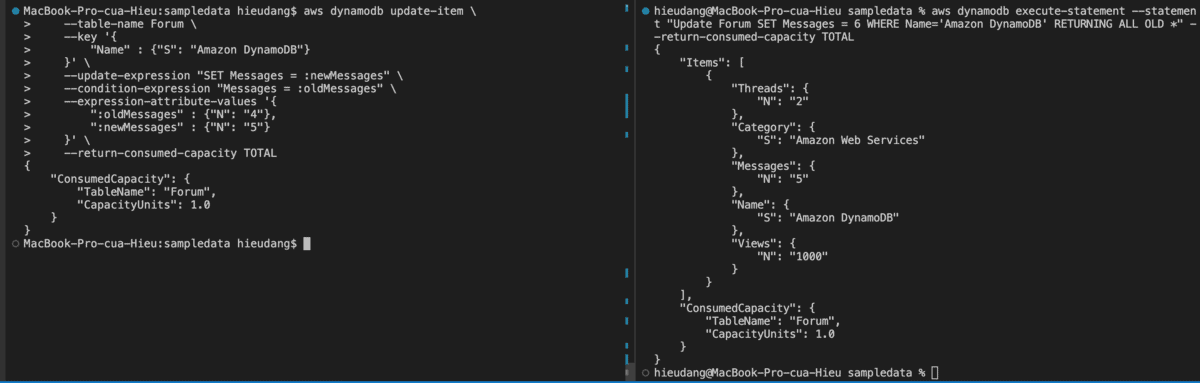
With the update-item command, we can edit an existing item’s attributes, or add a new item to the table if it does not already exist.
#DynamoDB API
aws dynamodb update-item \
    --table-name Forum \
    --key '{
        "Name" : {"S": "Amazon DynamoDB"}
    }' \
    --update-expression "SET Messages = :newMessages" \
    --condition-expression "Messages = :oldMessages" \
    --expression-attribute-values '{
        ":oldMessages" : {"N": "4"},
        ":newMessages" : {"N": "5"}
    }' \
    --return-consumed-capacity TOTAL

#PartiQL(update and show value before update)
aws dynamodb execute-statement --statement "Update Forum SET Messages = 6 WHERE Name='Amazon DynamoDB' RETURNING ALL OLD *" --return-consumed-capacity TOTAL
This command returns the following result.
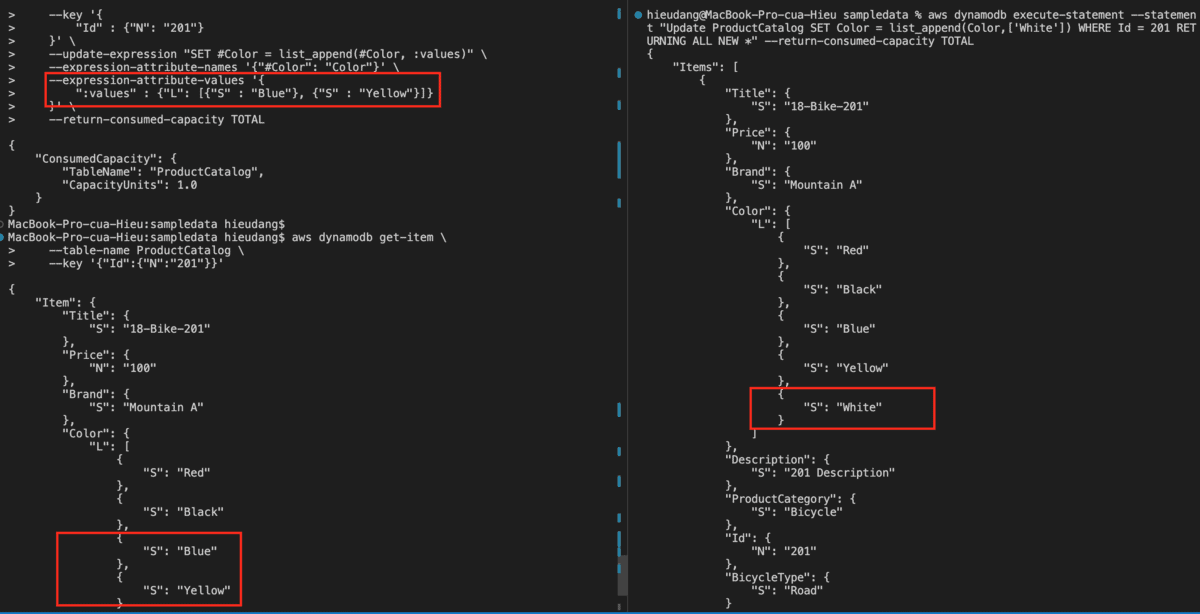
Let’s update the attribute of the type map with the CLI
#DynamoDB API
aws dynamodb update-item \
    --table-name ProductCatalog \
    --key '{
        "Id" : {"N": "201"}
    }' \
    --update-expression "SET #Color = list_append(#Color, :values)" \
    --expression-attribute-names '{"#Color": "Color"}' \
    --expression-attribute-values '{
        ":values" : {"L": [{"S" : "Blue"}, {"S" : "Yellow"}]}
    }' \
    --return-consumed-capacity TOTAL

#PartiQL
aws dynamodb execute-statement --statement "Update ProductCatalog SET Color = list_append(Color,['White']) WHERE Id = 201 RETURNING ALL NEW *" --return-consumed-capacity TOTAL
This command returns the following result.
Delete data of DynamoDB table with CLI command
The delete-item the command is used command to delete an item from the DynamoDB table. Because it won’t report an error if the key doesn’t exist, we can use the delete-item command to confirm the existence of an item before deleting it.
If the DynamoDB table does not have any item with the same primary key as that of the item for which the DELETE is issued, SUCCESS is returned with 0 items deleted. If the table has an item with same primary key, but the condition in the WHERE clause of the DELETE statement evaluates to false, ConditionalCheckFailedException is returned.
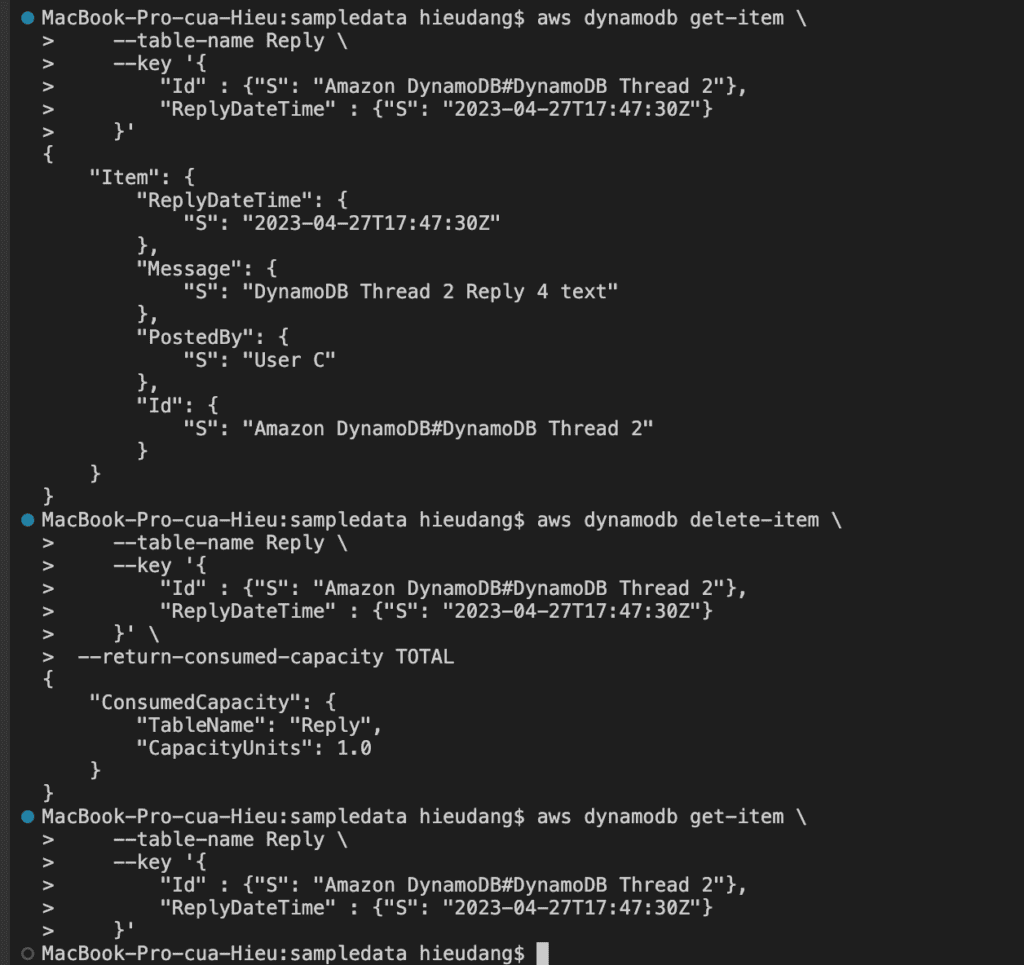
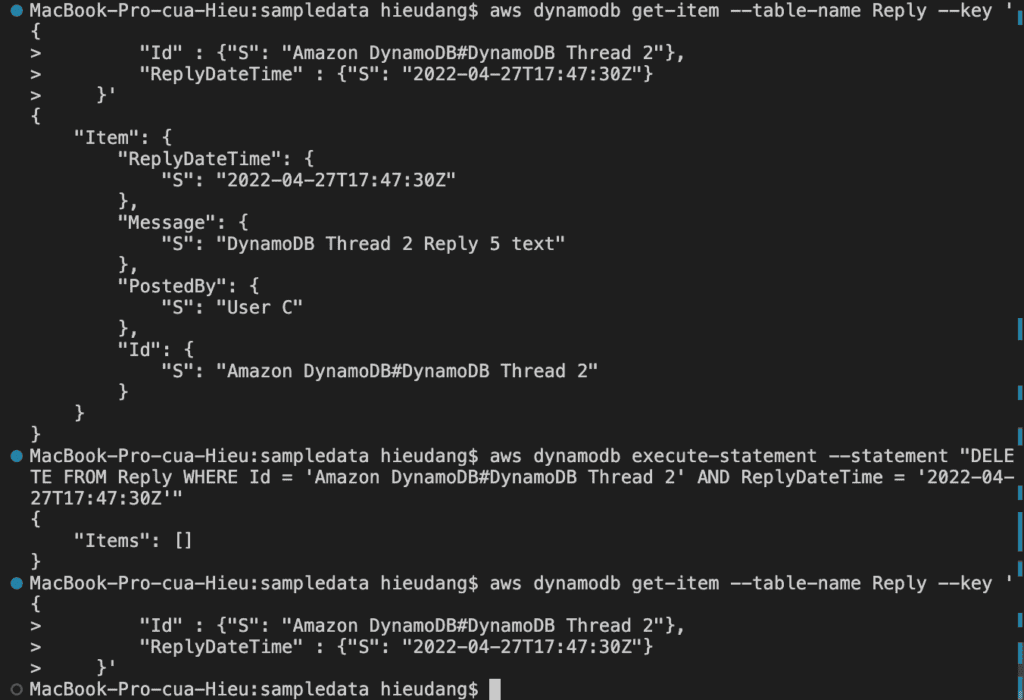
#PartiQL delete
aws dynamodb get-item --table-name Reply --key '{
        "Id" : {"S": "Amazon DynamoDB#DynamoDB Thread 2"},
        "ReplyDateTime" : {"S": "2022-04-27T17:47:30Z"}
    }'
aws dynamodb execute-statement --statement "DELETE FROM Reply WHERE Id = 'Amazon DynamoDB#DynamoDB Thread 2' AND ReplyDateTime = '2022-04-27T17:47:30Z'"
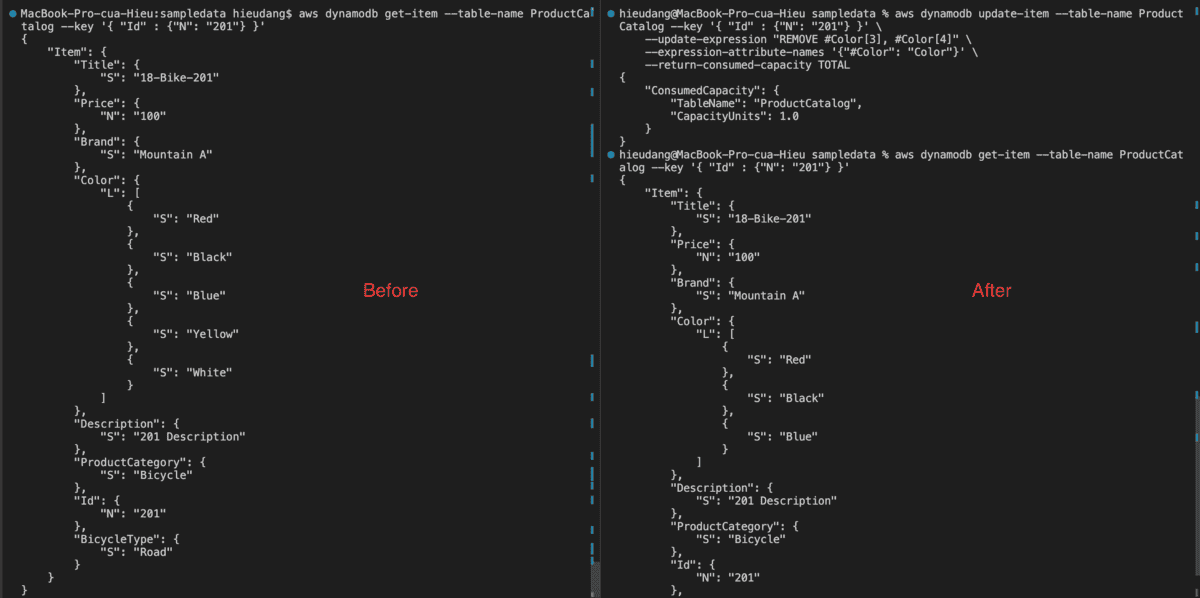
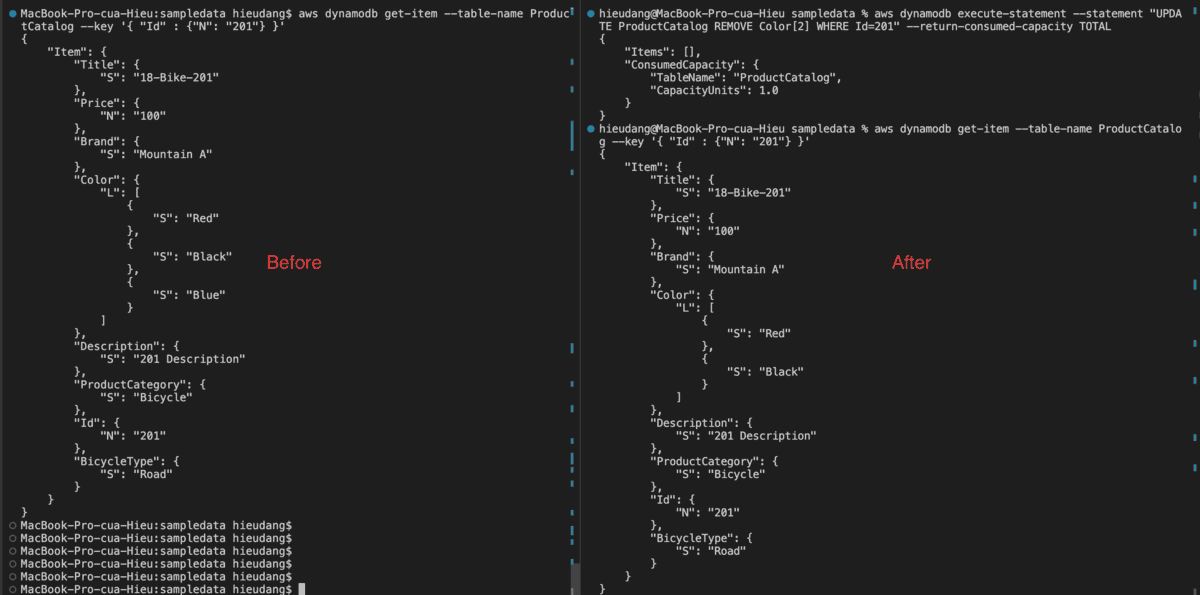
Delete a value from a list type with the CLI command
Delete from a list type use PartiQL update statements
#Confirm
aws dynamodb get-item --table-name ProductCatalog --key '{ "Id" : {"N": "201"} }'

#Delete 'Blue' from Color list
aws dynamodb execute-statement --statement "UPDATE ProductCatalog REMOVE Color[2] WHERE Id=201" --return-consumed-capacity TOTAL
This command returns the following result.
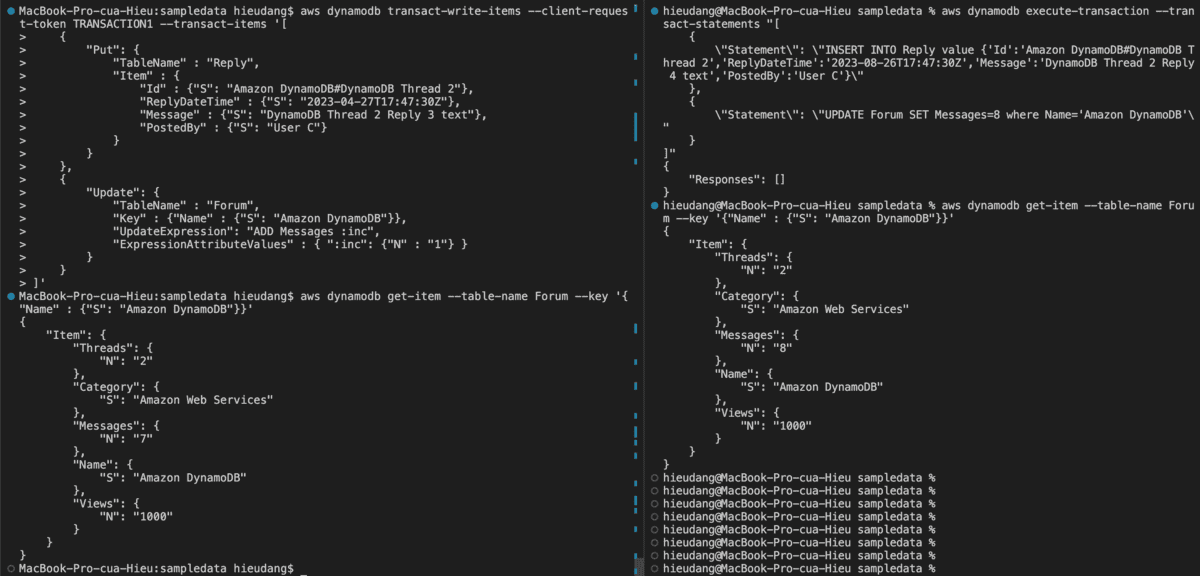
DynamoDB transaction with CLI command
DynamoDB API TransactWriteItems is a synchronous write operation that groups up to 100 action requests. These actions can target items in different tables, but not in different Amazon Web Services accounts or Regions, and no two actions can target the same item. For example, you cannot both ConditionCheck and Update the same item. The aggregate size of the items in the transaction cannot exceed 4 MB.
The following example runs multiple statements as a transaction.
PartiQL allows you to save your JSON code to a file and pass it to the –transact-statements parameter. Alternatively, you can enter it directly on the command line.
This command returns the following result.
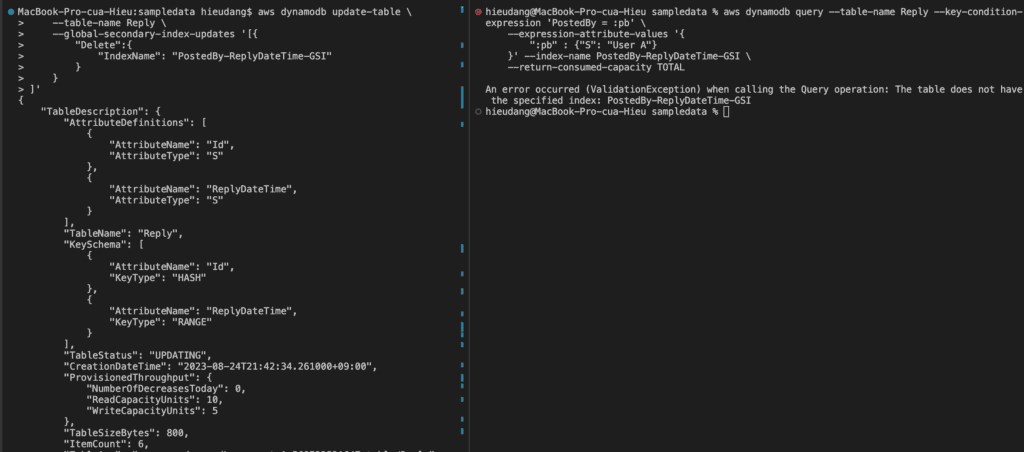
Using the Global Secondary Index
To speed up queries on non-key attributes, you can create a global secondary index. A global secondary index contains a selection of attributes from the base table, but they are organized by a primary key that is different from that of the table.
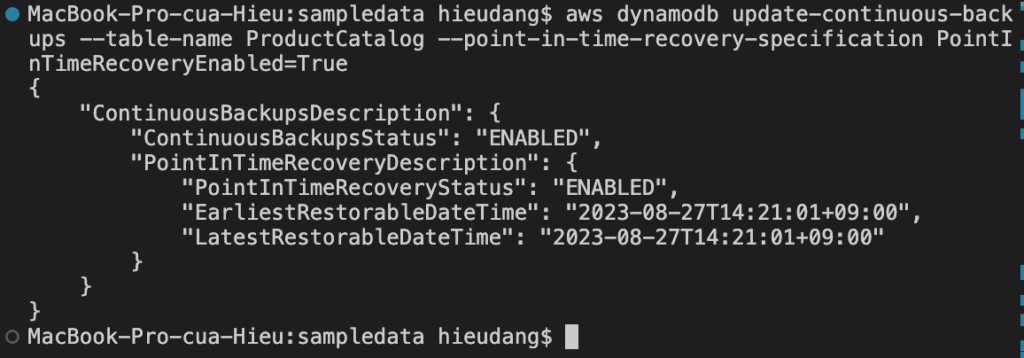
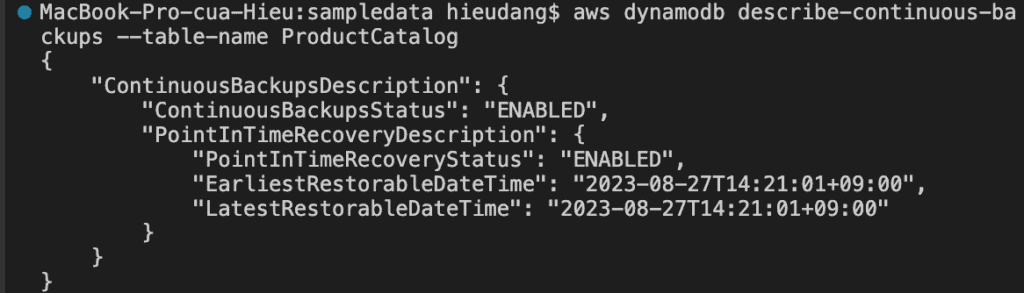
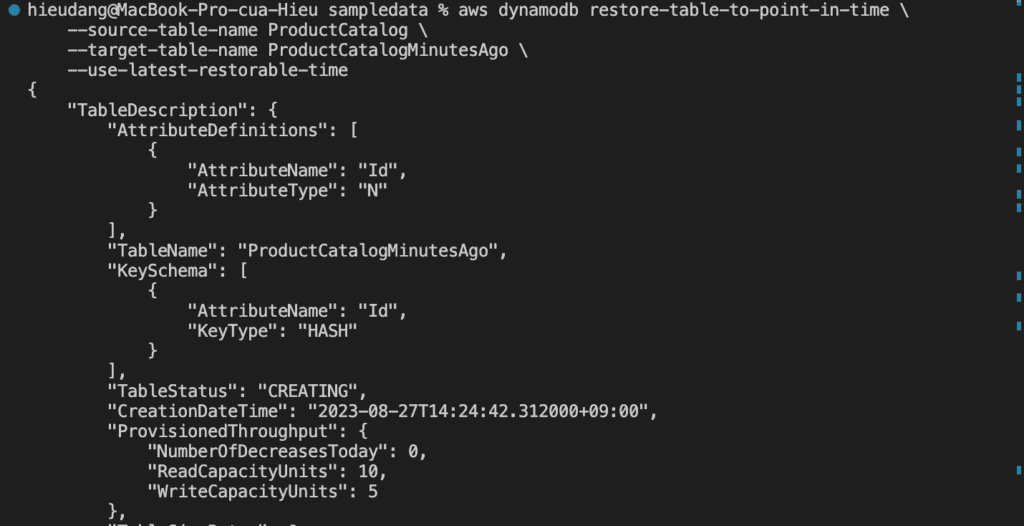
Restore the table to a point in time. In this case, the ProductCatalog table is restored to the LatestRestorableDateTime (~5 minutes ago) to the same AWS Region.
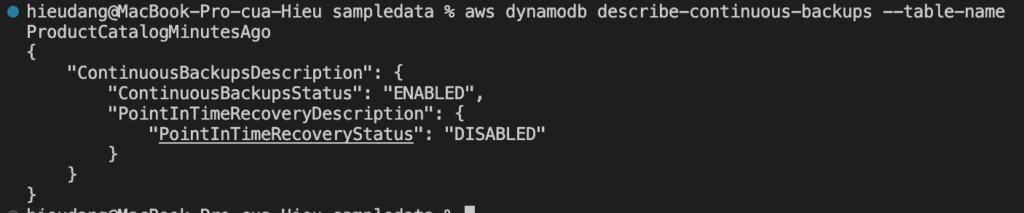
We must manually set the following on the restored table:
Auto scaling policies
AWS Identity and Access Management (IAM) policies
Amazon CloudWatch metrics and alarms
Tags
Stream settings
Time to Live (TTL) settings
Point-in-time recovery settings
Delete Amazon DynamoDB table CLI command
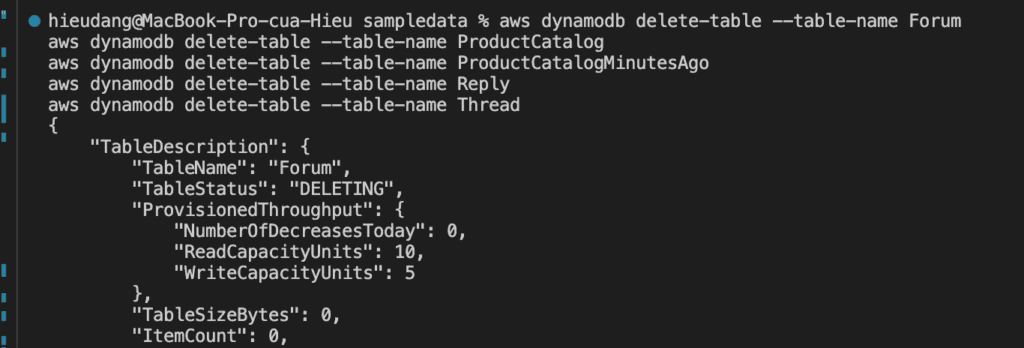
The delete-table operation deletes a table and all of its items, any indexes on that table are also deleted. If you have DynamoDB Streams enabled on the table, then the corresponding stream on that table goes into the DISABLED state and the stream is automatically deleted after 24 hours.
aws dynamodb delete-table --table-name Forum
We can use the describe-table action to check the status of the table.
Conclusion
These steps provide a general AWS CLI (DynamoDB API and PartiQL for DynamoDB) of the process to manage DynamoDB. The specific configuration details may vary depending on your environment and setup. It’s recommended to consult the relevant documentation from AWS for detailed instructions on setting up. I hope will this be helpful. Thank you for reading the DevopsRoles page!
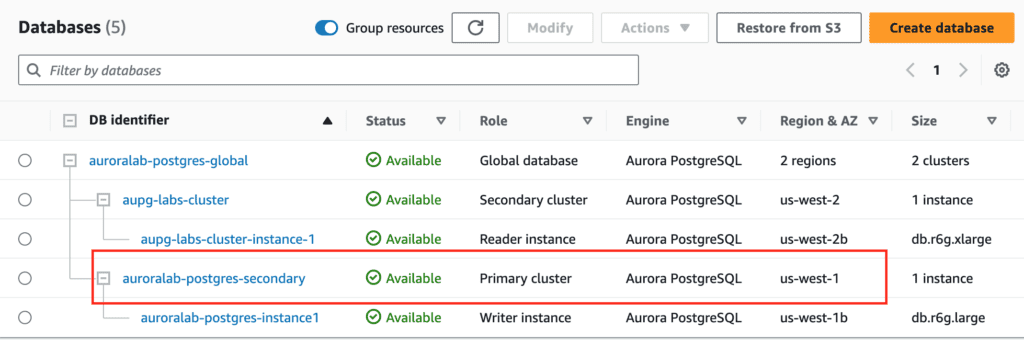
You can use the AWS Console Manager to manage the Aurora PostgreSQL global database, alternatively, you can manage the Aurora PostgreSQL global database using the AWS CLI in Linux(AWS Cloud9 for my lab) as below.
Guide to creating and managing the Aurora PostgreSQL global database using the AWS CLI.
This lab contains the following tasks
Create Aurora Postgresql global database from a Regional cluster using AWS CLI
Add reader instances in the Secondary Aurora DB cluster using AWS CLI
Perform a Managed Planned Failover to the secondary region using AWS CLI
Detaches an Aurora secondary cluster from an Aurora global database cluster using AWS CLI
Prerequisites
For this walkthrough, you should have the following prerequisites configured:
Amazon Aurora PostgreSQL cluster in a single region
AWS CLI environment deployed
Cluster Parameter Group Name, VPC Security Group, and DB Subnet Group were deployed into the primary region and the secondary region
Detail Steps
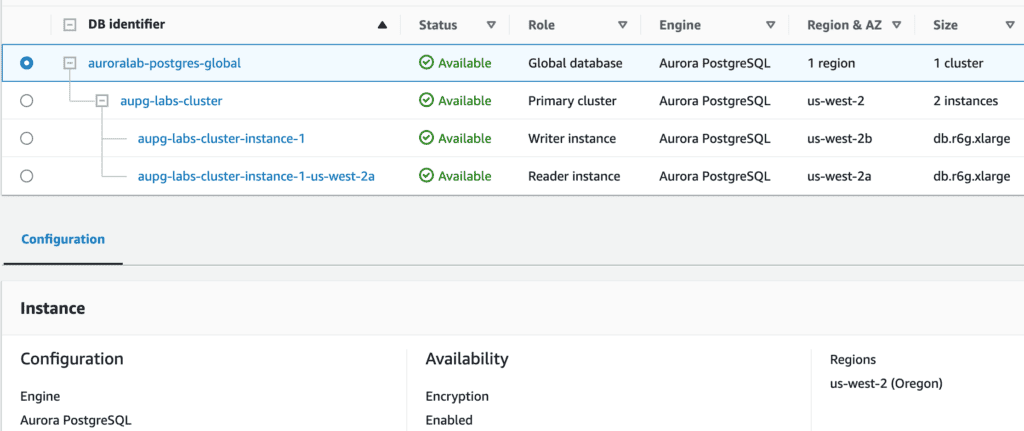
Create Aurora Postgresql global database from a Regional cluster using AWS CLI
On the primary AWS Region, execute the below code using AWS CLI
# Get current cluster ARN
CLUSTER_ID=`aws rds describe-db-clusters --db-cluster-identifier aupg-labs-cluster --query 'DBClusters[*].DBClusterArn' | jq -r '.[0]'`

# convert the Aurora Provisioned cluster to global
aws rds create-global-cluster  --global-cluster-identifier auroralab-postgres-global --source-db-cluster-identifier $CLUSTER_ID
This operation will take 2-5 minutes to complete.
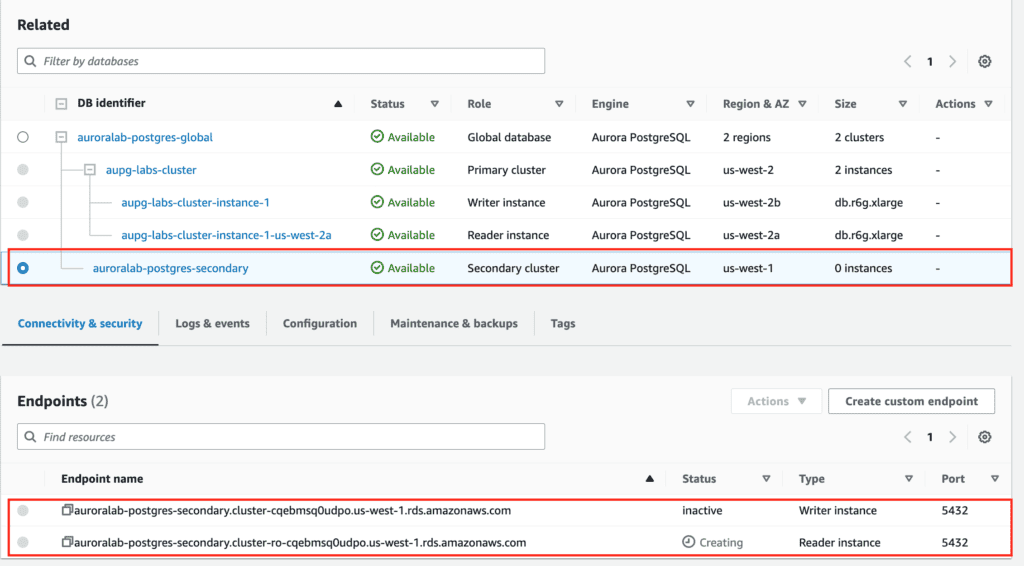
In the next step, perform the following actions using AWS CLI to add a secondary region.
# obtain KeyID of the KMS key in the secondary region
aws kms describe-key --key-id alias/aws/rds --region us-west-1 --query 'KeyMetadata.KeyId'

# create the secondary cluster
aws rds --region us-east-1 \
  create-db-cluster \
     --db-cluster-identifier auroralab-postgres-secondary \
     --global-cluster-identifier auroralab-postgres-global \
     --engine aurora-postgresql \
     --kms-key-id d71e19d3-24a3-48cb-9e7f-10fbd28ef271 \
     --engine-version 15.3 \
     --db-cluster-parameter-group-name rds-apgcustomclusterparamgroup \
     --db-subnet-group-name aupg-labs-db-subnet-group \
     --vpc-security-group-ids sg-0cdcd29e64fd436c6 \
     --backup-retention-period 7 --region us-west-1
This operation will take 5-10 minutes to complete.
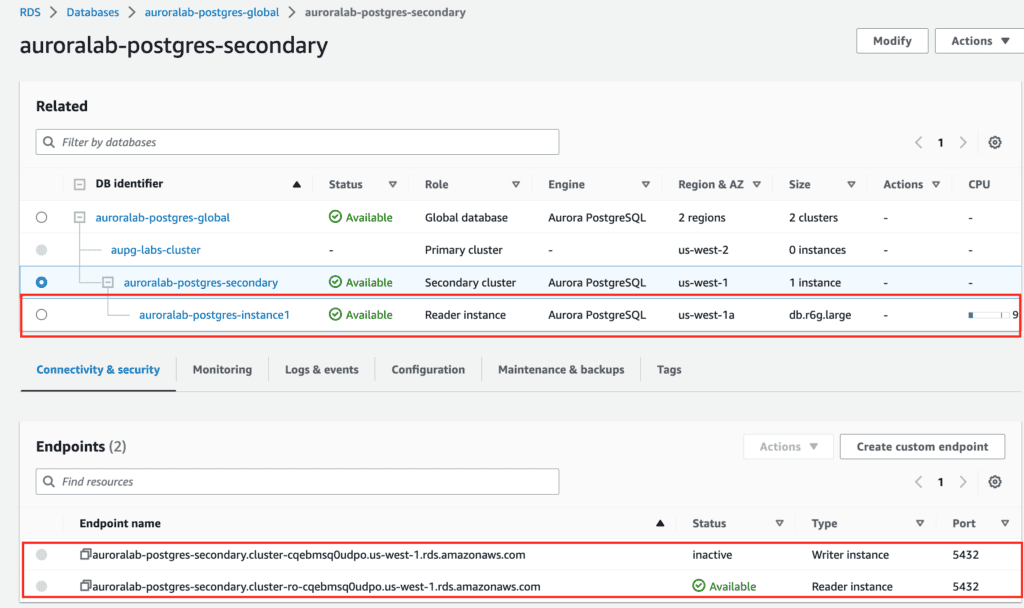
Add reader instances in the Secondary Aurora DB cluster using AWS CLI
This operation will take 5-10 minutes to complete.
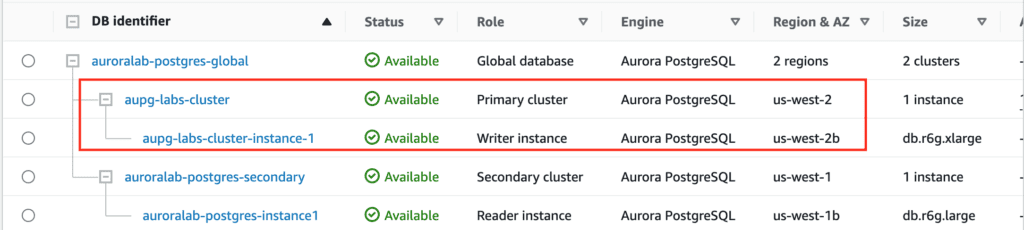
Perform a Managed Planned Failover to the secondary region using AWS CLI
This method is recommended for disaster recovery. When you use this method, Aurora automatically adds back the old primary Region to the global database as a secondary Region when it becomes available again. Thus, the original topology of your global cluster is maintained.
This alternative method can be used when managed failover isn’t an option, for example, when your primary and secondary Regions are running incompatible engine versions.
Detaches an Aurora secondary cluster from an Aurora global database cluster using AWS CLI
These steps provide a general AWS CLI of the process of managing the Aurora global Postgresql instance. The specific configuration details may vary depending on your environment and setup. It’s recommended to consult the relevant documentation from AWS for detailed instructions on setting up.
Manage the Aurora PostgreSQL global database
I hope will this be helpful. Thank you for reading the DevopsRoles page!
Docker and Kubernetes are both open-source container platforms that enable the packaging and deployment of applications. We will Unravel the Enigmatic Docker and Kubernetes comparison.
In the realm of modern software deployment, where technology evolves at the speed of light, two names reign supreme: Docker and Kubernetes.
These two technological titans have transformed the landscape of application development, but they often find themselves in the spotlight together, leaving many wondering: what’s the real difference between Docker and Kubernetes? Buckle up as we embark on an illuminating journey through the cosmos of containers and orchestration.
What is Docker: The Art of Containerization
Docker, launched in 2013, is the pioneer in containerization technology. At its core, Docker allows developers to package an application and its dependencies, including libraries and configurations, into a single unit called a container.
Imagine Docker as a master craftsman, wielding tools to sculpt applications into self-contained, portable entities known as containers. Docker empowers developers to encapsulate an application along with its dependencies, libraries, and configurations into a single unit. This container becomes a traveler, capable of seamlessly transitioning between development environments, testing stages, and production servers.
The allure of Docker lies in its promise of consistency. No longer must developers grapple with the frustrating “it works on my machine” dilemma. Docker containers ensure that an application behaves the same way regardless of where it’s run, minimizing compatibility woes and facilitating smoother collaboration among developers.
What is Kubernetes: The Cosmic Choreographer
While Docker handles the creation and management of containers, Kubernetes steps in to manage the orchestration and deployment of these containers at scale. Launched by Google in 2014, Kubernetes provides a powerful solution for automating, scaling, and managing containerized applications.
In this cosmic dance of software deployment, Kubernetes steps onto the stage as a masterful choreographer, orchestrating the movement of containers with finesse and precision. Kubernetes introduces the concept of pods groups of interconnected containers that share network and storage resources. This dynamic entity enables seamless load balancing, ensuring smooth traffic distribution across the dance floor of application deployment.
Yet, Kubernetes offers more than elegant moves. It’s a wizard of automation, capable of dynamically scaling applications based on demand. Like a cosmic conductor, Kubernetes monitors the performance of applications and orchestrates adjustments, ensuring that the performance remains stellar even as the audience and the users grow.
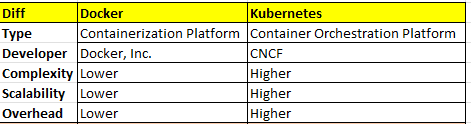
Docker and Kubernetes comparison
Docker vs Kubernetes Pros and cons
Key Differences and Complementary Roles
While Docker and Kubernetes fulfill distinct roles, they synergize seamlessly to offer a holistic solution for containerization and orchestration. Docker excels in crafting portable and uniform containers that encapsulate applications, while Kubernetes steps in to oversee the intricate dance of deploying, scaling, and monitoring these containers.
Consider Docker the cornerstone of containerization, providing the essential building blocks that Kubernetes builds upon. Through Docker, developers elegantly wrap applications and dependencies in containers that maintain their coherence across diverse environments, from the intimate realms of development laptops to the grand stages of production servers.
On the contrasting side of the spectrum, Kubernetes emerges as the maestro of container lifecycle management. Its genius lies in abstracting the complex infrastructure beneath and orchestrating multifaceted tasks load balancing, scaling, mending, and updating with automated grace. As organizations venture into vast container deployments, Kubernetes emerges as the compass, ensuring not only high availability but also the optimal utilization of resources, resulting in a symphony of efficiency.
In conclusion
Docker and Kubernetes, though distinct technologies are interconnected in the world of modern software deployment. Docker empowers developers to create portable and consistent containers, while Kubernetes takes the reins of orchestration, automating the deployment and scaling of those containers. Together, they offer a robust ecosystem for building, deploying, and managing applications in today’s fast-paced and ever-changing technology landscape.
Thank you for reading Docker and Kubernetes comparison. I hope will this your helpful. Thank you for reading the DevopsRoles page!
You can use the AWS Console Manager to manage the RDS PostgreSQL instance, alternatively, you can manage the RDS PostgreSQL instance using the AWS CLI in Linux as below.
Guide to creating and managing the RDS PostgreSQL instance using the AWS CLI.
This lab contains the following tasks
Step 1: Install AWS CLI into the Cloud9 instance
Step 2: Create an RDS PostgreSQL Instance using the AWS CLI
Step 3: Configure the RDS PostgreSQL client on the Cloud9 instance
Step 4: Create Read-replica using the AWS CLI
Step 5: Promote Read Replica into a standalone instance using the AWS CLI
Step 6: Scale up the instance using the AWS CLI
Step 7: Migrating to a Multi-AZ DB cluster using the AWS CLI
Step 8: Promote this Multi-AZ read replica cluster to a stand-alone cluster using the AWS CLI
Step 9: Create a read replica from a Multi-AZ read replica cluster using the AWS CLI
Step 10: Check if the instance is Multi-AZ using the AWS CLI
Step 11: Convert the instance to Multi-AZ using the AWS CLI
Step 12: Create an SNS Topic and an RDS Event Subscription using the AWS CLI
Step 13: Perform failover of a Multi-AZ RDS instance using the AWS CLI
Step 14: View the instance’s backups using the AWS CLI
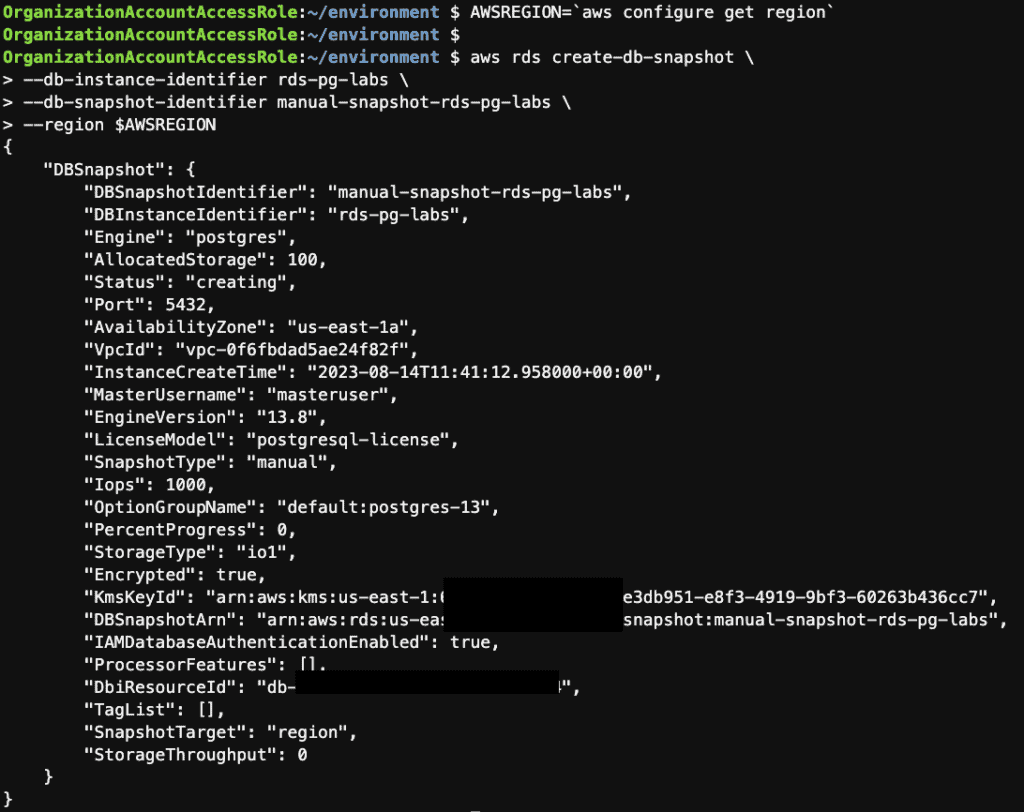
Step 15: Take a manual snapshot of the RDS instance using the AWS CLI
Step 16: Restores an instance from the latest manual snapshot using the AWS CLI
Step 17: Point in time restore the RDS instance using the AWS CLI
Step 18: Delete the RDS instances using the AWS CLI
Step 19: Upgrading the engine version of RDS instances using the AWS CLI
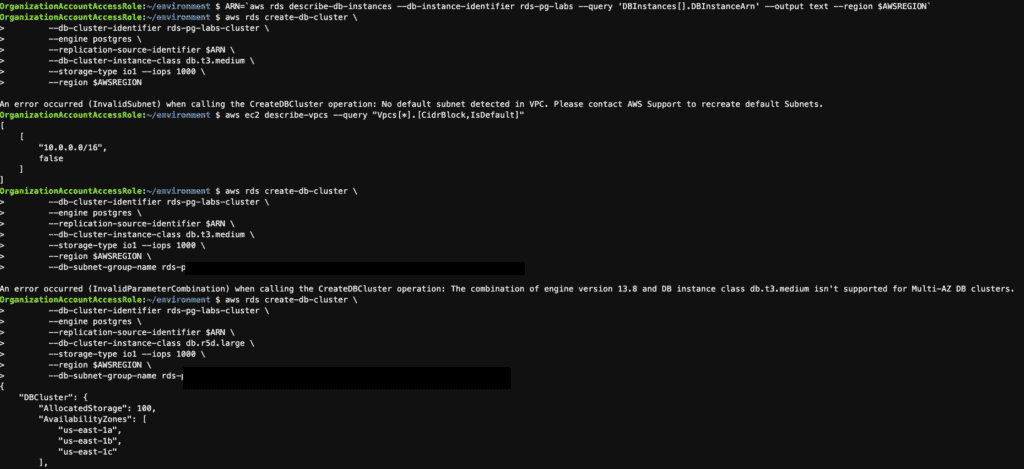
An error occurred (InvalidSubnet) when calling the CreateDBCluster operation: No default subnet was detected in VPC. Please contact AWS Support to recreate the default Subnets.
An error occurred (InvalidParameterCombination) when calling the CreateDBCluster operation: The combination of engine version 13.8 and DB instance class db.t3.medium isn’t supported for Multi-AZ DB clusters.
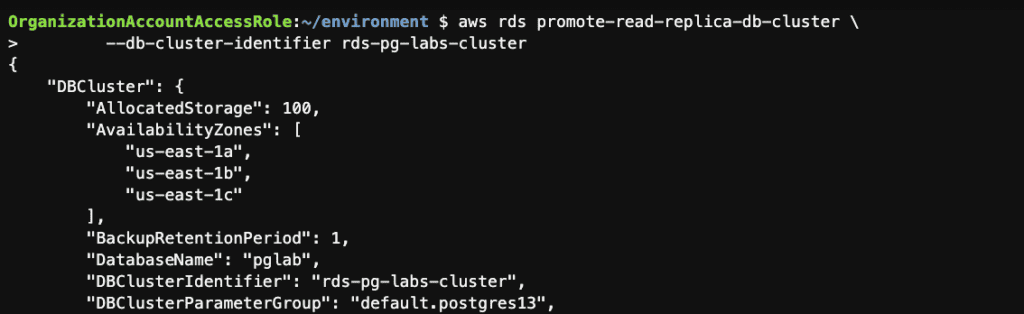
Step 8: Promote this Multi-AZ read replica cluster to a stand-alone cluster using the AWS CLI
Note: For RDS for PostgreSQL, the source Multi-AZ DB cluster must be running version 15.2-R2 or higher to create a DB instance read replica. See other Limitations in the Amazon RDS User Guide.
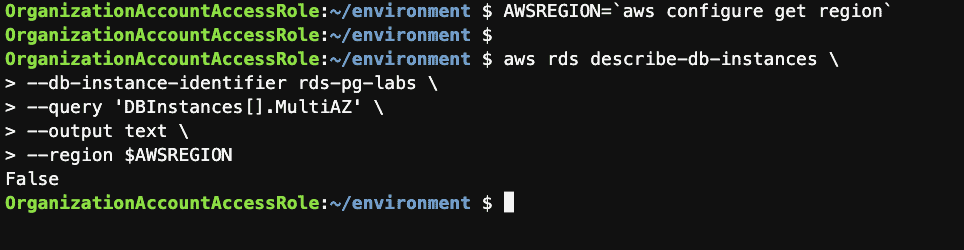
Step 10: Check if the instance is Multi-AZ using the AWS CLI
AWSREGION=`aws configure get region`
aws rds describe-db-instances \
	--db-instance-identifier rds-pg-labs \
	--query 'DBInstances[].MultiAZ' \
	--output text \
	--region $AWSREGION
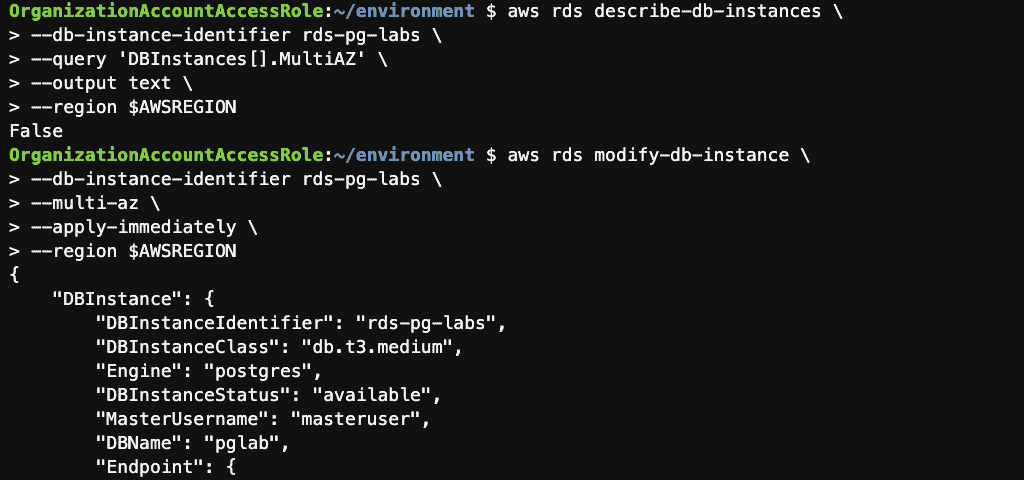
Step 11: Convert the instance to Multi-AZ using the AWS CLI
Step 12: Create an SNS Topic and an RDS Event Subscription using the AWS CLI
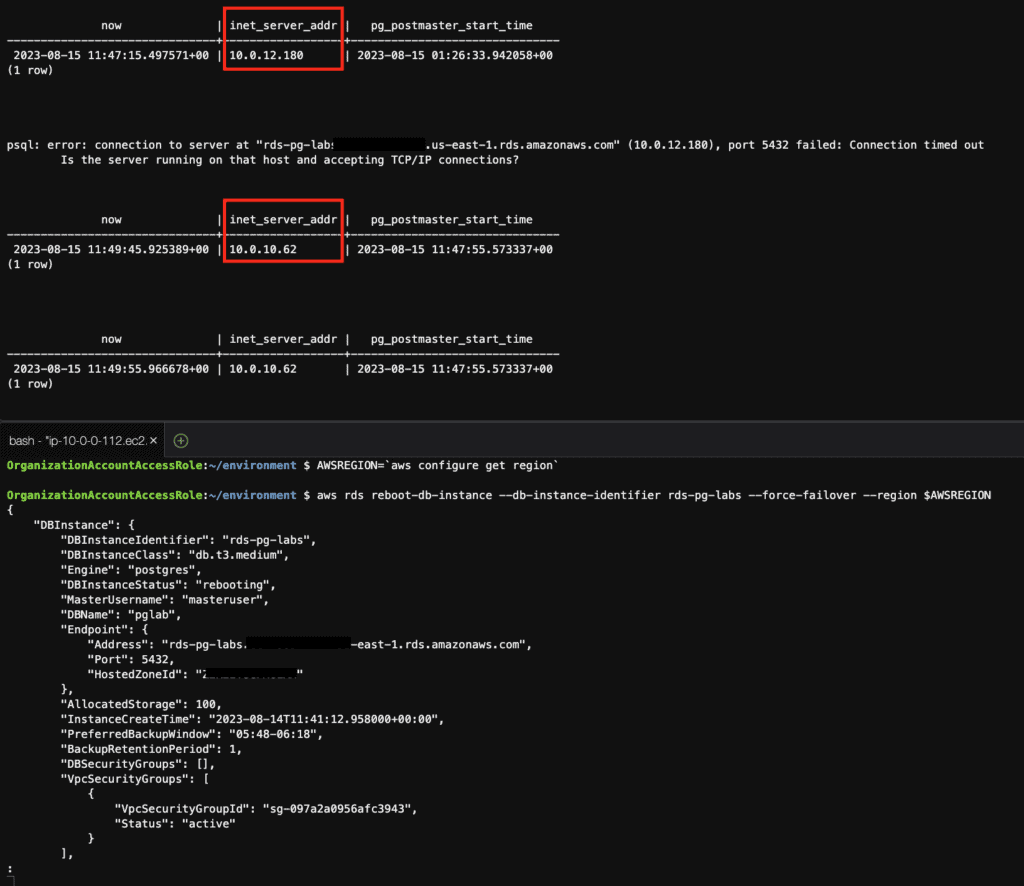
Step 13: Perform failover of a Multi-AZ RDS instance using the AWS CLI
# connection to the database at 10-second intervals
while true;
do
psql pglab -c 'select now() ,inet_server_addr(), pg_postmaster_start_time() ';
echo -e "\n\n"
sleep 10
done

# reboot the instance with failover
AWSREGION=`aws configure get region`
aws rds reboot-db-instance --db-instance-identifier rds-pg-labs --force-failover --region $AWSREGION
Before failover
Failover
Step 14: View the instance’s backups using the AWS CLI
AWSREGION=`aws configure get region`

# List the automated backups for the instance
m

# List the snapshots for the instance
aws rds describe-db-snapshots \
	--db-instance-identifier rds-pg-labs \
	--region $AWSREGION --output table

# Check the Latest Restorable Time (LRT) of the instance
aws rds describe-db-instances \
	--db-instance-identifier rds-pg-labs \
	--query 'DBInstances[].LatestRestorableTime' \
	--region $AWSREGION \
	--output text
Step 15: Take a manual snapshot of the RDS instance using the AWS CLI
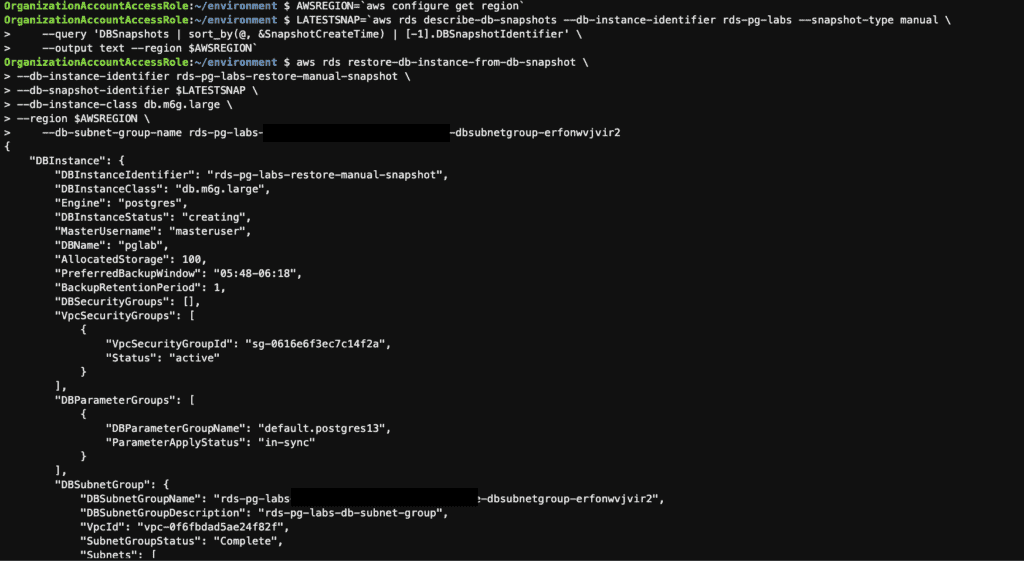
Step 16: Restores an instance from the latest manual snapshot using the AWS CLI
AWSREGION=`aws configure get region`
# Get the Latest Manual Snapshot ID
LATESTSNAP=`aws rds describe-db-snapshots --db-instance-identifier rds-pg-labs --snapshot-type manual \
    --query 'DBSnapshots | sort_by(@, &SnapshotCreateTime) | [-1].DBSnapshotIdentifier' \
    --output text --region $AWSREGION`

# Restore the Snapshot
aws rds restore-db-instance-from-db-snapshot \
	--db-instance-identifier rds-pg-labs-restore-manual-snapshot \
	--db-snapshot-identifier $LATESTSNAP \
	--db-instance-class db.m6g.large \
	--region $AWSREGION \
    --db-subnet-group-name XXXXXXX
# Monitor the progress and status of the restoration
aws rds describe-db-instances --db-instance-identifier rds-pg-labs-restore-manual-snapshot \
	--query 'DBInstances[0].[DBInstanceStatus,Endpoint.Address]' \
    --output text --region $AWSREGION
Monitor the progress and status of the restoration
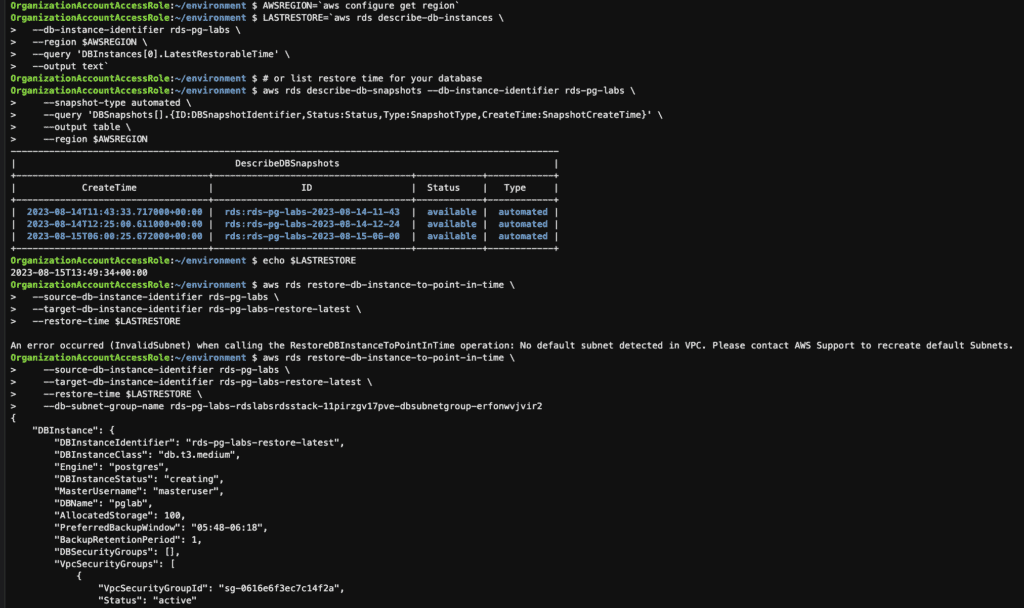
Step 17: Point in time restore the RDS instance using the AWS CLI
AWSREGION=`aws configure get region`
# Lookup the latest restore time for your database
LASTRESTORE=`aws rds describe-db-instances \
  --db-instance-identifier rds-pg-labs \
  --region $AWSREGION \
  --query 'DBInstances[0].LatestRestorableTime' \
  --output text`

# or list restore time for your database
aws rds describe-db-snapshots --db-instance-identifier rds-pg-labs \
    --snapshot-type automated \
    --query 'DBSnapshots[].{ID:DBSnapshotIdentifier,Status:Status,Type:SnapshotType,CreateTime:SnapshotCreateTime}' \
    --output table \
    --region $AWSREGION

# Restore the database to the latest restorable time
aws rds restore-db-instance-to-point-in-time \
    --source-db-instance-identifier rds-pg-labs \
    --target-db-instance-identifier rds-pg-labs-restore-latest \
    --restore-time $LASTRESTORE \
    --db-subnet-group-name XXXXXXX

# Monitor the progress and status of the restoration
aws rds describe-db-instances --db-instance-identifier rds-pg-labs-restore-latest \
	--query 'DBInstances[0].[DBInstanceStatus,Endpoint.Address]' \
    --output text --region $AWSREGION
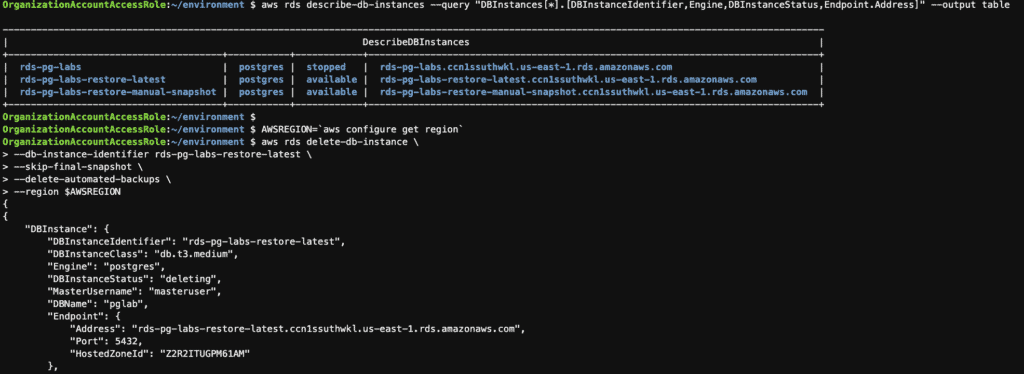
Step 18: Delete the RDS instances using the AWS CLI
These steps provide a general AWS CLI of the process of managing RDS instances. The specific configuration details may vary depending on your environment and setup. It’s recommended to consult the relevant documentation from AWS for detailed instructions on setting up.
Manage the RDS PostgreSQL instance using the AWS CLI
I hope will this be helpful. Thank you for reading the DevopsRoles page!
A Beginner’s Guide How to count files in Linux. To count files in a directory in Linux, you can use the ls command along with some options to list the files in the directory and then pipe the output to the wc (word count) command
How to count files in Linux
Linux file-counting methods
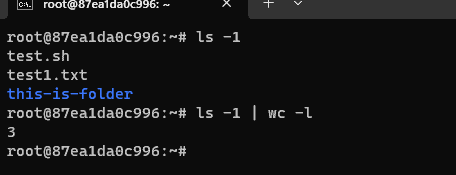
Using the ls command and wc Commands
This method counts all entries in the directory, including subdirectories and special files.
ls -1 | wc -l
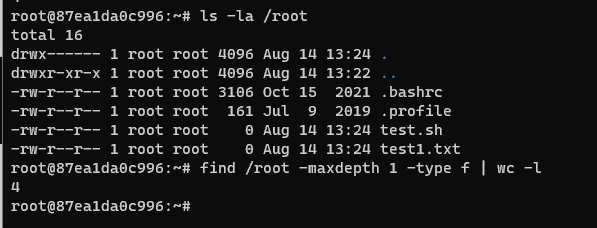
Using the find Command
If you want to count only regular files (excluding directories and other types of files), you can use the find command in combination with the -type f option.
find /path/to/directory -maxdepth 1 -type f | wc -l
Replace /path/to/directory with the actual path of the directory you want to count files in.
The -maxdepth 1 option ensures that find doesn’t go into subdirectories.
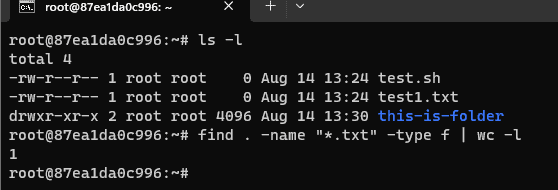
To count only text files in a directory as the command below
find . -name "*.txt" -type f | wc -l
Using the ls command with the grep command
This method is similar to the first one but filters the output using grep to exclude directories from the count.
ls -l | grep -v '^d' | wc -l
Here, the grep -v ‘^d’ command filters out lines that start with ‘d’ (indicating directories) from the ls output.
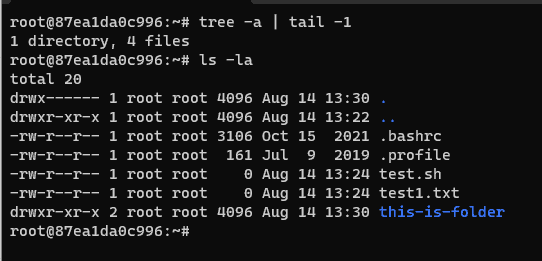
Counting Files with ‘tree’
You can count all files in a directory, including subdirectories as the command below
tree -a | tail -1
Conclusion
In this tutorial, How to count files in Linux. Choose the method that best fits your needs and use case. Each approach has its advantages, so consider the scope and specificity you require when counting files in Linux. I hope will this your helpful. Thank you for reading the DevopsRoles page!
In this tutorial, we’ll explore the process of batch Linux rename file with the inclusion of dates. You can use the rename command or a combination of find commands and mv commands to batch rename files in a directory with new filenames containing dates in Linux.
Linux rename file with Dates
Today I want to share how to batch rename files in a directory to new filenames with dates in Linux only with one command
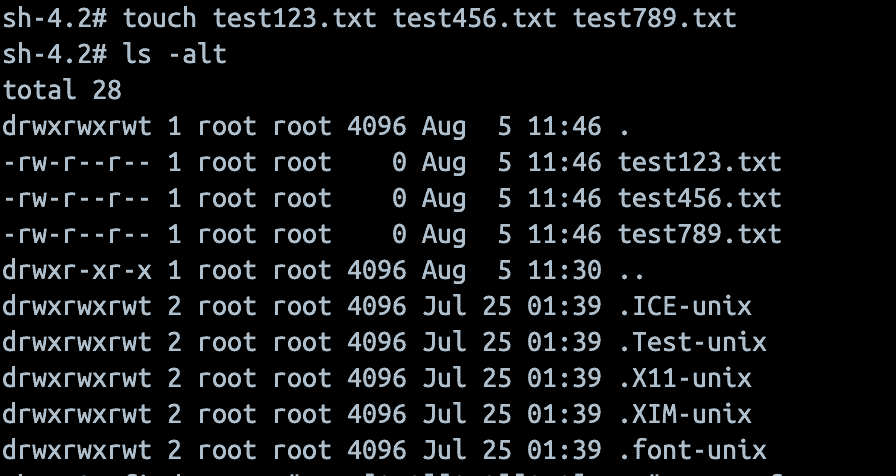
For example, in my directory, I have files named like this:
test123.txt
test456.txt
test789.txt
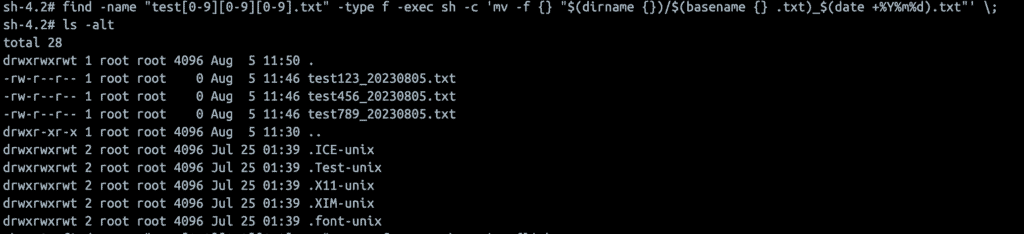
The result after running the command looks like this:
“20230805” is the execution date.
test123_20230805.txt
test456_20230805.txt
test789_20230805.txt
Batch Renaming Files with Date Appended
find -name "test[0-9][0-9][0-9].txt" -type f -exec sh -c 'mv -f {} "$(dirname {})/$(basename {} .txt)_$(date +%Y%m%d).txt"' \;
This command searches for and renames files in the current directory (and subdirectories) with names in the format test###.txt (where ### represents three digits).
find -name "test[0-9][0-9][0-9].txt": Searches for files with names matching the pattern test###.txt.
-type f: Only searches for files (not directories).
-exec sh -c '...' \;: Executes the shell command for each file found.
mv -f {}: Renames the file (forcing if necessary).
"$(dirname {})/$(basename {} .txt)_$(date +%Y%m%d).txt": Renames the file by removing the .txt extension, appending the current date (in YYYYMMDD format), and then adding back the .txt extension.
For example, test001.txt would be renamed to test001_20240812.txt (assuming the current date is August 12, 2024).
The outcome of rename file in Linux is depicted in the image below:
Conclusion
Remember to back up your files before performing batch operations like this, just to be safe. Also, modify the date format and naming convention as per your requirements. I hope will this be helpful. Thank you for reading the DevopsRoles page!
Security-Enhanced Linux is a powerful security system that is enabled, by default, on most Linux distributions based on RHEL. Here are the general steps to configure SELinux for applications and services:
In this blog, we will explore the process of configuring SELinux to safeguard your applications, providing a detailed understanding of SELinux modes, Booleans, custom policies, and troubleshooting tips.
For example, the Apache web server. Apache on RHEL-based distributions defaults to the /var/httpd directory as the document root and ports 80 (for HTTP) and 443 (for HTTPS) when installed.
You can use a different directory and port for a website might opt for /opt as the document root and port 8080.
Out of the box, SELinux denies those nonstandard options, so they must be configured to work properly.
configure SELinux for nonstandard configurations
You also need a user with sudo privileges.
Install Apache
First, you need to install the Apache web server on a Linux distribution such as Rocky Linux, AlmaLinux, or RHEL.
If SELinux is not installed on your system, install the necessary packages. The package names might vary depending on your Linux distribution. For example, on CentOS/RHEL systems, you can use:
SELinux has three main modes: enforcing, permissive, and disabled. The enforcing mode enforces security policies, the permissive mode logs policy violations but does not block actions, and the disabled mode turns off SELinux.
For production use, you should typically set SELinux to enforcing mode. You can temporarily set it to permissive mode for debugging purposes.
Set SELinux modes
To set the SELinux mode, use the following command:
If issues arise, review SELinux logs in /var/log/audit/audit.log and system logs to identify potential problems.
SELinux Booleans:
You can list available Booleans and their statuses using the semanage boolean -l or getsebool -a command. To change a Boolean value, use the setsebool command.
View SELinux Context:
You can view the SELinux context for a specific file or directory using the ls -Z command.
Creating Custom SELinux Policies (Optional):
This involves using SELinux policy development tools like audit2allow and semodule to define the necessary rules.
Conclusion
Incorporating SELinux into your Linux system’s security posture can significantly improve its resilience against cyber threats.
By following the steps outlined in this guide, you’ll be well-equipped to configure SELinux effectively for your applications and services, bolstering the overall security of your Linux environment.
Remember to continually monitor and update your SELinux configurations to keep up with evolving security challenges. I hope will this your helpful. Thank you for reading the DevopsRoles page!
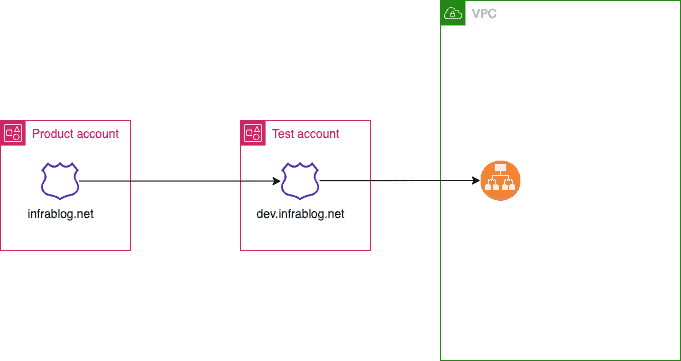
How to share your Route 53 Domains across AWS accounts via Route 53 hostedzone. What I will do here is that I already have a Production account with the domain, so I want to use this domain on the Test account to conduct my other activities.
Share your Route 53 Domains across AWS accounts
To share your Route 53 Domains across AWS accounts, you can follow these general steps
Create a Public Hosted Zone in the Test account: In the Test create a public hosted zone in Route 53 for the domain you want to use
Create a record in the Product account: In the account that owns the domain, create a record in Route 53 Hosted Zone for the domain you want to share.
Create a record in the Test account: in the Test account, create a record to route traffic to ALB
Step by step: Share your Route 53 Domains across the AWS account
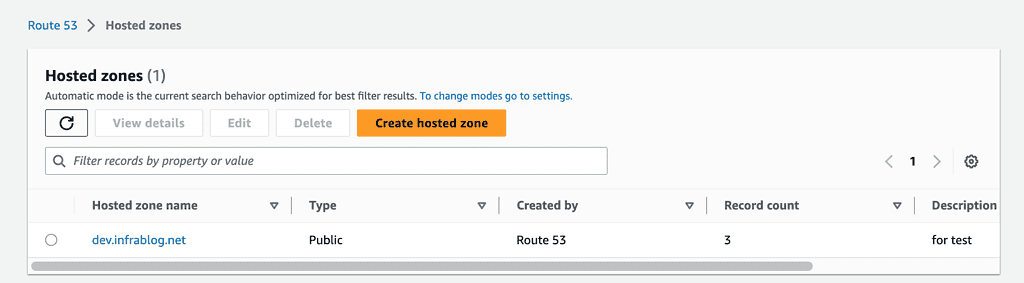
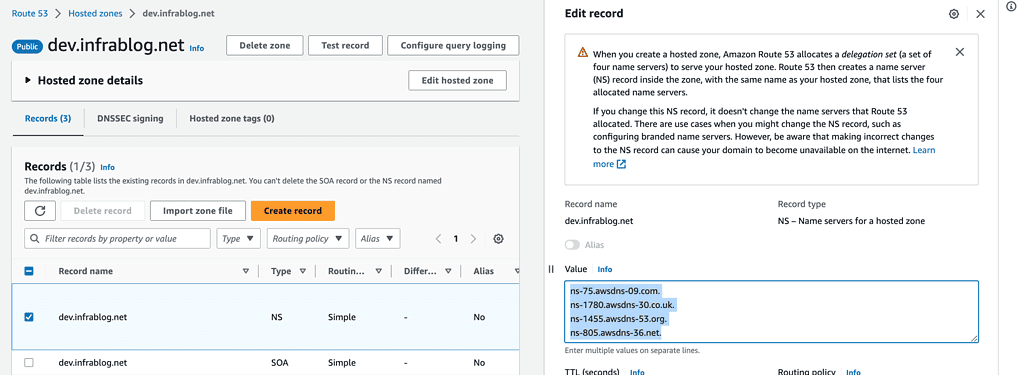
Create a Public Hosted Zone in the Test account
When you have to fill out the information and return to your Route 53 hosted zone, you need to copy the 4 lines inside the value box, which contains the nameserver information you need to use in the next step.
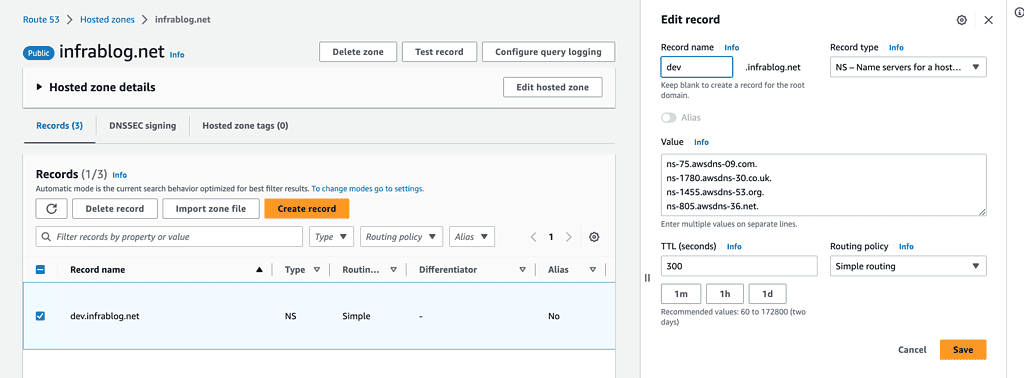
Create a record in the Product account
Paste the 4 nameservers from your Test account Route 53 Hosted Zone into the value list.
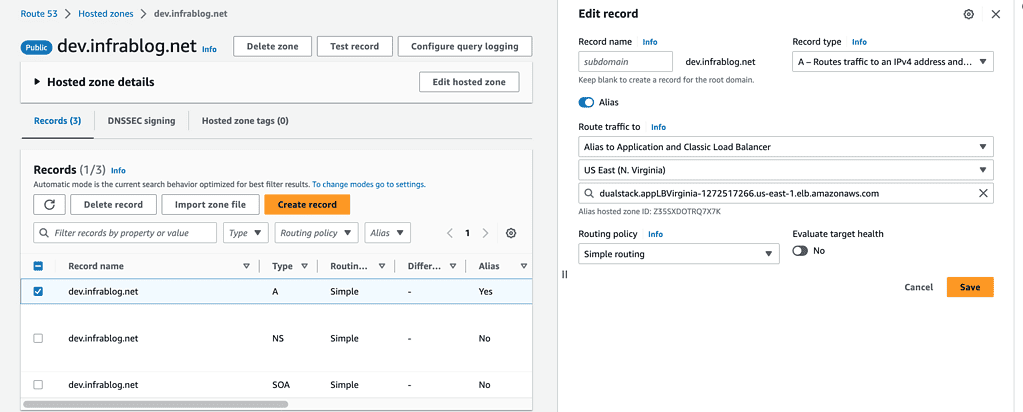
Create a record in the Test account
In the Test account, create a record to route traffic to ALB
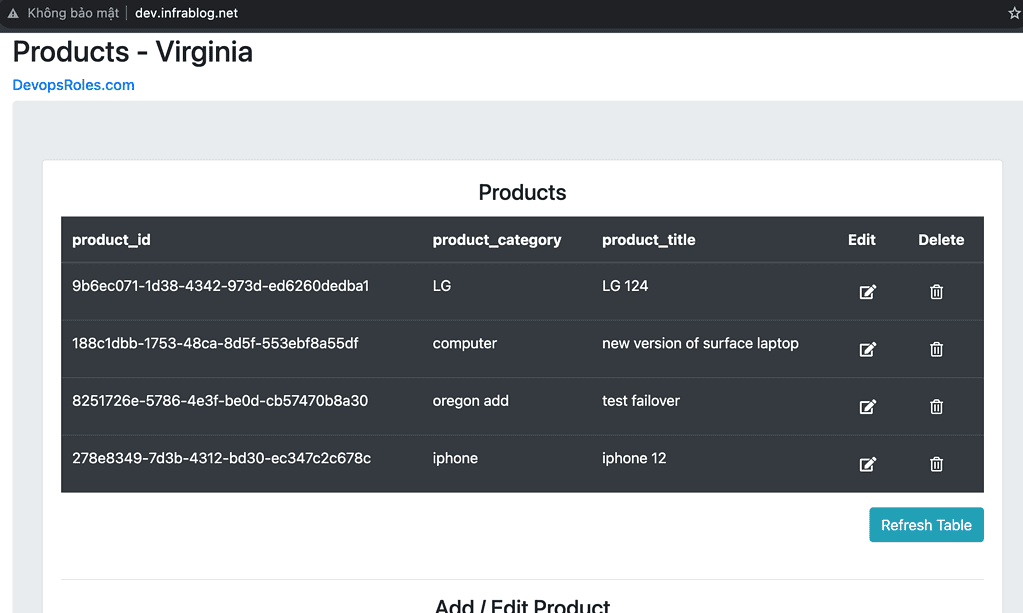
Test page
Conclusion
These steps provide a general overview of the process. The specific configuration details may vary depending on your environment and setup. It’s recommended to consult the relevant documentation from AWS for detailed instructions on setting up. I hope will this be helpful. Thank you for reading the DevopsRoles page!
Refer to: This lab html uses the template of ChandraLingam