Linux Password Managers, protecting online credentials is paramount, especially for Linux users, who often prioritize security and privacy. A dependable password manager not only simplifies your login process but also bolsters your online safety by creating and storing complex passwords. This article explores the best Linux password managers in 2024, highlighting their security features and user-friendliness.
Why Linux Users Need a Dedicated Password Manager
Linux users, typically tech-savvy and security-conscious, demand password managers that provide robust security while integrating seamlessly with Linux operating systems. Due to Linux’s diverse ecosystem, compatibility and support are crucial factors in selecting an appropriate password manager.
Top 5 Linux Password Managers for 2024
Each password manager listed below is selected for its unique strengths to suit different preferences and needs:
NordPass: Best for Usability NordPass excels with its user-friendly interface and robust integration across platforms, including Linux. It features tools like password health, data breach scanners, and secure notes. Its zero-knowledge architecture ensures that your data remains private. Learn more about NordPass here.
1Password: Best for Privacy Known for its strong privacy and security measures, 1Password employs end-to-end encryption and offers features like Watchtower for alerts on security breaches and vulnerable passwords. It’s ideal for those who prioritize privacy. More about 1Password can be found here.
Keeper: Best for Beginners Keeper’s intuitive design and excellent customer support make it suitable for newcomers to password management. It features robust password generation, secure file storage, and an easy-to-use dashboard. Despite its simplicity, it maintains rigorous security. Discover more about Keeper here.
RoboForm: Best Free Option RoboForm’s strong free version includes unlimited password storage, form filling, and password audits, making it a top choice for users seeking a cost-effective yet feature-rich solution. Learn more about RoboForm here.
Enpass: Best for Families with Lifetime Protection Enpass is ideal for families, offering a one-time purchase for a lifetime license, which is economical over the long term. Its family plan includes multiple vaults, secure sharing, and an offline mode for added privacy. Explore Enpass here.
Conclusion
Selecting the right password manager for Linux depends on your specific needs, whether they concern usability, privacy, ease for beginners, cost-effectiveness, or suitability for family use. Each option listed offers robust security features designed to enhance your online experience while safeguarding your digital assets.
Consider your priorities and try out a few of these options – most offer free trials or versions – to find the ideal match for your Linux setup. Thank you for reading the DevopsRoles page!
Using docker compose with Podman on Linux is a straightforward process, especially because Podman is designed to be a drop-in replacement for Docker. This means you can use Podman to run software that was written for Docker, such as Docker Compose, without modifying the Dockerfile or docker-compose.yml files.
Setting up Docker Compose with Podman
Here’s a step-by-step guide to using docker-compose with Podman on Linux:
1. Install Podman
First, ensure that Podman is installed on your system. You can install Podman using your package manager. For example, on Ubuntu:
sudo apt update
sudo apt install -y podman
On Fedora or CentOS:
sudo dnf install -y podman
2. Install Docker Compose
You also need Docker Compose. Install it using pip:
sudo pip3 install docker-compose
3. Set Up Podman to Mimic Docker
You need to configure Podman to mimic Docker. This involves setting up alias and ensuring that socket files are correctly handled.
You can alias Docker commands to Podman for your user by adding the following line to your ~/.bashrc or ~/.zshrc:
alias docker=podman
After adding the alias, apply the changes:
source ~/.bashrc # or ~/.zshrc
4. Configure Docker Compose for Podman
To make Docker Compose use Podman, and point to the DOCKER_HOST environment variable to Podman’s socket. You can do this on the fly or by setting it permanently in your shell configuration file:
For permanent configuration, add the above line to your ~/.bashrc or ~/.zshrc.
5. Run Docker Compose
Now, you can use Docker Compose as you normally would:
docker-compose up
or if you have not aliased docker to podman, you can explicitly tell Docker Compose to use Podman:
DOCKER_HOST=unix:///run/user/$(id -u)/podman/podman.sock docker-compose up
6. Troubleshooting
If you encounter permissions issues with the Podman socket or other related errors, make sure that your user is in the appropriate group to manage Podman containers, and check that the socket path in DOCKER_HOST is correct.
7. Consider Podman Compose
Podman team has developed podman-compose which is a script to help Podman manage full application lifecycles using docker-compose format. It might be beneficial to use podman-compose if you face any compatibility issues:
pip3 install podman-compose
Then use it similarly to Docker Compose:
podman-compose up
Conclusion
This guide should help you set up a working environment using Podman and Docker Compose on a Linux system. I hope will this your helpful. Thank you for reading the DevopsRoles page!
In this guide, we’ll walk you through the process of configuring a VPN Site-to-Site from your home network to AWS, enabling seamless and secure communication between the two environments.
Before diving into the setup process, let’s briefly understand what a VPN Site-to-Site connection entails.
A VPN Site-to-Site connection establishes a secure, encrypted tunnel between two networks, allowing them to communicate as if they were directly connected. In our case, we’ll be connecting our home network to an AWS Virtual Private Cloud (VPC), effectively extending our network infrastructure to the cloud.
Prerequisites
Before proceeding, ensure you have the following prerequisites in place:
An AWS account with appropriate permissions to create VPC resources.
public IP (find public IP of home network at link )
Configure AWS
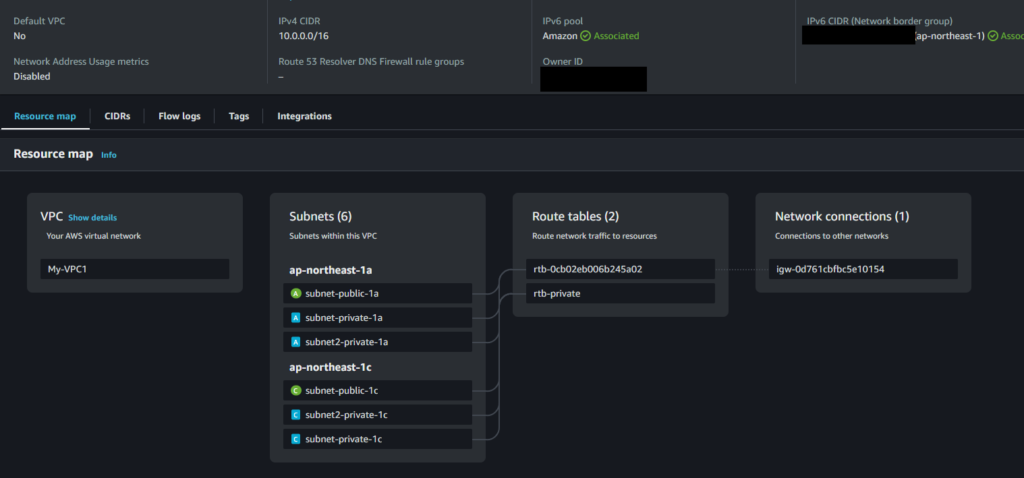
Create VPC with a private subnet
Create a EC2 and config inboud for SG
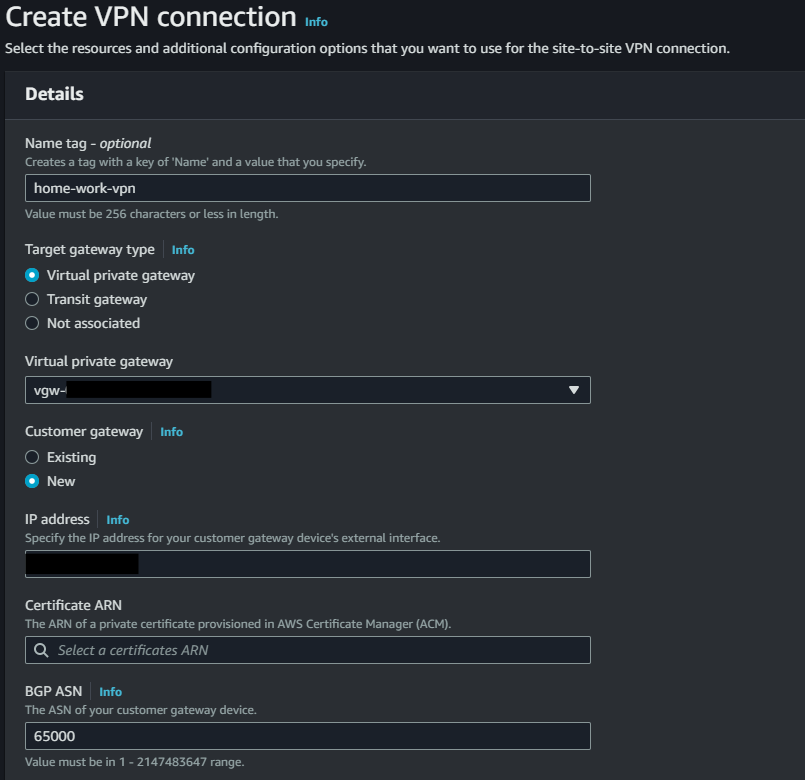
Creating a virtual private gateway
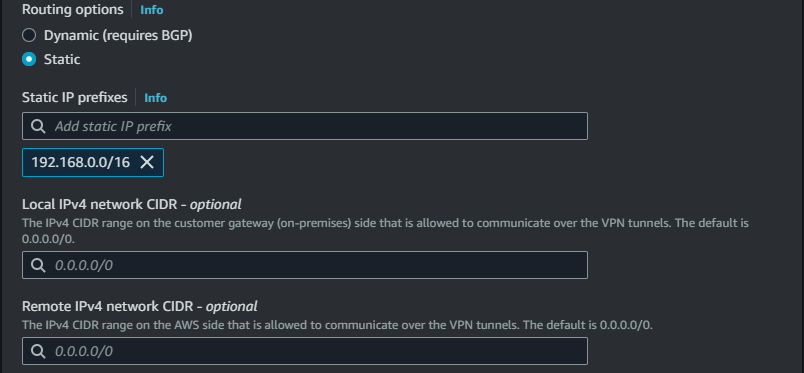
Setting route table
Site to Site VPN settings and download vendor config file
Create a new VPC with a CIDR block that does not conflict with your home network.
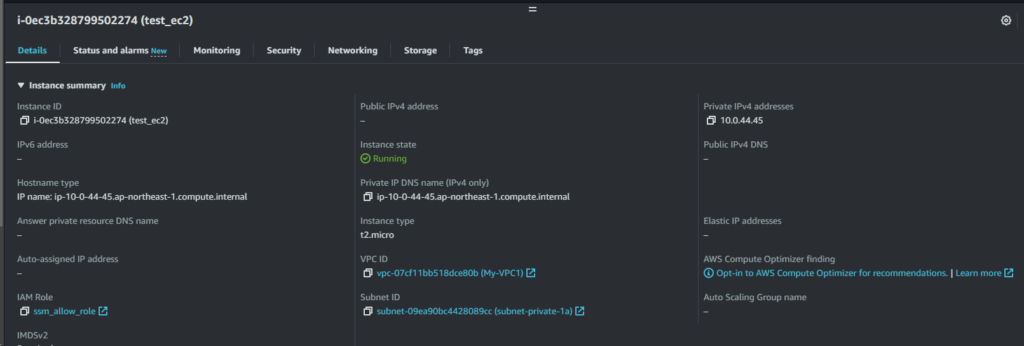
Create a new EC2 in subnet-private-1 for test if you have not
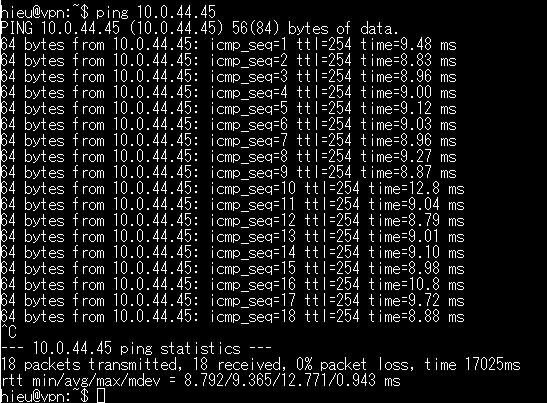
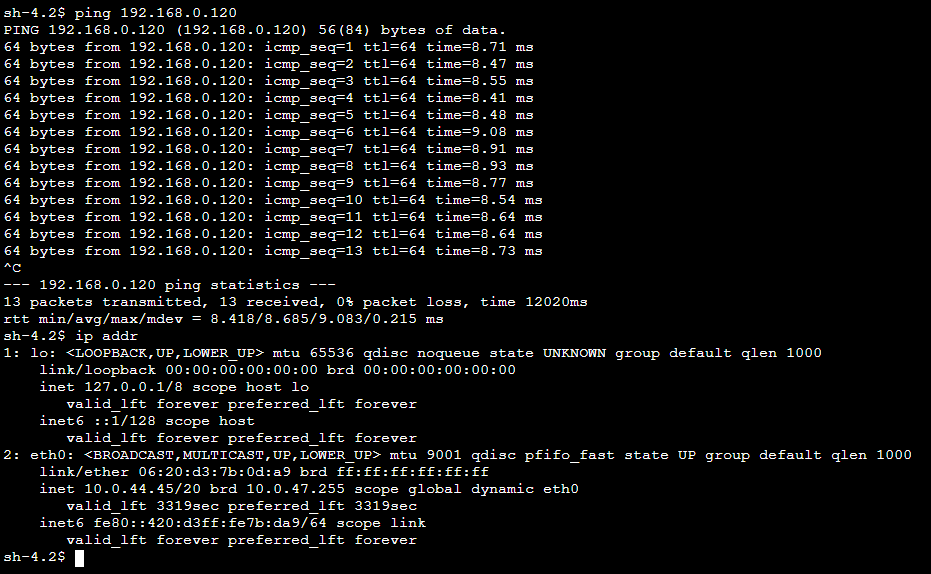
Private IP : 10.0.44.45
EC2 sercurity group inboud setting(allow ping test only)
Creating a virtual private gateway
Attach to the VPC that will be the Site to Site VPN connection destination.
Edit route table
In the route table of the private subnet connection destination VPN, configure routing for the local network segment with the virtual private gateway as the destination.
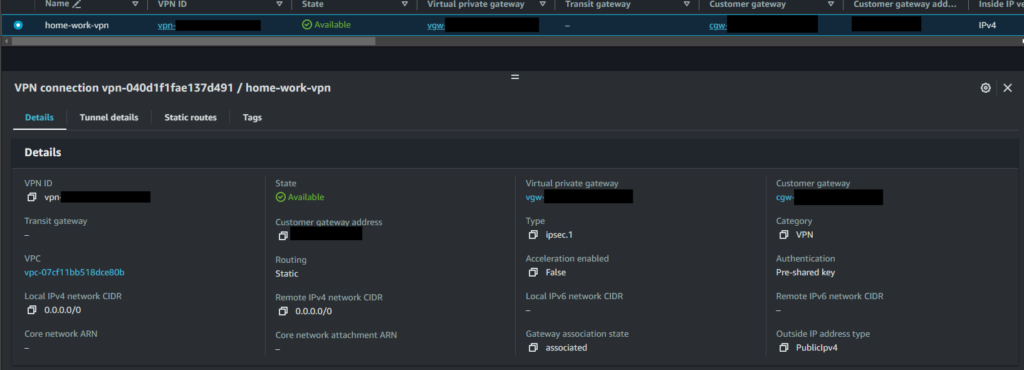
Site to Site VPN settings
IP address : Your public IP adress
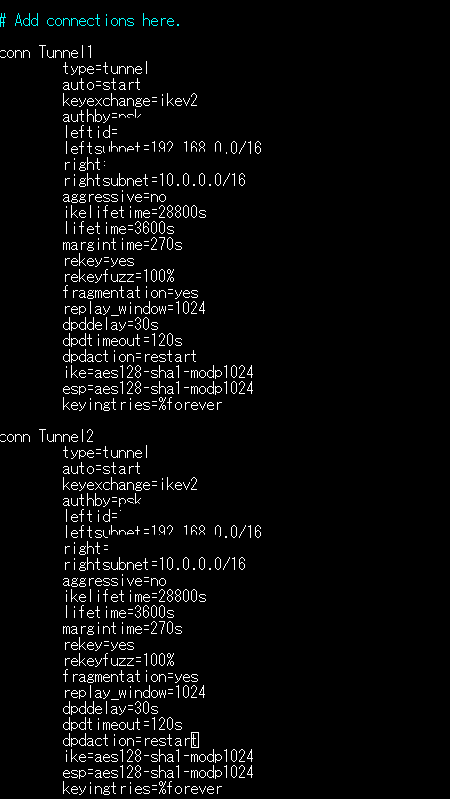
Static IP prefixes : Local network segment(192.168.0.0/16)
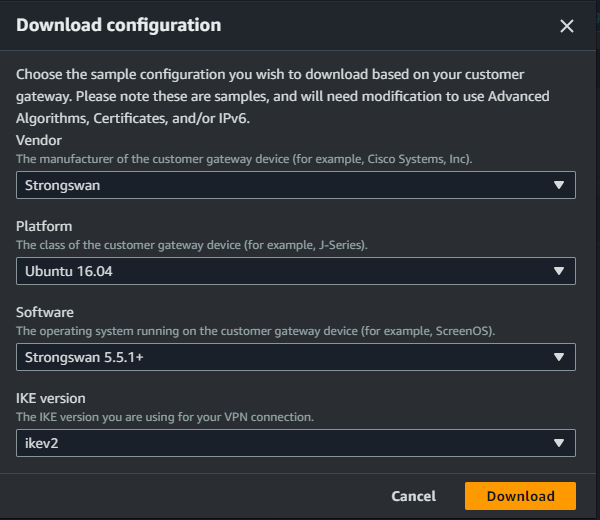
VPN config download
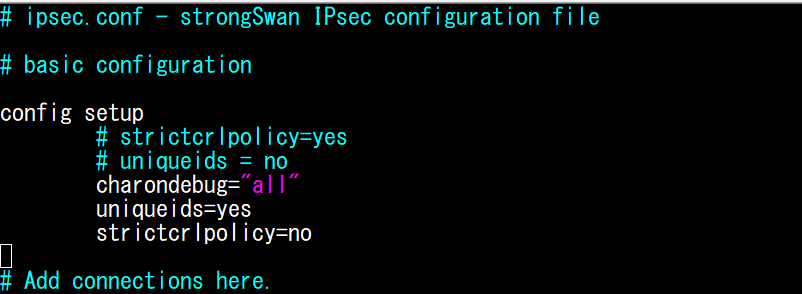
Chose Vendor is Strongwan and IKE version is ikev2
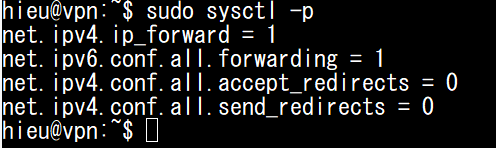
Configure the following settings according to the downloaded file.
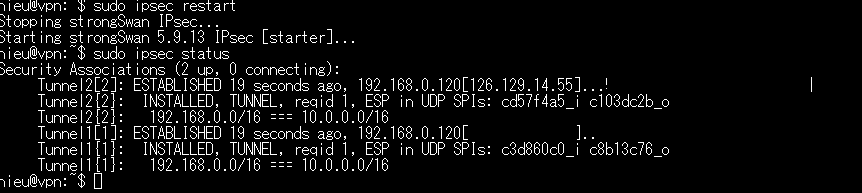
By following these steps, you’ve successfully set up a VPN Site-to-Site connection from your home network to AWS, enabling secure communication between the two environments. This setup enhances security by encrypting traffic over the internet and facilitates seamless access to cloud resources from the comfort of your home network. Experiment with different configurations and explore additional AWS networking features to optimize performance and security based on your specific requirements.
Rocky Linux is a popular choice for businesses and developers who need a stable, secure Linux distribution. It’s especially valuable for containerized applications, which brings us to Podman – an excellent alternative to Docker that doesn’t require root access to run containers. In this comprehensive guide step-by-step Installing Podman, we’ll explore how to install and run Podman on Rocky Linux, covering everything from the initial installation to deploying your first container.
Podman is an open-source, Linux-native tool designed to develop, manage, and run OCI Containers on your Linux system. Its daemonless architecture increases security and makes it easier to manage containers without the need for root privileges. This security feature is one speculated reason why Red Hat shifted its container tool support from Docker to Podman.
What You Need
A running instance of Rocky Linux
A user account with sudo privileges
Checking for installing Podman
Podman is typically installed by default on Rocky Linux. To verify, you can open a terminal and type the following command:
podman -v
If Podman is installed, you should see an output like:
podman version 4.6.1
If you receive an error indicating the command is not found, you will need to install Podman by executing:
sudo dnf install podman -y
Step 1: Pulling an Image
With Podman installed, your first task is to pull a container image from a registry. We will use the Nginx image as an example. To find the Nginx image, use:
podman search nginx
You’ll see various entries, including official builds and other versions hosted on different registries. To pull the latest official Nginx image from Docker’s registry, run:
podman pull nginx:latest
After selecting the image from the list (using arrow keys if needed), the image will download, ending with a confirmation of the image ID.
Step 2: Deploying a Container
Now that you have your image, it’s time to run a container using it. Execute the following command to deploy an Nginx container:
podman run --name podman-nginx -p 8080:80 -d nginx
Here’s what each part of the command means:
podman run: Command to create and start a container.
--name podman-nginx: Names the container.
-p 8080:80: Maps port 80 in the container to port 8080 on the host.
-d: Runs the container in detached mode.
nginx: The image used to create the container.
You can verify that your container is running by listing all active containers:
podman ps -a
Interacting with Your Container
To interact with the running Nginx container, use:
podman exec -it podman-nginx /bin/bash
This command opens a bash shell inside the container. You can now manage files and services inside the container as if you were logged into a regular Linux server.
Stopping and Removing Containers
When you’re done, you can stop the container using:
podman stop [ID]
And remove it with:
podman rm [ID]
Replace [ID] with the first few characters of your container’s ID.
An Easier Method: Using Cockpit
Rocky Linux offers Cockpit, a web-based management interface that includes support for managing Podman containers. To use it, start the Cockpit service:
sudo systemctl enable --now cockpit.socket
Then, open a web browser and navigate to https://[SERVER]:9090, replacing [SERVER] with your server’s IP address. Log in with your sudo user credentials. You’ll see an interface where you can manage Podman containers, including starting, stopping, and inspecting containers.
Conclusion
Congratulations! You’ve installed Podman on Rocky Linux and deployed your first container. With these skills, you can now begin using Rocky Linux to host containers in a secure, efficient environment. Podman’s integration into Rocky Linux, along with tools like Cockpit, makes it a powerful platform for developing and deploying containerized applications. Thank you for reading the DevopsRoles page!
Kubernetes Secrets Encrypted: Kubernetes has emerged as a pivotal player in managing containerized applications. However, with great power comes great responsibility, especially when handling sensitive information. Are Kubernetes secrets encrypted? This critical question underscores the need for robust security practices in Kubernetes deployments. Let’s dive into the essentials of Kubernetes secrets encryption.
Kubernetes, a powerful orchestration tool, revolutionizes how we deploy and manage containerized applications. At its core, Kubernetes secrets offer a secure way to store and manage sensitive data such as passwords, tokens, and SSH keys. But the burning question remains: Are these secrets encrypted by default, and how can we ensure they are secure?
What Are Kubernetes Secrets?
Kubernetes secrets are objects that store sensitive data, such as passwords, OAuth tokens, and SSH keys, safeguarding this information within your Kubernetes pods and services. These secrets are designed to be more secure than storing sensitive data in pod specifications or in Docker images, but this does not inherently mean they are encrypted.
Current State of Encryption for Kubernetes Secrets
By default, Kubernetes secrets are stored as plaintext in the API server’s datastore, etcd. This means that without proper configuration, sensitive information could be exposed to unauthorized users with access to etcd. The revelation raises concerns about the intrinsic security measures provided by Kubernetes for secret management.
How to Encrypt Kubernetes Secrets
To enhance the security of Kubernetes secrets, administrators must take proactive steps. Encryption at rest, introduced in Kubernetes v1.7, allows you to encrypt secret data stored in etcd. Here’s a simplified guide to enable this feature:
Generate an Encryption Key: First, create a strong encryption key.
Configure the Encryption Provider: Kubernetes supports several encryption providers. Choose one and configure it with your encryption key.
Apply the Configuration: Update the Kubernetes API server configuration to use the encryption provider configuration file.
Verify Encryption: After applying the configuration, create a new secret and check etcd to ensure it’s encrypted.
Implementing encryption requires a careful approach to key management and access control, underscoring the need for comprehensive security practices.
Best Practices for Managing Kubernetes Secrets Encryption
Securing Kubernetes secrets goes beyond enabling encryption. Follow these best practices to fortify your secret management:
Least Privilege Access: Implement role-based access control (RBAC) to limit who can access Kubernetes secrets.
Secrets Rotation: Regularly rotate secrets to minimize the impact of potential exposures.
Audit and Monitor: Continuously monitor access to secrets and audit logs to detect unauthorized access attempts.
Use External Secrets Management Tools: Consider integrating external secrets managers like HashiCorp Vault, AWS Secrets Manager, or Google Cloud Secret Manager for enhanced security features.
Conclusion: Kubernetes Secrets Encrypted
The question, “Are Kubernetes secrets encrypted?” highlights a vital aspect of Kubernetes security. While secrets are not encrypted by default, Kubernetes offers mechanisms to secure them, provided administrators take the necessary steps to implement these features. By following the outlined best practices, you can significantly enhance the security of your Kubernetes secrets, ensuring your sensitive information remains protected.
Kubernetes continues to evolve, and with it, the tools and practices for secure secret management. Staying informed and proactive in implementing security measures is paramount for safeguarding your deployments against evolving threats. Thank you for reading the DevopsRoles page!
In this tutorial, How to Install CNI for Kubernetes. Container orchestration has become an indispensable part of modern IT infrastructure management, and Kubernetes stands out as a leading platform in this domain. One of the key components that contribute to Kubernetes’ flexibility and scalability is the Container Networking Interface (CNI). In this comprehensive guide, we’ll delve into the intricacies of installing CNI for Kubernetes, ensuring smooth communication between pods and services within your cluster.
What is CNI and Why is it Important?
Before we delve into the installation process, let’s understand the significance of the Container Networking Interface (CNI) in the Kubernetes ecosystem. CNI serves as a standard interface for configuring networking in Linux containers. It facilitates seamless communication between pods, enabling them to communicate with each other and external resources. By abstracting network configuration, CNI simplifies the deployment and management of containerized applications within Kubernetes clusters.
Preparing for Installation
Before embarking on the installation journey, it’s essential to ensure that you have the necessary prerequisites in place. Firstly, you’ll need access to your Kubernetes cluster, along with appropriate permissions to install CNI plugins. Additionally, familiarity with basic Kubernetes concepts and command-line tools such as kubectl will prove beneficial during the installation process.
Step-by-Step How to Install CNI for Kubernetes
Example: Installing Calico CNI Plugin
Install kubectl: If you haven’t already installed kubectl, you can do so by following the official Kubernetes documentation for your operating system. For example, on a Linux system, you can use the following command:
Once installed, verify the installation by running:
kubectl version --client
Choose Calico as the CNI Plugin: Calico is a popular CNI plugin known for its simplicity and scalability. To install Calico, you can choose from various deployment methods, including YAML manifests or Helm charts. For this example, we’ll use YAML manifests.
Download the Calico Manifests: Calico provides YAML manifests for easy deployment. Download the manifests using the following command:
Configure Calico: Before applying the Calico manifests to your Kubernetes cluster, you may need to configure certain parameters, such as the IP pool for pod IPs. Open the calico.yaml file in a text editor and modify the configuration as needed.
vi calico.yaml
Here’s an example configuration snippet specifying an IP pool:
Apply Calico Manifests to Kubernetes: Once you’ve configured Calico according to your requirements, apply the manifests to your Kubernetes cluster using kubectl:
kubectl apply -f calico.yaml
This command will create the necessary Kubernetes resources, including Custom Resource Definitions (CRDs), Pods, Services, and ConfigMaps, to deploy Calico within your cluster.
Verify Installation: After applying the Calico manifests, verify the successful installation by checking the status of Calico pods and related resources:
kubectl get pods -n kube-system
Conclusion
Installing Container Network Interface (CNI) plugins for Kubernetes is a critical step towards enabling seamless communication between containers within a Kubernetes cluster. This process, while it might seem intricate at first, can significantly streamline and secure network operations, providing the flexibility to choose from a wide array of CNI plugins that best fit the specific requirements of your environment. By following the best practices and steps outlined for the installation process, users can ensure that their Kubernetes cluster is equipped with a robust and efficient networking solution.
This not only enhances the performance of applications running on the cluster but also leverages Kubernetes’ capabilities to the fullest, ensuring a scalable, manageable, and highly available system. Whether you’re deploying on-premise or in the cloud, understanding and implementing CNI effectively can profoundly impact your Kubernetes ecosystem’s efficiency and reliability. . Thank you for reading the DevopsRoles page!
Mastering Git, Git stands as a cornerstone for version control, enabling seamless collaboration and efficient project management. Whether you’re a seasoned programmer or just embarking on your coding journey, mastering Git commands is essential for optimizing your workflow and maximizing productivity. This comprehensive guide explores 36 indispensable Git commands, complete with practical command line examples, to empower programmers and developers at every level.
Mastering Git commands
Configure User Profile:
Set up your user profile to ensure accurate tracking of contributions.
Compress loose objects in the repository into pack files to save space and improve performance.
$ git repack
List Unpacked Objects:
Display statistics about the repository’s object storage.
$ git count-objects
Validate the Object Database:
Check the integrity of the repository’s object database to ensure it is not corrupted.
$ git fsck
Display Changes for Each Commit:
View detailed information about each commit, including the files that were modified.
$ git whatchanged
Summarize Log Information:
Generate summarized logs of commit history, optionally grouped by author or email.
$ git shortlog
$ git shortlog --email --summary
Consult Git Help
Conclusion
Mastering Git commands is a fundamental skill for programmers and developers seeking to streamline their workflow and collaborate effectively on projects. In this comprehensive guide, we’ve explored 39 essential Git commands, providing command-line examples for each one.
By understanding and incorporating these commands into your daily development routine, you’ll gain greater control over your version-controlled projects. From configuring user profiles to managing branches, committing changes, and collaborating with remote repositories, each Git command plays a crucial role in the software development lifecycle.
Whether you’re working solo on a personal project or collaborating with a team of developers on a large-scale application, Git empowers you to track changes, manage versions, and seamlessly integrate new features. With practice and dedication, you can harness the power of Git to enhance your productivity, streamline your workflow, and achieve greater success in your software development endeavors. . Thank you for reading the DevopsRoles page!
Python AI. In the rapidly evolving landscape of technology, Python’s role in artificial intelligence (AI) development has become more crucial than ever. Known for its simplicity and flexibility, Python has emerged as the go-to language for AI enthusiasts and professionals aiming to push the boundaries of what’s possible. This guide presents seven revolutionary insights into Python AI, designed to equip you with the knowledge to unleash its full potential.
Python’s readability and straightforward syntax have made it particularly appealing for AI development. Its extensive support from a vibrant community and compatibility with numerous AI and machine learning (ML) libraries allow for seamless integration and scalable solutions.
Key Python Libraries for AI
The power of Python in AI comes from its extensive libraries:
NumPy & Pandas: Essential for data manipulation and analysis.
Scikit-learn: A fundamental toolkit for data mining and analysis.
TensorFlow & PyTorch: Advanced libraries for building and training neural networks in deep learning projects.
Embarking on Python AI Projects
Starting with Python AI projects can seem daunting, yet, by focusing on basic projects such as spam detection or simple recommendation systems, beginners can gradually build confidence and skills, paving the way to tackle more complex challenges.
Leveraging Python AI in Data Analysis
Python excels in data analysis, providing a robust foundation for AI models that rely on data insights for prediction and decision-making. Its data handling capabilities ensure AI projects are built on accurate and insightful analyses.
Mastering Machine Learning with Python
With libraries like Scikit-learn, Python offers an accessible path to developing machine learning models. From regression to clustering, Python simplifies the journey from data processing to model training and evaluation.
Exploring Deep Learning with Python
For deep learning enthusiasts, Python’s TensorFlow and PyTorch libraries offer cutting-edge tools. Whether you’re designing neural networks or implementing NLP models, Python is the bridge to advanced AI solutions.
Overcoming Challenges in Python AI
Despite its advantages, Python AI development is not without challenges. From data quality issues to the computational demands of training models, developers must navigate these hurdles with continuous learning and innovative thinking.
Conclusion: Unleashing the Potential of Python AI
Python AI represents a fusion of accessibility and power, offering a platform for innovation in the AI space. As you delve into these seven insights, remember that the journey into Python AI is one of exploration and continuous learning. Whether you’re a novice taking your first steps or a seasoned professional seeking to expand your toolkit, Python AI opens up a world of possibilities. Embark on this journey today and be part of the revolution that’s shaping the future of technology. Thank you for reading the DevopsRoles page!
Bash Completion: Are you spending too much time typing out lengthy Linux commands or struggling to remember Docker command options? Boost your terminal productivity with Bash Completion! This powerful tool helps automate your workflow by filling in partially typed commands and arguments with a simple tap of the tab key. Let’s dive into how you can set up and leverage for a more efficient command line experience.
Installing Bash Completion
First, ensure Bash Completion is installed on your system.
For Debian/Ubuntu users, execute
sudo apt-get install bash-completion
CentOS/RHEL folks can type
sudo yum install bash-completion
and Fedora users are likely all set but can ensure installation with
sudo dnf install bash-completion
After installation, restart your terminal to enable the feature.
Enabling Bash Completion
In most cases, it will activate automatically. If not, add source /etc/bash_completion to your .bashrc or .bash_profile file to kick things off. This ensures that every time you open your terminal, It is ready to assist you.
How to Use it
Simply start typing a command or file name and press the Tabkey. If there’s only one completion, Bash fills it in for you. If there are several options, a second Tabpress will display them. This function works with file names, command options, and more, streamlining your terminal navigation.
Docker Command Completion
Docker users, rejoice! Bash Completion extends to Docker commands, too. Installation may vary, but generally, you can place the Docker completion script /etc/bash_completion.d/ or /usr/share/bash-completion/completions/. Source the script or restart your terminal to apply. Now, managing Docker containers and images is faster than ever.
Customizing Bash Completion
Feeling adventurous? Create your own Bash completion scripts for commands that lack them. By examining existing scripts in /etc/bash_completion.d/ or /usr/share/bash-completion/completions/, you can learn how they’re constructed and customize your own for any command.
Conclusion
By integrating Bash Completion into your workflow, you’ll not only save time but also enhance your terminal’s functionality. It’s an essential tool for anyone looking to streamline their command line experience. So, give it a try, and watch your productivity soar! I hope will this your helpful. Thank you for reading the DevopsRoles page!
For Example
Here’s a simple example to illustrate the power: Suppose you’re using Docker and want to check the logs of a container.
Instead of typing docker container logs [container_id], simply type docker con and press Tabtwice to see all possible commands starting with “con“. Continue with logsand another Tabto list your containers. Pick the right one, and you’re done in a fraction of the time!
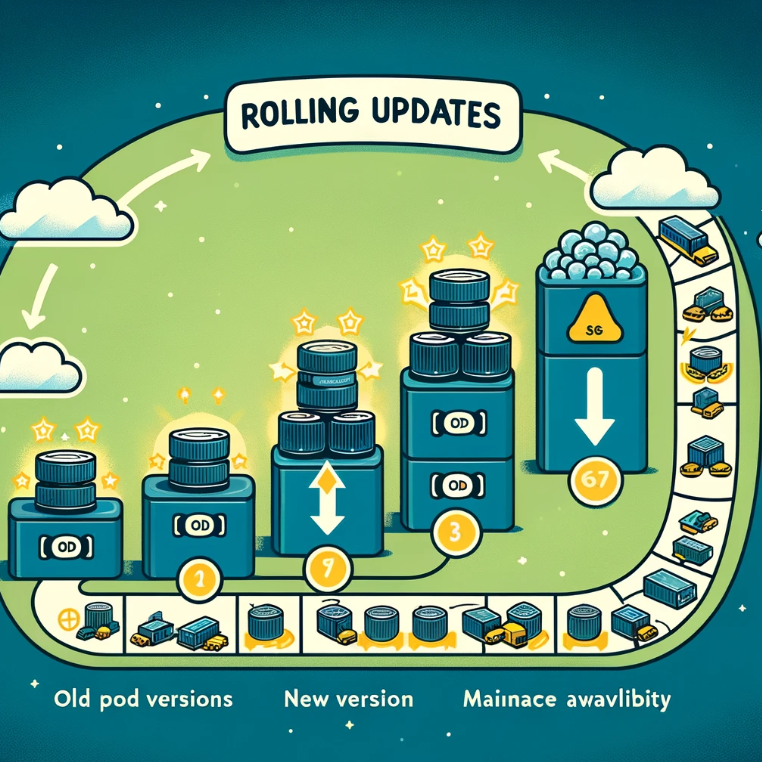
In the realm of Kubernetes, ensuring zero downtime during application updates is crucial. Rolling Updates in Kubernetes provide a seamless way to update the application’s pods without affecting its availability. In this guide, we’ll walk through setting up rolling updates for an Nginx deployment in Kubernetes, ensuring your services remain uninterrupted.
Preparation
Before proceeding, ensure you have Kubernetes and kubectl installed and configured. This guide assumes you have basic knowledge of Kubernetes components and YAML syntax.
Deployment and Service Configuration
First, let’s understand the components of our .yaml file which configures both the Nginx deployment and service:
Deployment Configuration
apiVersion: apps/v1 indicates the API version.
kind: Deployment specifies the kind of Kubernetes object.
metadata: Defines the name of the deployment.
spec: Describes the desired state of the deployment:
selector: Ensures the deployment applies to pods with the label app: nginxdeployment.
revisionHistoryLimit: The number of old ReplicaSets to retain.
progressDeadlineSeconds: Time to wait before indicating progress has stalled.
minReadySeconds: Minimum duration a pod should be ready without any of its containers crashing, for it to be considered available.
strategy: Specifies the strategy used to replace old pods with new ones. Here, it’s set to RollingUpdate.
replicas: Number of desired pods.
template: Template for the pods the deployment creates.
containers: Specifies the Nginx container and its settings, such as image and ports.
Service Configuration
apiVersion: v1 indicates the API version.
kind: Service specifies the kind of Kubernetes object.
metadata: Defines the name of the service.
spec: Describes the desired state of the service:
selector: Maps the service to the deployment.
ports: Specifies the port configuration.
Implementing Rolling Updates in Kubernetes
To apply these configurations and initiate rolling updates, follow these steps:
Step 1. Create or update your deployment and service file named nginx-deployment-service.yaml with the content below.
Step 2. Apply the configuration using the command:
kubectl apply -f nginx-deployment-service.yaml
Step 3. To update the Nginx image or make other changes, modify the nginx-deployment-service.yaml file, and then reapply it. Kubernetes will handle the rolling update according to your strategy specifications.
Monitoring and Troubleshooting:
Monitor the update process using:
kubectl rollout status deployment/nginx-deployment
Check the status of your pods with:
kubectl get pods
If you need to revert to a previous version due to an issue, use:
kubectl rollout undo deployment/nginx-deployment
Conclusion
Rolling updates are essential for maintaining application availability and user satisfaction. By following this guide, you’ve learned how to set up and manage rolling updates for an Nginx deployment in Kubernetes. As you continue to work with Kubernetes, remember that careful planning and monitoring are key to successful deployment management. I hope will this your helpful. Thank you for reading the DevopsRoles page!