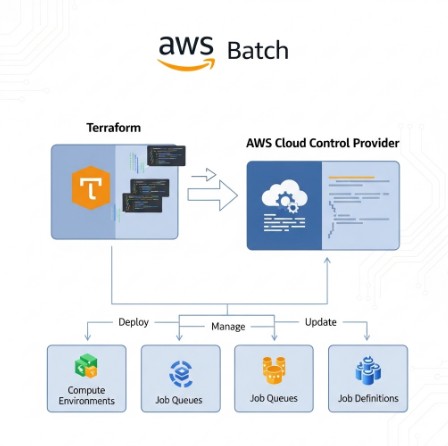
This comprehensive guide will walk you through the process of deploying Terraform on AWS, leveraging the capabilities of AWS Control Tower to establish a secure and well-governed infrastructure-as-code (IaC) environment. We’ll cover setting up your environment, configuring Control Tower, writing and deploying Terraform code, and managing your infrastructure effectively. Understanding how to effectively utilize Terraform on AWS is crucial for any organization aiming for efficient and repeatable cloud deployments.
Setting Up Your AWS Environment and Control Tower
Before you can begin deploying Terraform on AWS, you need a properly configured AWS environment and AWS Control Tower. Control Tower provides a centralized governance mechanism, ensuring consistency and compliance across your AWS accounts.
1. Creating an AWS Account
If you don’t already have an AWS account, you’ll need to create one. Ensure you choose a suitable support plan based on your needs. The free tier offers a good starting point for experimentation.
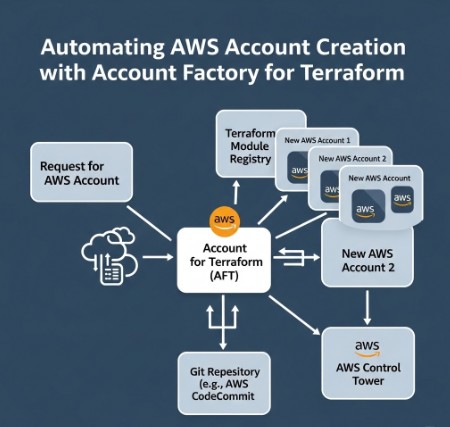
2. Enabling AWS Control Tower
Next, enable AWS Control Tower. This involves deploying a landing zone, which sets up the foundational governance and security controls for your organization. Follow the AWS Control Tower documentation for detailed instructions. This includes defining organizational units (OUs) to manage access and policies.
- Step 1: Navigate to the AWS Control Tower console.
- Step 2: Follow the guided setup to create your landing zone.
- Step 3: Choose the appropriate AWS Regions for your deployment.
3. Configuring IAM Roles
Properly configuring IAM roles is critical for secure access to AWS resources. Terraform on AWS requires specific IAM permissions to interact with AWS services. Create an IAM role with permissions necessary for deploying your infrastructure. This should adhere to the principle of least privilege.
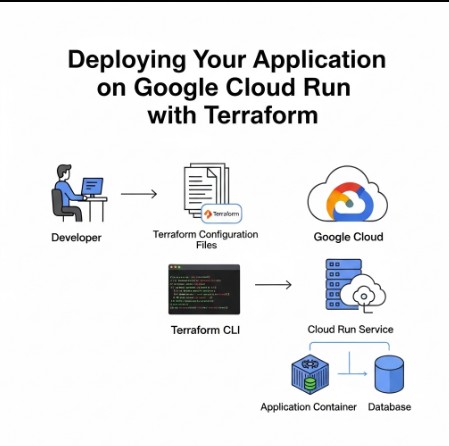
Deploying Terraform on AWS: A Practical Example
This section demonstrates deploying a simple EC2 instance using Terraform on AWS. This example assumes you have Terraform installed and configured with appropriate AWS credentials.
1. Writing the Terraform Configuration File (main.tf)
terraform {
  required_providers {
    aws = {
      source  = "hashicorp/aws"
      version = "~> 4.0"
    }
  }
}

provider "aws" {
  region = "us-west-2" # Replace with your desired region
}

resource "aws_instance" "example" {
  ami           = "ami-0c55b31ad2299a701" # Replace with a suitable AMI ID for your region
  instance_type = "t2.micro"
}
2. Initializing and Deploying Terraform
After creating your main.tf file, navigate to the directory in your terminal and execute the following commands:
terraform init: This downloads the necessary AWS provider plugins.terraform plan: This shows you a preview of the changes Terraform will make.terraform apply: This applies the changes and deploys the EC2 instance.
3. Destroying the Infrastructure
When you’re finished, use terraform destroy to remove the deployed resources. Always review the plan before applying any destructive changes.
Advanced Terraform Techniques with AWS Control Tower
Leveraging Control Tower alongside Terraform on AWS allows for more sophisticated deployments and enhanced governance. This section explores some advanced techniques.
1. Using Modules for Reusability
Terraform modules promote code reuse and maintainability. Create modules for common infrastructure components, such as VPCs, subnets, and security groups. This improves consistency and reduces errors.
2. Implementing Security Best Practices
Utilize Control Tower’s security controls alongside Terraform on AWS. This includes managing IAM roles effectively, adhering to least privilege principles, and implementing security groups and network ACLs to control access to your resources. Always use version control for your Terraform code.
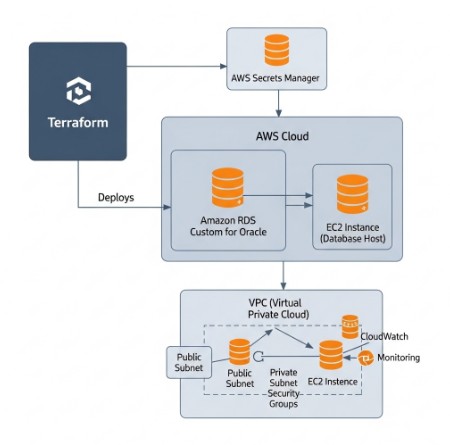
3. Integrating with Other AWS Services
Terraform on AWS integrates seamlessly with many AWS services. Consider incorporating services like:
- AWS S3: For storing configuration files and state.
- AWS CloudFormation: For orchestrating complex deployments.
- AWS CloudWatch: For monitoring infrastructure health and performance.
4. Using Workspaces for Different Environments
Employ Terraform workspaces to manage different environments (e.g., development, staging, production) using the same codebase. This helps maintain separation and reduces risk.
Implementing CI/CD with Terraform and AWS Control Tower
Integrating Terraform on AWS within a CI/CD pipeline enhances automation and allows for streamlined deployments. Utilize tools like GitHub Actions or Jenkins to trigger Terraform deployments based on code changes.
Frequently Asked Questions
Q1: What are the benefits of using Terraform with AWS Control Tower?
Using Terraform on AWS in conjunction with Control Tower significantly improves governance and security. Control Tower ensures your infrastructure adheres to defined policies, while Terraform provides repeatable and efficient deployments. This combination minimizes risks and allows for more streamlined operations.
Q2: How do I manage Terraform state securely?
Store your Terraform state securely using AWS services like S3, backed by KMS encryption. This protects your infrastructure configuration and prevents unauthorized modifications.
Q3: What are some common pitfalls to avoid when using Terraform on AWS?
Common pitfalls include insufficient IAM permissions, incorrect region settings, and neglecting to properly manage your Terraform state. Always thoroughly test your deployments in a non-production environment before applying to production.

Conclusion
This guide has detailed the process of deploying Terraform on AWS, emphasizing the benefits of integrating with AWS Control Tower for enhanced governance and security. By mastering these techniques, you can establish a robust, repeatable, and secure infrastructure-as-code workflow. Remember, consistent adherence to security best practices is paramount when deploying Terraform on AWS, especially when leveraging the centralized governance features of Control Tower. Proper planning and testing are key to successful and reliable deployments.
For more detailed information, refer to the official Terraform AWS Provider documentation and the AWS Control Tower documentation. Thank you for reading the DevopsRoles page!