Introduction
You can use the AWS Console Manager to manage the RDS PostgreSQL instance, alternatively, you can manage the RDS PostgreSQL instance using the AWS CLI in Linux as below.
Guide to creating and managing the RDS PostgreSQL instance using the AWS CLI.
This lab contains the following tasks
Step 1: Install AWS CLI into the Cloud9 instance
Step 2: Create an RDS PostgreSQL Instance using the AWS CLI
Step 3: Configure the RDS PostgreSQL client on the Cloud9 instance
Step 4: Create Read-replica using the AWS CLI
Step 5: Promote Read Replica into a standalone instance using the AWS CLI
Step 6: Scale up the instance using the AWS CLI
Step 7: Migrating to a Multi-AZ DB cluster using the AWS CLI
Step 8: Promote this Multi-AZ read replica cluster to a stand-alone cluster using the AWS CLI
Step 9: Create a read replica from a Multi-AZ read replica cluster using the AWS CLI
Step 10: Check if the instance is Multi-AZ using the AWS CLI
Step 11: Convert the instance to Multi-AZ using the AWS CLI
Step 12: Create an SNS Topic and an RDS Event Subscription using the AWS CLI
Step 13: Perform failover of a Multi-AZ RDS instance using the AWS CLI
Step 14: View the instance’s backups using the AWS CLI
Step 15: Take a manual snapshot of the RDS instance using the AWS CLI
Step 16: Restores an instance from the latest manual snapshot using the AWS CLI
Step 17: Point in time restore the RDS instance using the AWS CLI
Step 18: Delete the RDS instances using the AWS CLI
Step 19: Upgrading the engine version of RDS instances using the AWS CLI
Detail Steps
Step 1: Install AWS CLI into the Cloud9 instance
sudo rm -rf /usr/local/aws
sudo rm /usr/bin/aws
curl "https://awscli.amazonaws.com/awscli-exe-linux-x86_64.zip" -o "awscliv2.zip"
unzip awscliv2.zip
sudo ./aws/install
rm awscliv2.zip
Step 2: Create an RDS PostgreSQL Instance cluster using the AWS CLI
read -s -p "Enter a Password: " MASTER_USER_PASSWORD
AWSREGION=`aws configure get region`
DBSUBNETGRP=XXXXXXX
DBSECGRP=XXXXXXX
EMROLEARN=XXXXXXX
RDSKMSKEY=XXXXXXX

aws rds create-db-instance \
	--db-instance-identifier rds-pg-labs \
	--db-name pglab \
	--engine postgres \
	--engine-version 13.8 \
	--master-username masteruser \
	--master-user-password $MASTER_USER_PASSWORD \
	--db-instance-class db.t2.micro \
	--storage-type io1 \
	--iops 1000 \
	--allocated-storage 100 \
	--no-multi-az \
	--db-subnet-group $DBSUBNETGRP \
	--vpc-security-group-ids $DBSECGRP \
	--no-publicly-accessible \
	--enable-iam-database-authentication \
	--backup-retention-period 1 \
	--copy-tags-to-snapshot \
	--auto-minor-version-upgrade \
	--storage-encrypted \
	--kms-key-id $RDSKMSKEY \
	--monitoring-interval 1 \
	--monitoring-role-arn $EMROLEARN \
	--enable-performance-insights \
	--performance-insights-kms-key-id $RDSKMSKEY \
	--performance-insights-retention-period 7 \
	--enable-cloudwatch-logs-exports '["postgresql","upgrade"]' \
	--deletion-protection \
	--region $AWSREGION
Step 3: Configure the RDS PostgreSQL client on the Cloud9 instance
sudo amazon-linux-extras install -y postgresql14
sudo yum install -y postgresql-contrib sysbench jq
AWSREGION=`aws configure get region`
sudo amazon-linux-extras install -y postgresql14
sudo yum install -y postgresql-contrib sysbench jq
AWSREGION=`aws configure get region`
export DBUSER="XXXXXX"
export DBPASS="XXXXXX"

export PGHOST=rds-pg-labs.XXXXXX.us-east-1.rds.amazonaws.com
export PGUSER=$DBUSER
export PGPASSWORD="$DBPASS"
echo "export DBPASS=\"$DBPASS\"" >> /home/ec2-user/.bashrc
echo "export DBUSER=$DBUSER" >> /home/ec2-user/.bashrc
echo "export DBENDP=$DBENDP" >> /home/ec2-user/.bashrc
echo "export AWSREGION=$AWSREGION" >> /home/ec2-user/.bashrc
echo "export PGUSER=$DBUSER" >> /home/ec2-user/.bashrc
echo "export PGPASSWORD=\"$DBPASS\"" >> /home/ec2-user/.bashrc
echo "export PGHOST=$DBENDP" >> /home/ec2-user/.bashrc

Now, Verify DB Instance as bellow
psql pglab
Step 4: Create Read-replica cluster using the AWS CLI
AWSREGION=`aws configure get region`

aws rds create-db-instance-read-replica \
	--db-instance-identifier rds-pg-labs-read \
	--source-db-instance-identifier rds-pg-labs \
	--db-instance-class db.t3.medium \
	--region $AWSREGION
Step 5: Promote Read Replica into a standalone instance cluster using the AWS CLI
AWSREGION=`aws configure get region`
aws rds promote-read-replica \
--db-instance-identifier rds-pg-labs-read \
--backup-retention-period 1 \
--region $AWSREGION
Step 6: Scale up the instance using the AWS CLI
AWSREGION=`aws configure get region`
aws rds modify-db-instance \
	--db-instance-identifier rds-pg-labs \
	--db-instance-class db.t3.large \
	--apply-immediately \
	--region $AWSREGION
Step 7: Migrating to a Multi-AZ DB cluster cluster using the AWS CLI
ARN=`aws rds describe-db-instances --db-instance-identifier rds-pg-labs --query 'DBInstances[].DBInstanceArn' --output text --region $AWSREGION`

aws rds create-db-cluster \
        --db-cluster-identifier rds-pg-labs-cluster \
        --engine postgres \
        --replication-source-identifier $ARN \
        --db-cluster-instance-class db.r5d.large \
        --storage-type io1 --iops 1000 \
        --region $AWSREGION \
        --db-subnet-group-name XXXXXXX
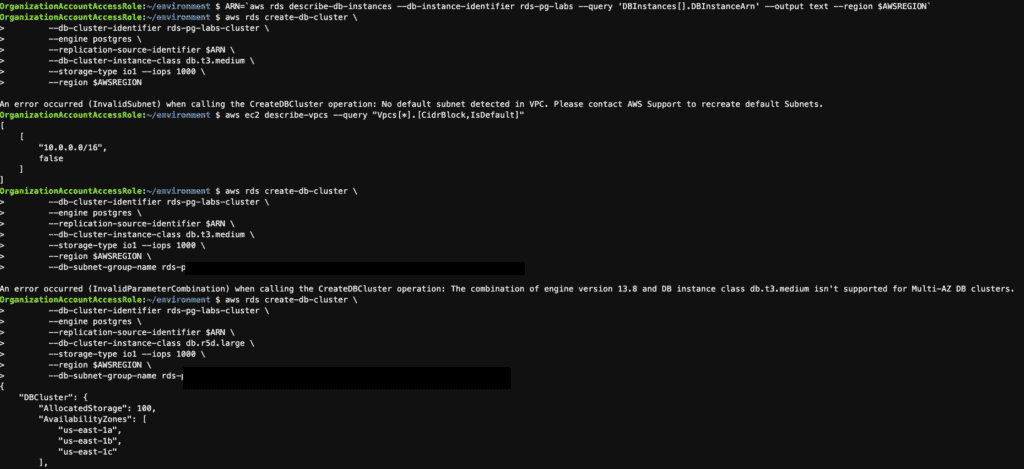
Please note the following message.
An error occurred (InvalidSubnet) when calling the CreateDBCluster operation: No default subnet was detected in VPC. Please contact AWS Support to recreate the default Subnets.
An error occurred (InvalidParameterCombination) when calling the CreateDBCluster operation: The combination of engine version 13.8 and DB instance class db.t3.medium isn’t supported for Multi-AZ DB clusters.
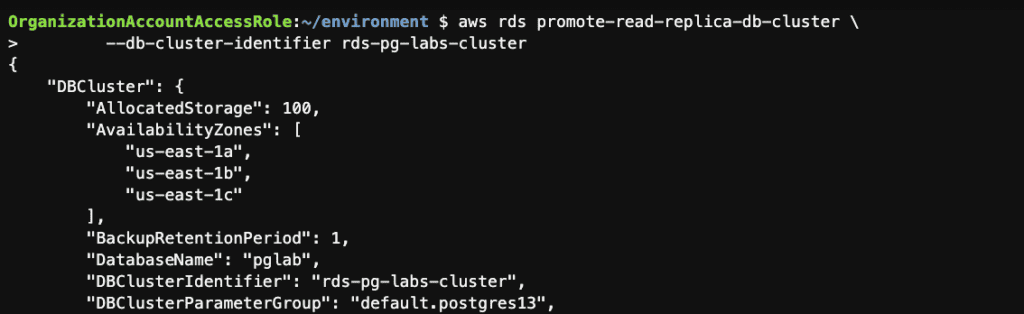
Step 8: Promote this Multi-AZ read replica cluster to a stand-alone cluster using the AWS CLI
aws rds promote-read-replica-db-cluster \
        --db-cluster-identifier rds-pg-labs-cluster


Step 9: Create a read replica from a Multi-AZ read replica cluster using the AWS CLI
aws rds create-db-instance-read-replica \
   --db-instance-identifier rds-pg-labs-cluster-replica \
   --source-db-cluster-identifier rds-pg-labs-cluster
Note: For RDS for PostgreSQL, the source Multi-AZ DB cluster must be running version 15.2-R2 or higher to create a DB instance read replica. See other Limitations in the Amazon RDS User Guide.
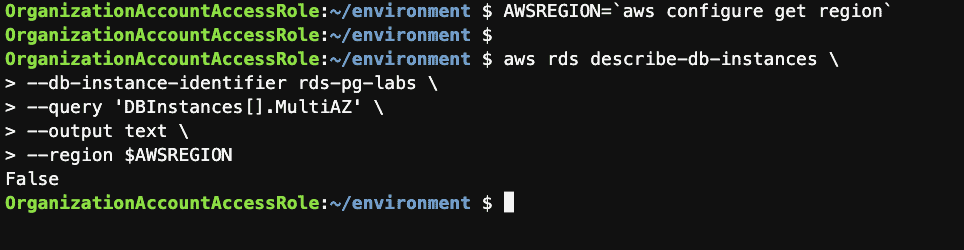
Step 10: Check if the instance is Multi-AZ using the AWS CLI
AWSREGION=`aws configure get region`
aws rds describe-db-instances \
	--db-instance-identifier rds-pg-labs \
	--query 'DBInstances[].MultiAZ' \
	--output text \
	--region $AWSREGION
Step 11: Convert the instance to Multi-AZ using the AWS CLI
aws rds modify-db-instance \
	--db-instance-identifier rds-pg-labs \
	--multi-az \
	--apply-immediately \
	--region $AWSREGION
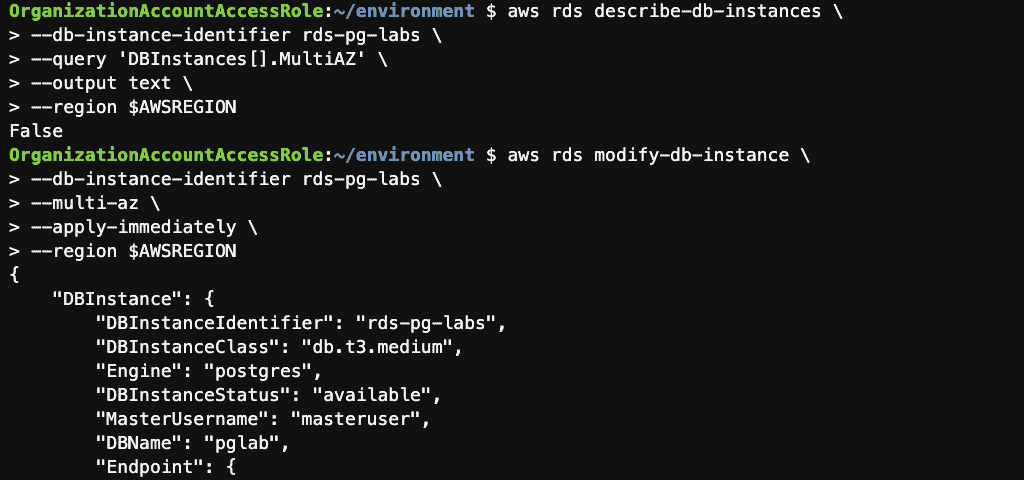
Confirm that your instance is now Multi-AZ


Step 12: Create an SNS Topic and an RDS Event Subscription using the AWS CLI


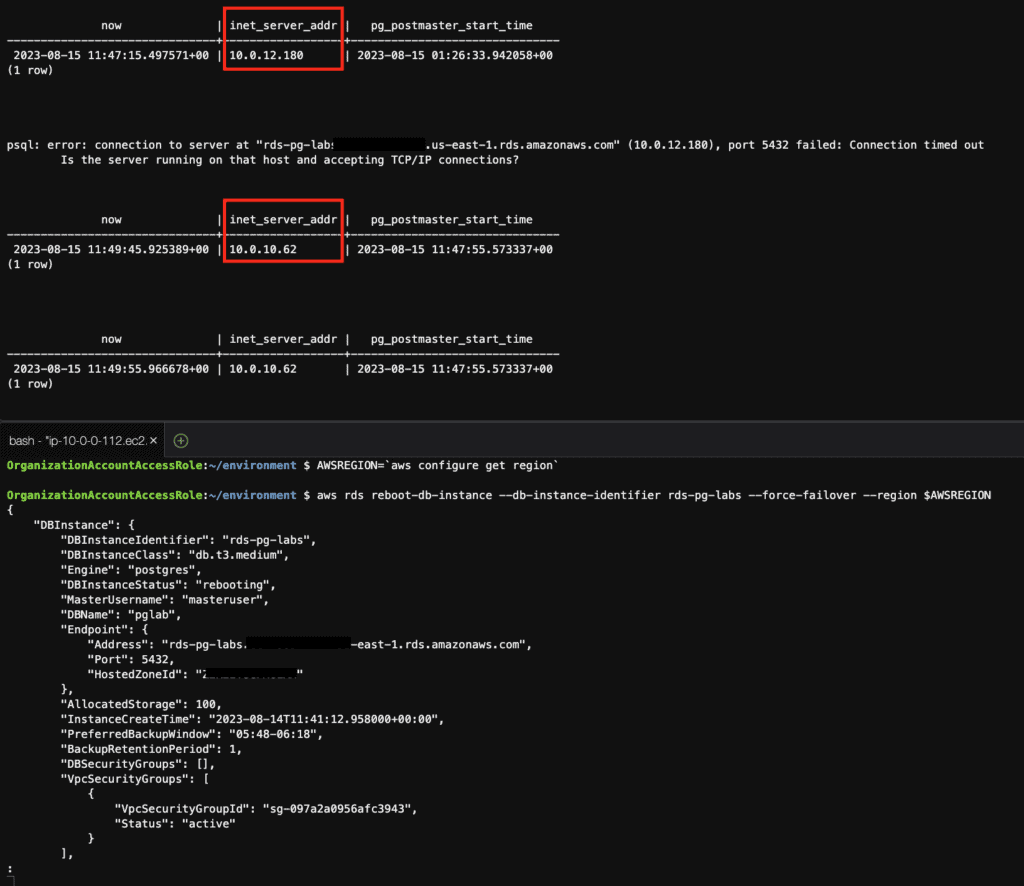
Step 13: Perform failover of a Multi-AZ RDS instance using the AWS CLI
# connection to the database at 10-second intervals
while true;
do
psql pglab -c 'select now() ,inet_server_addr(), pg_postmaster_start_time() ';
echo -e "\n\n"
sleep 10
done

# reboot the instance with failover
AWSREGION=`aws configure get region`
aws rds reboot-db-instance --db-instance-identifier rds-pg-labs --force-failover --region $AWSREGION
Before failover


Failover

Step 14: View the instance’s backups using the AWS CLI
AWSREGION=`aws configure get region`
# List the automated backups for the instance
m
# List the snapshots for the instance
aws rds describe-db-snapshots \
--db-instance-identifier rds-pg-labs \
--region $AWSREGION --output table
# Check the Latest Restorable Time (LRT) of the instance
aws rds describe-db-instances \
--db-instance-identifier rds-pg-labs \
--query 'DBInstances[].LatestRestorableTime' \
--region $AWSREGION \
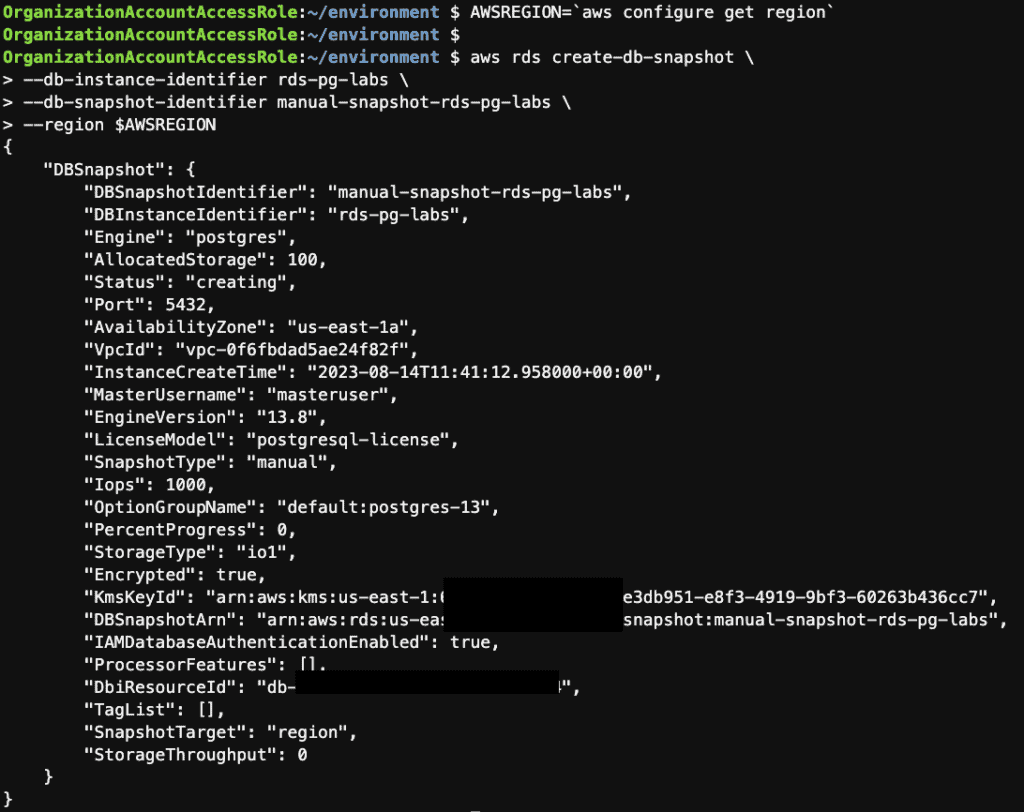
--output textStep 15: Take a manual snapshot of the RDS instance using the AWS CLI
AWSREGION=`aws configure get region`

aws rds create-db-snapshot \
	--db-instance-identifier rds-pg-labs \
	--db-snapshot-identifier manual-snapshot-rds-pg-labs \
	--region $AWSREGION
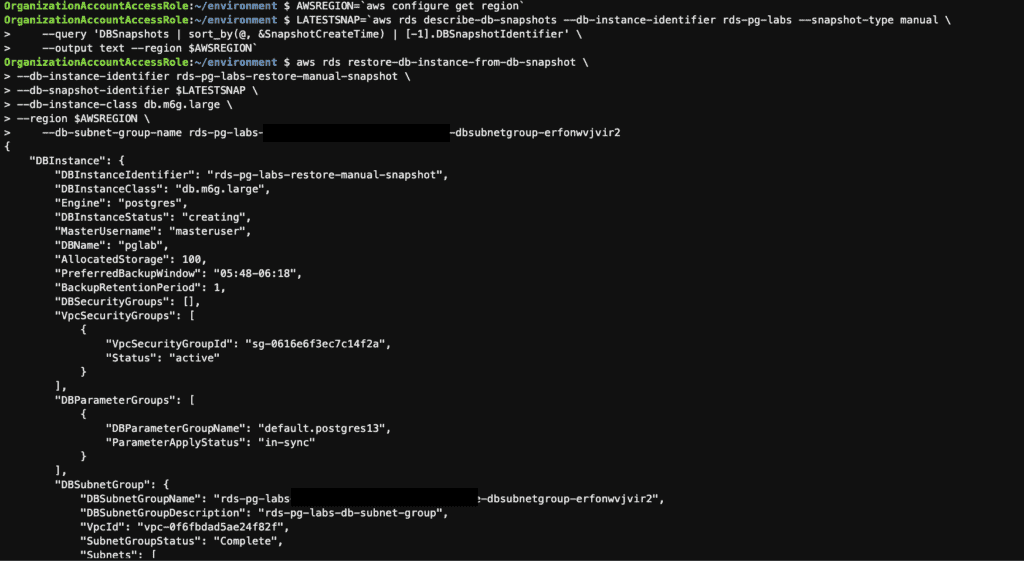
Step 16: Restores an instance from the latest manual snapshot using the AWS CLI
AWSREGION=`aws configure get region`
# Get the Latest Manual Snapshot ID
LATESTSNAP=`aws rds describe-db-snapshots --db-instance-identifier rds-pg-labs --snapshot-type manual \
    --query 'DBSnapshots | sort_by(@, &SnapshotCreateTime) | [-1].DBSnapshotIdentifier' \
    --output text --region $AWSREGION`

# Restore the Snapshot
aws rds restore-db-instance-from-db-snapshot \
	--db-instance-identifier rds-pg-labs-restore-manual-snapshot \
	--db-snapshot-identifier $LATESTSNAP \
	--db-instance-class db.m6g.large \
	--region $AWSREGION \
    --db-subnet-group-name XXXXXXX
# Monitor the progress and status of the restoration
aws rds describe-db-instances --db-instance-identifier rds-pg-labs-restore-manual-snapshot \
	--query 'DBInstances[0].[DBInstanceStatus,Endpoint.Address]' \
    --output text --region $AWSREGION
Monitor the progress and status of the restoration


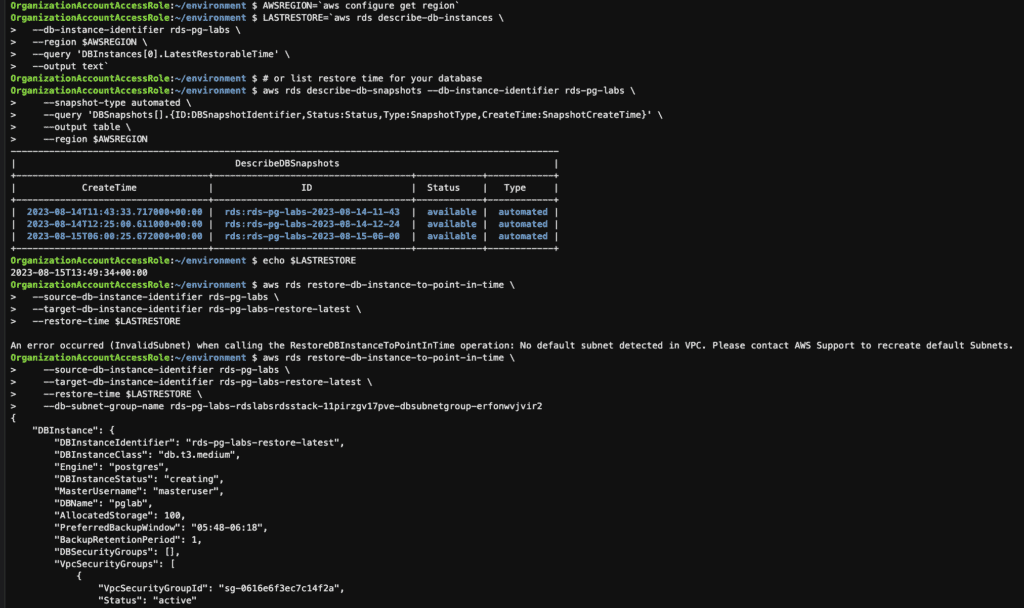
Step 17: Point in time restore the RDS instance using the AWS CLI
AWSREGION=`aws configure get region`
# Lookup the latest restore time for your database
LASTRESTORE=`aws rds describe-db-instances \
  --db-instance-identifier rds-pg-labs \
  --region $AWSREGION \
  --query 'DBInstances[0].LatestRestorableTime' \
  --output text`

# or list restore time for your database
aws rds describe-db-snapshots --db-instance-identifier rds-pg-labs \
    --snapshot-type automated \
    --query 'DBSnapshots[].{ID:DBSnapshotIdentifier,Status:Status,Type:SnapshotType,CreateTime:SnapshotCreateTime}' \
    --output table \
    --region $AWSREGION

# Restore the database to the latest restorable time
aws rds restore-db-instance-to-point-in-time \
    --source-db-instance-identifier rds-pg-labs \
    --target-db-instance-identifier rds-pg-labs-restore-latest \
    --restore-time $LASTRESTORE \
    --db-subnet-group-name XXXXXXX

# Monitor the progress and status of the restoration
aws rds describe-db-instances --db-instance-identifier rds-pg-labs-restore-latest \
	--query 'DBInstances[0].[DBInstanceStatus,Endpoint.Address]' \
    --output text --region $AWSREGION
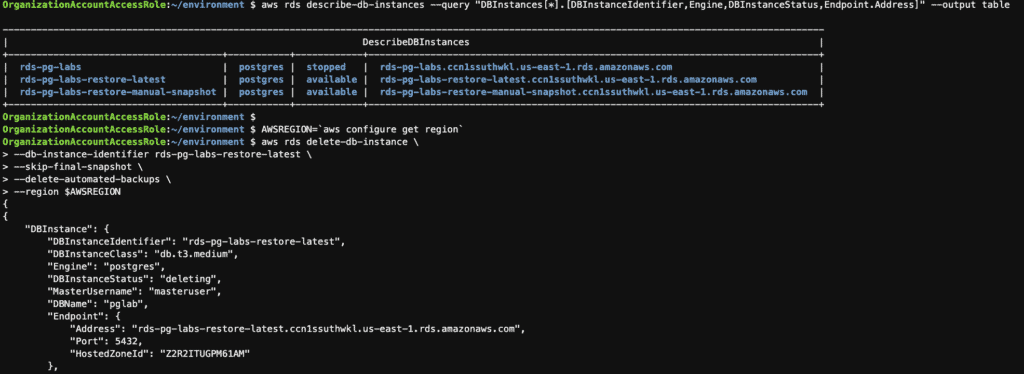
Step 18: Delete the RDS instances using the AWS CLI
# list RDS instance
aws rds describe-db-instances --query "DBInstances[*].[DBInstanceIdentifier,Engine,DBInstanceStatus,Endpoint.Address]" --output table

AWSREGION=`aws configure get region`
# delete RDS instance
aws rds delete-db-instance \
	--db-instance-identifier rds-pg-labs-restore-latest \
	--skip-final-snapshot \
	--delete-automated-backups \
	--region $AWSREGION
Step 19: Upgrading the engine version of RDS instances using the AWS CLI
AWSREGION=`aws configure get region`
aws rds modify-db-instance --db-instance-identifier rds-pg-labs --engine-version 14.8 --allow-major-version-upgrade --apply-immediately --region $AWSREGION
aws rds describe-db-instances --db-instance-identifier rds-pg-labs --region $AWSREGION --query 'DBInstances[*].EngineVersion'

Conclusion
These steps provide a general AWS CLI of the process of managing RDS instances. The specific configuration details may vary depending on your environment and setup. It’s recommended to consult the relevant documentation from AWS for detailed instructions on setting up.
Manage the RDS PostgreSQL instance using the AWS CLI
I hope will this be helpful. Thank you for reading the DevopsRoles page!