Become a Database Administrator with DevOpsRoles.com. Access expert guides and tutorials to master database management, optimization, and security for DevOps.
How to change sysdate for Oracle Database server. Oracle gets the system day from OS server data. You can change Oracle SYSDATE for testing.
In Oracle Database, the SYSDATE function returns the current date and time of the database server. However, you cannot directly change the value of SYSDATE as it is a read-only function that always provides the current timestamp. It reflects the system time when the query or statement is executed.
If you want to manipulate or change dates in Oracle, you can use various date manipulation functions and arithmetic operations. For example, you can use the ADD_MONTHS, TO_DATE, TRUNC, DATEADD, and other functions to perform date calculations and transformations.
Oracle change sysdate Tips and Tricks
Oracle change SYSDATE.
SQL> ALTER SYSTEM SET fixed_date = '2018-01-28-13:00:00' SCOPE = MEMORY;
Compatibility and Availability: The use of fixed_date is available only in Oracle Database releases before Oracle Database 21c. Starting from Oracle Database 21c, the fixed_date parameter has been desupported and cannot be used to alter the system date and time.
Scope: The SCOPE parameter determines whether the change takes effect immediately (MEMORY scope) or at the next database startup (SPFILE scope).
Format: The fixed_date parameter expects the date and time in the YYYY-MM-DD-HH24:MI:SS format.
Privileges: Modifying system parameters typically requires administrative privileges, such as the ALTER SYSTEM privilege.
Oracle Reset SYSDATE
SQL> ALTER SYSTEM SET fixed_date=NONE;
Beware! Changing Oracle sysdate for testing. After you can reset sysdate for the Oracle database server.
In this tutorial, you will learn how to Export and Import in Oracle 11g. This process is essential for database administrators to backup, transfer, and restore database schemas efficiently.
Create DBA Directory
Export all SCHEMA using expdp
Import all SCHEMA using impd
Export and Import in Oracle
Syntax for IMPDP command
IMPDPTABLE_EXISTS_ACTIONPARAMETEREXPLAINED
TABLE_EXISTS_ACTION
SKIP: The default value for this parameter is SKIP.
APPEND: the dump will be appended to the table and the existing data will remain unchanged.
TRUNCATE: This option truncates the existing rows in the table and inserts the rows from the dump
REPLACE: This option drops the current table and creates the table as it is in the dump file. Both SKIP and REPLACE options are not valid if you set the CONTENT=DATA_ONLY for the impdp.
Create a DBA Directory in Oracle
Login into SQL Plus with user sys.
[oracle@DBOracle ~]$ sqlplus / as sysdba
Creating folder DBA MY_BACKUP_DIR in /tmp folder
SQL> create or replace directory MY_BACKUP_DIR AS '/tmp/oraclebackup';
DBA Directory is created by the user system. Only users grant DBA to use this folder. you can assign grant Other_User.
SQL> grant read,write on directory MY_BACKUP_DIR to Other_User;
Export all SCHEMA using expdp
Using expdp command to export all schema into a dump file.
[oracle@DBOracle ~]$ expdp \"sys/123456789@DEVOPSROLES AS SYSDBA\" DIRECTORY=MY_BACKUP_DIR DUMPFILE=exp_ora.dmp SCHEMAS=huupv LOGFILE=exp_ora.log
Import all SCHEMA using impd
The first, create a user huupv
SQL> create user huupv identified by 123456789;
Import from sysadmin
[oracle@DBOracle ~]$ impdp \"sys/123456789@DEVOPSROLES AS SYSDBA\" schemas=huupv directory=MY_BACKUP_DIR dumpfile=exp_ora.dmp logfile=imp_ora.log
Note:
File dump: exp_ora.dmp
Service Name: DEVOPSROLES
To schema: huupv
Conclusion
Through this article, you have learned how to use the Export and Import in Oracle 11g to manage database schemas. These tools are crucial for database backup, restoration, and migration tasks. I hope will this your helpful. Thank you for reading the DevopsRoles page!
A schema is defined as a user that owns data such as tables, indexes, and so forth. In this tutorial, How to use Oracle create schema.
Dive into the world of Oracle with this practical guide on creating schemas. This tutorial walks you through the essential steps to establish a schema in Oracle Database, starting with creating a tablespace, defining a new user, and culminating in setting up a test table. Ideal for database administrators and developers who want to streamline their database structure and enhance data management.
Oracle create schema
Access the Oracle database with permission privileges for creating a tablespace, creating a user, and creating a table on the Oracle Database.
[oracle@DBOracle ~]$ sqlplus / as sysdba
Step 1: Create tablespace on Oracle Database
Before creating a schema you need to create a file ( one or more files) for the schema to place its data into. This file schema writes data is called a tablespace. One tablespace has one or more datafile.
SQL> create tablespace datafile_test datafile '/U02/datafile_test_01.dbf' size 1000M extent management local autoallocate segment space management auto;
SQL> CREATE USER HuuPV IDENTIFIED BY pwd4HuuPV DEFAULT TABLESPACE datafile_test TEMPORARY TABLESPACE TEMP;
Oracle Privileges Granted to the APPDEV Role
SQL> GRANT CONNECT TO HuuPV;
SQL> GRANT UNLIMITED TABLESPACE TO HuuPV;
SQL> GRANT CREATE TABLE TO HuuPV;
SQL> GRANT CREATE PROCEDURE TO HuuPV;
SQL> GRANT CREATE VIEW TO HuuPV;
SQL> GRANT CREATE TRIGGER TO HuuPV;
SQL> GRANT CREATE SEQUENCE TO HuuPV;
SQL> GRANT CREATE SYNONYM TO HuuPV;
Step 3: Oracle creates a table for the test
SQL> create table test (NAME varchar2(32), AGE number);
SQL> insert into test (NAME, AGE) values ('HuuPV', 29);
SQL> insert into test (NAME, AGE) values ('Huu', 30);
SQL> commit;
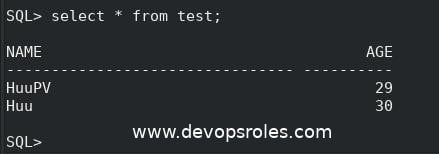
Examine the content of the table test created above
SQL> select * from test;
The result created a table for the test
Oracle create schema another method uses the script oracle_create_user.sql file
The content oracle_create_user.sql file
CREATE USER HuuPV IDENTIFIED BY pwd4HuuPV DEFAULT TABLESPACE datafile_test TEMPORARY TABLESPACE TEMP;
GRANT CONNECT TO HuuPV;
GRANT UNLIMITED TABLESPACE TO HuuPV;
GRANT CREATE TABLE TO HuuPV;
GRANT CREATE PROCEDURE TO HuuPV;
GRANT CREATE VIEW TO HuuPV;
GRANT CREATE TRIGGER TO HuuPV;
GRANT CREATE SEQUENCE TO HuuPV;
GRANT CREATE SYNONYM TO HuuPV;
Running script oracle_create_user.sql file
SQL>@/home/oracle/scripts/oracle_create_user.sql
Conclusion
By following the steps outlined in this guide, you’ve learned how to create an Oracle schema effectively. This foundation is crucial for managing and organizing data in Oracle databases efficiently, providing you with the skills to maintain a robust database environment.
Oracle Database is a relational database management system (RDBMS) from the Oracle Corporation. I will guide Install Oracle Database 12c on centos 7 for Dev Environment step by step.
Step 1: Intro
My system is as below:
[root@DBOracle ~]# hostnamectl
Static hostname: DBOracle.DevopsRoles.local
Icon name: computer-vm
Chassis: vm
Machine ID: 248dbd1f6d5b4bbb85e743d11d4e994e
Boot ID: 7eded015f6a242e9a9e8c982d754cc26
Virtualization: kvm
Operating System: CentOS Linux 7 (Core)
CPE OS Name: cpe:/o:centos:centos:7
Kernel: Linux 3.10.0-862.6.3.el7.x86_64
Architecture: x86-64
Prerequisites
The firewall allows port Oracle Database
SELinux allows Oracle Database
In this guide, I will stop the firewall and SELinux disable mode 🙂 for a test install Oracle Database.
Step 2: Prepare to install Oracle database 12c step-by-step
the limit for Oracle users in /etc/security/limits.conf file
oracle soft nproc 2047
oracle hard nproc 16384
oracle soft nofile 1024
oracle hard nofile 65536
#Oracle recommended value for stack is set to 10240 for user oracle
oracle soft stack 10240
Oracle installation requires GUI access. I will install an X Window System on the Server Oracle Database
Yeah! let’s go install Oracle Database 12c. Are you ready
Step 3: Install Oracle Database 12c
From the client open a new terminal and connect to the server Oracle database.
ssh -X oracle@192.168.1.114
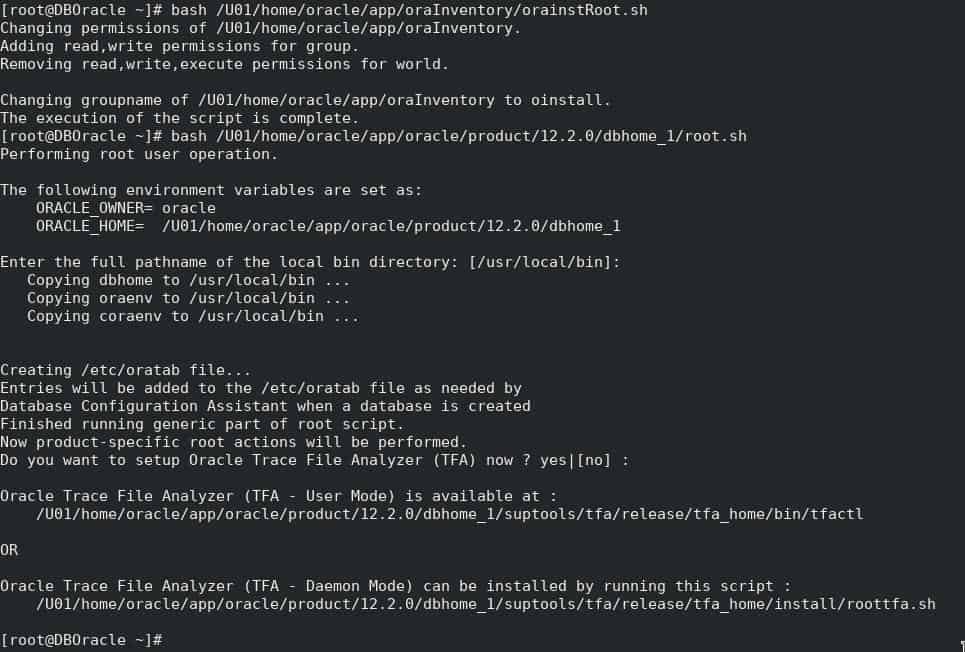
Install Oracle Database 12c as below:
[root@DBOracle ~]# cd /stage/database
[root@DBOracle ~]# ./runInstaller
The display terminal is as below:
Starting Oracle Universal Installer...

Checking Temp space: must be greater than 500 MB. Actual 26587 MB Passed
Checking swap space: must be greater than 150 MB. Actual 9535 MB Passed
Checking monitor: must be configured to display at least 256 colors. Actual 16777216 Passed
Preparing to launch Oracle Universal Installer from /tmp/OraInstall2018-07-05_10-20-03PM. Please wait ...
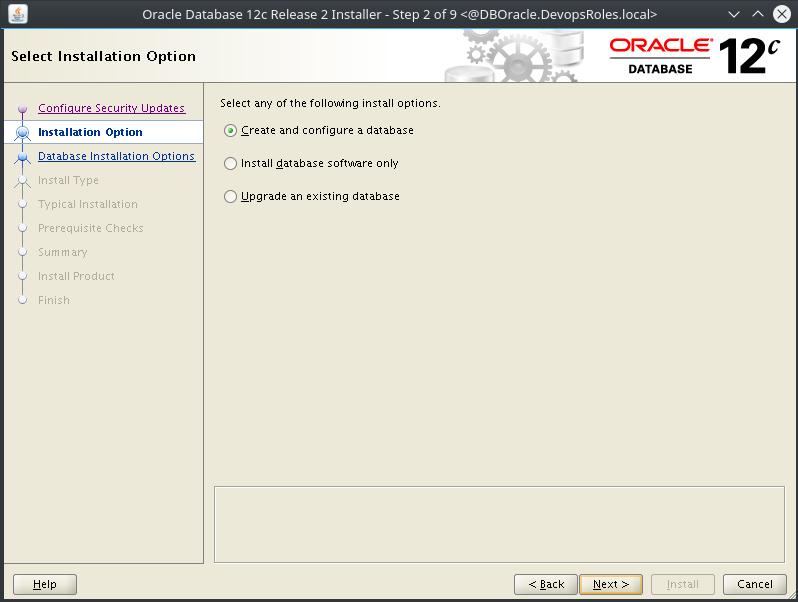
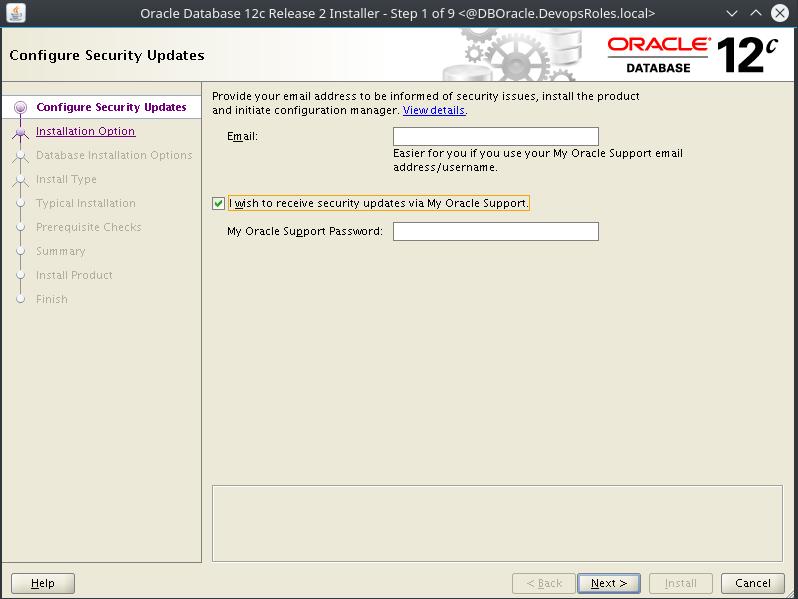
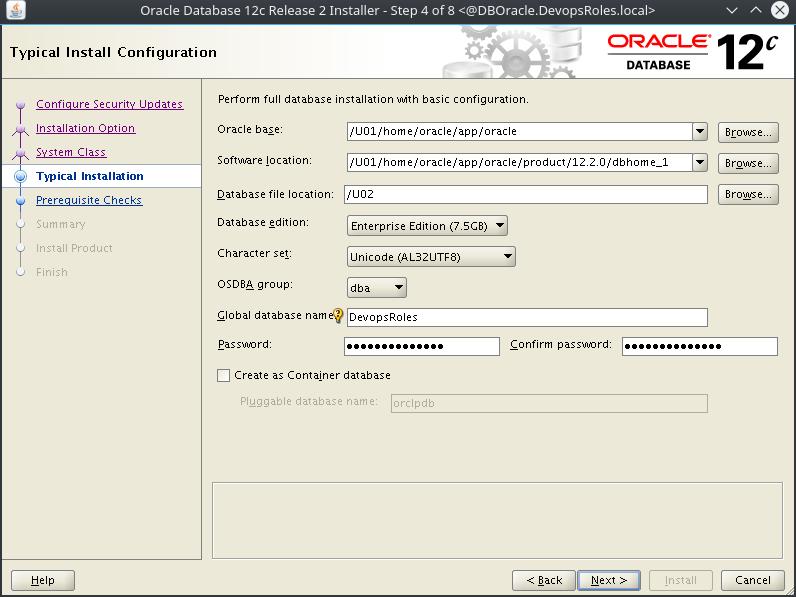
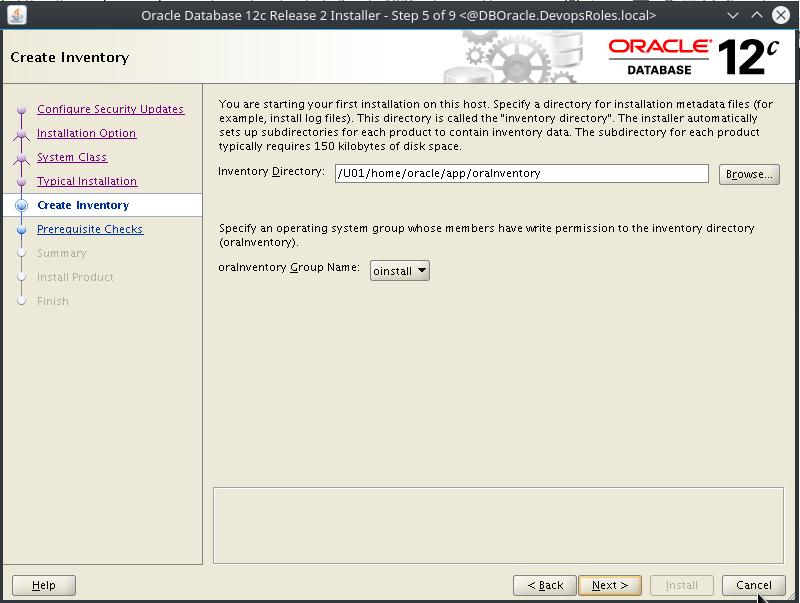
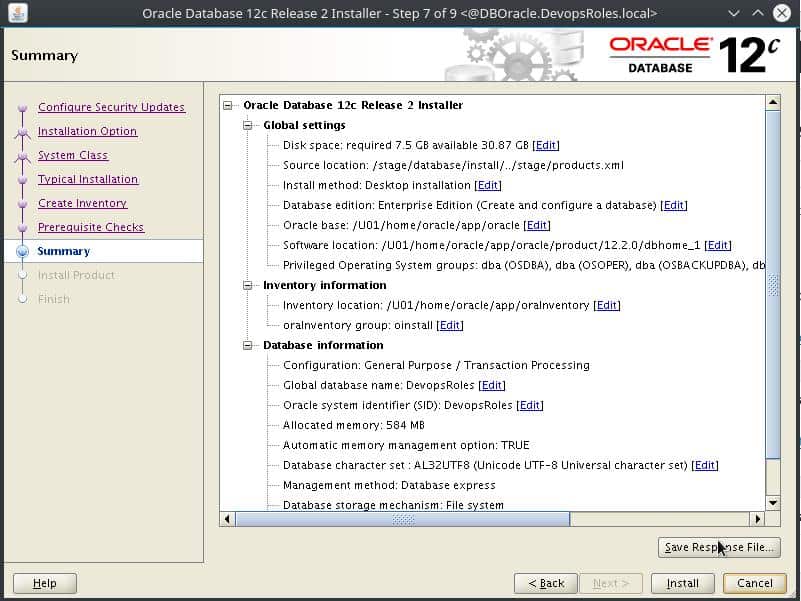
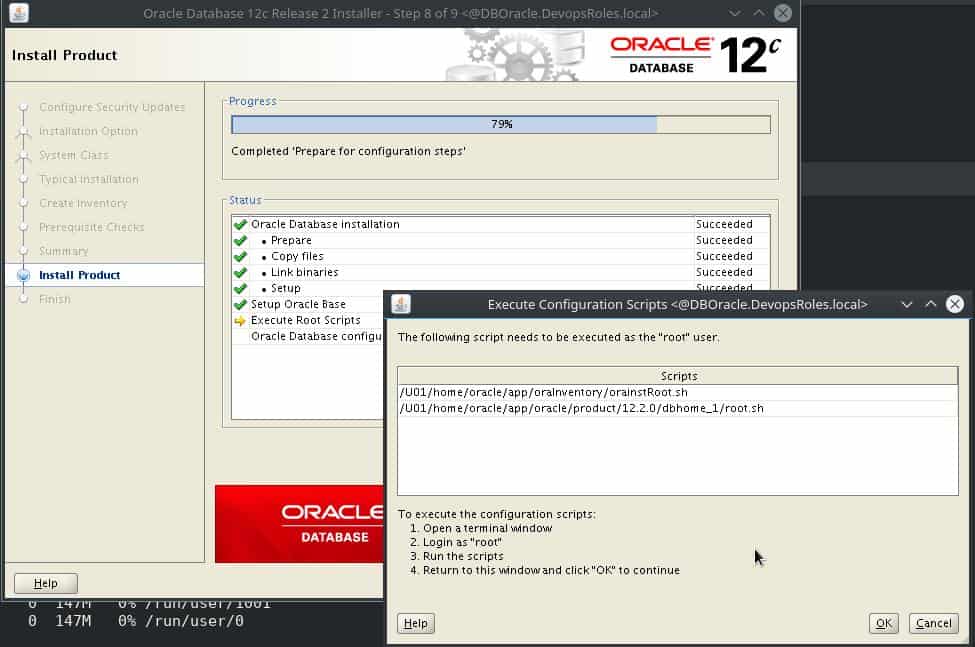
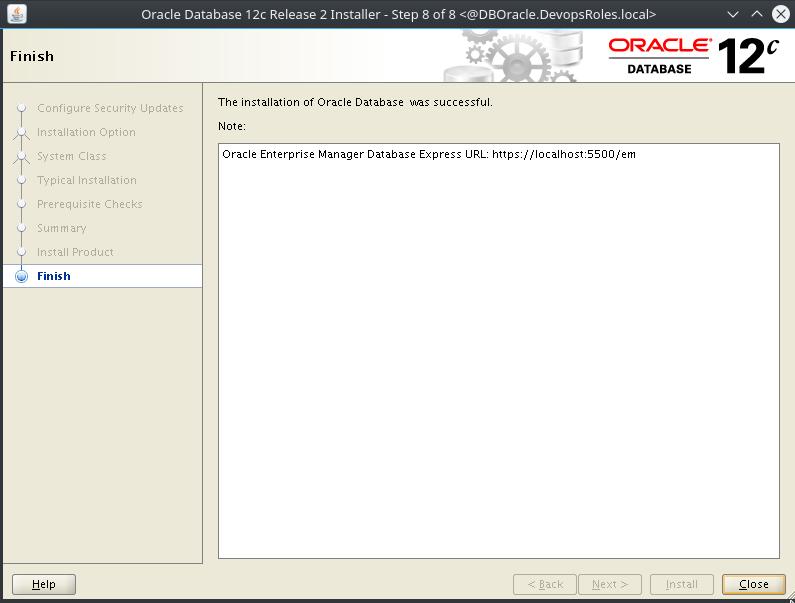
The installation GUI Oracle Database 12c as the picture below:
Select Installation Option
The choice “Create and configure a database” –> Next
Configure Security Updates
For Dev Environment
Email: None
Uncheck: I wish to receive security updates via My Oracle Support
For Production Environment
Email: Input your email
Check: I wish to receive security updates via My Oracle Support