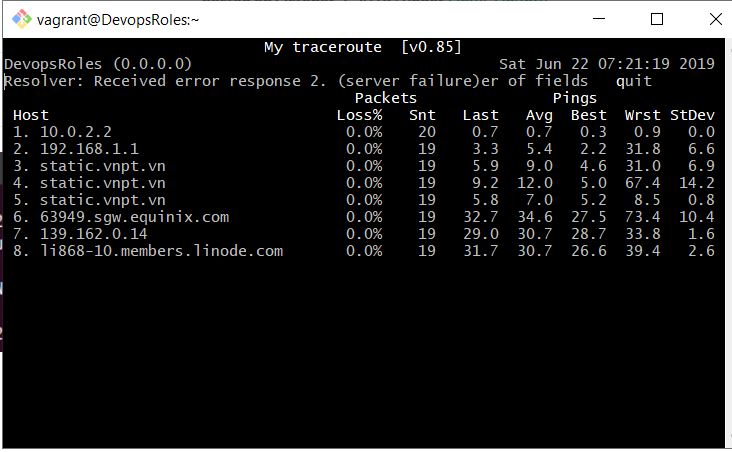
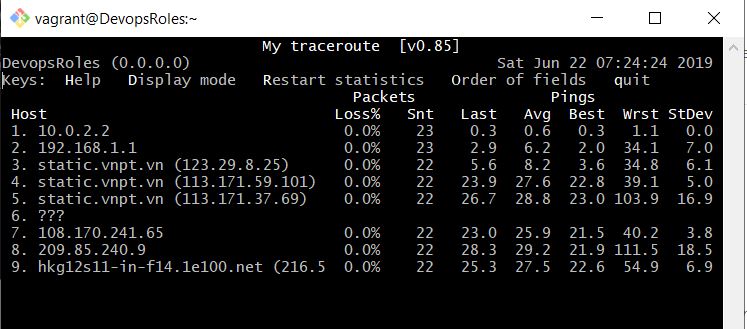
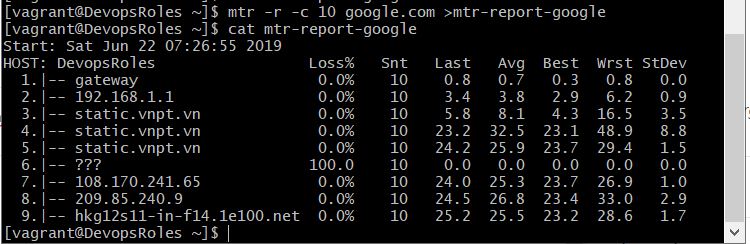
Use the MTR command in Linux to view the traceroute report for a remote machine. As a network administrator, you need to learn the usage of mtr command to Diagnosing Network issues.
MTR command is a powerful tool to diagnose and isolate networking errors and provide reports of the network.
In this tutorial, How to install an RPM package into a different directory on Centos. Installing RPM packages is a common task for Linux users, especially those working with Red Hat-based distributions like Fedora, CentOS, or RHEL. Sometimes, you may need to install an RPM package into a different directory than the default.
What is an RPM Package?
RPM stands for Red Hat Package Manager. It is a package management system used by Red Hat-based distributions to manage software installation, updates, and removals. RPM packages are precompiled binaries that simplify software distribution and installation.
Why Install RPM Packages into a Different Directory?
There are several reasons why you might want to install an RPM package into a different directory:
Space Constraints: Your default installation directory might be running out of space.
Testing: You may want to test a package in a separate environment before moving it to production.
Custom Configurations: Some applications may require custom directory structures.
For example, Install package bind install into another directory /opt/bind.
Use rpm -qi command to check the package has been installed but not yet
$ sudo rpm -qi [name-package]
Not all RPM packages can be installed into another directory.
For example, the bind RPM package is not relocatable. You install it then the error: package bind is not relocatable
[vagrant@DevopsRoles ~]$ rpm -qpi bind-9.8.2-0.68.rc1.el6_10.1.x86_64.rpm | head -1
Name        : bind                         Relocations: (not relocatable)
Install an RPM package into a different directory.
No, not all RPM packages support relocation. You need to check the package metadata using the rpm -qpi command to see if it supports relocation.
What if the RPM package does not support relocation?
If the RPM package does not support relocation, you can use the rpm2cpio and cpio method to manually extract and place the files in your desired directory.
How do I handle dependencies when relocating RPM packages?
Handling dependencies can be tricky when relocating RPM packages. You may need to manually resolve and relocate dependencies as well. Adjusting environment variables and creating symbolic links can help in managing dependencies.
Is it safe to relocate RPM packages?
Relocating RPM packages can be safe if done correctly. However, it can lead to unexpected behavior if not handled properly, especially with packages that have strict directory dependencies.
Can I use package managers like Yum or DNF to relocate packages?
Yum and DNF do not support package relocation directly. You need to use the RPM command with the --relocate option or manually extract the package using rpm2cpio and cpio.
Conclusion
Installing an RPM package into a different directory can be useful for various reasons, including space management, testing, and custom configurations. While not all RPM packages support relocation, the methods outlined in this guide provide a comprehensive approach to handling different scenarios. Whether using the RPM command with relocation options or extracting packages manually with rpm2cpio and cpio, these techniques will help you manage your RPM packages effectively. I hope will this your helpful. Thank you for reading the DevopsRoles page!
In this tutorial, How to generate a random password using the OpenSSL command in Linux. It generates a number of random bytes, which the output HEX or Base64.
In today’s digital landscape, securing sensitive information is more important than ever. Passwords play a critical role in maintaining data privacy, and generating strong, random passwords is a cornerstone of cybersecurity. OpenSSL, a powerful cryptographic toolkit, offers a reliable way to generate random passwords.
This guide delves into how to use the OpenSSL command line tool to generate secure passwords, along with practical examples and tips to enhance your security strategy.
What Is OpenSSL?
OpenSSL is an open-source implementation of the SSL and TLS protocols. It’s widely used for tasks such as encrypting data, generating certificates, and managing cryptographic keys. One lesser-known but highly valuable feature of OpenSSL is its ability to generate random passwords. By leveraging its robust pseudo-random number generator, OpenSSL creates secure passwords that are nearly impossible to predict.
Why Use OpenSSL to Generate Random Passwords?
Enhanced Security: OpenSSL’s random number generation ensures high entropy, reducing the risk of brute-force attacks.
Customizability: You can tailor the password length and character set to meet specific security requirements.
Convenience: With a single command, you can generate passwords for a variety of applications, from securing databases to encrypting files.
Cross-Platform Compatibility: OpenSSL works on Linux, macOS, and Windows, making it a versatile tool.
How to Use OpenSSL to Generate Random Passwords
Generating a Basic Password
The simplest way to generate a random password with OpenSSL is by using the rand command. Here’s an example:
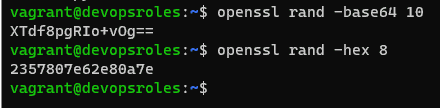
openssl rand -base64 12
rand: Invokes the random number generator.
-base64: Specifies the encoding format.
12: Defines the number of bytes to generate.
Output Example:
3kHnP1T+/rJcWg==
This command generates a 12-byte random password encoded in Base64. Base64 encoding is ideal for generating passwords because it includes a mix of alphanumeric characters and special symbols.
The Base64 the output is a good password.
The syntax OpenSSL generate random password
# For Base64
openssl rand -base64 NUMBER
# For HEX
openssl rand -hex NUMBER
Using OpenSSL to generate random passwords is a quick and effective way to bolster your security measures. Whether you need simple Base64-encoded passwords or complex strings with special characters, OpenSSL provides the flexibility to meet your requirements. By mastering these commands and integrating them into your workflow, you can protect sensitive data and ensure a robust security posture. Start experimenting with OpenSSL today and take the first step toward enhanced password security.
Thought the article, How to use “OpenSSL generate random password” as above. I hope will this your helpful. Thank you for reading the DevopsRoles page!
In this tutorial, How to install KVM ( Kernel-based Virtual Machine ) and QEMU on Ubuntu 14.04 LTS server. This requires a CPU on your system to enable Intel VT or AMD-V.
KVM is an Open Source.
QEMU is a open source machine emulator and virtualizer.
# This file describes the network interfaces available on your system
# and how to activate them. For more information, see interfaces(5).

# The loopback network interface
auto lo
iface lo inet loopback

# The primary network interface
# change like follows
auto eth0
iface eth0 inet manual
#iface eth0 inet static
#address 192.168.3.50
#network 192.168.3.0
#netmask 255.255.255.0
#broadcast 192.168.3.255
#gateway 192.168.3.1
#dns-nameservers 192.168.3.30
# add bridge interface

iface br0 inet static
address 192.168.3.30
network 192.168.3.0
netmask 255.255.255.0
broadcast 192.168.3.255
gateway 192.168.3.1
dns-nameservers 192.168.3.30
bridge_ports eth0
bridge_stp off
auto br0
Conclusion
Through the article, you can use install KVM and QEMU on Ubuntu as above. I hope will this your helpful. Thank you for reading the DevopsRoles page!
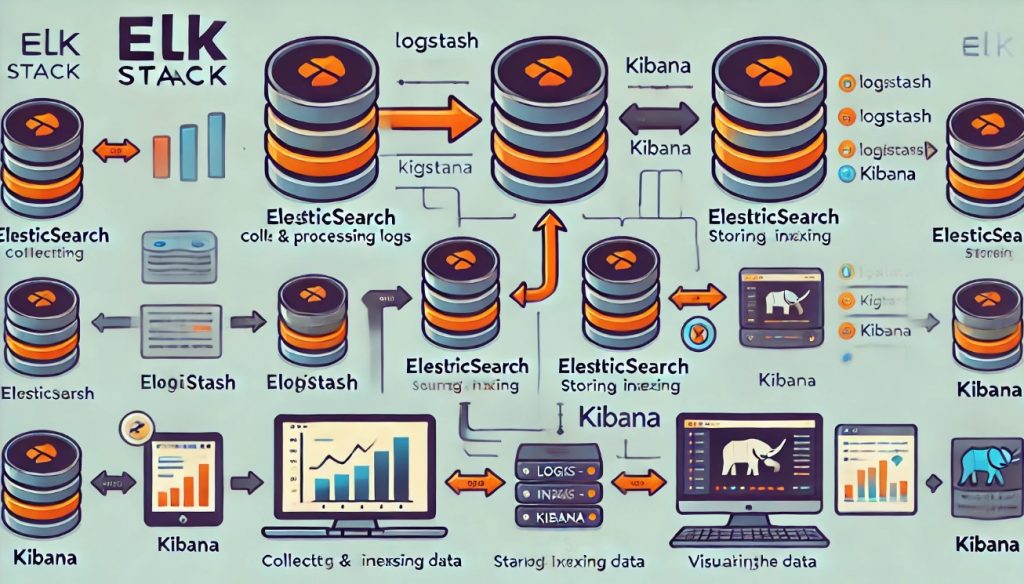
In the world of DevOps, log management and data visualization are crucial tasks. The ELK Stack, consisting of Elasticsearch, Logstash, and Kibana, offers a powerful and comprehensive solution to achieve these tasks efficiently. In this tutorial, I guide install ELK stack on Linux. The ELK Stack is a collection of three open-source Elasticsearch, Kibana, and Logstash. Now, let’s install ELK stack on Linux.
For my example install ELK stack
Elasticsearch, Kibana and Logstash -> 192.168.3.4
Filebeat -> 192.168.3.5
Requirements to install elk you need JAVA. If you do not yet install java on your system. The guided install Java on server ELK as below
Installing Java
ELK requires the installation of Java 8 and higher.
$ sudo yum install java-1.8.0-openjdk
Set JAVA_HOME for Elasticsearch
# sudo cp /etc/profile /etc/profile_backup
# echo 'export JAVA_HOME=/usr/lib/jvm/jre-1.8.0-openjdk' | sudo tee -a /etc/profile
# source /etc/profile
Installing and configuring the ELK Stack can significantly enhance your system’s log management and analysis capabilities. With Elasticsearch’s powerful search capabilities, Logstash’s diverse log collection and processing features, and Kibana’s intuitive interface, the entire ELK Stack provides a robust tool for every DevOps professional. We hope that through this article, you have mastered the steps to install the ELK Stack and can effectively apply it to your projects. Don’t hesitate to explore other features of the ELK Stack to further optimize your work. Thank you for reading the DevopsRoles page!
Welcome to this tutorial where I’ll guide you through the basics to advanced uses of the netstat command in Linux, with practical examples to help you master this tool.
What is Netstat?
Netstat is a command-line utility used to display all active network connections, both incoming and outgoing, on Unix, Linux, and Windows NT-based systems. It’s invaluable for network administration and monitoring.
Details can be found on the netstat command manual page:
[root@DevopsRoles ~]# man netstat | more
Detailed Usage of the Netstat Command in Linux
Here’s how you can use the netstat command in Linux to explore various network statistics:
1. List all LISTENING Ports of TCP and UDP connections using netstat -a option
2. Viewing Open TCP Socket Connections
This displays all active TCP connections. Execute this command to see detailed socket information.
[root@DevopsRoles ~]# netstat -s
Ip:
    9607 total packets received
    0 forwarded
    0 incoming packets discarded
    9605 incoming packets delivered
    4614 requests sent out
    7 outgoing packets dropped
Icmp:
    16 ICMP messages received
    0 input ICMP message failed.
    ICMP input histogram:
        destination unreachable: 16
    16 ICMP messages sent
    0 ICMP messages failed
    ICMP output histogram:
        destination unreachable: 16
IcmpMsg:
        InType3: 16
        OutType3: 16
Tcp:
    267 active connections openings
    412 passive connection openings
    2 failed connection attempts
    3 connection resets received
    3 connections established
    20699 segments received
    19546 segments send out
    66 segments retransmited
    0 bad segments received.
    13 resets sent
Udp:
    184 packets received
    16 packets to unknown port received.
    0 packet receive errors
    200 packets sent
    0 receive buffer errors
    0 send buffer errors
UdpLite:
TcpExt:
    255 TCP sockets finished time wait in fast timer
    245 delayed acks sent
    16 delayed acks further delayed because of locked socket
    Quick ack mode was activated 66 times
    6400 packet headers predicted
    2503 acknowledgments not containing data payload received
    8067 predicted acknowledgments
    TCPLossProbes: 66
    TCPLossProbeRecovery: 65
    66 DSACKs sent for old packets
    66 DSACKs received
    TCPDSACKIgnoredNoUndo: 65
    TCPRcvCoalesce: 3322
    TCPOrigDataSent: 14558
    TCPHystartTrainDetect: 7
    TCPHystartTrainCwnd: 124
IpExt:
    InNoRoutes: 2
    InOctets: 1806054
    OutOctets: 7957156
    InNoECTPkts: 9899
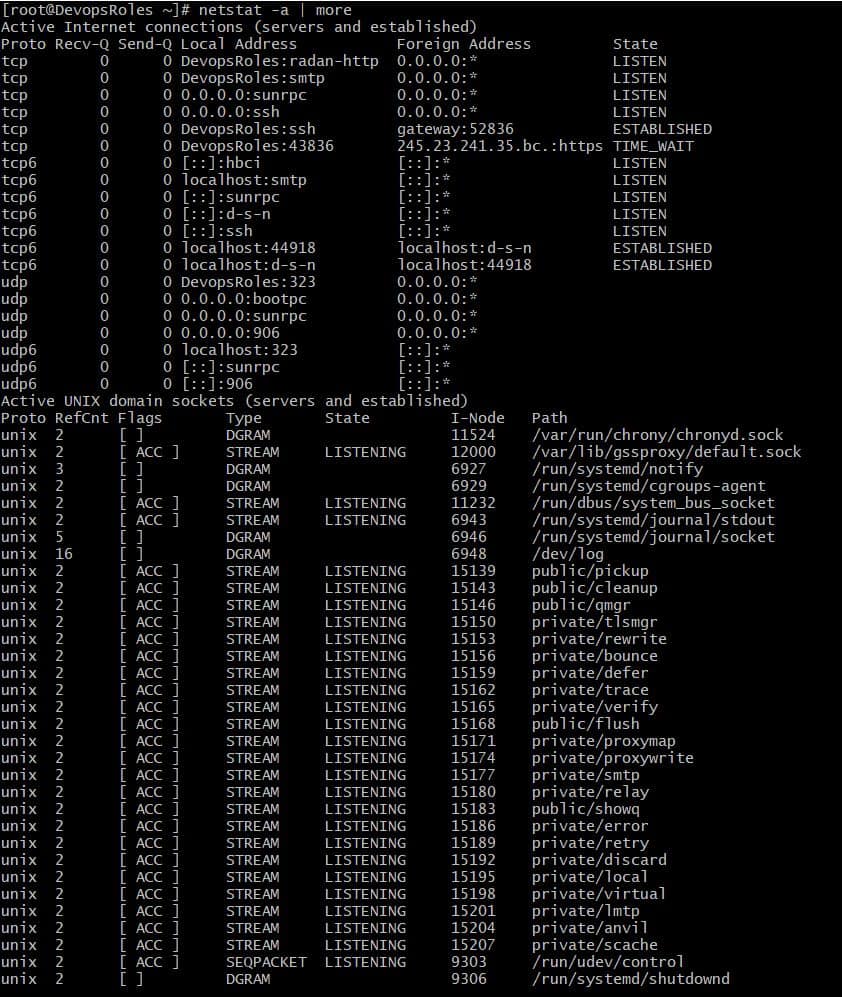
6. Displaying Service name with PID
[root@DevopsRoles ~]# netstat -tp
Active Internet connections (w/o servers)
Proto Recv-Q Send-Q Local Address           Foreign Address         State       PID/Program name
tcp        0      0 DevopsRoles:ssh         gateway:52836           ESTABLISHED 2434/sshd: vagrant
tcp6       0      0 localhost:44918         localhost:d-s-n         ESTABLISHED 654/telegraf
tcp6       0      0 localhost:d-s-n         localhost:44918         ESTABLISHED 659/influxd
By following the netstat examples provided, you can effectively leverage the netstat command in Linux to gain insights into your system’s network connections. This guide aims to be a practical resource for both new and seasoned users. Thank you for choosing DevopsRoles for your learning needs!
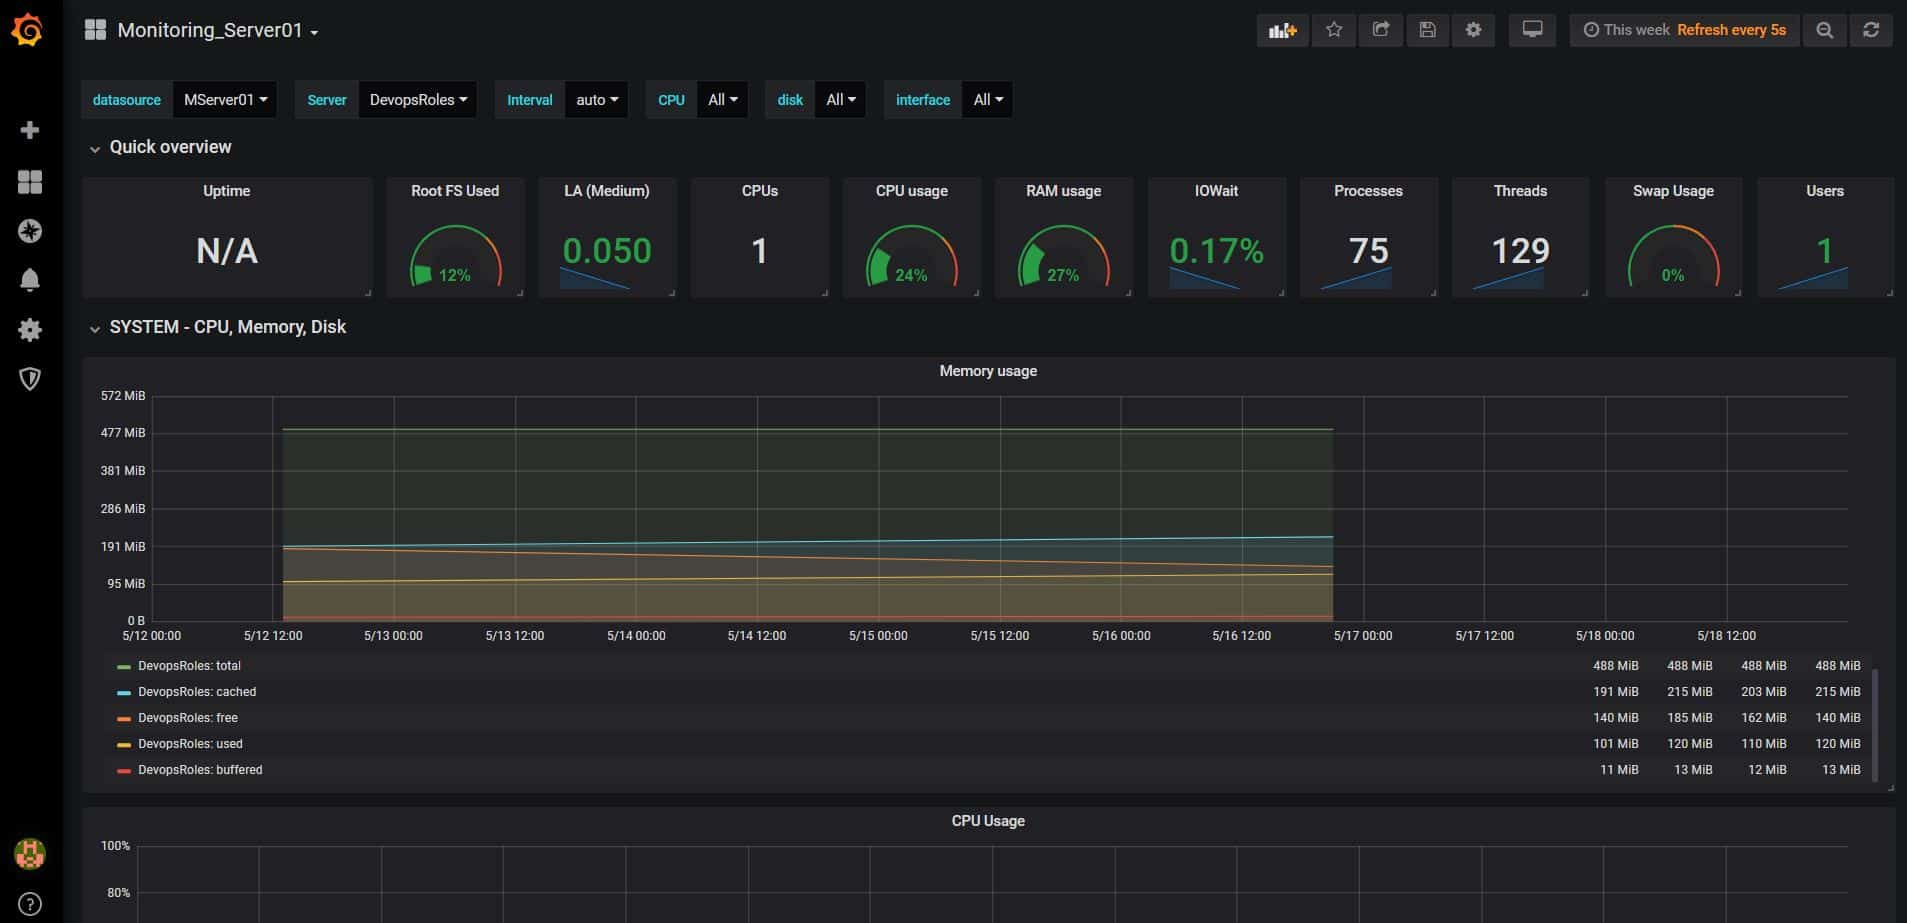
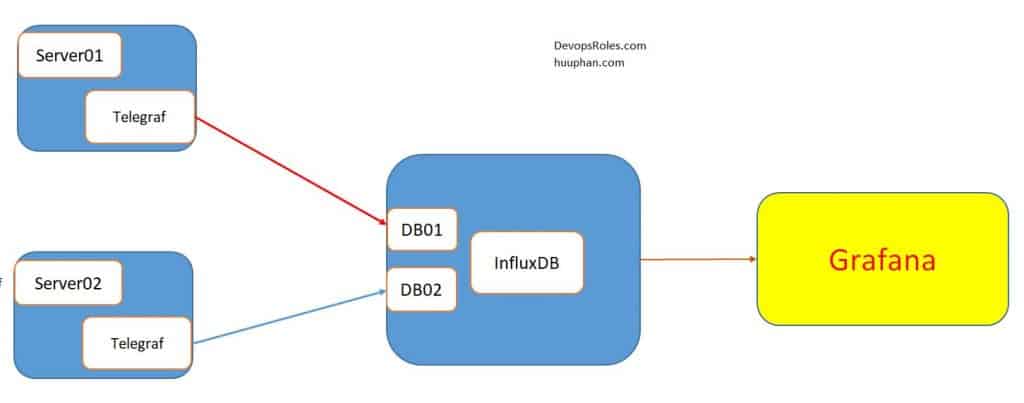
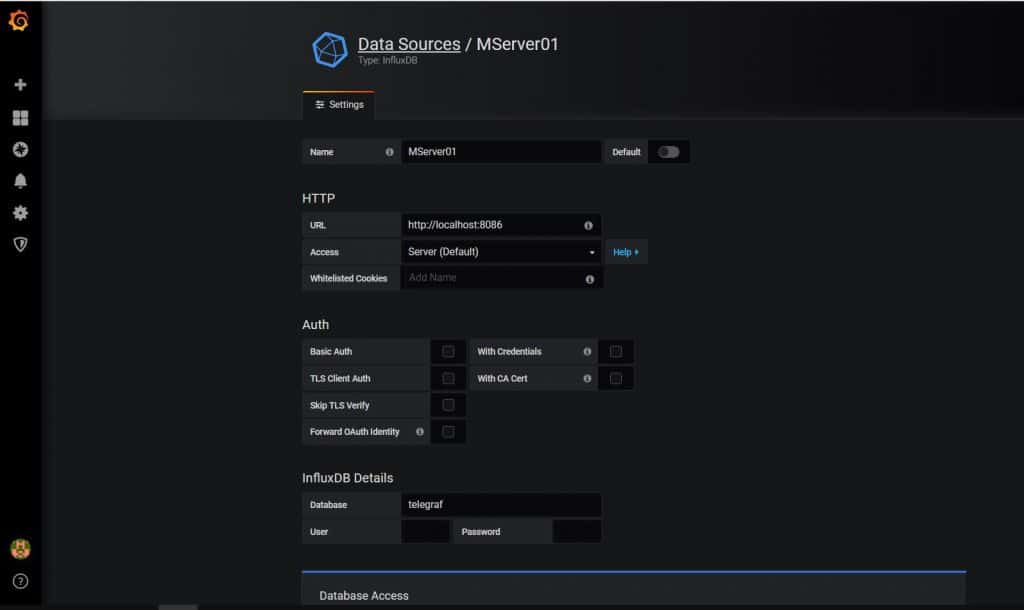
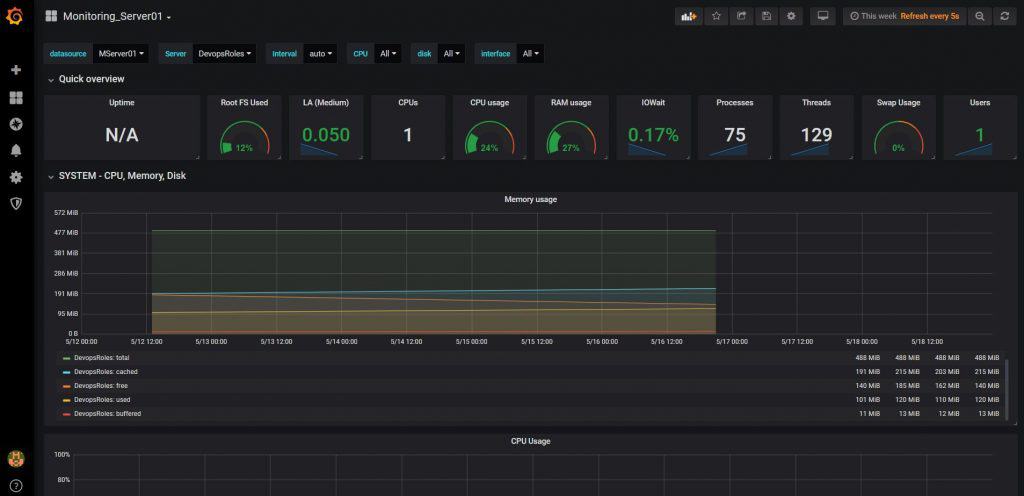
In this tutorial, How to monitor your system using Grafana InfluxDB and Telegraf. This article will guide you through the process of setting up and using these tools, from basic configurations to advanced monitoring techniques.
What is Monitoring with Grafana InfluxDB and Telegraf?
Monitoring with Grafana, InfluxDB, and Telegraf involves collecting, storing, and visualizing time-series data. Telegraf is responsible for gathering data from various sources, InfluxDB stores this data, and Grafana visualizes it through customizable dashboards.
Benefits of Using Grafana, InfluxDB, and Telegraf
Real-time Monitoring: Visualize data in real-time to quickly identify and address issues.
Scalability: Easily scale your monitoring setup to handle increased data volumes.
Customization: Create personalized dashboards to suit your specific monitoring needs.
My example is Grafana InfluxDB, Telegraf as in the picture below:
For my example, create 2 Databases with a 14-day retention policy.
[root@DevopsRoles ~]# influx
Connected to http://localhost:8086 version 1.7.6
InfluxDB shell version: 1.7.6
Enter an InfluxQL query
> show databases
name: databases
name
----
telegraf
mydb
_internal
> CREATE DATABASE mydb WITH DURATION 14d
> CREATE DATABASE telegraf WITH DURATION 14d
Open and edit the file /etc/influxdb/influxdb.confas below
In this tutorial, we get started with InfluxDB. we can use commands with InfluxDB. In the latter-mentioned post, I created a “telegraf” database in InfluxDB.
Let’s know if InfluxDB getting started
Now jump into InfluxDB.
[root@devopsroles.localhost ~]# influx
Connected to http://localhost:8086 version 1.7.4
InfluxDB shell version: 1.7.4
Enter an InfluxQL query
>
View a list of all the databases using the “show databases” command.
> show databases
name: databases
name
----
_internal
netdata
monitoring
telegraf
opentsdb
>
“_internal” is an internal InfluxDB database. To use telegraf database the “use telegraf” command:
> use telegraf
Using database telegraf
Now we are inside of the telegraf database. using the “show measurements” command:
> show measurements
name: measurements
name
----
cpu
disk
diskio
kernel
mem
processes
swap
system
> show tag keys
name: cpu
tagKey
------
cpu
host

name: disk
tagKey
------
device
fstype
host
mode
path

name: diskio
tagKey
------
host
name

name: kernel
tagKey
------
host

name: mem
tagKey
------
host

name: processes
tagKey
------
host

name: swap
tagKey
------
host

name: system
tagKey
------
host
InfluxDB Queries
How fields and tags work together. For example as below
> select * from cpu where time > now() - 10s
name: cpu
time                cpu       host                         usage_guest usage_guest_nice usage_idle       usage_iowait      usage_irq usage_nice usage_softirq usage_steal usage_system        usage_user
----                ---       ----                         ----------- ---------------- ----------       ------------      --------- ---------- ------------- ----------- ------------        ----------
1557722520000000000 cpu-total devopsroles.localhost 0           0                92.4924924924855 6.106106106081209 0         0          0             0           0.30030030030030713 1.10110110109885
1557722520000000000 cpu0      devopsroles.localhost 0           0                92.4924924924855 6.106106106081209 0         0          0             0           0.30030030030030713 1.10110110109885

> select * from cpu where cpu='cpu-total' and host='devopsroles.localhost' and time > now() - 10s
name: cpu
time                cpu       host                         usage_guest usage_guest_nice usage_idle       usage_iowait      usage_irq usage_nice usage_softirq usage_steal usage_system        usage_user
----                ---       ----                         ----------- ---------------- ----------       ------------      --------- ---------- ------------- ----------- ------------        ----------
1557727830000000000 cpu-total devopsroles.localhost 0           0                96.7967967967239 2.402402402420665 0         0          0             0           0.20020020020020476 0.6006006006006143

> select usage_user,cpu,host from cpu where cpu='cpu-total' and host='devopsroles.localhost' and time > now() - 20s
name: cpu
time                usage_user         cpu       host
----                ----------         ---       ----
1557727930000000000 1.6016016016016381 cpu-total devopsroles.localhost
Link Documentation about Influxdb getting started
Series is a “collection of data in InfluxDB’s data structure that share a measurement, tag set, and retention policy.” Thank you for reading the DevopsRoles page!
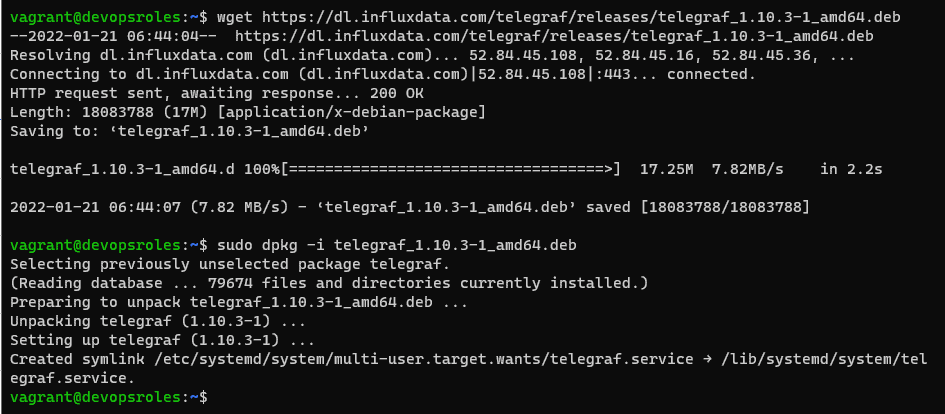
Telegraf is a versatile and efficient agent for collecting and reporting metrics. It supports a wide array of data stores such as InfluxDB, Graphite, OpenTSDB, Datadog, and many more. This guide will walk you through the process of installing Telegraf on various Linux distributions, including Ubuntu and CentOS, ensuring you can get started with minimal hassle. How to install Telegraf on Linux is a step below.
Features of Telegraf
Supports Multiple Datastores: Compatible with InfluxDB, Graphite, OpenTSDB, Datadog, and many others.
Plugin-Driven: Easily extendable through numerous input and output plugins.
Small Memory Footprint: Designed to be lightweight and efficient.
Prerequisites
Before proceeding with the installation, ensure your system meets the following requirements:
A Linux distribution (Ubuntu, CentOS, Debian, etc.)
Root or sudo access to the system
Internet connection for downloading Telegraf packages
Installation Steps
RedHat & CentOS
To install Telegraf on RedHat and CentOS systems, follow these steps:
You can extend Telegraf’s functionality by adding custom plugins. Place your custom plugin scripts in the appropriate directory and reference them in the configuration file.
Using Environment Variables
Telegraf supports environment variables, which can be useful for managing configurations in different environments.
Securing Telegraf
Ensure Telegraf is secure by:
Running it with the least privileges necessary.
Using HTTPS for data transmission.
Regularly updating to the latest version.
Troubleshooting
Common Issues
Service not starting: Check the system logs for errors using journalctl -u telegraf.
Data not collected: Ensure the input plugins are correctly configured.
Data not sent: Verify the output plugin configuration and network connectivity.
Useful Commands
Check the configuration: telegraf --config /etc/telegraf/telegraf.conf --test
View logs: sudo journalctl -u telegraf
Frequently Asked Questions (FAQs)
What is Telegraf used for?
Telegraf is used for collecting, processing, and writing metrics and events from various sources to various outputs.
Can Telegraf run on Windows?
Yes, Telegraf is cross-platform and can run on Windows, macOS, and Linux.
How do I update Telegraf?
To update Telegraf, simply follow the installation steps again, as the package manager will handle the upgrade process.
Is Telegraf free to use?
Yes, Telegraf is open-source and free to use under the MIT license.
Conclusion
Installing Telegraf on Linux is a straightforward process when you follow the right steps. From basic installation to advanced configuration, this guide has covered everything you need to get started with Telegraf. By leveraging its powerful features, you can efficiently collect and manage metrics for your infrastructure. Whether you’re a beginner or an advanced user, Telegraf offers the flexibility and scalability needed for effective monitoring.
Start your journey with Telegraf today and ensure your system’s performance is always at its peak! Thank you for reading the DevopsRoles page!
I have forgotten the password admin Grafana dashboard. Yesterday, I can not log in to my Grafana dashboard. I have searched google and reset the Admin password in Grafana. Now, let’s go Grafana reset admin password.
Grafana is a powerful open-source platform for monitoring and observability. Its user-friendly dashboards make it a favorite among DevOps teams and system administrators. However, there may be situations where you need to reset the admin password, such as forgotten credentials or initial setup. In this comprehensive guide, we’ll cover everything you need to know about resetting the admin password in Grafana, from basic commands to advanced security practices.
Why Resetting the Admin Password Is Essential
Resetting the admin password in Grafana is necessary in scenarios like:
Forgotten Admin Credentials: If the admin password is lost, resetting it ensures access to the platform.
Security Maintenance: Resetting passwords regularly minimizes the risk of unauthorized access.
Initial Setup Needs: During initial configuration, resetting the default password enhances security.
Grafana provides multiple ways to reset the admin password, catering to different environments and user needs. Let’s dive into these methods step-by-step.
How do I Grafana reset admin password
Log in to the database
$ sudo sqlite3 /var/lib/grafana/grafana.db
Reset the admin password to “admin”
sqlite> update user set password = '59acf18b94d7eb0694c61e60ce44c110c7a683ac6a8f09580d626f90f4a242000746579358d77dd9e570e83fa24faa88a8a6', salt = 'F3FAxVm33R' where login = 'admin';
sqlite> .quit
Now you can log in using these credentials:
username: admin
password: admin
FAQs on Grafana Reset Admin Password
1. What happens if I reset the admin password?
Resetting the admin password updates the login credentials for the admin user only. Other user accounts and settings remain unaffected.
2. Can I reset the password without restarting Grafana?
No, most methods require restarting the Grafana service to apply changes.
3. Is the grafana-cli command available for all installations?
The grafana-cli tool is available in standard installations. If it’s missing, verify your installation method or use alternative methods.
4. How can I hash passwords for SQL resets?
Use a tool like openssl or online SHA256 hashing tools to generate a hashed password.
5. Is it possible to automate password resets?
Yes, you can automate resets using scripts that interact with grafana-cli or directly modify the database.
Resetting the admin password in Grafana is a straightforward process, whether using the grafana-cli command, editing the configuration file, or updating the database directly. By following this guide, you can efficiently regain access to your Grafana instance and secure it against unauthorized access. Remember to adopt best practices for password management to maintain a robust security posture.
You have reset admin password Grafana dashboard. Afterward, you need to change the admin password. Thank you for reading the DevopsRoles page!