Helm Kubernetes is a powerful package manager for Kubernetes, designed to simplify the deployment and management of applications. This article will guide you through the basics of using Helm, its key features, and practical examples to help streamline your Kubernetes application deployment.
What is Helm Kubernetes?
Helm is a tool that helps you manage Kubernetes applications through Helm charts. Helm charts are collections of pre-configured Kubernetes resources that make it easy to deploy and manage complex applications. Helm significantly reduces the complexity of deploying and maintaining applications in Kubernetes clusters.
Key Features of Helm
Charts: Pre-packaged Kubernetes applications.
Releases: Installations of charts into a Kubernetes cluster.
Repositories: Locations where charts can be stored and shared.
Rollback: Ability to revert to previous versions of a chart.
Getting Started with Helm
To get started with Helm, you need to install it on your local machine and configure it to work with your Kubernetes cluster.
Installing Helm
Download and Install Helm:
For macOS: bash brew install helm
For Linux: bash curl https://raw.githubusercontent.com/helm/helm/master/scripts/get-helm-3 | bash
Verify the Installation:
helm version
Adding a Helm Repository
Helm repositories are locations where charts are stored. To use Helm, you need to add a repository:
If an upgrade causes issues, you can roll back to a previous release:
helm rollback my-nginx 1
This command rolls back the my-nginx release to revision 1.
Creating Custom Helm Charts
Helm allows you to create your own custom charts to package and deploy your applications.
Creating a New Chart
To create a new chart:
helm create my-chart
This command creates a new directory structure for your chart with default templates and values.
Modifying Chart Templates
Modify the templates and values in the my-chart directory to fit your application’s requirements. Templates are located in the templates/ directory, and default values are in the values.yaml file.
Installing Your Custom Chart
To install your custom chart:
helm install my-release ./my-chart
This command deploys your chart with the release name my-release.
Best Practices for Using Helm
Version Control: Store your Helm charts in version control to track changes and collaborate with others.
Use Values Files: Customize deployments by using values files to override default values.
Chart Testing: Test your charts in a staging environment before deploying to production.
Documentation: Document your charts and configurations to ensure maintainability.
Conclusion
Helm is an invaluable tool for managing Kubernetes applications, offering powerful features to simplify deployment, management, and versioning. By using Helm, you can streamline your Kubernetes workflows, reduce complexity, and ensure your applications are deployed consistently and reliably. Embrace Helm to enhance your Kubernetes deployments and maintain a robust and efficient infrastructure. Thank you for reading the DevopsRoles page!
Kustomize Kubernetes is a powerful tool for managing Kubernetes configurations. Unlike other templating tools, Kustomize allows you to customize Kubernetes YAML configurations without using templates.
This article will guide you through the basics of using Kustomize, its key features, and practical examples to help streamline your Kubernetes configuration management.
What is Kustomize Kubernetes?
Kustomize is a configuration management tool that lets you customize Kubernetes resource files. It works by layering modifications on top of existing Kubernetes manifests, enabling you to maintain reusable and composable configurations. Kustomize is built into kubectl, making it easy to integrate into your Kubernetes workflows.
Key Features of Kustomize
No Templating: Modify YAML files directly without templates.
Layered Configurations: Apply different overlays for various environments (development, staging, production).
Reusability: Use base configurations across multiple environments.
Customization: Easily customize configurations with patches and strategic merge patches.
Getting Started with Kustomize
To get started with Kustomize, you need to understand its basic concepts: bases, overlays, and customization files.
Base Configuration
A base configuration is a set of common Kubernetes manifests. Here’s an example structure:
Common Labels and Annotations: Add common labels and annotations to all resources.
commonLabels:
  app: my-app
Best Practices for Using Kustomize
Organize Directories: Maintain a clear directory structure for bases and overlays.
Reuse Configurations: Use base configurations to avoid duplication and ensure consistency.
Version Control: Store Kustomize configurations in version control systems for easy collaboration and rollback.
Testing: Test your configurations in a staging environment before applying them to production.
Conclusion
Kustomize is an invaluable tool for managing Kubernetes configurations efficiently. By using Kustomize, you can create reusable, layered configurations that simplify the deployment process across multiple environments. Embrace Kustomize to enhance your Kubernetes workflows and maintain clean, maintainable configurations. Thank you for reading the DevopsRoles page!
Kubernetes is a powerful container orchestration platform that efficiently manages and schedules workloads across a cluster of nodes. However, resource limitations on worker nodes can impact the performance and stability of your applications. This article explores what happens when a worker node in Kubernetes runs out of resources and how to mitigate these issues.
Understanding Worker Nodes
In a Kubernetes cluster, worker nodes are responsible for running containerized applications. Each node has a finite amount of CPU, memory, and storage resources. Kubernetes schedules Pods on these nodes based on their resource requests and limits.
What Happens When a Worker Node Doesn’t Have Enough Resources in Kubernetes?
When a worker node doesn’t have enough resources, several issues can arise, affecting the overall performance and reliability of the applications running on that node. Here are the key consequences:
Pod Scheduling Failures:
Insufficient Resources: When a node lacks the necessary CPU or memory to fulfill the resource requests of new Pods, Kubernetes will fail to schedule these Pods on the node.
Pending State: Pods remain in a pending state, waiting for resources to become available or for another suitable node to be found.
Resource Contention:
Throttling: When multiple Pods compete for limited resources, Kubernetes may throttle resource usage, leading to degraded performance.
OOM (Out of Memory) Kills: If a Pod exceeds its memory limit, the system’s Out of Memory (OOM) killer will terminate the Pod to free up memory.
Node Pressure:
Eviction: Kubernetes may evict less critical Pods to free up resources for higher priority Pods. Evicted Pods are rescheduled on other nodes if resources are available.
Disk Pressure: If disk space is insufficient, Kubernetes may also evict Pods to prevent the node from becoming unusable.
Mitigating Resource Shortages
To prevent resource shortages and ensure the smooth operation of your Kubernetes cluster, consider the following strategies:
Resource Requests and Limits:
Define Requests and Limits: Ensure each Pod has well-defined resource requests and limits to help Kubernetes make informed scheduling decisions.
Horizontal Pod Autoscaler (HPA): Automatically scales the number of Pod replicas based on CPU or memory usage.
Cluster Autoscaler: Automatically adjust the size of your cluster by adding or removing nodes based on resource demands.
kubectl apply -f cluster-autoscaler.yaml
Node Management:
Monitor Node Health: Use monitoring tools to keep track of node resource usage and health.
Proactive Scaling: Manually add more nodes to the cluster when you anticipate increased workloads.
Quality of Service (QoS) Classes:
Assign QoS Classes: Kubernetes assigns QoS classes to Pods based on their resource requests and limits, ensuring that critical Pods are prioritized during resource contention. qosClass: Guaranteed
Conclusion
Understanding what happens when a worker node in Kubernetes runs out of resources is crucial for maintaining the performance and stability of your applications. By defining appropriate resource requests and limits, leveraging autoscaling tools, and proactively managing your cluster, you can mitigate the impact of resource shortages and ensure a robust and efficient Kubernetes environment. Thank you for reading the DevopsRoles page!
In this article, we will guide you through the process of Add second drive in Vagrant. Adding an additional drive can be beneficial for various purposes, such as expanding storage space or separating application data. We will go through each step in detail so that you can easily implement and manage your new drive in the Vagrant environment.
Why Add a Second Drive in Vagrant?
Adding a second drive to your Vagrant environment can provide numerous benefits:
Increased Storage: Expand your VM’s storage capacity.
Data Segregation: Separate different types of data or applications.
Improved Performance: Enhance I/O performance by distributing data across multiple drives.
Backup and Recovery: Simplify backup and recovery processes by isolating critical data.
Prerequisites
Before you begin, ensure you have the following:
Vagrant installed on your system.
A Vagrant box is configured and running.
Basic knowledge of Vagrant commands and configuration.
Step-by-Step Guide to Add Second drive in Vagrant
Step 1: Check the Collected Data – Disk File
First, list the contents of your VirtualBox VM directory to check the existing disk files:
$ ls -l /home/huupv/VirtualBox\ VMs/build6_default_1464167769486_18523/
Step 2: Login and Check the Disks in the OS
Once logged in, you can check the existing disks in the OS itself with the following command:
# fdisk -l
Step 3: Stop the Vagrant Box
Before making any changes, halt the Vagrant box:
$ vagrant halt
Step 4: Edit the Vagrantfile
Edit your Vagrantfile to add the second drive. Include the following configuration:
config.vm.provider "virtualbox" do |vb| # Display the VirtualBox GUI when booting the machine # vb.gui = true
# Customize the amount of memory on the VM: # vb.memory = "1024"
Start the Vagrant box with the updated configuration:
$ vagrant up
Step 6: Verify the New Disk
Check the file of the new disk on the host machine:
$ file /tmp/build6box-disk2.vmdk
And verify the drive within the Vagrant box itself using fdisk:
# fdisk -l | grep Disk
Following these steps, you will successfully add a second drive to your Vagrant setup.
Conclusion
Adding a second drive in Vagrant is a straightforward process when you follow the specific instructions. From editing the Vagrantfile to restarting the Vagrant box, each step ensures that the new drive is created and attached successfully. With the ability to easily expand and customize, Vagrant helps you manage and develop your virtual environment efficiently. Try applying these steps to improve your system configuration today. Thank you for reading the DevopsRoles page!
Kubernetes Service Types: LoadBalancer vs ClusterIP vs NodePort Explained. Kubernetes offers multiple ways to expose your applications to external and internal traffic through various service types. Understanding the differences between LoadBalancer, ClusterIP, and NodePort is crucial for effectively managing network traffic and ensuring the availability of your applications. This article will explain each service type, their use cases, and best practices for choosing the right one for your needs.
What is a Kubernetes Service?
A Kubernetes Service is an abstraction that defines a logical set of Pods and a policy by which to access them. Kubernetes services enable Pods to communicate with each other and with external clients. There are three primary service types in Kubernetes: LoadBalancer, ClusterIP, and NodePort.
ClusterIP
ClusterIP is the default service type in Kubernetes. It exposes the service on a cluster-internal IP, making the service accessible only within the cluster.
Use Cases for ClusterIP
Internal Communication: Use ClusterIP for internal communication between Pods within the cluster.
Microservices Architecture: Ideal for microservices that only need to communicate with each other within the cluster.
Creating a ClusterIP Service
Here’s an example of a YAML configuration for a ClusterIP service:
NodePort exposes the service on each node’s IP address at a static port (the NodePort). This makes the service accessible from outside the cluster by requesting <NodeIP>:<NodePort>.
Use Cases for NodePort
Testing and Development: Suitable for development and testing environments where you need to access the service from outside the cluster.
Basic External Access: Provides a simple way to expose services externally without requiring a load balancer.
Creating a NodePort Service
Here’s an example of a YAML configuration for a NodePort service:
LoadBalancer creates an external load balancer in the cloud provider’s infrastructure and assigns a fixed, external IP to the service. This makes the service accessible from outside the cluster via the load balancer’s IP.
Use Cases for LoadBalancer
Production Environments: Ideal for production environments where you need to provide external access to your services with high availability and scalability.
Cloud Deployments: Best suited for cloud-based Kubernetes clusters where you can leverage the cloud provider’s load-balancing capabilities.
Creating a LoadBalancer Service
Here’s an example of a YAML configuration for a LoadBalancer service:
Best Practices for Choosing Kubernetes Service Types
Assess Your Needs: Choose ClusterIP for internal-only services, NodePort for simple external access, and LoadBalancer for robust, scalable external access in production.
Security Considerations: Use ClusterIP for services that do not need to be exposed externally to enhance security.
Resource Management: Consider the resource and cost implications of using LoadBalancer services in a cloud environment.
Conclusion
Understanding the differences between LoadBalancer, ClusterIP, and NodePort is crucial for effectively managing network traffic in Kubernetes. By choosing the appropriate service type for your application’s needs, you can ensure optimal performance, security, and scalability. Follow best practices to maintain a robust and efficient Kubernetes deployment. Thank you for reading the DevopsRoles page!
In this tutorial on Memcached, you will learn how to create an ElastiCache for Redis instance and manage it using the AWS CLI.
Prerequisites
Before starting, you should have the following prerequisites configured
An AWS account
AWS CLI on your computer
Memcached tutorial
Creating a Redis cluster with AWS CLI
Modifying a Redis cluster with AWS CLI
Viewing the elements in a Redis cluster with AWS CLI
Discovering the endpoints of Redis cluster with AWS CLI
Adding nodes to a Redis cluster with AWS CLI
Removing nodes from a Redis cluster with AWS CLI
Auto Scaling ElastiCache for Redis clusters
Redis clusters manual failover with Global datastore
Deleting a Redis cluster with AWS CLI
Creating a Redis cluster with AWS CLI
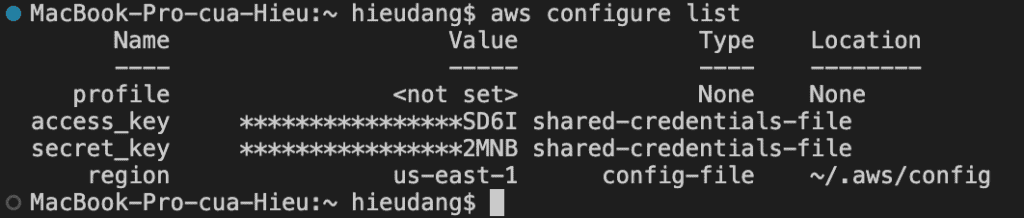
Before you begin, If you have not installed the AWS CLI, see Setting up the Amazon Redshift CLI. This tutorial uses the us-ease-1 region.
Now we’re ready to launch a Redis cluster by using the AWS CLI.
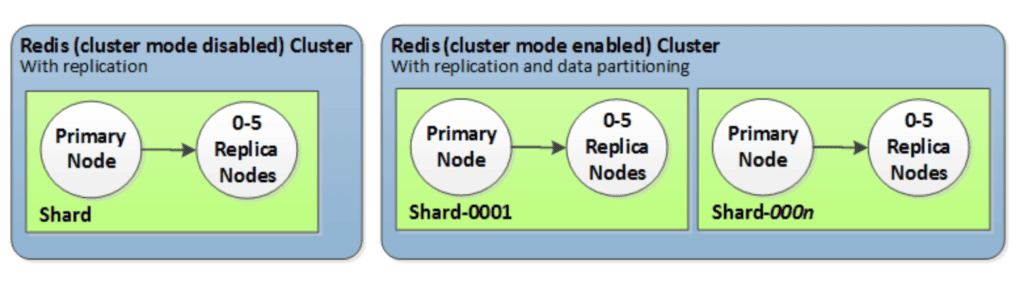
Typical cluster configurations:
Redis (cluster mode enabled): can have up to 500 shards, with your data partitioned across the shards.
Redis (cluster mode disabled):always contain just one shard (in the API and CLI, one node group). A Redis shard contains one to six nodes. If there is more than one node in a shard, the shard supports replication. In this case, one node is the read/write primary node and the others are read-only replica nodes.
In this tutorial we will create a Redis (cluster mode enabled) using AWS CLI.
Before you create a cluster, you first create a subnet group. A cache subnet group is a collection of subnets that you may want to designate for your cache clusters in a VPC.
You can modify an existing cluster using the AWS CLI modify-cache-cluster operation. To modify a cluster’s configuration value, specify the cluster’s ID, the parameter to change and the parameter’s new value. Refer Memcached tutorial to know this command.
Viewing the elements in a Redis cluster with AWS CLI
The following command to view details for my-cluster:
Discovering the endpoints of Redis cluster with AWS CLI
You can use the AWS CLI to discover the endpoints for a replication group and its clusters with the describe-replication-groups command. The command returns the replication group’s primary endpoint and a list of all the clusters (nodes) in the replication group with their endpoints, along with the reader endpoint.
You can online resharding with Regis cluster (there is some degradation in performance, nevertheless, your cluster continues to serve requests throughout the scaling operation). When you add shards to a Redis (cluster mode enabled) cluster, any tags on the existing shards are copied over to the new shards.
There are two ways to scale your Redis (cluster mode enabled) cluster; horizontal and vertical scaling.
Horizontal scaling allows you to change the number of node groups (shards) in the replication group by adding or removing node groups (shards). The online resharding process allows scaling in/out while the cluster continues serving incoming requests. Configure the slots in your new cluster differently than they were in the old cluster. Offline method only.
Vertical Scaling – Change the node type to resize the cluster. The online vertical scaling allows scaling up/down while the cluster continues serving incoming requests.
The following process describes how to reconfigure the shards in your Redis (cluster mode enabled) cluster by adding shards using the AWS CLI.
Data tiering (cluster mode enabled) clusters running Redis engine version 7.0.7 onwards
Instance type families – R7g, R6g, R5, M7g, M6g, M5
Instance sizes – Large, XLarge, 2XLarge
Auto Scaling in ElastiCache for Redis is not supported for clusters running in Global datastores, Outposts or Local Zones.
AWS Auto Scaling for ElastiCache for Redis is not available in the following regions: China (Beijing), China (Ningxia), AWS GovCloud (US-West) and AWS GovCloud (US-East).
ElastiCache for Redis auto scaling is the ability to increase or decrease the desired shards or replicas in your ElastiCache for Redis service automatically. ElastiCache for Redis leverages the Application Auto Scaling service to provide this functionality. For more information, see Application Auto Scaling. To use automatic scaling, you define and apply a scaling policy that uses CloudWatch metrics and target values that you assign. ElastiCache for Redis auto scaling uses the policy to increase or decrease the number of instances in response to actual workloads.
ElastiCache for Redis supports scaling for the following dimensions:
Shards – Automatically add/remove shards in the cluster similar to manual online resharding. In this case, ElastiCache for Redis auto scaling triggers scaling on your behalf.
Replicas – Automatically add/remove replicas in the cluster similar to manual Increase/Decrease replica operations. ElastiCache for Redis auto scaling adds/removes replicas uniformly across all shards in the cluster.
ElastiCache for Redis supports the following types of automatic scaling policies:
Target tracking scaling policies – Increase or decrease the number of shards/replicas that your service runs based on a target value for a specific metric. This is similar to the way that your thermostat maintains the temperature of your home. You select a temperature and the thermostat does the rest.
Currently, ElastiCache for Redis supports the following predefined metrics in ElastiCache for Redis NodeGroup Auto Scaling:
ElastiCachePrimaryEngineCPUUtilization – The average value of the EngineCPUUtilization metric in CloudWatch across all primary nodes in the ElastiCache for Redis cluster.
ElastiCacheDatabaseMemoryUsageCountedForEvictPercentage – The average value of the DatabaseMemoryUsageCountedForEvictPercentage metric in CloudWatch across all primary nodes in the ElastiCache for Redis cluster.
ElastiCacheDatabaseCapacityUsageCountedForEvictPercentage – The average value of the ElastiCacheDatabaseCapacityUsageCountedForEvictPercentage metric in CloudWatch across all primary nodes in the ElastiCache for Redis cluster.
The following example cpuscalablepolicy.json describes a target-tracking configuration for a scaling policy for EngineCPUUtilization metric.
In the following example, you apply a target-tracking scaling policy named cpuscalablepolicy to an ElastiCache for Redis cluster named myscalablecluster with ElastiCache for Redis auto scaling. To do so, you use a policy configuration saved in a file named cpuscalablepolicy.json.
Before you can use Auto Scaling with an ElastiCache for Redis cluster, you register your cluster with ElastiCache for Redis auto scaling.
In the following example, you register an ElastiCache for Redis cluster named myscalablecluster. The registration indicates that the cluster should be dynamically scaled to have from one to ten shards.
--max-capacity – The maximum number of shards to be managed by ElastiCache for Redis auto scaling. For information about the relationship between --min-capacity, --max-capacity, and the number of shards in your cluster, see Minimum and maximum capacity.
--min-capacity – The minimum number of shards to be managed by ElastiCache for Redis auto scaling. For information about the relationship between --min-capacity, --max-capacity, and the number of shards in your cluster, see Minimum and maximum capacity.
Deleting a scaling policy using the AWS CLI
In the following example, you delete a target-tracking scaling policy named myscalablepolicy from an ElastiCache for Redis cluster named myscalablecluster.
These steps provide an example to manage Memcached cluster. The specific configuration details may vary depending on your environment and setup. It’s recommended to consult the relevant documentation from AWS for detailed instructions on setting up. I hope will this your helpful. Thank you for reading the DevopsRoles page!
How to Kubernetes Scaling Pods. Kubernetes, a leading container orchestration platform, offers powerful tools for scaling applications. Scaling Pods is a crucial aspect of managing workloads in Kubernetes, allowing applications to handle varying levels of traffic efficiently.
This article will guide you through the process of scaling Pods in Kubernetes, covering the key concepts, methods, and best practices.
Understanding Pod Scaling in Kubernetes
Pod scaling in Kubernetes involves adjusting the number of replicas of a Pod to match the workload demands. Scaling can be performed manually or automatically, ensuring that applications remain responsive and cost-effective.
Types of Pod Scaling
There are two primary types of Pod scaling in Kubernetes:
Manual Scaling: Administrators manually adjust the number of Pod replicas.
Automatic Scaling: Kubernetes automatically adjusts the number of Pod replicas based on resource usage or custom metrics.
Manual Scaling
Manual scaling allows administrators to specify the desired number of Pod replicas. This can be done using the kubectl command-line tool.
This command sets the number of replicas for my-deployment to 5.
3.Verify the scaling operation:
kubectl get deployment my-deployment
Automatic Scaling
Automatic scaling adjusts the number of Pod replicas based on resource usage, ensuring applications can handle spikes in demand without manual intervention. Kubernetes provides the Horizontal Pod Autoscaler (HPA) for this purpose.
Setting Up Horizontal Pod Autoscaler (HPA)
1.Ensure the metrics server is running: HPA relies on the metrics server to collect resource usage data.
This command creates an HPA for my-deployment, scaling the number of replicas between 1 and 10 based on CPU usage. If CPU usage exceeds 50%, more replicas will be added.
3.Check the HPA status:
kubectl get hpa
Best Practices for Kubernetes Scaling Pods
Monitor resource usage: Continuously monitor resource usage to ensure scaling policies are effective.
Set appropriate limits: Define minimum and maximum replica limits to avoid over-provisioning or under-provisioning.
Test scaling configurations: Regularly test scaling configurations under different load conditions to ensure reliability.
Use custom metrics: Consider using custom metrics for scaling decisions to align with application-specific performance indicators.
Advanced Scaling Techniques
Cluster Autoscaler: Automatically adjusts the size of the Kubernetes cluster based on the resource requirements of Pods.
kubectl apply -f cluster-autoscaler.yaml
Vertical Pod Autoscaler (VPA): Adjusts the resource requests and limits of containers to optimize resource usage.
kubectl apply -f vertical-pod-autoscaler.yaml
Conclusion
Scaling Pods in Kubernetes is essential for maintaining application performance and cost efficiency. By mastering both manual and automatic scaling techniques, you can ensure your applications are responsive to varying workloads and can handle traffic spikes gracefully. Implementing best practices and leveraging advanced scaling techniques like Cluster Autoscaler and Vertical Pod Autoscaler can further enhance your Kubernetes deployments. Thank you for reading the DevopsRoles page!
In this tutorial, Kubernetes Implementing a sidecar container as a special case of init containers. Kubernetes has revolutionized the way applications are deployed and managed. One of the powerful patterns it supports is the Sidecar pattern. This article will guide you through implementing a Sidecar in Kubernetes, explaining its benefits and practical applications. By mastering the Sidecar pattern, you can enhance the functionality and reliability of your microservices.
What is a Sidecar?
The Sidecar pattern is a design pattern where an additional container is deployed alongside the main application container within the same Pod. This Sidecar container extends and enhances the functionality of the primary application without modifying its code. Typical use cases include logging, monitoring, proxying, and configuration updates.
Benefits of the Sidecar
Decoupling functionality: Keep the main application container focused on its primary tasks while offloading auxiliary tasks to the Sidecar.
Enhancing modularity: Add or update Sidecar containers independently of the main application.
Improving maintainability: Simplify the main application’s code by moving ancillary features to the Sidecar.
Kubernetes Implementing a Sidecar
Implementing a Sidecar in Kubernetes involves defining a Pod with multiple containers in the deployment configuration. Here’s a step-by-step guide:
Step 1: Define the Pod Specification
Create a YAML file for your Kubernetes deployment. Here’s an example of a Pod specification with a Sidecar container:
Logging: Use a Sidecar container to collect and forward logs to a centralized logging system.
Monitoring: Deploy a monitoring agent as a Sidecar to collect metrics and send them to a monitoring service.
Proxying: Implement a proxy server in a Sidecar to manage outbound or inbound traffic for the main application.
Configuration Management: Use a Sidecar to fetch and update configuration files dynamically.
Best Practices for Using Sidecars
Resource Management: Ensure that resource limits and requests are appropriately set for both the main and Sidecar containers.
Security: Implement security measures such as network policies and secure communication between containers.
Lifecycle Management: Manage the lifecycle of Sidecar containers to ensure they start and stop gracefully with the main application.
Conclusion
Implementing a Sidecar in Kubernetes is a powerful way to extend the functionality of your applications without altering their core logic. By following the steps outlined in this guide, you can enhance the modularity, maintainability, and overall reliability of your microservices. Whether for logging, monitoring, or configuration management, the Sidecar pattern offers a robust solution for modern application deployment. Thank you for reading the DevopsRoles page!
In this tutorial, how to use Kubernetes Security Implementing Third Party Secrets Solutions. In the world of Kubernetes, managing secrets securely is essential. While Kubernetes offers built-in solutions for secret management, third-party solutions can provide enhanced security, compliance, and management features. This article delves into the benefits and implementation process of integrating third-party secrets management solutions with Kubernetes.
Why Implement a Third-Party Secrets Solution?
While Kubernetes native secrets management is effective, third-party solutions offer several advantages:
Enhanced Security: Superior encryption methods and access controls.
Compliance: Helps meet regulatory standards for data protection.
Centralized Management: Simplifies secret management across multiple environments and clusters.
Audit and Monitoring: Provides detailed logging and monitoring capabilities.
Popular Third-Party Secrets Management Solutions
Here are some widely used third-party solutions that integrate seamlessly with Kubernetes:
HashiCorp Vault: Known for its robust security and access control features.
AWS Secrets Manager: Ideal for AWS-hosted applications, offering seamless integration.
Azure Key Vault: Perfect for Azure-hosted applications with strong integration features.
Google Cloud Secret Manager: Optimized for Google Cloud environments with native support.
Implementing HashiCorp Vault with Kubernetes
Prerequisites
A running Kubernetes cluster.
Helm installed on your local machine.
HashiCorp Vault installed and configured.
Step-by-Step Kubernetes Security Implementing Third Party Secrets
Your application can now access the secrets injected into the specified path (/vault/secrets).
Benefits of Using HashiCorp Vault
Dynamic Secrets: Generate secrets dynamically, reducing the risk of exposure.
Automated Secret Rotation: Periodically rotate secrets without downtime.
Access Control: Granular access control with policies and roles.
Conclusion
Integrating third-party secrets management solutions like HashiCorp Vault with Kubernetes can significantly enhance your security posture and compliance capabilities. By following the steps outlined in this article, you can leverage advanced features to securely manage your application secrets. Thank you for reading the DevopsRoles page!
Kubernetes Secrets provides a secure way to handle this sensitive data. In the realm of Kubernetes, managing sensitive information such as API keys, passwords, and certificates is crucial for maintaining security.
Creating and Storing Secrets
Kubernetes Secrets are designed to store and manage sensitive information securely. Here’s how you can create a Secret using a YAML file:
To enhance security, Kubernetes supports the encryption of secrets at rest. This involves configuring an encryption provider in the EncryptionConfig file:
Implementing audit logging helps monitor access to secrets, allowing you to detect unauthorized access or anomalies. Configure audit logging by modifying the audit-policy.yaml file and setting up an audit webhook.
Kubernetes External Secrets
For centralized management and enhanced security, consider using Kubernetes External Secrets to integrate with external secret management systems like AWS Secrets Manager, Azure Key Vault, or HashiCorp Vault.
Best Practices Kubernetes Secrets
Use Environment Variables Judiciously: Only expose necessary secrets.
Regularly Rotate Secrets: Ensure secrets are rotated periodically to minimize risks.
Limit Secret Scope: Use namespace-scoped secrets to limit exposure.
Encrypt Secrets: Always encrypt secrets both in transit and at rest.
Conclusion
Managing secrets in Kubernetes is vital for securing your applications. By leveraging Kubernetes’ native features, encryption, RBAC, and external secret management solutions, you can safeguard your sensitive information against potential threats. Thank you for reading the DevopsRoles page!