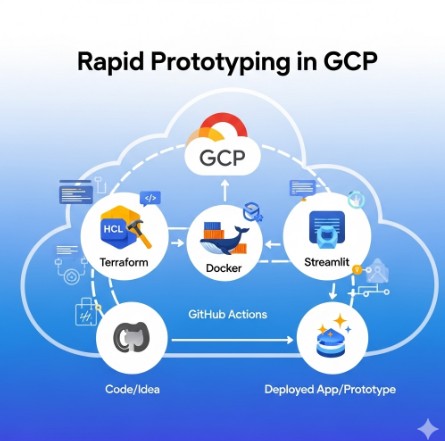
Tag Archives: DevOps

Terraform Amazon RDS Oracle: A Comprehensive Guide

Managing and scaling database infrastructure is a critical aspect of modern application development. For organizations relying on Oracle databases, integrating this crucial component into a robust and automated infrastructure-as-code (IaC) workflow is paramount. This guide provides a comprehensive walkthrough on leveraging Amazon RDS Oracle Terraform to seamlessly provision, manage, and scale your Oracle databases within the AWS ecosystem. We’ll cover everything from basic setup to advanced configurations, ensuring you have a firm grasp of this powerful combination. By the end, you’ll be equipped to confidently automate your Oracle database deployments using Amazon RDS Oracle Terraform.

Understanding the Power of Amazon RDS Oracle and Terraform

Amazon Relational Database Service (RDS) simplifies the setup, operation, and scaling of relational databases in the cloud. For Oracle deployments, RDS offers managed instances that abstract away much of the underlying infrastructure management, allowing you to focus on your application. This eliminates the need for manual patching, backups, and other administrative tasks.

Terraform, on the other hand, is a powerful IaC tool that allows you to define and manage your entire infrastructure as code. This enables automation, version control, and reproducible deployments. By combining Terraform with Amazon RDS Oracle, you gain the ability to define your database infrastructure declaratively, ensuring consistency and repeatability.

Key Benefits of Using Amazon RDS Oracle Terraform

  • Automation: Automate the entire lifecycle of your Oracle databases, from creation to deletion.
  • Reproducibility: Ensure consistent deployments across different environments.
  • Version Control: Track changes to your infrastructure using Git or other version control systems.
  • Scalability: Easily scale your databases up or down based on demand.
  • Collaboration: Enable teams to collaborate on infrastructure management.

Setting up Your Environment for Amazon RDS Oracle Terraform

Before diving into the code, ensure you have the following prerequisites in place:

  • AWS Account: An active AWS account with appropriate permissions.
  • Terraform Installation: Download and install Terraform from the official website: https://www.terraform.io/downloads.html
  • AWS Credentials: Configure your AWS credentials using the AWS CLI or environment variables. Ensure your IAM user has the necessary permissions to create and manage RDS instances.
  • Oracle License: You’ll need a valid Oracle license to use Amazon RDS for Oracle.

Creating Your First Amazon RDS Oracle Instance with Terraform

Let’s create a simple Terraform configuration to provision an Amazon RDS Oracle instance. This example uses a basic configuration; you can customize it further based on your requirements.

Basic Terraform Configuration (main.tf)


terraform {
  required_providers {
    aws = {
      source  = "hashicorp/aws"
      version = "~> 4.0"
    }
  }
}

provider "aws" {
  region = "us-west-2" # Replace with your desired region
}

resource "aws_db_instance" "default" {
  allocated_storage       = 20
  engine                  = "oracle-se2"
  engine_version          = "19.3"
  identifier              = "my-oracle-db"
  instance_class          = "db.t3.medium"
  name                    = "my-oracle-db"
  password                = "MyStrongPassword123!" # Replace with a strong password
  skip_final_snapshot     = true
  username                = "admin"
  db_subnet_group_name    = "default" # Optional, create a subnet group if needed
  # ... other configurations as needed ...
}

Explanation:

  • allocated_storage: Specifies the storage size in GB.
  • engine and engine_version: Define the Oracle engine and version.
  • identifier and name: Unique identifiers for the instance.
  • instance_class: Specifies the instance type.
  • password and username: Credentials for the database administrator.

Deploying the Infrastructure

  1. Save the code above as main.tf.
  2. Open your terminal and navigate to the directory containing main.tf.
  3. Run terraform init to initialize the Terraform providers.
  4. Run terraform plan to see a preview of the changes.
  5. Run terraform apply to create the RDS instance.

Advanced Amazon RDS Oracle Terraform Configurations

The basic example provides a foundation. Let’s explore more advanced features for enhanced control and management.

Implementing High Availability with Multi-AZ Deployments

For high availability, configure your RDS instance as a Multi-AZ deployment:


resource "aws_db_instance" "default" {
  # ... other configurations ...
  multi_az = true
}

Managing Security with Security Groups

Control network access to your RDS instance using security groups:


resource "aws_security_group" "default" {
  name        = "my-rds-sg"
  description = "Security group for RDS instance"
}

resource "aws_db_instance" "default" {
  # ... other configurations ...
  vpc_security_group_ids = [aws_security_group.default.id]
}

Automated Backups with Terraform

Configure automated backups to protect your data:


resource "aws_db_instance" "default" {
  # ... other configurations ...
  backup_retention_period = 7 # Retain backups for 7 days
  skip_final_snapshot     = false # Take a final snapshot on deletion
}

Amazon RDS Oracle Terraform: Best Practices and Considerations

Implementing Amazon RDS Oracle Terraform effectively involves following best practices for security, scalability, and maintainability:

  • Use strong passwords: Employ strong and unique passwords for your database users.
  • Implement proper security groups: Restrict network access to your RDS instance to only authorized sources.
  • Monitor your RDS instance: Regularly monitor your instance’s performance and resource usage.
  • Regularly back up your data: Implement a robust backup and recovery strategy.
  • Use version control for your Terraform code: This ensures that you can track changes, revert to previous versions, and collaborate effectively with your team.

Frequently Asked Questions

Q1: Can I use Terraform to manage existing Amazon RDS Oracle instances?

Yes, Terraform’s aws_db_instance resource can be used to manage existing instances. You’ll need to import the existing resource into your Terraform state. Refer to the official Terraform documentation for the terraform import command.

Q2: How do I handle updates to my Amazon RDS Oracle instance using Terraform?

Modify your main.tf file with the desired changes. Then run terraform plan to preview the changes and terraform apply to apply them. Terraform will intelligently update only the necessary configurations.

Q3: What are the costs associated with using Amazon RDS Oracle?

The cost depends on several factors, including the instance type, storage size, and usage. Refer to the AWS Pricing Calculator for a detailed cost estimate: https://calculator.aws/

Q4: How do I handle different environments (dev, test, prod) with Terraform and Amazon RDS Oracle?

Use Terraform workspaces or separate Terraform configurations for each environment. This allows you to manage different configurations independently. You can also use environment variables to manage configuration differences across environments.

Conclusion

Provisioning and managing Amazon RDS Oracle instances using Terraform provides significant advantages in terms of automation, reproducibility, and scalability. This comprehensive guide has walked you through the process, from basic setup to advanced configurations. By mastering Amazon RDS Oracle Terraform, you’ll streamline your database deployments, enhance your infrastructure’s reliability, and free up. Thank you for reading the DevopsRoles page!

Using AWS Lambda SnapStart with infrastructure as code and CI/CD pipelines

AWS Lambda has become a cornerstone of serverless computing, offering incredible scalability and cost-effectiveness. However, cold starts – the delay experienced when invoking a Lambda function for the first time – can significantly impact application performance and user experience. This is where AWS Lambda SnapStart emerges as a game-changer. This in-depth guide will explore how to leverage AWS Lambda SnapStart, integrating it seamlessly with Infrastructure as Code (IaC) and Continuous Integration/Continuous Delivery (CI/CD) pipelines for optimal performance and streamlined deployments. We’ll cover everything from basic setup to advanced optimization strategies, ensuring your serverless applications run smoothly and efficiently.

Understanding AWS Lambda SnapStart

AWS Lambda SnapStart is a powerful feature that dramatically reduces Lambda function cold start times. Instead of starting from scratch each time, SnapStart creates a pre-warmed execution environment, significantly shortening the invocation latency. This translates to faster response times, improved user experience, and more consistent performance, particularly crucial for latency-sensitive applications.

How SnapStart Works

SnapStart works by creating a snapshot of the function’s execution environment. When a function is invoked, instead of initializing the environment from scratch, AWS Lambda uses this snapshot to quickly bring the function online. This dramatically minimizes the time it takes for the function to start processing requests.

Benefits of Using SnapStart

  • Reduced Cold Start Latency: Experience drastically shorter invocation times.
  • Improved User Experience: Faster responses lead to happier users.
  • Enhanced Application Performance: Consistent performance under load.
  • Cost Optimization (Potentially): While SnapStart itself doesn’t directly reduce costs, the improved performance can lead to more efficient resource utilization in some cases.

Integrating AWS Lambda SnapStart with Infrastructure as Code

Managing your AWS infrastructure manually is inefficient and error-prone. Infrastructure as Code (IaC) tools like Terraform or CloudFormation provide a robust and repeatable way to define and manage your infrastructure. Integrating AWS Lambda SnapStart with IaC ensures consistency and automation across environments.

Implementing SnapStart with Terraform

Here’s a basic example of how to enable AWS Lambda SnapStart using Terraform:

resource "aws_lambda_function" "example" {
  filename        = "function.zip"
  function_name   = "my-lambda-function"
  role            = aws_iam_role.lambda_role.arn
  handler         = "main.handler"
  runtime         = "nodejs16.x"
  environment {
    variables = {
      MY_VARIABLE = "some_value"
    }
  }
  # Enable SnapStart
  snap_start {
    enabled = true
  }
}

This Terraform configuration creates a Lambda function and explicitly enables SnapStart. Remember to replace placeholders like `”function.zip”`, `”my-lambda-function”`, etc., with your actual values. You’ll also need to define the IAM role (`aws_iam_role.lambda_role`) separately.

Implementing SnapStart with AWS CloudFormation

Similar to Terraform, you can enable AWS Lambda SnapStart within your CloudFormation templates. The relevant property is usually within the Lambda function resource definition. For example:

Resources:
  MyLambdaFunction:
    Type: AWS::Serverless::Function
    Properties:
      Handler: index.handler
      Runtime: nodejs16.x
      CodeUri: s3://my-bucket/my-lambda.zip
      Role: arn:aws:iam::YOUR_ACCOUNT_ID:role/lambda_execution_role
      SnapStart:
        Enabled: true

CI/CD Pipelines and AWS Lambda SnapStart

Integrating AWS Lambda SnapStart into your CI/CD pipeline ensures that every deployment includes this performance enhancement. This automation prevents manual configuration and guarantees consistent deployment of SnapStart across all environments (development, staging, production).

CI/CD Best Practices with SnapStart

  • Automated Deployment: Use your CI/CD tools (e.g., Jenkins, GitHub Actions, AWS CodePipeline) to automatically deploy Lambda functions with SnapStart enabled.
  • Version Control: Store your IaC templates (Terraform or CloudFormation) in version control (e.g., Git) for traceability and rollback capabilities.
  • Testing: Thoroughly test your Lambda functions with SnapStart enabled to ensure functionality and performance.
  • Monitoring: Monitor your Lambda function invocations and cold start times to track the effectiveness of SnapStart.

Advanced Considerations for AWS Lambda SnapStart

While AWS Lambda SnapStart offers significant benefits, it’s important to understand some advanced considerations:

Memory Allocation and SnapStart

The amount of memory allocated to your Lambda function impacts SnapStart performance. Larger memory allocations can lead to slightly larger snapshots and, potentially, marginally longer startup times. Experiment to find the optimal balance between memory and startup time for your specific function.

Function Size and SnapStart

Extremely large Lambda functions may experience limitations with SnapStart. Consider refactoring large functions into smaller, more manageable units to optimize SnapStart effectiveness. The size of the function’s deployment package directly influences the size of the SnapStart snapshot. Larger packages may lead to longer snapshot creation times.

Layers and SnapStart

Using Lambda Layers is generally compatible with SnapStart. However, changes to the layers will trigger a new snapshot creation. Ensure your layer updates are thoroughly tested to avoid unintended consequences.

Debugging SnapStart Issues

If you encounter problems with SnapStart, AWS CloudWatch logs are a crucial resource. They provide insights into function execution, including details about SnapStart initialization. Check CloudWatch for any errors or unusual behavior.

Frequently Asked Questions

Q1: Does SnapStart work with all Lambda runtimes?

A1: SnapStart compatibility varies based on the Lambda runtime. Check the AWS documentation for the most up-to-date list of supported runtimes. Support is constantly expanding, so stay informed about the latest additions.

Q2: How much does SnapStart cost?

A2: There’s no additional charge for using AWS Lambda SnapStart. The cost remains the same as standard Lambda function invocations.

Q3: Can I disable SnapStart after enabling it?

A3: Yes, you can easily disable SnapStart at any time by modifying your Lambda function configuration through the AWS console, CLI, or IaC tools. This gives you flexibility to manage SnapStart usage based on your application’s needs.

Q4: What metrics should I monitor to assess SnapStart effectiveness?

A4: Monitor both cold start and warm start latencies in CloudWatch. You should observe a substantial reduction in cold start times after implementing AWS Lambda SnapStart. Pay close attention to p99 latencies as well, to see the impact of SnapStart on tail latency performance.

Conclusion

Optimizing the performance of your AWS Lambda functions is crucial for building responsive and efficient serverless applications. AWS Lambda SnapStart offers a significant performance boost by reducing cold start times. By integrating AWS Lambda SnapStart with your IaC and CI/CD pipelines, you can ensure consistent performance across all environments and streamline your deployment process.

Remember to monitor your function’s performance metrics and adjust your configuration as needed to maximize the benefits of AWS Lambda SnapStart. Investing in understanding and implementing SnapStart will undoubtedly enhance the speed and reliability of your serverless applications. For more information, consult the official AWS Lambda SnapStart documentation and consider exploring the possibilities with Terraform and AWS CloudFormation for streamlined infrastructure management.Thank you for reading the DevopsRoles page!

Efficient AKS Cluster Provisioning in a Virtual Network Using Terraform

Azure Kubernetes Service (AKS) is a powerful managed Kubernetes service, simplifying the deployment and management of containerized applications. However, setting up an AKS cluster, especially within a pre-existing virtual network, can be a complex and time-consuming process. This article provides a comprehensive guide to AKS Cluster Provisioning using Terraform, a popular Infrastructure-as-Code (IaC) tool, ensuring efficiency and repeatability. We’ll navigate the intricacies of networking configurations and resource allocation, empowering you to streamline your Kubernetes deployments.

Understanding the Need for Automated AKS Cluster Provisioning

Manually provisioning AKS clusters is prone to errors and inconsistencies. It’s a tedious process involving numerous steps across multiple Azure portals and command-line interfaces. This approach is inefficient, especially when dealing with multiple environments or frequent cluster updates. Automating AKS Cluster Provisioning with Terraform offers several advantages:

  • Increased Efficiency: Automate the entire process, significantly reducing manual effort and time.
  • Improved Consistency: Ensure consistent cluster configurations across different environments.
  • Enhanced Reproducibility: Easily recreate clusters from a defined state, simplifying testing and deployment.
  • Version Control: Track changes to your infrastructure configurations using Git and other version control systems.
  • Reduced Errors: Minimize human errors associated with manual configuration.

Setting up the Environment for Terraform and AKS Provisioning

Before embarking on AKS Cluster Provisioning, ensure you have the necessary prerequisites:

1. Azure Subscription and Resource Group:

You need an active Azure subscription and a resource group where your AKS cluster and related resources will be created. Create a resource group using the Azure portal, Azure CLI, or PowerShell.

2. Terraform Installation:

Download and install Terraform on your local machine. Refer to the official Terraform documentation for installation instructions here.

3. Azure CLI Installation:

Install the Azure CLI to authenticate with your Azure subscription. Instructions are available on the official Microsoft documentation website. This allows Terraform to interact with your Azure environment.

4. Azure Authentication:

Authenticate with Azure using the Azure CLI. This step is crucial to allow Terraform to access and manage your Azure resources.

az login

Terraform Code for AKS Cluster Provisioning in a Virtual Network

This section presents a Terraform configuration to provision an AKS cluster within a pre-existing virtual network. We’ll focus on key aspects, including network configuration, node pools, and Kubernetes version.

resource "azurerm_resource_group" "example" {
  name     = "aks-rg"
  location = "WestUS"
}

resource "azurerm_virtual_network" "example" {
  name                = "aks-vnet"
  address_space       = ["10.0.0.0/16"]
  location            = azurerm_resource_group.example.location
  resource_group_name = azurerm_resource_group.example.name
}

resource "azurerm_subnet" "example" {
  name                 = "aks-subnet"
  resource_group_name  = azurerm_resource_group.example.name
  virtual_network_name = azurerm_virtual_network.example.name
  address_prefixes     = ["10.0.1.0/24"]
}

resource "azurerm_kubernetes_cluster" "example" {
  name                = "aks-cluster"
  location            = azurerm_resource_group.example.location
  resource_group_name = azurerm_resource_group.example.name
  kubernetes_version  = "1.24.7"

  network_profile {
    network_plugin     = "azure"
    pod_cidr           = "10.244.0.0/16"
    service_cidr       = "10.0.0.0/16"
    dns_service_ip     = "10.0.0.10"
  }

  node_resource_group = azurerm_resource_group.example.name
  node_subnet_id      = azurerm_subnet.example.id

  agent_pool {
    name            = "agentpool"
    count           = 3
    vm_size         = "Standard_D2_v2"
    os_disk_size_gb = 100
    max_pods        = 110
  }
}

This code snippet demonstrates the core components. Remember to adapt it to your specific requirements, including the Kubernetes version, VM size, node count, and network configurations. You should also configure appropriate security rules and network policies within your Virtual Network.

Advanced AKS Cluster Provisioning with Terraform

Building upon the foundation established above, let’s explore advanced techniques for AKS Cluster Provisioning using Terraform:

1. Custom Node Pools:

Create specialized node pools for different application requirements, such as dedicated pools for specific workloads or with different VM sizes.

2. Auto-Scaling:

Configure auto-scaling for your node pools to automatically adjust the number of nodes based on demand, ensuring optimal resource utilization and cost efficiency.

3. Network Policies:

Implement network policies to control the communication between pods within your cluster, enhancing security and isolation.

4. Integration with other Azure Services:

Integrate your AKS cluster with other Azure services such as Azure Monitor for logging and monitoring, Azure Active Directory for authentication, and Azure Key Vault for secret management.

AKS Cluster Provisioning Best Practices

  • Use descriptive resource names.
  • Implement proper version control for your Terraform code.
  • Leverage Terraform modules for reusability.
  • Test your Terraform configurations thoroughly before applying them to production.
  • Regularly update your Terraform and Azure CLI versions.

Frequently Asked Questions

Q1: Can I use Terraform to manage existing AKS clusters?

Yes, Terraform can manage existing AKS clusters. You can import existing resources into your Terraform state, allowing you to manage them through your IaC configuration.

Q2: What are the security considerations when using Terraform for AKS provisioning?

Security is paramount. Employ appropriate access control mechanisms, including managing Azure service principals and utilizing least privilege principles. Securely store and manage secrets using Azure Key Vault integration within your Terraform configuration.

Q3: How can I handle updates to my AKS cluster using Terraform?

Terraform’s state management makes updating your AKS cluster straightforward. Simply modify your Terraform configuration to reflect the desired changes, and apply the configuration using terraform apply. Terraform will intelligently manage the changes, minimizing disruption to your running applications.

Q4: What happens if my Terraform configuration fails?

Terraform provides robust error handling. If a configuration step fails, Terraform will report the error and prevent any further changes. You can review the logs to troubleshoot the issue and correct your configuration.

Conclusion

Automating AKS Cluster Provisioning with Terraform is a powerful way to streamline your Kubernetes deployments. This guide has walked you through the essential steps, from setting up the environment to implementing advanced techniques. By leveraging Terraform’s capabilities, you can significantly improve the efficiency, consistency, and reproducibility of your AKS deployments. Remember to prioritize security best practices and thoroughly test your configurations before applying them to production. Efficient and reliable AKS Cluster Provisioning is crucial for smooth operation and scalable cloud-native applications. Thank you for reading the DevopsRoles page!

4 Tiny Docker Images: Lightweight Containers

In today’s fast-paced world of cloud computing and microservices, efficient resource utilization is paramount. Docker, the industry-standard containerization platform, allows developers to package applications and their dependencies into isolated containers.

However, not all Docker images are created equal. Larger images consume more disk space, memory, and network bandwidth, potentially impacting performance and scalability. This article delves into four tiny Docker images designed for lightweight containerization, providing you with the tools to build lean, efficient, and high-performing applications.

Alpine Linux: The Lightweight Champion

Alpine Linux consistently ranks as one of the smallest and most efficient Linux distributions available. Its tiny footprint, thanks to its use of musl libc and BusyBox, makes it an ideal base for lightweight Docker images. This translates to faster downloads, quicker startup times, and reduced resource consumption in production.

Advantages of Using Alpine Linux in Docker Images:

  • Small Size: Significantly smaller than other distributions, leading to faster downloads and deployments.
  • Security: Regularly updated and known for its strong security posture.
  • Resource Efficient: Minimal resource consumption makes it perfect for resource-constrained environments.
  • Wide Package Support: Access to a substantial package repository via the Alpine Linux package manager (apk).

Example: Creating a simple web server using Alpine Linux:

A basic Apache web server in Alpine Linux can be built with a Dockerfile like this:

# Use the latest Alpine Linux image as the base
FROM alpine:latest

# Install Apache HTTP Server without caching package index
RUN apk add --no-cache apache2

# Copy all website files from the current directory to the Apache web root
COPY . /var/www/html

# Expose port 80 for HTTP traffic
EXPOSE 80

# Start Apache in the foreground to keep the container running
CMD ["apache2ctl", "-D", "FOREGROUND"]

Distroless Images: Security Focused Minimalism

Distroless images from Google Container Tools represent a unique approach to lightweight containerization. They remove all unnecessary packages and tools, focusing solely on the application’s runtime dependencies. This dramatically reduces the attack surface, improving security without sacrificing efficiency. These 4 tiny Docker images offer significant security benefits.

Key Benefits of Distroless Images:

  • Enhanced Security: Minimized attack surface by removing unnecessary components.
  • Small Size: Extremely lightweight, resulting in faster deployments and reduced resource consumption.
  • Reproducibility: Consistent and predictable environment due to the absence of package managers and shell utilities.
  • Language Specific: Available for various programming languages (Java, Python, Node.js, etc.).

Example: Using a Distroless image for a Node.js application:

A Dockerfile leveraging a Distroless Node.js image might look like this:

# Stage 1: Build and install dependencies
FROM node:16-alpine as build

WORKDIR /app

COPY package*.json ./
RUN npm install

COPY . .

# Stage 2: Use distroless for lightweight, secure runtime
FROM gcr.io/distroless/nodejs:16

WORKDIR /app

COPY --from=build /app .

CMD ["index.js"]

Scratch: The Ultimate Minimalist Base

Docker’s `scratch` image is the most minimal base image available. It contains absolutely nothing – no shell, no libraries, no system utilities. Using `scratch` requires a deep understanding of your application’s dependencies and how to build a completely self-contained image. While challenging, it results in the smallest possible container size.

Advantages and Challenges of Using `scratch`

  • Smallest Size Possible: The ultimate in lightweight containerization.
  • Maximum Control: Complete control over the container’s contents.
  • Complexity: Requires a high level of Docker expertise and a thorough understanding of your application’s requirements.
  • Debugging Difficulty: Troubleshooting can be significantly more difficult due to the lack of standard tools.

Example (Conceptual): Building a simple static web application with `scratch`

The process involves copying all necessary files (HTML, CSS, JavaScript) directly into the image and specifying the entrypoint:

FROM nginx:alpine

COPY index.html /usr/share/nginx/html/
COPY styles.css /usr/share/nginx/html/
COPY app.js /usr/share/nginx/html/

EXPOSE 80
CMD ["nginx", "-g", "daemon off;"]

Minimal Debian/Ubuntu Images: A Balanced Approach

While not as minimal as Alpine or Distroless, carefully curated Debian or Ubuntu images with only essential packages can offer a good balance between size and usability. Using the `slim` variants of these distributions, you can reduce their size significantly, while still retaining a familiar environment and access to common tools.

Benefits of Using Minimal Debian/Ubuntu Images:

  • Familiarity: Many developers are comfortable with Debian or Ubuntu.
  • Moderate Size: Smaller than full-fledged distributions, offering a compromise between size and functionality.
  • Package Management: Access to familiar package managers (apt).
  • Ease of Use: Generally easier to manage than `scratch` or Distroless images.

Example: A simple Python application using a minimal Debian image:

FROM debian:slim-bullseye

WORKDIR /app

RUN apt-get update && apt-get install -y python3 python3-pip && \
    apt-get clean && rm -rf /var/lib/apt/lists/*

COPY requirements.txt ./
RUN pip3 install --no-cache-dir -r requirements.txt

COPY . .

CMD ["python3", "app.py"]

Frequently Asked Questions (FAQ)

Q1: Which image is best for my application?

The ideal image depends on your specific needs and priorities. Alpine Linux is a great general-purpose option. Distroless images prioritize security, while `scratch` offers the smallest size but demands more expertise. Minimal Debian/Ubuntu images provide a balance.

Q2: How do I choose the right base image version?

Always use the latest stable version to benefit from security updates and performance improvements. However, consider sticking to a specific version for production environments to maintain consistency.

Q3: What are the potential downsides of using tiny Docker images?

Using extremely minimal images like `scratch` can increase complexity and debugging time. Also, ensure that all dependencies are correctly handled to avoid runtime errors.

Q4: How can I reduce the size of my Docker images further?

Employ multi-stage builds to separate build dependencies from runtime dependencies, use layer caching effectively, and minimize the number of installed packages. Regularly clean up temporary files during the build process.

Q5: Are tiny Docker images suitable for all applications?

While generally beneficial, some applications with extensive dependencies or complex requirements might not be ideal candidates for extremely minimal images. Consider the trade-off between size and ease of development/maintenance.

Conclusion

Choosing the right Docker image significantly impacts your application’s efficiency, performance, and security. The four tiny Docker images discussed – Alpine Linux, Distroless images, `scratch`, and minimal Debian/Ubuntu images – each offer unique advantages. By understanding their strengths and limitations, you can select the most appropriate image for your specific use case, building lightweight, robust, and secure containers. Remember to prioritize security and always stay updated with the latest stable versions of your chosen base image. Thank you for reading the DevopsRoles page!

Remember to always consult the official documentation for each image for the most up-to-date information and best practices. Happy containerizing!

External Links: Alpine Linux, Distroless Images, Docker FROM instruction

Automating Cloudflare Tunnel with Terraform: A Comprehensive Guide

In today’s dynamic IT landscape, efficient infrastructure management is paramount. Automating tasks is no longer a luxury but a necessity for maintaining scalability, reliability, and security. Cloudflare Tunnel, a service that securely exposes internal applications to the internet, perfectly complements this need. However, manual configuration of Cloudflare Tunnel can be time-consuming and error-prone. This is where Terraform steps in, offering a powerful solution for automating the entire process. This comprehensive guide will walk you through automating Cloudflare Tunnel with Terraform, covering everything from basic setup to advanced configurations.

Understanding Cloudflare Tunnel and Terraform

Before diving into the automation process, let’s briefly understand the core components involved.

Cloudflare Tunnel

Cloudflare Tunnel creates a secure connection between your internal network and Cloudflare’s global network. This allows you to expose internal services to the internet without opening ports in your firewall, significantly enhancing your security posture. The tunnel uses a client-side application (cloudflared) to establish a secure connection, encrypting all traffic. Learn more about Cloudflare Tunnel.

Terraform

Terraform is an open-source Infrastructure as Code (IaC) tool that allows you to define and manage your infrastructure in a declarative manner. This means you define the desired state of your infrastructure in code, and Terraform ensures that state is achieved and maintained. Using Terraform to manage Cloudflare Tunnel provides several benefits, including:

  • Automation: Automate the entire process of creating and managing Cloudflare Tunnel.
  • Version Control: Track changes to your infrastructure configuration using Git or other version control systems.
  • Consistency: Ensure consistent deployments across multiple environments.
  • Repeatability: Easily recreate your infrastructure in different environments.
  • Collaboration: Facilitate collaboration among team members through a shared codebase.

Automating Cloudflare Tunnel with Terraform: A Step-by-Step Guide

To automate Cloudflare Tunnel with Terraform, you’ll need a Cloudflare account and a Terraform installation. We’ll use the Cloudflare Terraform Provider, which simplifies the interaction with the Cloudflare API.

Prerequisites

  1. Cloudflare Account: Create a Cloudflare account if you don’t already have one.
  2. Cloudflare API Token: Generate an API token with the necessary permissions (e.g., access to Tunnel). Learn how to generate an API token.
  3. Terraform Installation: Download and install Terraform on your system. Download Terraform here.
  4. Cloudflare CLI (cloudflared): Download and install the Cloudflare CLI. Download cloudflared.

Basic Configuration

Let’s start with a basic configuration. This example creates a Cloudflare Tunnel and associates it with a specific origin server.

terraform {
  required_providers {
    cloudflare = {
      source  = "cloudflare/cloudflare"
      version = "~> 2.0"
    }
  }
}

provider "cloudflare" {
  api_token = var.cloudflare_api_token
}

variable "cloudflare_api_token" {
  type      = string
  sensitive = true
}

resource "cloudflare_tunnel" "example" {
  name       = "my-tunnel"

  configuration {
    origin_server {
      address = "192.168.1.100:8080"
    }
  }
}

This code defines a Cloudflare Tunnel named “my-tunnel” and specifies the origin server’s address. Replace `”192.168.1.100:8080″` with your actual origin server’s address and port.

Applying the Configuration

After creating the Terraform configuration file (e.g., `main.tf`), run the following commands:

# Initialize the working directory containing Terraform configuration files
terraform init

# Review the execution plan to see what will be created, changed, or destroyed
terraform plan

# Apply the configuration to provision the infrastructure
terraform apply

The `terraform plan` command shows you what changes Terraform will make, and `terraform apply` executes the plan, creating the Cloudflare Tunnel.

Advanced Configurations

The basic example provides a foundation. Let’s explore some advanced scenarios:

Multiple Origins

You can add multiple origin servers to a single tunnel:

variable "origin_servers" {
  type        = list(string)
  description = "List of origin server addresses"
  default     = ["192.168.1.100:8080", "10.0.0.10:8000"]
}

resource "cloudflare_tunnel" "example" {
  name = "my-tunnel"

  configuration {
    dynamic "origin_server" {
      for_each = var.origin_servers
      content {
        address = origin_server.value
      }
    }
  }
}

Using Variables

Employing variables makes your configuration more flexible and reusable:

variable "origin_servers" {
  type        = list(string)
  description = "List of origin server addresses"
}

resource "cloudflare_tunnel" "example" {
  name = "my-tunnel"

  configuration {
    dynamic "origin_server" {
      for_each = var.origin_servers
      content {
        address = origin_server.value
      }
    }
  }
}

Using Data Sources

Data sources allow you to retrieve information from Cloudflare:

data "cloudflare_account" "account" {
  # Retrieves details of the authenticated Cloudflare account
}

resource "cloudflare_tunnel" "example" {
  name       = "my-tunnel"
  account_id = data.cloudflare_account.account.id

  configuration {
    origin_server {
      address = "192.168.1.100:8080"
    }
  }
}

Integration with Other Services

Terraform’s power shines when integrating Cloudflare Tunnel with other infrastructure components. You can orchestrate the creation of related resources, like load balancers or virtual machines, within the same Terraform configuration.

Frequently Asked Questions (FAQ)

  • Q: What are the security implications of using Cloudflare Tunnel?

    A: Cloudflare Tunnel significantly enhances security by preventing direct exposure of your internal services to the internet. All traffic is encrypted, and you don’t need to open ports in your firewall. However, you should still maintain strong security practices on your internal network and application.
  • Q: Can I use Terraform to manage multiple Cloudflare Tunnels?

    A: Yes, you can easily manage multiple Cloudflare Tunnels using Terraform by defining multiple resources of the `cloudflare_tunnel` type, each with its own configuration.
  • Q: How do I handle updates to my Cloudflare Tunnel configuration?

    A: Modify your Terraform configuration, run `terraform plan` to review the changes, and then run `terraform apply` to update your Cloudflare Tunnel.
  • Q: What if my Cloudflare Tunnel fails?

    A: Terraform’s state management helps with troubleshooting. If a tunnel fails, Terraform’s `plan` command will highlight the issue. You can then investigate the cause and correct your configuration.
  • Q: Can I use this with other cloud providers?

    A: While this focuses on Cloudflare Tunnel, Terraform’s versatility allows you to integrate this with other cloud providers for managing related infrastructure components like virtual machines or networks. This would be done through their respective Terraform providers.
  • Q: What are the limitations of using Terraform for Cloudflare Tunnel management?

    A: The primary limitation is dependency on the Cloudflare API and Terraform provider. Any downtime or issues with either could impact your ability to manage tunnels. Ensure you always have backups and disaster recovery plans in place.

Conclusion

Automating Cloudflare Tunnel deployment with Terraform offers a significant advantage in managing infrastructure efficiently and securely. This guide has provided a detailed walkthrough from basic configurations to advanced scenarios, empowering you to streamline your workflows and ensure consistent deployments. By leveraging Infrastructure as Code. Thank you for reading the DevopsRoles page!

Revolutionizing Infrastructure as Code: Terraform CI/CD and Testing on AWS with the New Terraform Test Framework

Infrastructure as Code (IaC) has become an indispensable practice for managing and deploying cloud infrastructure efficiently and reliably. Terraform, HashiCorp’s popular IaC tool, empowers developers and DevOps engineers to define and provision infrastructure resources in a declarative manner. Integrating Terraform into a robust CI/CD pipeline is crucial for automating deployments, ensuring consistency, and reducing human error.

This comprehensive guide dives into implementing Terraform CI/CD and testing on AWS, leveraging the power of the new Terraform Test Framework to enhance your infrastructure management workflow. We’ll cover everything from setting up a basic pipeline to implementing advanced testing strategies, equipping you with the knowledge to build a reliable and efficient infrastructure deployment process.

Understanding Terraform CI/CD

Continuous Integration/Continuous Delivery (CI/CD) is a set of practices that automate the process of building, testing, and deploying software. When applied to infrastructure, CI/CD ensures that infrastructure changes are deployed consistently and reliably, minimizing the risk of errors and downtime. A typical Terraform CI/CD pipeline involves the following stages:

Key Stages of a Terraform CI/CD Pipeline:

  • Code Commit: Developers commit Terraform configuration code to a version control system (e.g., Git).
  • Build: The CI system detects code changes and initiates a build process, which might involve linting and validating the Terraform code.
  • Test: Automated tests are executed to validate the Terraform configuration. This is where the new Terraform Test Framework plays a vital role.
  • Plan: Terraform generates an execution plan, outlining the changes that will be made to the infrastructure.
  • Apply: Terraform applies the changes to the AWS infrastructure, provisioning or modifying resources.
  • Destroy (Optional): In certain scenarios (e.g., testing environments), a destroy step can automatically tear down the infrastructure after testing.

Leveraging the New Terraform Test Framework

The Terraform Test Framework is a powerful tool that allows you to write automated tests for your Terraform configurations. This framework facilitates testing the correctness and behavior of your infrastructure code before deployment, significantly reducing the risk of errors in production. It enables you to:

Benefits of the Terraform Test Framework:

  • Verify Infrastructure State: Assert the desired state of your infrastructure after applying your Terraform code.
  • Test Configuration Changes: Ensure that changes to your Terraform configurations have the expected effect.
  • Improve Code Quality: Encourage writing more robust, maintainable, and testable Terraform code.
  • Reduce Deployment Risks: Identify and fix potential issues early in the development cycle, reducing the chance of errors in production.

Integrating Terraform with AWS and CI/CD Tools

To implement Terraform CI/CD on AWS, you’ll typically use a CI/CD tool such as Jenkins, GitHub Actions, GitLab CI, or AWS CodePipeline. These tools integrate seamlessly with Terraform, automating the execution of Terraform commands as part of your pipeline.

Example: Setting up a basic Terraform CI/CD pipeline with GitHub Actions:

A simplified GitHub Actions workflow could look like this:


name: Terraform AWS Deployment

on: push

jobs:
  build:
    runs-on: ubuntu-latest
    steps:
      - name: Checkout code
        uses: actions/checkout@v3

      - name: Setup Terraform
        uses: hashicorp/setup-terraform@v2

      - name: Terraform Init
        run: terraform init

      - name: Terraform Plan
        run: terraform plan -out=tfplan

      - name: Terraform Apply
        run: terraform apply tfplan

This workflow checks out the code, initializes Terraform, creates a plan, and applies the changes. For production environments, adding a testing stage using the Terraform Test Framework is crucial.

Implementing Terraform Testing with Practical Examples

Let’s explore practical examples demonstrating how to use the Terraform Test Framework for various scenarios.

Example 1: Basic Resource Existence Test

This test verifies that an EC2 instance exists after applying the Terraform configuration:


package main

import (
	"testing"

	"github.com/stretchr/testify/assert"
	"github.com/hashicorp/terraform-plugin-sdk/v2/helper/resource"
)

func TestEC2InstanceExists(t *testing.T) {
	resource.Test(t, resource.TestCase{
		PreCheck:  func() { /* ... */ },
		Providers: providers(),
		Steps: []resource.TestStep{
			{
				Config: `
					resource "aws_instance" "example" {
						ami           = "ami-0c55b31ad2299a701" # Replace with your AMI ID
						instance_type = "t2.micro"
					}
				`,
				Check: resource.ComposeTestCheckFunc(
					resource.TestCheckResourceAttr("aws_instance.example", "instance_state", "running"),
				),
			},
		},
	})
}

Example 2: Testing Output Values

This example tests whether the Terraform output value matches the expected value:

func TestOutputValue(t *testing.T) {
	resource.Test(t, resource.TestCase{
		PreCheck:  func() { /* pre-check logic */ },
		Providers: providers(),
		Steps: []resource.TestStep{
			{
				Config: `
resource "aws_instance" "example" {
  ami           = "ami-0c55b31ad2299a701"
  instance_type = "t2.micro"
}

output "instance_id" {
  value = aws_instance.example.id
}
`,
				Check: resource.ComposeTestCheckFunc(
					resource.TestCheckOutputSet("instance_id"), // 
				),
			},
		},
	})
}

Example 3: Advanced Testing with Custom Assertions

For more complex scenarios, you can create custom assertions to check specific aspects of your infrastructure.

// ... (imports: "testing", "github.com/hashicorp/terraform-plugin-sdk/v2/helper/resource", "github.com/hashicorp/terraform-plugin-sdk/v2/terraform", "fmt") ...

func TestCustomAssertion(t *testing.T) {
	resource.Test(t, resource.TestCase{
		PreCheck:  func() { /* validate preconditions */ },
		Providers: providers(),
		Steps: []resource.TestStep{
			{
				Config: `
resource "aws_instance" "example" {
  ami           = "ami-0c55b31ad2299a701"
  instance_type = "t2.micro"
}
`,
				Check: resource.ComposeTestCheckFunc(
					func(s *terraform.State) error {
						rs, ok := s.RootModule().Resources["aws_instance.example"]
						if !ok {
							return fmt.Errorf("resource aws_instance.example not found")
						}

						if rs.Primary.ID == "" {
							return fmt.Errorf("expected instance ID to be set")
						}

						// Custom assertion logic: for example, check ID prefix
						if len(rs.Primary.ID) < 2 || rs.Primary.ID[0] != 'i' {
							return fmt.Errorf("instance ID %q does not look like a valid EC2 ID", rs.Primary.ID)
						}

						// Optional: perform DB lookup, external API call, etc.
						// e.g., validate the instance ID exists in a mock service

						return nil
					},
				),
			},
		},
	})
}

Frequently Asked Questions (FAQ)

Q1: What are the best practices for writing Terraform tests?

Best practices include writing small, focused tests, using clear and descriptive names, and organizing tests into logical groups. Prioritize testing critical infrastructure components and avoid over-testing.

Q2: How can I integrate the Terraform Test Framework into my existing CI/CD pipeline?

You can integrate the tests by adding a testing stage to your CI/CD workflow. Your CI/CD tool will execute the test suite before applying Terraform changes. Failure in the tests should halt the deployment process.

Q3: What are some common testing pitfalls to avoid?

Common pitfalls include writing tests that are too complex, not adequately covering edge cases, and neglecting to test dependencies. Ensure comprehensive testing covers both happy path and failure scenarios.

Q4: Can I use the Terraform Test Framework for testing resources outside of AWS?

Yes, the Terraform Test Framework is not limited to AWS. It can be used to test configurations for various cloud providers and on-premise infrastructure.

Conclusion

In the era of modern DevOps, infrastructure deployment is no longer a manual, isolated task—it has evolved into an automated, testable, and reusable process. This article has shed light on how the powerful combination of Terraform, CI/CD pipelines, and the Terraform Test Framework can significantly enhance the reliability, efficiency, and quality of infrastructure management on AWS.

By setting up a professional CI/CD pipeline that integrates essential steps such as terraform init, plan, apply, and, crucially, automated testing written in Go, you can:

  • Minimize deployment risks,
  • Catch errors early in the development lifecycle, and
  • Ensure infrastructure configurations remain under strict control.

Moreover, the Terraform Test Framework offers more than just basic resource checks (e.g., EC2 instances or output values). It empowers teams to create custom test assertions for complex logic, marking a major advancement toward treating infrastructure as fully testable software.

In conclusion, if you’re aiming to build a professional, safe, and verifiable deployment workflow, the integration of Terraform + CI/CD + Test Framework is your strategic foundation. It’s not just a DevOps toolchain-it’s a roadmap to the future of resilient and scalable infrastructure operations. Thank you for reading the DevopsRoles page!

DevOps Tool Comparison: Ansible vs Chef vs Puppet

In the dynamic world of DevOps, efficient infrastructure management is paramount. Automation is key, and configuration management tools play a crucial role in achieving this. Three prominent players dominate this space: Ansible vs Chef vs Puppet. Each offers a unique approach to automating infrastructure provisioning, configuration, and deployment.

This comprehensive guide provides a detailed DevOps tool comparison: Ansible vs. Chef vs. Puppet, helping you determine which tool best aligns with your specific needs and organizational goals.

Understanding Configuration Management Tools

Before diving into the specifics of Ansible, Chef, and Puppet, it’s essential to understand the core function of configuration management tools. These tools automate the process of setting up, configuring, and maintaining systems, ensuring consistency and reducing manual errors. They achieve this by defining the desired state of a system and then applying the necessary changes to reach that state. This approach is particularly beneficial in managing large-scale infrastructure, where manual configuration would be incredibly time-consuming and error-prone.

Key Features of Configuration Management Tools:

  • Automation: Automates repetitive tasks, freeing up DevOps engineers for more strategic work.
  • Consistency: Ensures consistency across multiple systems, reducing configuration drift.
  • Scalability: Enables efficient management of large and complex infrastructures.
  • Version Control: Allows for tracking changes and reverting to previous configurations.
  • Idempotency: Ensures that applying a configuration multiple times has the same effect as applying it once.

Ansible: The Agentless Simplicity

Ansible distinguishes itself through its agentless architecture. It uses SSH to connect to remote systems, eliminating the need for installing agents on each managed node. This simplifies deployment and reduces overhead. Ansible employs YAML, a human-readable language, for defining configurations, making it relatively easy to learn and use.

Ansible Advantages:

  • Agentless Architecture: Simplifies deployment and reduces overhead.
  • Easy to Learn: Uses YAML, a user-friendly configuration language.
  • Fast and Efficient: Known for its speed and efficiency in performing tasks.
  • Community Support: Benefits from a large and active community.

Ansible Disadvantages:

  • Limited State Management: Not as robust in managing complex, constantly changing states as Chef or Puppet.
  • Less Suitable for Complex Environments: Might not be ideal for highly complex infrastructures requiring extensive configuration management.

Ansible Example (Basic):

A simple Ansible playbook to install Apache on a remote server might look like this:


- hosts: webservers
  become: true
  tasks:
    - name: Install Apache
      apt:
        name: apache2
        state: present

Chef: The Robust Infrastructure Management Solution

Chef adopts a more robust, centralized approach to configuration management. It utilizes a client-server architecture where agents (Chef clients) reside on each managed node, regularly checking in with a central server (Chef server) for updated configurations. Chef employs Ruby, a powerful scripting language, for defining configurations, providing greater flexibility and expressiveness.

Chef Advantages:

  • Comprehensive Infrastructure Management: Offers a broad range of features for managing complex infrastructures.
  • Strong Version Control: Excellent support for version control, facilitating collaborative development and rollback capabilities.
  • Scalability: Designed to handle large-scale deployments efficiently.
  • Detailed Reporting: Provides detailed reporting and auditing capabilities.

Chef Disadvantages:

  • Steeper Learning Curve: Ruby scripting and Chef’s architecture can be more challenging to learn compared to Ansible.
  • More Complex Setup: Requires setting up a central server, increasing initial setup complexity.
  • Higher Resource Consumption: The agent-based architecture requires more resources compared to Ansible.

Chef Example (Basic):

A basic Chef recipe to install Apache might involve creating a recipe file (e.g., apache2.rb) that uses the `apt` resource:


package "apache2" do
  action :install
end

Puppet: The Mature and Powerful Option

Puppet is a mature and powerful configuration management tool that, like Chef, employs a client-server architecture. It utilizes a declarative language (Puppet DSL) to define configurations, making it easier to specify the desired state without explicitly detailing the steps to achieve it. Puppet is well-suited for managing complex, large-scale infrastructures.

Puppet Advantages:

  • Mature and Stable: A well-established tool with a long track record and extensive features.
  • Powerful Declarative Language: Allows defining configurations concisely and focusing on the desired state.
  • Strong Community and Support: Benefits from a large community and readily available support resources.
  • Comprehensive Module Library: Offers a vast library of pre-built modules, simplifying common tasks.

Puppet Disadvantages:

  • Steep Learning Curve: Its declarative language and architecture can have a steeper learning curve than Ansible.
  • More Complex Setup: Like Chef, it requires a central server and client installation.
  • Can Be Resource Intensive: Managing large infrastructures can require significant computational resources.

Puppet Example (Basic):

A basic Puppet manifest to install Apache might look like this:


package { 'apache2':
  ensure => present,
}

DevOps Tool Comparison: Ansible vs. Chef vs. Puppet – A Summary Table

| Feature | Ansible | Chef | Puppet |
|—————–|—————————|—————————|—————————|
| Architecture | Agentless | Client-Server | Client-Server |
| Configuration Language | YAML | Ruby | Puppet DSL |
| Learning Curve | Easy | Moderate | Moderate |
| Scalability | Moderate | High | High |
| Complexity | Low | High | High |
| Ideal Use Cases | Small to medium-sized deployments, rapid prototyping | Large-scale, complex infrastructures | Large-scale, complex infrastructures, robust state management |

FAQ Section

Q1: Which tool is best for beginners?

Ansible generally has the easiest learning curve due to its agentless architecture and use of YAML.

Q2: Which tool is best for large-scale deployments?

Chef and Puppet are better suited for large-scale deployments because of their robust features and ability to manage complex configurations across many systems.

Q3: Can I use multiple tools together?

Yes, it’s possible and even common to integrate different tools within a DevOps pipeline. For instance, you might use Ansible for quick ad-hoc tasks and Puppet for managing a more complex, long-term infrastructure.

Q4: What about cost?

Ansible has a free open-source version, while Chef and Puppet offer both open-source and commercial versions with varying features and support levels.

Q5: Which tool offers better security features?

All three tools offer security features, but the specific features and their implementation vary. Careful configuration and security best practices are crucial regardless of the chosen tool.

Conclusion

Choosing between Ansible, Chef, and Puppet depends heavily on your specific requirements and organizational context. Ansible’s simplicity and agentless nature make it ideal for smaller teams and quicker deployments. Chef and Puppet offer more robust features and better scalability for large-scale infrastructures but come with a steeper learning curve and more complex setups. Consider your team’s skills, infrastructure complexity, and budget when making your decision. Careful evaluation of your needs against the strengths and weaknesses of each tool is crucial for successful DevOps implementation.

Remember that the best choice is often the one that best fits your existing workflow and future goals. Thoroughly researching each option and perhaps experimenting with trial versions will provide the most informed path towards choosing the optimal configuration management tool for your organization. Thank you for reading the DevopsRoles page!

5 Reasons Podman Is Better Than Docker for Self-Hosted Environments

For developers and system administrators managing self-hosted environments, choosing the right containerization technology is critical. While Docker has long been the industry standard, Podman offers a compelling alternative with several advantages, especially for individual users. This article delves into five key reasons why Podman often emerges as the superior choice for self-hosted setups. We’ll explore its security features, ease of use, performance benefits, and more, equipping you with the knowledge to make an informed decision.

1. Enhanced Security: Running Containers Without Root Privileges

Rootless Containers: A Game Changer for Security

One of Podman’s most significant advantages is its ability to run containers without requiring root privileges. This is a game-changer for security. With Docker, running containers typically requires root access, creating a potential security vulnerability. If a container is compromised, the attacker could gain root access to the entire host system. Podman mitigates this risk by utilizing user namespaces and other security mechanisms to isolate containers effectively, even without root. This rootless operation significantly reduces the attack surface and enhances the overall security posture of your self-hosted environment.

  • Reduced Attack Surface: Rootless operation minimizes the potential impact of a compromised container.
  • Improved Security Posture: Podman’s security model provides a more secure foundation for your self-hosted infrastructure.
  • Simplified Management: Running containers without root simplifies user management and access control.

Example: Running a Web Server Rootlessly with Podman

Imagine you’re running a web server inside a container. With Docker, a compromise could allow an attacker to take over your entire system. With Podman’s rootless mode, even if the web server container is compromised, the attacker’s access is significantly limited, protecting your host system.

2. Simplified Container Management: No Daemon Required

Daemonless Architecture: Streamlined Operations

Unlike Docker, which relies on a central daemon (dockerd) for managing containers, Podman uses a daemonless architecture. This means that each container runs as its own independent process, eliminating a single point of failure and simplifying the overall system architecture. This also contributes to increased security, as the absence of a central daemon reduces the risk of a widespread compromise.

  • Improved Stability: The daemonless architecture enhances the stability of your containerized environment.
  • Simplified Troubleshooting: Debugging and troubleshooting become simpler due to the absence of a complex daemon.
  • Enhanced Security: Removing the daemon reduces the attack surface and enhances security.

Example: Faster Startup and Shutdown

Because Podman doesn’t need to communicate with a daemon to start and stop containers, the process is much faster. This is especially noticeable when dealing with numerous containers in your self-hosted environment.

3. Native Support for Pod-Based Workloads: Enhanced Resource Management

Pods: Grouping Containers for Efficient Resource Allocation

Podman provides native support for pods – a grouping of containers that share resources and networking. This feature is crucial for orchestrating more complex applications that require multiple containers working together. While Docker can achieve similar functionality through tools like Docker Compose, Podman’s built-in pod support is more integrated and efficient, especially beneficial for self-hosted deployments requiring optimized resource utilization.

  • Simplified Orchestration: Manage multiple containers as a single unit (pod) for easier control.
  • Efficient Resource Allocation: Share network and storage resources effectively among containers within a pod.
  • Improved Scalability: Easily scale your applications by managing pods instead of individual containers.

Example: Deploying a Multi-Container Application

Consider a microservice architecture consisting of a database container, a web server container, and a caching container. With Podman, you can group these containers into a single pod, simplifying deployment and management. This approach improves efficiency compared to managing individual Docker containers separately.

4. Better Integration with Systemd: Seamless System Management

Systemd Integration: Enhanced Control and Monitoring

Podman offers excellent integration with systemd, the system and service manager used in many Linux distributions. This allows you to manage containers as systemd services, enabling features like automatic startup, logging, and monitoring. This tighter integration significantly simplifies the management of your containerized applications within your self-hosted environment.

  • Automatic Container Startup: Containers automatically start with your system.
  • Improved Monitoring: Use systemd tools for monitoring container status and resource usage.
  • Simplified Management: Manage containers through the familiar systemd command-line interface.

Example: Managing Containers as Systemd Services

You can configure a Podman container to automatically start when your system boots, ensuring your applications are always running. Systemd also provides detailed logging for the container, simplifying troubleshooting and monitoring.

5. Improved Performance and Resource Utilization

Lightweight Architecture: Reduced Overhead

Podman’s daemonless architecture and efficient design contribute to improved performance and better resource utilization compared to Docker. The absence of a central daemon reduces overhead, leading to faster startup times, quicker container operations, and lower resource consumption, particularly beneficial in resource-constrained self-hosted environments.

  • Faster Startup Times: Containers start and stop significantly faster without the daemon overhead.
  • Lower Resource Consumption: Reduced CPU and memory usage compared to Docker.
  • Improved Performance: Faster container operations and overall system responsiveness.

Example: Running Multiple Containers Simultaneously

In a self-hosted setup with limited resources, Podman’s lower overhead can enable you to run more containers simultaneously compared to Docker, maximizing your system’s capabilities.

FAQ

Q1: Can I use Podman on Windows or macOS?

While Podman is primarily designed for Linux systems, it can be used on Windows and macOS through virtualization technologies like WSL2 (Windows Subsystem for Linux 2) or virtualization software that provides a Linux environment.

Q2: Is Podman compatible with Docker images?

Yes, Podman is largely compatible with Docker images. You can typically use images from Docker Hub and other registries with Podman without any significant modifications.

Q3: How do I switch from Docker to Podman?

Migrating from Docker to Podman is generally straightforward. You can export your Docker images and then import them into Podman. However, you may need to adapt your Docker Compose files or other automation scripts to work with Podman’s command-line interface.

Q4: What are the limitations of Podman?

While Podman offers many advantages, it might lack some advanced features available in Docker Enterprise or other commercial container orchestration platforms. Its community support might also be slightly smaller compared to Docker’s.

Conclusion

For users managing self-hosted environments, Podman presents a compelling alternative to Docker, offering significant advantages in security, ease of use, performance, and resource management. Its rootless containers, daemonless architecture, native pod support, and improved systemd integration make it a strong contender, particularly for those prioritizing security and efficient resource utilization. While some aspects might require a learning curve for users familiar with Docker, the benefits often outweigh the transition effort, ultimately leading to a more robust and secure self-hosted infrastructure.

This article provided five key reasons why Podman could be superior for your needs, but the best choice ultimately depends on your specific requirements and familiarity with containerization technology. Consider your security priorities, resource constraints, and complexity of your applications when making your decision. Experimenting with both Docker and Podman will allow you to determine which tool best suits your self-hosted environment. Thank you for reading the DevopsRoles page!

Terraform Your SAP Infrastructure on AWS: A Comprehensive Guide

Deploying and managing SAP landscapes on Amazon Web Services (AWS) can be complex. Traditional methods often involve manual configurations, increasing the risk of errors and slowing down deployment times. Enter Terraform, a powerful Infrastructure as Code (IaC) tool that automates the provisioning, configuration, and management of your infrastructure. This guide will walk you through leveraging Terraform to streamline your SAP infrastructure on AWS, leading to greater efficiency, scalability, and reliability.

Understanding the Benefits of Terraform for SAP on AWS

Utilizing Terraform to manage your SAP infrastructure on AWS offers several significant advantages:

Increased Efficiency and Automation

  • Automate the entire provisioning process, from setting up virtual machines to configuring networks and databases.
  • Reduce manual errors associated with manual configuration.
  • Accelerate deployment times, enabling faster time-to-market for new applications and services.

Improved Consistency and Repeatability

  • Ensure consistent infrastructure deployments across different environments (development, testing, production).
  • Easily replicate your infrastructure in different AWS regions or accounts.
  • Simplify the process of updating and modifying your infrastructure.

Enhanced Scalability and Flexibility

  • Easily scale your SAP infrastructure up or down based on your needs.
  • Adapt to changing business requirements quickly and efficiently.
  • Benefit from the scalability and flexibility of the AWS cloud platform.

Improved Collaboration and Version Control

  • Enable collaboration among team members through version control systems (like Git).
  • Track changes to your infrastructure over time.
  • Maintain a clear audit trail of all infrastructure modifications.

Setting up Your Terraform Environment for SAP on AWS

Before you begin, ensure you have the following prerequisites:

1. AWS Account and Credentials

You’ll need an active AWS account with appropriate permissions to create and manage resources.

2. Terraform Installation

Download and install Terraform from the official HashiCorp website: https://www.terraform.io/downloads.html

3. AWS Provider Configuration

Configure the AWS provider in your Terraform configuration file (typically `main.tf`) using your AWS access key ID and secret access key. Important: Store your credentials securely, ideally using AWS IAM roles or environment variables. Do not hardcode them directly into your configuration files.


terraform {
  required_providers {
    aws = {
      source  = "hashicorp/aws"
      version = "~> 4.0"
    }
  }
}

provider "aws" {
  region = "us-east-1" # Replace with your desired region
}

4. Understanding Terraform Modules for SAP

Leveraging pre-built Terraform modules can significantly simplify the deployment process. Several community-contributed and commercial modules are available for various SAP components. Always carefully review the source and security implications of any module before integrating it into your infrastructure.

Terraform Examples: Deploying SAP Components on AWS

Here are examples demonstrating how to deploy various SAP components using Terraform on AWS. These examples are simplified for clarity; real-world implementations require more detailed configuration.

Example 1: Deploying an EC2 Instance for SAP Application Server


resource "aws_instance" "sap_app_server" {
  ami                    = "ami-0c55b31ad2299a701" # Replace with appropriate AMI
  instance_type          = "t3.medium"
  key_name               = "your_key_pair_name"
  vpc_security_group_ids = [aws_security_group.sap_app_server.id]
  # ... other configurations ...
}

resource "aws_security_group" "sap_app_server" {
  name        = "sap_app_server_sg"
  description = "Security group for SAP application server"

  ingress {
    from_port   = 22
    to_port     = 22
    protocol    = "tcp"
    cidr_blocks = ["0.0.0.0/0"] #Restrict this in production!
  }
  # ... other rules ...
}

Example 2: Creating an Amazon RDS Instance for SAP HANA


resource "aws_db_instance" "sap_hana" {
  allocated_storage    = 200
  engine                = "sap-hana"
  engine_version        = "2.0"
  instance_class        = "db.m5.large"
  db_name               = "saphana"
  username              = "sapuser"
  password              = "strong_password" # Never hardcode passwords in production! Use secrets management
  skip_final_snapshot = true
  # ... other configurations ...
}

Example 3: Deploying a Network Infrastructure with VPC and Subnets


resource "aws_vpc" "main" {
  cidr_block = "10.0.0.0/16"
}

resource "aws_subnet" "public" {
  vpc_id            = aws_vpc.main.id
  cidr_block        = "10.0.1.0/24"
  availability_zone = "us-east-1a"
}
# ... more subnets and network configurations ...

Advanced Scenarios: High Availability and Disaster Recovery

Terraform excels in setting up complex, highly available SAP landscapes. This involves deploying multiple instances across different availability zones, implementing load balancing, and configuring disaster recovery mechanisms. These scenarios often require sophisticated configurations and might utilize external modules or custom scripts to automate more intricate tasks, including SAP specific configuration settings.

Frequently Asked Questions (FAQ)

Q1: What are the best practices for managing Terraform state files for SAP infrastructure?

Use a remote backend like AWS S3 or Terraform Cloud to manage your state files. This ensures that multiple team members can collaborate effectively and prevents data loss. Always encrypt your state files for security.

Q2: How can I handle sensitive information like database passwords within my Terraform code?

Avoid hardcoding sensitive data directly in your Terraform configurations. Utilize AWS Secrets Manager or other secrets management solutions to store and retrieve sensitive information during deployment. Refer to these secrets within your Terraform code using environment variables or dedicated data sources.

Q3: How do I integrate Terraform with existing SAP monitoring tools?

Use Terraform’s output values to integrate with your monitoring tools. For example, Terraform can output the IP addresses and instance IDs of your SAP components, which can then be fed into your monitoring system’s configuration.

Q4: Can I use Terraform to migrate an existing on-premise SAP system to AWS?

While Terraform isn’t directly involved in the data migration process, it can automate the infrastructure provisioning on AWS to receive the migrated data. Tools like AWS Database Migration Service (DMS) are commonly used for the actual data migration, and Terraform can manage the target infrastructure to receive this data efficiently.

Q5: What are some common challenges when using Terraform for SAP on AWS?

Some common challenges include managing complex dependencies between SAP components, handling large-scale deployments, ensuring proper security configurations, and understanding the nuances of SAP-specific parameters and configurations within your Terraform code. Careful planning and testing are crucial to mitigate these challenges.

Conclusion

Terraform significantly simplifies and streamlines the deployment and management of SAP infrastructure on AWS. By automating the provisioning, configuration, and management of your SAP landscape, you can significantly improve efficiency, consistency, and scalability. While there’s a learning curve involved, the long-term benefits of using Terraform for your SAP systems on AWS far outweigh the initial investment. Remember to embrace best practices for state management, security, and error handling to maximize the value of this powerful IaC tool. By following the guidance and examples in this guide, you can confidently begin your journey towards automating and optimizing your SAP infrastructure on AWS using Terraform.Thank you for reading the DevopsRoles page!

Mastering the Terraform Registry: A Tutorial on Building and Sharing Modules

Introduction: Unlock the Power of Reusable Infrastructure with the Terraform Registry

In the dynamic world of infrastructure-as-code (IaC), efficiency and consistency are paramount. Terraform, a widely adopted IaC tool, allows you to define and manage your infrastructure in a declarative manner. However, writing the same infrastructure code repeatedly across projects can be tedious and error-prone. This is where the Terraform Registry shines. It’s a central repository for sharing and reusing pre-built Terraform modules, enabling developers to accelerate their workflows and maintain a consistent infrastructure landscape. This A Terraform Registry tutorial to build and share modules will guide you through the entire process, from creating your first module to publishing it for the community to use.

Understanding Terraform Modules

Before diving into the Registry, it’s crucial to understand Terraform modules. Modules are reusable packages of Terraform configuration. They encapsulate a specific set of resources and allow you to parameterize their behavior, making them adaptable to different environments. Think of them as functions for your infrastructure.

Benefits of Using Terraform Modules

* **Reusability:** Avoid writing repetitive code.
* **Maintainability:** Easier to update and maintain a single module than multiple instances of similar code.
* **Consistency:** Ensure consistency across different environments.
* **Collaboration:** Share modules with your team or the wider community.
* **Abstraction:** Hide implementation details and expose only necessary parameters.

Building Your First Terraform Module

Let’s start by creating a simple module for deploying a virtual machine on AWS. This A Terraform Registry tutorial to build and share modules example will use AWS EC2 instances.

Step 1: Project Structure

Create a directory for your module, for example, `aws-ec2-instance`. Inside this directory, create the following files:

* `main.tf`: This file contains the core Terraform configuration.
* `variables.tf`: This file defines the input variables for your module.
* `outputs.tf`: This file defines the output values that your module will return.

Step 2: `variables.tf`

variable "instance_type" {
  type        = string
  default     = "t2.micro"
  description = "EC2 instance type"
}

variable "ami_id" {
  type        = string
  description = "AMI ID for the instance"
}

variable "key_name" {
  type        = string
  description = "Name of the SSH key pair"
}

Step 3: `main.tf`

resource "aws_instance" "ec2" {
  ami           = var.ami_id
  instance_type = var.instance_type
  key_name      = var.key_name
}

Step 4: `outputs.tf`

output "instance_public_ip" {
  value       = aws_instance.ec2.public_ip
  description = "Public IP address of the EC2 instance"
}

Step 5: Testing Your Module

Before publishing, test your module locally. Create a test directory and use the module within a sample `main.tf` file. Make sure to provide the necessary AWS credentials.

Publishing Your Module to the Terraform Registry

Publishing your module involves creating a repository on a platform supported by the Terraform Registry, such as GitHub.

Step 1: Create a GitHub Repository

Create a new public GitHub repository for your module. This is crucial for the Terraform Registry to access your code.

Step 2: Configure the Registry

You’ll need a Terraform Cloud account (or you can link a GitHub account via Terraform Cloud) to manage and publish your module. Follow the instructions on the official Terraform documentation to connect your provider with your repository.
[Link to Terraform Cloud Documentation](https://www.terraform.io/cloud-docs/cli/workspaces/create)

Step 3: Set up a Provider in your Module

Within your Terraform module repository, you should have a `provider.tf` file. This file defines the provider for your resources. It is not strictly necessary to include a provider in a module (your main `Terraform` file could specify it), but it is common practice.

Step 4: Submit Your Module

Through Terraform Cloud you submit your module for review. You’ll be prompted to provide metadata and other relevant information. Once validated and approved, your module will be available on the Terraform Registry.

Using Published Modules

Once your module is published, others can easily integrate it into their projects. Here’s how to use a module from the Terraform Registry:

module "aws-ec2-instance" {
  source        = "your-github-username/aws-ec2-instance"  # Replace with your GitHub username and repository name
  instance_type = "t2.micro"
  ami_id        = "ami-0c55b31ad2299a701"                   # Replace with a valid AMI ID
  key_name      = "your-key-pair-name"                      # Replace with your key pair name
}

Advanced Module Techniques

Let’s explore some advanced techniques to make your modules more robust and reusable.

Using Conditional Logic

Use `count` or `for_each` to create multiple instances of resources based on variables or conditions.

Creating Nested Modules

Organize complex infrastructure deployments by nesting modules within each other for improved modularity and structure.

Using Data Sources

Integrate data sources within your modules to dynamically fetch values from external services or cloud providers.

Versioning Your Modules

Proper versioning is essential for maintainability and compatibility. Use semantic versioning (semver) to manage releases and updates.

Frequently Asked Questions (FAQ)

**Q: What are the benefits of using the Terraform Registry over storing my modules privately?**

A: The Terraform Registry offers discoverability, allowing others to benefit from your work and potentially collaborate. It also simplifies module updates and management. Private modules work well for internal organization-specific needs.

**Q: How do I update my published module?**

A: Push updates to your source code repository (GitHub). The Terraform Registry will automatically process and release new versions.

**Q: Can I publish private modules?**

A: No, the Terraform Registry is publicly accessible. For private modules, consider using a private git repository and referencing it directly in your Terraform configurations.

**Q: What happens if I delete my module from the registry?**

A: Deleting the module removes it from the Registry, making it inaccessible to others.

**Q: How do I handle dependencies between modules?**

A: Terraform’s module system handles dependencies automatically, enabling effortless integration between various modules.

Conclusion: Elevate Your Infrastructure-as-Code with the Terraform Registry

This A Terraform Registry tutorial to build and share modules demonstrates how to create, publish, and use Terraform modules effectively. By embracing the power of the Terraform Registry, you can significantly improve your workflow, enhance code reusability, and foster collaboration within your team and the wider Terraform community. Remember to follow best practices like proper versioning and thorough testing to maintain high-quality, reliable infrastructure deployments. Using modules effectively and sharing them through the registry is a fundamental step towards achieving efficient and scalable infrastructure management.Thank you for reading the DevopsRoles page!