Discover DevOps roles and learn Linux from basics to advanced at DevOpsRoles.com. Detailed guides and in-depth articles to master Linux for DevOps careers.
egularly backing up and, if necessary, restoring your PostgreSQL database is essential for data protection and disaster recovery. Remember to schedule automated backups, keep your backup files in a secure location, and test your backup and restore procedures periodically to ensure they work as expected.
By following these steps, you can safeguard your data and have peace of mind knowing that your PostgreSQL database is protected against data loss and system failures.
You have Backup and restore a Postgres database. I hope will this your helpful. Thank you for reading the DevopsRoles page!
xargs Command powerful tool that can revolutionize the way you handle various tasks on your system. Whether it’s processing files, executing commands in parallel, or manipulating data streams, xargs is a versatile Swiss Army knife for any Linux enthusiast.
What does the xargs command in Linux?
xargs is a great command that reads streams of data from standard input, then generates and executes command lines.
In this blog, we will explore the ins and outs of the xargs command, its practical applications, and how it can make your life as a Linux user much easier.
Syntax
xargs [options] [command]
Here are some common options used with the xargs command:
-n: Specifies the maximum number of items to be passed as arguments to the command.
-I: Allows you to specify a placeholder (usually {}) for the argument, which is replaced by each item from the input.
-t: Prints the command being executed before running it.
-p: Asks for confirmation before executing each command.
-r: Prevents the command from running if there is no input.
-a: Specifies the input file from which xargs should read the items instead of STDIN.
-P: Sets the maximum number of parallel processes to run at once.
xargs command Tips and Tricks
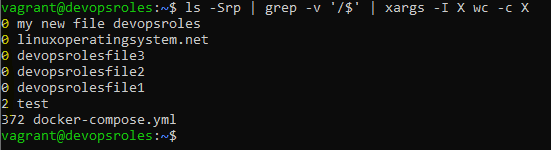
How to create multiple files with xargs command in Linux.
Check the most recent four logins for each currently logged-in user.
who | awk '{print $1}' | xargs -I x last -4 x
The output terminal is below
Conclusion
You have to use xargs command for your work daily. The xargs command is an indispensable tool that empowers Linux users to streamline their tasks and increase productivity.
The xargs command is a versatile tool that can greatly enhance your command-line productivity. Whether you’re processing files, running commands in parallel, or performing batch operations, xargs can simplify and automate many tasks. However, it’s important to use it with care, especially when dealing with commands that modify or delete files.
Its ability to handle large sets of data, parallelize operations, and simplify complex tasks makes it a valuable asset in any Linux user’s toolkit. I hope will this your helpful. Thank you for reading the DevopsRoles page!
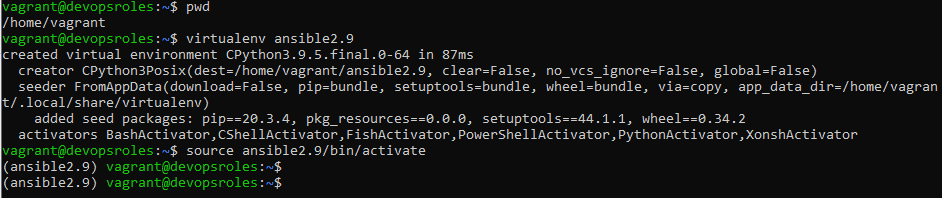
You need to create a “virtual environment” to host your local copy of Ansible.
virtualenv ansible2.9
This command creates a directory called ansible2.9 in your current working directory.
You must activate it
source ansible2.9/bin/activate
You should see the prompt change to include the virtualenv name.
(ansible2.9) $
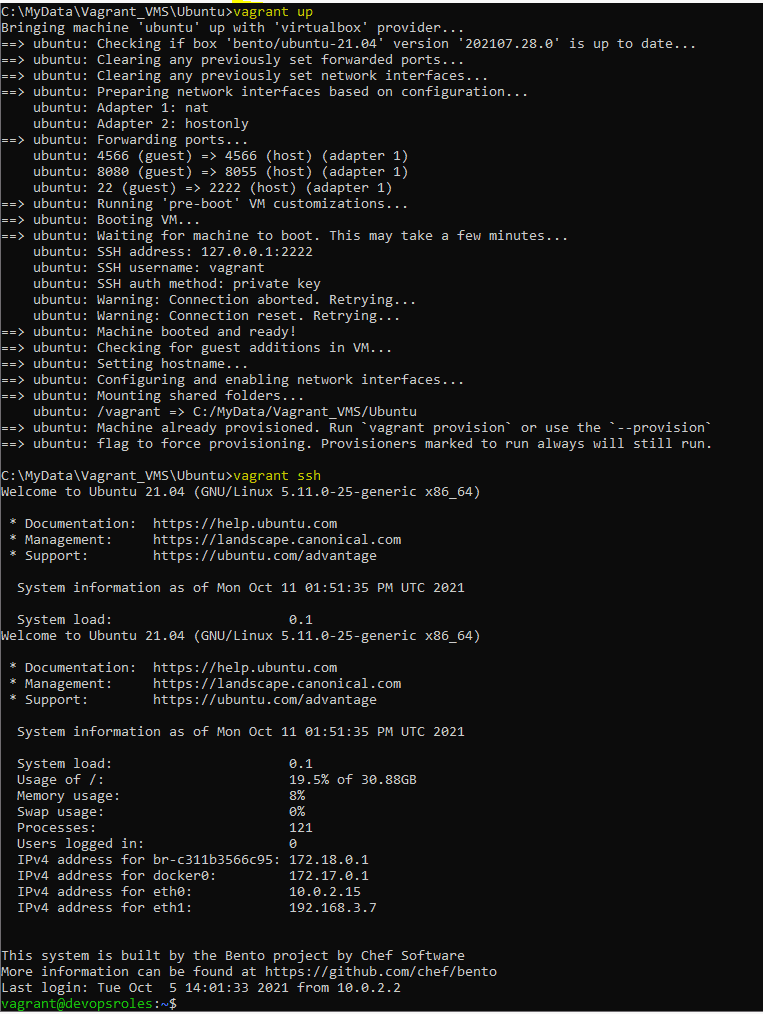
The output terminal is as below
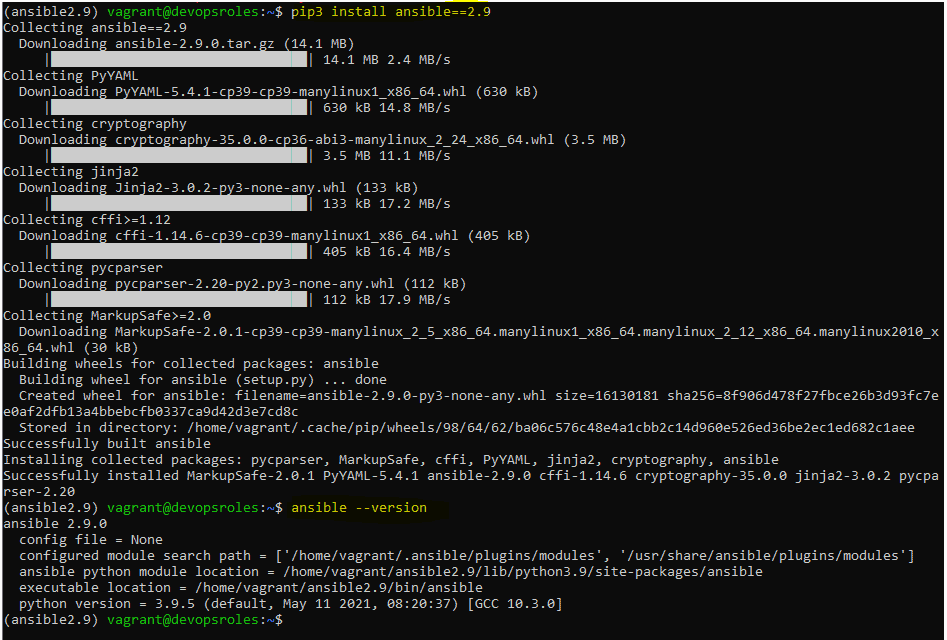
Let’s install Ansible
pip3 install ansible==2.9
The output terminal is as below
Conclusion
Congratulations! You’ve successfully installed Ansible using Virtualenv. This setup allows you to manage Ansible and its dependencies separately, ensuring a clean and controlled environment for your automation tasks. Activate the virtual environment whenever you need to work with Ansible and deactivate it when you’re done to keep your system Python environment tidy. I hope will this your helpful. Thank you for reading the DevopsRoles page!
In this tutorial, How to check the dependencies of the package in Ubuntu.
How to Check Package Dependencies in Ubuntu
The default package manager in Ubuntu and Debian-based distros is APT. There are several ways to get the list of Dependencies of a Package in Ubuntu
APT Package Manager
The basic syntax of the command
sudo apt depends package_name
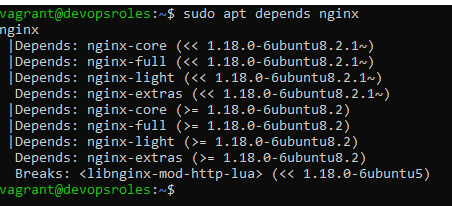
For example, How to check dependencies for the Nginx package
sudo apt depends nginx
The output terminal is as below
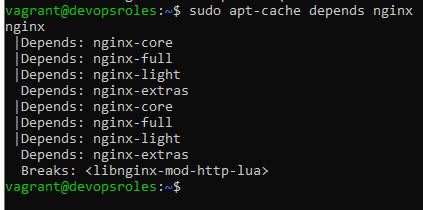
Alternatively, You can use apt-cache command
To list the dependencies of a package in Ubuntu, you can use the apt-cache command. The apt-cache command provides information about packages available in the repositories.
Please note that you may need administrative privileges (e.g., using sudo) to execute apt-cache commands.
Here’s how you can list the dependencies of a package:
sudo apt-cache depends nginx
The output terminal is as below
To get additional information on a specific package
sudo apt show nginx
sudo apt-cache show nginx
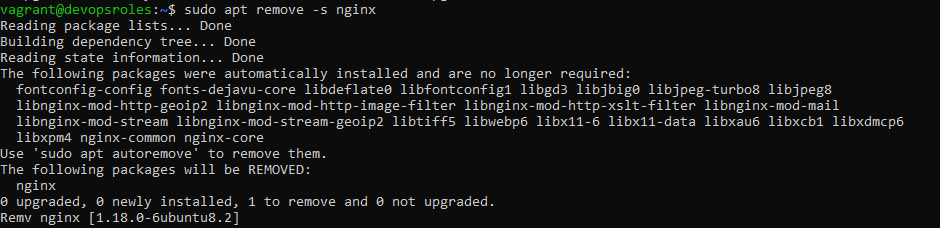
Using dpkg
If you have downloaded a DEB package on your system and want to know which dependencies will be installed along with the package
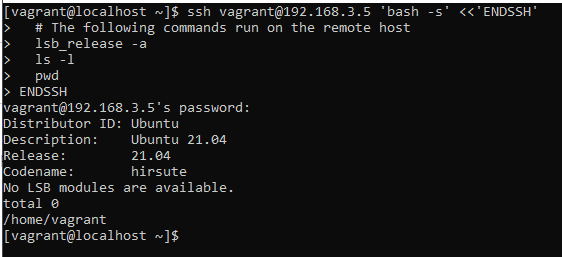
In this tutorial, How to Run a Local Shell Script on a Remote SSH Server. You can pass entire scripts over SSH without having the .sh file on the remote Linux server.
To run a local shell script on a remote SSH server, you can use the ssh command with the following syntax:
ssh user@remote_host 'bash -s' < local_script.sh
Here’s a breakdown of the command:
user: Replace this with the username for the remote SSH server.
remote_host: Replace this with the IP address or hostname of the remote SSH server.
local_script.sh: Replace this with the path to your local shell script that you want to run on the remote server.
Linux commands are powerful tools that allow users to interact with the operating system and perform various tasks efficiently. Whether you’re a beginner or an experienced Linux user, having a cheat sheet of commonly used commands can be invaluable. In this blog post, we’ll provide you with a handy Linux commands cheat sheet to help you navigate through your Linux journey.
System Information
Linux Commands cheat sheet for System Information. You want to query information about your system.
Commands
Description
For example
whoami
Output the current user using the Linux system
[vagrant@localhost ~]$ whoami vagrant
w
who or which systems are online especially
[vagrant@localhost ~]$ w 20:29:06 up 3 min, 1 user, load average: 0.00, 0.00, 0.00 USER TTY FROM LOGIN@ IDLE JCPU PCPU WHAT vagrant pts/0 10.0.2.2 20:27 2.00s 0.01s 0.00s w
cal
Outputs the present month’s calendar.
[vagrant@localhost ~]$ cal September 2021 Su Mo Tu We Th Fr Sa 1 2 3 4 5 6 7 8 9 10 11 12 13 14 15 16 17 18 19 20 21 22 23 24 25 26 27 28 29 30
date
Displaying the current date and time.
[vagrant@localhost ~]$ date Tue Sep 21 20:30:00 +07 2021
last reboot
A useful command of how many times your system restarted.
[vagrant@localhost ~]$ last reboot reboot system boot 3.10.0-1127.el7. Tue Sep 21 20:25 – 20:30 (00:04) reboot system boot 3.10.0-1127.el7. Tue Sep 21 14:42 – 17:26 (02:44) reboot system boot 3.10.0-1127.el7. Sat Sep 18 20:56 – 22:00 (01:03) reboot system boot 3.10.0-1127.el7. Sat Sep 18 14:37 – 22:00 (07:22) wtmp begins Sat Sep 18 14:37:54 2021
hostname -I
Outputs the assigned IP address your system is currently
Outputs information about the CPU and processing units.
[vagrant@localhost ~]$ lscpu Architecture: x86_64 CPU op-mode(s): 32-bit, 64-bit Byte Order: Little Endian CPU(s): 1 On-line CPU(s) list: 0 Thread(s) per core: 1 Core(s) per socket: 1 Socket(s): 1 NUMA node(s): 1 Vendor ID: GenuineIntel CPU family: 6 …..
lsscsi
Lists out the SCSI/SATA devices like hard drives and optical drives.
[vagrant@localhost ~]$ lsscsi [0:0:0:0] disk ATA VBOX HARDDISK 1.0 /dev/sda
These commands should help you gather hardware information about your Linux system. By utilizing them, you can gain insights into the components and configurations of your machine.
Networking
Here are some commonly used commands to gather networking information in Linux:
Commands
Description
For example
ping hostname_or_IP
Useful in analyzing the responsiveness of a hostname connected to a network.
[vagrant@localhost ~]$ ping 192.168.3.4 PING 192.168.3.4 (192.168.3.4) 56(84) bytes of data. 64 bytes from 192.168.3.4: icmp_seq=1 ttl=64 time=0.017 ms 64 bytes from 192.168.3.4: icmp_seq=2 ttl=64 time=0.021 ms 64 bytes from 192.168.3.4: icmp_seq=3 ttl=64 time=0.021 ms
tcpdump
Used to dump network traffic.
[vagrant@localhost ~]$ sudo tcpdump -i eth0
netstat -r -v
Prints network routing, information, and connections.
[vagrant@localhost ~]$ netstat -r -v Kernel IP routing table Destination Gateway Genmask Flags MSS Window irtt Iface default gateway 0.0.0.0 UG 0 0 0 eth0 10.0.2.0 0.0.0.0 255.255.255.0 U 0 0 0 eth0 172.17.0.0 0.0.0.0 255.255.0.0 U 0 0 0 docker0 192.168.3.0 0.0.0.0 255.255.255.0 U 0 0 0 eth1
ip addr show
Outputs network interfaces and their related IP addresses.
ifconfig
Outputs configured network interfaces’ IP addresses.
whois domain_name
Reveals more information regarding an active domain name on the internet.
[vagrant@localhost ~]$ host huuphan.com huuphan.com has address 104.21.73.16 huuphan.com has address 172.67.137.70 huuphan.com has IPv6 address 2606:4700:3032::6815:4910 huuphan.com has IPv6 address 2606:4700:3031::ac43:8946 huuphan.com mail is handled by 10 aspmx2.googlemail.com. huuphan.com mail is handled by 1 aspmx.l.google.com. huuphan.com mail is handled by 5 alt1.aspmx.l.google.com. huuphan.com mail is handled by 10 aspmx3.googlemail.com. huuphan.com mail is handled by 5 alt2.aspmx.l.google.com.
wget file_name
Useful in downloading a file from a specified domain name
wget https://www.huuphan.com/filename.zip
ifconfig -a
Outputs all the network interface details
ifconfig eth0
Outputs eth0 configuration and address details.
ethtool eth0
Used to manage hardware and network drivers query and control settings
[vagrant@localhost ~]$ ethtool eth0 Settings for eth0: Supported ports: [ TP ] Supported link modes: 10baseT/Half 10baseT/Full 100baseT/Half 100baseT/Full 1000baseT/Full Supported pause frame use: No Supports auto-negotiation: Yes Supported FEC modes: Not reported Advertised link modes: 10baseT/Half 10baseT/Full 100baseT/Half 100baseT/Full 1000baseT/Full Advertised pause frame use: No Advertised auto-negotiation: Yes Advertised FEC modes: Not reported Speed: 1000Mb/s Duplex: Full Port: Twisted Pair PHYAD: 0 Transceiver: internal Auto-negotiation: on MDI-X: off (auto) Cannot get wake-on-lan settings: Operation not permitted Current message level: 0x00000007 (7) drv probe link Link detected: yes
These commands should help you gather networking information in Linux, enabling you to troubleshoot network issues, check connections, and analyze network configurations.
Archives and File Compression
Archiving and file compression are common tasks in Linux that help to organize and reduce the size of files. Here are some commonly used commands for archives and file compression:
Commands
Description
For example
tar cvf compressed_file_name.tar file_name # creating tar xvf compressed_file_name.tar file_name # extracting
creating or extracting files with .tar
[vagrant@localhost ~]$ tar cvf share.tar share share/ [vagrant@localhost ~]$ tar xvf share.tar share/
tar czf compressed_file_name.tar.gz
compresses a tar file into a gzip archive.
tar cjf archive.tar.bz2 folder
compresses a tar file inside a bz2 archive.
[vagrant@localhost ~]$ tar cjf archive.tar.bz2 share [vagrant@localhost ~]$ ll total 20 -rw-rw-r–. 1 vagrant vagrant 150 Sep 23 07:51 archive.tar.bz2
tar xjf archive.tar.bz2
extracts a tar file compressed inside a bz2 archive.
gzip, gunzip, zcat file_name
creating, extracting. or viewing files with .gz extension
These commands should help you perform file compression, archiving, and extraction tasks in Linux. The specific options may vary depending on the command and the desired operation.
Installing Packages
Installing packages is a fundamental task in Linux for adding new software and libraries to your system. The method of package installation can vary depending on the Linux distribution you are using. Here, I’ll provide an overview of package management tools commonly used in different distributions:
Commands
Description
For example
yum search keyword
Search a package installation based on specific keywords.
[vagrant@localhost ~]$ yum search nginx Loaded plugins: fastestmirror Determining fastest mirrors base: mirror.vietnix.vn epel: mirror.xeonbd.com extras: mirror.vietnix.vn updates: mirror.vietnix.vn =============== N/S matched: nginx ========== collectd-nginx.x86_64 : Nginx plugin for collectd munin-nginx.noarch : NGINX support for Munin resource monitoring nginx-all-modules.noarch : A meta package that installs all available Nginx modules nginx-filesystem.noarch : The basic directory layout for the Nginx serve ……
yum install package.rpm
The use of a YUM package manager to install and configure a package.
yum info package
To find more information about a package before optionally proceeding with its installation.
[vagrant@localhost ~]$ yum info nginx Loaded plugins: fastestmirror Loading mirror speeds from cached hostfile base: mirror.vietnix.vn epel: mirror.xeonbd.com extras: mirror.vietnix.vn updates: mirror.vietnix.vn Available Packages Name : nginx Arch : x86_64 Epoch : 1 Version : 1.20.1 Release : 2.el7 Size : 586 k Repo : epel/x86_64 Summary : A high performance web server and reverse proxy server URL : https://nginx.org License : BSD Description : Nginx is a web server and a reverse proxy server for HTTP, SMTP, POP3 and : IMAP protocols, with a strong focus on high concurrency, performance and low : memory usage.
rpm -i package.rpm
To install a downloaded RPM package.
yum remove package
To uninstall or remove a Yum package from your system.
tar zxvf sourcecode.tar.gz cd sourcecode ./configure make make install
Command sequence to install a package software that comes as a source code.
dnf install package.rpm
Using the DNF package manager to install package software.
apt install package
Using the APT package manager to install package software.
rpm -e package.rpm
Using the RPM package manager to remove or uninstall an rpm package
Remember to use the sudo command before installation commands to execute them with administrative privileges.
Search Commands
Searching for files, directories, and text within files is a common task in Linux. Here are some commonly used search commands:
These commands should help you search for files, directories, and text within files on your Linux system. You can customize the search criteria based on your specific requirements.
SSH Logins
SSH (Secure Shell) is a widely used protocol for securely accessing remote systems over a network. Monitoring SSH logins can be important for security and auditing purposes. Here’s how you can view SSH login information:
Commands
Description
For example
ssh user_name@hostname
Connects you to a remote machine or server
ssh host
Connects you to a specified host through the default port 22.
ssh -p port user_name@hostname
Connects you to a remote machine or server through a specified port.
telnet hostname
Uses telnet’s default port 23 to connect you to a target hostname, remote machine, or server.
File Transfers and Management
File transfers and management are common tasks in Linux for organizing, moving, copying, and transferring files between different locations. Here are some commonly used commands for file transfers and management:
Commands
Description
For example
rm -r -f
To remove or delete active files and directories
du -s
Give important information regarding the disk usage (storage space) on your Linux system.
[vagrant@localhost ~]$ du -s /home/vagrant 60 /home/vagrant
Used for moving directories or files to a different system path or location.
grep, egrep, fgrep -i -v
Useful in printing lines with a matching pattern.
scp file.txt server:/tmp
To copy files to a remote server.
scp server:/home/vagrant/*.txt /tmp
to copy files from a remote server to a directory on a local machine.
scp -r server:/home/vagrant /tmp
recursively copy all the files and directories on a remote server’s directory to a target machine directory.
rsync -a /var/www /backups/
Synchronizes the content of two directories (/var/www and /backups) on the same machine.
rsync -avz /home/vagrant server:/backups/
synchronizes the content of a folder on a local machine with the content of a folder on a remote server.
These commands should help you with basic file transfers, copying, moving, renaming, and deleting files and directories in Linux. Remember to use appropriate options and double-check before performing any destructive operations like removing or overwriting files.
File and Directory Operations
Working with files and directories is a common task in Linux. Here are some commonly used commands for file and directory operations:
Commands
Description
ls
list the files and directories under and directory path.
pwd
print working directory
mkdir dir_name
create a directory with the specified name.
rm filename
delete a file with the specified name.
rm -rf directory_name
recursively and forcefully delete a directory with the specified name.
cp filename1 filename2
copy filename1 to filename2
cp -r directory1 directory2
recursively copy the content of directory1 to directory2
mv filename1 filename2
rename filename1 to filename2
ln -s /path/to/file_name link_name
To create a symbolic link (link_name) to a specified file name (file_name).
touch filename
to create a new file
more filename
open and display the contents of a specified file.
cat filename
open and display the contents of a specified file.
cat filename1 >> filename2
appends or adds the content of filename1 at the bottom of filename2.
head filename
Outputs the first ten lines of a specified file name.
tail filename
Outputs the last ten lines of a specified file name.
gpg -c filename
to encrypt a specified file.
gpg filename.gpg
to decrypt a specified file with a .gpg extension.
wc filename
Outputs the number of bytes, lines, and words of a specified file name.
cd
Takes you to the Home directory
cd /target/directory
To change directories to a specific directory name.
These commands should help you perform common file and directory operations in Linux. Be careful when using commands like “rm” or “rmdir” to avoid accidental deletion of important files or directories.
Disk Utilities and Usage
Monitoring disk usage and managing disk-related tasks are essential in Linux to ensure efficient use of storage space. Here are some commonly used disk utilities and commands for disk management and usage:
Commands
Description
For example
df -h
Display the amount of free space in the file system
Outputs the target mount point associated with all your file systems.
mount device_path mount_point
to mount a device.
mkfs -t -V
to create a new file system.
resize2fs
updating a file system, especially after lvextend*
fsck -A -N
to check and repair a file system.
pvcreate
creating a physical volume.
mount -a -t
mounting a file system.
lvcreate
creating a logical volume.
unmount -f -v
unmounting a mounted file system.
These commands and utilities will help you monitor disk usage, manage partitions, mount file systems, and perform disk-related tasks in Linux. Make sure to use appropriate administrative privileges, such as “sudo,” when required.
Environment Variables
Commands
Description
For example
env
Display all exported environment or run a program in a modified environment
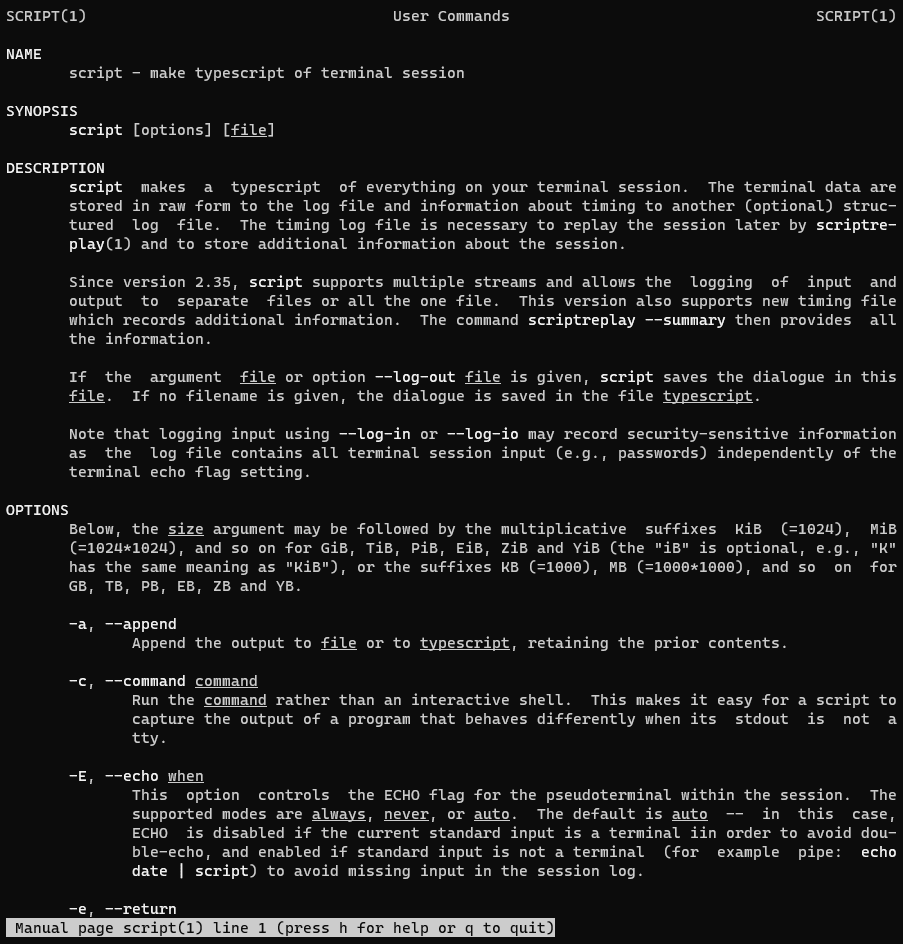
This tutorial covers how to record Linux terminal commands using the scriptcommand.
This command allows you to record and replay all the activity in your terminal.
Using scriptcommands can be especially helpful when you want to create a tutorial for a set of commands.
Record Linux Terminal Commands
The script command can be run without any arguments
script
A new capturing session will start. your terminal session is saved to ./typescipt in your working directory. When you’re done, press Ctrl+D or type the exit command to drop out of the sub-shell.
The output terminal is as follows
[vagrant@localhost ~]$ script

Script started, file is typescript
[vagrant@localhost ~]$ ls
share  typescript
[vagrant@localhost ~]$ whoami
vagrant
[vagrant@localhost ~]$ exit
exit
Script done, file is typescript
[vagrant@localhost ~]$
[vagrant@localhost ~]$ cat typescript
Script started on Sat 18 Sep 2021 08:59:49 PM +07
[vagrant@localhost ~]$ ls
share  typescript
[vagrant@localhost ~]$ whoami
vagrant
[vagrant@localhost ~]$ exit
exit

Script done on Sat 18 Sep 2021 09:00:09 PM +07
[vagrant@localhost ~]$
You can specify a different file with a script that commands an argument:
script session_`hostname`_`whoami`
The following is the output from the terminal command:
[vagrant@localhost ~]$ script session_`hostname`_`whoami`
Script started, file is session_localhost.localdomain_vagrant
[vagrant@localhost ~]$ cat /etc/redhat-release
CentOS Linux release 7.8.2003 (Core)
[vagrant@localhost ~]$ exit
Script done, file is session_localhost.localdomain_vagrant
[vagrant@localhost ~]$
Appending to an Existing File
Use -a flag to append your commands.
script -a session_`hostname`_`whoami`
Conclusion
You have Record Linux Terminal Commands. I hope will this your helpful. Thank you for reading the DevopsRoles page!
This tutorial covers how to manage and monitor swap on Linux, including how to determine the amount of swap space available and how much is currently in use.
Swap space plays an important role in system performance, so it’s crucial to understand how to manage it effectively.
How much swap on Linux do you need?
The recommendation is to swap the space used to double your RAM. If your system has a lot of memory, you may never need to use swap space.
In this tutorial, how to deploy a React Application using our own Ubuntu Server and Nginx. You can quickly deploy react Applications using the default Create React App build tool.
Prerequisites
VPS Ubuntu 21.04. I use Linode is Cloud Hosting High-performance SSD Linux servers.
Nginx: Lightweight and high-performance Web server or Reverse Proxy
On your local machine: you will need a development environment running node.js.
A registered domain name. And setup DNS records for your server.
An A record with your_domain pointing to your server’s public IP address.
An A record with www.your_domain pointing to your server’s public IP address.
Deploy a React Application with Nginx on Ubuntu 21.04
Your local machine
Step 1 — Creating a React Project
npx create-react-app react-deploy
cd react-deploy
npm start
Open a browser and navigate to http://localhost:3000.
Step 2: Build production
npm run build
Your VPS
Step 3: Uploading build files to VPS
Use scp command uploading build files to /var/www/your_domain/html directory on VPS.
Discover how to remove orphaned packages on CentOS Linux in this detailed tutorial. Orphaned packages, which are remnants not needed for package dependencies, can clutter your system.
Learn the step-by-step process to clean up these unnecessary files effectively, enhancing your CentOS system’s performance and reliability. Orphaned packages are all packages that no longer serve the purpose of package dependencies.
Now, we remove Orphaned packages using the yum remove command to remove the entire list:
yum remove `package-cleanup --leaves`
The output terminal is as below:
[root@centos7 ~]# yum remove `package-cleanup --leaves`
Loaded plugins: fastestmirror
No Match for argument: Loaded
No Match for argument: plugins:
No Match for argument: fastestmirror
Resolving Dependencies
--> Running transaction check
---> Package cryptsetup-libs.x86_64 0:1.7.4-3.el7_4.1 will be erased
---> Package libicu.x86_64 0:50.2-4.el7_7 will be erased
---> Package libicu62.x86_64 0:62.2-1.el7.remi will be erased
---> Package libmemcached.x86_64 0:1.0.16-5.el7 will be erased
---> Package libsysfs.x86_64 0:2.1.0-16.el7 will be erased
---> Package libtool-ltdl.x86_64 0:2.4.2-22.el7_3 will be erased
---> Package libunwind.x86_64 2:1.2-2.el7 will be erased
---> Package libuv.x86_64 1:1.40.0-1.el7 will be erased
---> Package libwebp.x86_64 0:0.3.0-7.el7 will be erased
--> Finished Dependency Resolution

Dependencies Resolved

==============================================================================================================================================================================================================
 Package                                              Arch                                        Version                                                Repository                                      Size
==============================================================================================================================================================================================================
Removing:
 cryptsetup-libs                                      x86_64                                      1.7.4-3.el7_4.1                                        @updates                                       947 k
 libicu                                               x86_64                                      50.2-4.el7_7                                           @updates                                        24 M
 libicu62                                             x86_64                                      62.2-1.el7.remi                                        installed                                       31 M
 libmemcached                                         x86_64                                      1.0.16-5.el7                                           @base                                          677 k
 libsysfs                                             x86_64                                      2.1.0-16.el7                                           @anaconda                                      146 k
 libtool-ltdl                                         x86_64                                      2.4.2-22.el7_3                                         @base                                           66 k
 libunwind                                            x86_64                                      2:1.2-2.el7                                            @base                                          150 k
 libuv                                                x86_64                                      1:1.40.0-1.el7                                         @epel                                          378 k
 libwebp                                              x86_64                                      0.3.0-7.el7                                            @base                                          371 k

Transaction Summary
==============================================================================================================================================================================================================
Remove  9 Packages

Installed size: 57 M
Is this ok [y/N]: y
Downloading packages:
Running transaction check
Running transaction test
Transaction test succeeded
Running transaction
  Erasing    : libmemcached-1.0.16-5.el7.x86_64                                                                                                                                                           1/9
  Erasing    : 2:libunwind-1.2-2.el7.x86_64                                                                                                                                                               2/9
  Erasing    : 1:libuv-1.40.0-1.el7.x86_64                                                                                                                                                                3/9
  Erasing    : libicu-50.2-4.el7_7.x86_64                                                                                                                                                                 4/9
  Erasing    : libtool-ltdl-2.4.2-22.el7_3.x86_64                                                                                                                                                         5/9
  Erasing    : libicu62-62.2-1.el7.remi.x86_64                                                                                                                                                            6/9
  Erasing    : libsysfs-2.1.0-16.el7.x86_64                                                                                                                                                               7/9
  Erasing    : cryptsetup-libs-1.7.4-3.el7_4.1.x86_64                                                                                                                                                     8/9
  Erasing    : libwebp-0.3.0-7.el7.x86_64                                                                                                                                                                 9/9
  Verifying  : libwebp-0.3.0-7.el7.x86_64                                                                                                                                                                 1/9
  Verifying  : cryptsetup-libs-1.7.4-3.el7_4.1.x86_64                                                                                                                                                     2/9
  Verifying  : libsysfs-2.1.0-16.el7.x86_64                                                                                                                                                               3/9
  Verifying  : libicu62-62.2-1.el7.remi.x86_64                                                                                                                                                            4/9
  Verifying  : libtool-ltdl-2.4.2-22.el7_3.x86_64                                                                                                                                                         5/9
  Verifying  : libicu-50.2-4.el7_7.x86_64                                                                                                                                                                 6/9
  Verifying  : 1:libuv-1.40.0-1.el7.x86_64                                                                                                                                                                7/9
  Verifying  : 2:libunwind-1.2-2.el7.x86_64                                                                                                                                                               8/9
  Verifying  : libmemcached-1.0.16-5.el7.x86_64                                                                                                                                                           9/9

Removed:
  cryptsetup-libs.x86_64 0:1.7.4-3.el7_4.1        libicu.x86_64 0:50.2-4.el7_7        libicu62.x86_64 0:62.2-1.el7.remi        libmemcached.x86_64 0:1.0.16-5.el7        libsysfs.x86_64 0:2.1.0-16.el7
  libtool-ltdl.x86_64 0:2.4.2-22.el7_3            libunwind.x86_64 2:1.2-2.el7        libuv.x86_64 1:1.40.0-1.el7              libwebp.x86_64 0:0.3.0-7.el7

Complete!
[root@centos7 ~]#
Conclusion
Remove orphaned packages from CentOS systems is an essential step in maintaining the efficiency and stability of your server. Orphaned packages are remnants left behind after uninstalling software that no longer serve any functional purpose. By eliminating these unnecessary files, you can optimize system performance and prevent potential conflicts. This guide on DevopsRoles aims to assist you in cleaning up your CentOS installation effectively. We hope you find these instructions beneficial. Thank you for choosing DevopsRoles for your technological needs and for trusting us with your system optimization tasks. Your continued support inspires us to provide helpful and practical content.