Introduction
How to Find large files Linux. To find large files in Linux, you can use the find command along with the du (disk usage) command.
In this blog post, we will explore a simple yet powerful method to identify and locate large files in Linux using the command line.
Use find command line
The find command line can use to search any files inside a Linux Filesystem.
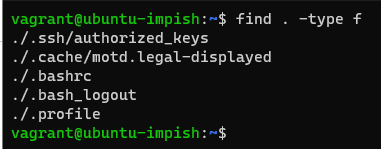
Find the command line inside your current working directory as the command below:
find . -type f
Filter with a minimum size of 10MB
find . -type f -size +10MTo search the entire filesystem to find the largest file.
sudo find / -xdev -type f -size +10M
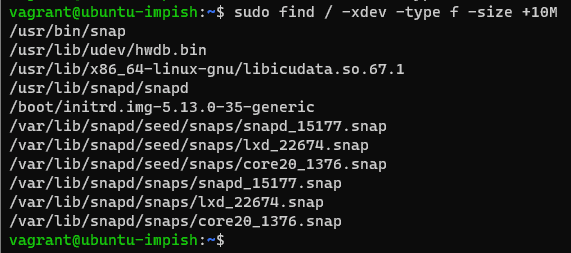
Note: “-xdev flag” won’t scan other mounted filesystems in your Linux Server.
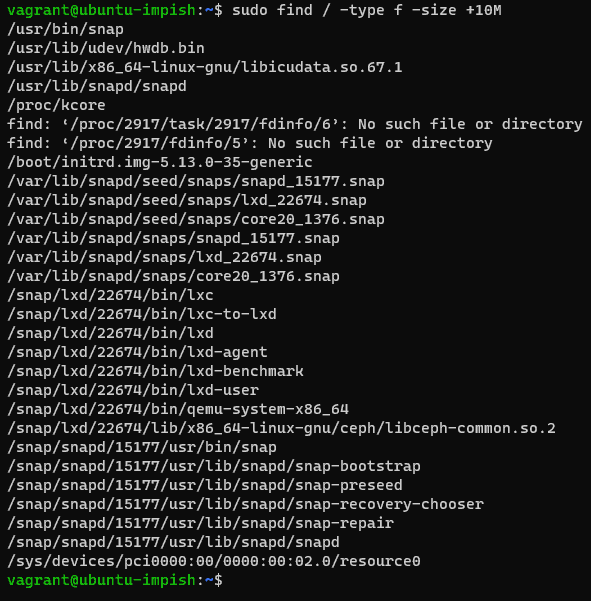
To scan all the mounted drives along with your primary filesystem
sudo find / -type f -size +10M
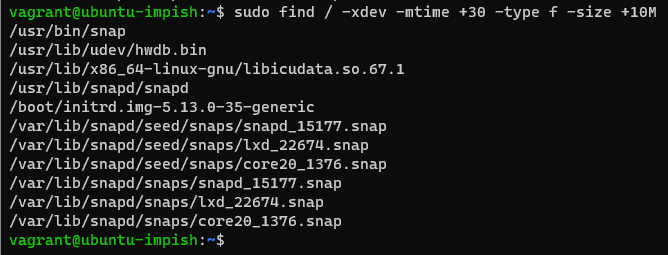
Find Large Unused Files: These have not been modified for more than 30 days and have a file size of at least 10 MB.
sudo find / -xdev -mtime +30 -type f -size +10M
Use the du command line
the du command to estimate file sizes in Linux. And how to find large files in Linux
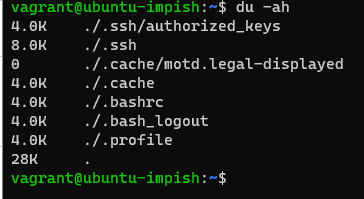
List the files along with directory sizes recursively
du -ah
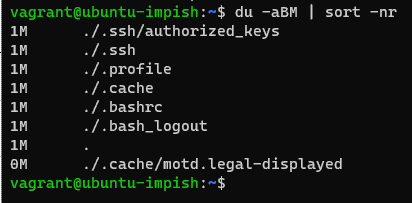
combined with the command sort command to sort the files in descending order. use the blocksize operator -B along with a unit of your choice. If you want to convert the sizes in MB, use unit M as a block size.
du -aBM | sort -nr
To find the largest 15 files in your entire filesystem
du / -aBM | sort -nr | head -n 15Linux combines find and du command
find /path/to/directory -type f -size +100M -exec du -sh {} \; 2>/dev/null | sort -rh | head -n 10Let’s break it down:
- find /path/to/directory: Replace /path/to/directory with the actual directory path where you want to start the search for large files.
- -type f: Specifies that you’re looking for regular files.
- -size +100M: Filters files that are larger than 100 megabytes. Adjust this value as per your requirements.
- -exec du -sh {} \;: Executes the du -sh command on each found file to display its size in a human-readable format.
- 2>/dev/null: Redirects any error messages to /dev/null to suppress them.
- sort -rh: Sorts the output in a reverse human-readable format to display the largest files first.
- head -n 10: Displays only the first 10 lines of the output, which will be the largest files.
Conclusion
Effectively managing disk space is crucial for maintaining system performance and organization. With the find command in Linux, locating large files becomes a straightforward process. By following the steps outlined in this blog post, you can easily identify and manage large files, reclaiming valuable disk space on your Linux system.
You have to find large files in Linux. I hope will this your helpful. Thank you for reading the DevopsRoles page!