Category Archives: Jenkins

Master Jenkins with DevOpsRoles.com. Explore detailed guides and tutorials to automate your CI/CD pipelines and enhance your DevOps practices with Jenkins.

Top 10 DevOps Tools for Automation: A Deep Guide

Introduction

Automation is the backbone of modern DevOps practices, enabling teams to streamline complex workflows, reduce human errors, and accelerate software delivery. As the demand for efficient DevOps processes grows, so does the need for powerful tools that can handle everything from continuous integration (CI) to infrastructure as code (IaC). In this deep guide, we’ll explore the top 10 DevOps tools for automation, diving into their advanced features, practical use cases, and expert tips for getting the most out of each tool.
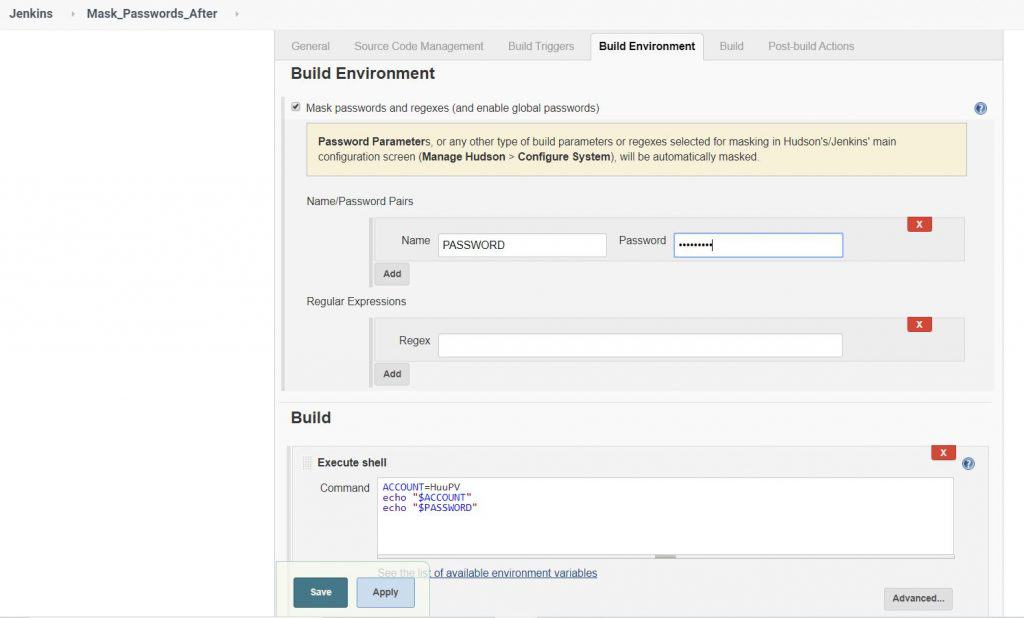
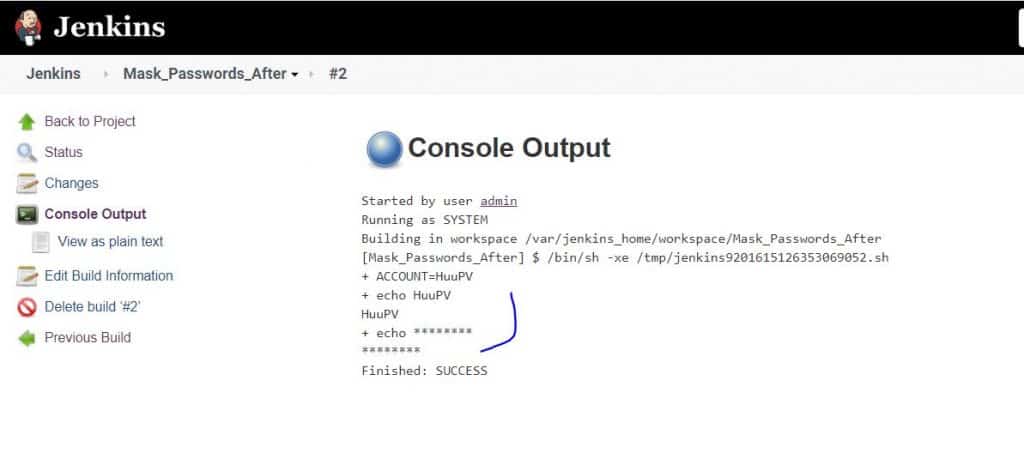
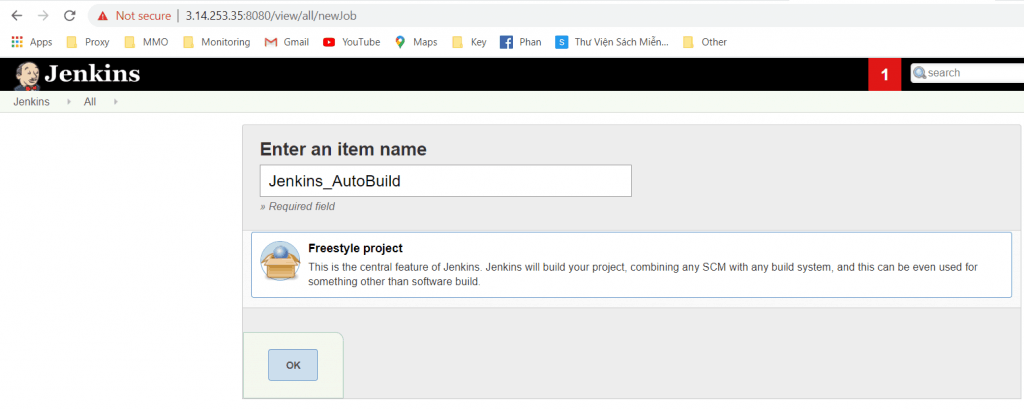
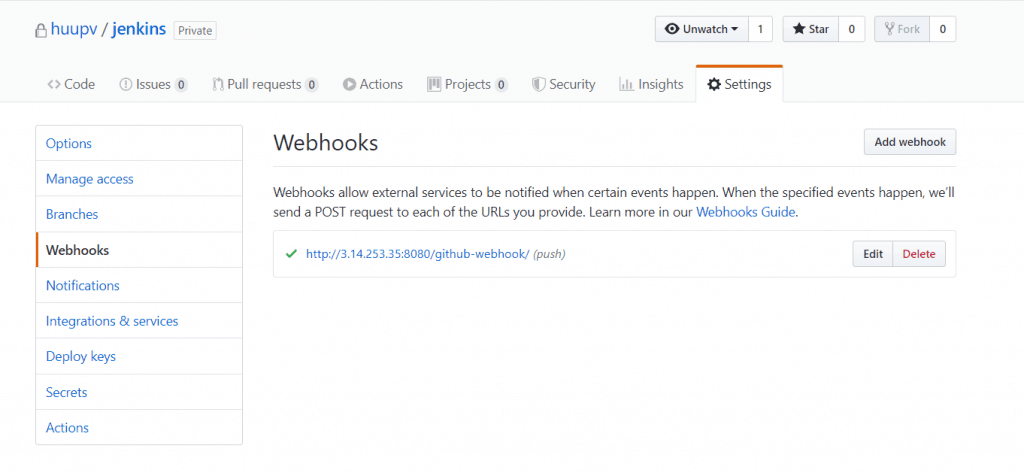
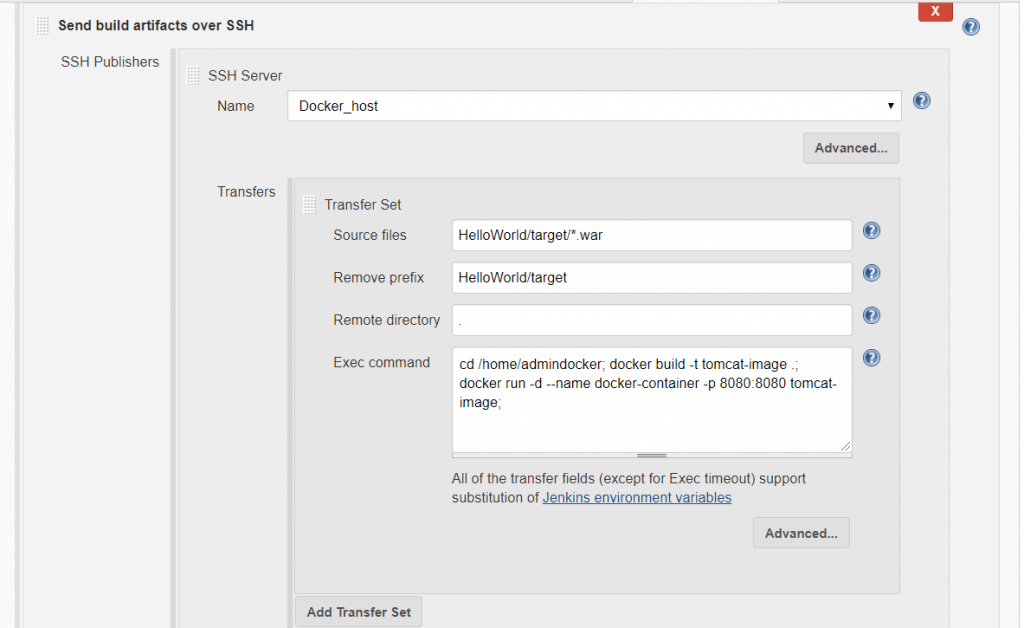
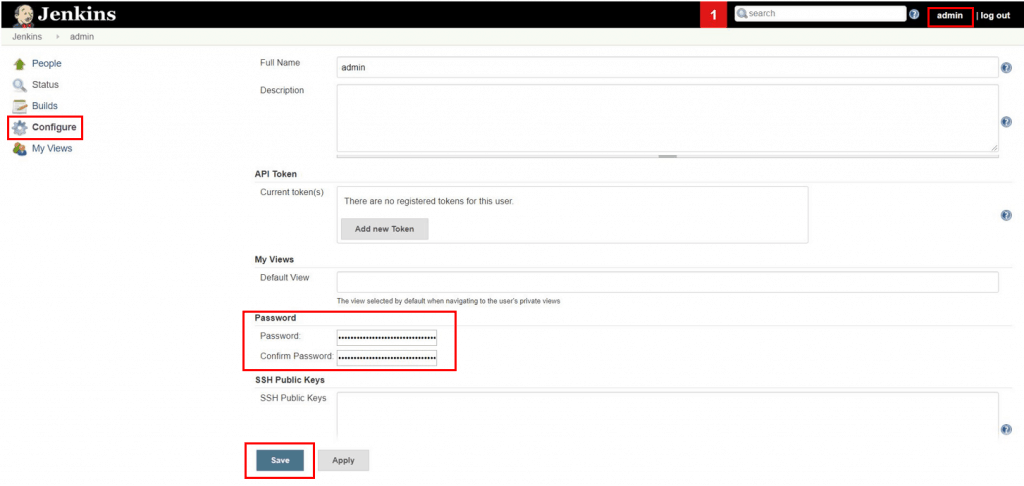
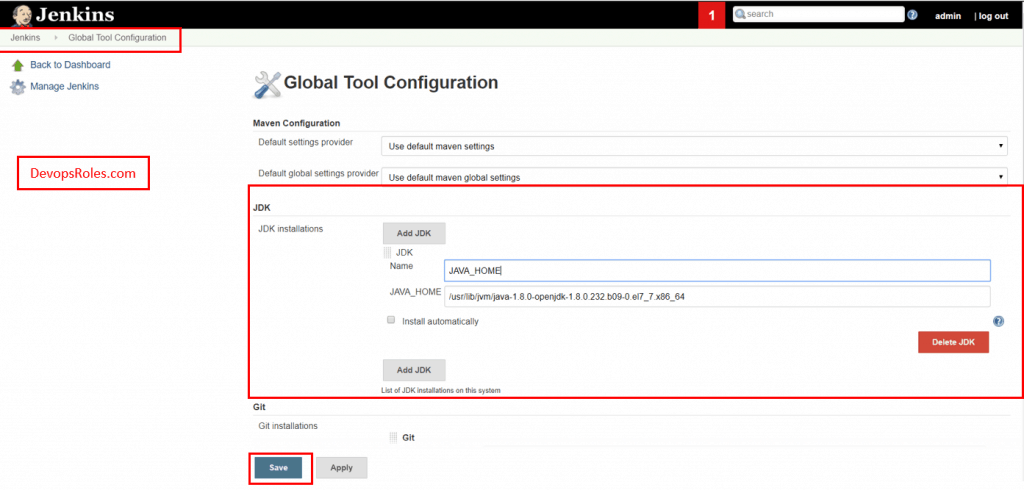
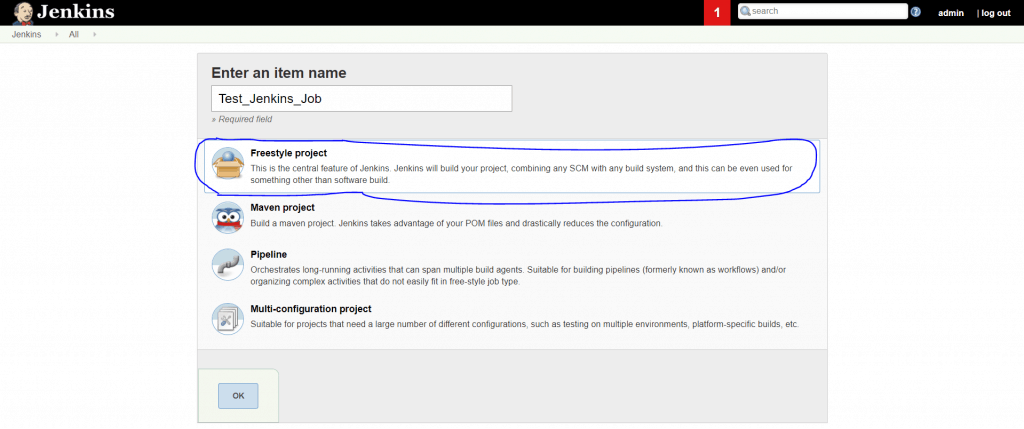
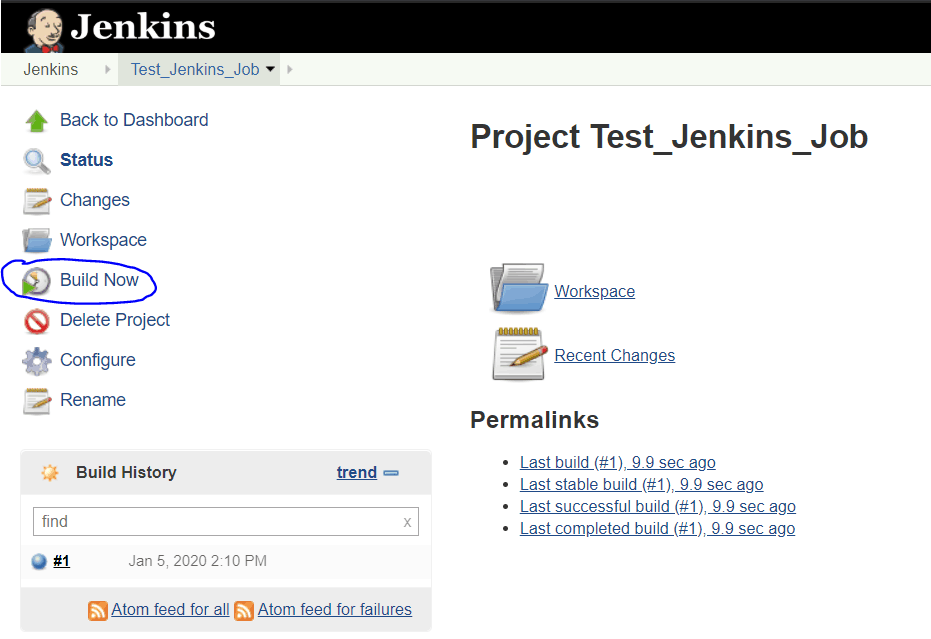
1. Jenkins

What is Jenkins?

Jenkins is an open-source automation server that is often referred to as the Swiss Army knife of CI/CD. It offers a robust and flexible platform that can integrate with virtually any tool in your DevOps pipeline.

Advanced Features:

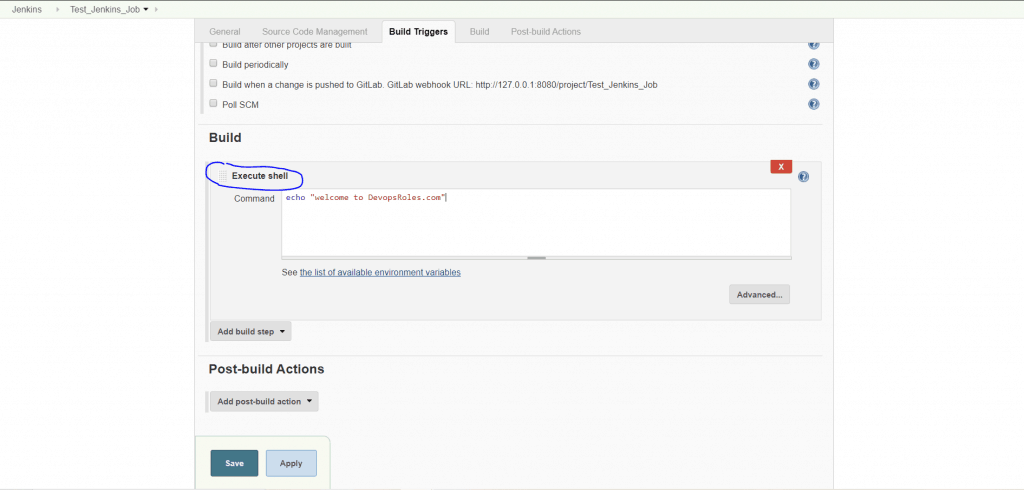
  • Declarative Pipelines: Jenkins allows you to define complex CI/CD pipelines using the Declarative Pipeline syntax, which simplifies the process of building and deploying applications.
  • Blue Ocean UI: A modern interface for Jenkins that simplifies pipeline creation and visualization, making it easier to manage and debug pipelines.
  • Pipeline Libraries: Reusable shared libraries that can be used across multiple pipelines, enabling better code reuse and standardization.

Practical Implementation Tips:

  • Set up Jenkins Master-Slave Architecture: For large teams, setting up a distributed Jenkins architecture with master and slave nodes can significantly improve performance by distributing build loads.
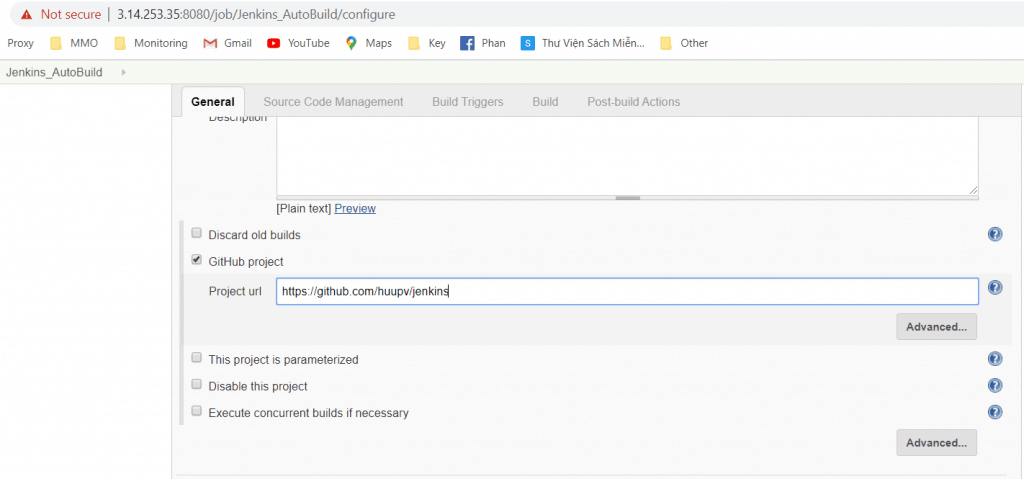
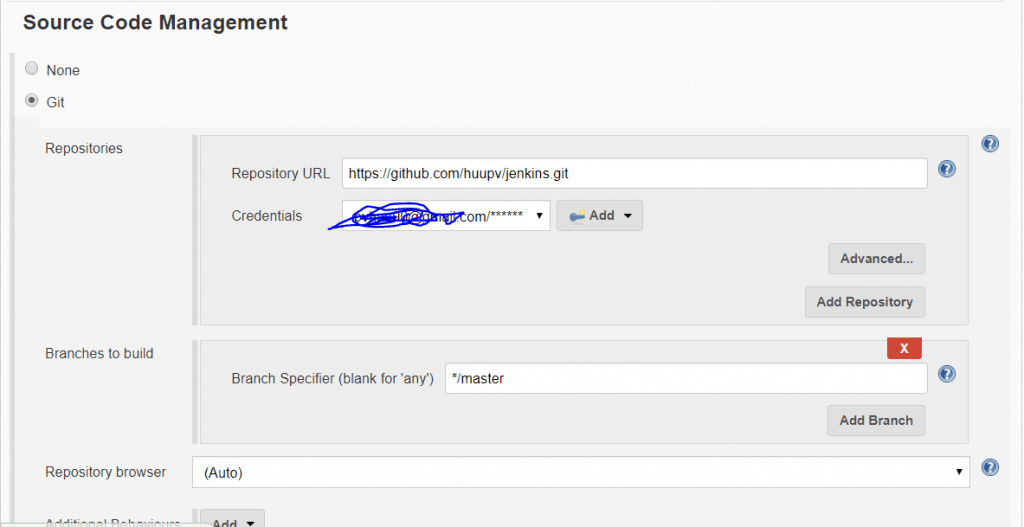
  • Use Jenkinsfile for Pipeline as Code: Store your Jenkins pipeline configuration in a Jenkinsfile within your source code repository to version control your CI/CD pipelines.
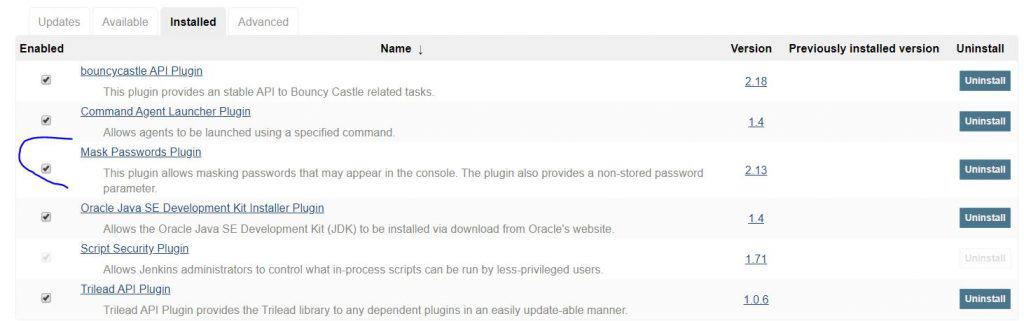
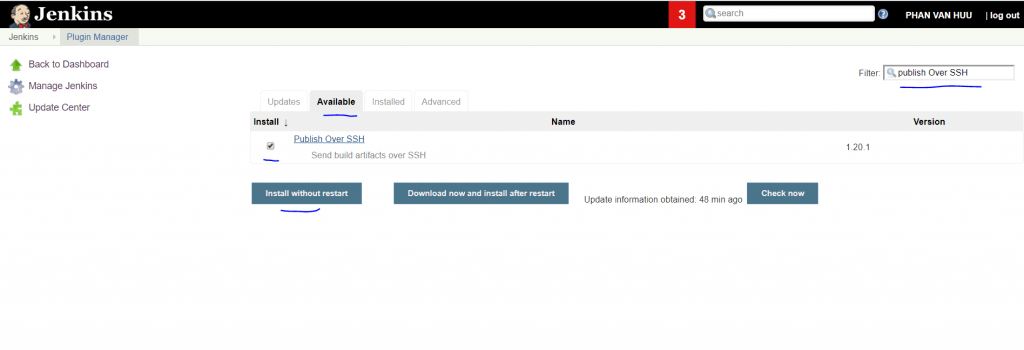
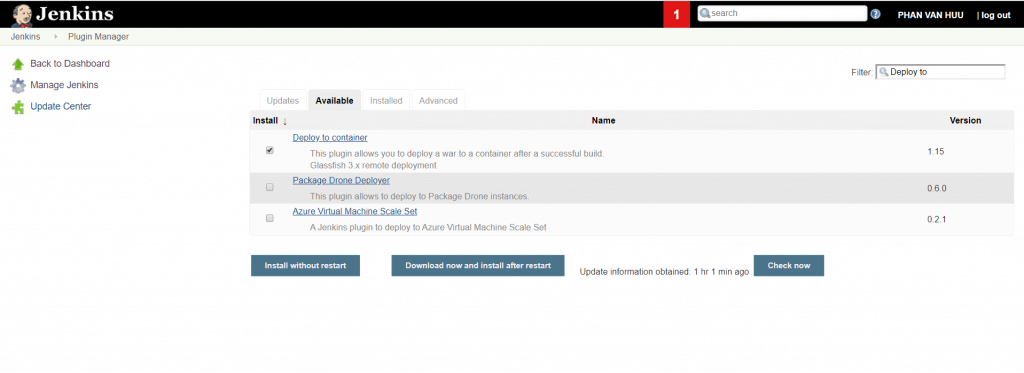
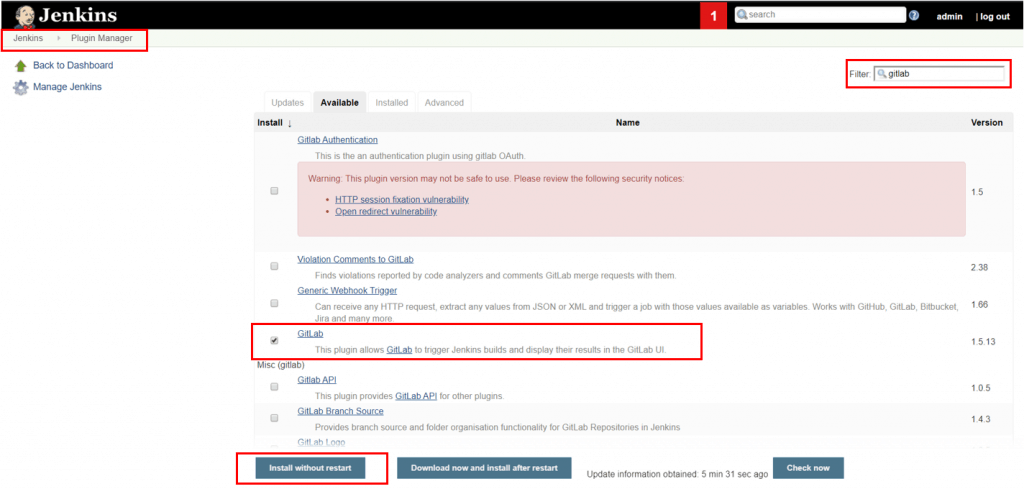
  • Automate Plugin Management: Keep your Jenkins instance secure and up-to-date by automating plugin updates using the Jenkins Plugin Manager CLI.

Use Case:

Jenkins is ideal for teams that need a highly customizable CI/CD solution that can be integrated with various tools and services, from simple CI pipelines to complex CD workflows.
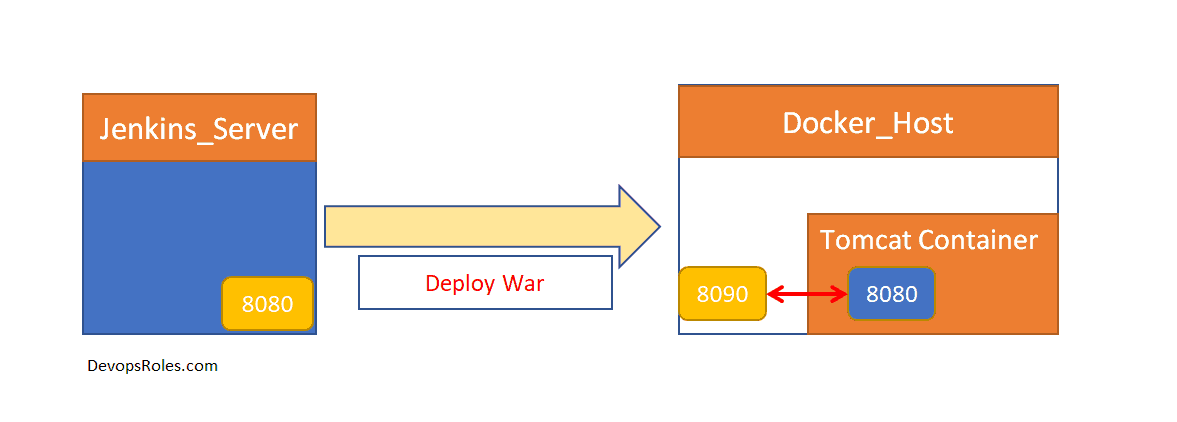
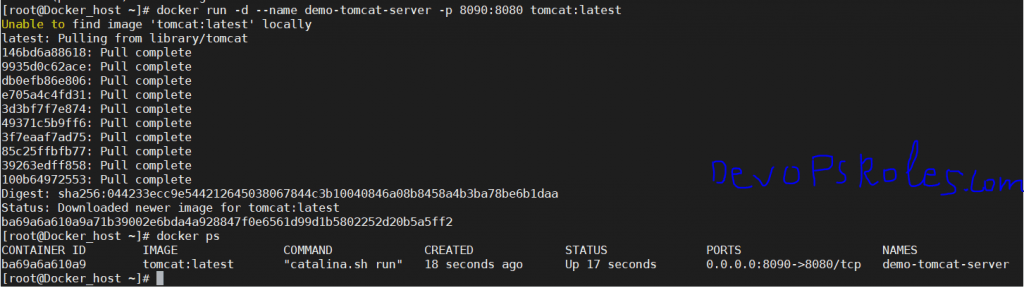
2. Docker

What is Docker?

Docker is a platform that encapsulates applications and their dependencies into containers, ensuring that they run consistently across different environments.

Advanced Features:

  • Docker Compose: Simplifies the process of defining and running multi-container Docker applications. It allows you to configure your application’s services in a YAML file.
  • Docker Swarm: A native clustering and orchestration tool for Docker, enabling the deployment and management of a swarm of Docker nodes.
  • Multi-stage Builds: Optimize Docker images by using multi-stage builds, where intermediate stages are used to build the application, and only the final stage is included in the final image.

Practical Implementation Tips:

  • Use Multi-stage Builds: Reduce the size of your Docker images by using multi-stage builds, which can significantly improve performance and reduce security risks by minimizing the attack surface.
  • Leverage Docker Compose for Development: Use Docker Compose to create development environments that mimic production, ensuring consistency across different stages of development.
  • Implement Health Checks: Add health checks to your Docker containers to monitor the status of your services and take corrective actions if necessary.

Use Case:

Docker is perfect for teams that require a portable and consistent environment across development, testing, and production, particularly in microservices architectures.

3. Kubernetes

What is Kubernetes?

Kubernetes is an open-source container orchestration platform that automates the deployment, scaling, and management of containerized applications across clusters of hosts.

Advanced Features:

  • Custom Resource Definitions (CRDs): Extend Kubernetes with custom resources to manage bespoke application components.
  • Helm: A package manager for Kubernetes that allows you to define, install, and upgrade even the most complex Kubernetes applications.
  • Operators: Automate the management of complex applications by using Kubernetes Operators, which extend the Kubernetes API to manage stateful applications.

Practical Implementation Tips:

  • Use Helm for Managing Kubernetes Applications: Helm charts make it easier to deploy, version, and manage applications on Kubernetes by encapsulating all necessary resources and configurations.
  • Leverage Kubernetes Namespaces: Use namespaces to logically separate and organize resources within your Kubernetes cluster, improving security and resource management.
  • Implement RBAC: Role-Based Access Control (RBAC) in Kubernetes ensures that users and services have the appropriate level of access to cluster resources.

Use Case:

Kubernetes is essential for managing containerized applications at scale, particularly in cloud-native environments where dynamic scaling and high availability are crucial.
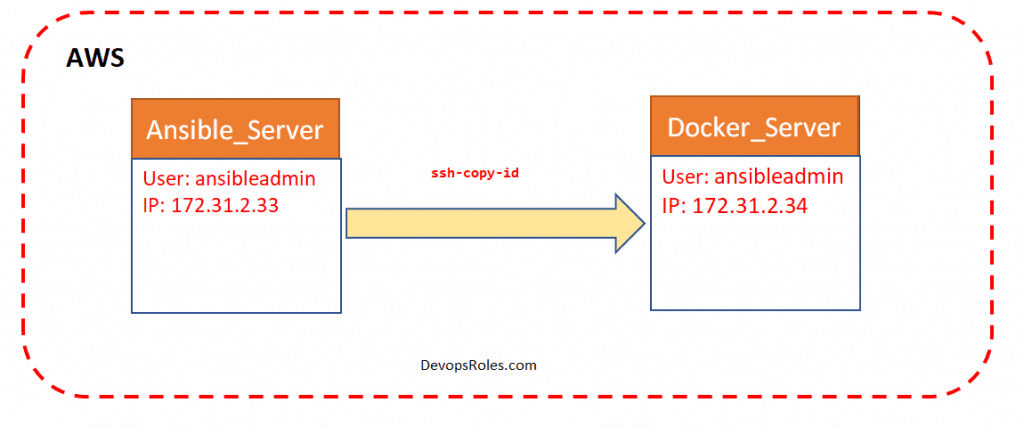
4. Ansible

What is Ansible?

Ansible is a simple yet powerful automation tool that excels at configuration management, application deployment, and task automation.

Advanced Features:

  • Ansible Tower: A web-based solution for managing Ansible at scale, providing a centralized dashboard, role-based access control, and a visual interface for orchestrating complex tasks.
  • Dynamic Inventory: Automatically generate inventory lists from cloud providers or other dynamic sources, ensuring that Ansible always has an up-to-date view of your infrastructure.
  • Ansible Vault: Secure sensitive data such as passwords and API tokens by encrypting them within your Ansible playbooks.

Practical Implementation Tips:

  • Use Ansible Tower for Enterprise-grade Management: Ansible Tower simplifies complex automation workflows by providing a GUI and RESTful API for managing your playbooks and inventory.
  • Implement Ansible Roles: Organize your playbooks using roles to improve modularity and reusability, making your automation scripts easier to maintain and scale.
  • Use Dynamic Inventory: Automatically keep your inventory files up-to-date by integrating Ansible with cloud providers like AWS, Azure, or Google Cloud.

Use Case:

Ansible is great for automating repetitive tasks and managing configurations across large and diverse infrastructure environments.

5. Terraform

What is Terraform?

Terraform is an infrastructure as code (IaC) tool that allows you to define and provision cloud infrastructure using a declarative configuration language.

Advanced Features:

  • Terraform Modules: Reusable, self-contained components that encapsulate resource configurations, making it easier to manage and share infrastructure code.
  • State Management: Terraform keeps track of the state of your infrastructure, allowing you to make incremental changes and ensuring that your actual environment matches your configuration files.
  • Provider Ecosystem: Terraform supports a wide range of cloud providers, enabling multi-cloud and hybrid-cloud deployments.

Practical Implementation Tips:

  • Modularize Your Infrastructure: Use Terraform modules to break down your infrastructure into reusable components, improving manageability and reducing code duplication.
  • Implement Remote State Storage: Store your Terraform state files in remote backends (e.g., AWS S3, Google Cloud Storage) to enable collaboration and disaster recovery.
  • Use Workspaces for Environment Separation: Use Terraform workspaces to manage different environments (e.g., dev, staging, prod) within the same configuration codebase.

Use Case:

Terraform is ideal for teams that need to manage complex infrastructure across multiple cloud providers and environments with a consistent and scalable approach.

6. GitLab CI/CD

What is GitLab CI/CD?

GitLab CI/CD is an integral part of the GitLab platform, providing powerful automation capabilities for building, testing, and deploying code.

Advanced Features:

  • Auto DevOps: Automatically detect and configure CI/CD pipelines for your applications based on best practices, reducing the need for manual configuration.
  • Multi-project Pipelines: Orchestrate complex workflows that span multiple GitLab projects, enabling better collaboration across teams.
  • Container Registry: GitLab includes a built-in container registry that allows you to manage and deploy Docker images directly from your GitLab pipelines.

Practical Implementation Tips:

  • Utilize Auto DevOps: Leverage GitLab’s Auto DevOps feature to quickly get started with CI/CD pipelines, especially for new projects where best practices are not yet established.
  • Implement Multi-project Pipelines: Use multi-project pipelines to coordinate releases across multiple repositories, ensuring that all related components are tested and deployed together.
  • Manage Docker Images with GitLab Registry: Store and manage Docker images in GitLab’s built-in container registry, simplifying the process of deploying containerized applications.

Use Case:

GitLab CI/CD is perfect for teams using GitLab for source control and looking for a seamless, integrated solution for automating the software development lifecycle.

7. Prometheus

What is Prometheus?

Prometheus is an open-source monitoring system that collects metrics from configured targets, allowing you to monitor system performance and set up alerts.

Advanced Features:

  • PromQL: A powerful query language that enables you to analyze and visualize metrics collected by Prometheus.
  • Alertmanager: A tool that handles alerts generated by Prometheus, allowing you to route, deduplicate, and silence alerts based on your requirements.
  • Service Discovery: Automatically discover targets to monitor in dynamic environments, such as containers and cloud services.

Practical Implementation Tips:

  • Master PromQL: Invest time in learning PromQL to make the most of Prometheus’s powerful querying and data analysis capabilities.
  • Integrate with Grafana: Use Grafana as a visualization tool for Prometheus metrics, enabling you to create detailed and interactive dashboards.
  • Implement Alerting Rules: Set up complex alerting rules to monitor critical thresholds in your infrastructure and trigger alerts based on specific conditions.

Use Case:

Prometheus is essential for teams that need robust monitoring and alerting capabilities, especially in dynamic and cloud-native environments.

8. Nagios

What is Nagios?

Nagios is a powerful, open-source monitoring tool that provides comprehensive monitoring of systems, networks, and infrastructure.

Advanced Features:

  • Nagios Core vs. Nagios XI: Understand the differences between Nagios Core (the free version) and Nagios XI (the enterprise version) to choose the best option for your needs.
  • Plugin Development: Extend Nagios’s functionality by developing custom plugins to monitor specific services and metrics.
  • Event Handlers: Use event handlers to automatically take corrective actions when certain thresholds are breached, such as restarting services or sending notifications.

Practical Implementation Tips:

  • Leverage Nagios XI for Enterprise: If you’re managing a large, complex environment, consider using Nagios XI for its advanced features like reporting, configuration wizards, and web-based configuration.
  • Customize with Plugins: Develop custom Nagios plugins to monitor specialized services and metrics that are critical to your operations.
  • Automate Responses with Event Handlers: Implement event handlers in Nagios to automate corrective actions, reducing the need for manual intervention during incidents.

Use Case:

Nagios is ideal for teams that need a mature and extensible monitoring solution with a vast ecosystem of plugins and community support.

9. Chef

What is Chef?

Chef is an infrastructure automation tool that turns infrastructure into code, allowing you to automate the management and configuration of your entire infrastructure.

Advanced Features:

  • Chef Automate: A platform that extends Chef’s capabilities with workflow automation, visibility, and compliance features, providing a complete solution for managing infrastructure.
  • InSpec: A framework for defining and testing compliance as code, ensuring that your infrastructure meets security and compliance standards.
  • Chef Habitat: A tool for automating application lifecycle management, allowing you to package, deploy, and manage applications consistently across environments.

Practical Implementation Tips:

  • Use Chef Automate for Visibility and Control: Chef Automate provides a centralized platform for managing your infrastructure, enabling better control and visibility into your automation workflows.
  • Integrate InSpec for Compliance: Ensure that your infrastructure meets security and compliance requirements by integrating InSpec into your Chef workflows.
  • Adopt Chef Habitat for Application Management: Use Chef Habitat to automate the deployment and management of applications across different environments, ensuring consistency and reliability.

Use Case:

Chef is best suited for teams looking to automate complex infrastructure management and ensure compliance across large-scale environments.

10. Puppet

What is Puppet?

Puppet is a configuration management tool that automates the provisioning, configuration, and management of infrastructure, ensuring that your systems remain in a desired state.

Advanced Features:

  • Puppet Enterprise: An enterprise version of Puppet that includes additional features such as role-based access control, reporting, and orchestration.
  • Bolt: A stand-alone, open-source orchestration tool that can run ad-hoc tasks on remote systems, integrating seamlessly with Puppet.
  • Puppet Forge: A repository of over 5,000 modules and scripts, allowing you to quickly implement and share Puppet configurations.

Practical Implementation Tips:

  • Leverage Puppet Enterprise for Large Environments: Puppet Enterprise offers advanced features like role-based access control, node management, and reporting, making it ideal for managing large-scale infrastructure.
  • Use Bolt for Orchestration: If you need to run ad-hoc tasks across your infrastructure, consider using Bolt, which integrates well with Puppet and extends its orchestration capabilities.
  • Explore Puppet Forge: Access thousands of pre-built modules and scripts on Puppet Forge to quickly implement common configurations and save time.

Use Case:

Puppet is ideal for managing large, heterogeneous environments where consistency, compliance, and automation are critical to maintaining infrastructure health.

FAQs

What are the key benefits of using DevOps tools for automation?

DevOps tools for automation help streamline processes, reduce manual errors, improve collaboration between development and operations teams, accelerate release cycles, and enhance product quality.

Which DevOps tool should I choose for my team?

The choice of DevOps tools depends on your team’s specific needs, such as the complexity of your infrastructure, your existing tech stack, and your workflow requirements. Jenkins, Docker, and Kubernetes are excellent starting points, but more advanced teams may benefit from using tools like Terraform, Ansible, or Chef.

Can I use multiple DevOps tools together?

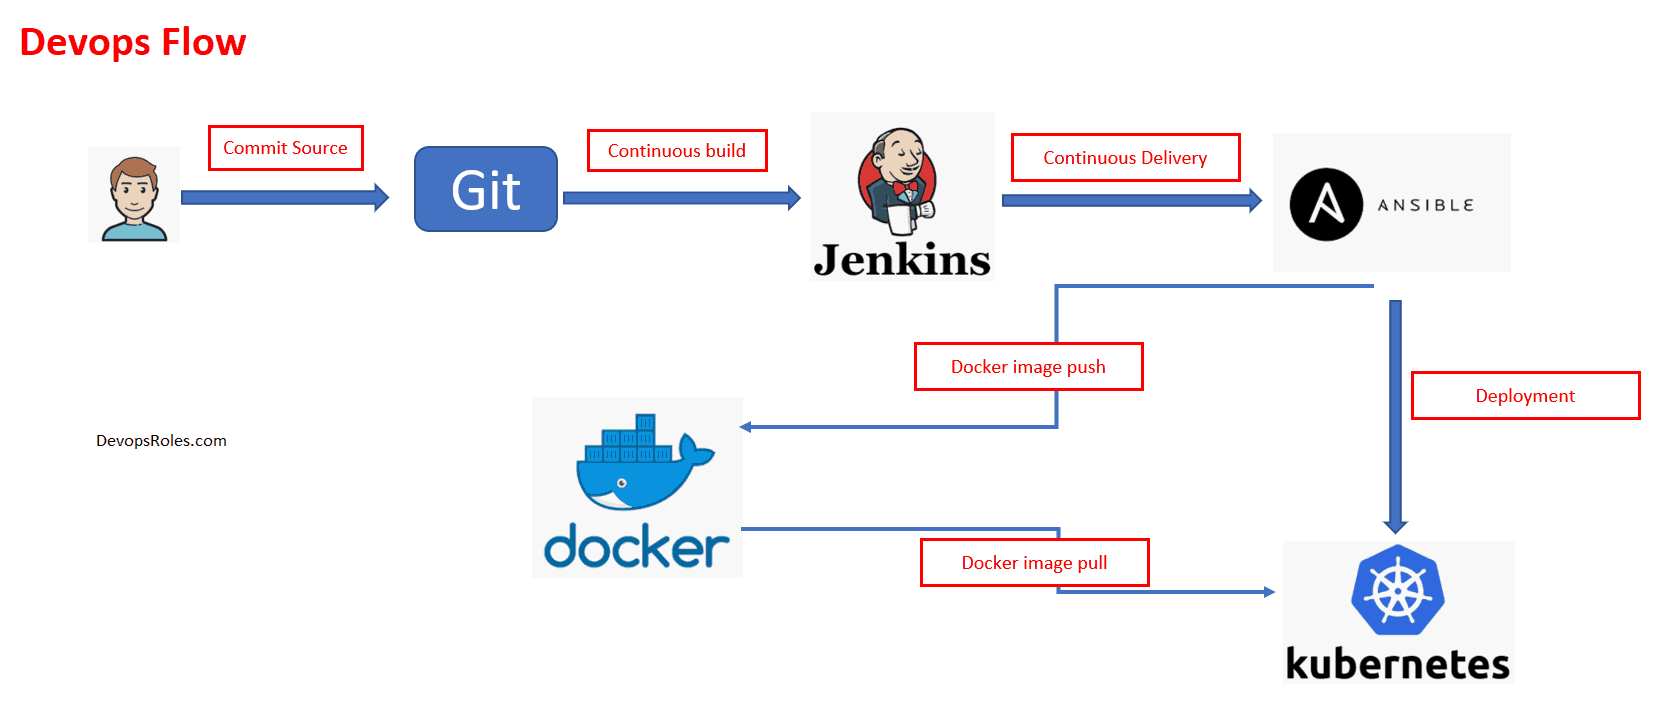
Yes, DevOps tools are often used together to create a comprehensive automation pipeline. For example, you can use Jenkins for CI/CD, Docker for containerization, Kubernetes for orchestration, and Prometheus for monitoring, all within the same workflow.

How do I ensure that my DevOps pipeline is secure?

To secure your DevOps pipeline, implement best practices such as using infrastructure as code (IaC) tools to define and version control your infrastructure, setting up role-based access control (RBAC) to manage permissions, and continuously monitoring your systems for vulnerabilities and compliance issues.

Conclusion

In this deep guide, we’ve explored the top 10 DevOps tools for automation, delving into their advanced features, practical implementation tips, and real-world use cases. Whether you’re just starting your DevOps journey or looking to enhance your existing workflows, these tools offer the flexibility, scalability, and power needed to automate your development and operations processes effectively.

Remember, successful DevOps automation requires not only the right tools but also the right practices and culture. Start by implementing these tools in small, manageable steps, continuously iterating and improving your processes to achieve the best results for your team.

By mastering these tools and integrating them into your workflows, you’ll be well-equipped to handle the complexities of modern software development and operations, ultimately delivering better products faster and with greater reliability. Thank you for reading the DevopsRoles page!

SonarQube from a Jenkins Pipeline job in Docker

Introduction

In today’s fast-paced DevOps environment, maintaining code quality is paramount. Integrating SonarQube with Jenkins in a Docker environment offers a robust solution for continuous code inspection and improvement.

This guide will walk you through the steps to set up SonarQube from a Jenkins pipeline job in Docker, ensuring your projects adhere to high standards of code quality and security.

Integrating SonarQube from a Jenkins Pipeline job in Docker: A Step-by-Step Guide.

Docker Compose for SonarQube

Create directories to keep SonarQube’s data

# mkdir -p /data/sonarqube/{conf,logs,temp,data,extensions,bundled_plugins,postgresql,postgresql_data}

Create a new user and change those directories owner

# adduser sonarqube
# usermod -aG docker sonarqube
# chown -R sonarqube:sonarqube /data/sonarqube/

Find UID of sonarqube user

# id sonarqube

Create a Docker Compose file using the UID in the user.

version: "3"

networks:
  sonarnet:
    driver: bridge

services:
  sonarqube:
    // use UID here
    user: 1005:1005
    image: sonarqube
    ports:
      - "9000:9000"
    networks:
      - sonarnet
    environment:
      - sonar.jdbc.url=jdbc:postgresql://db:5432/sonar
    volumes:
      - /data/sonarqube/conf:/opt/sonarqube/conf
      - /data/sonarqube/logs:/opt/sonarqube/logs
      - /data/sonarqube/temp:/opt/sonarqube/temp
      - /data/sonarqube/data:/opt/sonarqube/data
      - /data/sonarqube/extensions:/opt/sonarqube/extensions
      - /data/sonarqube/bundled_plugins:/opt/sonarqube/lib/bundled-plugins

  db:
    image: postgres
    networks:
      - sonarnet
    environment:
      - POSTGRES_USER=sonar
      - POSTGRES_PASSWORD=sonar
    volumes:
      - /data/sonarqube/postgresql:/var/lib/postgresql
      - /data/sonarqube/postgresql_data:/var/lib/postgresql/data

Use docker-compose start

# docker-compose -f sonarqube-compose.yml up

Install and configure Nginx

Nginx Install

# yum install nginx

Start Nginx service

# service nginx start

Configure nginx

I have created a “/etc/nginx/conf.d/sonar.devopsroles.com.conf” file, look like as below:

upstream sonar {
    server 127.0.0.1:9000;
}


server {

    listen 80;
    server_name  dev.sonar.devopsroles.com;


    root /var/www/html;
        allow all;
    }

    location / {
        return 301 https://dev.sonar.devopsroles.com;
    }
}

server {

    listen       443 ssl;
    server_name  dev.sonar.devopsroles.com;

    access_log  /var/log/nginx/dev.sonar.devopsroles.com-access.log proxy;
    error_log /var/log/nginx/dev.sonar.devopsroles.com-error.log warn;

    location / {
        proxy_http_version 1.1;
        proxy_request_buffering off;
        proxy_buffering off;

        proxy_redirect          off;
        proxy_set_header        Host            $host;
        proxy_set_header        X-Real-IP       $remote_addr;
        proxy_set_header        X-Forwarded-For $proxy_add_x_forwarded_for;
        proxy_set_header        X-Forwarded-Proto   $scheme;
        proxy_pass http://sonar$request_uri;
    }
}

Check syntax and reload NGINX’s configs

# nginx -t && systemctl start nginx

Jenkins Docker Compose

Here is an example of a Jenkins Docker Compose setup that could be used for integrating SonarQube from a Jenkins pipeline job:

version: '3'

services:
  jenkins:
    image: jenkins/jenkins:lts
    container_name: jenkins
    ports:
      - "8080:8080"
      - "50000:50000"
    volumes:
      - jenkins_home:/var/jenkins_home
    networks:
      - jenkins-sonarqube

  sonarqube:
    image: sonarqube:latest
    container_name: sonarqube
    ports:
      - "9000:9000"
    environment:
      - SONAR_JDBC_URL=jdbc:postgresql://db:5432/sonarqube
      - SONAR_JDBC_USERNAME=sonar
      - SONAR_JDBC_PASSWORD=sonar
    networks:
      - jenkins-sonarqube

  db:
    image: postgres:latest
    container_name: postgres
    environment:
      - POSTGRES_USER=sonar
      - POSTGRES_PASSWORD=sonar
      - POSTGRES_DB=sonarqube
    networks:
      - jenkins-sonarqube

networks:
  jenkins-sonarqube:

volumes:
  jenkins_home:

Explanation:

  • Jenkins Service: Runs Jenkins on the default LTS image. It exposes ports 8080 (Jenkins web UI) and 50000 (Jenkins slave agents).
  • SonarQube Service: Runs SonarQube on the latest image. It connects to a PostgreSQL database for data storage.
  • PostgreSQL Service: Provides the database backend for SonarQube.
  • Networks and Volumes: Shared network (jenkins-sonarqube) and a named volume (jenkins_home) for Jenkins data persistence.

Conclusion

By following this comprehensive guide, you have successfully integrated SonarQube with Jenkins using Docker, enhancing your continuous integration pipeline. This setup not only helps in maintaining code quality but also ensures your development process is more efficient and reliable. Thank you for visiting DevOpsRoles, and we hope this tutorial has been helpful in improving your DevOps practices.

Hide password in Jenkins console

Introduction

How to hide the password in Jenkins console output? some build Jobs may require a username and the password is hidden for security. I use Jenkins mask password plugin to hide the password in Jenkins console output.

Jenkins Mask Passwords plugin

This plugin allows masking passwords that may appear in the console.

You need to install the Mask passwords plugin in Jenkins.

For example

I will Mask_Passwords_Before job as a picture below

As picture top. Password will show in console. it is dangerous.

Now, I use the mask password plugin for the hidden passwords in console output Jenkins.

Create Mask_Passwords_After job

The result, Passwords have hidden in console output Jenkins.

Link Youtube Hide password in Jenkins console

❓ Frequently Asked Questions (FAQ)

Q1: Is it safe to echo environment variables in Jenkins?

No, especially if they contain secrets. Even if Jenkins masks values, certain command structures can cause secrets to leak.

Q2: How do I ensure a password is masked in Jenkins console?

Use the credentials() method or the withCredentials block. Additionally, avoid echoing secrets and use the Mask Passwords Plugin for extra safety.

Q3: Can secrets leak through error logs?

Yes, poorly written scripts or verbose debug logs can expose secrets. Always sanitize error output and avoid set -x in shell scripts.

Q4: Do all Jenkins plugins respect credential masking?

Not always. Some third-party or community plugins may inadvertently expose secrets. Stick to trusted plugins and test thoroughly.

Q5: Can I revoke access to a leaked credential?

Yes. Rotate the secret immediately and update Jenkins with the new credential. Audit logs to assess impact.

🔗 External Resources

Conclusion

Through the article, You can “Hide password in Jenkins console as above. I hope will this your helpful. Thank you for reading the DevopsRoles page!

Jenkins on Linux AWS can not start

Today, I have installed Jenkins on Linux AWS can not start. Then start it, but an error as below.

[root@Jenkins_Server ~]# service jenkins restart
Shutting down Jenkins                                      [FAILED]
Starting Jenkins Mar 13, 2020 11:22:44 AM Main verifyJavaVersion
SEVERE: Running with Java class version 51, which is older than the Minimum required version 52. See https://jenkins.io/redirect/java-support/
java.lang.UnsupportedClassVersionError: 51.0
        at Main.verifyJavaVersion(Main.java:182)
        at Main.main(Main.java:142)

Jenkins requires Java versions [8, 11] but you are running with Java 1.7 from /usr/lib/jvm/java-1.7.0-openjdk-1.7.0.231.x86_64/jre
java.lang.UnsupportedClassVersionError: 51.0
        at Main.verifyJavaVersion(Main.java:182)
        at Main.main(Main.java:142)

I have installed java Version 1.8.x. Check Java version on Linux AWS the default version 1.7.x.

[root@Jenkins_Server ~]# java -version
java version "1.7.0_231"
OpenJDK Runtime Environment (amzn-2.6.19.1.80.amzn1-x86_64 u231-b01)
OpenJDK 64-Bit Server VM (build 24.231-b01, mixed mode)
[root@Jenkins_Server ~]# echo $JAVA_HOME
/usr/lib/jvm/java-1.8.0-openjdk-1.8.0.242.b08-0.50.amzn1.x86_64

Jenkins on Linux AWS can not start fixed

How to fix it. I use the command below to switch JDK to Java version “1.8.x”. You can refer to the link here

sudo alternatives --config java

Link youtube

Now, I have started Jenkins is OK. Thank you for reading DevOpsRoles.com page

Jenkins auto build when git commit

Introduction

In this tutorial, How to use Jenkins auto-build when git commit. You use a webhook to capture when a new git commit was made and Jenkins will start to build jobs.

Step-by-Step Guide to Jenkins Auto Build on Commit

Configuration Setup

  • Jenkins Server
  • Install GitHub and Git plugins

For instructions on setting up Jenkins on AWS EC2, please refer to the installation guide.

How to Install the Git and Github plugins.

Under ‘Manage Jenkins’ -> ‘Manage Plugins’, select and install both Github and Git plugins.

Restart to finish the installation.

Configure a Jenkins job to use your repository.

Create a Jenkins job ‘Freestyle project

First, You add a repository in the “Github project” text field under the general settings.

you’ll need to enable Git under ‘Source Code Management

Under ‘Build Triggers‘, tick ‘GitHub hook trigger for GITScm polling‘.

Add the hooks to Github.

Click “settings” for your repository. For Example, My repository https://github.com/huupv/jenkins/settings/hooks . Click ‘Add webhook‘ as the picture.

Setting webhooks for Jenkins.

Conclusion

When you commit changes to a repository on GitHub, Jenkins will automatically trigger a build job. Test it out and see how it works! I hope you find this information useful. Thank you for visiting the DevopsRoles website!

DevOps CI/CD pipeline tutorial part 4

In this tutorial, I will integrate Ansible into the Jenkins CI/CD pipeline. Now, let’s go to DevOps CI/CD pipeline tutorial part 4.

The content is

  • Install Ansible on Amazon EC2
  • How to integrate Ansible with Jenkins
  • Create an Ansible playbook
  • Jenkins job to deploy on Docker container through DockerHub
  • Jenkin’s job to deploy a war file on Docker container using Ansible.

Install Ansible on Amazon EC2

Prerequisites

  • Amazon Linux EC2 Instance

Installation steps

Install python and python-pip

[root@Ansible_host ~]# yum install python
[root@Ansible_host ~]# yum install python-pip

Using pip command install Ansible

[root@Ansible_host ~]# pip install ansible
[root@Ansible_host ~]# ansible --version

Create a user called for Ansible

[root@Ansible_host ~]# useradd ansibleadmin
[root@Ansible_host ~]# passwd ansibleadmin

grant sudo access to ansibleadmin user.

[root@Ansible_host ~]# echo "ansibleadmin ALL=(ALL) NOPASSWD: ALL" >> /etc/sudoers

Login ansibleadmin user and generate key

ssh-keygen

Copy keys to the target server.

ssh-copy-id ansibleadmin@<target-server>

Ansible server used to create images and store them on the docker registry.

yum install docker
service docker status
service docker start
usermod -aG docker ansibleadmin

Create a folder /opt/ansible and hosts file for inventory file add control node and manged hosts IP address to it.

Validating test Ansible

Run ansible command as ansibleadmin user.

ansible all -m ping

How to integrate Ansible with Jenkins

You need to Install “publish Over SSH” as below

Manage Jenkins > Manage Plugins > Available > Publish over SSH

Enable connection between Ansible-control-node and Jenkins as below.

Manage Jenkins > Configure System > Publish Over SSH > SSH Servers

Example,

  • SSH Servers:
  • Name: ansible-server
  • Hostname:<ServerIP>
  • username: ansibleadmin
  • Click Advanced > chose Use password authentication, or use a different key.

Create an Ansible playbook

I will create a simple Ansible playbook as below

---
- hosts: 172.13.13.4
  become: true
  tasks:
  - name: Stop old docker container
    command: docker stop devops-container
    ignore_errors: yes

  - name: Remove stopped docker container
    command: docker rm devops-container
    ignore_errors: yes

  - name: Remove current docker image
    command: docker rmi devops-image
    ignore_errors: yes


  - name: Building docker image
    command: docker build -t devops-image .
    args:
      chdir: /opt/docker

  - name: creating docker image
    command: docker run -d --name devops-container -p 8080:8080 devops-image

Run Ansible playbook

ansible-playbook -i hosts simple-devops.yml

DevOps CI/CD pipeline tutorial part 4 update later … Thank you for reading DevOpsRoles.com page

DevOps CI/CD pipeline tutorial part 3

I will continue the article DevOps CI/CD pipeline tutorial part 3. In this tutorial, How to integrating Docker in CI/CD pipeline Jenkins.

Jenkins Host –> Docker Host –> Tomcat on Docker container

The content is

  • Installing Docker on Amazon Linux server
  • Integrating Docker with Jenkins
  • Deploy a war file on the Docker container using Jenkins.

Installing Docker on Amazon Linux server

Prerequisites

  • Amazon Linux EC2 Instance

Installation Docker

[root@Docker_host ~]# yum install docker -y

Check version

[root@Docker_host ~]# docker --version

Start docker services

[root@Docker_host ~]# service docker start
[root@Docker_host ~]# service docker status

Create user admindocker

[root@Docker_host ~]# useradd admindocker
[root@Docker_host ~]# passwd admindocker

Add a user to docker group to manage docker

[root@Docker_host ~]# usermod -aG docker admindocker

Validation

Create a tomcat docker container by pulling a docker image from the public docker registry.

[root@Docker_host ~]# docker run -d --name demo-tomcat-server -p 8090:8080 tomcat:latest

List out running containers

[root@Docker_host ~]# docker ps

Now, we will pull image tomcat from https://hub.docker.com/_/tomcat

You can then go to http://localhost:8080 in a browser (noting that it will return a 404 since there are no webapps loaded by default).

Log in to a docker container

docker exec -it <container_Name> /bin/bash

Default, tomcat container webapp is empty. you access a browser it will return a 404 page. I will copy the example webapps as below:

[root@Docker_host ~]# docker run -d --name tomcat-container -p 8090:8080 tomcat
f2732ff3f29496513c5489863fcc405f243bd07275021074af2107a74713683e
[root@Docker_host ~]# docker ps
CONTAINER ID        IMAGE               COMMAND             CREATED             STATUS              PORTS                    NAMES
f2732ff3f294        tomcat              "catalina.sh run"   7 seconds ago       Up 6 seconds        0.0.0.0:8090->8080/tcp   tomcat-container
[root@Docker_host ~]# docker exec -it f2732ff3f294 /bin/bash
root@f2732ff3f294:/usr/local/tomcat# ll
bash: ll: command not found
root@f2732ff3f294:/usr/local/tomcat# ls
BUILDING.txt     LICENSE  README.md      RUNNING.txt  conf     lib   native-jni-lib  webapps       work
CONTRIBUTING.md  NOTICE   RELEASE-NOTES  bin          include  logs  temp            webapps.dist
root@f2732ff3f294:/usr/local/tomcat# cp -R webapps.dist/* webapps/

Integrating Docker with Jenkins

Login to console Jenkins

Add ” Publish Over SSH ” plugin.

Manage Jenkins Configure System >  Publish over SSH

You need to allow Password Authentication of SSH on Docker Host server ( if you use password)

[root@Docker_host ~]# grep PasswordAuthentication /etc/ssh/sshd_config
PasswordAuthentication yes

For example, Jenkins copy artifacts to Docker host

Add post-build action –> Send build artifacts over SSH

Result,

Deploy a war file on the Docker container using Jenkins.

Create Dockerfile to copy the war file to the delivery folder.

Example Dockerfile simple

FROM tomcat:latest
COPY ./HelloWorld.war /usr/local/tomcat/webapps

Jenkins setting copy war to the docker container.

Link Youtube

Thank you for reading DevOpsRoles.com page

DevOps CI/CD pipeline tutorial part 2

I wrote DevOps CI/CD pipeline tutorial part 2. Serial the previous article here. This time I will integrate Tomcat Server in CI/CD Jenkins pipeline.

The content is

  • How to set up Tomcat server
  • Using Jenkins to Deploy a war file on Tomcat VM
  • Deploy on VM through PollSCM

How to Tomcat installation on EC2 instance

Prerequisites

  • EC2 instance with Java v1.8.xx

Install Apache Tomcat

Download tomcat packages latest version here

# Create tomcat directory
[ec2-user@Tomcat_Server ~]$ sudo su -
[root@~]# cd /opt
[root@Tomcat_Server opt]# wget https://www-eu.apache.org/dist/tomcat/tomcat-8/v8.5.50/bin/apache-tomcat-8.5.50.tar.gz
[root@Tomcat_Server opt]# tar -xvzf /opt/apache-tomcat-8.5.50.tar.gz

Executing permissions for startup.sh and shutdown.sh

[root@Tomcat_Server opt]# chmod +x /opt/apache-tomcat-8.5.50/bin/{startup.sh,shutdown.sh}

Create link files for tomcat startup.sh and shutdown.sh

[root@Tomcat_Server opt]# ln -s /opt/apache-tomcat-8.5.50/bin/startup.sh /usr/local/bin/tomcatup
[root@Tomcat_Server opt]# ln -s /opt/apache-tomcat-8.5.50/bin/shutdown.sh /usr/local/bin/tomcatdown
[root@Tomcat_Server opt]# tomcatup

Now, We will access the tomcat application from the browser to port 8080

http://<Public_IP>:8080

But, the default tomcat and Jenkins runs on ports number 8080. Hence I will change the tomcat port number to 8090. Change port number in conf/server.xml file under tomcat home

[root@Tomcat_Server opt]# cd /opt/apache-tomcat-8.5.50/conf
# update port number in the "connecter port" field in server.xml
# restart tomcat after configuration update
[root@Tomcat_Server conf]# cat server.xml | grep '\<Connector port\=\"8090\"'
    <Connector port="8090" protocol="HTTP/1.1"
[root@Tomcat_Server conf]# tomcatdown
[root@Tomcat_Server conf]# tomcatup

Access tomcat application from the browser on port 8090

http://<Public_IP>:8090

But the tomcat application doesn’t allow us to log in from the browser. changing a default parameter in context.xml

# comment (<!-- & -->) `Value ClassName` field on files which are under webapp directory.

[root@Tomcat_Server bin]# pwd
/opt/apache-tomcat-8.5.50/bin
[root@Tomcat_Server bin]# find /opt/apache-tomcat-8.5.50 -name context.xml
/opt/apache-tomcat-8.5.50/webapps/host-manager/META-INF/context.xml
/opt/apache-tomcat-8.5.50/webapps/manager/META-INF/context.xml
/opt/apache-tomcat-8.5.50/conf/context.xml
[root@Tomcat_Server bin]# vi /opt/apache-tomcat-8.5.50/webapps/manager/META-INF/context.xml

After that restart tomcat services to effect these changes.

tomcatdown
tomcatup

Update users information in the /opt/apache-tomcat-8.5.50/conf/tomcat-users.xml file

	<role rolename="manager-gui"/>
	<role rolename="manager-script"/>
	<role rolename="manager-jmx"/>
	<role rolename="manager-status"/>
	<user username="admin" password="admin" roles="manager-gui, manager-script, manager-jmx, manager-status"/>
	<user username="deployer" password="deployer" roles="manager-script"/>
	<user username="tomcat" password="s3cret" roles="manager-gui"/>

Restart the service and try to log in to the tomcat application from the browser.

Using Jenkins to Deploy a war file on Tomcat VM

I use the plugin “Deploy to container” for Jenkins.

Link Youtube DevOps CI/CD pipeline tutorial part 2

Thank you for reading the DevopsRoles page!

DevOps CI/CD pipeline tutorial part 1

In this tutorial, How to create DevOps CI/CD pipelines using Git, Jenkins, Ansible, Docker, and Kubernetes on AWS. How to learn DevOps. Step-by-step Hand-on Lab DevOps CI/CD pipeline tutorial part 1.

DevOps Flow

What is Continuous Integration?

It is a DevOps software development. It contains some combination of tools such as the Version Control System, Builds server, and testing automation tools.

What is Continuous Delivery (CD) & Continuous Deployment (CD)?

It is a practice that could be achieved. Combination of CI tool, configuration management tool, and orchestration tool.

How to Install Jenkins on AWS EC2

Jenkins is a self-contained Java-based program. Use Jenkins ci/cd pipeline for any project.

Prerequisites

Amazon EC2 Instance

  • EC2 with Internet Access
  • Security Group with Port 8080 open for internet

Java

  • Version 1.8.x

Install Java on Amazon EC2

Get the latest version from here.

[root@Jenkins_Server ~]# yum install java-1.8*

You need to confirm Java Version and set the java home in Linux.

# find java version on Linux
[root@Jenkins_Server ~]# find /usr/lib/jvm/java-1.8* | head -n 3
# To set JAVA_HOME it permanently update your .bash_profile
[root@Jenkins_Server ~]# vi ~/.bash_profile
[root@Jenkins_Server ~]# java -version

# Result, The output should be something like this
[root@Jenkins_Server ~]# find /usr/lib/jvm/java-1.8* | head -n 3
 /usr/lib/jvm/java-1.8.0-openjdk-1.8.0.232.b09-0.el7_7.x86_64
 /usr/lib/jvm/java-1.8.0-openjdk-1.8.0.232.b09-0.el7_7.x86_64/jre
 /usr/lib/jvm/java-1.8.0-openjdk-1.8.0.232.b09-0.el7_7.x86_64/jre/bin

[root@Jenkins_Server ~]# cat ~/.bash_profile
# .bash_profile
# Get the aliases and functions
if [ -f ~/.bashrc ]; then
         . ~/.bashrc
fi
# User specific environment and startup programs
JAVA_HOME=/usr/lib/jvm/java-1.8.0-openjdk-1.8.0.232.b09-0.el7_7.x86_64
PATH=$PATH:$HOME/bin:$JAVA_HOME
export PATH

[root@Jenkins_Server ~]# java -version
openjdk version "1.8.0_232"
OpenJDK Runtime Environment (build 1.8.0_232-b09)
OpenJDK 64-Bit Server VM (build 25.232-b09, mixed mode)

[root@~]# echo $JAVA_HOME
/usr/lib/jvm/java-1.8.0-openjdk-1.8.0.232.b09-0.el7_7.x86_64

Install Jenkins on Amazon EC2

Get the latest version of Jenkins from here. You can install Jenkins using the rpm or by setting up the repo.

[root@Jenkins_Server ~]# yum -y install wget
[root@Jenkins_Server ~]# sudo wget -O /etc/yum.repos.d/jenkins.repo https://pkg.jenkins.io/redhat-stable/jenkins.repo
[root@Jenkins_Server ~]# sudo rpm --import https://pkg.jenkins.io/redhat-stable/jenkins.io.key
[root@Jenkins_Server ~]# yum -y install jenkins

Start Jenkins

[root@Jenkins_Server ~]# service jenkins start
[root@Jenkins_Server ~]# chkconfig jenkins on

Accessing Jenkins from Browser

By default, Jenkins runs at port 8080

http://[YOUR-SERVER]or [PUBLIC-IP]:8080

Configure Jenkins

  • The default Username is admin
  • Grab the default password
  • Password Location:/var/lib/jenkins/secrets/initialAdminPassword
  • Skip Plugin Installation;

Change admin password

Configure java path

Manage Jenkins > Global Tool Configuration > JDK

How to Run First Jenkins Job

I use to create a Jenkins job simple. step by step as in the example picture below.

Example, “Test_Jenkins_Job” job.

In Build –> select “execute shell”

Click Build Now

Configure Git plugin for Jenkins

Git is a version control system. It is an open-source tool. You can pull code from git repo using Jenkins.

Install git packages on the Jenkins server

[root@Jenkins_Server ~]# yum install git -y

Setup Git on Jenkins console

Install the git plugin without a restart. For this tutorial, I use the Gitlab plugin (example)

Manage Jenkins > Jenkins Plugins > available > gitlab

Configure git path

Manage Jenkins > Global Tool Configuration > git

Install and configure Maven for Jenkins

Maven is a software project management and comprehension tool. It is a code-build tool used to convert your code to an artifact.

Install Maven on Jenkins

Download maven packages here.

[root@Jenkins_Server ~]# mkdir /opt/maven
[root@Jenkins_Server ~]# cd /opt/maven
[root@Jenkins_Server ~]# wget https://www-us.apache.org/dist/maven/maven-3/3.6.3/binaries/apache-maven-3.6.3-bin.tar.gz
[root@Jenkins_Server ~]# tar -xvzf apache-maven-3.6.3-bin.tar.gz

Set up MAVEN_HOME and MAVEN2 paths in the .bash_profile of the user.

vi ~/.bash_profile


#### Example add variable maven path
# Add vairable maven here
MAVEN_HOME=/opt/maven/apache-maven-3.6.3
MAVEN2=$MAVEN_HOME/bin

PATH=$PATH:$HOME/bin:$JAVA_HOME:$MAVEN2
export PATH

Check maven version

[root@Jenkins_Server ~]# mvn --version
Apache Maven 3.6.3 (cecedd343002696d0abb50b32b541b8a6ba2883f)
Maven home: /opt/maven/apache-maven-3.6.3
Java version: 1.8.0_232, vendor: Oracle Corporation, runtime: /usr/lib/jvm/java-1.8.0-openjdk-1.8.0.232.b09-0.el7_7.x86_64/jre
Default locale: en_US, platform encoding: UTF-8
OS name: "linux", version: "3.10.0-1062.9.1.el7.x86_64", arch: "amd64", family: "unix"

Setup maven on Jenkins console

Install Maven plugin without restart

Manage Jenkins > Jenkins Plugins > available > choice Maven Invoker and Maven Integration

Configure maven path

Manage Jenkins > Global Tool Configuration > Maven

How to create a maven job

Link Youtube DevOps CI/CD pipeline tutorial part 1

DevOps CI/CD pipeline tutorial part 1. Thank you for reading DevOpsRoles.com page

Mastering Jenkins pipeline groovy example

Introduction

In this tutorial, I have written a script groovy using Jenkins pipeline call shell to create a folder and copy. How to Execute shell script from Jenkins groovy script in Pipeline. Now, let’s go to the Jenkins pipeline groovy example.

Jenkins Pipeline creates multiple automation jobs with the help of use cases and runs them as a Jenkins pipeline.

You can installed build pipeline plugin on Jenkins server.

Jenkins pipeline groovy example

I will create 3 folder: app1,app-api,app2 and copy war file is app1.war,app-api.war,app2.war

JENKINS_HOME: /var/lib/jenkins
WORKSPACE: /var/lib/jenkins/{JOB_NAME}

Execute shell script from Jenkins Groovy script in Pipeline.

node('master') {
stage('Create directory and copy to folder release') {
   artifacts = "app1,app-api,app2"
   targets = artifacts.split(",")
   for (String artifact : targets){
         Warfile = artifact + ".war"
         sh """
              mkdir -p ${JENKINS_HOME}/delivery/${artifact}           
              cp ${WORKSPACE}/${artifact}/target/${Warfile} ${JENKINS_HOME}/delivery/${artifact}/
         """
 }
 }
}

Conclusion

Throughout this article, “How to Execute a Shell Script from Jenkins Groovy Script in Pipeline,” we’ve explored detailed steps and strategies for integrating shell scripts into Jenkins pipelines using Groovy. I hope you found the information provided useful for enhancing your DevOps processes. Thank you for reading at DevOpsRoles.com, and stay tuned for more insights and tutorials to streamline your development and operational tasks.