How to deploy OpenProject platform as a Docker Container

#Introduction

In this tutorial, How to deploy OpenProject platform as a Docker Container.

OpenProject is an outstanding platform for project management. It is manage meetings, control project budgets, run reports on your projects, communicate with a project team, etc.

Deploy OpenProject platform as a Docker Container

Install Docker and Docker-Compose

I will this deployment on Ubuntu Server.

sudo apt-get install docker.io -y
sudo usermod -aG docker $USER
sudo curl -L "https://github.com/docker/compose/releases/download/1.23.1/docker-compose-$(uname -s)-$(uname -m)" -o /usr/local/bin/docker-compose
sudo chmod +x /usr/local/bin/docker-compose

Check version after finished install.

root@DevopsRoles:~# docker --version
Docker version 20.10.2, build 20.10.2-0ubuntu2
root@DevopsRoles:~# docker-compose --version
docker-compose version 1.23.1, build b02f1306

Deploy OpenProject with Docker Compose

git clone https://github.com/opf/openproject-deploy --depth=1 --branch=stable/11 myopenproject
cd myopenproject/compose
docker-compose pull # Make sure to update docker images.
docker-compose up -d # You need to wait a few minutes.

For example, The output terminal is as below:

root@DevopsRoles:~# git clone https://github.com/opf/openproject-deploy --depth=1 --branch=stable/11 myopenproject
Cloning into 'myopenproject'...
remote: Enumerating objects: 7, done.
remote: Counting objects: 100% (7/7), done.
remote: Compressing objects: 100% (6/6), done.
remote: Total 7 (delta 0), reused 2 (delta 0), pack-reused 0
Receiving objects: 100% (7/7), done.
root@DevopsRoles:~# cd myopenproject/compose
root@DevopsRoles:~/myopenproject/compose# docker-compose pull
Pulling db     ... done
Pulling cache  ... done
Pulling seeder ... done
Pulling cron   ... done
Pulling worker ... done
Pulling web    ... done
Pulling proxy  ... done
root@DevopsRoles:~/myopenproject/compose# docker-compose up -d
Creating network "compose_backend" with the default driver
Creating network "compose_frontend" with the default driver
Creating volume "compose_pgdata" with default driver
Creating volume "compose_opdata" with default driver
Creating compose_seeder_1_f0f0cb90c947 ... done
Creating compose_cache_1_e6fe61ccd342  ... done
Creating compose_db_1_17392590a82e     ... done
Creating compose_cron_1_f15f9d68fc11   ... done
Creating compose_web_1_ce68c823fc5f    ... done
Creating compose_worker_1_a9c88ca2f672 ... done
Creating compose_proxy_1_c7c5f08e77e8  ... done
root@DevopsRoles:~/myopenproject/compose#
root@DevopsRoles:~/myopenproject/compose# docker ps
CONTAINER ID   IMAGE                      COMMAND                  CREATED          STATUS          PORTS                            NAMES
9aa1fe05f737   openproject/community:11   "./docker/prod/entry…"   40 seconds ago   Up 35 seconds   5432/tcp, 0.0.0.0:8080->80/tcp   compose_proxy_1_5fdbbaa63ec5
2df1b233a515   openproject/community:11   "./docker/prod/entry…"   42 seconds ago   Up 39 seconds   80/tcp, 5432/tcp                 compose_worker_1_6db9f1adb68b
e1b6878e9e32   openproject/community:11   "./docker/prod/entry…"   42 seconds ago   Up 39 seconds   80/tcp, 5432/tcp                 compose_web_1_544e288b78ff
ef3b645bc783   openproject/community:11   "./docker/prod/entry…"   42 seconds ago   Up 39 seconds   80/tcp, 5432/tcp                 compose_cron_1_db11c0e207d9
0dad3d1c28d1   postgres:10                "docker-entrypoint.s…"   46 seconds ago   Up 41 seconds   5432/tcp                         compose_db_1_31484339d5bc
1cd386cca514   memcached                  "docker-entrypoint.s…"   46 seconds ago   Up 41 seconds   11211/tcp                        compose_cache_1_6b9f381e6e82
13f9ad2a8cfa   openproject/community:11   "./docker/prod/entry…"   46 seconds ago   Up 41 seconds   80/tcp, 5432/tcp                 compose_seeder_1_f88dde804cb4

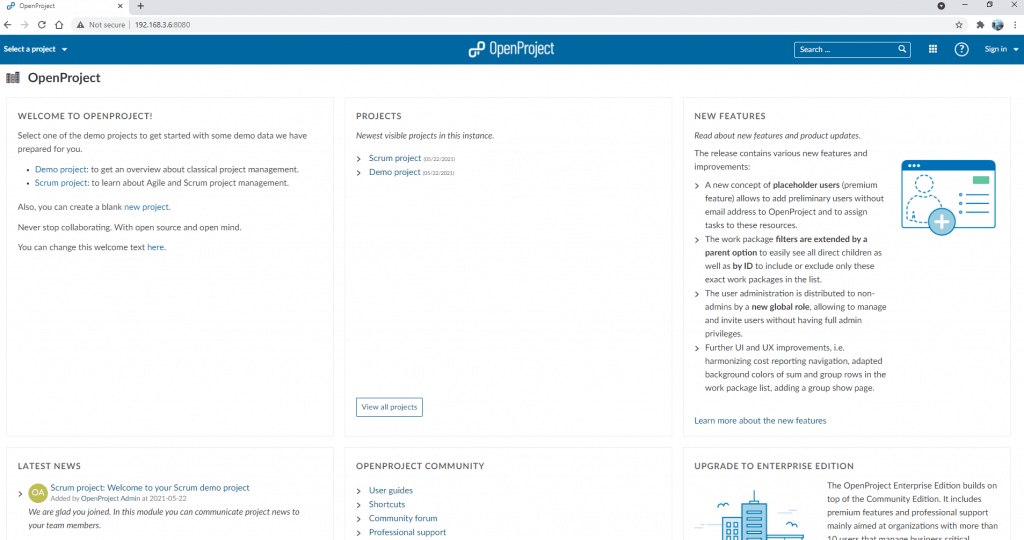
The result is openproject docker the picture below:

How to deploy with docker

sudo mkdir -p /var/lib/myopenproject/{pgdata,assets}
head /dev/urandom | tr -dc A-Za-z0-9 | head -c 32 ; echo '' # The random key generated for SECRET_KEY_BASE variable.

Deploy the OpenProject containers with the command:

docker run -d -p 8080:80 --name myopenproject -e SECRET_KEY_BASE=secret -v /var/lib/myopenproject/pgdata:/var/myopenproject/pgdata -v /var/lib/myopenproject/assets:/var/myopenproject/assets openproject/community:11

The output terminal is as below:

root@DevopsRoles:~/myopenproject/compose# head /dev/urandom | tr -dc A-Za-z0-9 | head -c 32 ; echo ''
HgRwijSjJXYBHRl8MSPfm7oiYd0F5hmK
root@DevopsRoles:~/myopenproject/compose# docker run -d -p 8080:80 --name myopenproject -e SECRET_KEY_BASE=HgRwijSjJXYBHRl8MSPfm7oiYd0F5hmK -v /var/lib/myopenproject/pgdata:/var/myopenproject/pgdata -v /var/lib/myopenproject/assets:/var/myopenproject/assets openproject/community:11
24c5f3fb9b560f4eca821555a50d8cab8ef7b3e38616071db9083ed2784219fe
root@DevopsRoles:~/myopenproject/compose# docker ps
CONTAINER ID   IMAGE                      COMMAND                  CREATED         STATUS         PORTS                            NAMES
24c5f3fb9b56   openproject/community:11   "./docker/prod/entry…"   5 seconds ago   Up 4 seconds   5432/tcp, 0.0.0.0:8080->80/tcp   myopenproject
root@DevopsRoles:~/myopenproject/compose# netstat -nplt
Active Internet connections (only servers)
Proto Recv-Q Send-Q Local Address           Foreign Address         State       PID/Program name
tcp        0      0 127.0.0.1:38701         0.0.0.0:*               LISTEN      15247/containerd
tcp        0      0 0.0.0.0:8080            0.0.0.0:*               LISTEN      19208/docker-proxy
tcp        0      0 127.0.0.53:53           0.0.0.0:*               LISTEN      599/systemd-resolve
tcp        0      0 0.0.0.0:22              0.0.0.0:*               LISTEN      1091/sshd: /usr/sbi
tcp6       0      0 :::22                   :::*                    LISTEN      1091/sshd: /usr/sbi

Conclusion

You have to deploy the OpenProject platform as a Docker Container. I hope will this your helpful. Thank you for reading the DevopsRoles page! deploy OpenProject.

Reduce AWS Billing and Setup Email Alerts

In this tutorial, How to Reduce AWS Billing & Setup Email Alerts.

Setup AWS Billing email alert

You need to login to AWS Console as a Root user

Follow these steps on aws:

Choice “My Billing Dashboard

Create a budget

Choice “Cost budget

Example, My “Budgeted amount” is 15 USD.

Input: Email contacts for Alerts

Final, Create it

Conclusion

You have set up Email Alerts to reduce AWS Billing. I hope will this your helpful. Thank you for reading the DevopsRoles page!

Install Portainer Docker Web GUI on Linux

#Introduction

In this tutorial, How to Install Portainer Docker Web GUI on Linux. Portainer is a web-based management UI for Docker hosts.

Install Portainer Docker

I have installed docker on My computer. First, Create a Docker volume portainer_data

$ docker volume create portainer_data
Or,
$ sudo docker volume create portainer_data

Example:

[root@DockerServer ~]# docker volume create portainer_data
portainer_data
[root@DockerServer ~]# docker volume ls
DRIVER              VOLUME NAME
local               portainer_data

Create a Portainer Docker container.

docker run -d -p 8000:8000 -p 9000:9000 --name=portainer --restart=always -v /var/run/docker.sock:/var/run/docker.sock -v portainer_data:/data portainer/portainer-ce

-d – the container runs in the background
-p 8000: 8000 – Releases the corresponding ports on the host system of Docker
–Name = Portainer – To easily identify the container created for Portainer Docker
–Restart = always – The container is always restarted here.
-v /var/run/docker.sock:/var/run/docker.sock – Specifies that the container is allowed to access the Docker socket storage.
-v portainer_data: / data – Created storage “portainer_data” to the storage folder “/data” within the container.

Example:

[root@DockerServer ~]# docker run -d -p 8000:8000 -p 9000:9000 --name=portainer --restart=always -v /var/run/docker.sock:/var/run/docker.sock -v portainer_data:/data portainer/portainer-ce
Unable to find image 'portainer/portainer-ce:latest' locally
Trying to pull repository docker.io/portainer/portainer-ce ...
latest: Pulling from docker.io/portainer/portainer-ce
94cfa856b2b1: Pull complete
49d59ee0881a: Pull complete
527b866940d5: Pull complete
Digest: sha256:5064d8414091c175c55ef6f8744da1210819388c2136273b4607a629b7d93358
Status: Downloaded newer image for docker.io/portainer/portainer-ce:latest
531acdb49696ad5206043915b157bc63bcd0783149485d17bfdd18993a72535a
[root@DockerServer ~]# docker ps
CONTAINER ID        IMAGE                    COMMAND             CREATED             STATUS              PORTS                                            NAMES
531acdb49696        portainer/portainer-ce   "/portainer"        11 seconds ago      Up 10 seconds       0.0.0.0:8000->8000/tcp, 0.0.0.0:9000->9000/tcp   portainer

Accessing Portainer Docker Web Interface

Check Portainer is running in the background as a container on Docker.

[root@DockerServer ~]# docker ps
CONTAINER ID        IMAGE                    COMMAND             CREATED             STATUS              PORTS                                            NAMES
531acdb49696        portainer/portainer-ce   "/portainer"        11 seconds ago      Up 10 seconds       0.0.0.0:8000->8000/tcp, 0.0.0.0:9000->9000/tcp   portainer

Open a web browser http://192.168.3.6:9000

Create Administrator account

Connect Portainer to the container environment

Web Interface

Conclusion

You have to install Portainer Docker Web GUI on Linux. I hope will this your helpful. Thank you for reading the DevopsRoles page!

Vagrant provision inline: A Step-by-Step Guide for Developers

Introduction

In this tutorial, How to use vagrant provision inline. Use inline to execute on the remote machine. Explore the essentials of inline provisioning with Vagrant in our latest tutorial. This guide provides a practical walkthrough on setting up and configuring virtual environments directly through Vagrant’s inline commands. Perfect for developers and IT professionals, this tutorial simplifies the process of using inline scripts to manage complex configurations, ensuring a seamless and efficient setup for your development projects.

What is Vagrant Inline Provisioning?

Vagrant Inline Provisioning is a method used in Vagrant for automatically configuring and setting up virtual machines. Here’s a simple explanation in English, presented as a bulleted list:

  • Purpose: Automatically configures and sets up virtual machines.
  • Method: Uses simple scripts written directly in the Vagrantfile.
  • Functionality: Allows users to execute shell commands during the virtual machine setup process.
  • Benefits: Streamlines and automates the configuration of development environments efficiently.

Vagrant provision inline example as below


Vagrant.configure("2") do |config|

  config.vm.define :ansible_controller do |ansible_controller|
    ansible_controller.vm.hostname = "ansible"
    ansible_controller.vm.box = "centos/6.5"
    ENV["LC_ALL"] = "en_US.UTF-8"
    config.ssh.insert_key = false
    ansible_controller.vm.network "private_network", ip: "192.168.3.10", :netmask => "255.255.255.0"
    ansible_controller.vm.provision "shell", inline: <<-SHELL
      echo "hello"
      echo "192.168.3.11 centos8" >> /etc/hosts
      groupadd -g 20000 gadmin
      useradd -d /home/huupv -u 9999 -m huupv
      echo -e "huupv\nhuupv\n" |  passwd huupv
      echo "huupv ALL = (root) NOPASSWD:ALL" | tee /etc/sudoers.d/huupv
      chmod 0440 /etc/sudoers.d/huupv
      su - huupv -c "echo |ssh-keygen -t rsa"
      SHELL
  end

  config.vm.define :centos do |centos|
    centos.vm.hostname = "centos8"
    centos.vm.box = "centos/8"
    ENV["LC_ALL"] = "en_US.UTF-8"
    config.ssh.insert_key = false
    centos.vm.network "private_network", ip: "192.168.3.11", :netmask => "255.255.255.0"
    centos.vm.provision "shell", inline: <<-SHELL
      echo "hello"
      groupadd -g 20000 gadmin
      useradd -d /home/huupv -u 9999 -m huupv
      echo -e "huupv\nhuupv\n" |  passwd huupv
      echo "huupv ALL = (root) NOPASSWD:ALL" | tee /etc/sudoers.d/huupv
      chmod 0440 /etc/sudoers.d/huupv
      useradd -m -d /home/user001 -s  /bin/bash   -g gadmin -u 8889  user001; echo -e "user001\nuser001\n"  |  passwd  user001
	  su - huupv -c "mkdir /home/huupv/.ssh"
      su - huupv -c "touch /home/huupv/.ssh/authorized_keys"
      su - huupv -c "chmod 600 /home/huupv/.ssh/authorized_keys"
      su - huupv -c "chmod 700 /home/huupv/.ssh"
    SHELL
  end
  end

Conclusion

You have to use a vagrant inline to execute on the remote machine. Mastering Vagrant’s inline provisioning can significantly streamline your development workflow. We’ve covered the key steps to execute scripts within your Vagrantfile, enhancing your capability to manage and automate your virtual environments. Keep experimenting with different configurations and scripts to fully leverage the power of Vagrant in your projects. I hope will this your helpful. Thank you for reading the DevopsRoles page!

How to git rename branch: A Step-by-Step Guide

Introduction

In this tutorial, How to git rename branch in Git. How to rename both local and remote git branches. Branches are a powerful feature in Git that allows developers to work on multiple features or experiments concurrently.

However, there may be situations where you need to rename a branch for clarity or consistency. In this guide, we’ll walk you through the steps to rename a branch in Git.

How to use git rename branch

Rename a Local Branch in Git

we can find out the local branches.

$ git branch
$ git branch -a # The -a option lists the remote branches.

Check the local Branch

$ git checkout <old-branch-name>
$ git checkout oldbranch

Rename the Local Branch

we have switched to the desired branch. you can rename the local branch as the command follows

$ git branch -m <new-branch-name>
$ git branch -m newbranch

This command changes the name of the local branch oldbranch to newbranch

You can also rename a local branch from inside another git branch

$ git branch -m <old-branch-name> <new-branch-name>
$ git branch -m oldbranch  newbranch

Check the New Branch Name

$ git branch -a

Rename a Remote Branch in Git

  • You need first to rename the local branch
  • push the new branch to the server
  • delete the old branch from your repository.

Step 1. Rename the Local Branch

$ git branch -m newbranch
# or
$ git branch -m oldbranch newbranch

Step 2: Push the Updated Branch

Push the renamed branch newbranch to the remote server

$ git push origin <new-branch-name>
$ git push origin newbranch

Set the Upstream

Set up tracking between the local branch newbranch and the remote branch newbranch.

$ git push origin -u <new-branch-name>
$ git push origin -u newbranch

Step 3: Remove the Old Branch

$ git push origin --delete <old-branch-name>
$ git push origin --delete oldbranch

Conclusion

You have successfully renamed both your local and remote Git branches. Git rename branch is a straightforward process that enhances the clarity and consistency of your project’s branch structure.

It’s important to note that renaming a branch changes only its name without affecting the commit history or the contents of the branch. If other developers are working on this branch, make sure to inform them about the name change to facilitate smooth collaboration.

Thanks to its flexibility and robust branch management features, Git remains a vital tool for version control and collaborative development. For more tips like how to rename a branch, stay tuned.

Thank you for visiting DevOpsRoles!

Mastering the lsof command example:Essential for Linux System Administration

Introduction

lsof command meaning “List open files“. This command will not find CentOS7/RHEL. We will install lsof command example as below:

$ sudo yum install lsof

In the realm of Linux administration, understanding the tools at your disposal is key to effective system management. The lsof command, which stands for “List Open Files”, is an indispensable utility that provides crucial visibility into the system’s file usage. By listing information about files opened by processes, lsof helps administrators manage resources, troubleshoot system issues, and ensure secure operations. This guide aims to demystify the lsof command through practical examples, enhancing your system management toolkit.

Basic Usage

lsof

This will display a list of all open files and the processes that are using them.

lsof command examples

List open files

$ lsof -n

Kill a process running on port 8443

$ lsof -i :8443 | awk '{print $2}' | tail -n 1 | xargs kill
# or
$ lsof -i :8443  | awk 'NR > 1 {print $2}' | xargs --no-run-if-empty kill

Show the 15 Largest Open Files in Linux.

$ lsof / | awk '{ if($7 > 1048576) print $7/1048576 "MB" " " $9 " " $1 }' | sort -n -u | tail -n 15

List User-Specific Opened Files. This will display a list of all open files that are being used by the specified user.

$ lsof -u huupv

Search by PID

$ lsof -p 1

Exclude User with ^ Character

$ lsof -i -u^root

List TCP Port ranges 8000-9000

$ lsof -i TCP:8000-9000

Conclusion

The lsof command is a powerful tool in the Linux administrator’s arsenal, offering deep insights into the system’s interaction with files. From tracking down process-specific files to managing system resources, lsof facilitates a wide range of administrative tasks.

By mastering its usage through the examples provided, you enhance your capabilities in system management, contributing to the overall efficiency and security of your operations. Dive into these examples to leverage lsof effectively, ensuring your Linux systems run smoothly and securely. I hope will this your helpful. Thank you for reading the DevopsRoles page!

Guide to Install Python 3.6 on Centos 6

Introduction

OS Centos 6 is the default Python version 2. How to Install Python 3.6 on Centos 6. Python is a powerful and flexible programming language widely used in various fields such as web development, data science, artificial intelligence, and DevOps. Python 3.6 brings many improvements and new features, enhancing performance and security.

In this article, we will guide you through the process of installing Python 3.6 on CentOS 6, one of the popular Linux operating systems for server environments. This installation will allow you to take full advantage of Python 3.6 in your projects.

Installation packages pre-requisites

sudo yum -y install gcc openssl-devel bzip2-devel wget

How to Install Python 3.6 on Centos 6

cd /tmp/
wget https://www.python.org/ftp/python/3.6.6/Python-3.6.6.tgz
tar xzf Python-3.6.6.tgz
cd Python-3.6.6
./configure --enable-optimizations
sudo make altinstall

Create symbolic link

sudo ln -sfn /usr/local/bin/python3.6 /usr/bin/python3.6

Python verifying new version.

[huupv2@server1 ~]$ python -V
Python 3.6.6

The result is Python 3.6 on Centos 6.

[huupv2@server1 ~]$ cat /etc/redhat-release
CentOS release 6.5 (Final)
[huupv2@server1 ~]$ ll /usr/bin/python*
-rwxr-xr-x 2 root root 4864 Aug 18  2016 /usr/bin/python
lrwxrwxrwx 1 root root    6 Jul 19  2018 /usr/bin/python2 -> python
-rwxr-xr-x 2 root root 4864 Aug 18  2016 /usr/bin/python2.6
lrwxrwxrwx 1 root root    9 Mar  8 13:26 /usr/bin/python3 -> python3.4
-rwxr-xr-x 2 root root 6088 Oct  5  2019 /usr/bin/python3.4
-rwxr-xr-x 2 root root 6088 Oct  5  2019 /usr/bin/python3.4m
lrwxrwxrwx 1 root root   24 Mar  8 14:45 /usr/bin/python3.6 -> /usr/local/bin/python3.6

Configure alias python on .bashrc file

[huupv2@server1 ~]$ cat .bashrc
# .bashrc

# Source global definitions
if [ -f /etc/bashrc ]; then
        . /etc/bashrc
fi

# User specific aliases and functions
alias python='/usr/bin/python3.6'

Check Python version 3.6 on Centos 6

[huupv2@server1 ~]$ python
Python 3.6.6 (default, Mar  8 2021, 14:41:43)
[GCC 4.4.7 20120313 (Red Hat 4.4.7-23)] on linux
Type "help", "copyright", "credits" or "license" for more information.
>>>
[huupv2@server1 ~]$

Conclusion

You have to install Python 3.6 on Centos 6. Installing Python 3.6 on CentOS 6 may present some challenges, but with this detailed guide, you can easily accomplish it. Python 3.6 will open up many new opportunities for your projects, from web application development to data processing and automating DevOps workflows.

We wish you success in installing and leveraging the full potential of Python 3.6 on CentOS 6. If you encounter any difficulties, don’t hesitate to contact us or refer to community support resources. I hope will this your helpful. Thank you for reading the DevopsRoles page!

Docker Container Essentials: A Comprehensive Handbook for Efficient Application Deployment

Introduction

You will be learning about container manipulation basics in detail. Container manipulation you will be performing every single day. You can visit the official refer here for the Docker command Line. Now, We write a Docker container handbook.

What is a docker container?

its core is a self-contained and lightweight entity that wraps up an application along with all its dependencies. This encapsulation ensures that the application runs consistently across different computing environments. It operates on the principle of containerization, with Docker being a widely used platform for implementing this concept.

One of the key advantages of Docker containers lies in their portability. Applications packaged within containers can seamlessly transition between development, testing, and production environments. This consistent behavior across various platforms simplifies the deployment process and minimizes compatibility challenges.

Containers leverage the host system’s kernel, resulting in efficiency gains by sharing resources and enabling quick startup times. These containers are built from images, which are compact and versioned packages containing the application and its required components. Docker containers are not just isolated units; they also facilitate streamlined software development, testing, and deployment processes.

Run a Container

The syntax of this command is below for version 1.13:

docker run <image name>

In the new version, The syntax of this command is as below:

docker <object> <command> <options>

In this syntax:

  • object can be a container, image, network, or volume object.
  • command is the run command.
  • options can be any valid parameter that can override the default behavior of the command. example, –publish option for port mapping.

Now, for this syntax, the run command is as follows:

docker container run <image name>

The “image name” can be any image from an online registry or your local system.

For example, To run a container using the image as my terminal below:

docker container run --publish 8080:80 nginx

Publish a Port

The host system doesn’t know inside a container. How to outside access inside a container. The syntax, The Publish a port a container.

--publish <host port>:<container port>

Use Detached Mode

To a container running in the background, you can use the –detach option with the run command.

docker container run --detach --publish 8080:80 nginx

List Containers

You will list out containers that are currently running.

docker container ls

List all out containers.

docker container ls --all

Stop or Kill a Running Container

The syntax Stop or kill a Container

docker container stop <container identifier>
docker container kill <container identifier>
  • <container identifier>: can either be the id or the name of the container.

How to restart a Container

Restarting a container that has been previously stopped or killed

docker container start <container identifier>

Rebooting a running container.

docker container restart <container identifier>

Rename a Container

By default, every container has two identifiers

  • CONTAINER ID
  • NAME

Using the –name option defined Naming a container

docker container run --detach --publish 8888:80 --name nginx-container nginx

The syntax renames a container

docker container rename <container identifier> <new name>

Remove Dangling Containers

Find out containers are not running, use the command “docker container ls –all

The syntax removes Dangling Containers

docker container rm <container identifier>

Execute Commands Inside a Container

docker run name-of-image uname -a

In conclusion, the Docker container handbook provides a comprehensive understanding of the principles and benefits of containerization. I trust that this resource proves to be valuable for your endeavors in deploying and managing applications using Docker containers. The versatility, consistency, and efficiency offered by containerization, as highlighted in the handbook, are crucial aspects that enhance the software development and deployment lifecycle. If you have any further questions or seek additional insights, feel free to explore more on the DevopsRoles page! Thank you for taking the time to read and engage with the content. Best of luck with your Docker container journey in the realm of DevOps!

JIRA installing and configure on CentOS

Introduction

How to install and configure jira on Centos. Installing and configuring JIRA on CentOS involves a series of systematic steps to set up this popular project management tool effectively. Begin by preparing your CentOS system with the necessary prerequisites, including Java. Then, download and install the JIRA software from Atlassian’s official site. Configuration involves setting up a database, typically PostgreSQL or MySQL, and adjusting the JIRA setup wizard to connect to your newly prepared database. This process ensures that JIRA runs smoothly on CentOS, providing a robust platform for managing your projects. Now, let’s proceed with the JIRA installation and configuration on CentOS.

JIRA installing

Install Java

[vagrant@DevopsRoles ~]$ sudo yum install java-1.8.0-openjdk*

Install MySQL on Centos 7

Link refers to installing MySQL here.

Create a user for installation jira.

[vagrant@DevopsRoles ~]$ sudo useradd jira
[vagrant@DevopsRoles ~]$ sudo passwd jira
[vagrant@DevopsRoles ~]$ echo "jira ALL=(ALL) NOPASSWD:ALL" | sudo tee -a /etc/sudoers
[vagrant@DevopsRoles ~]$ su -l jira
Password:
[jira@DevopsRoles ~]$

Create a temporary install directory:

[jira@DevopsRoles ~]$ mkdir jira && cd jira

Download jira

Link download here:

[jira@DevopsRoles jira]$ wget https://product-downloads.atlassian.com/software/jira/downloads/atlassian-jira-software-8.13.4-x64.bin
[jira@DevopsRoles jira]$ ls -l
total 399948
-rw-rw-r--. 1 jira jira 409545222 Feb 15 11:02 atlassian-jira-software-8.13.4-x64.bin
[jira@DevopsRoles jira]$ chmod u+x atlassian-jira-software-8.13.4-x64.bin
[jira@DevopsRoles jira]$ ./atlassian-jira-software-8.13.4-x64.bin

The result is as follows:

[jira@DevopsRoles jira]$ ./atlassian-jira-software-8.13.4-x64.bin
Unpacking JRE ...
Starting Installer ...
You do not have administrator rights to this machine and as such, some installation options will not be available. Are you sure you want to continue?
Yes [y, Enter], No [n]
y

This will install Jira Software 8.13.4 on your computer.
OK [o, Enter], Cancel [c]
o
Click Next to continue, or Cancel to exit Setup.

Choose the appropriate installation or upgrade option.
Please choose one of the following:
Express Install (use default settings) [1], Custom Install (recommended for advanced users) [2, Enter], Upgrade an existing Jira installation [3]
1

Details on where Jira Software will be installed and the settings that will be used.
Installation Directory: /home/jira/atlassian/jira
Home Directory: /home/jira/atlassian/application-data/jira
HTTP Port: 8080
RMI Port: 8005
Install as service: No
Install [i, Enter], Exit [e]
i

Extracting files ...


Please wait a few moments while Jira Software is configured.

Installation of Jira Software 8.13.4 is complete
Start Jira Software 8.13.4 now?
Yes [y, Enter], No [n]
y

Please wait a few moments while Jira Software starts up.
Launching Jira Software ...

Installation of Jira Software 8.13.4 is complete
Your installation of Jira Software 8.13.4 is now ready and can be accessed
via your browser.
Jira Software 8.13.4 can be accessed at http://localhost:8080
Finishing installation ...
[jira@DevopsRoles jira]$

JIRA’s directory structure looks like this:

[jira@DevopsRoles jira]$ cd ../
[jira@DevopsRoles ~]$ ls -l
total 0
drwxrwxr-x. 4 jira jira 42 Feb 22 14:19 atlassian
drwxrwxr-x. 2 jira jira 52 Feb 22 14:20 jira
[jira@DevopsRoles ~]$ tree -d -L 3 atlassian/
atlassian/
├── application-data
│   └── jira
│       ├── caches
│       ├── data
│       ├── export
│       ├── import
│       ├── log
│       ├── plugins
│       └── tmp
└── jira
    ├── atlassian-jira
    │   ├── aui-examples
    │   ├── decorators
    │   ├── func
    │   ├── images
    │   ├── includes
    │   ├── META-INF
    │   ├── portlets
    │   ├── secure
    │   ├── static
    │   ├── static-assets
    │   ├── styles
    │   ├── template
    │   ├── templates
    │   ├── ui
    │   ├── views
    │   └── WEB-INF
    ├── bin
    ├── conf
    │   └── Catalina
    ├── external-source
    ├── jre
    │   ├── bin
    │   ├── lib
    │   └── man
    ├── lib
    ├── licenses
    ├── logs
    ├── temp
    ├── tomcat-docs
    ├── webapps
    └── work
        └── Catalina

43 directories
[jira@DevopsRoles ~]$

Go to JIRA Installation Directory:

[jira@DevopsRoles ~]$ cd ~/atlassian/jira/
[jira@DevopsRoles jira]$ sudo ./bin/start-jira.sh

start-jira.sh and stop-jira.sh in folder bin

Check JIRA should already be running.

[jira@DevopsRoles jira]$ ps ux | grep jira | grep java | grep -v grep
jira      3184 10.8 24.0 4971344 358732 pts/0  Sl   14:20   0:29 /home/jira/atlassian/jira/jre//bin/java -Djava.util.logging.config.file=/home/jira/atlassian/jira/conf/logging.properties -Djava.util.logging.manager=org.apache.juli.ClassLoaderLogManager -Xms384m -Xmx2048m -XX:InitialCodeCacheSize=32m -XX:ReservedCodeCacheSize=512m -Djava.awt.headless=true -Datlassian.standalone=JIRA -Dorg.apache.jasper.runtime.BodyContentImpl.LIMIT_BUFFER=true -Dmail.mime.decodeparameters=true -Dorg.dom4j.factory=com.atlassian.core.xml.InterningDocumentFactory -XX:-OmitStackTraceInFastThrow -Djava.locale.providers=COMPAT -Datlassian.plugins.startup.options= -Djdk.tls.ephemeralDHKeySize=2048 -Djava.protocol.handler.pkgs=org.apache.catalina.webresources -Dorg.apache.catalina.security.SecurityListener.UMASK=0027 -Xloggc:/home/jira/atlassian/jira/logs/atlassian-jira-gc-%t.log -XX:+UseGCLogFileRotation -XX:NumberOfGCLogFiles=5 -XX:GCLogFileSize=20M -XX:+PrintGCDetails -XX:+PrintGCDateStamps -XX:+PrintGCTimeStamps -XX:+PrintGCCause -XX:+ExplicitGCInvokesConcurrent -Dignore.endorsed.dirs= -classpath /home/jira/atlassian/jira/bin/bootstrap.jar:/home/jira/atlassian/jira/bin/tomcat-juli.jar -Dcatalina.base=/home/jira/atlassian/jira -Dcatalina.home=/home/jira/atlassian/jira -Djava.io.tmpdir=/home/jira/atlassian/jira/temp org.apache.catalina.startup.Bootstrap start

[vagrant@DevopsRoles ~]$ sudo netstat -nplt | grep 8080
tcp6       0      0 :::8080                 :::*                    LISTEN      3184/java

Create user MySQL

mysql -u root -p 
mysql> CREATE DATABASE jiradb CHARACTER SET utf8 COLLATE utf8_bin;
mysql> CREATE USER 'jiradb'@'localhost' IDENTIFIED BY 'Abc123!@#';
mysql> GRANT ALL PRIVILEGES ON jiradb.* TO 'jiradb'@'localhost' WITH GRANT OPTION;

we need a JDBC connector driver for MySQL

[jira@DevopsRoles ~]$ cd && mkdir tmp
[jira@DevopsRoles ~]$ cd tmp/
[jira@DevopsRoles tmp]$ wget http://dev.mysql.com/get/Downloads/Connector-J/mysql-connector-java-5.1.29.tar.gz
[jira@DevopsRoles tmp]$ tar xfp mysql-connector-java-5.1.29.tar.gz
[jira@DevopsRoles tmp]$ find mysql-connector-java-5.1.29 -name "mysql-connector-java-*-bin.jar"
mysql-connector-java-5.1.29/mysql-connector-java-5.1.29-bin.jar
[jira@DevopsRoles tmp]$ cp mysql-connector-java-5.1.29/mysql-connector-java-5.1.29-bin.jar ~/atlassian/jira/lib/
[jira@DevopsRoles tmp]$ cd

Restart JIRA

$ sudo ./atlassian/jira/bin/stop-jira.sh
$ sudo ./atlassian/jira/bin/start-jira.sh

Access Browser Jira

Conclusion

JIRA installing and configuring on CentOS. I hope will this your helpful. Thank you for reading the DevopsRoles page!

How to auto create a large csv file with powershell/plsql

Introduction

Creating large CSV files can be a tedious task, especially when dealing with significant amounts of data. PowerShell and PL/SQL offer robust solutions to automate this process, ensuring efficiency and accuracy. In this article, we will explore How to auto create a large csv file with Powershell and plsql, from basic to advanced techniques.

Understanding CSV Files

What is a CSV File?

CSV (Comma-Separated Values) files are plain text files that store tabular data. Each line in the file corresponds to a row in the table, and each value is separated by a comma. These files are widely used for data exchange between systems due to their simplicity and ease of use.

Why Use PowerShell and PL/SQL for CSV Creation?

PowerShell is a task automation and configuration management framework from Microsoft, while PL/SQL is Oracle’s procedural extension for SQL. Both tools offer scripting capabilities that make it easy to automate data handling tasks, including the creation of large CSV files.

Basic Example: Creating a CSV File with PowerShell

Installing PowerShell

PowerShell comes pre-installed on Windows systems. However, if you need the latest version, you can download it from the official PowerShell GitHub page.

Writing a Basic PowerShell Script

Here’s a simple PowerShell script to create a basic CSV file:

# Define the file path
$filePath = "C:\temp\example.csv"

# Create an array of data
$data = @(
[PSCustomObject]@{Name="John"; Age=30; City="New York"},
[PSCustomObject]@{Name="Jane"; Age=25; City="Los Angeles"},
[PSCustomObject]@{Name="Doe"; Age=35; City="Chicago"}
)

# Export the data to a CSV file
$data | Export-Csv -Path $filePath -NoTypeInformation

This script creates a CSV file named example.csv with three rows of sample data.

Running the PowerShell Script

To run the script, save it as CreateCSV.ps1 and execute it in PowerShell:

.\CreateCSV.ps1

Intermediate Example: Adding More Data and Automation

Generating Large Data Sets

To create a larger CSV file, you can generate data programmatically. Here’s an example that generates 10,000 rows of sample data:

# Define the file path
$filePath = "C:\temp\large_example.csv"

# Initialize an array to hold the data
$data = @()

# Generate 10,000 rows of data
for ($i = 1; $i -le 10000; $i++) {
$data += [PSCustomObject]@{Name="User_$i"; Age=(Get-Random -Minimum 20 -Maximum 60); City="City_$i"}
}

# Export the data to a CSV file
$data | Export-Csv -Path $filePath -NoTypeInformation

This script generates a CSV file with 10,000 rows, each containing a unique user name, a random age, and a city.

Scheduling the Script

To automate the execution of your PowerShell script, you can use Task Scheduler on Windows:

  1. Open Task Scheduler.
  2. Create a new task.
  3. Set the trigger (e.g., daily at a specific time).
  4. Set the action to start a program and browse to powershell.exe.
  5. Add arguments: -File "C:\path\to\CreateCSV.ps1"

Advanced Example: Creating Extremely Large CSV Files with PowerShell

To create a large CSV data test using PowerShell:

# Define the count of rows
$count = 9999999999999

# Create a large CSV file
for ($i = 1; $i -le $count; $i++) {
$line = $i.ToString() + "," + "Thora,Temple,2013-05-26 14:47:57"
Add-Content -Path "C:\Users\Hieu\actor_202102111552.csv" -Value $line
}

This script generates a CSV file with a very large number of rows, each containing sequential data.

Advanced Example: Using PL/SQL to Create a Large CSV File

Setting Up Oracle Database

Ensure you have access to an Oracle database and the necessary permissions to create and execute PL/SQL scripts.

Writing a Basic PL/SQL Script

Here’s a basic PL/SQL script to create a CSV file:

DECLARE
fileHandler UTL_FILE.FILE_TYPE;
BEGIN
fileHandler := UTL_FILE.FOPEN('CSV_DIR', 'example.csv', 'W');
UTL_FILE.PUT_LINE(fileHandler, 'Name, Age, City');
UTL_FILE.PUT_LINE(fileHandler, 'John, 30, New York');
UTL_FILE.PUT_LINE(fileHandler, 'Jane, 25, Los Angeles');
UTL_FILE.PUT_LINE(fileHandler, 'Doe, 35, Chicago');
UTL_FILE.FCLOSE(fileHandler);
END;
/

This script creates a CSV file named example.csv in the directory CSV_DIR.

Generating Large Data Sets in PL/SQL

To create a larger CSV file with dynamically generated data:

DECLARE
fileHandler UTL_FILE.FILE_TYPE;
i NUMBER;
BEGIN
fileHandler := UTL_FILE.FOPEN('CSV_DIR', 'large_example.csv', 'W');
UTL_FILE.PUT_LINE(fileHandler, 'Name, Age, City');

FOR i IN 1..10000 LOOP
UTL_FILE.PUT_LINE(fileHandler, 'User_' || i || ', ' || TRUNC(DBMS_RANDOM.VALUE(20, 60)) || ', City_' || i);
END LOOP;

UTL_FILE.FCLOSE(fileHandler);
END;
/

This script generates a CSV file with 10,000 rows, similar to the PowerShell example.

Creating Extremely Large Data Sets in PL/SQL

To create a large data test using PL/SQL:

CREATE OR REPLACE FUNCTION public.insertTable() RETURNS void AS $$
DECLARE
BEGIN
FOR counter IN 1..922337203 LOOP
INSERT INTO public.actor
(first_name, last_name, last_update)
VALUES ('Penelope', 'Guiness', now());
END LOOP;
END;
$$ LANGUAGE plpgsql;

This script inserts a very large number of rows into the public.actor table.

Scheduling the PL/SQL Script

You can use Oracle’s DBMS_SCHEDULER to schedule the execution of your PL/SQL script:

BEGIN
DBMS_SCHEDULER.CREATE_JOB (
job_name => 'CREATE_CSV_JOB',
job_type => 'PLSQL_BLOCK',
job_action => 'BEGIN
fileHandler := UTL_FILE.FOPEN(''CSV_DIR'', ''large_example.csv'', ''W'');
UTL_FILE.PUT_LINE(fileHandler, ''Name, Age, City'');
FOR i IN 1..10000 LOOP
UTL_FILE.PUT_LINE(fileHandler, ''User_'' || i || '', '' || TRUNC(DBMS_RANDOM.VALUE(20, 60)) || '', City_'' || i);
END LOOP;
UTL_FILE.FCLOSE(fileHandler);
END;',
start_date => SYSTIMESTAMP,
repeat_interval => 'FREQ=DAILY; BYHOUR=2; BYMINUTE=0; BYSECOND=0',
enabled => TRUE
);
END;
/

This script schedules the PL/SQL block to run daily at 2:00 AM.

FAQs

What is the best way to handle large CSV files?

Using automation tools like PowerShell and PL/SQL can efficiently handle large CSV files, minimizing manual effort and reducing errors.

How can I optimize the performance of my CSV creation scripts?

Ensure your scripts are optimized by minimizing loops, using bulk operations, and avoiding unnecessary computations. For extremely large files, consider breaking them into smaller chunks.

Can I automate CSV file creation on a schedule?

Yes, both PowerShell and PL/SQL scripts can be scheduled using Task Scheduler on Windows or DBMS_SCHEDULER in Oracle, respectively.

What are some common issues with large CSV files?

Common issues include file size limitations, performance bottlenecks, and data consistency. Using robust scripting and automation can help mitigate these problems.

How do I handle special characters in CSV files?

Ensure your scripts correctly handle special characters by escaping them as needed and using appropriate encoding formats like UTF-8.

Conclusion

auto create a large csv file with Powershell and plsql can be a straightforward process with the right tools and techniques. PowerShell and PL/SQL offer powerful scripting capabilities to automate this task efficiently. By following the examples and tips provided in this guide, you can streamline your CSV file creation process, saving time and reducing errors. Thank you for reading the DevopsRoles page!

Devops Tutorial

Exit mobile version