In this tutorial, How to Deploy MongoDB as a Docker container. MongoDB is a source-available cross-platform document-oriented database program. Classified as a NoSQL database program, MongoDB uses JSON-like documents with optional schemas.
In today’s world of modern application development, containerization has become a popular approach for deploying and managing applications.
You need to verify the deployment as command below:
docker ps -a
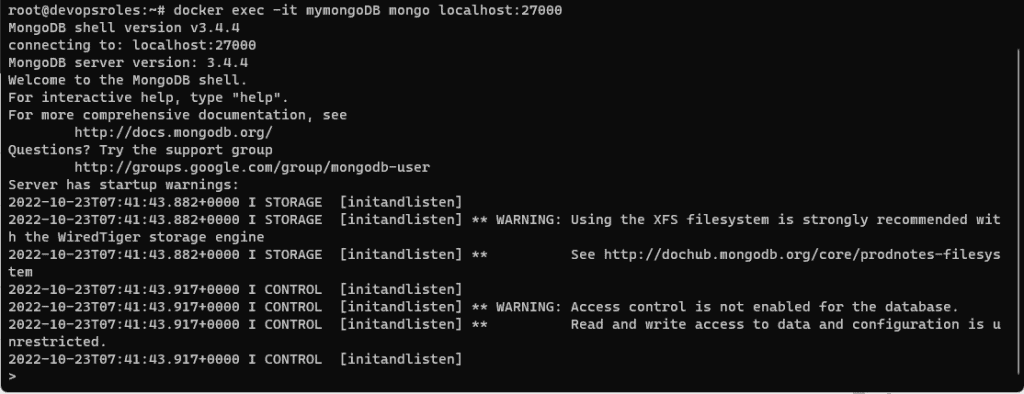
The container is running, How to access it?
docker exec -it mymongoDB mongo localhost:27000
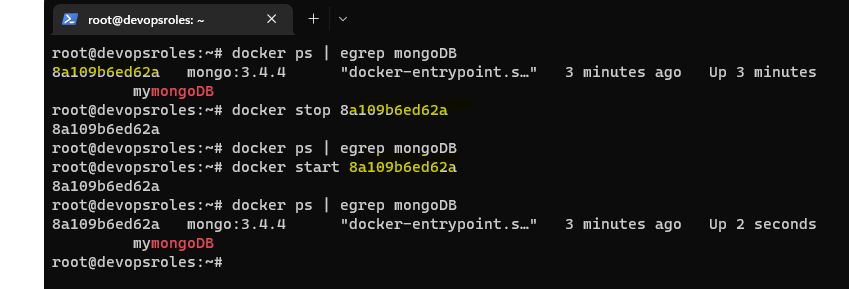
If you need to stop the MongoDB container.
docker stop ID
If you need to start the MongoDB container.
docker start ID
Conclusion
You have successfully deployed MongoDB as a Docker container. This approach offers flexibility, scalability, and portability for your MongoDB deployments. With containerization, you can easily manage your database infrastructure and ensure consistency across different environments. I hope this will be helpful. Thank you for reading the DevopsRoles page!
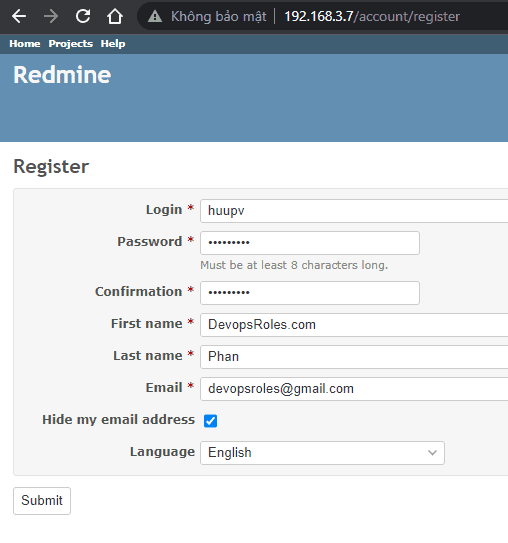
In this tutorial, How to Deploy Redmine Project Management using Docker Compose. Redmine is an Open Source project management you can install on your LAN or Cloud host.
In this tutorial, How to install Gitea repository in Ubuntu.
Understanding Gitea
Gitea is a web-based Git repository management tool, similar to GitHub, GitLab, and Bitbucket. It is a self-hosted, open-source software that allows developers to create and manage Git repositories, as well as collaborate with others on software development projects.
With Gitea, you can create your own private Git repositories, manage access control and permissions for users and teams, and track issues and bugs with an integrated issue tracker. It also supports pull requests, code reviews, and continuous integration and deployment with built-in integrations for popular tools like Jenkins and Travis CI.
It is written in Go, and it’s lightweight and easy to set up and run.
Why Choose Gitea?
Lightweight: Gitea is very resource-efficient.
Open Source: It is free to use and modify.
Feature-Rich: Offers essential Git features along with additional tools like issue tracking and code review.
Easy to Install: The setup process is straightforward, making it accessible even for beginners.
Prerequisites
Before you begin, ensure you have the following:
An Ubuntu server instance with sudo privileges.
A basic understanding of terminal commands.
Install Gitea repository in Ubuntu
Install the necessary dependencies
sudo apt-get install wget get mariadb-server -y
After the installation, secure the database server as command below:
sudo mysql_secure_installation
Create a database and user
Log in to the database console as below:
sudo mysql -u root -p
Create the database
CREATE DATABASE gitea;
GRANT ALL PRIVILEGES ON gitea.* TO 'gitea'@'localhost' IDENTIFIED BY "your_password";
FLUSH PRIVILEGES;
exit
In this tutorial, How to Set A Memory Limit For Docker Containers. Docker container defaults to running without any resource constraints.
In production, each container will set a memory limit to prevent runaway resource consumption.
How to Set A Memory Limit For Docker Containers
You set hard and soft memory limits on individual containers.
Hard memory limits
Hard limit on virtual memory, any worker exceeding the limit will be immediately killed without waiting for the end of the current request processing.
Soft memory limits
Maximum allowed virtual memory per worker.
How to setting hard memory limits
Set by docker run command with “-m” or “–memory” flag. For example, set value 2g
$ docker run --memory=2g devopsroles-app:latest
How to setting soft memory limits
Soft memory limits are set with the “–memory-reservation” flag. For example, set the value to 512m of reserved memory. It will always stop if usage exceeds 512MB.
$ docker run --memory=512m --memory-reservation=256m devopsroles:latest
setting Swap Memory
The “--memory-swap" flag controls the amount of swap space available in conjunction with the “–memory” flag. For example, Container has access to 1000MB of memory of which 512MB is physical RAM. The remaining 488MB is swap space stored on disk.
$ docker run --memory=512m --memory-swap=1000m devopsroles:latest
How to disable Out-Of-Memory process skills.
The result in the container stopping with the error code is 137. Use “–oom-kill-disable” with your docker run command to disable this behavior.
Conclusion
You have Set A Memory Limit For Docker Containers. I hope this will your helpful. Thank you for reading the DevopsRoles page!
How to Find large files Linux. To find large files in Linux, you can use the find command along with the du (disk usage) command.
In this blog post, we will explore a simple yet powerful method to identify and locate large files in Linux using the command line.
Use find command line
The find command line can use to search any files inside a Linux Filesystem.
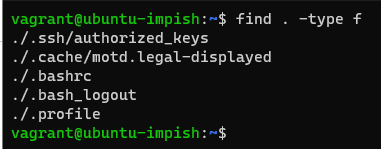
Find the command line inside your current working directory as the command below:
find . -type f
Filter with a minimum size of 10MB
find . -type f -size +10M
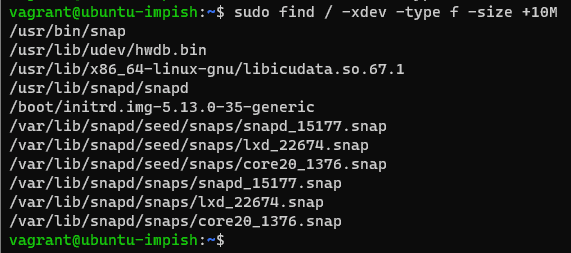
To search the entire filesystem to find the largest file.
sudo find / -xdev -type f -size +10M
Note: “-xdev flag” won’t scan other mounted filesystems in your Linux Server.
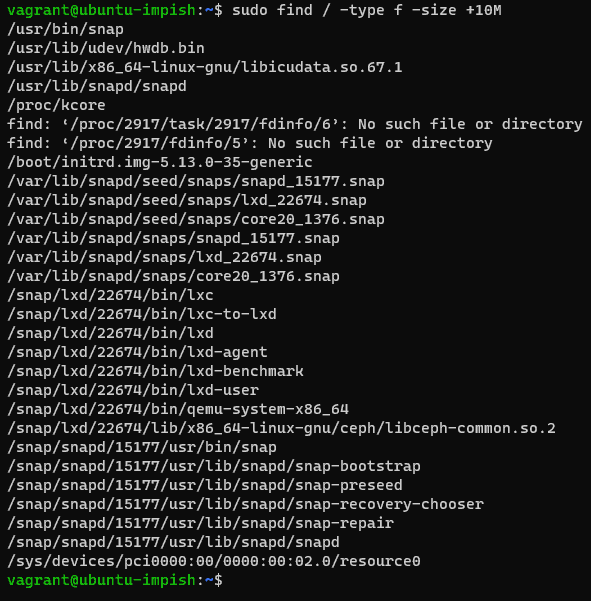
To scan all the mounted drives along with your primary filesystem
sudo find / -type f -size +10M
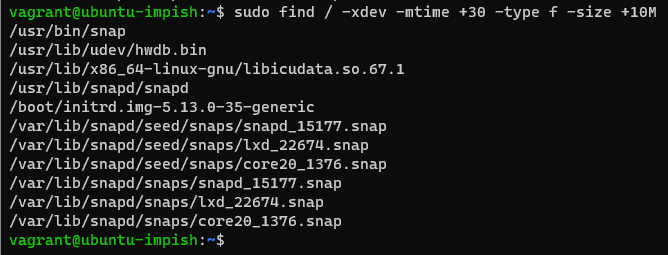
Find Large Unused Files: These have not been modified for more than 30 days and have a file size of at least 10 MB.
sudo find / -xdev -mtime +30 -type f -size +10M
Use the du command line
the du command to estimate file sizes in Linux. And how to find large files in Linux
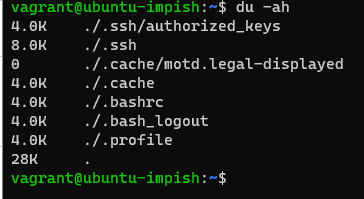
List the files along with directory sizes recursively
du -ah
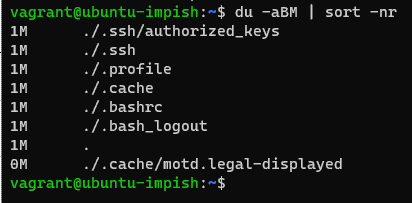
combined with the command sort command to sort the files in descending order. use the blocksize operator -B along with a unit of your choice. If you want to convert the sizes in MB, use unit M as a block size.
du -aBM | sort -nr
To find the largest 15 files in your entire filesystem
du / -aBM | sort -nr | head -n 15
Linux combines find and du command
find /path/to/directory -type f -size +100M -exec du -sh {} \; 2>/dev/null | sort -rh | head -n 10
Let’s break it down:
find /path/to/directory: Replace /path/to/directory with the actual directory path where you want to start the search for large files.
-type f: Specifies that you’re looking for regular files.
-size +100M: Filters files that are larger than 100 megabytes. Adjust this value as per your requirements.
-exec du -sh {} \;: Executes the du -sh command on each found file to display its size in a human-readable format.
2>/dev/null: Redirects any error messages to /dev/null to suppress them.
sort -rh: Sorts the output in a reverse human-readable format to display the largest files first.
head -n 10: Displays only the first 10 lines of the output, which will be the largest files.
Conclusion
Effectively managing disk space is crucial for maintaining system performance and organization. With the find command in Linux, locating large files becomes a straightforward process. By following the steps outlined in this blog post, you can easily identify and manage large files, reclaiming valuable disk space on your Linux system.
You have to find large files in Linux. I hope will this your helpful. Thank you for reading the DevopsRoles page!
This tutorial is all about using bash create file in Linux in the terminal. Guess what? It’s super easy! Bash has this neat and efficient command called “touch” that makes creating files a breeze. So, let’s dive in and discover how to use the touch command to create new files in Bash.
Alright, so what’s the deal with this “touch” command? Well, it’s like a magic wand for your terminal. With just a simple touch command, you can conjure up new files effortlessly. No need to go through complicated steps – Bash keeps it straightforward. In this tutorial, we’re going to break down the touch command and explore how it turns your terminal into a file-creating wizard.
Creating files in Bash doesn’t have to be a puzzle. With the trusty touch command, you’ll be crafting files like a pro in no time. This tutorial is your guide to mastering the art of file creation in Bash, so get ready to unleash the power of the touch command and make your terminal work wonders!
How to use Bash to create a file
Bash create file: A Guide to Using the Touch Command
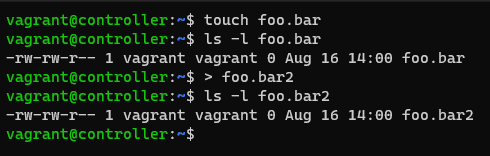
The touch command to create an empty text file with foo.txt
The touch command in Bash is primarily used to update the access and modification timestamps of files. However, it can also be used to create a new file if it doesn’t already exist.
To create a new file using the touch command, follow this syntax:
$ touch foo.bar
$ > foo.bar
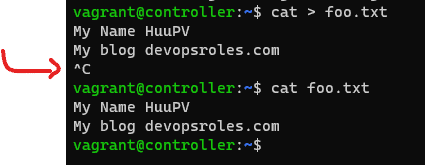
To make a text file using the cat command line on Linux. press ctrl+c to quit and save the file.
$ cat > foo.txt
shell command
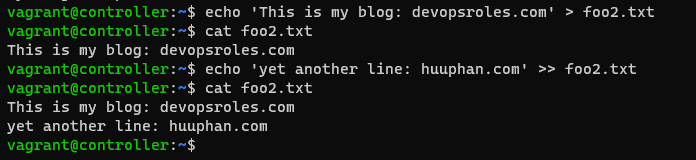
$ echo 'This is my blog: devopsroles.com' > foo.txt
Append text to an existing file
$ echo 'yet another line: huuphan.com' >> foo.txt
To create a text file, you can use the vi or vim commands in your terminal. These tools are powerful editors for crafting text documents. Simply type vi or vim followed by the desired filename and press Enter. This will open an editor where you can write and edit your text. To begin typing, press i to enter insert mode. When you’re finished, press the Esc key to exit insert mode.
To save your work, type :w and press Enter. To close the editor, type :q, or you can save and exit at the same time by typing :wq. With these simple steps, you’ve successfully created your text file!
Conclusion
You have to use the Bash create file command terminal. Creating a new file in Bash is a straightforward process with the help of the touch command. Its simplicity and efficiency make it a popular choice for generating empty files. By using the touch command and providing the desired filename, you can quickly create new files in your Bash scripts or command-line operations. I hope will this your helpful. Thank you for reading the DevopsRoles page!
In this tutorial, you’ll learn how to password protect files on Linux to ensure they remain secure from unauthorized access. Various methods are available for this purpose, each providing different levels of security. Here are a few techniques to help you safeguard your files and folders with strong passwords.
Using tools like zip and gpg, you can encrypt your files effectively. zip allows you to compress and password protect files, while gpg offers robust encryption options. Both methods are straightforward and enhance the security of your sensitive data on Linux systems.
How to Password Protect Files on Linux
Encrypt a File with GnuPG
I use gpg command to encrypt a file. GnuPG is a free Linux program that supports multiple encryptions for file encryption.
1. Open the terminal
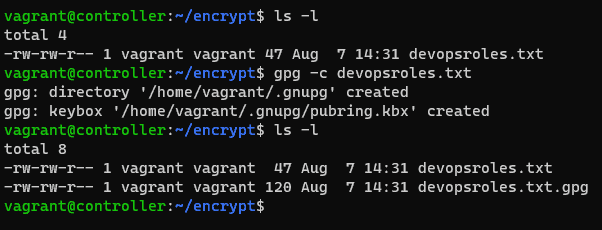
2. Run the following command line to encrypt your file.
gpg -c your_file
GnuPG will create an encrypted file with .gpg extension in your current working folder.
The result is the picture below:
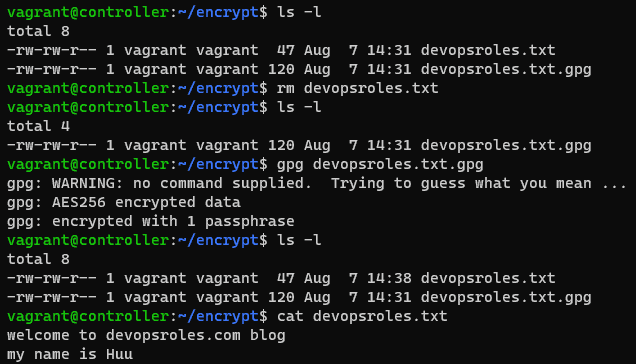
To access it, you’ll need to decrypt it. For this, run the following command
gpg your_file.gpg
The result is the picture below:
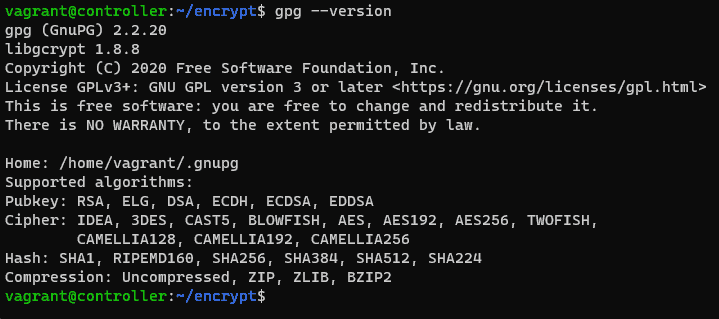
other encryption algorithms, first, check the supported ones by running:
For example, you specify the desired algorithm as a command below
gpg -c --cipher-algo algorithm_name your_file
using the zip command to Encrypt a File
the zip command is another CLI utility that password-protect files on Linux. it is pre-installed on all Linux distros.
zip --password your_password archive_file.zip file1 file2
you replace your_passowrd with the password you want to use to encrypt the archive.
Unzip the archive and enter your password. you can run the command below:
unzip archive_file.zip
Encrypt a File Using mcrypt
list out all the supported encryption algorithms
mcrypt --list
encrypt filename
mcrypt -a algorithm_name filename
If you wish to open this file, you’ll need to decrypt it as the command below:
mcrypt -d filename.nc
Conclusion
By following this tutorial, you now know how to password protect files on Linux, enhancing your data security. Always choose a strong, unique password when prompted and consider using a password manager to keep your passwords safe and easily accessible. Implementing these methods helps prevent unauthorized access and ensures your sensitive information remains protected. Thank you for reading the DevopsRoles page and I hope you found this information helpful. Stay secure!
In this tutorial, How to fix the Ubuntu repository no longer has a Release.
Ubuntu, a widely used Linux distribution, relies on repositories to provide software packages and updates. Occasionally, you might encounter the error message “Ubuntu repository no longer has a release,” indicating that the repository you’re trying to access is unavailable or unsupported. This article delves into the reasons behind this issue and offers potential solutions to address it effectively.
Today, I am installing Nginx, But suddenly one day you use this command and get the following error:
vagrant@controller:~$ sudo apt install nginx -y
Reading package lists... Done
Building dependency tree... Done
Reading state information... Done
The following additional packages will be installed:
  libnginx-mod-http-geoip2 libnginx-mod-http-image-filter libnginx-mod-http-xslt-filter libnginx-mod-mail
  libnginx-mod-stream libnginx-mod-stream-geoip2 nginx-common nginx-core
Suggested packages:
  fcgiwrap nginx-doc ssl-cert
The following NEW packages will be installed:
  libnginx-mod-http-geoip2 libnginx-mod-http-image-filter libnginx-mod-http-xslt-filter libnginx-mod-mail
  libnginx-mod-stream libnginx-mod-stream-geoip2 nginx nginx-common nginx-core
0 upgraded, 9 newly installed, 0 to remove and 0 not upgraded.
Need to get 700 kB of archives.
After this operation, 2386 kB of additional disk space will be used.
Ign:1 http://archive.ubuntu.com/ubuntu impish-updates/main amd64 nginx-common all 1.18.0-6ubuntu11.1
Ign:2 http://archive.ubuntu.com/ubuntu impish-updates/main amd64 libnginx-mod-http-geoip2 amd64 1.18.0-6ubuntu11.1
Ign:3 http://archive.ubuntu.com/ubuntu impish-updates/main amd64 libnginx-mod-http-image-filter amd64 1.18.0-6ubuntu11.1Ign:4 http://archive.ubuntu.com/ubuntu impish-updates/main amd64 libnginx-mod-http-xslt-filter amd64 1.18.0-6ubuntu11.1
Ign:5 http://archive.ubuntu.com/ubuntu impish-updates/main amd64 libnginx-mod-mail amd64 1.18.0-6ubuntu11.1
Ign:6 http://archive.ubuntu.com/ubuntu impish-updates/main amd64 libnginx-mod-stream amd64 1.18.0-6ubuntu11.1
Ign:7 http://archive.ubuntu.com/ubuntu impish-updates/main amd64 libnginx-mod-stream-geoip2 amd64 1.18.0-6ubuntu11.1
Ign:8 http://archive.ubuntu.com/ubuntu impish-updates/main amd64 nginx-core amd64 1.18.0-6ubuntu11.1
Ign:9 http://archive.ubuntu.com/ubuntu impish-updates/main amd64 nginx amd64 1.18.0-6ubuntu11.1
Err:1 http://security.ubuntu.com/ubuntu impish-updates/main amd64 nginx-common all 1.18.0-6ubuntu11.1
  404  Not Found [IP: 91.189.91.39 80]
Err:2 http://security.ubuntu.com/ubuntu impish-updates/main amd64 libnginx-mod-http-geoip2 amd64 1.18.0-6ubuntu11.1
  404  Not Found [IP: 91.189.91.39 80]
Err:3 http://security.ubuntu.com/ubuntu impish-updates/main amd64 libnginx-mod-http-image-filter amd64 1.18.0-6ubuntu11.1
  404  Not Found [IP: 91.189.91.39 80]
Err:4 http://security.ubuntu.com/ubuntu impish-updates/main amd64 libnginx-mod-http-xslt-filter amd64 1.18.0-6ubuntu11.1  404  Not Found [IP: 91.189.91.39 80]
Err:5 http://security.ubuntu.com/ubuntu impish-updates/main amd64 libnginx-mod-mail amd64 1.18.0-6ubuntu11.1
  404  Not Found [IP: 91.189.91.39 80]
Err:6 http://security.ubuntu.com/ubuntu impish-updates/main amd64 libnginx-mod-stream amd64 1.18.0-6ubuntu11.1
  404  Not Found [IP: 91.189.91.39 80]
  404  Not Found [IP: 91.189.91.39 80]
Err:9 http://security.ubuntu.com/ubuntu impish-updates/main amd64 nginx amd64 1.18.0-6ubuntu11.1
  404  Not Found [IP: 91.189.91.39 80]
E: Failed to fetch http://security.ubuntu.com/ubuntu/pool/main/n/nginx/nginx-common_1.18.0-6ubuntu11.1_all.deb  404  Not Found [IP: 91.189.91.39 80]
E: Failed to fetch http://security.ubuntu.com/ubuntu/pool/main/n/nginx/libnginx-mod-http-geoip2_1.18.0-6ubuntu11.1_amd64.deb  404  Not Found [IP: 91.189.91.39 80]
E: Failed to fetch http://security.ubuntu.com/ubuntu/pool/main/n/nginx/libnginx-mod-http-image-filter_1.18.0-6ubuntu11.1_amd64.deb  404  Not Found [IP: 91.189.91.39 80]
E: Failed to fetch http://security.ubuntu.com/ubuntu/pool/main/n/nginx/libnginx-mod-http-xslt-filter_1.18.0-6ubuntu11.1_amd64.deb  404  Not Found [IP: 91.189.91.39 80]
E: Failed to fetch http://security.ubuntu.com/ubuntu/pool/main/n/nginx/libnginx-mod-mail_1.18.0-6ubuntu11.1_amd64.deb  404  Not Found [IP: 91.189.91.39 80]
E: Failed to fetch http://security.ubuntu.com/ubuntu/pool/main/n/nginx/libnginx-mod-stream_1.18.0-6ubuntu11.1_amd64.deb  404  Not Found [IP: 91.189.91.39 80]
E: Failed to fetch http://security.ubuntu.com/ubuntu/pool/main/n/nginx/libnginx-mod-stream-geoip2_1.18.0-6ubuntu11.1_amd64.deb  404  Not Found [IP: 91.189.91.39 80]
E: Failed to fetch http://security.ubuntu.com/ubuntu/pool/main/n/nginx/nginx-core_1.18.0-6ubuntu11.1_amd64.deb  404  Not Found [IP: 91.189.91.39 80]
E: Failed to fetch http://security.ubuntu.com/ubuntu/pool/main/n/nginx/nginx_1.18.0-6ubuntu11.1_amd64.deb  404  Not Found [IP: 91.189.91.39 80]
E: Unable to fetch some archives, maybe run apt-get update or try with --fix-missing?
Cause: older releases of Ubuntu moved to a new host.
If you encounter an issue where the Ubuntu repository no longer has a “Release” file, it could be due to a temporary problem with the repository or a misconfiguration on your system. Here are a few steps you can take to troubleshoot and potentially resolve the issue:
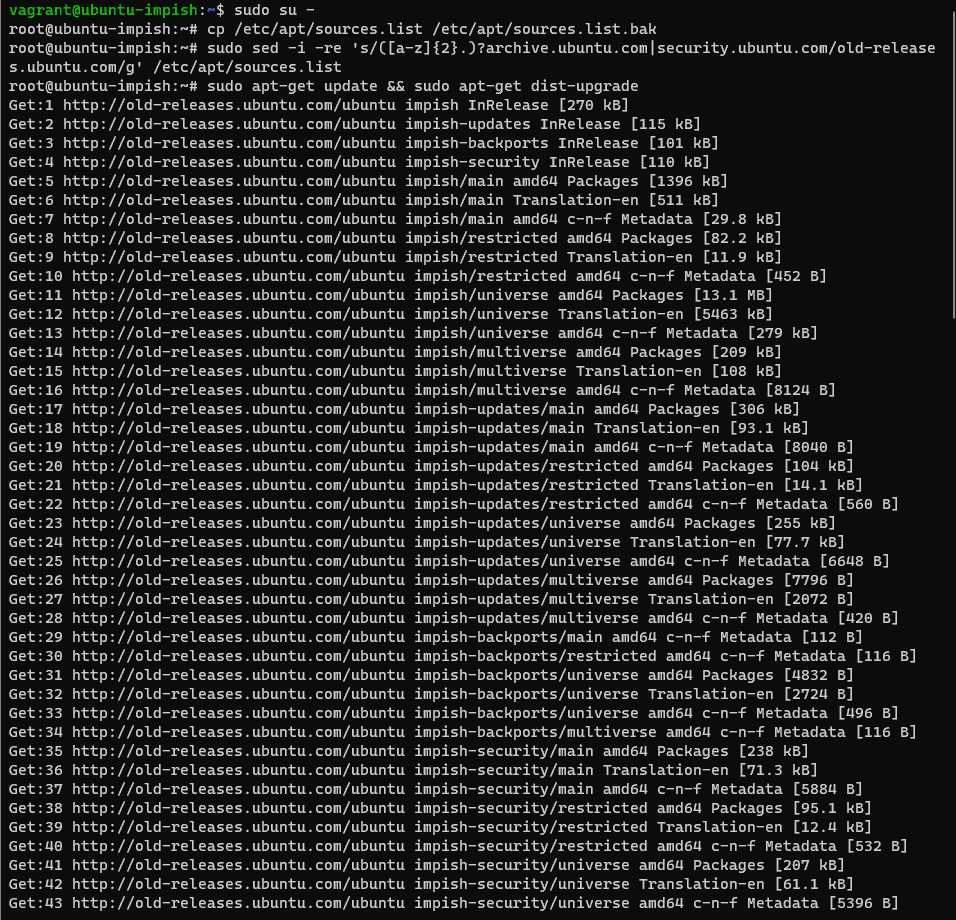
Step 2. Replace the links with the new repository address.
sudo sed -i -re 's/([a-z]{2}.)?archive.ubuntu.com|security.ubuntu.com/old-releases.ubuntu.com/g' /etc/apt/sources.list
Step 3. Update OS after steps 1 and step 2.
sudo apt-get update && sudo apt-get dist-upgrade
At this point, when you see that command 3 has run successfully, you can completely select Y to continue the update process for your Ubuntu server. Or select N to cancel the update process.
As a result, the fixed repository no longer has a Release file on Ubuntu Server. For example, I select Y.
root@controller:~# sudo apt-get update && sudo apt-get dist-upgrade
Get:1 http://old-releases.ubuntu.com/ubuntu impish InRelease [270 kB]
Hit:2 https://apache.jfrog.io/artifactory/couchdb-deb focal InRelease
Get:3 http://old-releases.ubuntu.com/ubuntu impish-updates InRelease [115 kB]
Get:4 http://old-releases.ubuntu.com/ubuntu impish-backports InRelease [101 kB]
Get:5 http://old-releases.ubuntu.com/ubuntu impish-security InRelease [110 kB]
Get:6 http://old-releases.ubuntu.com/ubuntu impish/main amd64 Packages [1396 kB]
Get:7 http://old-releases.ubuntu.com/ubuntu impish/main Translation-en [511 kB]
Get:8 http://old-releases.ubuntu.com/ubuntu impish/main amd64 c-n-f Metadata [29.8 kB]
Get:9 http://old-releases.ubuntu.com/ubuntu impish/restricted amd64 Packages [82.2 kB]
Get:44 http://old-releases.ubuntu.com/ubuntu impish-security/universe amd64 c-n-f Metadata [5396 B]
Get:45 http://old-releases.ubuntu.com/ubuntu impish-security/multiverse amd64 Packages [4776 B]
Get:46 http://old-releases.ubuntu.com/ubuntu impish-security/multiverse Translation-en [988 B]
Get:47 http://old-releases.ubuntu.com/ubuntu impish-security/multiverse amd64 c-n-f Metadata [228 B]
Fetched 23.4 MB in 1min 34s (248 kB/s)
Reading package lists... Done
Reading package lists... Done
Building dependency tree... Done
Reading state information... Done
Calculating upgrade... Done
The following packages will be upgraded:
  git git-man libpython3.9 libpython3.9-minimal libpython3.9-stdlib python3-distupgrade python3.9 python3.9-minimal
  ubuntu-release-upgrader-core
9 upgraded, 0 newly installed, 0 to remove and 0 not upgraded.
7 standard security updates
Need to get 11.1 MB of archives.
After this operation, 24.6 kB disk space will be freed.
Do you want to continue? [Y/n] y
Get:1 http://old-releases.ubuntu.com/ubuntu impish-updates/main amd64 python3.9 amd64 3.9.7-2ubuntu0.1 [433 kB]
Get:2 http://old-releases.ubuntu.com/ubuntu impish-updates/main amd64 libpython3.9 amd64 3.9.7-2ubuntu0.1 [1897 kB]
Get:3 http://old-releases.ubuntu.com/ubuntu impish-updates/main amd64 libpython3.9-stdlib amd64 3.9.7-2ubuntu0.1 [1807 kB]
Get:4 http://old-releases.ubuntu.com/ubuntu impish-updates/main amd64 python3.9-minimal amd64 3.9.7-2ubuntu0.1 [2058 kB]
Get:5 http://old-releases.ubuntu.com/ubuntu impish-updates/main amd64 libpython3.9-minimal amd64 3.9.7-2ubuntu0.1 [783 kB]
Get:6 http://old-releases.ubuntu.com/ubuntu impish-updates/main amd64 ubuntu-release-upgrader-core all 1:21.10.10 [25.5 kB]
Get:7 http://old-releases.ubuntu.com/ubuntu impish-updates/main amd64 python3-distupgrade all 1:21.10.10 [104 kB]
Get:8 http://old-releases.ubuntu.com/ubuntu impish-updates/main amd64 git-man all 1:2.32.0-1ubuntu1.3 [943 kB]
Get:9 http://old-releases.ubuntu.com/ubuntu impish-updates/main amd64 git amd64 1:2.32.0-1ubuntu1.3 [3038 kB]
Fetched 11.1 MB in 50s (221 kB/s)
(Reading database ... 99174 files and directories currently installed.)
Preparing to unpack .../0-python3.9_3.9.7-2ubuntu0.1_amd64.deb ...
Unpacking python3.9 (3.9.7-2ubuntu0.1) over (3.9.7-2build1) ...
Preparing to unpack .../1-libpython3.9_3.9.7-2ubuntu0.1_amd64.deb ...
Unpacking libpython3.9:amd64 (3.9.7-2ubuntu0.1) over (3.9.7-2build1) ...
Preparing to unpack .../2-libpython3.9-stdlib_3.9.7-2ubuntu0.1_amd64.deb ...
Unpacking libpython3.9-stdlib:amd64 (3.9.7-2ubuntu0.1) over (3.9.7-2build1) ...
Preparing to unpack .../3-python3.9-minimal_3.9.7-2ubuntu0.1_amd64.deb ...
Unpacking python3.9-minimal (3.9.7-2ubuntu0.1) over (3.9.7-2build1) ...
Preparing to unpack .../4-libpython3.9-minimal_3.9.7-2ubuntu0.1_amd64.deb ...
Unpacking libpython3.9-minimal:amd64 (3.9.7-2ubuntu0.1) over (3.9.7-2build1) ...
Preparing to unpack .../5-ubuntu-release-upgrader-core_1%3a21.10.10_all.deb ...
Unpacking ubuntu-release-upgrader-core (1:21.10.10) over (1:21.10.9) ...
Preparing to unpack .../6-python3-distupgrade_1%3a21.10.10_all.deb ...
Unpacking python3-distupgrade (1:21.10.10) over (1:21.10.9) ...
Preparing to unpack .../7-git-man_1%3a2.32.0-1ubuntu1.3_all.deb ...
Unpacking git-man (1:2.32.0-1ubuntu1.3) over (1:2.32.0-1ubuntu1.2) ...
Preparing to unpack .../8-git_1%3a2.32.0-1ubuntu1.3_amd64.deb ...
Unpacking git (1:2.32.0-1ubuntu1.3) over (1:2.32.0-1ubuntu1.2) ...
Setting up libpython3.9-minimal:amd64 (3.9.7-2ubuntu0.1) ...
Setting up python3-distupgrade (1:21.10.10) ...
Setting up ubuntu-release-upgrader-core (1:21.10.10) ...
Setting up git-man (1:2.32.0-1ubuntu1.3) ...
Setting up python3.9-minimal (3.9.7-2ubuntu0.1) ...
Setting up libpython3.9-stdlib:amd64 (3.9.7-2ubuntu0.1) ...
Setting up libpython3.9:amd64 (3.9.7-2ubuntu0.1) ...
Setting up git (1:2.32.0-1ubuntu1.3) ...
Setting up python3.9 (3.9.7-2ubuntu0.1) ...
Processing triggers for man-db (2.9.4-2) ...
Processing triggers for libc-bin (2.34-0ubuntu3.2) ...
Scanning processes...
Scanning candidates...
Scanning linux images...

Running kernel seems to be up-to-date.

Restarting services...
Service restarts being deferred:
 systemctl restart networkd-dispatcher.service
 systemctl restart unattended-upgrades.service

No containers need to be restarted.

No user sessions are running outdated binaries.
Via Youtube
Conclusion
By understanding the potential causes and implementing the solutions provided in this article, you can address the issue and restore the functionality of your package manager.
Whether it’s removing unsupported repositories, updating URLs, ensuring network connectivity, or waiting for temporary issues to be resolved, these steps will help you navigate and resolve the error efficiently.
You have a fixed repository no longer has a Release file on Ubuntu. I hope will this your helpful. Thank you for reading the DevopsRoles page!