Category Archives: Vagrant

Master Vagrant with DevOpsRoles.com. Explore comprehensive guides and tutorials to automate development environments using Vagrant for efficient DevOps practices.

Vagrant: Unknown configuration section vbguest

#Introduction

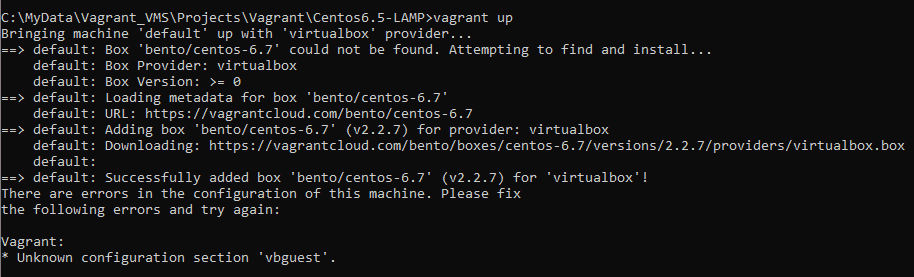
In this tutorial, How to fix the Unknown configuration section vbguest on Vagrant. Now, let’s fix Vagrant: Unknown configuration section vbguest.

  • Environment: CentOS 6x.
  • Vagrant version 2.2.18

My Vagrantfile

Vagrant.configure("2") do |config|
-----
config.vbguest.auto_update = false
-----

Error: Unknown configuration section vbguest

The reason is because of the missing vagrant.vbguest plugin.

Check plugin for Vagrant

C:\Users\HuuPV>vagrant plugin list
not found

1.If not, install “vagrant-vbguest

C:\MyData\Vagrant_VMS\Projects\Vagrant\Centos6.5-LAMP>vagrant plugin install vagrant-vbguest
Installing the 'vagrant-vbguest' plugin. This can take a few minutes...
Fetching micromachine-3.0.0.gem
Fetching vagrant-vbguest-0.30.0.gem
Installed the plugin 'vagrant-vbguest (0.30.0)'!

2. If exist, uninstall and reinstall “vagrant-vbguest

vagrant plugin uninstall vagrant-vbguest
vagrant plugin install vagrant-vbguest

Conclusion

You have fixed Vagrant: Unknown configuration section vbguest. I hope will this your helpful. Thank you for reading the DevopsRoles page!

Vagrant provision inline: A Step-by-Step Guide for Developers

Introduction

In this tutorial, How to use vagrant provision inline. Use inline to execute on the remote machine. Explore the essentials of inline provisioning with Vagrant in our latest tutorial. This guide provides a practical walkthrough on setting up and configuring virtual environments directly through Vagrant’s inline commands. Perfect for developers and IT professionals, this tutorial simplifies the process of using inline scripts to manage complex configurations, ensuring a seamless and efficient setup for your development projects.

What is Vagrant Inline Provisioning?

Vagrant Inline Provisioning is a method used in Vagrant for automatically configuring and setting up virtual machines. Here’s a simple explanation in English, presented as a bulleted list:

  • Purpose: Automatically configures and sets up virtual machines.
  • Method: Uses simple scripts written directly in the Vagrantfile.
  • Functionality: Allows users to execute shell commands during the virtual machine setup process.
  • Benefits: Streamlines and automates the configuration of development environments efficiently.

Vagrant provision inline example as below


Vagrant.configure("2") do |config|

  config.vm.define :ansible_controller do |ansible_controller|
    ansible_controller.vm.hostname = "ansible"
    ansible_controller.vm.box = "centos/6.5"
    ENV["LC_ALL"] = "en_US.UTF-8"
    config.ssh.insert_key = false
    ansible_controller.vm.network "private_network", ip: "192.168.3.10", :netmask => "255.255.255.0"
    ansible_controller.vm.provision "shell", inline: <<-SHELL
      echo "hello"
      echo "192.168.3.11 centos8" >> /etc/hosts
      groupadd -g 20000 gadmin
      useradd -d /home/huupv -u 9999 -m huupv
      echo -e "huupv\nhuupv\n" |  passwd huupv
      echo "huupv ALL = (root) NOPASSWD:ALL" | tee /etc/sudoers.d/huupv
      chmod 0440 /etc/sudoers.d/huupv
      su - huupv -c "echo |ssh-keygen -t rsa"
      SHELL
  end

  config.vm.define :centos do |centos|
    centos.vm.hostname = "centos8"
    centos.vm.box = "centos/8"
    ENV["LC_ALL"] = "en_US.UTF-8"
    config.ssh.insert_key = false
    centos.vm.network "private_network", ip: "192.168.3.11", :netmask => "255.255.255.0"
    centos.vm.provision "shell", inline: <<-SHELL
      echo "hello"
      groupadd -g 20000 gadmin
      useradd -d /home/huupv -u 9999 -m huupv
      echo -e "huupv\nhuupv\n" |  passwd huupv
      echo "huupv ALL = (root) NOPASSWD:ALL" | tee /etc/sudoers.d/huupv
      chmod 0440 /etc/sudoers.d/huupv
      useradd -m -d /home/user001 -s  /bin/bash   -g gadmin -u 8889  user001; echo -e "user001\nuser001\n"  |  passwd  user001
	  su - huupv -c "mkdir /home/huupv/.ssh"
      su - huupv -c "touch /home/huupv/.ssh/authorized_keys"
      su - huupv -c "chmod 600 /home/huupv/.ssh/authorized_keys"
      su - huupv -c "chmod 700 /home/huupv/.ssh"
    SHELL
  end
  end

Conclusion

You have to use a vagrant inline to execute on the remote machine. Mastering Vagrant’s inline provisioning can significantly streamline your development workflow. We’ve covered the key steps to execute scripts within your Vagrantfile, enhancing your capability to manage and automate your virtual environments. Keep experimenting with different configurations and scripts to fully leverage the power of Vagrant in your projects. I hope will this your helpful. Thank you for reading the DevopsRoles page!

Vagrant No VirtualBox Guest Additions installation found [Fixed]

Introduction

In this tutorial, How to fix the error Vagrant No VirtualBox Guest Additions installation is found. I use a laptop and run the command vagrant up for the NFS server then the error “umount: /mnt: not mounted

ERROR umount: /mnt: not mounted

E:\Vagrant_VMS\NFS_server>vagrant up 

Error: Nothing to do
Unmounting Virtualbox Guest Additions ISO from: /mnt
umount: /mnt: not mounted
==> servernfs: Checking for guest additions in VM...
    servernfs: No guest additions were detected on the base box for this VM! Guest
    servernfs: additions are required for forwarded ports, shared folders, host only
    servernfs: networking, and more. If SSH fails on this machine, please install
    servernfs: the guest additions and repackage the box to continue.
    servernfs:
    servernfs: This is not an error message; everything may continue to work properly,
    servernfs: in which case you may ignore this message.
The following SSH command responded with a non-zero exit status.
Vagrant assumes that this means the command failed!

umount /mnt

Stdout from the command:


Stderr from the command:

umount: /mnt: not mounted

Vagrant No VirtualBox Guest Additions installation found fixed

I have uninstalled vagrant-vbguest and installed vagrant-vbguest.

vagrant plugin uninstall vagrant-vbguest
vagrant plugin install vagrant-vbguest --plugin-version 0.21

The output uninstall and install vagrant-vbguest as below

E:\Vagrant_VMS\NFS_server>vagrant plugin uninstall vagrant-vbguest
Uninstalling the 'vagrant-vbguest' plugin...
Successfully uninstalled micromachine-3.0.0
Successfully uninstalled vagrant-vbguest-0.27.0

E:\Vagrant_VMS\NFS_server>vagrant plugin install vagrant-vbguest --plugin-version 0.21
Installing the 'vagrant-vbguest --version '0.21'' plugin. This can take a few minutes...
Fetching micromachine-3.0.0.gem
Fetching vagrant-vbguest-0.21.0.gem
Installed the plugin 'vagrant-vbguest (0.21.0)'!

As a result, I have to fix it!

E:\Vagrant_VMS\NFS_server>vagrant reload
==> servernfs: Attempting graceful shutdown of VM...
==> servernfs: Checking if box 'centos/7' version '2004.01' is up to date...
==> servernfs: Clearing any previously set forwarded ports...
==> servernfs: Clearing any previously set network interfaces...
==> servernfs: Preparing network interfaces based on configuration...
    servernfs: Adapter 1: nat
    servernfs: Adapter 2: hostonly
==> servernfs: Forwarding ports...
    servernfs: 22 (guest) => 2222 (host) (adapter 1)
==> servernfs: Booting VM...
==> servernfs: Waiting for machine to boot. This may take a few minutes...
    servernfs: SSH address: 127.0.0.1:2222
    servernfs: SSH username: vagrant
    servernfs: SSH auth method: private key
    servernfs: Warning: Connection aborted. Retrying...
==> servernfs: Machine booted and ready!
[servernfs] GuestAdditions 6.1.14 running --- OK.
==> servernfs: Checking for guest additions in VM...
==> servernfs: Configuring and enabling network interfaces...
==> servernfs: Rsyncing folder: /cygdrive/e/MyData/Vagrant_VMS/NFS_server/ => /vagrant
==> servernfs: Rsyncing folder: /cygdrive/e/MyData/Vagrant_VMS/NFS_server/NFS_Volumn/ => /home/vagrant/nfs_test
==> servernfs: Machine already provisioned. Run `vagrant provision` or use the `--provision`
==> servernfs: flag to force provisioning. Provisioners marked to run always will still run.

Youtube Vagrant No VirtualBox Guest Additions installation found [Fixed]

Conclusion

You have fixed Vagrant No VirtualBox. I hope will this your helpful. Thank you for reading the DevopsRoles page!

Command creating a virtual machine in vagrant

#Introduction

In this tutorial, I have written The commands when creating a virtual machine in VirtualBox using Vagrant.

Prerequisites

  • VirtualBox Installed
  • Vagrant Installed

The first, command at the time of creating

The box is searched from Vagrant Cloud.

Create a directory for the virtual machine you want to create and change to it.

mkdir vagrant_test
cd vagrant_test

Initialize the directory and create a Vagrantfile.

vagrant init ubuntu/trusty64

The contents should be as follows. If the box name is different, rewrite it.

cat Vagrantfile
Vagrant.configure("2") do |config|
  config.vm.box = "ubuntu/trusty64"
end

Start the virtual machine. A box has been added at this time.

vagrant up

ssh connection

vagrant ssh

Other used commands Vagrant

Add box

vagrant box add your-box-name

Added box list

vagrant box list

Delete box

vagrant box remove your-box-name

Virtual machine shutdown

vagrant halt

Delete virtual machine

vagrant destroy

Check virtual machine status

vagrant status

Conclusion

You have to use Command creating a virtual machine in vagrant. I hope will this your helpful. Thank you for reading the DevopsRoles page!

Install Vagrant and VirtualBox on Fedora

Introduction

In this tutorial, How to Install Vagrant and VirtualBox on Fedora. You use Vagrant for DevOps professionals and coder sysadmin. I will be installing VirtualBox and Vagrant on My Laptop is Fedora 32.

How to Install Vagrant and VirtualBox

Check CPU has Intel VT or AMD-V Virtualization extensions

sudo lscpu | grep Virtualization

Add VirtualBox RPM repository

dnf -y install wget
wget http://download.virtualbox.org/virtualbox/rpm/fedora/virtualbox.repo
mv virtualbox.repo /etc/yum.repos.d/virtualbox.repo

Install VirtualBox

[root@localhost ~]# dnf install -y VirtualBox*

The output on my terminal is below

[root@localhost ~]# dnf install -y  VirtualBox*
Last metadata expiration check: 0:06:53 ago on Mon 05 Oct 2020 09:32:56 PM +07.
Dependencies resolved.
======================================================================================================================
 Package                         Architecture      Version                                Repository             Size
======================================================================================================================
Installing:
 VirtualBox-6.1                  x86_64            6.1.14_140239_fedora32-1               virtualbox             88 M
Installing dependencies:
 SDL                             x86_64            1.2.15-43.fc32                         fedora                213 k
 annobin                         x86_64            9.27-1.fc32                            updates                98 k
 dwz                             x86_64            0.13-2.fc32                            fedora                109 k
 efi-srpm-macros                 noarch            4-4.fc32                               fedora                 22 k
 fonts-srpm-macros               noarch            2.0.3-1.fc32                           fedora                 26 k
 fpc-srpm-macros                 noarch            1.3-1.fc32                             fedora                7.6 k
 ghc-srpm-macros                 noarch            1.5.0-2.fc32                           fedora                7.7 k
 gnat-srpm-macros                noarch            4-11.fc32                              fedora                8.2 k
 go-srpm-macros                  noarch            3.0.9-1.fc32                           updates                25 k
 nim-srpm-macros                 noarch            3-2.fc32                               fedora                8.3 k
 ocaml-srpm-macros               noarch            6-2.fc32                               fedora                7.7 k
 openblas-srpm-macros            noarch            2-7.fc32                               fedora                7.2 k
 perl-srpm-macros                noarch            1-34.fc32                              fedora                8.3 k
 python-srpm-macros              noarch            3-59.fc32                              updates                17 k
 python27                        x86_64            2.7.18-2.fc32                          updates                11 M
 qt5-srpm-macros                 noarch            5.14.2-3.fc32                          updates               8.4 k
 redhat-rpm-config               noarch            150-1.fc32                             fedora                 63 k
 rust-srpm-macros                noarch            14-1.fc32                              updates               9.6 k
 tix                             x86_64            1:8.4.3-27.fc31                        fedora                246 k
 tk                              x86_64            1:8.6.10-3.fc32                        fedora                1.6 M

Transaction Summary
======================================================================================================================
Install  21 Packages

Total download size: 101 M
Installed size: 257 M
Downloading Packages:
(1/21): go-srpm-macros-3.0.9-1.fc32.noarch.rpm                                         82 kB/s |  25 kB     00:00    
(2/21): python-srpm-macros-3-59.fc32.noarch.rpm                                        49 kB/s |  17 kB     00:00    
(3/21): qt5-srpm-macros-5.14.2-3.fc32.noarch.rpm                                      130 kB/s | 8.4 kB     00:00    
(4/21): annobin-9.27-1.fc32.x86_64.rpm                                                210 kB/s |  98 kB     00:00    
(5/21): rust-srpm-macros-14-1.fc32.noarch.rpm                                          75 kB/s | 9.6 kB     00:00    
(6/21): SDL-1.2.15-43.fc32.x86_64.rpm                                                 217 kB/s | 213 kB     00:00    
(7/21): efi-srpm-macros-4-4.fc32.noarch.rpm                                            72 kB/s |  22 kB     00:00    
(8/21): dwz-0.13-2.fc32.x86_64.rpm                                                     82 kB/s | 109 kB     00:01    
(9/21): fpc-srpm-macros-1.3-1.fc32.noarch.rpm                                          67 kB/s | 7.6 kB     00:00    
(10/21): fonts-srpm-macros-2.0.3-1.fc32.noarch.rpm                                    116 kB/s |  26 kB     00:00    
(11/21): ghc-srpm-macros-1.5.0-2.fc32.noarch.rpm                                       44 kB/s | 7.7 kB     00:00    
(12/21): gnat-srpm-macros-4-11.fc32.noarch.rpm                                         47 kB/s | 8.2 kB     00:00    
(13/21): nim-srpm-macros-3-2.fc32.noarch.rpm                                           40 kB/s | 8.3 kB     00:00    
(14/21): ocaml-srpm-macros-6-2.fc32.noarch.rpm                                         37 kB/s | 7.7 kB     00:00    
(15/21): python27-2.7.18-2.fc32.x86_64.rpm                                            4.8 MB/s |  11 MB     00:02    
(16/21): openblas-srpm-macros-2-7.fc32.noarch.rpm                                      35 kB/s | 7.2 kB     00:00    
(17/21): perl-srpm-macros-1-34.fc32.noarch.rpm                                         40 kB/s | 8.3 kB     00:00    
(18/21): redhat-rpm-config-150-1.fc32.noarch.rpm                                      631 kB/s |  63 kB     00:00    
(19/21): tix-8.4.3-27.fc31.x86_64.rpm                                                 866 kB/s | 246 kB     00:00    
(20/21): tk-8.6.10-3.fc32.x86_64.rpm                                                  811 kB/s | 1.6 MB     00:01    
(21/21): VirtualBox-6.1-6.1.14_140239_fedora32-1.x86_64.rpm                           5.1 MB/s |  88 MB     00:17    
----------------------------------------------------------------------------------------------------------------------
Total                                                                                 4.9 MB/s | 101 MB     00:20     
warning: /var/cache/dnf/virtualbox-a644194517384f93/packages/VirtualBox-6.1-6.1.14_140239_fedora32-1.x86_64.rpm: Header V4 DSA/SHA1 Signature, key ID 98ab5139: NOKEY
Fedora 32 - x86_64 - VirtualBox                                                       945  B/s | 1.7 kB     00:01    
Importing GPG key 0x98AB5139:
 Userid     : "Oracle Corporation (VirtualBox archive signing key) <info@virtualbox.org>"
 Fingerprint: 7B0F AB3A 13B9 0743 5925 D9C9 5442 2A4B 98AB 5139
 From       : https://www.virtualbox.org/download/oracle_vbox.asc
Key imported successfully
Running transaction check
Transaction check succeeded.
Running transaction test
Transaction test succeeded.
Running transaction
  Preparing        :                                                                                              1/1 
  Running scriptlet: tk-1:8.6.10-3.fc32.x86_64                                                                   1/21 
  Installing       : tk-1:8.6.10-3.fc32.x86_64                                                                   1/21 
  Installing       : tix-1:8.4.3-27.fc31.x86_64                                                                  2/21 
  Running scriptlet: tix-1:8.4.3-27.fc31.x86_64                                                                  2/21 
  Installing       : perl-srpm-macros-1-34.fc32.noarch                                                           3/21 
  Installing       : openblas-srpm-macros-2-7.fc32.noarch                                                        4/21 
  Installing       : ocaml-srpm-macros-6-2.fc32.noarch                                                           5/21 
  Installing       : nim-srpm-macros-3-2.fc32.noarch                                                             6/21 
  Installing       : gnat-srpm-macros-4-11.fc32.noarch                                                           7/21 
  Installing       : ghc-srpm-macros-1.5.0-2.fc32.noarch                                                         8/21 
  Installing       : fpc-srpm-macros-1.3-1.fc32.noarch                                                           9/21 
  Installing       : efi-srpm-macros-4-4.fc32.noarch                                                            10/21 
  Installing       : dwz-0.13-2.fc32.x86_64                                                                     11/21 
  Installing       : SDL-1.2.15-43.fc32.x86_64                                                                  12/21 
  Installing       : rust-srpm-macros-14-1.fc32.noarch                                                          13/21 
  Installing       : qt5-srpm-macros-5.14.2-3.fc32.noarch                                                       14/21 
  Installing       : annobin-9.27-1.fc32.x86_64                                                                 15/21 
  Installing       : go-srpm-macros-3.0.9-1.fc32.noarch                                                         16/21 
  Installing       : python-srpm-macros-3-59.fc32.noarch                                                        17/21 
  Installing       : fonts-srpm-macros-2.0.3-1.fc32.noarch                                                      18/21 
  Installing       : redhat-rpm-config-150-1.fc32.noarch                                                        19/21 
  Installing       : python27-2.7.18-2.fc32.x86_64                                                              20/21 
  Running scriptlet: VirtualBox-6.1-6.1.14_140239_fedora32-1.x86_64                                             21/21 
  Installing       : VirtualBox-6.1-6.1.14_140239_fedora32-1.x86_64                                             21/21 
  Running scriptlet: VirtualBox-6.1-6.1.14_140239_fedora32-1.x86_64                                             21/21 

Creating group 'vboxusers'. VM users must be member of that group!


  Verifying        : annobin-9.27-1.fc32.x86_64                                                                  1/21 
  Verifying        : go-srpm-macros-3.0.9-1.fc32.noarch                                                          2/21 
  Verifying        : python-srpm-macros-3-59.fc32.noarch                                                         3/21 
  Verifying        : python27-2.7.18-2.fc32.x86_64                                                               4/21 
  Verifying        : qt5-srpm-macros-5.14.2-3.fc32.noarch                                                        5/21 
  Verifying        : rust-srpm-macros-14-1.fc32.noarch                                                           6/21 
  Verifying        : SDL-1.2.15-43.fc32.x86_64                                                                   7/21 
  Verifying        : dwz-0.13-2.fc32.x86_64                                                                      8/21 
  Verifying        : efi-srpm-macros-4-4.fc32.noarch                                                             9/21 
  Verifying        : fonts-srpm-macros-2.0.3-1.fc32.noarch                                                      10/21 
  Verifying        : fpc-srpm-macros-1.3-1.fc32.noarch                                                          11/21 
  Verifying        : ghc-srpm-macros-1.5.0-2.fc32.noarch                                                        12/21 
  Verifying        : gnat-srpm-macros-4-11.fc32.noarch                                                          13/21 
  Verifying        : nim-srpm-macros-3-2.fc32.noarch                                                            14/21 
  Verifying        : ocaml-srpm-macros-6-2.fc32.noarch                                                          15/21 
  Verifying        : openblas-srpm-macros-2-7.fc32.noarch                                                       16/21 
  Verifying        : perl-srpm-macros-1-34.fc32.noarch                                                          17/21 
  Verifying        : redhat-rpm-config-150-1.fc32.noarch                                                        18/21 
  Verifying        : tix-1:8.4.3-27.fc31.x86_64                                                                 19/21 
  Verifying        : tk-1:8.6.10-3.fc32.x86_64                                                                  20/21 
  Verifying        : VirtualBox-6.1-6.1.14_140239_fedora32-1.x86_64                                             21/21 

Installed:
  SDL-1.2.15-43.fc32.x86_64                            VirtualBox-6.1-6.1.14_140239_fedora32-1.x86_64                
  annobin-9.27-1.fc32.x86_64                           dwz-0.13-2.fc32.x86_64                                        
  efi-srpm-macros-4-4.fc32.noarch                      fonts-srpm-macros-2.0.3-1.fc32.noarch                         
  fpc-srpm-macros-1.3-1.fc32.noarch                    ghc-srpm-macros-1.5.0-2.fc32.noarch                           
  gnat-srpm-macros-4-11.fc32.noarch                    go-srpm-macros-3.0.9-1.fc32.noarch                            
  nim-srpm-macros-3-2.fc32.noarch                      ocaml-srpm-macros-6-2.fc32.noarch                             
  openblas-srpm-macros-2-7.fc32.noarch                 perl-srpm-macros-1-34.fc32.noarch                             
  python-srpm-macros-3-59.fc32.noarch                  python27-2.7.18-2.fc32.x86_64                                 
  qt5-srpm-macros-5.14.2-3.fc32.noarch                 redhat-rpm-config-150-1.fc32.noarch                           
  rust-srpm-macros-14-1.fc32.noarch                    tix-1:8.4.3-27.fc31.x86_64                                    
  tk-1:8.6.10-3.fc32.x86_64                           

Complete!

Configure VirtualBox Drivers

/usr/lib/virtualbox/vboxdrv.sh setup

The output my terminal as below

[root@localhost ~]# /usr/lib/virtualbox/vboxdrv.sh setup
vboxdrv.sh: Stopping VirtualBox services.
vboxdrv.sh: Starting VirtualBox services.
vboxdrv.sh: Building VirtualBox kernel modules.

Download Extension Pack

cd /tmp/
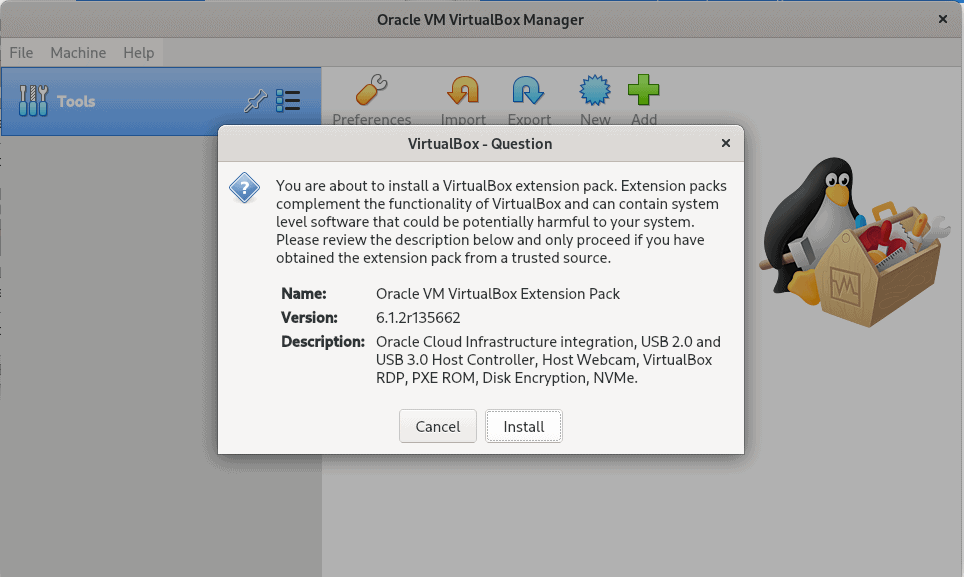
wget https://download.virtualbox.org/virtualbox/6.1.2/Oracle_VM_VirtualBox_Extension_Pack-6.1.2.vbox-extpack

Install the extension pack by clicking on the Downloaded file. The picture below

Install Vagrant on Fedora

Run command on your terminal as below

dnf -y install vagrant

Test Vagrant and Virtualbox

Create a minimal Vagrantfile

$ mkdir vagrant-test
$ cd vagrant-test
$ vi Vagrantfile

An example that also sets the amount of memory and number of CPUs in the Vagrantfile file

[huupv@localhost vagrant-test]$ cat Vagrantfile 
Vagrant.configure("2") do |config|
  config.ssh.insert_key = false
  config.vm.provider :virtualbox do |vb|
    vb.memory = 256
    vb.cpus = 1
  end
  
  config.vm.define "DevopsRoles" do |server01|
    server01.vm.hostname = "DevopsRoles.com"
    server01.vm.box = "centos/7"
    #server01.vm.network :private_network, ip: "192.168.3.4"
  end
end

The output on my terminal as below

huupv@localhost vagrant-test]$ vagrant up
Bringing machine 'DevopsRoles' up with 'virtualbox' provider...
==> DevopsRoles: Box 'centos/7' could not be found. Attempting to find and install...
    DevopsRoles: Box Provider: virtualbox
    DevopsRoles: Box Version: >= 0
==> DevopsRoles: Loading metadata for box 'centos/7'
    DevopsRoles: URL: https://vagrantcloud.com/centos/7
==> DevopsRoles: Adding box 'centos/7' (v2004.01) for provider: virtualbox
    DevopsRoles: Downloading: https://vagrantcloud.com/centos/boxes/7/versions/2004.01/providers/virtualbox.box
Download redirected to host: cloud.centos.org
    DevopsRoles: Calculating and comparing box checksum...
==> DevopsRoles: Successfully added box 'centos/7' (v2004.01) for 'virtualbox'!
==> DevopsRoles: Importing base box 'centos/7'...
==> DevopsRoles: Matching MAC address for NAT networking...
==> DevopsRoles: Checking if box 'centos/7' version '2004.01' is up to date...
==> DevopsRoles: Setting the name of the VM: vagrant-test_DevopsRoles_1601910055210_96696
==> DevopsRoles: Clearing any previously set network interfaces...
==> DevopsRoles: Preparing network interfaces based on configuration...
    DevopsRoles: Adapter 1: nat
==> DevopsRoles: Forwarding ports...
    DevopsRoles: 22 (guest) => 2222 (host) (adapter 1)
==> DevopsRoles: Running 'pre-boot' VM customizations...
==> DevopsRoles: Booting VM...
==> DevopsRoles: Waiting for machine to boot. This may take a few minutes...
    DevopsRoles: SSH address: 127.0.0.1:2222
    DevopsRoles: SSH username: vagrant
    DevopsRoles: SSH auth method: private key
==> DevopsRoles: Machine booted and ready!
==> DevopsRoles: Checking for guest additions in VM...
    DevopsRoles: No guest additions were detected on the base box for this VM! Guest
    DevopsRoles: additions are required for forwarded ports, shared folders, host only
    DevopsRoles: networking, and more. If SSH fails on this machine, please install
    DevopsRoles: the guest additions and repackage the box to continue.
    DevopsRoles: 
    DevopsRoles: This is not an error message; everything may continue to work properly,
    DevopsRoles: in which case you may ignore this message.
==> DevopsRoles: Setting hostname...
==> DevopsRoles: Rsyncing folder: /home/huupv/vagrant-test/ => /vagrant

Conclusion

You have to install and run Vagrant using VirtualBox. I hope will this your helpful. Thank you for reading the DevopsRoles page!

Vagrant use KVM provider

Introduction

In this tutorial, I’ll guide you on installing and running Vagrant use KVM provider. Whether you’re a DevOps professional, coder, or sysadmin, Vagrant proves invaluable. I’ll walk you through the installation and setup process on my Fedora 32 laptop. Together, we’ll explore the seamless integration of Vagrant with the Qemu-KVM provider, opening up new possibilities for efficient development environments. Let’s dive into the steps to harness the power of Vagrant and enhance your workflow on Fedora 32.

Installing and running Vagrant use KVM provider

Check the machine supports virtualization

[HuuPV@DevopsRoles ~]$ sudo lscpu | grep Virtualization
Virtualization:                  VT-x

Install qemu-kvm

[HuuPV@DevopsRoles ~]$ sudo dnf install qemu-kvm libvirt libguestfs-tools virt-install rsync
[HuuPV@DevopsRoles ~]$ sudo systemctl enable --now libvirtd

Install Vagrant and vagrant libvirtd plugin

[HuuPV@DevopsRoles ~]$ sudo dnf install vagrant
[HuuPV@DevopsRoles ~]$ sudo vagrant plugin install vagrant-libvirt

Using the vagrant box command to Add a box

Link download box here

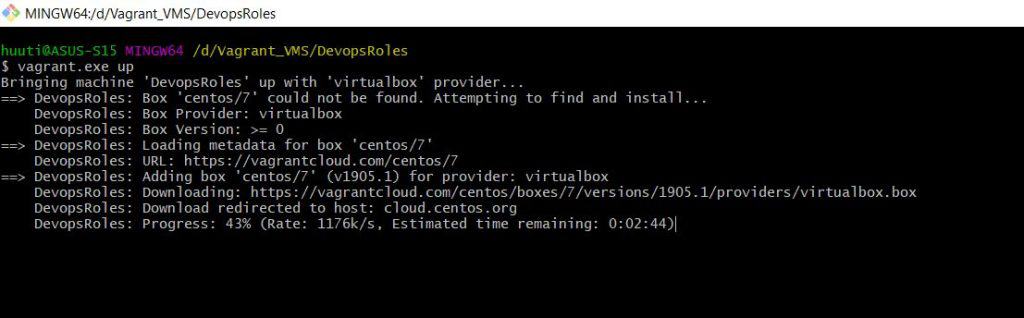
[HuuPV@DevopsRoles vagrant-test]$ vagrant box add centos/7 --provider=libvirt

==> box: Loading metadata for box 'centos/7'
    box: URL: https://vagrantcloud.com/centos/7
==> box: Adding box 'centos/7' (v2004.01) for provider: libvirt
    box: Downloading: https://vagrantcloud.com/centos/boxes/7/versions/2004.01/providers/libvirt.box
Download redirected to host: cloud.centos.org
    box: Calculating and comparing box checksum...
==> box: Successfully added box 'centos/7' (v2004.01) for 'libvirt'!

Test: Create a minimal Vagrantfile

$ mkdir vagrant-test
$ cd vagrant-test
$ vi Vagrantfile
# An example which also sets the amount memory and number of CPUs in Vagrantfile file

Vagrant.configure("2") do |config|
  config.vm.box = "centos/7"
  config.vm.provider :libvirt do |libvirt|
    libvirt.cpus = 1
    libvirt.memory = 1024
  end
end

Start the box

vagrant up

The output is an example below:

[HuuPV@DevopsRoles vagrant-test]$ vagrant up
Bringing machine 'default' up with 'libvirt' provider...
==> default: Checking if box 'centos/7' version '2004.01' is up to date...
==> default: Uploading base box image as volume into libvirt storage...
==> default: Creating image (snapshot of base box volume).
==> default: Creating domain with the following settings...
==> default:  -- Name:              vagrant-test_default
==> default:  -- Domain type:       kvm
==> default:  -- Cpus:              1
==> default:  -- Feature:           acpi
==> default:  -- Feature:           apic
==> default:  -- Feature:           pae
==> default:  -- Memory:            1024M
==> default:  -- Management MAC:    
==> default:  -- Loader:            
==> default:  -- Nvram:             
==> default:  -- Base box:          centos/7
==> default:  -- Storage pool:      default
==> default:  -- Image:             /home/HuuPV/.local/share/libvirt/images/vagrant-test_default.img (41G)
==> default:  -- Volume Cache:      default
==> default:  -- Kernel:            
==> default:  -- Initrd:            
==> default:  -- Graphics Type:     vnc
==> default:  -- Graphics Port:     -1
==> default:  -- Graphics IP:       127.0.0.1
==> default:  -- Graphics Password: Not defined
==> default:  -- Video Type:        cirrus
==> default:  -- Video VRAM:        9216
==> default:  -- Sound Type:	
==> default:  -- Keymap:            en-us
==> default:  -- TPM Path:          
==> default:  -- INPUT:             type=mouse, bus=ps2
==> default: Creating shared folders metadata...
==> default: Starting domain.
==> default: Waiting for domain to get an IP address...
==> default: Waiting for SSH to become available...
    default: 
    default: Vagrant insecure key detected. Vagrant will automatically replace
    default: this with a newly generated keypair for better security.
    default: 
    default: Inserting generated public key within guest...
    default: Removing insecure key from the guest if it's present...
    default: Key inserted! Disconnecting and reconnecting using new SSH key...
==> default: Configuring and enabling network interfaces...
    default: SSH address: 192.168.122.97:22
    default: SSH username: vagrant
    default: SSH auth method: private key
==> default: Rsyncing folder: /home/HuuPV/Vagrant_VMS/vagrant-test/ => /vagrant

Connect to your new machine

vagrant ssh

The output as the example below

[HuuPV@DevopsRoles vagrant-test]$ vagrant ssh
[vagrant@localhost ~]$ hostname
localhost.localdomain
[vagrant@localhost ~]$ pwd
/home/vagrant

Conclusion

Install and run Vagrant with Qemu-KVM for an enhanced experience. This step-by-step guide aims to be a valuable resource for your journey. Your support is appreciated. Thank you for exploring the DevopsRoles page!

Vagrant issues solved

Vagrant up command the response in error “No usable default provider could be found for your system”. Vagrant issues solved.

My environment

  • OS: Windows 10
  • Vagrant is version 2.2.6
  • Virtualbox is version 6.1

I installed the latest Vagrant and VirtualBox versions. I got the following error.

$ vagrant.exe up
 No usable default provider could be found for your system.
 Vagrant relies on interactions with 3rd party systems, known as
 "providers", to provide Vagrant with resources to run development
 environments. Examples are VirtualBox, VMware, Hyper-V.
 The easiest solution to this message is to install VirtualBox, which
 is available for free on all major platforms.
 If you believe you already have a provider available, make sure it
 is properly installed and configured. You can see more details about
 why a particular provider isn't working by forcing usage with
 vagrant up --provider=PROVIDER, which should give you a more specific
 error message for that particular provider.

Vagrant issues solved the problem

You need to downgrade Virtualbox to version 5.2. Vagrant support PROVIDER here.

The VirtualBox provider is compatible with VirtualBox versions 4.0.x, 4.1.x, 4.2.x, 4.3.x, 5.0.x, 5.1.x, 5.2.x, and 6.0.x.

I decided to downgrade from Virtualbox 6.1 to Virtualbox 5.2

Link download Virtualbox 5.2

vagrant up command result as follows

I hope this helps you. Thank you for reading the DevopsRoles page!

Vagrant cheat sheet: Quick Reference for DevOps Professionals

Introduction

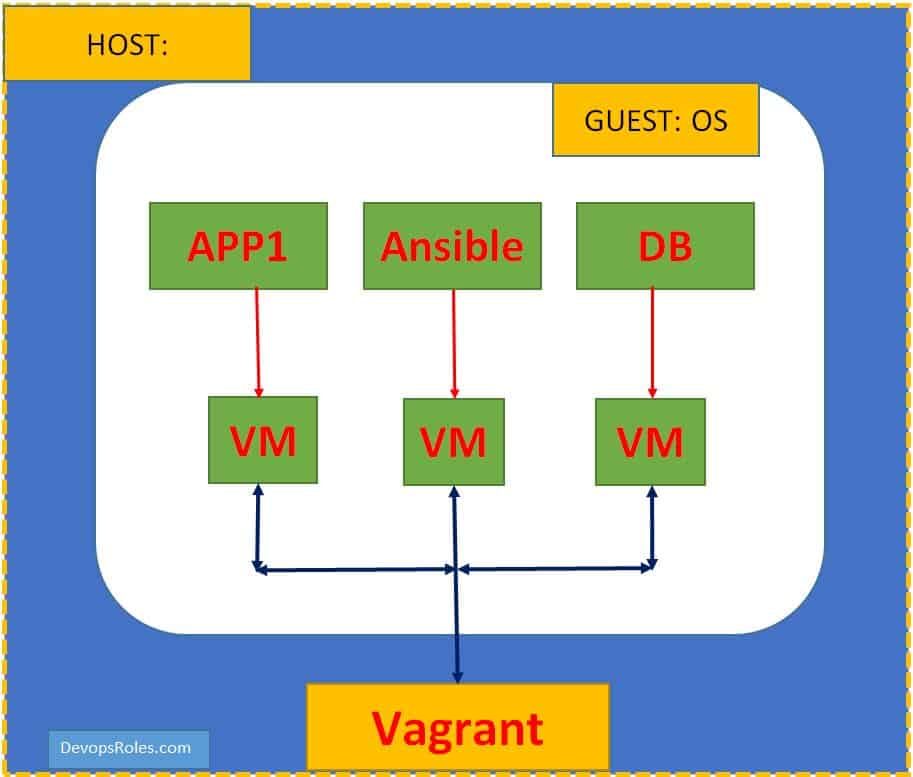
In the world of DevOps, setting up and managing consistent development environments is crucial for ensuring application performance and reliability. Vagrant, a powerful tool, has become a popular choice to quickly and easily create virtual environments for developers. In this article, we provide a detailed Vagrant Cheat Sheet to help you quickly grasp the basic commands and configurations of this tool. Let’s explore how Vagrant can enhance your development workflow! The Vagrant is building an isolated virtual environment for the app. Vagrant is essential for DevOps Roles.

Vagrant cheat sheet

Vagrant add box

Link download vagrant box here

$ vagrant box add Centos7 https://github.com/holms/vagrant-centos7-box/releases/download/7.1.1503.001/CentOS-7.1.1503-x86_64-netboot.box
Creating Your Project with Vagrant:
$ mkdir your_projects
$ cd your_projects
$ vagrant init Centos7

Vagrant run

$ vagrant up
$ vagrant ssh

Vagrant stop

Stopping Virtual Machine using one of the commands following

$ vagrant ssh # then: sudo shutdown -h now
$ vagrant suspend
$ vagrant destroy # stop running machine Vagrant is managing and destroys all resources

Conclusion

Vagrant is an essential tool in the modern DevOps toolkit, simplifying the setup and management of development environments. With this Cheat Sheet, you now have the basic commands and configurations to start using Vagrant effectively.

Make the most of Vagrant’s capabilities to boost your productivity and ensure consistency across your projects. If you need more detailed information or encounter any issues, don’t hesitate to seek help from the DevOps community. Good luck!

Install Vagrant on Windows 10

In this tutorial, How to install Vagrant on Windows 10. Vagrant the essential for DevOps Roles.

Required Tools

  • Virtual Box
  • Vagrant
  • Git

What does Vagrant work?

  1. Creating and destroy VMs.
  2. Starting, stopping and restarting VMs.
  3. Access to VMs.
  4. Networking and WM setting
  5. v.v

Step by step install Vagrant on Windows 10

Step 1: Installing Git for windows 10

Link download URL: git here. The during install Vagrant steps,  You can Select as below

  • “Use Git from the Windows Command Prompt”
  • “Checkout as-is, commit Unix-style line endings”

Step 2: Downloading and Installing VirtualBox on Windows 10

Link Download URL: http://download.virtualbox.org/virtualbox/5.2.22/

Step 3: Installing Vagrant on windows 10

Link download URL: https://releases.hashicorp.com/vagrant/

I use Vagrant version 2.2.0 Link here.  Installing the Vagrant is very easy, then restart your machine.

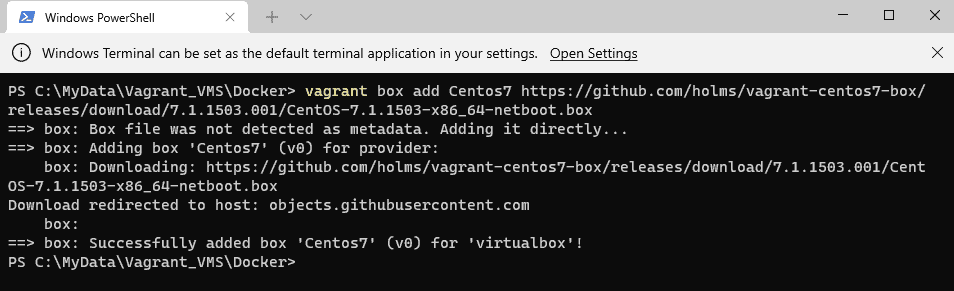
Download and run Centos 7 Vagrant Box on Windows 10

Open Git Bash as below

HuuPV@LAPTOP-HKT198TT MINGW64 ~
$ pwd
/c/Users/HuuPV

HuuPV@LAPTOP-HKT198TT MINGW64 ~
$ mkdir VMs_vagrant

HuuPV@LAPTOP-HKT198TT MINGW64 ~
$ cd VMs_vagrant/

HuuPV@LAPTOP-HKT198TT MINGW64 ~/VMs_vagrant
$ mkdir Centos7

HuuPV@LAPTOP-HKT198TT MINGW64 ~/VMs_vagrant
$ cd Centos7/

HuuPV@LAPTOP-HKT198TT MINGW64 ~/VMs_vagrant/Centos7
$ vagrant.exe init
A `Vagrantfile` has been placed in this directory. You are now
ready to `vagrant up` your first virtual environment! Please read
the comments in the Vagrantfile as well as documentation on
`vagrantup.com` for more information on using Vagrant.

HuuPV@LAPTOP-HKT198TT MINGW64 ~/VMs_vagrant/Centos7
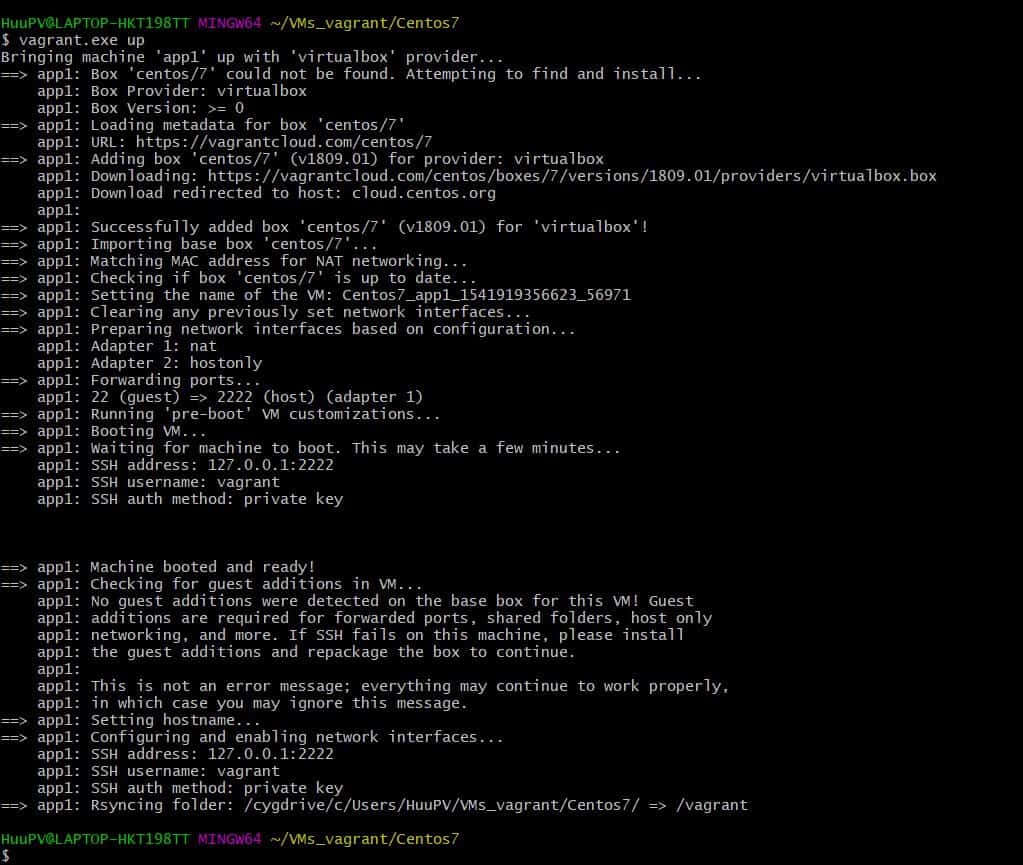
$ notepad Vagrantfile

The result as the picture below

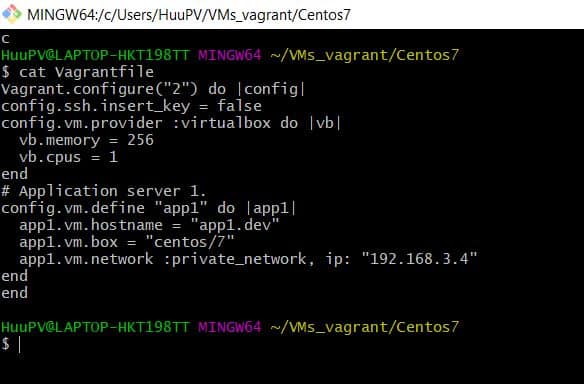
The content “Vagrantfile” file

Vagrant.configure("2") do |config|
config.ssh.insert_key = false
config.vm.provider :virtualbox do |vb|
  vb.memory = 256
  vb.cpus = 1
end
# Application server 1.
config.vm.define "app1" do |app1|
  app1.vm.hostname = "app1.dev"
  app1.vm.box = "centos/7"
  app1.vm.network :private_network, ip: "192.168.3.4"
end
end

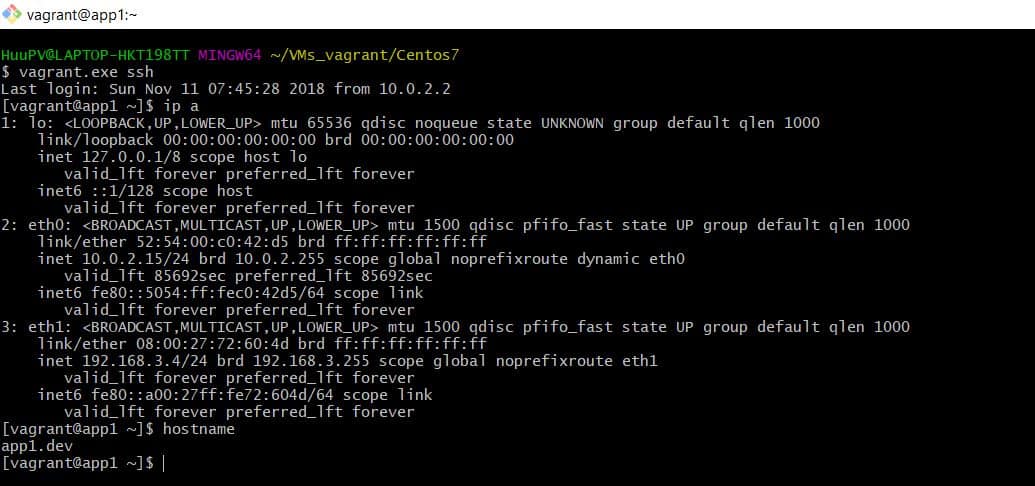
Vagrant ssh (Connecting non-GUI Linux OS)

$ vagrant.exe ssh

The result as the picture below

Most Common Vagrant Commands

  • vagrant init: initialize
  • vagrant up: Download image and do rest of the settings and power-up the box
  • vagrant status: Shows status
  • vagrant suspend: Saves the box’s current state
  • vagrant halt: shutdown the box (Power-off)
  • vagrant destroy: shutdown and delete the box

How to Install Vagrant on Windows 10 Youtube

https://youtu.be/WZITvq1l2VY

Conclusion

Thought the article, You can “Install Vagrant on Windows 10 as above. I hope will this your helpful. Thank you for reading the DevopsRoles page!

How to update vagrant box

Introduction

In this tutorial, we will explore the crucial process of update vagrant box, an essential tool for DevOps roles. Keeping your Vagrant box up-to-date ensures you have access to the latest features and improvements.

Locating Vagrant Boxes

Start by browsing the Vagrant Box repository at Vagrant Box Search. Here, you can find a variety of boxes tailored to different development needs.

https://app.vagrantup.com/boxes/search

Automating Guest Addition Installation:

To streamline your workflow, consider using the vagrant-vbguest plugin. Install it effortlessly with the following command:

$ vagrant plugin install vagrant-vbguest

This plugin automatically installs guest additions on the guest side, saving you time and effort.

Update vagrant box

Now, let’s dive into the core of the tutorial—updating your Vagrant box. Utilize the following command structure:

$ vagrant box update --box [box-name]

Note: It’s important to note that when updating the box file, old and new versions may coexist.

Conclusion

Throughout this article, we’ve walked through the steps of using vagrant box update. By following these guidelines, you can ensure your Vagrant box is always equipped with the latest enhancements. I hope this information proves helpful for your DevOps journey. Thank you for reading the DevopsRoles page!