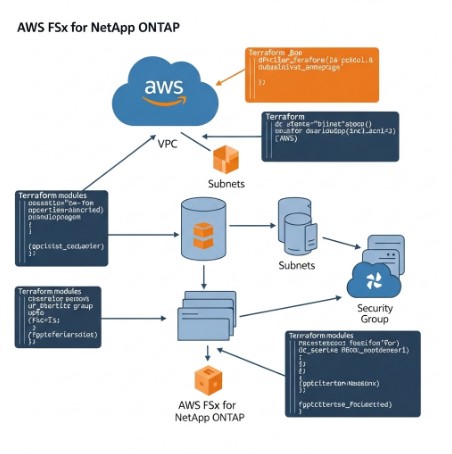
Tag Archives: Terraform

How to Deploy Terraform Code in an Azure DevOps Pipeline

In today’s dynamic cloud landscape, infrastructure as code (IaC) has become paramount. Terraform, a powerful IaC tool, allows you to define and manage your infrastructure using declarative configuration files. Integrating Terraform with a robust CI/CD pipeline like Azure DevOps streamlines the deployment process, enhancing efficiency, consistency, and collaboration. This comprehensive guide will walk you through how to deploy Terraform code in an Azure DevOps pipeline, covering everything from setup to advanced techniques. This is crucial for DevOps engineers, cloud engineers, and anyone involved in managing and automating infrastructure deployments.

Setting up Your Azure DevOps Project

Creating a New Project

First, you need an Azure DevOps organization and project. If you don’t have one, create a free account at dev.azure.com. Once logged in, create a new project and choose a suitable name (e.g., “Terraform-Azure-Deployment”). Select “Agile” or “Scrum” for the process template based on your team’s preferences.

Creating a New Pipeline

Navigate to “Pipelines” in your project’s menu. Click “New pipeline.” Select the Azure Repos Git repository where your Terraform code resides. If you’re using a different Git provider (like GitHub or Bitbucket), choose the appropriate option and follow the authentication instructions.

Configuring the Azure DevOps Pipeline

Choosing a Pipeline Template

Azure DevOps offers various pipeline templates. For Terraform, you’ll likely use a YAML template. This provides maximum control and flexibility. Click “YAML” to start creating a custom YAML pipeline.

Writing Your YAML Pipeline

The YAML file will define the stages of your pipeline. Here’s a basic example:


trigger:
- main

stages:
- stage: TerraformInit
  displayName: Terraform Init
  jobs:
  - job: InitJob
    steps:
    - task: UseDotNet@2
      inputs:
        version: '6.0.x'
    - task: TerraformInstaller@0
      inputs:
        version: '1.3.0'
    - script: terraform init -input=false
      displayName: 'terraform init'

- stage: TerraformPlan
  displayName: Terraform Plan
  jobs:
  - job: PlanJob
    steps:
    - script: terraform plan -input=false -out=tfplan
      displayName: 'terraform plan'

- stage: TerraformApply
  displayName: Terraform Apply
  jobs:
  - job: ApplyJob
    steps:
    - script: terraform apply -auto-approve tfplan
      displayName: 'terraform apply'

- stage: TerraformDestroy
  displayName: Terraform Destroy
  jobs:
    - job: DestroyJob
      steps:
        - script: terraform destroy -auto-approve
          displayName: 'terraform destroy'
          condition: eq(variables['destroy'], true)

Explanation of the YAML File

  • trigger: main: This line indicates that the pipeline should run automatically whenever code is pushed to the main branch.
  • stages: This defines the different stages of the pipeline: Init, Plan, Apply, and Destroy.
  • jobs: Each stage contains one or more jobs.
  • steps: These are the individual tasks within each job. We are using tasks to install .NET, install Terraform, and run the Terraform commands (init, plan, apply, destroy).
  • condition: Allows conditional execution, in this case the destroy stage only runs if the variable destroy is set to true.

Integrating with Azure Resources

To deploy resources to Azure, you’ll need to configure your Azure credentials within the pipeline. This can be done through Azure DevOps service connections. Create a service connection that uses a service principal for secure authentication.

Advanced Techniques

Using Azure Resource Manager (ARM) Templates

You can enhance your Terraform deployments by integrating with ARM templates. This allows you to manage resources that are better suited to ARM’s capabilities or leverage existing ARM templates within your Terraform configuration.

State Management with Azure Storage

For production environments, it’s crucial to manage your Terraform state securely and reliably. Use Azure Storage accounts to store the state file, ensuring consistent state management across multiple runs of your pipeline.

Variables and Modules

Employ Terraform modules and variables to promote code reusability and maintainability. This allows for parameterization of your infrastructure deployments.

Automated Testing

Implement automated tests within your pipeline to verify your Terraform configurations before deployment. This helps catch potential issues early in the process and ensures higher quality deployments.

Real-World Examples

Deploying a Virtual Machine

A simple example is deploying a Linux virtual machine. Your Terraform code would define the resource group, virtual network, subnet, and virtual machine specifics. The Azure DevOps pipeline would then execute the Terraform commands to create these resources.

Deploying a Database

You can also deploy databases such as Azure SQL Database or MySQL using Terraform and manage their configuration through Azure DevOps. This could involve setting up server parameters, networking, and firewall rules.

Deploying Kubernetes Clusters

More complex scenarios include deploying and managing Kubernetes clusters using Terraform. The pipeline could handle the entire lifecycle, from creating the cluster to deploying applications on it.

Frequently Asked Questions (FAQ)

Q1: How do I handle secrets in my Terraform code within Azure DevOps?

A1: Avoid hardcoding secrets directly in your Terraform code. Use Azure Key Vault to store sensitive information like passwords and API keys. Your pipeline can then access these secrets securely using a Key Vault task.

Q2: What if my Terraform apply fails? How can I troubleshoot?

A2: Azure DevOps provides detailed logs for each step of the pipeline. Carefully review these logs to identify the root cause of the failure. Terraform’s error messages are generally informative. Also, ensure your Terraform configuration is valid and that your Azure environment has the necessary permissions and resources.

Q3: Can I use Terraform Cloud with Azure DevOps?

A3: Yes, you can integrate Terraform Cloud with Azure DevOps. This can offer additional features such as remote state management and collaboration tools. You’ll need to configure the appropriate authentication and permissions between Terraform Cloud and your Azure DevOps pipeline.

Q4: How do I roll back a failed Terraform deployment?

A4: If your terraform apply fails, don’t panic. The pipeline will usually halt at that point. You can investigate the logs to understand the cause of the failure. If the deployment was partially successful, you may need to manually intervene to clean up resources, or better still, have a rollback mechanism built into your Terraform code. You can also utilize the terraform destroy command within your pipeline to automatically delete resources in case of failure. However, it’s best to thoroughly test your infrastructure code and review the plan thoroughly before applying changes to production environments.

Q5: How can I incorporate code review into my Terraform deployment pipeline?

A5: Integrate a code review process into your Git workflow. Azure DevOps has built-in pull request capabilities. Require code reviews before merging changes into your main branch. This ensures that changes are reviewed and approved before deployment, reducing the risk of errors.

How to Deploy Terraform Code in an Azure DevOps Pipeline

Conclusion Deploy Terraform Code in an Azure

Deploying Terraform code in an Azure DevOps pipeline offers a powerful way to automate and streamline your infrastructure deployments. By leveraging the features of Azure DevOps and best practices in Terraform, you can create a robust and reliable CI/CD system for your infrastructure. Remember to prioritize security by securely managing your secrets, using version control, and testing your configurations thoroughly. Following the steps and best practices outlined in this guide will enable you to effectively manage and automate your infrastructure deployments, leading to increased efficiency, consistency, and reliability.Thank you for reading the DevopsRoles page!

Manage Amazon Redshift Provisioned Clusters with Terraform

In today’s data-driven world, efficiently managing your data warehouse is paramount. Amazon Redshift, a fully managed, petabyte-scale data warehouse service in the cloud, offers a powerful solution. However, managing Redshift clusters manually can be time-consuming and error-prone. This is where Terraform steps in. This comprehensive guide will delve into how to effectively manage Amazon Redshift provisioned clusters with Terraform, providing you with the knowledge and practical examples to streamline your data warehouse infrastructure management.

Why Terraform for Amazon Redshift?

Terraform, a popular Infrastructure as Code (IaC) tool, allows you to define and manage your infrastructure in a declarative manner. Using Terraform to manage your Amazon Redshift clusters offers several key advantages:

  • Automation: Automate the entire lifecycle of your Redshift clusters – from creation and configuration to updates and deletion.
  • Version Control: Store your infrastructure configurations in version control systems like Git, enabling collaboration, auditing, and rollback capabilities.
  • Consistency and Repeatability: Ensure consistent deployments across different environments (development, testing, production).
  • Reduced Errors: Minimize human error by automating the provisioning and management process.
  • Improved Collaboration: Facilitate collaboration among team members through a shared, standardized approach to infrastructure management.
  • Scalability: Easily scale your Redshift clusters up or down based on your needs.

Setting up Your Environment

Before you begin, ensure you have the following:

  • An AWS account with appropriate permissions.
  • Terraform installed on your system. You can download it from the official Terraform website.
  • The AWS CLI configured and authenticated.
  • Basic understanding of Terraform concepts like providers, resources, and state files.

Basic Redshift Cluster Provisioning with Terraform

Let’s start with a simple example of creating a Redshift cluster using Terraform. This example uses the AWS provider and defines a basic Redshift cluster with a single node.

Terraform Configuration File (main.tf)


terraform {
  required_providers {
    aws = {
      source  = "hashicorp/aws"
      version = "~> 4.0"
    }
  }
}

provider "aws" {
  region = "us-west-2" // Replace with your desired region
}

resource "aws_redshift_cluster" "default" {
  cluster_identifier = "my-redshift-cluster"
  database_name      = "mydatabase"
  master_username    = "myusername"
  master_user_password = "mypassword" # **Important: Securely manage passwords!**
  node_type          = "dc2.large"
  number_of_nodes    = 1
}

Deploying the Infrastructure

  1. Save the code above as main.tf.
  2. Navigate to the directory containing main.tf in your terminal.
  3. Run terraform init to initialize the Terraform providers.
  4. Run terraform plan to preview the changes.
  5. Run terraform apply to create the Redshift cluster.

Advanced Configurations and Features

The basic example above provides a foundation. Let’s explore more advanced scenarios for managing Amazon Redshift provisioned clusters with Terraform.

Managing Cluster Parameters

Terraform allows fine-grained control over various Redshift cluster parameters. You can configure parameters like:

  • Cluster type: Single-node or multi-node.
  • Node type: Choose from various node types based on your performance requirements.
  • Automated snapshots: Enable automated backups for data protection.
  • Encryption: Configure encryption at rest and in transit.
  • IAM roles: Grant specific permissions to your Redshift cluster.
  • Maintenance window: Schedule maintenance operations during off-peak hours.

Managing IAM Roles and Policies

It’s crucial to manage IAM roles and policies effectively. This ensures that your Redshift cluster has only the necessary permissions to access other AWS services.


resource "aws_iam_role" "redshift_role" {
  name = "RedshiftRole"
  assume_role_policy = jsonencode({
    Version = "2012-10-17"
    Statement = [
      {
        Action = "sts:AssumeRole"
        Effect = "Allow"
        Principal = {
          Service = "redshift.amazonaws.com"
        }
      }
    ]
  })
}

resource "aws_iam_role_policy_attachment" "redshift_policy_attachment" {
  role       = aws_iam_role.redshift_role.name
  policy_arn = "arn:aws:iam::aws:policy/AmazonS3ReadOnlyAccess" // Replace with appropriate policy
}

resource "aws_redshift_cluster" "default" {
  # ... other configurations ...
  iam_roles = [aws_iam_role.redshift_role.arn]
}

Managing Security Groups

Control network access to your Redshift cluster by managing security groups. This enhances the security posture of your data warehouse.


resource "aws_security_group" "redshift_sg" {
  name        = "redshift-sg"
  description = "Security group for Redshift cluster"

  ingress {
    from_port   = 5439  // Redshift port
    to_port     = 5439
    protocol    = "tcp"
    cidr_blocks = ["0.0.0.0/0"] // Replace with appropriate CIDR blocks
  }

  egress {
    from_port   = 0
    to_port     = 0
    protocol    = "-1"
    cidr_blocks = ["0.0.0.0/0"]
  }
}

resource "aws_redshift_cluster" "default" {
  # ... other configurations ...
  vpc_security_group_ids = [aws_security_group.redshift_sg.id]
}

Scaling Your Redshift Cluster

Terraform simplifies scaling your Redshift cluster. You can modify the number_of_nodes parameter in your Terraform configuration and re-apply the configuration to adjust the cluster size.

Real-World Use Cases

  • DevOps Automation: Automate the deployment of Redshift clusters in different environments, ensuring consistency and reducing manual effort.
  • Disaster Recovery: Create a secondary Redshift cluster in a different region for disaster recovery purposes, leveraging Terraform’s automation capabilities.
  • Data Migration: Use Terraform to manage the creation and configuration of Redshift clusters for large-scale data migration projects.
  • Continuous Integration/Continuous Deployment (CI/CD): Integrate Terraform into your CI/CD pipeline to automate the entire infrastructure lifecycle.

Frequently Asked Questions (FAQ)

Q1: How do I manage passwords securely when using Terraform for Redshift?

A1: Avoid hardcoding passwords directly in your Terraform configuration files. Use environment variables, AWS Secrets Manager, or other secure secret management solutions to store and retrieve passwords.

Q2: Can I use Terraform to manage existing Redshift clusters?

A2: Yes, Terraform can manage existing clusters. You’ll need to import the existing resources into your Terraform state using the terraform import command. Then, you can manage the cluster’s configurations through Terraform.

Q3: How do I handle updates to my Redshift cluster configuration?

A3: Make changes to your Terraform configuration file, run terraform plan to review the changes, and then run terraform apply to update the Redshift cluster. Terraform will intelligently determine the necessary changes and apply them efficiently.

Conclusion Manage Amazon Redshift Provisioned Clusters with Terraform

Managing Amazon Redshift Provisioned Clusters with Terraform offers a modern, efficient, and highly scalable solution for organizations deploying data infrastructure on AWS. By leveraging Infrastructure as Code (IaC), Terraform automates the entire lifecycle of Redshift clusters — from provisioning and scaling to updating and decommissioning – ensuring consistency and reducing manual errors. Thank you for reading the DevopsRoles page!

With Terraform, DevOps and Data Engineering teams can:

  • Reuse and standardize infrastructure configurations with clarity;
  • Track changes and manage versions through Git integration;
  • Optimize costs and resource allocation via automated provisioning workflows;
  • Accelerate the deployment and scaling of big data environments in production.

Deploy Cloudflare Workers with Terraform: A Comprehensive Guide

In today’s fast-paced world of software development and deployment, efficiency and automation are paramount. Infrastructure as Code (IaC) tools like Terraform have revolutionized how we manage and deploy infrastructure. This guide delves into the powerful combination of Cloudflare Workers and Terraform, showing you how to seamlessly deploy and manage your Workers using this robust IaC tool. We’ll cover everything from basic deployments to advanced scenarios, ensuring you have a firm grasp on this essential skill.

What are Cloudflare Workers?

Cloudflare Workers are a serverless platform that allows developers to run JavaScript code at the edge of Cloudflare’s network. This means your code is executed incredibly close to your users, resulting in faster loading times and improved performance. Workers are incredibly versatile, enabling you to create APIs, build microservices, and implement various functionalities without managing servers.

Why Use Terraform for Deploying Workers?

Manually managing Cloudflare Workers can become cumbersome, especially as the number of Workers and their configurations grow. Terraform provides a solution by allowing you to define your infrastructure-in this case, your Workers—as code. This approach offers numerous advantages:

  • Automation: Automate the entire deployment process, from creating Workers to configuring their settings.
  • Version Control: Track changes to your Worker configurations using Git, enabling easy rollback and collaboration.
  • Consistency: Ensure consistent deployments across different environments (development, staging, production).
  • Repeatability: Easily recreate your infrastructure from scratch.
  • Collaboration: Facilitates teamwork and simplifies the handoff between developers and operations teams.

Setting Up Your Environment

Before we begin, ensure you have the following:

  • Terraform installed: Download and install Terraform from the official website: https://www.terraform.io/downloads.html
  • Cloudflare Account: You’ll need a Cloudflare account and a zone configured.
  • Cloudflare API Token: Generate an API token with the appropriate permissions (Workers management) from your Cloudflare account.

Basic Worker Deployment with Terraform

Let’s start with a simple example. This Terraform configuration creates a basic “Hello, World!” Worker:


terraform {
  required_providers {
    cloudflare = {
      source  = "cloudflare/cloudflare"
      version = "~> 2.0"
    }
  }
}
provider "cloudflare" {
  api_token = "YOUR_CLOUDFLARE_API_TOKEN"
}
resource "cloudflare_worker" "hello_world" {
  name        = "hello-world"
  script      = "addEventListener('fetch', event => { event.respondWith(new Response('Hello, World!')); });"
}

Explanation:

  • provider "cloudflare": Defines the Cloudflare provider and your API token.
  • resource "cloudflare_worker": Creates a new Worker resource.
  • name: Sets the name of the Worker.
  • script: Contains the JavaScript code for the Worker.

To deploy this Worker:

  1. Save the code as main.tf.
  2. Run terraform init to initialize the providers.
  3. Run terraform plan to preview the changes.
  4. Run terraform apply to deploy the Worker.

Advanced Worker Deployment Scenarios

Using Environment Variables

Workers often require environment variables. Terraform allows you to manage these efficiently:

resource "cloudflare_worker_script" "my_worker" {
  name = "my-worker"
  script = <<-EOF
    addEventListener('fetch', event => {
      const apiKey = ENV.API_KEY;
      // ... use apiKey ...
    });
  EOF
  environment_variables = {
    API_KEY = "your_actual_api_key"
  }
}

Managing Worker Routes

You can use Terraform to define routes for your Workers:

resource "cloudflare_worker_route" "my_route" {
  pattern     = "/api/*"
  service_id  = cloudflare_worker.my_worker.id
}

Deploying Multiple Workers

You can easily deploy multiple Workers within the same Terraform configuration:

resource "cloudflare_worker" "worker1" {
  name        = "worker1"
  script      = "/* Worker 1 script */"
}
resource "cloudflare_worker" "worker2" {
  name        = "worker2"
  script      = "/* Worker 2 script */"
}

Real-World Use Cases

  • API Gateway: Create a serverless API gateway using Workers, managed by Terraform for automated deployment and updates.
  • Microservices: Deploy individual microservices as Workers, simplifying scaling and maintenance.
  • Static Site Generation: Combine Workers with a CDN for fast and efficient static site hosting, all orchestrated through Terraform.
  • Authentication and Authorization: Implement authentication and authorization layers using Workers managed by Terraform.
  • Image Optimization: Build a Worker to optimize images on-the-fly, improving website performance.

Frequently Asked Questions (FAQ)

1. Can I use Terraform to manage Worker KV (Key-Value) stores?

Yes, Terraform can manage Cloudflare Workers KV stores. You can create, update, and delete KV namespaces and their entries using the appropriate Cloudflare Terraform provider resources. This allows you to manage your worker’s data storage as part of your infrastructure-as-code.

2. How do I handle secrets in my Terraform configuration for Worker deployments?

Avoid hardcoding secrets directly into your main.tf file. Instead, utilize Terraform’s environment variables, or consider using a secrets management solution like HashiCorp Vault to securely store and access sensitive information. Terraform can then retrieve these secrets during deployment.

3. What happens if my Worker script has an error?

If your Worker script encounters an error, Cloudflare will log the error and your Worker might stop responding. Proper error handling within your Worker script is crucial. Terraform itself won’t directly handle runtime errors within the worker, but it facilitates re-deployment if necessary.

4. How can I integrate Terraform with my CI/CD pipeline?

Integrate Terraform into your CI/CD pipeline (e.g., Jenkins, GitLab CI, GitHub Actions) to automate the deployment process. Your pipeline can trigger Terraform commands (terraform init, terraform plan, terraform apply) on code changes, ensuring seamless and automated deployments.

5. What are the limitations of using Terraform for Cloudflare Workers?

While Terraform is highly effective for managing the infrastructure surrounding Cloudflare Workers, it doesn’t directly manage the runtime execution of the Worker itself. Debugging and monitoring still primarily rely on Cloudflare’s own tools and dashboards. Also, complex Worker configurations might require more intricate Terraform configurations, potentially increasing complexity.

Conclusion Deploy Cloudflare Workers with Terraform

Deploying Workers using Terraform offers significant advantages in managing and automating your serverless infrastructure. From basic deployments to sophisticated configurations involving environment variables, routes, and multiple Workers, Terraform provides a robust and scalable solution. By leveraging IaC principles, you can ensure consistency, repeatability, and collaboration throughout your development lifecycle. Remember to prioritize security by using appropriate secret management techniques and integrating Terraform into your CI/CD pipeline for a fully automated and efficient workflow. Thank you for reading the DevopsRoles page!

Setting up a bottlerocket eks terraform

In today’s fast-evolving cloud computing environment, achieving secure, reliable Kubernetes deployments is more critical than ever. Amazon Elastic Kubernetes Service (EKS) streamlines the management of Kubernetes clusters, but ensuring robust node security and operational simplicity remains a key concern.

By leveraging Bottlerocket EKS Terraform integration, you combine the security-focused, container-optimized Bottlerocket OS with Terraform’s powerful Infrastructure-as-Code capabilities. This guide provides a step-by-step approach to deploying a Bottlerocket-managed node group on Amazon EKS using Terraform, helping you enhance both the security and maintainability of your Kubernetes infrastructure.

Why Bottlerocket and Terraform for EKS?

Choosing Bottlerocket for your EKS nodes offers significant advantages. Its minimal attack surface, immutable infrastructure approach, and streamlined update process greatly reduce operational overhead and security vulnerabilities compared to traditional Linux distributions. Pairing Bottlerocket with Terraform, a popular Infrastructure-as-Code (IaC) tool, allows for automated and reproducible deployments, ensuring consistency and ease of management across multiple environments.

Bottlerocket’s Benefits:

  • Reduced Attack Surface: Bottlerocket’s minimal footprint significantly reduces potential attack vectors.
  • Immutable Infrastructure: Updates are handled by replacing entire nodes, eliminating configuration drift and simplifying rollback.
  • Simplified Updates: Updates are streamlined and reliable, reducing downtime and simplifying maintenance.
  • Security Focused: Designed with security as a primary concern, incorporating features like Secure Boot and runtime security measures.

Terraform’s Advantages:

  • Infrastructure as Code (IaC): Enables automated and repeatable deployments, simplifying management and reducing errors.
  • Version Control: Allows for tracking changes and rolling back to previous versions if needed.
  • Collaboration: Facilitates collaboration among team members through version control systems like Git.
  • Modular Design: Promotes reusability and maintainability of infrastructure configurations.

Setting up the Environment for bottlerocket eks terraform

Before we begin, ensure you have the following prerequisites:

  • An AWS account with appropriate permissions.
  • Terraform installed and configured with AWS credentials (Terraform AWS Provider documentation).
  • An existing EKS cluster (you can create one using the AWS console or Terraform).
  • Basic familiarity with AWS IAM roles and policies.
  • The AWS CLI installed and configured.

Terraform Configuration

The core of our deployment will be a Terraform configuration file (main.tf). This file defines the resources needed to create the Bottlerocket managed node group:


terraform {
  required_providers {
    aws = {
      source  = "hashicorp/aws"
      version = "~> 4.0"
    }
  }
}

provider "aws" {
  region = "us-west-2" // Replace with your region
}

resource "aws_eks_node_group" "bottlerocket" {
  cluster_name     = "my-eks-cluster" // Replace with your cluster name
  node_group_name  = "bottlerocket-ng"
  node_role_arn    = aws_iam_role.eks_node_role.arn
  subnet_ids       = [aws_subnet.private_subnet.*.id]
  scaling_config {
    desired_size = 1
    min_size     = 1
    max_size     = 3
  }
  ami_type        = "AL2_x86_64" # or appropriate AMI type for Bottlerocket
  instance_types  = ["t3.medium"]
  disk_size       = 20
  labels = {
    "kubernetes.io/os" = "bottlerocket"
  }
  tags = {
    Name = "bottlerocket-node-group"
  }
}


resource "aws_iam_role" "eks_node_role" {
  name = "eks-bottlerocket-node-role"
  assume_role_policy = jsonencode({
    Version = "2012-10-17",
    Statement = [
      {
        Action = "sts:AssumeRole",
        Effect = "Allow",
        Principal = {
          Service = "ec2.amazonaws.com"
        }
      }
    ]
  })
}

resource "aws_iam_role_policy_attachment" "eks_node_group_policy" {
  role       = aws_iam_role.eks_node_role.name
  policy_arn = "arn:aws:iam::aws:policy/AmazonEKSWorkerNodePolicy"
}

resource "aws_iam_role_policy_attachment" "amazon_ec2_container_registry_read_only_access" {
  role       = aws_iam_role.eks_node_role.name
  policy_arn = "arn:aws:iam::aws:policy/AmazonEC2ContainerRegistryReadOnly"
}


resource "aws_subnet" "private_subnet" {
  count = 2 # adjust count based on your VPC configuration
  vpc_id            = "vpc-xxxxxxxxxxxxxxxxx" # replace with your VPC ID
  cidr_block        = "10.0.1.0/24" # replace with your subnet CIDR block
  availability_zone = "us-west-2a" # replace with correct AZ.  Modify count accordingly.
  map_public_ip_on_launch = false
  tags = {
    Name = "private-subnet"
  }
}

Remember to replace placeholders like `”my-eks-cluster”`, `”vpc-xxxxxxxxxxxxxxxxx”`, `”10.0.1.0/24″`, and `”us-west-2″` with your actual values. You’ll also need to adjust the subnet configuration to match your VPC setup.

Deploying with Terraform

Once the main.tf file is ready, navigate to the directory containing it in your terminal and execute the following commands:


terraform init
terraform plan
terraform apply

terraform init downloads the necessary providers. terraform plan shows a preview of the changes that will be made. Finally, terraform apply executes the deployment. Review the plan carefully before applying it.

Verifying the Deployment

After successful deployment, use the AWS console or the AWS CLI to verify that the Bottlerocket node group is running and joined to your EKS cluster. Check the node status using the kubectl get nodes command. You should see nodes with the OS reported as Bottlerocket.

Advanced Configuration and Use Cases

This basic configuration provides a foundation for setting up Bottlerocket managed node groups. Let’s explore some advanced use cases:

Auto-scaling:

Fine-tune the scaling_config block in the Terraform configuration to adjust the desired, minimum, and maximum number of nodes based on your workload requirements. Auto-scaling ensures optimal resource utilization and responsiveness.

IAM Roles and Policies:

Customize the IAM roles and policies attached to the node group to grant only necessary permissions, adhering to the principle of least privilege. This enhances security by limiting potential impact of compromise.

Spot Instances:

Leverage AWS Spot Instances to reduce costs by using spare compute capacity. Configure your node group to utilize Spot Instances, ensuring your applications can tolerate potential interruptions.

Custom AMIs:

For highly specialized needs, you may create custom Bottlerocket AMIs that include pre-installed tools or configurations. This allows tailoring the node group to your application’s specific demands.

Frequently Asked Questions (FAQ)

Q1: What are the limitations of using Bottlerocket?

Bottlerocket is still a relatively new technology, so its community support and third-party tool compatibility might not be as extensive as that of established Linux distributions. While improving rapidly, some tools and configurations may require adaptation or workarounds.

Q2: How do I troubleshoot node issues in a Bottlerocket node group?

Troubleshooting Bottlerocket nodes often requires careful examination of cloudwatch logs and potentially using tools like kubectl describe node to identify specific problems. The immutable nature of Bottlerocket simplifies debugging, since issues are often resolved by replacing the affected node.

Conclusion

Setting up a Bottlerocket managed node group on Amazon EKS using Terraform provides a highly secure, automated, and efficient infrastructure foundation. By leveraging Bottlerocket’s minimal, security-focused operating system alongside Terraform’s powerful Infrastructure-as-Code capabilities, you achieve a streamlined, consistent, and scalable Kubernetes environment. This combination reduces operational complexity, enhances security posture, and enables rapid, reliable deployments. While Bottlerocket introduces some limitations due to its specialized nature, its benefits-especially in security and immutability-make it a compelling choice for modern cloud-native applications. As your needs evolve, advanced configurations such as auto-scaling, Spot Instances, and custom AMIs further extend the flexibility and efficiency of your EKS clusters. Thank you for reading the DevopsRoles page!

Terraform For Loop List of Lists

Introduction: Harnessing the Power of Nested Lists in Terraform

Terraform, HashiCorp’s Infrastructure as Code (IaC) tool, empowers users to define and provision infrastructure through code. While Terraform excels at managing individual resources, the complexity of modern systems often demands the ability to handle nested structures and relationships. This is where the ability to build a list of lists with a Terraform for loop becomes crucial. This article provides a comprehensive guide to mastering this technique, equipping you with the knowledge to efficiently manage even the most intricate infrastructure deployments. Understanding how to build a list of lists with Terraform for loops is vital for DevOps engineers and system administrators who need to automate the provisioning of complex, interconnected resources.

Understanding Terraform Lists and For Loops

Before diving into nested lists, let’s establish a solid foundation in Terraform’s core concepts. A Terraform list is an ordered collection of elements. These elements can be any valid Terraform data type, including strings, numbers, maps, and even other lists. This allows for the creation of complex, hierarchical data structures. Terraform’s for loop is a powerful construct used to iterate over lists and maps, generating multiple resources or configuring values based on the loop’s contents. Combining these two features enables the creation of dynamic, multi-dimensional structures like lists of lists.

Basic List Creation in Terraform

Let’s start with a simple example of creating a list in Terraform:

variable "my_list" {
  type = list(string)
  default = ["apple", "banana", "cherry"]
}
output "my_list_output" {
  value = var.my_list
}

This code defines a variable my_list containing a list of strings. The output block then displays the contents of this list.

Introducing the Terraform for Loop

The for loop allows iteration over lists. Here’s a basic example:

variable "my_list" {
  type = list(string)
  default = ["apple", "banana", "cherry"]
}
resource "null_resource" "example" {
  count = length(var.my_list)
  provisioner "local-exec" {
    command = "echo ${var.my_list[count.index]}"
  }
}

This creates a null_resource for each element in my_list, printing each element using a local-exec provisioner. The count.index variable provides the index of the current element during iteration.

Building a List of Lists with Terraform For Loops

Now, let’s move on to the core topic: constructing a list of lists using Terraform’s for loop. The key is to use nested loops, one for each level of the nested structure.

Example: A Simple List of Lists

Consider a scenario where you need to create a list of security groups, each containing a list of inbound rules.

variable "security_groups" {
  type = list(object({
    name = string
    rules = list(object({
      protocol = string
      port     = number
    }))
  }))
  default = [
    {
      name = "web_servers"
      rules = [
        { protocol = "tcp", port = 80 },
        { protocol = "tcp", port = 443 },
      ]
    },
    {
      name = "database_servers"
      rules = [
        { protocol = "tcp", port = 3306 },
      ]
    },
  ]
}
resource "aws_security_group" "example" {
  for_each = toset(var.security_groups)
  name        = each.value.name
  description = "Security group for ${each.value.name}"
  # ...rest of the aws_security_group configuration...  This would require further definition based on your AWS infrastructure.  This is just a simplified example.
}
#Example of how to access nested list inside a for loop  (this would need more aws specific resource blocks to be fully functional)
resource "null_resource" "print_rules" {
  for_each = {for k, v in var.security_groups : k => v}
  provisioner "local-exec" {
    command = "echo 'Security group ${each.value.name} has rules: ${jsonencode(each.value.rules)}'"
  }
}

This example demonstrates the creation of a list of objects, where each object (representing a security group) contains a list of rules. Note the usage of for_each which iterates over the list of security groups. While this doesn’t directly manipulate a list of lists in a nested loop, it shows how to utilize a list that inherently contains nested list structures. Accessing and manipulating this nested structure inside the loop using each.value.rules is vital.

Advanced Scenario: Dynamic List Generation

Let’s create a more dynamic example, where the number of nested lists is determined by a variable:

variable "num_groups" {
  type = number
  default = 3
}
variable "rules_per_group" {
  type = number
  default = 2
}
locals {
  groups = [for i in range(var.num_groups) : [for j in range(var.rules_per_group) : {port = i * var.rules_per_group + j + 8080}]]
}
output "groups" {
  value = local.groups
}
#Further actions would be applied here based on your individual needs and infrastructure.

This code generates a list of lists dynamically. The outer loop creates num_groups lists, and the inner loop populates each with rules_per_group objects, each with a unique port number. This highlights the power of nested loops for creating complex, configurable structures.

Use Cases and Practical Applications

Building lists of lists with Terraform for loops has several practical applications:

  • Network Configuration: Managing multiple subnets, each with its own set of security groups and associated rules.
  • Database Deployment: Creating multiple databases, each with its own set of users and permissions.
  • Application Deployment: Deploying multiple applications across different environments, each with its own configuration settings.
  • Cloud Resource Management: Orchestrating the deployment and management of various cloud resources, such as virtual machines, load balancers, and storage.

FAQ Section

Q1: Can I use nested for loops with other Terraform constructs like count?


A1: Yes, you can combine nested for loops with count, for_each, and other Terraform constructs. However, careful planning is essential to avoid unexpected behavior or conflicts. Understanding the order of evaluation is crucial for correct functionality.


Q2: How can I debug issues when working with nested lists in Terraform?


A2: Terraform’s output block is invaluable for debugging. Print out intermediate values from your loops to inspect the structure and contents of your lists at various stages of execution. Also, the terraform console command allows interactive inspection of your Terraform state.


Q3: What are the limitations of using nested loops for very large datasets?


A3: For extremely large datasets, nested loops can become computationally expensive. Consider alternative approaches, such as data transformations using external tools or leveraging Terraform’s data sources for pre-processed data.


Q4: Are there alternative approaches to building complex nested structures besides nested for loops?


A4: Yes, you can utilize Terraform’s data sources to fetch pre-structured data from external sources (e.g., CSV files, APIs). This can streamline the process, especially for complex configurations.


Q5: How can I handle errors gracefully when working with nested loops in Terraform?


A5: Employ proper error handling using try and catch blocks to gracefully manage exceptions that might occur during the loop’s execution.

Conclusion Terraform For Loop List of Lists

Building a list of lists with Terraform for loops is a powerful technique for managing complex infrastructure. This method provides flexibility and scalability, enabling you to efficiently define and provision intricate systems. By understanding the fundamentals of Terraform lists, for loops, and employing best practices for error handling and debugging, you can effectively leverage this technique to create robust and maintainable infrastructure code. Remember to carefully plan your code structure and leverage Terraform’s debugging capabilities to avoid common pitfalls when dealing with nested data structures. Proper use of this approach will lead to more efficient and reliable infrastructure management. Thank you for reading the DevopsRoles page!

A Comprehensive Guide to Using Terraform Infra for Seamless Infrastructure Management

Introduction: Understanding Terraform Infra and Its Applications

In today’s fast-paced technological world, managing and provisioning infrastructure efficiently is crucial for businesses to stay competitive. Terraform, an open-source tool created by HashiCorp, has emerged as a key player in this domain. By utilizing “terraform infra,” developers and system administrators can automate the process of setting up, managing, and scaling infrastructure on multiple cloud platforms.

Terraform Infra, short for “Terraform Infrastructure,” provides users with an easy way to codify and manage their infrastructure in a version-controlled environment, enhancing flexibility, efficiency, and consistency. In this article, we will explore what Terraform Infra is, its key features, how it can be implemented in real-world scenarios, and answer some common questions regarding its usage.

What is Terraform Infra?

The Basics of Terraform

Terraform is a tool that allows users to define and provision infrastructure using declarative configuration files. Instead of manually setting up resources like virtual machines, databases, and networks, you write code that specifies the desired state of the infrastructure. Terraform then interacts with your cloud provider’s APIs to ensure the resources match the desired state.

Key Components of Terraform Infra

Terraform’s core infrastructure components include:

  • Providers: These are responsible for interacting with cloud services like AWS, Azure, GCP, and others.
  • Resources: Define what you are creating or managing (e.g., virtual machines, load balancers).
  • Modules: Reusable configurations that help you structure your infrastructure code in a more modular way.
  • State: Terraform keeps track of your infrastructure’s current state in a file, which is key to identifying what needs to be modified.

Benefits of Using Terraform for Infrastructure

  • Declarative Language: Terraform’s configuration files are written in HashiCorp Configuration Language (HCL), making them easy to read and understand.
  • Multi-Cloud Support: Terraform works with multiple cloud providers, giving you the flexibility to choose the best provider for your needs.
  • Version Control: Infrastructure code is version-controlled, making it easier to track changes and collaborate with teams.
  • Scalability: Terraform can manage large-scale infrastructure, enabling businesses to grow without worrying about manual provisioning.

Setting Up Terraform Infra

1. Installing Terraform

Before you start using Terraform, you’ll need to install it on your system. Terraform supports Windows, macOS, and Linux operating systems. You can download the latest version from the official Terraform website.

# On macOS
brew install terraform

# On Ubuntu
sudo apt-get update && sudo apt-get install -y terraform

2. Creating Your First Terraform Configuration

Once installed, you can start by writing a basic configuration file to manage infrastructure. Below is an example of a simple configuration file that provisions an AWS EC2 instance:

provider "aws" {
  region = "us-west-2"
}

resource "aws_instance" "example" {
  ami           = "ami-0c55b159cbfafe1f0"
  instance_type = "t2.micro"
}

3. Initializing Terraform

After creating your configuration file, you’ll need to initialize the Terraform environment by running:

terraform init

This command downloads the necessary provider plugins and prepares the environment.

4. Plan and Apply Changes

Terraform uses a two-step approach to manage infrastructure: terraform plan and terraform apply.

  • terraform plan: This command shows you what changes Terraform will make to your infrastructure.
terraform plan
  • terraform apply: This command applies the changes to the infrastructure.
terraform apply

5. Managing Infrastructure State

Terraform uses a state file to track your infrastructure’s current state. It’s important to keep the state file secure, as it contains sensitive information.

You can also use remote state backends like AWS S3 or Terraform Cloud to store the state file securely.

terraform {
  backend "s3" {
    bucket = "my-terraform-state"
    key    = "global/s3/terraform.tfstate"
    region = "us-west-2"
  }
}

Advanced Terraform Infra Examples

Automating Multi-Tier Applications

Terraform can be used to automate complex, multi-tier applications. Consider a scenario where you need to create a web application that uses a load balancer, EC2 instances, and an RDS database.

provider "aws" {
  region = "us-west-2"
}

resource "aws_lb" "example" {
  name               = "example-lb"
  internal           = false
  load_balancer_type = "application"
  security_groups   = ["sg-123456"]
  subnets           = ["subnet-6789"]
}

resource "aws_instance" "web" {
  ami           = "ami-0c55b159cbfafe1f0"
  instance_type = "t2.micro"
  count         = 3
  user_data     = <<-EOF
                  #!/bin/bash
                  sudo apt update
                  sudo apt install -y nginx
                  EOF
}

resource "aws_db_instance" "example" {
  allocated_storage = 10
  engine            = "mysql"
  instance_class    = "db.t2.micro"
  name              = "mydb"
  username          = "admin"
  password          = "password"
  parameter_group_name = "default.mysql8.0"
}

Using Terraform Modules for Reusability

Modules are a powerful feature of Terraform that allows you to reuse and share infrastructure configurations. A typical module might contain resources for setting up a network, security group, or database cluster.

For example, the following module creates a reusable EC2 instance:

module "ec2_instance" {
  source        = "./modules/ec2_instance"
  instance_type = "t2.micro"
  ami_id        = "ami-0c55b159cbfafe1f0"
}

Common Questions About Terraform Infra

What is the purpose of Terraform’s state file?

The state file is used by Terraform to track the current configuration of your infrastructure. It maps the configuration files to the actual resources in the cloud, ensuring that Terraform knows what needs to be added, modified, or removed.

How does Terraform handle multi-cloud deployments?

Terraform supports multiple cloud providers and allows you to manage resources across different clouds. You can specify different providers in the configuration and deploy infrastructure in a hybrid or multi-cloud environment.

Can Terraform manage non-cloud infrastructure?

Yes, Terraform can also manage on-premise resources, such as virtual machines, physical servers, and networking equipment, using compatible providers.

What is a Terraform provider?

A provider is a plugin that allows Terraform to interact with various cloud services, APIs, or platforms. Common providers include AWS, Azure, Google Cloud, and VMware.

Conclusion: Key Takeaways

Terraform Infra is an invaluable tool for modern infrastructure management. By codifying infrastructure and using Terraform’s rich set of features, businesses can automate, scale, and manage their cloud resources efficiently. Whether you are managing a small project or a complex multi-cloud setup, Terraform provides the flexibility and power you need.

From its ability to provision infrastructure automatically to its support for multi-cloud environments, Terraform is transforming how infrastructure is managed today. Whether you’re a beginner or an experienced professional, leveraging Terraform’s capabilities will help you streamline your operations, ensure consistency, and improve the scalability of your infrastructure.

External Links

By using Terraform Infra effectively, businesses can achieve greater agility and maintain a more reliable and predictable infrastructure environment. Thank you for reading the DevopsRoles page!

Terraform Multi Cloud: Simplify Your Cloud Management Across Multiple Providers

Introduction: What is Terraform Multi Cloud?

In the modern era of cloud computing, businesses are increasingly adopting a multi-cloud approach to maximize flexibility, improve performance, and optimize costs. Terraform, an open-source infrastructure-as-code (IaC) tool, has emerged as a powerful solution for managing resources across multiple cloud platforms. By utilizing Terraform Multi Cloud, users can easily define, provision, and manage infrastructure across various cloud providers like AWS, Azure, Google Cloud, and others in a unified manner.

In this guide, we will explore the concept of Terraform Multi Cloud, its advantages, use cases, and best practices for implementing it. Whether you’re managing workloads in multiple cloud environments or planning a hybrid infrastructure, Terraform provides a seamless way to automate and orchestrate your cloud resources.

Why Choose Terraform for Multi-Cloud Environments?

Terraform’s ability to integrate with a wide range of cloud platforms and services makes it an ideal tool for managing multi-cloud infrastructures. Below are some compelling reasons why Terraform is a popular choice for multi-cloud environments:

1. Vendor-Agnostic Infrastructure Management

  • Terraform enables users to work with multiple cloud providers (AWS, Azure, GCP, etc.) using a single configuration language.
  • This flexibility ensures that businesses are not locked into a single vendor, enabling better pricing and service selection.

2. Unified Automation

  • Terraform allows you to define infrastructure using configuration files (HCL – HashiCorp Configuration Language), making it easier to automate provisioning and configuration across various clouds.
  • You can create a multi-cloud deployment pipeline, simplifying operational overhead.

3. Cost Optimization

  • With Terraform, managing resources across multiple clouds helps you take advantage of the best pricing and resource allocation from each provider.
  • Terraform’s capabilities in managing resources at scale can result in reduced operational costs.

4. Disaster Recovery and Fault Tolerance

  • By spreading workloads across multiple clouds, you can enhance the fault tolerance of your infrastructure. If one provider experiences issues, you can ensure business continuity by failing over to another cloud.

Key Concepts of Terraform Multi Cloud

Before diving into Terraform’s multi-cloud capabilities, it’s essential to understand the foundational concepts that drive its functionality.

Providers and Provider Blocks

In Terraform, a provider is a plugin that allows Terraform to interact with a cloud service (e.g., AWS, Azure, Google Cloud). For a multi-cloud setup, you’ll define multiple provider blocks for each cloud provider you wish to interact with.

Example: Defining AWS and Azure Providers in Terraform

# AWS Provider
provider "aws" {
  region = "us-east-1"
}

# Azure Provider
provider "azurerm" {
  features {}
}

Resources

A resource in Terraform represents a component of your infrastructure (e.g., an EC2 instance, a storage bucket, or a virtual machine). You can define resources from multiple cloud providers within a single Terraform configuration.

Example: Defining Resources for Multiple Clouds

# AWS EC2 Instance
resource "aws_instance" "web" {
  ami           = "ami-0c55b159cbfafe1f0"
  instance_type = "t2.micro"
}

# Azure Virtual Machine
resource "azurerm_virtual_machine" "example" {
  name                = "example-vm"
  location            = "East US"
  resource_group_name = azurerm_resource_group.example.name
  network_interface_ids = [
    azurerm_network_interface.example.id,
  ]
  vm_size             = "Standard_F2"
}

Backends and State Management

Terraform uses state files to track the resources it manages. In a multi-cloud environment, it’s crucial to use remote backends (e.g., AWS S3, Azure Storage) for state management to ensure consistency and collaboration.

Terraform Multi Cloud Use Cases

Now that we understand the basics of Terraform multi-cloud setups, let’s explore some common use cases where it provides significant benefits.

1. Hybrid Cloud Deployment

Organizations that require both on-premise infrastructure and cloud services can use Terraform to define and manage resources across both environments. A hybrid cloud deployment allows businesses to maintain sensitive workloads on-premises while taking advantage of the cloud for scalability.

2. Disaster Recovery Strategy

By distributing workloads across multiple cloud providers, companies can ensure that their infrastructure remains highly available even in the event of a failure. For example, if AWS faces a downtime, workloads can be shifted to Azure or Google Cloud, minimizing the risk of outages.

3. Optimizing Cloud Spend

By utilizing multiple cloud platforms, you can select the best-priced services and optimize costs. For instance, you can run cost-heavy workloads on Google Cloud and lightweight tasks on AWS, based on pricing models and performance benchmarks.

4. Regulatory Compliance

Certain industries require that data be hosted in specific geographic locations or meet certain security standards. Terraform enables organizations to provision resources in various regions and across multiple clouds to comply with these regulations.

Example: Implementing Terraform Multi Cloud

Let’s walk through an example of using Terraform to provision resources in both AWS and Google Cloud.

Step 1: Set Up Terraform Providers

Define the providers for both AWS and Google Cloud in your Terraform configuration file.

provider "aws" {
  access_key = "your-access-key"
  secret_key = "your-secret-key"
  region     = "us-west-2"
}

provider "google" {
  project     = "your-project-id"
  region      = "us-central1"
  credentials = file("path/to/your/credentials.json")
}

Step 2: Define Resources

Here, we will define an AWS EC2 instance and a Google Cloud Storage bucket.

# AWS EC2 Instance
resource "aws_instance" "my_instance" {
  ami           = "ami-123456"
  instance_type = "t2.micro"
}

# Google Cloud Storage Bucket
resource "google_storage_bucket" "my_bucket" {
  name     = "my-unique-bucket-name"
  location = "US"
}

Step 3: Apply Configuration

Run Terraform commands to apply your configuration.

terraform init  # Initialize the configuration
terraform plan  # Preview the changes
terraform apply # Apply the configuration

This will create both the EC2 instance in AWS and the storage bucket in Google Cloud.

Terraform Multi Cloud Best Practices

To ensure success when managing resources across multiple clouds, it’s essential to follow best practices.

1. Use Modules for Reusability

Define reusable Terraform modules for common infrastructure components like networks, storage, or compute resources. This reduces duplication and promotes consistency across multiple cloud platforms.

2. Implement Infrastructure as Code (IaC)

By using Terraform, ensure that all infrastructure changes are tracked in version control systems (e.g., Git). This approach improves traceability and collaboration among teams.

3. Automate with CI/CD Pipelines

Integrate Terraform into your continuous integration/continuous deployment (CI/CD) pipeline. This allows you to automate provisioning, making your infrastructure deployments repeatable and consistent.

4. Use Remote State Backends

Store your Terraform state files remotely (e.g., in AWS S3 or Azure Blob Storage) to ensure state consistency and enable collaboration.

Frequently Asked Questions (FAQ)

1. What is Terraform Multi Cloud?

Terraform Multi Cloud refers to using Terraform to manage infrastructure across multiple cloud providers (e.g., AWS, Azure, Google Cloud) from a single configuration. It simplifies cloud management, increases flexibility, and reduces vendor lock-in.

2. Can I use Terraform with any cloud provider?

Yes, Terraform supports numerous cloud providers, including AWS, Azure, Google Cloud, Oracle Cloud, and more. The multi-cloud functionality comes from defining and managing resources across different providers in the same configuration.

3. What are the benefits of using Terraform for multi-cloud?

Terraform provides a unified interface for managing resources across various clouds, making it easier to automate infrastructure, improve flexibility, and optimize costs. It also reduces complexity and prevents vendor lock-in.

Conclusion

Terraform Multi Cloud enables businesses to manage infrastructure across different cloud platforms with ease. By using Terraform’s provider blocks, defining resources, and leveraging automation tools, you can create flexible, cost-effective, and resilient cloud architectures. Whether you’re building a hybrid cloud infrastructure, optimizing cloud costs, or ensuring business continuity, Terraform is a valuable tool in the multi-cloud world.

For more information on how to get started with Terraform, check out the official Terraform documentation. Thank you for reading the DevopsRoles page!

Mastering Terraform EKS Automode: A Comprehensive Guide

Introduction

In the world of cloud infrastructure, managing Kubernetes clusters efficiently is crucial for smooth operations and scaling. One powerful tool that simplifies this process is Terraform, an open-source infrastructure as code software. When integrated with Amazon Elastic Kubernetes Service (EKS), Terraform helps automate the creation, configuration, and management of Kubernetes clusters, making it easier to deploy applications at scale.

In this guide, we’ll focus on one specific feature: Terraform EKS Automode. This feature allows for automatic management of certain aspects of an EKS cluster, optimizing workflows and reducing manual intervention. Whether you’re a beginner or an experienced user, this article will walk you through the benefits, setup process, and examples of using Terraform to manage your EKS clusters in automode.

What is Terraform EKS Automode?

Before diving into its usage, let’s define Terraform EKS Automode. Automode is a feature within the Terraform EKS module that allows you to automate various configurations within the EKS service, such as node group management, VPC configuration, and the integration of other AWS resources like IAM roles and security groups.

By leveraging this feature, users can reduce the complexity of managing EKS clusters manually. It helps you automate the creation of EKS clusters and ensures that node groups are automatically set up based on your defined requirements. Terraform automates these tasks, reducing errors and improving the efficiency of your deployment pipeline.

Benefits of Using Terraform EKS Automode

1. Simplified Cluster Management

Automating the management of your EKS clusters ensures that all the resources are properly configured without the need for manual intervention. Terraform’s EKS automode integrates directly with AWS APIs to handle tasks like VPC setup, node group creation, and IAM role assignments.

2. Scalability

Terraform’s automode feature helps with scaling your EKS clusters based on resource demand. You can easily define the node group sizes and other configurations to handle traffic spikes and scale down when demand decreases.

3. Version Control and Reusability

Terraform allows you to store your infrastructure code in version control systems like GitHub, making it easy to manage and reuse across different environments or teams.

4. Cost Efficiency

By automating cluster management and scaling, you ensure that you are using resources optimally, which helps reduce over-provisioning and unnecessary costs.

How to Set Up Terraform EKS Automode

To start using Terraform EKS Automode, you’ll first need to set up a few prerequisites:

Prerequisites:

  • Terraform: Installed and configured on your local machine or CI/CD pipeline.
  • AWS CLI: Configured with necessary permissions.
  • AWS Account: An active AWS account with appropriate IAM permissions for managing EKS, EC2, and other AWS resources.
  • Kubernetes CLI (kubectl): Installed to interact with the EKS cluster.

Step-by-Step Setup Guide

1. Define Terraform Provider

In your Terraform configuration file, begin by defining the AWS provider:

provider "aws" {
  region = "us-west-2"
}

2. Create EKS Cluster Resource

Next, define the eks_cluster resource in your Terraform configuration:

resource "aws_eks_cluster" "example" {
  name     = "example-cluster"
  role_arn = aws_iam_role.eks_cluster_role.arn

  vpc_config {
    subnet_ids = aws_subnet.example.*.id
  }

  # Enable EKS Automode
  enable_configure_automode = true
}

The enable_configure_automode argument enables Automode, which will help with the automatic setup of node groups, networking, and other essential configurations.

3. Define Node Groups

The next step is to define node groups that Terraform will automatically manage. A node group is a group of EC2 instances that run the Kubernetes workloads. You can use aws_eks_node_group to manage this.

resource "aws_eks_node_group" "example" {
  cluster_name    = aws_eks_cluster.example.name
  node_group_name = "example-node-group"
  node_role_arn   = aws_iam_role.eks_node_role.arn
  subnet_ids      = aws_subnet.example.*.id

  scaling_config {
    desired_size = 2
    min_size     = 1
    max_size     = 3
  }

  # Automatically configure with EKS Automode
  enable_auto_scaling = true
}

Here, enable_auto_scaling enables the automatic scaling of node groups based on resource utilization, a key feature in EKS Automode.

4. Apply the Terraform Configuration

Once your Terraform configuration is set up, run the following commands to apply the changes:

terraform init
terraform apply

This will create the EKS cluster and automatically configure the node groups and other related resources.

Example 1: Basic Terraform EKS Automode Setup

To give you a better understanding, here’s a simple example of a full Terraform script that automates the creation of an EKS cluster, a node group, and required networking components:

provider "aws" {
  region = "us-west-2"
}

resource "aws_vpc" "example" {
  cidr_block = "10.0.0.0/16"
}

resource "aws_subnet" "example" {
  vpc_id            = aws_vpc.example.id
  cidr_block        = "10.0.1.0/24"
  availability_zone = "us-west-2a"
}

resource "aws_iam_role" "eks_cluster_role" {
  assume_role_policy = jsonencode({
    Version = "2012-10-17"
    Statement = [
      {
        Action    = "sts:AssumeRole"
        Principal = {
          Service = "eks.amazonaws.com"
        }
        Effect    = "Allow"
        Sid       = ""
      },
    ]
  })
}

resource "aws_eks_cluster" "example" {
  name     = "example-cluster"
  role_arn = aws_iam_role.eks_cluster_role.arn

  vpc_config {
    subnet_ids = [aws_subnet.example.id]
  }

  enable_configure_automode = true
}

This script automatically creates a basic EKS cluster along with the necessary networking setup.

Advanced Scenarios for Terraform EKS Automode

Automating Multi-Region Deployments

Terraform EKS Automode can also help automate cluster deployments across multiple regions. This involves setting up different configurations for each region and using Terraform modules to manage the complexity.

Integrating with CI/CD Pipelines

You can integrate Terraform EKS Automode into your CI/CD pipeline for continuous delivery. By automating the deployment of EKS clusters, you can reduce human error and ensure that every new environment follows the same configuration standards.

FAQs About Terraform EKS Automode

1. What is EKS Automode?

EKS Automode is a feature in Terraform that automates the creation and management of Amazon EKS clusters, including node group creation, VPC configuration, and scaling.

2. How do I enable Terraform EKS Automode?

To enable Automode, use the enable_configure_automode parameter in the aws_eks_cluster resource definition.

3. Can Terraform EKS Automode help with auto-scaling?

Yes, Automode enables automatic scaling of node groups based on defined criteria such as resource utilization, ensuring that your cluster adapts to workload changes without manual intervention.

4. Do I need to configure anything manually with Automode?

While Automode automates most of the tasks, you may need to define some basic configurations such as VPC setup, IAM roles, and node group parameters based on your specific requirements.

External Links

Conclusion

In this guide, we’ve explored how to use Terraform EKS Automode to simplify the creation and management of Amazon EKS clusters. By automating key components like node groups and VPC configurations, Terraform helps reduce complexity, scale resources efficiently, and optimize costs.

With Terraform’s EKS Automode, you can focus more on your application deployments and less on managing infrastructure, knowing that your Kubernetes clusters are being managed efficiently in the background. Thank you for reading the DevopsRoles page!

Automating Infrastructure with Terraform Modules: A Comprehensive Guide

Introduction

Infrastructure as Code (IaC) has revolutionized the way developers and system administrators manage, deploy, and scale infrastructure. Among the various IaC tools available, Terraform stands out as one of the most popular and powerful options. One of its key features is the use of Terraform modules, which allows for efficient, reusable, and maintainable infrastructure code.

In this article, we will dive deep into Terraform modules, exploring their purpose, usage, and how they help automate infrastructure management. Whether you’re a beginner or an experienced Terraform user, this guide will walk you through everything you need to know to effectively use modules in your infrastructure automation workflow.

What Are Terraform Modules?

The Role of Terraform Modules in Automation

A Terraform module is a container for multiple resources that are used together. Modules allow you to group and organize resources in a way that makes your Terraform code more reusable, maintainable, and readable. By using modules, you can avoid writing repetitive code, making your infrastructure setup cleaner and easier to manage.

Modules can be local (defined in your project) or remote (hosted in a Terraform registry or Git repository). They can be as simple as a single resource or as complex as a collection of resources that create an entire architecture.

Benefits of Using Terraform Modules

Code Reusability

One of the most significant advantages of Terraform modules is code reusability. Once you’ve defined a module, you can reuse it across different projects or environments. This reduces the need to duplicate the same logic, leading to a more efficient workflow.

Simplified Codebase

Terraform modules break down complex infrastructure configurations into smaller, manageable pieces. By abstracting resources into modules, you can keep your main Terraform configuration files concise and readable.

Improved Collaboration

With modules, teams can work independently on different parts of the infrastructure. For example, one team can manage networking configurations, while another can focus on compute resources. This modularity facilitates collaboration and streamlines development.

Easier Updates and Maintenance

When infrastructure requirements change, updates can be made in a module, and the changes are reflected everywhere that module is used. This makes maintenance and updates significantly easier and less prone to errors.

Types of Terraform Modules

Root Module

Every Terraform configuration starts with a root module. This is the main configuration file that calls other modules and sets up the necessary infrastructure. The root module can reference both local and remote modules.

Child Modules

Child modules are the building blocks within a Terraform project. They contain reusable resource definitions that are called by the root module. Child modules can be as simple as a single resource or a combination of resources that fulfill specific infrastructure needs.

Remote Modules

Terraform also supports remote modules, which are modules hosted outside of the local project. These can be stored in a GitHub repository, GitLab, or the Terraform Registry. Using remote modules makes it easier to share and reuse code across multiple teams or organizations.

How to Use Terraform Modules for Automation

Setting Up Your First Terraform Module

To get started with Terraform modules, follow these basic steps:

Step 1: Create a New Directory for Your Module

Start by organizing your Terraform code. Create a directory structure for your module, such as:

/my-terraform-project
  /modules
    /network
      main.tf
      outputs.tf
      variables.tf
  main.tf

Define Your Resources in the Module

In the main.tf file of your module directory, define the resources that will be part of the module. For instance, a basic network module might include:

resource "aws_vpc" "main" {
  cidr_block = var.cidr_block
}

resource "aws_subnet" "subnet1" {
  vpc_id     = aws_vpc.main.id
  cidr_block = var.subnet_cidr
}

Step 3: Define Variables

In the variables.tf file, specify any inputs that the module will require:

variable "cidr_block" {
  description = "The CIDR block for the VPC"
  type        = string
}

variable "subnet_cidr" {
  description = "The CIDR block for the subnet"
  type        = string
}

Step 4: Call the Module from the Root Configuration

In the root main.tf file, call your module and pass the necessary values:

module "network" {
  source      = "./modules/network"
  cidr_block  = "10.0.0.0/16"
  subnet_cidr = "10.0.1.0/24"
}

Advanced Use Cases for Terraform Modules

Using Remote Modules for Reusability

In larger projects, you might prefer to use remote modules. This allows you to share modules across multiple projects or teams. For instance:

module "network" {
  source = "terraform-aws-modules/vpc/aws"
  cidr   = "10.0.0.0/16"
}

This approach ensures you can easily update modules across multiple infrastructure projects without duplicating code.

Module Versioning

When using remote modules, it’s important to pin the module version to ensure that updates don’t break your code. This is done using the version argument:

module "network" {
  source  = "terraform-aws-modules/vpc/aws"
  version = "3.0.0"
  cidr    = "10.0.0.0/16"
}

FAQ: Automating Infrastructure with Terraform Modules

Common Questions

What Is the Best Way to Organize Terraform Modules?

The best way to organize Terraform modules is to structure them by functionality. Group resources into separate directories based on their role, such as network, compute, storage, etc. Keep the module files minimal and focused on a single responsibility to enhance reusability and maintainability.

Can Terraform Modules Be Used Across Multiple Projects?

Yes! Terraform modules are designed for reuse. You can use the same module in multiple projects by either copying the module files or referencing remote modules hosted on a registry or version-controlled repository.

How Do I Debug Terraform Modules?

Debugging Terraform modules involves checking the output of Terraform plan and apply commands. Use the terraform plan command to inspect the execution plan and verify that resources are being created as expected. Additionally, ensure your variables are being passed correctly to the modules.

Can I Use Terraform Modules with Other IaC Tools?

Terraform modules are specific to Terraform, but you can integrate them with other tools if needed. For example, you might use Terraform modules alongside Ansible for configuration management or Kubernetes for container orchestration, depending on your infrastructure needs.

External Resources

Conclusion

Automating infrastructure with Terraform modules is an effective way to simplify and streamline the management of your cloud resources. By leveraging the power of modules, you can reduce duplication, improve collaboration, and create reusable infrastructure components that are easy to maintain and update.

Whether you’re just getting started or looking to refine your workflow, mastering Terraform modules will undoubtedly help you achieve greater efficiency and scalability in your infrastructure automation efforts.

If you have any questions or need further guidance, feel free to explore the external resources or leave a comment below. Thank you for reading the DevopsRoles page!

Ansible vs Terraform: Key Differences You Should Know

Introduction

In the modern world of DevOps and infrastructure automation, tools like Ansible and Terraform are essential for simplifying the process of provisioning, configuring, and managing infrastructure. However, while both of these tools share similarities in automating IT tasks, they are designed for different purposes and excel in different areas. Understanding the key differences between Ansible vs Terraform can help you make the right choice for your infrastructure management needs.

This article will explore the main distinctions between Ansible and Terraform, their use cases, and provide real-world examples to guide your decision-making process.

Ansible vs Terraform: What They Are

What is Ansible?

Ansible is an open-source IT automation tool that is primarily used for configuration management, application deployment, and task automation. Developed by Red Hat, Ansible uses playbooks written in YAML to automate tasks across various systems. It’s agentless, meaning it doesn’t require any agents to be installed on the target machines, making it simple to deploy.

Some of the key features of Ansible include:

  • Automation of tasks: Like installing packages, configuring software, or ensuring servers are up-to-date.
  • Ease of use: YAML syntax is simple and human-readable.
  • Agentless architecture: Ansible uses SSH or WinRM for communication, eliminating the need for additional agents on the target machines.

What is Terraform?

Terraform, developed by HashiCorp, is a powerful Infrastructure as Code (IaC) tool used for provisioning and managing cloud infrastructure. Unlike Ansible, which focuses on configuration management, Terraform is specifically designed to manage infrastructure resources such as virtual machines, storage, and networking components in a declarative manner.

Key features of Terraform include:

  • Declarative configuration: Users describe the desired state of the infrastructure in configuration files, and Terraform automatically ensures that the infrastructure matches the specified state.
  • Cross-cloud compatibility: Terraform supports multiple cloud providers like AWS, Azure, Google Cloud, and others.
  • State management: Terraform maintains a state file that tracks the current state of your infrastructure.

Ansible vs Terraform: Key Differences

1. Configuration Management vs Infrastructure Provisioning

The core distinction between Ansible and Terraform lies in their primary function:

  • Ansible is mainly focused on configuration management. It allows you to automate the setup and configuration of software and services on machines once they are provisioned.
  • Terraform, on the other hand, is an Infrastructure as Code (IaC) tool, focused on provisioning infrastructure. It allows you to create, modify, and version control cloud resources like servers, storage, networks, and more.

In simple terms, Terraform manages the “infrastructure”, while Ansible handles the “configuration” of that infrastructure.

2. Approach: Declarative vs Imperative

Another significant difference lies in the way both tools approach automation:

Terraform uses a declarative approach, where you define the desired end state of your infrastructure. Terraform will figure out the steps required to reach that state and will apply those changes automatically.

Example (Terraform):

resource "aws_instance" "example" {
  ami           = "ami-12345678"
  instance_type = "t2.micro"
}

Here, you’re declaring that you want an AWS instance with a specific AMI and instance type. Terraform handles the details of how to achieve that state.

Ansible, on the other hand, uses an imperative approach, where you explicitly define the sequence of actions that need to be executed.

Example (Ansible):

- name: Install Apache web server
  apt:
    name: apache2
    state: present

3. State Management

State management is a crucial aspect of IaC, and it differs greatly between Ansible and Terraform:

  • Terraform keeps track of the state of your infrastructure using a state file. This file contains information about your resources and their configurations, allowing Terraform to manage and update your infrastructure in an accurate and efficient way.
  • Ansible does not use a state file. It runs tasks on the target systems and doesn’t retain any state between runs. This means it doesn’t have an internal understanding of your infrastructure’s current state.

4. Ecosystem and Integrations

Both tools offer robust ecosystems and integrations but in different ways:

  • Ansible has a wide range of modules that allow it to interact with various cloud providers, servers, and other systems. It excels at configuration management, orchestration, and even application deployment.
  • Terraform specializes in infrastructure provisioning and integrates with multiple cloud providers through plugins (known as providers). Its ecosystem is tightly focused on managing resources across cloud platforms.

Use Cases of Ansible and Terraform

When to Use Ansible

Ansible is ideal when you need to:

  • Automate server configuration and software deployment.
  • Manage post-provisioning tasks such as setting up applications or configuring services on VMs.
  • Automate system-level tasks like patching, security updates, and network configurations.

When to Use Terraform

Terraform is best suited for:

  • Managing cloud infrastructure resources (e.g., creating VMs, networks, load balancers).
  • Handling infrastructure versioning, scaling, and resource management across different cloud platforms.
  • Managing complex infrastructures and dependencies in a repeatable, predictable manner.

Example Scenarios: Ansible vs Terraform

Scenario 1: Provisioning Infrastructure

If you want to create a new virtual machine in AWS, Terraform is the best tool to use since it’s designed specifically for infrastructure provisioning.

Terraform Example:

resource "aws_instance" "web" {
  ami           = "ami-abc12345"
  instance_type = "t2.micro"
}

Once the infrastructure is provisioned, you would use Ansible to configure the machine (install web servers, deploy applications, etc.).

Scenario 2: Configuring Servers

Once your infrastructure is provisioned using Terraform, Ansible can be used to configure and manage the software installed on your servers.

Ansible Example:

- name: Install Apache web server
  apt:
    name: apache2
    state: present

FAQ: Ansible vs Terraform

1. Can Ansible be used for Infrastructure as Code (IaC)?

Yes, Ansible can be used for Infrastructure as Code, but it is primarily focused on configuration management. While it can manage cloud resources, Terraform is more specialized for infrastructure provisioning.

2. Can Terraform be used for Configuration Management?

Terraform is not designed for configuration management. However, it can handle some simple tasks, but it’s more suited for provisioning infrastructure.

3. Which one is easier to learn: Ansible or Terraform?

Ansible is generally easier for beginners to learn because it uses YAML, which is a simple, human-readable format. Terraform, while also relatively easy, requires understanding of HCL (HashiCorp Configuration Language) and is more focused on infrastructure provisioning.

4. Can Ansible and Terraform be used together?

Yes, Ansible and Terraform are often used together. Terraform can handle infrastructure provisioning, while Ansible is used for configuring and managing the software and services on those provisioned resources.

Conclusion

Ansible vs Terraform ultimately depends on your specific use case. Ansible is excellent for configuration management and automation of tasks on existing infrastructure, while Terraform excels in provisioning and managing cloud infrastructure. By understanding the key differences between these two tools, you can decide which best fits your needs or how to use them together to streamline your DevOps processes.

For more detailed information on Terraform and Ansible, check out these authoritative resources:

Both tools play an integral role in modern infrastructure management and DevOps practices, making them essential for cloud-first organizations and enterprises managing large-scale systems. Thank you for reading the DevopsRoles page!