The convergence of serverless technologies and infrastructure-as-code (IaC) has revolutionized the way we deploy and manage applications. Two leading players in this space, AWS Serverless Application Model (AWS SAM) and HashiCorp Terraform, have significantly impacted cloud deployment strategies. This article delves into the now generally available integration of AWS SAM and HashiCorp Terraform, exploring how this combination empowers developers and DevOps engineers to streamline their workflows and improve application deployment efficiency. We’ll cover the benefits, potential challenges, and best practices for effectively leveraging AWS SAM HashiCorp Terraform in your cloud infrastructure.
Understanding AWS SAM and HashiCorp Terraform
Before diving into their integration, let’s briefly review each technology individually. AWS SAM simplifies the definition and deployment of serverless applications on AWS. It uses a YAML-based template language to define the resources needed for your application, including Lambda functions, API Gateway endpoints, DynamoDB tables, and more. This declarative approach makes it easier to manage and version your serverless infrastructure.
HashiCorp Terraform, on the other hand, is a powerful IaC tool supporting a wide range of cloud providers and infrastructure services. It uses a declarative configuration language (HCL) to define and manage infrastructure resources. Terraform’s strength lies in its ability to manage diverse infrastructure components, not just serverless applications. Its extensive provider ecosystem enables consistent management across various platforms.
Integrating AWS SAM with HashiCorp Terraform
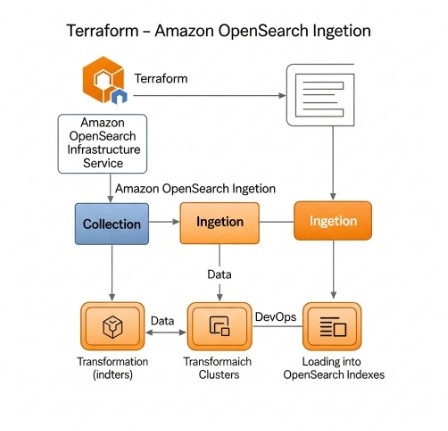
The integration of AWS SAM HashiCorp Terraform brings together the best of both worlds. You can now define your serverless application using AWS SAM’s YAML templates and manage the deployment of those templates, along with other infrastructure components, using Terraform. This allows for a more holistic approach to infrastructure management, enabling consistent management of serverless applications alongside other infrastructure elements.
Benefits of Using AWS SAM with Terraform
- Improved Workflow Efficiency: Centralize management of serverless and non-serverless infrastructure within a single IaC framework.
- Enhanced Version Control: Leverage Terraform’s state management capabilities to track infrastructure changes and roll back to previous versions.
- Simplified Infrastructure Provisioning: Automate the deployment of complex serverless applications and associated resources in a repeatable and consistent manner.
- Enhanced Collaboration: Facilitates collaboration amongst developers, DevOps engineers, and infrastructure teams through a shared IaC approach.
- Increased Reusability: Develop reusable Terraform modules for common serverless components, boosting productivity.
Implementing AWS SAM with Terraform: A Practical Example
Let’s consider a simple example. We’ll deploy a Lambda function using AWS SAM, managed by Terraform. This example assumes you have already installed Terraform and configured AWS credentials.
1. AWS SAM Template (template.yaml):
AWSTemplateFormatVersion: '2010-09-09'
Transform: AWS::Serverless-2016-10-31
Description: A simple Lambda function deployed via Terraform.
Resources:
  MyLambdaFunction:
    Type: AWS::Serverless::Function
    Properties:
      Handler: index.handler
      Runtime: nodejs16.x
      CodeUri: s3://my-bucket/my-lambda-function.zip
      Policies:
        - AWSLambdaBasicExecutionRole
2. Terraform Configuration (main.tf):
terraform {
  required_providers {
    aws = {
      source  = "hashicorp/aws"
      version = "~> 4.0"
    }
  }
}

provider "aws" {
  region = "us-east-1"
}

resource "aws_s3_bucket" "lambda_code" {
  bucket = "my-bucket"
}

resource "aws_s3_bucket_object" "lambda_code" {
  bucket = aws_s3_bucket.lambda_code.id
  key    = "my-lambda-function.zip"
  source = "my-lambda-function.zip"
}

resource "aws_s3_bucket_object" "sam_template" {
  bucket = "my-bucket"
  key    = "template.yaml"
  source = "template.yaml"
}

resource "aws_lambda_function" "my_lambda" {
  filename      = "template.yaml"
  s3_bucket     = aws_s3_bucket.lambda_code.id
  s3_key        = "template.yaml"
  function_name = "MyLambdaFunction"
}
This example shows how Terraform manages the deployment of the SAM template. Remember to replace placeholders like bucket names and file paths with your actual values. This simplified example omits error handling and advanced features. A real-world application might require more intricate configurations.
Advanced Considerations for AWS SAM HashiCorp Terraform
While the integration simplifies many aspects, certain nuances deserve attention.
Managing SAM Template Updates
Efficiently handling updates to your SAM template within the Terraform workflow requires careful planning. Using proper version control for both the SAM template and Terraform configuration is crucial. Strategically using Terraform’s `count` or `for_each` meta-arguments can aid in managing multiple SAM templates or environments.
Security Best Practices
Security is paramount. Avoid hardcoding sensitive information into your SAM templates and Terraform configurations. Utilize AWS Secrets Manager or similar services to store and securely access credentials. Employ infrastructure-as-code security scanning tools to identify potential vulnerabilities.
Addressing Potential Challenges
Integrating AWS SAM HashiCorp Terraform might present some challenges, particularly for complex serverless applications. Thorough testing is essential to ensure the smooth operation of the entire infrastructure. Effective error handling and logging within both the SAM template and the Terraform configuration can assist in debugging and troubleshooting.
Frequently Asked Questions
Q1: Can I use Terraform to manage all aspects of a serverless application built with AWS SAM?
A1: Yes, Terraform can manage the deployment and updates of the AWS SAM template, along with any supporting AWS resources such as IAM roles, S3 buckets, and other infrastructure components required by the serverless application.
Q2: What are the advantages of using AWS SAM and Terraform together compared to using only SAM?
A2: Using both provides better infrastructure management. Terraform offers features like state management, improved version control, and support for infrastructure beyond serverless components that SAM alone doesn’t offer. This ensures better governance, consistency, and easier integration with other parts of your infrastructure.
Q3: How can I handle dependency management when using both AWS SAM and Terraform?
A3: Terraform’s dependency management features handle the ordering of resource creation. For example, you would ensure that necessary IAM roles are created before deploying your SAM template. The `depends_on` meta-argument can be effectively used to specify dependencies between resources in your Terraform configuration.
Q4: Are there any limitations to integrating AWS SAM and Terraform?
A4: The primary limitation is the potential complexity for very large, intricate serverless applications. Proper planning, modular design, and robust testing are crucial to mitigating this. Also, understanding the nuances of both SAM and Terraform is necessary to avoid common pitfalls. Thorough testing and clear understanding of the technologies are critical to success.


Conclusion
The general availability of the integration between AWS SAM and HashiCorp Terraform marks a significant step forward in serverless application deployment and management. By combining the strengths of both technologies, you gain a powerful and streamlined approach to building and operating your cloud infrastructure. Mastering the interplay between AWS SAM HashiCorp Terraform allows for increased efficiency, scalability, and maintainability of your serverless applications. Remember to leverage best practices, thorough testing, and a modular approach for optimal results when utilizing this powerful combination. Successful integration requires a deep understanding of both AWS SAM and Terraform’s functionalities and capabilities.
For further information, refer to the official documentation: AWS SAM Documentation and HashiCorp Terraform Documentation. Additionally, consider exploring best practices from reputable sources such as HashiCorp’s blog for further insights. Thank you for reading the DevopsRoles page!