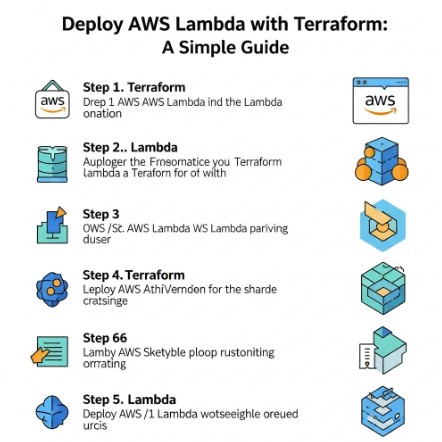
Tag Archives: Terraform

Revolutionizing Infrastructure as Code: HashiCorp Terraform AI Integration

The world of infrastructure as code (IaC) is constantly evolving, driven by the need for greater efficiency, automation, and scalability. HashiCorp, a leader in multi-cloud infrastructure automation, has significantly advanced the field with the launch of its Terraform Cloud Managed Private Cloud (MCP) server, enabling seamless integration with AI and machine learning (ML) capabilities. This article delves into the exciting possibilities offered by HashiCorp Terraform AI, exploring how it empowers developers and DevOps teams to build, manage, and secure their infrastructure more effectively than ever before. We will address the challenges traditional IaC faces and demonstrate how HashiCorp Terraform AI solutions overcome these limitations, paving the way for a more intelligent and automated future.

Understanding the Power of HashiCorp Terraform AI

Traditional IaC workflows, while powerful, often involve repetitive tasks, manual intervention, and a degree of guesswork. Predicting resource needs, optimizing configurations, and troubleshooting issues can be time-consuming and error-prone. HashiCorp Terraform AI changes this paradigm by leveraging the power of AI and ML to automate and enhance several critical aspects of the infrastructure lifecycle.

Enhanced Automation with AI-Driven Predictions

HashiCorp Terraform AI introduces intelligent features that significantly reduce the manual effort associated with infrastructure management. For instance, AI-powered predictive analytics can anticipate future resource requirements based on historical data and current trends, enabling proactive scaling and preventing performance bottlenecks. This predictive capacity minimizes the risk of resource exhaustion and ensures optimal infrastructure utilization.

Intelligent Configuration Optimization

Configuring infrastructure can be complex, often requiring extensive expertise and trial-and-error to achieve optimal performance and security. HashiCorp Terraform AI employs ML algorithms to analyze configurations and suggest improvements. This intelligent optimization leads to more efficient resource allocation, reduced costs, and enhanced system reliability. It helps to avoid common configuration errors and ensure compliance with best practices.

Streamlined Troubleshooting and Anomaly Detection

Identifying and resolving infrastructure issues can be a major challenge. HashiCorp Terraform AI excels in this area by employing advanced anomaly detection techniques. By continuously monitoring infrastructure performance, it can identify unusual patterns and potential problems before they escalate into significant outages or security breaches. This proactive approach significantly improves system stability and reduces downtime.

Implementing HashiCorp Terraform AI: A Practical Guide

Integrating AI into your Terraform workflows is not as daunting as it might seem. The process leverages existing Terraform features and integrates seamlessly with the Terraform Cloud MCP server. While specific implementation details depend on your chosen AI/ML services and your existing infrastructure, the core principles remain consistent.

Step-by-Step Integration Process

  1. Set up Terraform Cloud MCP Server: Ensure you have a properly configured Terraform Cloud MCP server. This provides a secure and controlled environment for deploying and managing your infrastructure.
  2. Choose AI/ML Services: Select suitable AI/ML services to integrate with Terraform. Options range from cloud-based offerings (like AWS SageMaker, Google AI Platform, or Azure Machine Learning) to on-premises solutions, depending on your requirements and existing infrastructure.
  3. Develop Custom Modules: Create custom Terraform modules to interface between Terraform and your chosen AI/ML services. These modules will handle data transfer, model execution, and integration of AI-driven insights into your infrastructure management workflows.
  4. Implement Data Pipelines: Establish robust data pipelines to feed relevant information from your infrastructure to the AI/ML models. This ensures the AI models receive the necessary data to make accurate predictions and recommendations.
  5. Monitor and Iterate: Continuously monitor the performance of your AI-powered infrastructure management system. Regularly evaluate the results, iterate on your models, and refine your integration strategies to maximize effectiveness.

Example Code Snippet (Conceptual):

This is a conceptual example and might require adjustments based on your specific AI/ML service and setup. It illustrates how you might integrate predictions into your Terraform configuration:

resource "aws_instance" "example" {
  ami           = "ami-0c55b31ad2299a701" # Replace with your AMI
  instance_type = data.aws_instance_type.example.id
  count         = var.instance_count + jsondecode(data.aws_lambda_function_invocation.prediction.result).predicted_instances
}

data "aws_lambda_function_invocation" "prediction" {
  function_name = "prediction-lambda" # Replace with your lambda function name
  input         = jsonencode({ instance_count = var.instance_count })
}

# The aws_instance_type data source is needed since you're using it in the resource block
data "aws_instance_type" "example" {
  instance_type = "t2.micro" # Example instance type
}

# The var.instance_count variable needs to be defined
variable "instance_count" {
  type    = number
  default = 1
}

Addressing Security Concerns with HashiCorp Terraform AI

Security is paramount when integrating AI into infrastructure management. HashiCorp Terraform AI addresses this by emphasizing secure data handling, access control, and robust authentication mechanisms. The Terraform Cloud MCP server offers features to manage access rights and encrypt sensitive data, ensuring that your infrastructure remains protected.

Best Practices for Secure Integration

  • Secure Data Transmission: Utilize encrypted channels for all communication between Terraform, your AI/ML services, and your infrastructure.
  • Role-Based Access Control: Implement granular access control to limit access to sensitive data and resources.
  • Regular Security Audits: Conduct regular security audits to identify and mitigate potential vulnerabilities.
  • Data Encryption: Encrypt all sensitive data both in transit and at rest.

Frequently Asked Questions

What are the benefits of using HashiCorp Terraform AI?

HashiCorp Terraform AI offers numerous advantages, including enhanced automation, improved resource utilization, proactive anomaly detection, streamlined troubleshooting, reduced costs, and increased operational efficiency. It empowers organizations to manage their infrastructure with greater speed, accuracy, and reliability.

How does HashiCorp Terraform AI compare to other IaC solutions?

While other IaC solutions exist, HashiCorp Terraform AI distinguishes itself through its seamless integration with AI and ML capabilities. This allows for a level of automation and intelligent optimization not readily available in traditional IaC tools. It streamlines operations, improves resource allocation, and enables proactive issue resolution.

What are the prerequisites for implementing HashiCorp Terraform AI?

Prerequisites include a working knowledge of Terraform, access to a Terraform Cloud MCP server, and a chosen AI/ML service. You’ll also need expertise in developing custom Terraform modules and setting up data pipelines to feed information to your AI/ML models. Familiarity with relevant cloud platforms is beneficial.

Is HashiCorp Terraform AI suitable for all organizations?

The suitability of HashiCorp Terraform AI depends on an organization’s specific needs and resources. Organizations with complex infrastructures, demanding scalability requirements, and a need for advanced automation capabilities will likely benefit most. Those with simpler setups might find the overhead unnecessary. However, the long-term advantages often justify the initial investment.

What is the cost of implementing HashiCorp Terraform AI?

The cost depends on several factors, including the chosen AI/ML services, the complexity of your infrastructure, and the level of customization required. Factors like cloud service provider costs, potential for reduced operational expenses, and increased efficiency must all be weighed.

Conclusion

The advent of HashiCorp Terraform AI marks a significant step forward in the evolution of infrastructure as code. By leveraging the power of AI and ML, it addresses many of the challenges associated with traditional IaC, offering enhanced automation, intelligent optimization, and proactive problem resolution. Implementing HashiCorp Terraform AI requires careful planning and execution, but the resulting improvements in efficiency, scalability, and reliability are well worth the investment. Embrace this powerful tool to build a more robust, resilient, and cost-effective infrastructure for your organization. Remember to prioritize security throughout the integration process. For more detailed information, refer to the official HashiCorp documentation https://www.hashicorp.com/docs/terraform and explore the capabilities of various cloud-based AI/ML platforms. https://aws.amazon.com/machine-learning/ https://cloud.google.com/ai-platform. Thank you for reading the DevopsRoles page!

Deploy & Manage Machine Learning Pipelines with Terraform & SageMaker

Deploying and managing machine learning (ML) pipelines efficiently and reliably is a critical challenge for organizations aiming to leverage the power of AI. The complexity of managing infrastructure, dependencies, and the iterative nature of ML model development often leads to operational bottlenecks. This article focuses on streamlining this process using Machine Learning Pipelines Terraform and Amazon SageMaker, providing a robust and scalable solution for deploying and managing your ML workflows.

Understanding the Need for Infrastructure as Code (IaC) in ML Pipelines

Traditional methods of deploying ML pipelines often involve manual configuration and provisioning of infrastructure, leading to inconsistencies, errors, and difficulty in reproducibility. Infrastructure as Code (IaC), using tools like Terraform, offers a solution by automating the provisioning and management of infrastructure resources. By defining infrastructure in code, you gain version control, improved consistency, and the ability to easily replicate environments across different cloud providers or on-premises setups. This is particularly crucial for Machine Learning Pipelines Terraform deployments, where the infrastructure needs can fluctuate depending on the complexity of the pipeline and the volume of data being processed.

Leveraging Terraform for Infrastructure Management

Terraform, a popular IaC tool, allows you to define and manage your infrastructure using a declarative configuration language called HashiCorp Configuration Language (HCL). This allows you to define the desired state of your infrastructure, and Terraform will manage the creation, modification, and deletion of resources to achieve that state. For Machine Learning Pipelines Terraform deployments, this means you can define all the necessary components, such as:

  • Amazon SageMaker instances (e.g., training instances, processing instances, endpoint instances).
  • Amazon S3 buckets for storing data and model artifacts.
  • IAM roles and policies to manage access control.
  • Amazon EC2 instances for custom components (if needed).
  • Networking resources such as VPCs, subnets, and security groups.

Example Terraform Configuration for SageMaker Instance

The following code snippet shows a basic example of creating a SageMaker training instance using Terraform:

resource "aws_sagemaker_notebook_instance" "training" {
  name          = "my-sagemaker-training-instance"
  instance_type = "ml.m5.xlarge"
  role_arn      = aws_iam_role.sagemaker_role.arn
}

resource "aws_iam_role" "sagemaker_role" {
  name               = "SageMakerTrainingRole"
  assume_role_policy = jsonencode({
    Version = "2012-10-17"
    Statement = [
      {
        Action = "sts:AssumeRole"
        Effect = "Allow"
        Principal = {
          Service = "sagemaker.amazonaws.com"
        }
      }
    ]
  })
}

This example demonstrates how to define a SageMaker notebook instance with a specific instance type and an associated IAM role. The full configuration would also include the necessary S3 buckets, VPC settings, and security configurations. More complex pipelines might require additional resources and configurations.

Building and Deploying Machine Learning Pipelines with SageMaker

Amazon SageMaker provides a managed service for building, training, and deploying ML models. By integrating SageMaker with Terraform, you can automate the entire process, from infrastructure provisioning to model deployment. SageMaker supports various pipeline components, including:

  • Processing jobs for data preprocessing and feature engineering.
  • Training jobs for model training.
  • Model building and evaluation.
  • Model deployment and endpoint creation.

Integrating SageMaker Pipelines with Terraform

You can manage SageMaker pipelines using Terraform by utilizing the AWS provider’s resources related to SageMaker pipelines and other supporting services. This includes defining the pipeline steps, dependencies, and the associated compute resources.

Remember to define IAM roles with appropriate permissions to allow Terraform to interact with SageMaker and other AWS services.

Managing Machine Learning Pipelines Terraform for Scalability and Maintainability

One of the key advantages of using Machine Learning Pipelines Terraform is the improved scalability and maintainability of your ML infrastructure. By leveraging Terraform’s capabilities, you can easily scale your infrastructure up or down based on your needs, ensuring optimal resource utilization. Furthermore, version control for your Terraform configuration provides a history of changes, allowing you to easily revert to previous states if necessary. This facilitates collaboration amongst team members working on the ML pipeline.

Monitoring and Logging

Comprehensive monitoring and logging are crucial for maintaining a robust ML pipeline. Integrate monitoring tools such as CloudWatch to track the performance of your SageMaker instances, pipelines, and other infrastructure components. This allows you to identify and address issues proactively.

Frequently Asked Questions

Q1: What are the benefits of using Terraform for managing SageMaker pipelines?

Using Terraform for managing SageMaker pipelines offers several advantages: Infrastructure as Code (IaC) enables automation, reproducibility, version control, and improved scalability and maintainability. It simplifies the complex task of managing the infrastructure required for machine learning workflows.

Q2: How do I handle secrets management when using Terraform for SageMaker?

For secure management of secrets, such as AWS access keys, use tools like AWS Secrets Manager or HashiCorp Vault. These tools allow you to securely store and retrieve secrets without hardcoding them in your Terraform configuration files. Integrate these secret management solutions into your Terraform workflow to access sensitive information safely.

Q3: Can I use Terraform to manage custom containers in SageMaker?

Yes, you can use Terraform to manage custom containers in SageMaker. You would define the necessary ECR repositories to store your custom container images and then reference them in your SageMaker training or deployment configurations managed by Terraform. This allows you to integrate your custom algorithms and dependencies seamlessly into your automated pipeline.

Q4: How do I handle updates and changes to my ML pipeline infrastructure?

Use Terraform’s `plan` and `apply` commands to preview and apply changes to your infrastructure. Terraform’s state management ensures that only necessary changes are applied, minimizing disruptions. Version control your Terraform code to track changes and easily revert if needed. Remember to test changes thoroughly in a non-production environment before deploying to production.

Conclusion

Deploying and managing Machine Learning Pipelines Terraform and SageMaker provides a powerful and efficient approach to building and deploying scalable ML workflows. By leveraging IaC principles and the capabilities of Terraform, organizations can overcome the challenges of managing complex infrastructure and ensure the reproducibility and reliability of their ML pipelines. Remember to prioritize security best practices, including robust IAM roles and secret management, when implementing this solution. Consistent use of Machine Learning Pipelines Terraform ensures efficient and reliable ML operations. Thank you for reading the DevopsRoles page!

For further information, refer to the official Terraform and AWS SageMaker documentation:

Terraform Documentation
AWS SageMaker Documentation
AWS Provider for Terraform

AWS SAM and HashiCorp Terraform: Now Generally Available

The convergence of serverless technologies and infrastructure-as-code (IaC) has revolutionized the way we deploy and manage applications. Two leading players in this space, AWS Serverless Application Model (AWS SAM) and HashiCorp Terraform, have significantly impacted cloud deployment strategies. This article delves into the now generally available integration of AWS SAM and HashiCorp Terraform, exploring how this combination empowers developers and DevOps engineers to streamline their workflows and improve application deployment efficiency. We’ll cover the benefits, potential challenges, and best practices for effectively leveraging AWS SAM HashiCorp Terraform in your cloud infrastructure.

Understanding AWS SAM and HashiCorp Terraform

Before diving into their integration, let’s briefly review each technology individually. AWS SAM simplifies the definition and deployment of serverless applications on AWS. It uses a YAML-based template language to define the resources needed for your application, including Lambda functions, API Gateway endpoints, DynamoDB tables, and more. This declarative approach makes it easier to manage and version your serverless infrastructure.

HashiCorp Terraform, on the other hand, is a powerful IaC tool supporting a wide range of cloud providers and infrastructure services. It uses a declarative configuration language (HCL) to define and manage infrastructure resources. Terraform’s strength lies in its ability to manage diverse infrastructure components, not just serverless applications. Its extensive provider ecosystem enables consistent management across various platforms.

Integrating AWS SAM with HashiCorp Terraform

The integration of AWS SAM HashiCorp Terraform brings together the best of both worlds. You can now define your serverless application using AWS SAM’s YAML templates and manage the deployment of those templates, along with other infrastructure components, using Terraform. This allows for a more holistic approach to infrastructure management, enabling consistent management of serverless applications alongside other infrastructure elements.

Benefits of Using AWS SAM with Terraform

  • Improved Workflow Efficiency: Centralize management of serverless and non-serverless infrastructure within a single IaC framework.
  • Enhanced Version Control: Leverage Terraform’s state management capabilities to track infrastructure changes and roll back to previous versions.
  • Simplified Infrastructure Provisioning: Automate the deployment of complex serverless applications and associated resources in a repeatable and consistent manner.
  • Enhanced Collaboration: Facilitates collaboration amongst developers, DevOps engineers, and infrastructure teams through a shared IaC approach.
  • Increased Reusability: Develop reusable Terraform modules for common serverless components, boosting productivity.

Implementing AWS SAM with Terraform: A Practical Example

Let’s consider a simple example. We’ll deploy a Lambda function using AWS SAM, managed by Terraform. This example assumes you have already installed Terraform and configured AWS credentials.

1. AWS SAM Template (template.yaml):

AWSTemplateFormatVersion: '2010-09-09'
Transform: AWS::Serverless-2016-10-31
Description: A simple Lambda function deployed via Terraform.
Resources:
  MyLambdaFunction:
    Type: AWS::Serverless::Function
    Properties:
      Handler: index.handler
      Runtime: nodejs16.x
      CodeUri: s3://my-bucket/my-lambda-function.zip
      Policies:
        - AWSLambdaBasicExecutionRole

2. Terraform Configuration (main.tf):

terraform {
  required_providers {
    aws = {
      source  = "hashicorp/aws"
      version = "~> 4.0"
    }
  }
}

provider "aws" {
  region = "us-east-1"
}

resource "aws_s3_bucket" "lambda_code" {
  bucket = "my-bucket"
}

resource "aws_s3_bucket_object" "lambda_code" {
  bucket = aws_s3_bucket.lambda_code.id
  key    = "my-lambda-function.zip"
  source = "my-lambda-function.zip"
}

resource "aws_s3_bucket_object" "sam_template" {
  bucket = "my-bucket"
  key    = "template.yaml"
  source = "template.yaml"
}

resource "aws_lambda_function" "my_lambda" {
  filename      = "template.yaml"
  s3_bucket     = aws_s3_bucket.lambda_code.id
  s3_key        = "template.yaml"
  function_name = "MyLambdaFunction"
}

This example shows how Terraform manages the deployment of the SAM template. Remember to replace placeholders like bucket names and file paths with your actual values. This simplified example omits error handling and advanced features. A real-world application might require more intricate configurations.

Advanced Considerations for AWS SAM HashiCorp Terraform

While the integration simplifies many aspects, certain nuances deserve attention.

Managing SAM Template Updates

Efficiently handling updates to your SAM template within the Terraform workflow requires careful planning. Using proper version control for both the SAM template and Terraform configuration is crucial. Strategically using Terraform’s `count` or `for_each` meta-arguments can aid in managing multiple SAM templates or environments.

Security Best Practices

Security is paramount. Avoid hardcoding sensitive information into your SAM templates and Terraform configurations. Utilize AWS Secrets Manager or similar services to store and securely access credentials. Employ infrastructure-as-code security scanning tools to identify potential vulnerabilities.

Addressing Potential Challenges

Integrating AWS SAM HashiCorp Terraform might present some challenges, particularly for complex serverless applications. Thorough testing is essential to ensure the smooth operation of the entire infrastructure. Effective error handling and logging within both the SAM template and the Terraform configuration can assist in debugging and troubleshooting.

Frequently Asked Questions

Q1: Can I use Terraform to manage all aspects of a serverless application built with AWS SAM?

A1: Yes, Terraform can manage the deployment and updates of the AWS SAM template, along with any supporting AWS resources such as IAM roles, S3 buckets, and other infrastructure components required by the serverless application.

Q2: What are the advantages of using AWS SAM and Terraform together compared to using only SAM?

A2: Using both provides better infrastructure management. Terraform offers features like state management, improved version control, and support for infrastructure beyond serverless components that SAM alone doesn’t offer. This ensures better governance, consistency, and easier integration with other parts of your infrastructure.

Q3: How can I handle dependency management when using both AWS SAM and Terraform?

A3: Terraform’s dependency management features handle the ordering of resource creation. For example, you would ensure that necessary IAM roles are created before deploying your SAM template. The `depends_on` meta-argument can be effectively used to specify dependencies between resources in your Terraform configuration.

Q4: Are there any limitations to integrating AWS SAM and Terraform?

A4: The primary limitation is the potential complexity for very large, intricate serverless applications. Proper planning, modular design, and robust testing are crucial to mitigating this. Also, understanding the nuances of both SAM and Terraform is necessary to avoid common pitfalls. Thorough testing and clear understanding of the technologies are critical to success.

Conclusion

The general availability of the integration between AWS SAM and HashiCorp Terraform marks a significant step forward in serverless application deployment and management. By combining the strengths of both technologies, you gain a powerful and streamlined approach to building and operating your cloud infrastructure. Mastering the interplay between AWS SAM HashiCorp Terraform allows for increased efficiency, scalability, and maintainability of your serverless applications. Remember to leverage best practices, thorough testing, and a modular approach for optimal results when utilizing this powerful combination. Successful integration requires a deep understanding of both AWS SAM and Terraform’s functionalities and capabilities.

For further information, refer to the official documentation: AWS SAM Documentation and HashiCorp Terraform Documentation. Additionally, consider exploring best practices from reputable sources such as HashiCorp’s blog for further insights. Thank you for reading the DevopsRoles page!

Deploy EKS Cluster using Terraform: A Comprehensive Guide

Managing Kubernetes clusters can be complex, requiring significant expertise in networking, security, and infrastructure. This complexity often leads to operational overhead and delays in deploying applications. This comprehensive guide will show you how to streamline this process by leveraging Terraform, a powerful Infrastructure as Code (IaC) tool, to automate the Deploy EKS Cluster Terraform process. We’ll cover everything from setting up your environment to configuring advanced cluster features, empowering you to build robust and scalable EKS clusters efficiently.

Prerequisites

Before embarking on this journey, ensure you have the following prerequisites in place:

  • An AWS account with appropriate permissions.
  • Terraform installed and configured with AWS credentials.
  • The AWS CLI installed and configured.
  • Basic understanding of Kubernetes concepts and EKS.
  • Familiarity with Terraform’s configuration language (HCL).

Refer to the official Terraform and AWS documentation for detailed installation and configuration instructions.

Setting up the Terraform Configuration

Our Deploy EKS Cluster Terraform approach begins by defining the infrastructure requirements in a Terraform configuration file (typically named main.tf). This file will define the VPC, subnets, IAM roles, and the EKS cluster itself.

Defining the VPC and Subnets

We’ll start by creating a VPC and several subnets to host our EKS cluster. This ensures network isolation and security. The following code snippet demonstrates this:

# Data source to get available availability zones
data "aws_availability_zones" "available" {
  state = "available"
}

# Main VPC resource
resource "aws_vpc" "main" {
  cidr_block           = "10.0.0.0/16"
  enable_dns_hostnames = true
  enable_dns_support   = true

  tags = {
    Name = "eks-vpc"
  }
}

# Private subnets
resource "aws_subnet" "private" {
  count = 2
  
  vpc_id                  = aws_vpc.main.id
  cidr_block              = cidrsubnet(aws_vpc.main.cidr_block, 8, count.index)
  availability_zone       = data.aws_availability_zones.available.names[count.index]
  map_public_ip_on_launch = false

  tags = {
    Name = "eks-private-subnet-${count.index}"
    Type = "Private"
  }
}

# Optional: Public subnets (commonly needed for EKS)
resource "aws_subnet" "public" {
  count = 2
  
  vpc_id                  = aws_vpc.main.id
  cidr_block              = cidrsubnet(aws_vpc.main.cidr_block, 8, count.index + 10)
  availability_zone       = data.aws_availability_zones.available.names[count.index]
  map_public_ip_on_launch = true

  tags = {
    Name = "eks-public-subnet-${count.index}"
    Type = "Public"
  }
}

# Internet Gateway for public subnets
resource "aws_internet_gateway" "main" {
  vpc_id = aws_vpc.main.id

  tags = {
    Name = "eks-igw"
  }
}

# Route table for public subnets
resource "aws_route_table" "public" {
  vpc_id = aws_vpc.main.id

  route {
    cidr_block = "0.0.0.0/0"
    gateway_id = aws_internet_gateway.main.id
  }

  tags = {
    Name = "eks-public-rt"
  }
}

# Associate public subnets with public route table
resource "aws_route_table_association" "public" {
  count = length(aws_subnet.public)
  
  subnet_id      = aws_subnet.public[count.index].id
  route_table_id = aws_route_table.public.id
}

Creating IAM Roles

IAM roles are crucial for granting the EKS cluster and its nodes appropriate permissions to access AWS services. We’ll create roles for the cluster’s nodes and the EKS service itself:

# IAM policy document for EC2 to assume the role
data "aws_iam_policy_document" "assume_role" {
  statement {
    actions = ["sts:AssumeRole"]
    
    principals {
      type        = "Service"
      identifiers = ["ec2.amazonaws.com"]
    }
  }
}

# EKS Node Instance Role
resource "aws_iam_role" "eks_node_instance_role" {
  name               = "eks-node-instance-role"
  assume_role_policy = data.aws_iam_policy_document.assume_role.json

  tags = {
    Name = "EKS Node Instance Role"
  }
}

# Required AWS managed policies for EKS worker nodes
resource "aws_iam_role_policy_attachment" "eks_worker_node_policy" {
  policy_arn = "arn:aws:iam::aws:policy/AmazonEKSWorkerNodePolicy"
  role       = aws_iam_role.eks_node_instance_role.name
}

resource "aws_iam_role_policy_attachment" "eks_cni_policy" {
  policy_arn = "arn:aws:iam::aws:policy/AmazonEKS_CNI_Policy"
  role       = aws_iam_role.eks_node_instance_role.name
}

resource "aws_iam_role_policy_attachment" "ec2_container_registry_read_only" {
  policy_arn = "arn:aws:iam::aws:policy/AmazonEC2ContainerRegistryReadOnly"
  role       = aws_iam_role.eks_node_instance_role.name
}

# Optional: Additional policy for CloudWatch logging
resource "aws_iam_role_policy_attachment" "cloudwatch_agent_server_policy" {
  policy_arn = "arn:aws:iam::aws:policy/CloudWatchAgentServerPolicy"
  role       = aws_iam_role.eks_node_instance_role.name
}

# Instance profile for EC2 instances
resource "aws_iam_instance_profile" "eks_node_instance_profile" {
  name = "eks-node-instance-profile"
  role = aws_iam_role.eks_node_instance_role.name

  tags = {
    Name = "EKS Node Instance Profile"
  }
}

# Output the role ARN for use in other resources
output "eks_node_instance_role_arn" {
  description = "ARN of the EKS node instance role"
  value       = aws_iam_role.eks_node_instance_role.arn
}

output "eks_node_instance_profile_name" {
  description = "Name of the EKS node instance profile"
  value       = aws_iam_instance_profile.eks_node_instance_profile.name
}

Deploying the EKS Cluster

Finally, we define the EKS cluster itself. This includes specifying the cluster name, version, VPC configuration, and node group details:


resource "aws_eks_cluster" "main" {
name = "my-eks-cluster"
role_arn = aws_iam_role.eks_node_instance_role.arn
vpc_config {
subnet_ids = aws_subnet.private.*.id
}
enabled_cluster_log_types = ["api", "audit", "authenticator"]
}

Deploying the EKS Cluster Terraform Configuration

After defining the configuration, we can deploy the cluster using Terraform. This involves initializing the project, planning the deployment, and finally applying the changes:

  1. terraform init: Initializes the Terraform project and downloads the necessary providers.
  2. terraform plan: Creates an execution plan, showing the changes that will be made.
  3. terraform apply: Applies the changes, creating the infrastructure defined in the configuration file.

Configuring Kubernetes Resources (Post-Deployment)

Once the EKS cluster is deployed, you can utilize tools like kubectl to manage Kubernetes resources within the cluster. This includes deploying applications, managing pods, and configuring services. You’ll need to configure your kubeconfig file to connect to the newly created cluster. This is typically downloaded after the EKS cluster is created through the AWS console or using the AWS CLI.

Advanced Configurations

This basic setup provides a functional EKS cluster. However, more advanced configurations can be implemented to enhance security, scalability, and manageability. Some examples include:

  • Node Groups: Terraform allows for managing multiple node groups with different instance types and configurations for better resource allocation.
  • Auto-Scaling Groups: Integrating with AWS Auto Scaling Groups allows for dynamically scaling the number of nodes based on demand.
  • Kubernetes Add-ons: Deploying add-ons like the Amazon EKS managed node groups for easier node management can improve cluster efficiency and reduce operational overhead.
  • Security Groups: Implement stringent security rules to control network traffic in and out of the cluster.

Frequently Asked Questions

Q1: How do I handle updates and upgrades of the EKS cluster using Terraform?

Terraform can manage updates to your EKS cluster. After upgrading the Kubernetes version through the AWS console or CLI, re-running `terraform apply` will reflect the changes in your Terraform configuration. However, ensure your Terraform configuration is up-to-date with the latest AWS provider version.

Q2: What happens if I destroy the cluster using `terraform destroy`?

Running `terraform destroy` will remove all the infrastructure created by Terraform, including the EKS cluster, VPC, subnets, and IAM roles. This action is irreversible, so proceed with caution.

Q3: Can I use Terraform to manage other AWS services related to my EKS cluster?

Yes, Terraform’s versatility extends to managing various AWS services associated with your EKS cluster, such as CloudWatch for monitoring, IAM roles for fine-grained access control, and S3 for persistent storage. This allows for comprehensive infrastructure management within a single IaC framework.

Q4: How can I integrate CI/CD with my Terraform deployment of an EKS cluster?

Integrate with CI/CD pipelines (like GitLab CI, Jenkins, or GitHub Actions) by triggering Terraform execution as part of your deployment process. This automates the creation and updates of your EKS cluster, enhancing efficiency and reducing manual intervention.

Conclusion

This guide provides a solid foundation for deploying and managing EKS clusters using Terraform. By leveraging Infrastructure as Code, you gain significant control, repeatability, and efficiency in your infrastructure management. Remember to continuously update your Terraform configurations and integrate with CI/CD pipelines to maintain a robust and scalable EKS cluster. Mastering the Deploy EKS Cluster Terraform process allows for streamlined deployment and management of your Kubernetes environments, minimizing operational burdens and maximizing efficiency.

For more in-depth information, consult the official Terraform documentation and AWS EKS documentation. Additionally, explore advanced topics like using Terraform modules and state management for enhanced organization and scalability.

Further exploration of using AWS provider for Terraform will be greatly beneficial. Thank you for reading the DevopsRoles page!

Automating Cloudflare Infrastructure with the Cloudflare Terraform Provider

Managing cloud infrastructure efficiently is paramount for any organization. The sheer scale and complexity of modern cloud deployments necessitate automation, and Terraform has emerged as a leading Infrastructure as Code (IaC) tool. This article delves into the intricacies of the Cloudflare Terraform provider, demonstrating how to automate the creation and management of your Cloudflare resources. We’ll explore various aspects of using this provider, from basic configurations to more advanced scenarios, addressing common challenges and providing best practices along the way. Mastering the Cloudflare Terraform provider significantly streamlines your workflow and ensures consistency across your Cloudflare deployments.

Understanding the Cloudflare Terraform Provider

The Cloudflare Terraform provider acts as a bridge between Terraform and the Cloudflare API. It allows you to define your Cloudflare infrastructure as code, using Terraform’s declarative configuration language. This means you describe the desired state of your Cloudflare resources (e.g., zones, DNS records, firewall rules), and Terraform handles the creation, modification, and deletion of those resources automatically. This approach drastically reduces manual effort, minimizes errors, and promotes reproducibility. The provider offers a rich set of resources covering most aspects of the Cloudflare platform, enabling comprehensive infrastructure management.

Key Features of the Cloudflare Terraform Provider

  • Declarative Configuration: Define your infrastructure using human-readable code.
  • Version Control Integration: Track changes to your infrastructure configuration using Git or similar systems.
  • Automation: Automate the entire lifecycle of your Cloudflare resources.
  • Idempotency: Apply the same configuration multiple times without unintended side effects.
  • Extensive Resource Coverage: Supports a wide range of Cloudflare resources, including DNS records, zones, firewall rules, and more.

Installing and Configuring the Cloudflare Terraform Provider

Before you can start using the Cloudflare Terraform provider, you need to install it. This usually involves adding it to your Terraform configuration file. The process involves specifying the provider’s source and configuring your Cloudflare API token.

Installation

The provider is installed by specifying it within your Terraform configuration file (typically main.tf). This usually looks like this:

terraform {
  required_providers {
    cloudflare = {
      source  = "cloudflare/cloudflare"
      version = "~> 2.0"
    }
  }
}

provider "cloudflare" {
  api_token = "YOUR_CLOUDFLARE_API_TOKEN"
}

Replace "YOUR_CLOUDFLARE_API_TOKEN" with your actual Cloudflare API token. You can obtain this token from your Cloudflare account settings.

Authentication and API Token

The api_token attribute is crucial. Ensure its secrecy; avoid hardcoding it directly into your configuration. Consider using environment variables or a secrets management system for enhanced security. Incorrectly managing your API token can expose your Cloudflare account to unauthorized access.

Creating Cloudflare Resources with Terraform

Once the provider is configured, you can begin defining and managing Cloudflare resources. This section provides examples for some common resources.

Managing DNS Records

Creating and managing DNS records is a fundamental aspect of DNS management. The following example demonstrates adding an A record.


resource "cloudflare_dns_record" "example" {
zone_id = "YOUR_ZONE_ID"
name = "www"
type = "A"
content = "192.0.2.1"
ttl = 300
}

Remember to replace YOUR_ZONE_ID with your actual Cloudflare zone ID.

Working with Cloudflare Zones

Managing zones is equally important. While the Cloudflare Terraform provider doesn’t allow zone creation directly (as this implies domain ownership verification outside of Terraform’s scope), it enables configuration management of existing zones.


resource "cloudflare_zone" "example" {
zone_id = "YOUR_ZONE_ID"
paused = false #Example - change to toggle zone pause status.
# other settings as needed
}

Advanced Usage: Firewall Rules

Implementing complex firewall rules is another powerful use case. This example demonstrates the creation of a basic firewall rule.


resource "cloudflare_firewall_rule" "example" {
zone_id = "YOUR_ZONE_ID"
action = "block"
expression = "ip.src eq 192.0.2.1"
description = "Block traffic from 192.0.2.1"
}

This showcases the power and flexibility of the Cloudflare Terraform provider. Complex expressions and multiple rules can be implemented to manage your firewall robustly.

Utilizing the Cloudflare Terraform Provider: Best Practices

For effective and secure management of your infrastructure, adopt these best practices:

  • Modularize your Terraform code: Break down large configurations into smaller, manageable modules.
  • Version control your Terraform code: Use Git or a similar version control system to track changes and facilitate collaboration.
  • Securely store your API token: Avoid hardcoding your API token directly into your Terraform files. Use environment variables or a secrets management solution instead.
  • Use a state management system: Store your Terraform state in a remote backend (e.g., AWS S3, Azure Blob Storage) for collaboration and redundancy.
  • Regularly test your Terraform configurations: Conduct thorough testing before deploying changes to your production environment. This includes using Terraform’s `plan` command to preview changes and the `apply` command for execution.

Frequently Asked Questions

What are the prerequisites for using the Cloudflare Terraform provider?

You need a Cloudflare account, a Cloudflare API token, and Terraform installed on your system. Familiarization with Terraform’s configuration language is highly beneficial.

How can I troubleshoot issues with the Cloudflare Terraform provider?

Refer to the official Cloudflare Terraform provider documentation for troubleshooting guides. The documentation often includes common errors and their solutions. Pay close attention to error messages as they provide valuable diagnostic information.

What is the best way to manage my Cloudflare API token for security?

Avoid hardcoding the API token directly into your Terraform files. Instead, use environment variables or a dedicated secrets management solution such as HashiCorp Vault, AWS Secrets Manager, or Azure Key Vault. These solutions provide enhanced security and centralized management of sensitive information.

Can I use the Cloudflare Terraform Provider for other Cloudflare products?

The Cloudflare Terraform provider supports a wide range of Cloudflare services. Check the official documentation for the latest list of supported resources. New integrations are continually added.

How do I update the Cloudflare Terraform Provider to the latest version?

Updating the provider typically involves modifying the version constraint in your required_providers block in your Terraform configuration file. After updating the version, run `terraform init` to download the latest version of the provider.

Conclusion

The Cloudflare Terraform provider empowers you to automate the management of your Cloudflare infrastructure efficiently and reliably. By leveraging IaC principles, you can streamline your workflows, reduce errors, and ensure consistency in your deployments. Remember to prioritize security and follow the best practices outlined in this article to optimize your use of the Cloudflare Terraform provider. Mastering this tool is a significant step toward achieving a robust and scalable Cloudflare infrastructure.

For further details and the latest updates, refer to the official Cloudflare Terraform Provider documentation and the official Cloudflare documentation. Understanding and implementing these resources will further enhance your ability to manage your cloud infrastructure effectively.Thank you for reading the DevopsRoles page!

Scale AWS Environment Securely with Terraform and Sentinel Policy as Code

Scaling your AWS environment efficiently and securely is crucial for any organization, regardless of size. Manual scaling processes are prone to errors, inconsistencies, and security vulnerabilities. This leads to increased operational costs, downtime, and potential security breaches. This comprehensive guide will demonstrate how to effectively scale AWS environment securely using Terraform for infrastructure-as-code (IaC) and Sentinel for policy-as-code, creating a robust and repeatable process. We’ll explore best practices and practical examples to ensure your AWS infrastructure remains scalable, resilient, and secure throughout its lifecycle.

Understanding the Challenges of Scaling AWS

Scaling AWS infrastructure presents several challenges. Manually managing resources, configurations, and security across different environments (development, testing, production) is tedious and error-prone. Inconsistent configurations lead to security vulnerabilities, compliance issues, and operational inefficiencies. As your infrastructure grows, managing this complexity becomes exponentially harder, leading to increased costs and risks. Furthermore, ensuring consistent security policies across your expanding infrastructure requires significant effort and expertise.

  • Manual Configuration Errors: Human error is inevitable when managing resources manually. Mistakes in configuration can lead to security breaches or operational failures.
  • Inconsistent Environments: Differences between environments (dev, test, prod) can cause deployment issues and complicate debugging.
  • Security Gaps: Manual security management can lead to inconsistencies and oversight, leaving your infrastructure vulnerable.
  • Scalability Limitations: Manual processes struggle to keep pace with the dynamic demands of a growing application.

Infrastructure as Code (IaC) with Terraform

Terraform addresses these challenges by enabling you to define and manage your infrastructure as code. This means representing your AWS resources (EC2 instances, S3 buckets, VPCs, etc.) in declarative configuration files. Terraform then automatically provisions and manages these resources based on your configurations. This eliminates manual processes, reduces errors, and improves consistency.

Terraform Basics

Terraform uses the HashiCorp Configuration Language (HCL) to define infrastructure. A simple example of creating an EC2 instance:


resource "aws_instance" "example" {
ami = "ami-0c55b31ad2299a701" # Replace with your AMI ID
instance_type = "t2.micro"
}

Scaling with Terraform

Terraform allows for easy scaling through variables and modules. You can define variables for the number of instances, instance type, and other parameters. This enables you to easily adjust your infrastructure’s scale by modifying these variables. Modules help organize your code into reusable components, making scaling more efficient and manageable.

Policy as Code with Sentinel

While Terraform handles infrastructure provisioning, Sentinel ensures your infrastructure adheres to your organization’s security policies. Sentinel allows you to define policies in a declarative way, which are then evaluated by Terraform before deploying changes. This prevents deployments that violate your security rules, reinforcing a secure scale AWS environment securely strategy.

Sentinel Policies

Sentinel policies are written in a dedicated language designed for policy enforcement. An example of a policy that checks for the minimum required instance type:


policy "instance_type_check" {
rule "minimum_instance_type" {
when aws_instance.example.instance_type != "t2.medium" {
message = "Instance type must be at least t2.medium"
}
}
}

Integrating Sentinel with Terraform

Integrating Sentinel with Terraform involves configuring the Sentinel provider and defining the policies that need to be enforced. Terraform will then automatically evaluate these policies before applying any infrastructure changes. This ensures that only configurations that meet your security requirements are deployed.

Scale AWS Environment Securely: Best Practices

Implementing a secure and scalable AWS environment requires adhering to best practices:

  • Version Control: Store your Terraform and Sentinel code in a version control system (e.g., Git) for tracking changes and collaboration.
  • Modular Design: Break down your infrastructure into reusable modules for better organization and scalability.
  • Automated Testing: Implement automated tests to validate your infrastructure code and policies.
  • Security Scanning: Use security scanning tools to identify potential vulnerabilities in your infrastructure.
  • Role-Based Access Control (RBAC): Implement RBAC to restrict access to your AWS resources based on roles and responsibilities.
  • Regular Audits: Regularly review and update your security policies to reflect changing threats and vulnerabilities.

Advanced Techniques

For more advanced scenarios, consider these techniques:

  • Terraform Cloud/Enterprise: Manage your Terraform state and collaborate efficiently using Terraform Cloud or Enterprise.
  • Continuous Integration/Continuous Deployment (CI/CD): Automate your infrastructure deployment process with a CI/CD pipeline.
  • Infrastructure as Code (IaC) security scanning tools: Integrate static and dynamic code analysis tools within your CI/CD pipeline to catch security issues early in the development lifecycle.

Frequently Asked Questions

1. What if a Sentinel policy fails?

If a Sentinel policy fails, Terraform will prevent the deployment from proceeding. You will need to address the policy violation before the deployment can continue. This ensures that only compliant infrastructure is deployed.

2. Can I use Sentinel with other cloud providers?

While Sentinel is primarily used with Terraform, its core concepts are applicable to other IaC tools and cloud providers. The specific implementation details would vary depending on the chosen tools and platforms. The core principle of defining and enforcing policies as code remains constant.

3. How do I handle complex security requirements?

Complex security requirements can be managed by decomposing them into smaller, manageable policies. These policies can then be organized and prioritized within your Sentinel configuration. This promotes modularity, clarity, and maintainability.

4. What are the benefits of using Terraform and Sentinel together?

Using Terraform and Sentinel together provides a comprehensive approach to managing and securing your AWS infrastructure. Terraform automates infrastructure provisioning, ensuring consistency, while Sentinel enforces security policies, preventing configurations that violate your organization’s security standards. This helps in building a robust and secure scale AWS environment securely.

Conclusion

Scaling your AWS environment securely is paramount for maintaining operational efficiency and mitigating security risks. By leveraging the power of Terraform for infrastructure as code and Sentinel for policy as code, you can create a robust, scalable, and secure AWS infrastructure. Remember to adopt best practices such as version control, automated testing, and regular security audits to maintain the integrity and security of your environment. Employing these techniques allows you to effectively scale AWS environment securely, ensuring your infrastructure remains resilient and protected throughout its lifecycle. Remember to consistently review and update your policies to adapt to evolving security threats and best practices.

For further reading, refer to the official Terraform documentation: https://www.terraform.io/ and the Sentinel documentation: https://www.hashicorp.com/products/sentinel.  Thank you for reading the DevopsRoles page!

Automating SAP Deployments on Azure with Terraform & Ansible: Streamlining Deploying SAP

Deploying SAP systems is traditionally a complex and time-consuming process, often fraught with manual steps and potential for human error. This complexity significantly impacts deployment speed, increases operational costs, and raises the risk of inconsistencies across environments. This article tackles these challenges by presenting a robust and efficient approach to automating SAP deployments on Microsoft Azure using Terraform and Ansible. We’ll explore how to leverage these powerful tools to streamline the entire Deploying SAP process, from infrastructure provisioning to application configuration, ensuring repeatable and reliable deployments.

Understanding the Need for Automation in Deploying SAP

Modern businesses demand agility and speed in their IT operations. Manual Deploying SAP processes simply cannot keep pace. Automation offers several key advantages:

  • Reduced Deployment Time: Automate repetitive tasks, significantly shortening the time required to deploy SAP systems.
  • Improved Consistency: Eliminate human error by automating consistent configurations across all environments (development, testing, production).
  • Increased Efficiency: Free up valuable IT resources from manual tasks, allowing them to focus on more strategic initiatives.
  • Enhanced Scalability: Easily scale your SAP infrastructure up or down as needed, adapting to changing business demands.
  • Reduced Costs: Minimize manual effort and infrastructure waste, leading to significant cost savings over time.

Leveraging Terraform for Infrastructure as Code (IaC)

Terraform is a powerful Infrastructure as Code (IaC) tool that allows you to define and provision your Azure infrastructure using declarative configuration files. This eliminates the need for manual configuration through the Azure portal, ensuring consistency and repeatability. For Deploying SAP on Azure, Terraform manages the creation and configuration of virtual machines, networks, storage accounts, and other resources required by the SAP system.

Defining Azure Resources with Terraform

A typical Terraform configuration for Deploying SAP might include:

  • Virtual Machines (VMs): Defining the specifications for SAP application servers, database servers, and other components.
  • Virtual Networks (VNETs): Creating isolated networks for enhanced security and management.
  • Subnets: Segmenting the VNET for better organization and security.
  • Network Security Groups (NSGs): Controlling inbound and outbound network traffic.
  • Storage Accounts: Providing storage for SAP data and other files.

Example Terraform Code Snippet (Simplified):


resource "azurerm_resource_group" "rg" {
name = "sap-rg"
location = "WestUS"
}
resource "azurerm_virtual_network" "vnet" {
name = "sap-vnet"
address_space = ["10.0.0.0/16"]
location = azurerm_resource_group.rg.location
resource_group_name = azurerm_resource_group.rg.name
}

This is a simplified example; a complete configuration would be significantly more extensive, detailing all required SAP resources.

Automating SAP Configuration with Ansible

While Terraform handles infrastructure provisioning, Ansible excels at automating the configuration of the SAP application itself. Ansible uses playbooks, written in YAML, to define tasks that configure and deploy the SAP software on the provisioned VMs. This includes installing software packages, configuring SAP parameters, and setting up the database.

Ansible Playbook Structure for Deploying SAP

An Ansible playbook for Deploying SAP would consist of several tasks, including:

  • Software Installation: Installing required SAP components and dependencies.
  • SAP System Configuration: Configuring SAP parameters, such as instance profiles and database connections.
  • Database Setup: Configuring and setting up the database (e.g., SAP HANA on Azure).
  • User Management: Creating and managing SAP users and authorizations.
  • Post-Installation Tasks: Performing any necessary post-installation steps.

Example Ansible Code Snippet (Simplified):


- name: Install SAP package
apt:
name: "{{ sap_package }}"
state: present
update_cache: yes
- name: Configure SAP profile
template:
src: ./templates/sap_profile.j2
dest: /usr/sap/{{ sap_instance }}/SYS/profile/{{ sap_profile }}

This is a highly simplified example; a real-world playbook would be considerably more complex, encompassing all aspects of the SAP application configuration.

Integrating Terraform and Ansible for a Complete Solution

For optimal efficiency, Terraform and Ansible should be integrated. Terraform provisions the infrastructure, and Ansible configures the SAP system on the provisioned VMs. This integration can be achieved through several mechanisms:

  • Terraform Output Variables: Terraform can output the IP addresses and other relevant information about the provisioned VMs, which Ansible can then use as input.
  • Ansible Dynamic Inventory: Ansible’s dynamic inventory mechanism can fetch the inventory of VMs directly from Terraform’s state file.
  • Terraform Providers: Using dedicated Terraform providers can simplify the interaction between Terraform and Ansible. Terraform Registry offers a wide selection of providers.

Deploying SAP: A Step-by-Step Guide

  1. Plan Your Infrastructure: Determine the required resources for your SAP system (VMs, storage, network).
  2. Write Terraform Code: Define your infrastructure as code using Terraform, specifying all required Azure resources.
  3. Write Ansible Playbooks: Create Ansible playbooks to automate the configuration of your SAP system.
  4. Integrate Terraform and Ansible: Connect Terraform and Ansible to exchange data and ensure smooth operation.
  5. Test Your Deployment: Thoroughly test your deployment process in a non-production environment before deploying to production.
  6. Deploy to Production: Once testing is complete, deploy your SAP system to your production environment.

Frequently Asked Questions

Q1: What are the prerequisites for automating SAP deployments on Azure?

Prerequisites include a working knowledge of Terraform, Ansible, and Azure, along with necessary Azure subscriptions and permissions. You’ll also need appropriate SAP licenses and access to the SAP installation media.

Q2: How can I manage secrets (passwords, etc.) securely in my automation scripts?

Employ techniques like using Azure Key Vault to store secrets securely and accessing them via environment variables or dedicated Ansible modules. Avoid hardcoding sensitive information in your scripts.

Q3: What are some common challenges faced during automated SAP deployments?

Common challenges include network connectivity issues, dependency conflicts during software installation, and ensuring compatibility between SAP components and the Azure environment. Thorough testing is crucial to mitigate these challenges.

Q4: How can I monitor the automated deployment process?

Implement monitoring using Azure Monitor and integrate it with your automation scripts. Log all relevant events and metrics to track deployment progress and identify potential issues.

Conclusion

Automating the Deploying SAP process on Azure using Terraform and Ansible offers significant advantages in terms of speed, consistency, and efficiency. By leveraging IaC and automation, you can streamline your SAP deployments, reduce operational costs, and improve overall agility. Remember to thoroughly test your automation scripts in a non-production environment before deploying to production to minimize risks. Adopting this approach will significantly enhance your ability to effectively and efficiently manage your SAP landscape in the cloud. Thank you for reading the DevopsRoles page!

Microsoft Azure Documentation

Terraform Official Website

Ansible Official Documentation

Terraform OpenSearch Ingestion: A Comprehensive Guide

Managing and scaling your Amazon OpenSearch Service (OpenSearch) deployments can be a complex undertaking. Ensuring efficient data ingestion is critical for leveraging the power of OpenSearch for analytics and logging. This comprehensive guide delves into how Terraform OpenSearch Ingestion simplifies this process, allowing you to automate the provisioning and management of your OpenSearch ingestion pipelines. We’ll explore various methods, best practices, and troubleshooting techniques to help you confidently manage your OpenSearch data flow using Terraform.

Understanding the Need for Automated OpenSearch Ingestion

Manually configuring and managing OpenSearch ingestion pipelines is time-consuming and error-prone. As your data volume and complexity grow, managing these pipelines becomes increasingly challenging. This is where Infrastructure as Code (IaC) tools, like Terraform, shine. Terraform OpenSearch Ingestion enables you to define your entire ingestion infrastructure as code, allowing for consistent, repeatable, and auditable deployments.

Benefits of using Terraform for OpenSearch Ingestion include:

  • Automation: Automate the creation, modification, and deletion of your ingestion pipelines.
  • Reproducibility: Easily recreate your infrastructure in different environments.
  • Version Control: Track changes to your infrastructure using Git and other version control systems.
  • Collaboration: Work collaboratively on infrastructure definitions.
  • Scalability: Easily scale your ingestion pipelines to handle growing data volumes.

Terraform OpenSearch Ingestion: Practical Implementation

This section demonstrates how to leverage Terraform to manage OpenSearch ingestion. We will focus on a common scenario: creating an OpenSearch domain and configuring an ingestion pipeline using the AWS SDK for Java. While this example uses Java, the principles apply to other languages as well. Remember to replace placeholders like `your-domain-name`, `your-key`, etc. with your actual values.

Setting up the Terraform Environment

First, ensure you have Terraform installed and configured. You’ll also need AWS credentials properly configured for your Terraform provider to access AWS resources. Consider using an IAM role for enhanced security.

Creating the OpenSearch Domain


resource "aws_opensearch_domain" "default" {
  domain_name = "your-domain-name"
  engine_version = "2.6" # or latest supported version
  cluster_config {
    instance_type = "t3.medium.elasticsearch"
    instance_count = 3
  }
  ebs_options {
    ebs_enabled = true
    volume_size  = 10
    volume_type  = "gp2"
  }
}

Configuring the Ingestion Pipeline (Example using Java)

This example outlines the basic structure. A complete implementation would involve details specific to your data source and schema. You would typically use a library like the AWS SDK for Java to interact with OpenSearch.


// Java code to ingest data into OpenSearch (simplified example)
// ... (Import necessary AWS SDK libraries) ...

AmazonOpenSearchClient client = AmazonOpenSearchClientBuilder.standard()
  .withCredentials(DefaultAWSCredentialsProviderChain.getInstance())
  .withRegion(Regions.US_EAST_1) // Replace with your region
  .build();

// ... (Data preparation and transformation logic) ...

BulkRequest bulkRequest = new BulkRequest();
// ... (Add documents to the bulk request) ...
BulkResponse bulkResponse = client.bulk(bulkRequest);

if (bulkResponse.hasFailures()) {
  // Handle failures
}

// ... (Close the client) ...

This Java code would then be packaged and deployed as a part of your infrastructure, likely using a separate service like AWS Lambda or an EC2 instance managed by Terraform.

Connecting the Pipeline to Terraform

Within your Terraform configuration, you would manage the deployment of the application (Lambda function, EC2 instance, etc.) responsible for data ingestion. This could involve using resources like aws_lambda_function or aws_instance, depending on your chosen method. The crucial point is that Terraform manages the entire infrastructure, ensuring its consistent and reliable deployment.

Advanced Terraform OpenSearch Ingestion Techniques

This section explores more advanced techniques to refine your Terraform OpenSearch Ingestion strategy.

Using Data Sources

Terraform data sources allow you to retrieve information about existing AWS resources. This is useful when integrating with pre-existing components or managing dependencies.


data "aws_opensearch_domain" "existing" {
  domain_name = "your-existing-domain"
}

output "endpoint" {
  value = data.aws_opensearch_domain.existing.endpoint
}

Implementing Security Best Practices

Prioritize security when designing your ingestion pipelines. Use IAM roles to restrict access to OpenSearch and other AWS services. Avoid hardcoding credentials directly in your Terraform configuration.

  • Use IAM roles for access control.
  • Encrypt data both in transit and at rest.
  • Regularly review and update security configurations.

Monitoring and Logging

Implement robust monitoring and logging to track the health and performance of your ingestion pipelines. Integrate with services like CloudWatch to gain insights into data flow and identify potential issues.

Terraform OpenSearch Ingestion: Best Practices

  • Modularization: Break down your Terraform code into reusable modules for better organization and maintainability.
  • Version Control: Use Git or a similar version control system to track changes and collaborate effectively.
  • Testing: Implement thorough testing to catch errors early in the development cycle. Consider using Terraform’s testing features.
  • State Management: Properly manage your Terraform state to prevent accidental infrastructure modifications.

Frequently Asked Questions

Q1: What are the different ways to ingest data into OpenSearch using Terraform?

Several approaches exist for Terraform OpenSearch Ingestion. You can use AWS services like Lambda functions, EC2 instances, or managed services like Kinesis to process and ingest data into OpenSearch. The choice depends on your specific requirements and data volume.

Q2: How can I handle errors during ingestion using Terraform?

Implement error handling within your ingestion pipeline (e.g., using try-catch blocks in your code). Configure logging and monitoring to track and analyze errors. Terraform itself doesn’t directly manage runtime errors within your ingestion code; it focuses on the infrastructure.

Q3: Can I use Terraform to manage OpenSearch dashboards and visualizations?

While Terraform primarily manages infrastructure, you can indirectly manage aspects of OpenSearch dashboards. This often involves using custom scripts or applications deployed through Terraform to create and update dashboards programmatically. Direct management of dashboard definitions within Terraform is not natively supported.

Conclusion

Effectively managing Terraform OpenSearch Ingestion is crucial for leveraging the full potential of OpenSearch. By embracing IaC principles and using Terraform, you gain automation, reproducibility, and scalability for your data ingestion pipelines. Remember to prioritize security and implement robust monitoring and logging to ensure a reliable and efficient data flow. Mastering Terraform OpenSearch Ingestion empowers you to build and maintain a robust and scalable data analytics platform.

For further information, refer to the official Terraform documentation and the AWS OpenSearch Service documentation. Thank you for reading the DevopsRoles page!

Terraform Amazon OpenSearch: A Guide to AI Social Media Prompts

The explosion of AI-powered tools has revolutionized various sectors, and social media marketing is no exception. Generating engaging content is crucial for success, and AI social media prompts offer a powerful solution. However, effectively utilizing these prompts often requires robust infrastructure capable of handling the data processing and model deployment.

This comprehensive guide explains how to leverage Terraform, a popular Infrastructure as Code (IaC) tool, to provision and manage an Amazon OpenSearch Service (Amazon OpenSearch) cluster optimized for AI social media prompts. We’ll explore how this approach streamlines the deployment process, enhances scalability, and provides a more efficient workflow for managing your AI-powered social media strategy.

Understanding the Role of Amazon OpenSearch in AI Social Media Prompts

AI social media prompts, whether for generating captions, tweets, or other content formats, often involve processing vast amounts of data. This data may include past posts, audience demographics, trending topics, and even sentiment analysis results. Amazon OpenSearch, a powerful and highly scalable search and analytics service, offers a robust solution for storing, querying, and analyzing this data. Its flexibility allows you to incorporate various data sources and use advanced analytics techniques to improve the performance and effectiveness of your AI prompt generation system.

Key Benefits of Using Amazon OpenSearch

  • Scalability: Easily handle growing data volumes and increasing user demands.
  • Cost-Effectiveness: Pay only for what you use, reducing infrastructure management costs.
  • Security: Benefit from Amazon’s robust security infrastructure and features.
  • Integration: Seamlessly integrate with other AWS services and your existing data pipelines.

Terraform: Automating Amazon OpenSearch Deployment for AI Social Media Prompts

Manually setting up and configuring an Amazon OpenSearch cluster can be time-consuming and error-prone. Terraform automates this process, ensuring consistency, repeatability, and reducing human error. It allows you to define your infrastructure as code, managing all aspects of your OpenSearch cluster, including domain creation, node configuration, and security settings. This is particularly beneficial when dealing with AI social media prompts as the infrastructure needs to scale efficiently to handle the processing of large amounts of textual data.

Building a Terraform Configuration for Amazon OpenSearch

Here’s a basic example of a Terraform configuration to create an Amazon OpenSearch domain:

terraform {
  required_providers {
    aws = {
      source  = "hashicorp/aws"
      version = "~> 4.0"
    }
  }
}

provider "aws" {
  region = "us-west-2" # Replace with your desired region
}

resource "aws_opensearch_domain" "default" {
  domain_name    = "my-opensearch-domain"
  engine_version = "2.0"

  cluster_config {
    instance_type  = "t3.medium.search"
    instance_count = 3
  }

  ebs_options {
    ebs_enabled = true
    volume_size = 10
    volume_type = "gp2"
  }

  tags = {
    Name = "My OpenSearch Domain"
  }
}

This code snippet creates a basic OpenSearch domain. You would need to adjust settings such as instance type, instance count, and EBS options based on your specific needs and the scale of your AI social media prompts processing.

Advanced Configuration Options

For more advanced use cases involving AI social media prompts, you might need to consider:

  • Access Policies: Carefully manage access control to protect your data.
  • Data Encryption: Utilize encryption at rest and in transit for enhanced security.
  • Automated Scaling: Configure autoscaling to handle fluctuating workloads during peak activity.
  • Integration with other AWS services: Connect OpenSearch with other services like AWS Lambda for real-time processing of social media data and AI prompt generation.

Generating AI Social Media Prompts with Amazon OpenSearch

Once your Amazon OpenSearch cluster is set up using Terraform, you can integrate it into your AI social media prompt generation pipeline. This might involve using a machine learning model trained on your historical data, stored and indexed in OpenSearch. The model could then use the data to generate fresh and engaging prompts tailored to your audience and current trends.

Example Workflow:

  1. Data Ingestion: Collect data from various sources (social media APIs, internal databases, etc.).
  2. Data Processing: Clean, transform, and pre-process the data for OpenSearch.
  3. Data Indexing: Index the pre-processed data into your Amazon OpenSearch cluster.
  4. Prompt Generation: Use a trained machine learning model (e.g., a large language model) to query OpenSearch for relevant data and generate AI social media prompts.
  5. Post-processing and Deployment: Refine the generated prompts and publish them to your social media channels.

Remember to regularly monitor the performance of your Amazon OpenSearch cluster and adjust its configuration as needed to ensure optimal performance and handle the demands of your AI social media prompts generation process.

AI Social Media Prompts: Optimizing Your Strategy

Generating effective AI social media prompts requires a well-defined strategy. This goes beyond just technical infrastructure; it also involves understanding your audience, defining your goals, and choosing the right AI models and techniques. Consider incorporating sentiment analysis into your prompt generation process to tailor your messaging based on audience feedback. Monitor campaign performance and iterate based on data insights to further optimize your social media strategy.

Frequently Asked Questions

Q1: What are the cost implications of using Amazon OpenSearch with Terraform?

The cost of using Amazon OpenSearch depends on factors such as the instance type, storage used, and data transfer. Terraform helps manage costs by automating provisioning and allowing for precise control over resource allocation. Use the AWS pricing calculator to estimate the costs based on your specific configuration.

Q2: How secure is Amazon OpenSearch when used with Terraform?

Amazon OpenSearch inherently offers strong security features. Terraform allows you to enforce security policies and manage access control through code, improving security posture. Implement security best practices like data encryption and appropriate IAM policies for enhanced protection.

Q3: Can I use Terraform to manage multiple OpenSearch clusters?

Yes, Terraform allows you to manage multiple OpenSearch clusters by defining multiple resources within the same configuration or in separate configurations. This is particularly useful for separating development, testing, and production environments.

Q4: What are the alternatives to Amazon OpenSearch for handling AI social media prompts?

Alternatives include Elasticsearch (self-hosted), other cloud-based search and analytics services, and potentially specialized database solutions for handling text data and machine learning models.

Conclusion

Successfully implementing AI social media prompts requires a robust and scalable infrastructure. This guide has demonstrated how Terraform simplifies the deployment and management of an Amazon OpenSearch cluster, providing a foundation for your AI-powered social media strategy.

By leveraging Terraform’s capabilities, you can automate the process, improve efficiency, and focus on optimizing your AI social media prompts for maximum engagement and results. Remember to continuously monitor and refine your infrastructure and AI models to adapt to evolving needs and maximize the impact of your campaigns.

For further information on Terraform, refer to the official documentation: Terraform Official Documentation. For more details on Amazon OpenSearch, visit: Amazon OpenSearch Service. Thank you for reading the DevopsRoles page!

Streamlining Your Infrastructure: A Deep Dive into Terraform Waypoint Migration

Migrating your infrastructure code can be a daunting task, fraught with potential pitfalls and unexpected challenges. However, the benefits of a well-planned migration are substantial, leading to improved efficiency, enhanced security, and a more robust infrastructure. This article focuses on simplifying the process of Terraform Waypoint migration, providing a comprehensive guide for developers and DevOps engineers looking to leverage Waypoint’s capabilities for managing their Terraform deployments. We’ll explore the reasons behind migrating, the process itself, best practices, and common issues you might encounter along the way.

Understanding the Need for Terraform Waypoint Migration

Many organizations rely on Terraform for infrastructure as code (IaC), but managing deployments, particularly across various environments (development, staging, production), can become complex. This complexity often involves manual steps, increasing the risk of human error and inconsistencies. Terraform Waypoint migration offers a solution by providing a streamlined, automated workflow for managing your Terraform deployments. Waypoint simplifies the process, reducing operational overhead and ensuring consistency across your environments. This is especially valuable for organizations with large, complex infrastructures or those aiming to embrace a GitOps workflow.

Why Choose Waypoint for Terraform?

  • Automated Deployments: Waypoint automates the entire deployment process, from building and testing to deploying to various environments.
  • Simplified Workflows: It integrates seamlessly with Git, enabling efficient CI/CD pipelines and simplifying the process of managing changes.
  • Improved Consistency: Waypoint ensures consistent deployments across different environments by automating the process and reducing manual intervention.
  • Enhanced Security: By automating deployments, Waypoint reduces the risk of human error and improves the security of your infrastructure.

The Terraform Waypoint Migration Process

Migrating to Waypoint from a different deployment system requires a structured approach. The following steps outline a recommended process for Terraform Waypoint migration:

Step 1: Planning and Assessment

  1. Inventory your current setup: Identify your existing Terraform configurations, deployment scripts, and any related tooling.
  2. Define your migration goals: Clearly articulate what you hope to achieve by migrating to Waypoint (e.g., improved automation, enhanced security, reduced deployment times).
  3. Choose a migration strategy: Decide whether to migrate all your infrastructure at once or adopt a phased approach.

Step 2: Setting up Waypoint

  1. Install Waypoint: Download and install Waypoint according to the official documentation. Waypoint Getting Started
  2. Configure Waypoint: Configure Waypoint to connect to your infrastructure providers (e.g., AWS, GCP, Azure) and your Git repository.
  3. Create a Waypoint project: Create a new Waypoint project in your Git repository and configure it to manage your Terraform deployments.

Step 3: Implementing Waypoint

This involves adapting your existing Terraform code to work with Waypoint. This usually involves creating a waypoint.hcl file, which specifies the deployment process. The following is an example of a basic waypoint.hcl file:


project "my-project" {
application "my-app" {
build {
type = "terraform"
platform = "linux/amd64"
}
deploy {
platform = "aws"
config = {
region = "us-west-2"
}
}
}
}

Remember to replace placeholders like “my-project”, “my-app”, “aws”, “us-west-2” with your specific details. You will need to define the build and deploy stages appropriately for your infrastructure. For more complex scenarios you may need to specify more complex build and deploy configurations, including environment-specific variables.

Step 4: Testing and Iteration

  1. Test thoroughly: Deploy to a non-production environment to verify everything works as expected.
  2. Iterate and refine: Based on testing results, adjust your Waypoint configuration and Terraform code.
  3. Monitor and log: Implement proper monitoring and logging to track deployments and identify potential issues.

Step 5: Full Migration

Once testing is complete and you’re confident in the reliability of your Waypoint configuration, proceed with the full migration to your production environment. Remember to follow your organization’s change management procedures.

Terraform Waypoint Migration: Best Practices

  • Modularization: Break down your Terraform code into smaller, reusable modules for easier management and maintenance.
  • Version Control: Use Git for version control to track changes and collaborate effectively.
  • Testing: Implement comprehensive testing strategies, including unit, integration, and end-to-end tests.
  • Automation: Automate as much of the process as possible to reduce manual intervention and human error.
  • Documentation: Maintain detailed documentation for your Terraform code and Waypoint configuration.

Frequently Asked Questions

Q1: What are the potential challenges during Terraform Waypoint migration?

Potential challenges include compatibility issues between your existing infrastructure and Waypoint, the need to adapt your existing Terraform code, and the learning curve associated with using Waypoint. Thorough planning and testing can mitigate these challenges.

Q2: How does Waypoint handle secrets management during deployment?

Waypoint integrates with various secrets management solutions, allowing you to securely store and manage sensitive information used during deployments. Consult the official Waypoint documentation for detailed information on integrating with specific secrets management tools. Waypoint Configuration Reference

Q3: Can I use Waypoint with different cloud providers?

Yes, Waypoint supports multiple cloud providers, including AWS, Google Cloud Platform (GCP), and Azure. You can configure Waypoint to deploy to different cloud providers by specifying the appropriate platform in your waypoint.hcl file.

Q4: What happens if my Terraform Waypoint migration fails?

Waypoint provides robust error handling and logging capabilities. In case of failure, you’ll receive detailed error messages that help you identify and troubleshoot the problem. Waypoint also allows for rollbacks to previous deployments, minimizing downtime.

Conclusion

Migrating your Terraform deployments to Waypoint can significantly improve your infrastructure management. By implementing the strategies and best practices outlined in this guide, you can streamline your workflows, enhance security, and achieve a more efficient and reliable infrastructure. Remember that careful planning and thorough testing are crucial for a successful Terraform Waypoint migration. Start small, test rigorously, and gradually migrate your infrastructure to reap the benefits of Waypoint’s powerful features. Thank you for reading the DevopsRoles page!