Discover DevOps roles and learn Linux from basics to advanced at DevOpsRoles.com. Detailed guides and in-depth articles to master Linux for DevOps careers.
In this tutorial, we’ll explore the process of batch Linux rename file with the inclusion of dates. You can use the rename command or a combination of find commands and mv commands to batch rename files in a directory with new filenames containing dates in Linux.
Linux rename file with Dates
Today I want to share how to batch rename files in a directory to new filenames with dates in Linux only with one command
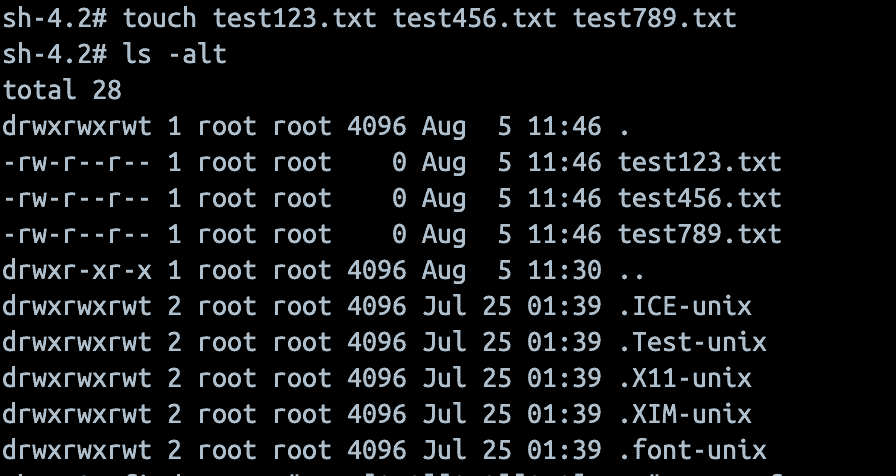
For example, in my directory, I have files named like this:
test123.txt
test456.txt
test789.txt
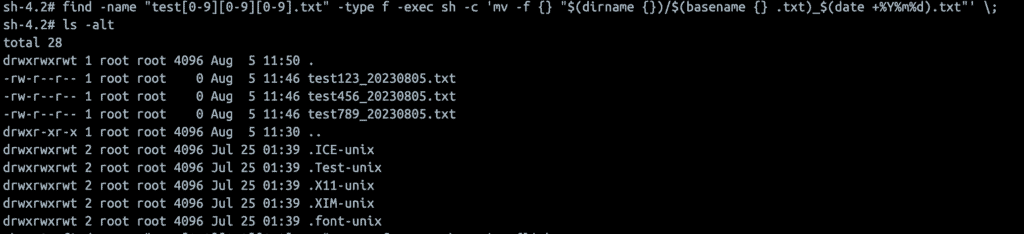
The result after running the command looks like this:
“20230805” is the execution date.
test123_20230805.txt
test456_20230805.txt
test789_20230805.txt
Batch Renaming Files with Date Appended
find -name "test[0-9][0-9][0-9].txt" -type f -exec sh -c 'mv -f {} "$(dirname {})/$(basename {} .txt)_$(date +%Y%m%d).txt"' \;
This command searches for and renames files in the current directory (and subdirectories) with names in the format test###.txt (where ### represents three digits).
find -name "test[0-9][0-9][0-9].txt": Searches for files with names matching the pattern test###.txt.
-type f: Only searches for files (not directories).
-exec sh -c '...' \;: Executes the shell command for each file found.
mv -f {}: Renames the file (forcing if necessary).
"$(dirname {})/$(basename {} .txt)_$(date +%Y%m%d).txt": Renames the file by removing the .txt extension, appending the current date (in YYYYMMDD format), and then adding back the .txt extension.
For example, test001.txt would be renamed to test001_20240812.txt (assuming the current date is August 12, 2024).
The outcome of rename file in Linux is depicted in the image below:
Conclusion
Remember to back up your files before performing batch operations like this, just to be safe. Also, modify the date format and naming convention as per your requirements. I hope will this be helpful. Thank you for reading the DevopsRoles page!
Security-Enhanced Linux is a powerful security system that is enabled, by default, on most Linux distributions based on RHEL. Here are the general steps to configure SELinux for applications and services:
In this blog, we will explore the process of configuring SELinux to safeguard your applications, providing a detailed understanding of SELinux modes, Booleans, custom policies, and troubleshooting tips.
For example, the Apache web server. Apache on RHEL-based distributions defaults to the /var/httpd directory as the document root and ports 80 (for HTTP) and 443 (for HTTPS) when installed.
You can use a different directory and port for a website might opt for /opt as the document root and port 8080.
Out of the box, SELinux denies those nonstandard options, so they must be configured to work properly.
configure SELinux for nonstandard configurations
You also need a user with sudo privileges.
Install Apache
First, you need to install the Apache web server on a Linux distribution such as Rocky Linux, AlmaLinux, or RHEL.
If SELinux is not installed on your system, install the necessary packages. The package names might vary depending on your Linux distribution. For example, on CentOS/RHEL systems, you can use:
SELinux has three main modes: enforcing, permissive, and disabled. The enforcing mode enforces security policies, the permissive mode logs policy violations but does not block actions, and the disabled mode turns off SELinux.
For production use, you should typically set SELinux to enforcing mode. You can temporarily set it to permissive mode for debugging purposes.
Set SELinux modes
To set the SELinux mode, use the following command:
If issues arise, review SELinux logs in /var/log/audit/audit.log and system logs to identify potential problems.
SELinux Booleans:
You can list available Booleans and their statuses using the semanage boolean -l or getsebool -a command. To change a Boolean value, use the setsebool command.
View SELinux Context:
You can view the SELinux context for a specific file or directory using the ls -Z command.
Creating Custom SELinux Policies (Optional):
This involves using SELinux policy development tools like audit2allow and semodule to define the necessary rules.
Conclusion
Incorporating SELinux into your Linux system’s security posture can significantly improve its resilience against cyber threats.
By following the steps outlined in this guide, you’ll be well-equipped to configure SELinux effectively for your applications and services, bolstering the overall security of your Linux environment.
Remember to continually monitor and update your SELinux configurations to keep up with evolving security challenges. I hope will this your helpful. Thank you for reading the DevopsRoles page!
How to master the curl command in Linux. In this article, we’ll explore the capabilities of curl and learn how to leverage its features to simplify your web-related operations.
The command line interface (CLI) is a powerful ally for Linux users, providing efficient ways to perform various tasks. Among the multitude of commands available, curl stands out as a versatile tool for making HTTP requests and interacting with different protocols.
What is the curl command?
curl is a command-line utility that allows you to transfer data to or from a server, supporting various protocols such as HTTP, HTTPS, FTP, SMTP, and more. With its extensive range of options, curl empowers users to send and receive data using different methods, customize headers, handle authentication, and automate web-related tasks.
Basic Usage
The syntax of curl is straightforward. It follows this general structure:
curl [options] [URL]
You can simply run curl followed by a URL to send a GET request and retrieve the content of a web page. For example:
curl https://devopsroles.com
How to Use Curl Command in Linux
Saving a File using the curl command
If you prefer to save the downloaded file with a different name, you can use the -o option followed by the desired filename.
The command you provided is using curl to download a file from an FTP server using basic authentication. Here’s an explanation of the options used in the command:
-v: Enables verbose output, providing detailed information about the request and response.
-udemo:password: Specifies the username and password for basic authentication. Replace the demo with the actual username and password with the corresponding password.
-O: Saves the downloaded file with its original name.
ftp://test.devopsroles.com/readme.txt: Specifies the FTP URL from which the file should be downloaded. Replace test.devopsroles.com with the actual FTP server address and readme.txt with the file name you want to download.
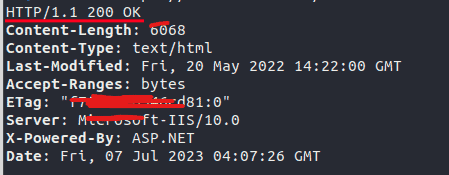
Testing If a Server Is Available or Not
curl -I https://test.devopsroles.com/
You can use it to send an HTTP HEAD request to the specified URL in order to retrieve the response headers.
-I: Specifies that curl should send an HTTP HEAD request instead of the default GET request. This means that only the response headers will be retrieved, and not the entire content of the page.
https://test.devopsroles.com/: Specifies the URL to which the request will be sent. Replace test.devopsroles.com with the actual domain or website you want to retrieve the headers from.
Check Server Response Time
How to measure the total time taken for the HTTP request to the specified website.
When you run this command, curl will initiate an HTTP request to the specified website and measure the total time taken for the request.
-w “%{time_total}\n”: Specifies a custom output format using the -w option. In this case, %{time_total} is a placeholder that represents the total time taken for the request, and \n is a newline character that adds a line break after the output. The total time is measured in seconds.
-o /dev/null: Redirects the response body to /dev/null, which is a special device file in Unix-like systems that discards any data written to it. By doing this, we discard the response body and only focus on measuring the time taken for the request.
devopsroles.com: Specifies the URL of the website to which the HTTP request will be sent. Replace devopsroles.com with the actual domain or website you want to measure the time for.
When you run this command, curl will establish an SSL/TLS-encrypted connection to the specified website and send an HTTP request. The response headers received from the server may include cookies, and curl will save these cookies to the specified “cookies.txt” file.
These cookies can be used for subsequent requests by providing the –cookie option and specifying the cookie file.
Setting User Agent Value with curl command
Uses curl to make an HTTP request to the specified website while setting a custom user-agent header.
curl --user-agent "Mozilla/4.73 [en] (X11; U; Linux 2.2.15 i686)" test.devopsroles.com
–user-agent “Mozilla/4.73 [en] (X11; U; Linux 2.2.15 i686)”: Sets the User-Agent header in the HTTP request. In this case, the specified user-agent string is “Mozilla/4.73 [en] (X11; U; Linux 2.2.15 i686)”. The User-Agent header provides information about the client or browser making the request. By setting a custom user-agent, you can emulate a specific browser or client behavior.
test.devopsroles.com: Specifies the URL of the website to which the HTTP request will be sent. Replace test.devopsroles.com with the actual domain or website you want to access.
Conclusion
The curl command is a powerful ally for Linux users, providing extensive capabilities to interact with web services and protocols. With its simple syntax and rich set of options, curl empowers you to perform a wide range of tasks, from retrieving web pages to sending data and handling authentication. By mastering curl, you can streamline your web-related operations and enhance your command line prowess.
Whether you’re a developer, sysadmin, or simply an avid Linux user, curl is a tool worth exploring. Its versatility and flexibility make it an invaluable asset for interacting with web services from the command line. Thank you for reading the DevopsRoles page.
Creating files in Linux, whether you are a system administrator, developer, or everyday user. Linux offers several methods to create files, giving you flexibility and convenience.
In this tutorial, we will explore different approaches to creating files in Linux, including command-line tools and text editors.
Creating Files in Linux
Method 1: Using the touch Command
The touch command is a versatile tool in Linux primarily used to update file timestamps. However, it can also create a new file if it doesn’t already exist.
To create a new file using the touch command, use the following syntax:
Replace filename.txt with the desired name and extension for your file. The touch command will create a new empty file with the specified name if it doesn’t already exist.
You can refer to the touch command in Linux with the examplehere.
Method 2: Using the echo Command and Output Redirection
Another method to create a file in Linux is by using the echo command in combination with output redirection.
To create a file and write content to it using echo, use the following syntax:
Replace “Content” with the desired content you want to write and filename.txt with the desired name and extension for your file. The > symbol redirects the output of the echo command to the specified file.
You can refer to the echo command in Linux with Examples here.
Method 3: Using a Text Editor
Linux provides various text editors that allow you to create and edit files. Some popular text editors include vi, vim, nano, and gedit. Using a text editor gives you more flexibility to create files and input content.
To create a file using a text editor, execute the respective command for the desired text editor, followed by the filename:
nano filename.txt
vi filename.txt
vim filename.txt
This command will open the specified text editor with a new file for editing. You can then start typing or paste existing content into the file. After making changes, save the file and exit the editor according to the editor’s instructions.
Conclusion
Creating files in Linux is a straightforward process with multiple methods at your disposal. The touch command allows you to quickly create empty files, while the echo command combined with output redirection lets you create files and populate them with content.
Additionally, text editors provide a more interactive approach to file creation, allowing you to input and edit content. Choose the method that suits your needs and preferences, and leverage the power of Linux to efficiently create and manage files on your system. I hope will this your helpful. Thank you for reading the DevopsRoles page!
In this blog post, we’ll cover how to view and flush the DNS cache on Linux. Linux flush DNS cache can help resolve HTTP errors and safeguard against DNS spoofing attacks. Follow along to learn the steps for managing your DNS cache effectively.
DNS Cache on Linux?
DNS Cache on Linux refers to the stored records of DNS lookups that the system keeps locally. These records contain information about previously resolved domain names and their corresponding IP addresses. By caching this information, Linux can speed up subsequent DNS queries, reducing the time required to resolve domain names.
Flushing the DNS cache on Linux clears this stored information, forcing the system to perform new DNS lookups for subsequent queries. This can be useful for troubleshooting DNS-related issues or ensuring that the system retrieves the most up-to-date information from DNS servers.
Here are a few commonly used DNS resolvers on Linux:
systemd-resolved
dnsmasq
NetworkManager
BIND (Berkeley Internet Name Domain)
Unbound
pdnsd
Why Flush DNS Cache on Linux?
Flushing the DNS cache on Linux can be useful in several scenarios:
Flushing the DNS cache ensures that your Linux system fetches the latest DNS information from authoritative DNS servers
A Flush DNS cache allows your system to start with a clean cache and retrieve fresh DNS information.
Network configuration changes
Clearing the DNS cache can help protect your privacy and security.
How to View the Local DNS Cache on Linux
To view the local DNS cache on Linux, the method varies depending on the DNS resolver software in use.
Viewing the local DNS cache on Linux varies based on the DNS resolver software.
For systemd-resolved users, employ systemd-resolve –statistics to check cache usage.
Alternatively, dnsmasq users can use dnsmasq –test or sudo rndc dumpdb -cache.
NetworkManager users can check cache status with nmcli dev show | grep DNS.
Familiarity with these methods aids in monitoring and troubleshooting DNS resolution for optimal system performance.
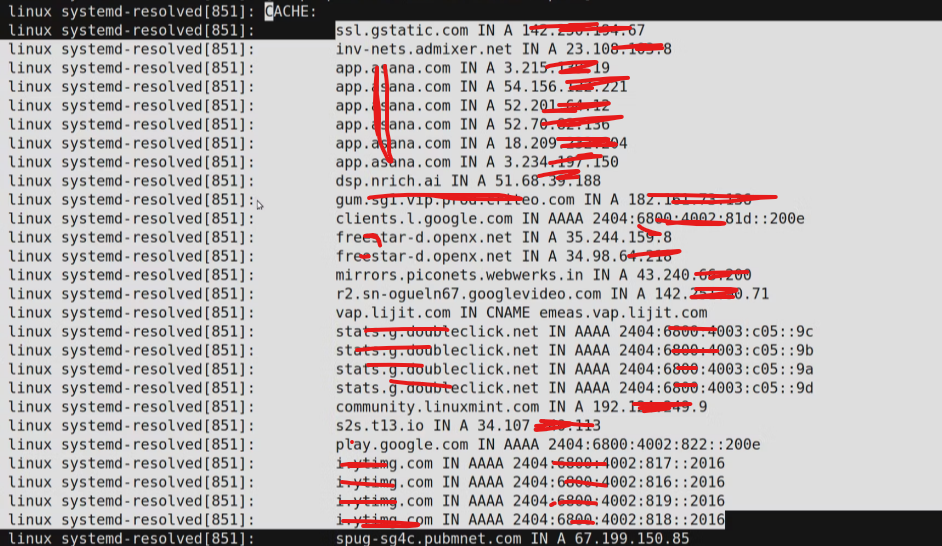
View DNS Cache for systemd-resolved
By sending a SIGUSR1 signal to kill the systemd-resolved service
sudo killall -USR1 systemd-resolved
Use the journalctl command and the standard output operator to save the output to a text file
You use the vim command line to open “/tmp/cache.txt” file. search for “CACHE:” by pressing Escape, typing “/CACHE:”, and hitting Enter.
View the Local DNS Cache for nscd
To view the local DNS cache for nscd (Name Service Cache Daemon), you can follow these steps:
sudo strings /var/cache/nscd/hosts | uniq
This command provides a comprehensive overview of nscd command, presenting statistics such as cache size, cache hits, and cache misses, offering valuable insights into the performance and operation of the Name Service Cache Daemon.
sudo nscd --statistics
Use dnsmasq command display the DNS Cache
To display the DNS cache generated by dnsmasq command , you can use the following command:
sudo dnsmasq --test --cache
Linux flush DNS cache
To view and flush the DNS cache on Linux, you can follow the steps below:
1. Open a terminal window. You can do this by pressing Ctrl+Alt+T on most Linux distributions.
2. To view the current contents of the DNS cache, use the following command:
sudo systemd-resolve --statistics
This command will display various statistics related to the DNS resolver, including the cache size, cache hits, and cache misses.
3. To flush the DNS cache, you need to restart the DNS resolver service. The method depends on your Linux distribution.
For Ubuntu 16.04 and later, Fedora, and CentOS 7, and later. You can use the following command:
sudo systemctl restart systemd-resolved.service
For Ubuntu 14.04 and earlier, CentOS 6 and earlier. you can use the following command:
sudo /etc/init.d/nscd restart
After executing the appropriate command, the DNS cache will be flushed, and any previously cached DNS entries will be cleared.
Conclusion
Linux flush DNS cache can temporarily disrupt domain name resolution on your system, as it clears existing DNS data. However, this process ensures that your system fetches updated DNS information, enhancing accuracy and security in the long run. I hope this will be helpful. Thank you for reading the DevopsRoles page!
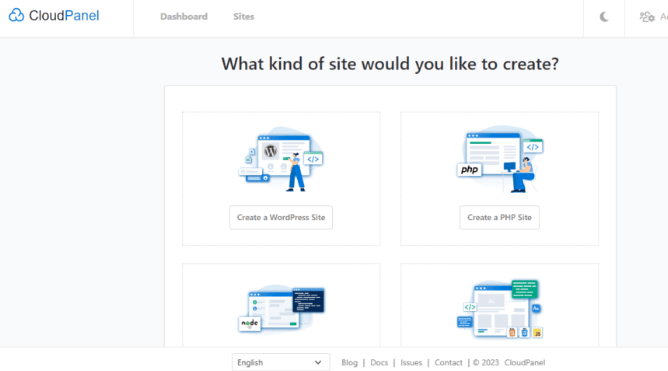
CloudPanel is a powerful web-based control panel that simplifies the management of cloud infrastructure and services. In this guide, we will walk you through the process of installing CloudPanel on Ubuntu, setting up monitoring for your cloud resources, and creating a WordPress website. Let’s dive in!
Installing CloudPanel on Ubuntu
Installation requires a few steps, but with our detailed instructions, you’ll have it up and running in no time. Follow these steps:
Step 1: Update System Packages Start by updating your Ubuntu system packages to ensure you have the latest updates.
sudo apt update
sudo apt upgrade
Step 2: Install Dependencies Install the necessary dependencies, including software-properties-common, curl, and unzip.
Once the installation is complete, you can access CloudPanel by opening a web browser and navigating to https://your-server-ip. Replaceyour-server-ip with the IP address or domain name of your Ubuntu server.
Monitoring Your Cloud Resources
Monitoring your cloud resources is crucial for ensuring their optimal performance. Here’s how to set it up:
Step 1: Access CloudPanel Dashboard After installing CloudPanel, access the CloudPanel dashboard using your server’s IP address or domain name.
Step 2: Enable Monitoring Navigate to the monitoring section in Cloud-Panel and enable the monitoring feature.
Step 3: Configure Monitoring Settings Configure the monitoring settings according to your requirements, such as the frequency of data collection and alert thresholds.
Step 4: View Resource Metrics Explore the monitoring dashboard to view real-time metrics of your cloud resources, including CPU usage, memory usage, disk I/O, and network traffic.
Creating a WordPress Website with CloudPanel
Setting up a WordPress website becomes a breeze. Follow these steps:
Step 1: Add a Domain In the CloudPanel dashboard, add your domain name, and configure DNS settings to point to your server.
Step 2: Create a Database Create a new database for your WordPress installation through the Cloud-Panel interface.
Step 3: Download and Install WordPress Download the latest version of WordPress and extract it into the webroot directory specified by Cloud-Panel.
Step 4: Configure WordPress Access your website’s URL and follow the WordPress installation wizard to set up your website.
Step 5: Customize and Manage Your Website Utilize the powerful features of WordPress to customize your website’s appearance and functionality. Install themes and plugins, create pages and blog posts, and manage user accounts.
Note: By default, CloudPanel will install a Self-signed SSL certificate for the website, therefore, make sure you have opened port number 443 in your Cloud service firewall.
The final, Point your Domain A record
Conclusion
CloudPanel offers a comprehensive solution for managing cloud infrastructure and services. By following this guide, you have learned how to install CloudPanel on Ubuntu, set up monitoring for your cloud resources, and create a WordPress website using Cloud-Panel.
Now, you can efficiently manage your cloud environment and host websites with ease. Enjoy the benefits of CloudPanel and take your cloud management to the next level! I hope will this your helpful. Thank you for reading the DevopsRoles page!
In the Linux world, text editors are essential tools for programmers, writers, and anyone working with text-based files. With a plethora of options available, it can be challenging to choose the right one for your needs.
In this article, we’ll explore some of the best Linux text editors renowned for their power, flexibility, and customization options. Whether you’re a seasoned developer or a beginner, there’s an editor here that can elevate your productivity.
Best Linux Text Editors
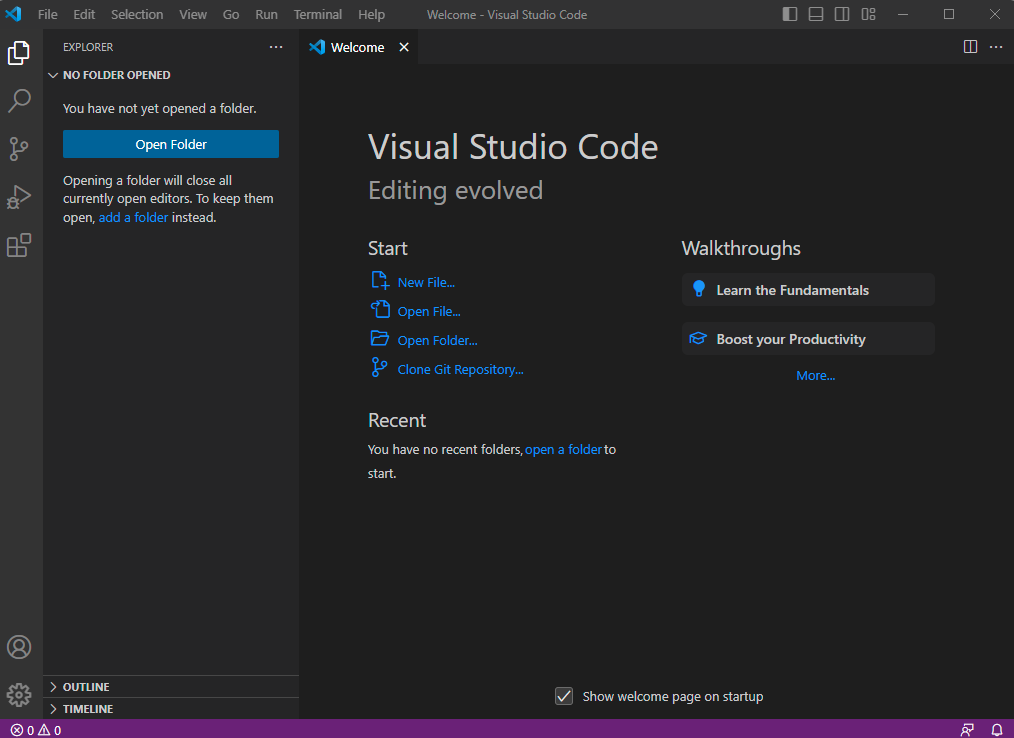
Visual Studio Code (VS Code)
Originally designed as a code editor, Visual Studio Code (VS Code) is equally proficient as a text editor. It boasts a user-friendly interface, excellent performance, and extensive language support.
VS Code comes with built-in debugging capabilities, a rich set of extensions, and a thriving community. It’s highly customizable, allowing users to personalize their editor with themes, settings, and keybindings.
Whether you’re writing code or crafting prose, VS Code provides a versatile and feature-rich editing experience.
I love it. My Best Linux Text Editors.
Pros
User-Friendly Interface: VS Code provides a clean and intuitive user interface, making it easy for users to navigate and understand its features. It offers a visually appealing layout with customizable themes and icons.
Extensive Language Support: VS Code supports a vast array of programming languages out of the box, including popular languages like JavaScript, Python, Java, C++, and more. It provides syntax highlighting, auto-completion, and code formatting for improved development productivity.
Rich Ecosystem of Extensions: VS Code has a thriving community that develops numerous extensions, which can enhance the editor’s functionality. From linters and debuggers to version control integrations and development environments, you can find extensions to tailor VS Code to your specific needs.
Integrated Version Control: VS Code seamlessly integrates with popular version control systems like Git. It provides features like inline diff views, commit history, and branch management, allowing developers to work with version-controlled projects directly within the editor.
Integrated Terminal: VS Code comes with an integrated terminal that allows you to run commands, compile code, and perform various tasks without switching to a separate terminal application. It eliminates the need to constantly switch between windows, streamlining your workflow.
Intelligent Code Editing Features: VS Code offers intelligent code completion, code snippets, and code refactoring tools. It helps developers write code faster and with fewer errors by suggesting completions, automatically generating code snippets, and providing helpful hints.
Cons
Performance with Large Projects: While VS Code performs well in general, it may experience some slowdowns when working with large and complex projects. The editor’s performance can be affected by factors like the number of installed extensions, the size of the codebase, and the available system resources.
Memory Consumption: Similar to the performance issue, VS Code’s memory consumption can increase significantly when working on large projects or with many open files and extensions. This can impact the overall system performance, particularly on machines with limited RAM.
Steep Learning Curve for Advanced Features: While the basic usage of VS Code is straightforward, some advanced features, configurations, and customizations may require a learning curve. Fully harnessing the power of VS Code and its extensions might take some time and exploration.
Limited Collaboration Features: Compared to dedicated collaborative development tools, VS Code’s built-in collaboration features are relatively limited. While it supports real-time collaboration to some extent, it may not provide the same level of collaboration functionality as specialized tools like Visual Studio Live Share.
Microsoft Ecosystem Ties: As a product developed by Microsoft, VS Code is inherently tied to the Microsoft ecosystem. While this is not necessarily a drawback for most users, it might be a consideration for individuals who prefer to avoid software from specific vendors or who seek a more platform-agnostic solution.
Vim
Vim, short for “Vi Improved,” is a legendary text editor that has stood the test of time. It offers a unique modal editing approach, allowing users to switch between different modes for various editing tasks.
Vim provides an extensive set of features, including syntax highlighting, split windows, macros, and an incredibly active community that develops plugins to enhance its capabilities.
While it has a steep learning curve, Vim rewards those who invest the time to master its efficient editing commands.
I think Vim is the Best Linux Text editor. I like it.
Pros
Best for general usage
Fast and easy navigation using keyboard shortcuts
Deeply integrated into Linux
Cons
Has a learning curve for Linux beginners
Emacs
Emacs is another heavyweight contender in the text editing world. Renowned for its extensibility, Emacs allows users to customize virtually every aspect of the editor through its built-in Lisp programming environment.
With Emacs, you can write custom scripts, create keybindings for repetitive tasks, and install a vast array of community-developed packages. It boasts features like syntax highlighting, powerful search and replace, version control integration, and even email and web browsing capabilities.
Sublime Text
While not open source, Sublime Text has gained a significant following due to its polished interface and extensive feature set. It offers a distraction-free writing experience with a responsive user interface.
Sublime Text excels in search and replaces functionality, multi-cursor editing, and a comprehensive plugin ecosystem. It also supports customization through themes and settings.
Although Sublime Text requires a license for continued use, it offers a free evaluation period.
Atom
Developed by GitHub, Atom is an open-source text editor that focuses on flexibility and customization. It comes with a modern and intuitive user interface and supports a wide range of features.
Atom offers smart autocompletion, multiple panes for side-by-side editing, and a built-in package manager for easy plugin installation.
The editor’s true strength lies in its extensibility, as the community has developed numerous plugins and themes to enhance its functionality and appearance.
GNU Nano
If you prefer a simpler and more beginner-friendly text editor, GNU Nano is an excellent choice.
Nano provides a straightforward and intuitive interface, making it accessible to users of all skill levels.
Despite its simplicity, Nano still offers essential features like syntax highlighting, search and replace, and multiple buffers. It’s a great option for quick edits or when you want a lightweight editor that doesn’t overwhelm you with complexity.
Conclusion
The Best Linux Text Editors. When it comes to Linux text editors, there’s no shortage of excellent options. Whether you prefer the power and efficiency of Vim and Emacs, the simplicity of GNU Nano, the polished experience of Sublime Text, the flexibility of Atom, or the versatility of VS Code, you can find a text editor that matches your needs and enhances your productivity.
I hope will this your helpful. Thank you for reading the DevopsRoles page! Best Linux Text Editors
How to master the rpm command in Linux. The RPM (Red Hat Package Manager) command is a powerful tool used in Linux systems for managing software packages.
Whether you are a beginner or an experienced user, understanding how to use RPM effectively can greatly enhance your Linux experience.
In this blog post, we will delve into the RPM command, its functionalities, and various operations such as querying, verifying, installing, updating, and removing RPM packages.
Master the rpm command
The RPM command is a powerful tool for managing packages on Linux systems. Here are some tips for mastering RPM:
1. Learn the basics:
RPM stands for “Red Hat Package Manager” and is used to install, update, and remove software packages on Linux systems. The basic syntax for using RPM is:
The syntax: rpm [options] [package_file(s)]
Some common options include -i (install),-U (upgrade), and -e (erase).
2. Get familiar with package dependencies:
RPM packages can have dependencies on other packages, which means that they require certain software to be installed before they can be installed themselves. You can use the rpm command with the -q option to query installed packages and their dependencies.
For example, to see the dependencies of the “httpd” package, you can run:
rpm -q --requires httpd
3. Use the RPM database:
RPM maintains a database of installed packages, which you can use to query information about packages, verify packages, and more. You can use the rpm command with the -q option to query the RPM database.
For example, to see information about the “httpd” package, you can run:
rpm -q httpd
4. Verify packages:
RPM includes a feature that allows you to verify the integrity of installed packages. You can use the rpm command with the -V option to verify the checksums, permissions, and other attributes of a package.
For example, to verify the integrity of the “httpd” package, you can run:
rpm -V httpd
5. Build your own packages:
RPM includes tools for building your own RPM packages. You can use the rpmbuild command to create RPM packages from source code or other files.
For example, to create an RPM package from a source code directory, you can run:
rpmbuild -bb mypackage.spec
6. Use RPM with package repositories:
Many Linux distributions include package repositories that provide pre-built packages for easy installation. You can use the yum or dnf command (depending on your distribution) to manage package repositories and install packages from them.
For example, to install the “httpd” package from the official CentOS repository, you can run:
yum install httpd
The Basics: Installing, Updating, and Removing RPM Packages
Installing RPM Packages:
Updating RPM Packages:
Removing RPM Packages:
Querying and Verifying RPM Packages
Querying RPM Packages:
To list all installed packages, use the following command:
rpm -qa
To check if a specific package is installed, use the following command:
rpm -q package_name
To display detailed information about a package, use the following command:
rpm -qi package_name
To list the files installed by a package, use the following command:
rpm -ql package_name
To list the files included in an RPM package, use the following command:
rpm -qpl package_name.rpm
Verifying RPM Packages:
To verify all installed packages, use the following command:
rpm -Va
To verify a specific package, use the following command:
rpm -V package_name
To verify the checksums of all files in a package, use the following command:
rpm -Vp package_name.rpm
To verify only the configuration files of a package, use the following command:
rpm -Vc package_name
Exploring More RPM Command Examples
Extracting files from RPM Packages:
The rpm2cpiothe command can be used to extract files from an RPM package. Here’s an example:
rpm2cpio package_name.rpm | cpio -idmv
This command extracts all files from the RPM package package_name.rpm to the current directory.
Signing RPM Packages:
The rpm --addsign the command can be used to sign an RPM package with a GPG key. Here’s an example:
rpm --addsign package_name.rpm
This command signs the RPM package package_name.rpm with the default GPG key.
Querying Package Dependencies:
The rpm -qpR the command can be used to query the dependencies of an RPM package file. Here’s an example:
rpm -qpR package_name.rpm
This command lists the dependencies of the RPM package package_name.rpm.
Rebuilding RPM Packages:
The rpmbuild the command can be used to rebuild an RPM package from source code or other files. Here’s an example:
rpmbuild -ba mypackage.spec
This command rebuilds the RPM package using the mypackage.spec file as the package specification.
Using RPM with Yum/DNF:
The yum or dnf command (depending on your distribution) can be used to manage package repositories and install packages from them. Here are some examples:
yum install package_name
dnf install package_name
Conclusion
Mastering the RPM command is an essential skill for any Linux user. With the ability to query, verify, install, update, and remove RPM packages, you can efficiently manage software on your system. I hope will this your helpful. Thank you for reading the DevopsRoles page!
In this tutorial, How to Encrypt Files in Linux with Tomb. It’s a simple shell script to allow you to encrypt folders and files in Linux.
The Tomb is a powerful encryption tool for Linux that allows users to create encrypted directories and files, providing an extra layer of security for sensitive data.
Tomb uses both GNU Privacy Guard to handle its encryption and dd to wipe and format its virtual partitions.
Installing Tomb in Ubuntu
sudo apt install -y tomb
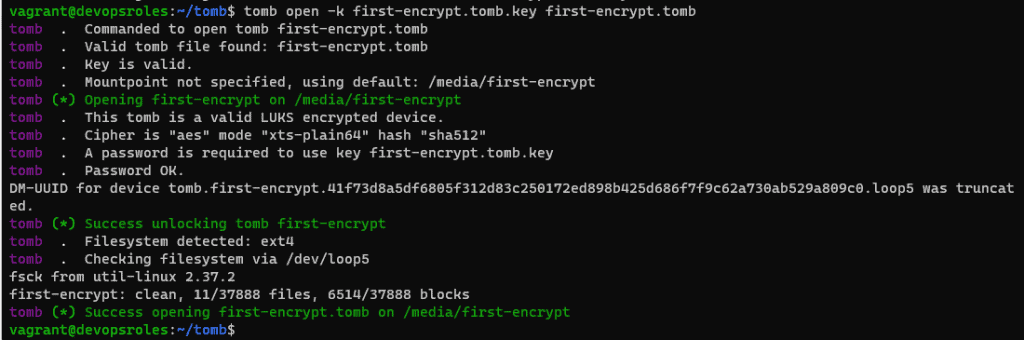
How to encrypt Files in Linux with Tomb
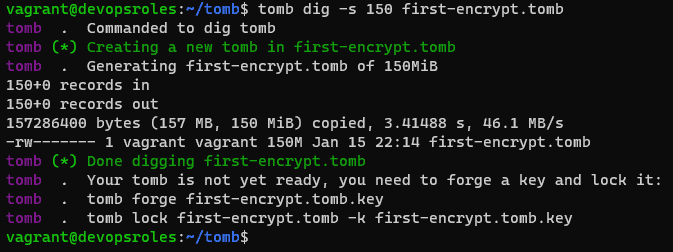
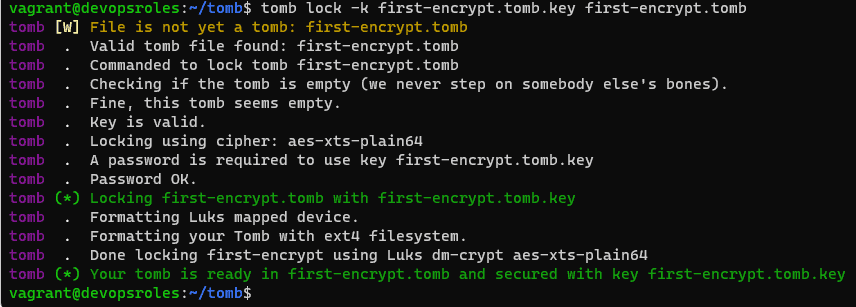
First, you must use the dig subcommand to create a 150M Tomb file with “first-encrypt.tomb“
tomb dig -s 150 first-encrypt.tomb
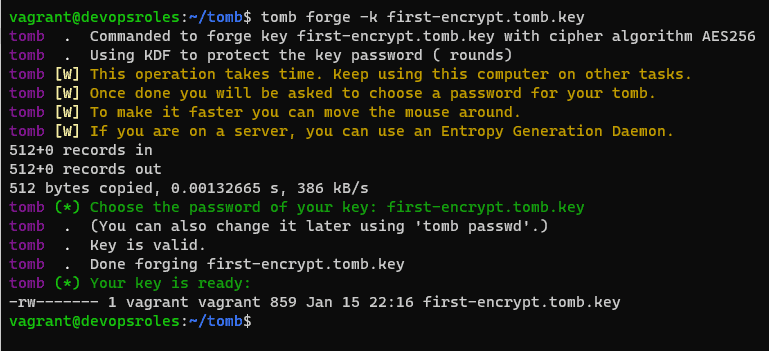
Next, You create a new key for the tomb file:
tomb forge -k first-encrypt.tomb.key
Second, You need to link the new key to your new tomb file as command below:
tomb index # The first, In order to search through your tomb files.
tomb search test # after search your want to
Conclusion
With Tomb, you can easily encrypt sensitive files and keep them secure on your Linux system. You know How to Encrypt Files in Linux with Tomb. I hope this will be helpful. Thank you for reading the DevopsRoles page!
In this tutorial, How to install Gitea repository in Ubuntu.
Understanding Gitea
Gitea is a web-based Git repository management tool, similar to GitHub, GitLab, and Bitbucket. It is a self-hosted, open-source software that allows developers to create and manage Git repositories, as well as collaborate with others on software development projects.
With Gitea, you can create your own private Git repositories, manage access control and permissions for users and teams, and track issues and bugs with an integrated issue tracker. It also supports pull requests, code reviews, and continuous integration and deployment with built-in integrations for popular tools like Jenkins and Travis CI.
It is written in Go, and it’s lightweight and easy to set up and run.
Why Choose Gitea?
Lightweight: Gitea is very resource-efficient.
Open Source: It is free to use and modify.
Feature-Rich: Offers essential Git features along with additional tools like issue tracking and code review.
Easy to Install: The setup process is straightforward, making it accessible even for beginners.
Prerequisites
Before you begin, ensure you have the following:
An Ubuntu server instance with sudo privileges.
A basic understanding of terminal commands.
Install Gitea repository in Ubuntu
Install the necessary dependencies
sudo apt-get install wget get mariadb-server -y
After the installation, secure the database server as command below:
sudo mysql_secure_installation
Create a database and user
Log in to the database console as below:
sudo mysql -u root -p
Create the database
CREATE DATABASE gitea;
GRANT ALL PRIVILEGES ON gitea.* TO 'gitea'@'localhost' IDENTIFIED BY "your_password";
FLUSH PRIVILEGES;
exit