In this tutorial, How to install InfluxDB on RHEL / Centos 7. InfluxDB is an open-source time-series database. It is High availability storage and optimized for fast and metrics analysis.
To install InfluxDB on RHEL/CentOS 7, you can follow the steps below:
Install InfluxDB on RHEL / Centos 7
First, You add InfluxDB repository to your system using the command below
[vagrant@DevopsRoles ~]$ sudo vi /etc/yum.repos.d/influxdb.repoAdd the content below:
[influxdb]
name = InfluxDB Repository
baseurl = https://repos.influxdata.com/rhel/7/x86_64/stable/
enabled = 1
gpgcheck = 1
gpgkey = https://repos.influxdata.com/influxdb.key
Install InfluxDB
[vagrant@DevopsRoles ~]$ sudo yum -y install influxdbEnable the InfluxDB service to start on system boot:
[vagrant@DevopsRoles ~]$ sudo systemctl enable influxdb
Start InfluxDB services on RHEL / Centos 7
[vagrant@DevopsRoles ~]$ sudo systemctl start influxdbTo check the status of InfluxDB is running
[vagrant@DevopsRoles ~]$ sudo systemctl status influxdbConfigure InfluxDB Firewall on RHEL / Centos 7
The default, InfluxDB uses TCP port 8086 for client-server communication over HTTP API, and TCP port 8088 is used for backup and restore.
Open the port on the Firewall using the command below
[vagrant@DevopsRoles ~]$ sudo firewall-cmd --add-port=8086/tcp --permanent
[vagrant@DevopsRoles ~]$ sudo firewall-cmd --reload
Configure InfluxDB HTTP Authentication on RHEL / Centos 7
Enable HTTP authentication
[vagrant@DevopsRoles ~]$ sudo vi /etc/influxdb/influxdb.confAdd the content below:
[http]
 auth-enabled = true
Restart the InfluxDB service.
[vagrant@DevopsRoles ~]$ sudo systemctl restart influxdbCreate a user with an Authentication password
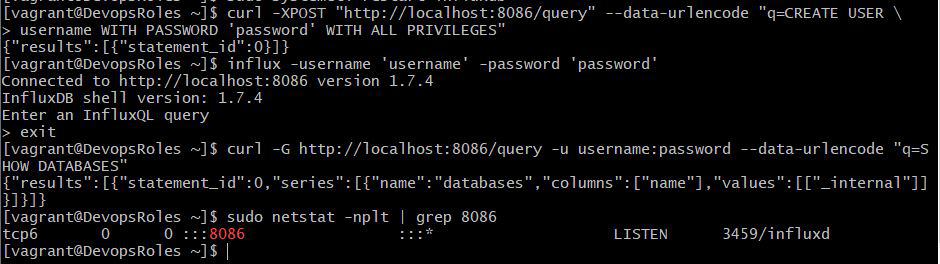
[vagrant@DevopsRoles ~]$ curl -XPOST "http://localhost:8086/query" --data-urlencode "q=CREATE USER \
username WITH PASSWORD 'password' WITH ALL PRIVILEGES"
You need to run any Influxdb commands on the terminal with a specific username and password.
[vagrant@DevopsRoles ~]$ influx -username 'username' -password 'password'For example, the curl command uses the -u option to specify a username and password.
[vagrant@DevopsRoles ~]$ curl -G http://localhost:8086/query -u username:password --data-urlencode "q=SHOW DATABASES"Check Influxdb service is listening
[vagrant@DevopsRoles ~]$ sudo netstat -nplt | grep 8086
You have successfully installed InfluxDB on RHEL/CentOS 7. Thank you for reading the DevopsRoles page!