Quick start install Elasticsearch and Kibana with Docker

In this tutorial, How to Quickstart install Elasticsearch and Kibana with Docker.

  • Elasticssearch: localhost:9200
  • Kibana: localhost:5601

Docker-compose start with

docker-compose -f docker-compose.yml up -d

Docker-compose Stop

$ docker-compose -f docker-compose.yml down

Be careful with command docker-compose down. If you want Stop and remove containers, networks, images, and volumes as in the picture below

Install Elasticsearch with Kibana with Docker-compose

For example docker-compose.yml

version: '3'
services:
  elasticsearch:
    image: docker.elastic.co/elasticsearch/elasticsearch:6.3.2
    ports:
      - 9200:9200
    volumes:
      - ./share/elasticsearch/data:/usr/share/elasticsearch/data
      - ./share/elasticsearch/config/elasticsearch.yml:/usr/share/elasticsearch/config/elasticsearch.yml
    networks: [elastic]
    environment:
      - discovery.type=single-node
  kibana:
    image: docker.elastic.co/kibana/kibana-oss:6.3.2
    ports:
      - 5601:5601
    networks: [elastic]
networks:
  elastic:

Host OS ./share/elasticsearch/data and Guest OS /usr/share/elasticsearch/data are mounted for data persistence of Elasticsearch.

File configure single node “./share//config/elasticsearch.yml”

cluster.name: "docker-cluster"
network.host: 0.0.0.0
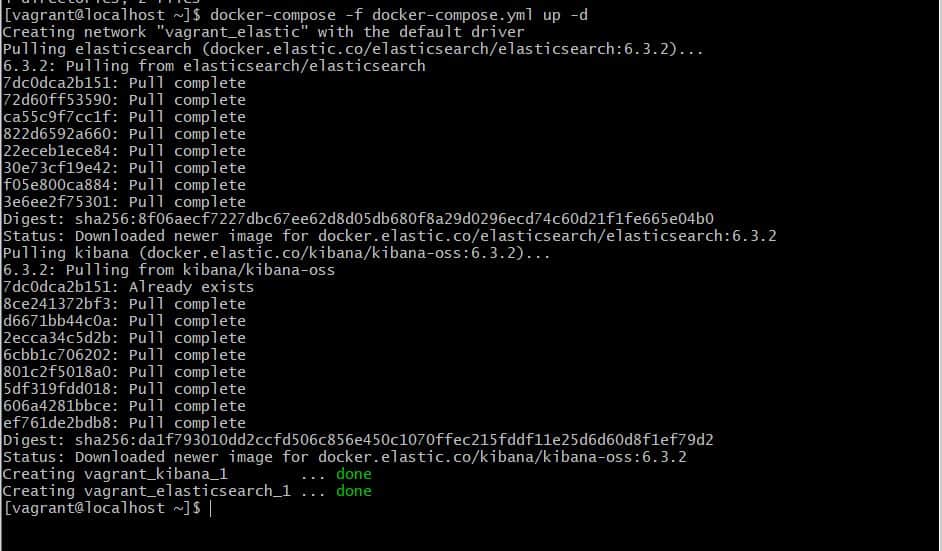
discovery.zen.minimum_master_nodes: 1

Steps install Elasticsearch and Kibana with Docker as the picture below

[vagrant@localhost ~]$ tree /home/vagrant/
/home/vagrant/
├── docker-compose.yml
└── share
    └── elasticsearch
        ├── config
        │   └── elasticsearch.yml
        └── data

4 directories, 2 files

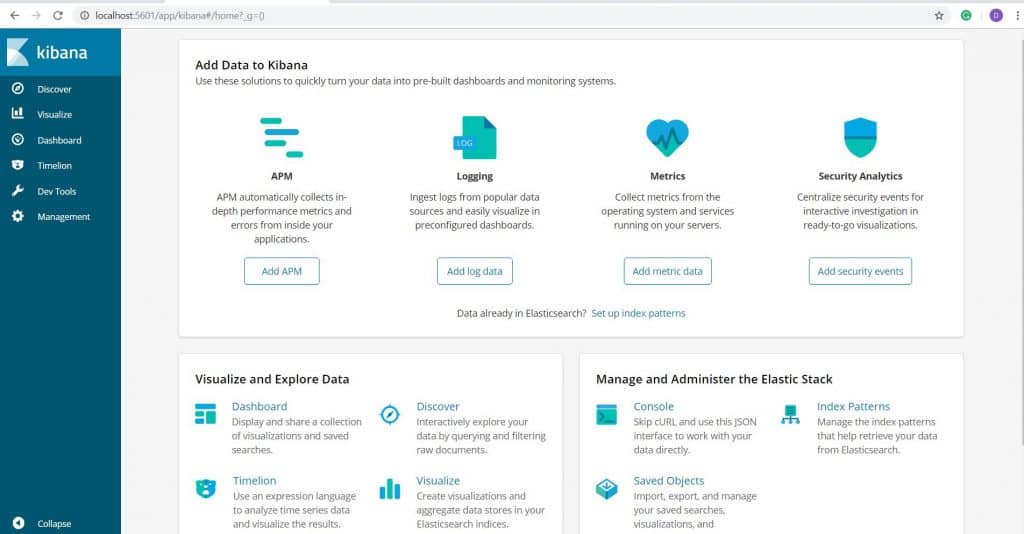
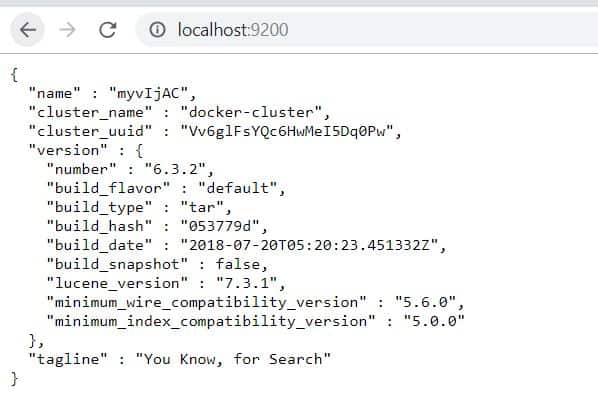
Access the client browser as the picture below

Kibana: localhost:5601

Elasticsearch: localhost:9200

Conclusion

Thought the article, How to “Quickstart install Elasticsearch and Kibana with Docker” as above. I hope will this your helpful. Thank you for reading the DevopsRoles page!

Jenkins checkout Pipeline Multibranch

In this tutorial, How to use Jenkins checkout Pipeline Multibranch. For example with Git, the reference a GitSCM Object. It is the same git pull command.

For example below, When you running job Jenkins then checkout source code from git takes 15 minutes. You running job Jenkins again then checkout the source code from git takes 4s. It is faster, as the picture below

Jenkins checkout Pipeline Multibranch code as below

stage('Checkout') {
      checkout([$class: 'GitSCM', branches: [[name: "${BRANCH}"]],
           doGenerateSubmoduleConfigurations: false,
            extensions: [[$class: 'CloneOption', depth: 0, noTags: false, reference: '', shallow: true, timeout: 30], 
[$class: 'LocalBranch', localBranch: '$BRANCH'], 
[$class: 'RelativeTargetDirectory', relativeTargetDir: 'devopsroles'], [$class: 'CleanBeforeCheckout'], 
[$class: 'CloneOption', depth: 0, honorRefspec: true, noTags: true, reference: '', shallow: false, timeout: 90]],
            submoduleCfg: [],
            userRemoteConfigs: [[credentialsId: '755f8df9-0g83-4b80-96d8-917eeb6b2fgg', url: 'https://gitlab.com/devopsroles.git']]
     ])
   }

Conclusion

You have use Jenkins checkout Pipeline Multibranch. I hope will this your helpful. Thank you for reading the DevopsRoles page!

Ansible structure playbook

In this tutorial, I wrote about the Ansible structure playbook. What does the Ansible structure playbook mean? Let’s begin!

A sample Ansible Directory Layout for staging development as below

[huupv2@server-deployment huupv2]$ tree myproject			
myproject			
├── group_vars			
│   └── nginx-server-var.yml			
├── host_vars			
│   └── server-web01.yml			
├── inventory			
│   └── my_hosts			
├── nginx-server.yml			
├── requirements			
│   └── web-server.yml			
├── roles			
└── vars			
    └── nginx_instance.yml			
			
6 directories, 6 files			

Create a structured folder for the Ansible playbook

[huupv2@server-deployment huupv2]$ mkdir myproject									
[huupv2@server-deployment huupv2]$ mkdir -p myproject/{inventory,host_vars,group_vars,vars,requirements,roles}

Create structure files for the Ansible playbook

[huupv2@server-deployment huupv2]$ touch myproject/requirements/web-server.yml							
[huupv2@server-deployment huupv2]$ touch myproject/vars/nginx_instance.yml							
[huupv2@server-deployment huupv2]$ touch myproject/group_vars/nginx-server-var.yml							
[huupv2@server-deployment huupv2]$ touch myproject/inventory/my_hosts							
[huupv2@server-deployment huupv2]$ touch myproject/host_vars/server-web01.yml							
[huupv2@server-deployment huupv2]$ touch myproject/nginx-server.yml							

For Ansible structure playbook

Server “server-deployment” installed Ansible and you want to deploy Nginx for server “server-web01” etc as in the picture below:

Working with inventory

[huupv2@server-deployment myproject]$ cat inventory/my_hosts
					
[dev-develop:children]					
tomcat-server					
nginx-server					
db-server					
					
[tomcat-server]					
					
[nginx-server]					
server-web01					
					
[db-server]					
server-db01	

Working with host_vars

set variables for individual hosts in the generated inventory file. For example, The content host_vars/nginx-server.yml file as below

nginx_instances:					
 - env_id: "dev"					
   instance_name:					
     - "DEVOPSROLES"					

Working with group_vars

set variables to particular groups. For example, The content group_vars/nginx-server-var.yml as below

nginx_version:  1.14.2					
nginx_package:					
  fullname: nginx-1.14.2-1.el6.ngx					

Working with requirements

Automatically install Ansible Galaxy roles with requirements/web-server.yml. For example, The content requirements/web-server.yml as below

## tag					
## version: v1.0.0					
## develop specify develop branch					
# version: remotes/origin/develop					
					
- src: git+https://huupv2:123456789@gitlab.com/tomcat/role-tomcat.git					
  version: v2.2					
					
- src: git+https://huupv2:123456789@gitlab.com/nginx/role-nginx.git					
  version: feature/dev-nginx					

Use ansible-galaxy to install all roles required by your playbook.

ansible-galaxy install -r requirements/web-server.yml -p roles

Working with vars

For example, The content file myproject/vars/nginx_instance.yml as below

# For devopsroles / role-nginx		
nginx_instance:		
# templates/conf/common.conf.j2		
  common_settings:		
    client_body_buffer_size: 16k		
    client_body_timeout: 60s		
    client_header_buffer_size: 1k		
    client_header_timeout: 60s		
    client_max_body_size: 1m		
    default_type: text/html		
    keepalive_timeout: 60s		
    large_client_header_buffers:		
      count: 4		
      size: 8k		
# templates/conf/nginx_site_instance.conf Used by		
  instance_indexes:		
  - index.html		
  - index.htm		
  instance_name: DEVOPSROLES							  		
# templates/conf/http[s].virtual_host.conf Used by		
  virtual_host_settings:				
    indexes:		
    - index.html		
    - index.htm		
    listen_port:		
      http: '8080'		
      https: '8443'					
    locations:				
    name: devopsroles.com		
    root: /app/DEVOPSROLES/nginx/htdocs		
    server_names:		
    - devopsroles.com		
		

Working with nginx-server.yml

- hosts: nginx-server		
  user: huupv		
  become: yes		
  roles:		
    - role-nginx		

Ansible run playbook

sudo ansible-playbook -i inventory/my_hosts nginx-server.yml -vvv --limit "server-web01"

Conclusion

Through the article, you can create a structured Ansible playbook simple. I hope will this your helpful. For more details, Ansible refers to Ansible tutorial.

create user and group in Linux

In this tutorial, I will quickly guide create user and group in Linux. How to add a user to a group in Linux. How to create users has permission or user no has permission.

Using command to create the and command to create the in Linux system.

How to create user and group in Linux

create group new in Linux

use groupadd command as below

$ sudo groupadd -g 2000 common # group common no has sudo permission
$ sudo groupadd -g 2001 dev # group dev has sudo permission
$ sudo groupadd -g 1100 IT

Create user new in Linux

For example, user user01 no has permission and user has permission

# useradd -m -d /home/user01 -s  /bin/bash   -g common -u 5000  user01; echo -e "user01\nuser01\n"  |  passwd  user01
# useradd -m -d /home/huupv  -s  /bin/bash   -g IT  -G dev    -u 5001  huupv; echo -e "huupv\nhuupv\n"  |  passwd  huupv

Add group to sudoers file

use visudo to open and edit the /etc/sudoers file and add group dev as follow below

%dev ALL=(root) ALL

Option

Create a user with sudo without password Linux.

# useradd -d /home/devops -u 8888 -s /bin/bash						
# echo -e "devops\ndevops\n" |  passwd devops						
# echo "devops ALL = (root) NOPASSWD:ALL" | tee /etc/sudoers.d/devops						
# chmod 0440 /etc/sudoers.d/devops						

Conclusion

Through the article, You can create user and group in Linux as above. I hope will this your helpful. Thank you for reading the DevopsRoles page!

Shell script execute SQL file

In this tutorial, How do I use shell script execute SQL file on DB? On the server running the shell script, you use a sqlplus command on the server.

You need to install Oracle client on server-run shell script. Example picture below

Oracle Client is free, easy to install client software for connecting to Oracle databases.

For example shell script execute SQL file as below

#!/bin/bash

CONNT=dbuser/password@connect_identifier #your env
SQL_FILE=/home/huupv/create_user.sql
sqlplus -s ${CONNT} <<EOF
  @${SQL_FILE}
EOF

RSTATUS=$?
if [ "${RSTATUS}" != "0" ]
then
  echo "Error"
  exit 100
else
  echo "success"
  exit 0
fi

Thank you for reading DevOpsRoles.com page.

How to extract substring in Bash Shell

In this tutorial, How to extract substring in Bash Shell on Linux. You can use a select substring from the string. The awk command has a few useful functions. It is function.

Function substr mean Returns a substring.

The syntax extract substring in Bash Shell

substr(S,P,N)
  • P: starting at position
  • N: it N number of from string S.

For example, I will use a string “HuuPV2123456789” with a length is 15 and starting position is 10.

$ echo "HuuPV2123456789" | awk '{ printf "%s", substr($0, 10, (length($0)-9)) }'

The result is below

456789

man page function substr here. Thank you for reading the DevopsRoles page!

Change timezone in Linux

In this tutorial, I will change timezone in Linux by command line. How to change the to your current time zone.

  • The location of the local time file in Linux is /etc/localtime.
  • Timezone files are located in /usr/share/zoninfo/

To change the timezone in the Linux command line, you can use the methods below, which are available on most modern Linux distributions. Here’s how you can do it:

How to Change Timezone in Linux with Two Methods.

Method 1: I will copy from /usr/share/zoneinfo/Asia/Ho_Chi_Minh to /etc/localtime

$ sudo cp /usr/share/zoneinfo/Asia/Ho_Chi_Minh /etc/localtime

Method 2: I will delete and make a symbolic Linux from //share//Asia/Ho_Chi_Minh to /etc/ as following below

$ sudo rm -f /etc/localtime
$ sudo ln -s /usr/share/zoneinfo/Asia/Ho_Chi_Minh /etc/localtime

Verify the new timezone:

Conclusion

After changing the timezone, you may need to restart services or applications that rely on the system time to ensure they reflect the new timezone.

You changed your current timezone You can type date command to verify and you’re done. I hope this is helpful you.

Jenkins pipeline error timeout after 10 minutes

How to fix Error fetching remote repository ‘origin’ from Jenkins build jobs. In this tutorial, I will be fixing the Jenkins pipeline error timeout after 10 minutes.

Jenkins build job error code as below

ERROR: Timeout after 10 minutes
ERROR: Error fetching remote repo 'origin'
Caused by: hudson.plugins.git.GitException: Command "/usr/local/git/bin/git fetch --tags --progress https://gitlab.com/devopsroles.git +refs/heads/*:refs/remotes/origin/*" returned status code 143:

Cause by

  1. incorrect credentials were provided with the Jenkins job definition.
  2. The repository is so large that it takes more than 10 minutes to clone.
  3. Bandwidth to the git server is slow enough that it takes more than 10 minutes to clone.

Jenkins pipeline error timeout after 10 minutes fixed

stage('Getsource') { // for display purposes
    // Get some code from a GitHub repository
    checkout([$class: 'GitSCM',
        branches: [[name: "${TARGET_BRANCH}"]],
        extensions: [[$class: 'CloneOption', timeout: 120]],
        gitTool: 'Default', 
        userRemoteConfigs: [[credentialsId: 'w55f8df9-0183-4b80-96d8-917ccccccccccc', url: 'https://gitlab.com/devopsroles.git']]
    ])
}

In my example, I will Increase the timeout is 120 minutes for the Git checkout source from the repository.

Conclusion

Through the article, you have solved the problem of Jenkins pipeline error timeout after 10 minutes as above. I hope will this your helpful.

Thank you for reading the DevopsRoles page!

How to configure a static IP address on Linux

In this tutorial, How to configure a static IP address on Linux. Step by step to make a static IP address on Linux.

Note: To change the network setting a good idea to make a copy of any configured file before your changes.

Configure a static IP address on Linux

For RHEL 8

How to configure a static IP address on an RHEL system. using command shown list network connections and devices on the system.

$ nmcli dev status

Now, To change the network interface from dynamic to static, you need to edit the file in folder “/etc//network-scripts”. In this example, I will create new file -Comtrend7FB9

Configuring a static IP address as below

HWADDR=7C:67:2A:CC:DF:8F
ESSID=Comtrend7FB9
MODE=Managed
KEY_MGMT=WPA-PSK
SECURITYMODE=open
MAC_ADDRESS_RANDOMIZATION=default
TYPE=Wireless
IPADDR=192.168.3.4  # Ip address static for Linux server
PROXY_METHOD=none
BROWSER_ONLY=no
BOOTPROTO=static      
DEFROUTE=yes
IPV4_FAILURE_FATAL=no
IPV6INIT=yes
IPV6_AUTOCONF=yes
IPV6_DEFROUTE=yes
IPV6_FAILURE_FATAL=no
IPV6_ADDR_GEN_MODE=stable-privacy
NAME=Comtrend7FB9
UUID=3f5a6317-27c7-249f-bfaa-1d2fa5283482
ONBOOT=yes

Restarting NetworkManager.

$ sudo systemctl restart NetworkManager

For Ubuntu 18.10

Using (network manager command-line interface) command to list the network interface on Ubuntu server.

$ nmcli d

For example, configure a static IP address on the Ubuntu system.

# interfaces(5) file used by ifup(8) and ifdown(8)
auto lo
iface lo inet loopback
auto enp0s25
iface enp0s25 inet static
    address 192.168.3.4
    netmask 255.255.255.0
    network 192.168.3.1
    broadcast 192.168.3.255

Restart the networking service.

$ sudo  systemctl restart NetworkManager.service

Configure Static IP On CentOS 6

You can update/edit as follow static IP configure. For example, I will update for eth0 interface network.

HWADDR=00:08:A2:0B:BA:B7
TYPE=Ethernet
BOOTPROTO=none
# IP static for Server #
IPADDR=192.168.3.4
# Subnet #
PREFIX=24
# Set default gateway IP for server #
GATEWAY=192.168.3.1
# Set dns servers #
DNS1=192.168.3.1
DNS2=8.8.8.8
DNS3=8.8.4.4
DEFROUTE=yes
IPV4_FAILURE_FATAL=no
# Disable ipv6 #
IPV6INIT=no
NAME=eth0
# This is system specific and can be created using 'uuidgen eth0' command #
UUID=31171a6f-bcg1-44de-8h6e-cf8e782f8bd6
DEVICE=eth0
ONBOOT=yes

Save and close the file. you need to restart the service network to apply the configure for the eth0 interface network.

$ sudo systemctl restart network

Conclusion

You have configure a static IP address on Linux. I hope will this your helpful. Thank you for reading the DevopsRoles page!

Bash script Create dir and copy specific files

In this tutorial, I will share the bash script Create dir and copy specific files while changing the in Linux.

My example

path_to_files variable structure folder as below

[root@localhost ~]# tree /home/huupv/
/home/huupv/
├── devopsroles.txt
├── dir
│   └── test.csv
└── huuphan.txt

1 directory, 3 files

dir_names variable will new folder after running bash script as below

[root@localhost ~]# tree folder
folder
├── folder-devopsroles.txt
├── folder-dir
│   └── test.csv
└── folder-huuphan.txt

1 directory, 3 files

Bash script Create dir and copy specific files and change name files/folder.

#!/bin/bash
dir_names=$1
path_to_files='/home/huupv/'

if [ ! -d $path_to_files ]; then
        echo "$path_to_files not found folder";
        exit 1;
fi

if [ -d $dir_names ]; then
        echo "$dir_names is exists";
        exit 1;
fi


echo "Creating $i and copying over files..."
mkdir $dir_names
for i in $(ls $path_to_files); do
    cp -rf ${path_to_files}${i} ${dir_names}/${dir_names}-$i
done

The result after run Bash Script

Thank you for reading the DevopsRoles page!

Devops Tutorial

Exit mobile version