In Bash scripting, comparing strings is an essential skill that allows you to check and manipulate input data. Unlike other programming languages, Bash has its own syntax and rules for handling string comparisons. In this article, we will explore how to use conditional expressions to compare strings in Bash. We will learn about common comparison operators, string handling techniques, and how to test strings under different conditions.
This guide aims to help you grasp the basics and provides practical examples that you can apply to your daily tasks. How do I use bash string comparison? In the bash shell use the if statement “==” to check equality and “!=” to check the inequality of the string. String comparison examples. The bash script is essential for DevOps Roles.
In bash, you can compare strings using various operators. Here are some common string comparison operators in bash:
= : Checks if two strings are equal
!= : Checks if two strings are not equal
-z : Checks if a string is empty (has zero length)
-n : Checks if a string is not empty
< : Checks if one string is less than another string (in lexicographical order)
> : Checks if one string is greater than another string (in lexicographical order)
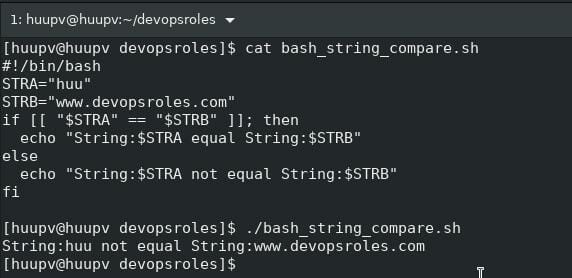
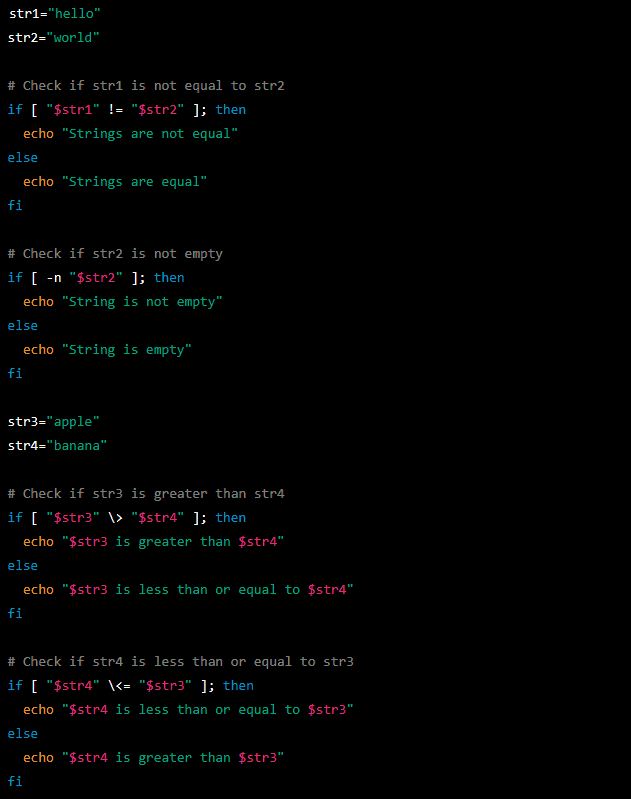
Bash string comparison use “==” operator
#!/bin/bash
STRA=huu
STRB="www.devopsroles.com"
if [[ "$STRA" == "$STRB" ]]; then
   echo "$STRA equal $STRB"
else
   echo "$STRA not equal $STRB"
fi
The screen output terminal:
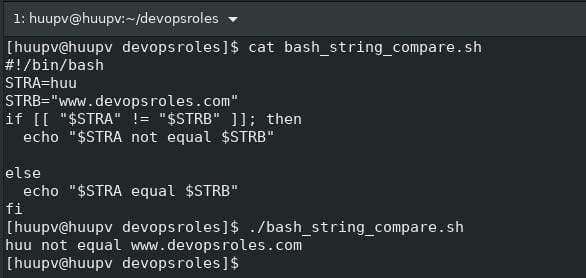
Bash script string compare use “!=” operator
#!/bin/bash
STRA=huu
STRB="www.devopsroles.com"
if [[ "$STRA" != "$STRB" ]]; then
   echo "$STRA not equal $STRB"
else
   echo "$STRA equal $STRB"
fi
The screen output terminal:
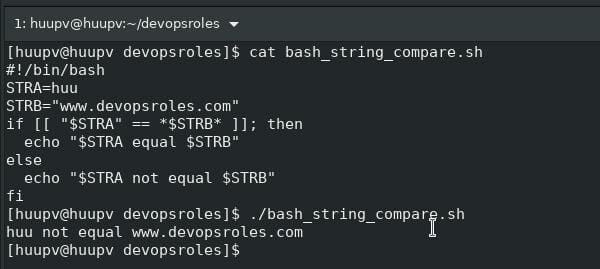
Bash script string compare use wildcards
#!/bin/bash
STRA=huu
STRB="www.devopsroles.com"
if [[ "$STRA" == *$STRB* ]]; then
   echo "$STRA equal $STRB"
else
   echo "$STRA not equal $STRB"
fi
The screen output terminal:
Examples of string comparison in bash
Conclusion
In summary, comparing strings in Bash is a crucial skill that every Bash programmer needs to master. By using comparison operators and conditional expressions, you can effectively and accurately perform string checks and manipulations. Understanding how to compare strings not only helps you write more powerful scripts but also improves your ability to handle data and automate complex tasks.
Hopefully, this article has given you a comprehensive overview and the necessary knowledge to apply to your Bash projects. I hope will this your helpful. For more details refer to the Bash script.
In this tutorial, I guide how to install Ansible on Centos 7/ Ubuntu 14.04 / Fedora. Ansible is an Automation tool for IT Management. It’s useful for System Admin, and DevOps to build Automation Configure Management. Ansible the essential for DevOps Roles.
To install Ansible on CentOS, Ubuntu, or Fedora, you can follow the instructions below for each respective operating system:
Requirements
Control Machine: Run Ansible.
Remote server: Deploy and Configure such as Tomcat, Nginx, Apache, and so forth from Control Machine.
Control Machine and remote server communication through SSH key Authentication.
That’s it! Ansible should now be installed on your CentOS, Ubuntu, or Fedora machine. You can start using Ansible to automate your IT infrastructure tasks.
Conclusion
Thought this article, How to install Ansible on Centos/Ubuntu and Fedora. In the next post, I installed and configured Nginx automation from Control Machine for the Remote server. Thank you for reading the DevopsRoles page!
Docker containers have revolutionized the way developers build, ship, and manage applications. However, one common question arises: How do you Docker SSH into Container? While Docker doesn’t support traditional SSH access like physical servers, it provides a powerful alternative with the docker exec command. In this guide, we’ll explore step-by-step instructions on how to “SSH” into Docker containers from basic operations to more advanced use cases.
What is Docker SSH into Container?
Before diving into the practical steps, it’s important to clarify that Docker doesn’t actually use SSH for container access. Instead, Docker uses the docker exec command, which allows you to run commands or get an interactive shell inside running containers. This method is more efficient, secure, and tailored for containers than traditional SSH.
Why You Shouldn’t Use SSH for Docker Containers
Containers are lightweight: Adding an SSH server increases container size.
Docker has built-in tools: Using docker exec provides direct and simple access to containers without the overhead of SSH configuration.
Security: Running an SSH service in every container increases the attack surface. Docker’s approach with docker exec is more secure.
How to SSH into a Docker Container: Basic Method
Let’s start with the basics – getting into the shell of a running Docker container.
Step 1: List Running Containers
To view the currently running containers, you can use the following command:
docker ps
This command will display:
CONTAINER ID: Unique ID for each running container
IMAGE: The Docker image used to create the container
COMMAND: The main process running in the container
STATUS: Whether the container is running, paused, or stopped
NAMES: Friendly names assigned to containers for easy identification
Step 2: Access the Shell of a Running Container
Once you have the container ID or name, you can use the docker exec command to access the container’s bash shell. For example:
docker exec -it <container_ID_or_name> /bin/bash
-i: Keep STDIN open even if not attached.
-t: Allocate a pseudo-TTY, allowing you to interact with the container.
If your container uses a different shell, such as sh, replace /bin/bash with the appropriate shell path.
Advanced Docker Exec Usage
Once you’ve mastered the basics, you can use the docker exec command for more advanced tasks. Let’s look at some examples.
Running Commands in a Docker Container
You don’t always need to access a full shell; sometimes you just need to run a single command. You can do this using the docker exec command, followed by the command you want to execute. For example, to check the /etc/hosts file inside a container:
To view detailed information about a container, such as its environment variables, network settings, and mounted volumes, use:
docker inspect <container_ID_or_name>
This is helpful when you need to troubleshoot or validate container configurations.
How to SSH into Stopped or Exited Containers
You can only run the docker exec command on running containers. If your container has stopped or exited, you need to start it before you can access it. Here’s how:
List all containers (including stopped ones):
docker ps -a
Start a stopped container:
docker start <container_ID_or_name>
SSH into the container using the previously mentioned docker exec command.
Automating Docker SSH Access
For users who frequently need to access containers, creating a function in your .bashrc or .zshrc file can streamline the process:
function docker_ssh() {
    docker exec -it $1 /bin/bash
}
This allows you to use a simpler command like docker_ssh <container_ID_or_name>.
Frequently Asked Questions (FAQs)
1. Can I install SSH in a Docker container?
Yes, you can install SSH in a Docker container, but it’s generally discouraged. Adding SSH increases the container’s size and complexity. Using docker exec is the recommended way to access containers.
2. How do I copy files between my host machine and Docker containers?
You can use the docker cp command to copy files from your host to the container or vice versa. For example:
3. How can I access Docker containers with graphical applications?
Docker containers can run graphical applications using X11 forwarding, but this setup requires additional configuration beyond simple terminal access.
4. What happens if I stop a container after SSHing into it?
If you stop a container while you’re connected using docker exec, your session will end immediately. You must restart the container to regain access.
Advanced Topics: Managing Multiple Containers
In environments with many running containers, it’s essential to efficiently manage them. Here are a few strategies:
Using Docker Compose for Multi-Container Applications
If you are running multiple containers, Docker Compose is a valuable tool. It allows you to define and manage multi-container applications with a simple YAML configuration file. To install and use Docker Compose:
sudo apt-get install docker-compose
docker-compose up
With Docker Compose, you can specify the configuration for all containers in one place, making it easier to scale, start, and stop services together.
Handling Docker Networks
Managing container networks is crucial, especially for multi-container applications. Docker provides default networking, but you can create custom networks for better isolation and performance.
List networks: docker network ls
Create a new network: docker network create my_network
Run a container on a network: docker run --network my_network <image>
Conclusion
Accessing a Docker container’s shell or executing commands inside it is made simple with the docker exec command. This guide covered everything from basic shell access to running advanced commands and managing multiple containers. Docker’s flexibility allows you to streamline container management without the need for traditional SSH. Thank you for reading the DevopsRoles page!
In this tutorial, I’ll guide you on How to inspect docker container to gain detailed insights into containers. Docker inspect is a powerful tool that provides comprehensive information about various aspects of a container, including its network settings, current status, attached volumes, and more. By exploring these details, you’ll have a deeper understanding of your containers’ configurations and runtime characteristics.
This knowledge proves invaluable for troubleshooting, optimization, and gaining a holistic view of your Dockerized applications. Follow along as I demonstrate the versatility of Docker inspect, enabling you to effectively manage and analyze your containers with precision and ease.
What is docker inspect?
Docker inspect ” is a command in Docker that provides a detailed overview of container information. This powerful tool unveils specifics such as network configurations, status, and attached volumes. By leveraging “docker inspect,” users gain valuable insights into container settings and runtime details, essential for troubleshooting and optimizing Dockerized applications. Mastery of this command empowers efficient container management, allowing users to delve into the intricacies of their Docker environments with precision and ease
What is a Docker container?
Portable Packages: Docker containers encapsulate applications along with their dependencies, ensuring a consistent and portable environment.
Isolation: Containers operate independently, isolated from the host system and other containers, promoting stability and consistency.
Comprehensive Inclusion: Each container includes the necessary components—code, runtime, libraries, and tools—creating a self-contained unit ready to execute.
Docker Platform: Docker, a widely used containerization platform, facilitates the seamless packaging and deployment of applications.
Cross-Environment Consistency: Developers can build a container once and run it consistently across various environments, from local development setups to large-scale production systems.
Resource Efficiency: Containers optimize resource utilization, offering agility, scalability, and quick deployment, making them popular in modern software development and deployment practices.
Inspect Docker container
Utilize the “docker ps” command to showcase a list of containers as follows:
$ sudo docker ps
The displayed results below
CONTAINER ID IMAGE COMMAND CREATED STATUS PORTS NAMES
055772699b49 devopsroles/nginx:v2 "nginx" 4 seconds ago Up 2 seconds 0.0.0.0:8080->80/tcp devopsroles
Provide details for the “devopsroles” container as illustrated below:
$ sudo docker inspect devopsroles
As an illustration, the output for the “devopsroles” container is presented below:
How to display all containers, including non-running
$ sudo docker ps -a -q
The output below:
055772699b49
Conclusion
Throughout the article, we guide you on inspecting containers effectively. Learn how to determine crucial container details such as status, volume, and networking. We’ll continually update this post with useful commands for your reference. Thank you for exploring the DevopsRoles page – we appreciate your readership!
Creating our own Docker images starts with a Dockerfile. Using the docker build command, we can easily transform the instructions in the Dockerfile into a new image. Wondering How to Docker build image from Dockerfile? Let’s dive in!
The first images built with Docker
To create a directory and a Dockerfile, the sample as below:
$ mkdir project
$ cd project
$ touch Dockerfile
The example Docker build the image from Dockerfile
$ vim Dockerfile
The content a Dockerfile as below:
 # CentOS 7 Dockerfile
 # Docker build:
 # sudo docker build -t devopsroles/centos:latest .
 # Docker create:
 # sudo docker create -it --name centos -h centos devopsroles/centos
 # Docker start:
 # sudo docker start centos
 # Connect with bash
 # sudo docker exec -it centos bash
 FROM centos:latest
 MAINTAINER PHAN VAN HUU <pvhuu90@gmail.com> My blogs: devopsroles.com
 #Update centos
 RUN yum update -y && yum upgrade -y
 RUN yum -y install git curl net-tools wget vim
 # Install EPEL Repository
 RUN yum install -y epel-release
 # Clean CentOS 7
 RUN yum clean all
 # Set the environment variables
 ENV HOME /root
 # Working directory
 WORKDIR /root
 # Default command
 CMD ["bash"]
Or test ping 8.8.8.8 from docker run command as below
$ sudo docker run centos ping 8.8.8.8 -c4
The output below:
 PING 8.8.8.8 (8.8.8.8) 56(84) bytes of data.
 64 bytes from 8.8.8.8: icmp_seq=1 ttl=127 time=40.6 ms
 64 bytes from 8.8.8.8: icmp_seq=2 ttl=127 time=41.7 ms
 64 bytes from 8.8.8.8: icmp_seq=3 ttl=127 time=42.1 ms
 64 bytes from 8.8.8.8: icmp_seq=4 ttl=127 time=40.1 ms

--- 8.8.8.8 ping statistics ---
 4 packets transmitted, 4 received, 0% packet loss, time 3005ms
 rtt min/avg/max/mdev = 40.124/41.184/42.196/0.832 ms
Conclusion
Docker build image from Dockerfile. You can update and edit package from Dockerfile file. For example to install Nginx, PHP, MySQL package in Dockerfile file. Thank you for reading the DevopsRoles page!
In this guide, We’ll explore how to use gitlab SSH keys for Git operations in your projects. Learn the step-by-step process to generate an SSH key pair for GitLab and integrate it with your account.
To effectively use GitLab via SSH, you must create an SSH key pair and link the public key with your GitLab account.
How to do Gitlab SSH key pair
Open a terminal on your Linux system.
If you do not have an SSH key pair, then the error message is as below:
$ cat ~huupv/.ssh/id_rsa.pub
 cat: /home/huupv/.ssh/id_rsa.pub: No such file or directory
To generate a new ssh key pair by running the following command
Replace “huupv@devopsroles.com” with your actual email address associated with your GitLab account. You can press Enter to accept the default file path and passphrase (or set a passphrase for added security).
The output Gitlab SSH key pair is below
Generating public/private rsa key pair.
 Enter file in which to save the key (/home/huupv/.ssh/id_rsa):
 Created directory '/home/huupv/.ssh'.
 Enter passphrase (empty for no passphrase):
 Enter same passphrase again:
 Your identification has been saved in /home/huupv/.ssh/id_rsa.
 Your public key has been saved in /home/huupv/.ssh/id_rsa.pub.
 The key fingerprint is:
 2a:16:6d:94:35:a2:02:db:2c:ce:fb:4f:79:56:bf:0b huupv@devopsroles.com
 The key's randomart image is:
 +--[ RSA 4096]----+
To generate 2 files as below:
Private key: id_rsa
Public key: id_rsa.pub
I already have ssh key pair to create on my laptop.
Copy and paste the content id_rsa.pub to the Profile Settings in the Gitlab server web interface. ( step by step as below)
Copy the ssh key to GitLab
Copy the contents of the public key by running the following command: cat ~/.ssh/id_rsa.pub
Copy the entire public key output from the terminal.
Now, log in to your GitLab account using a web browser.
In the top right corner, click on your profile picture and select “Settings.”
From the left-hand side menu, click on “SSH Keys.”
Paste the copied public key into the “Key” field.
Optionally, give a recognizable “Title” to the SSH key (e.g., “My Linux Workstation”).
Click on the “Add key” button to save the SSH key to your GitLab account.
The SSH key is now added to your GitLab account, and you can use SSH to interact with GitLab repositories.
To test the SSH key connection
You can run the following command in the terminal:
Conclusion
Throughout this article, we’ll guide you on how to set up and use an SSH key pair for your project. You’ll learn the straightforward steps to generate an SSH key pair that secures your account. This essential setup enhances the security of your project by ensuring that only authorized users can access it. Follow along to easily create and implement your SSH keys.
You are now ready to use your GitLab SSH key for secure interactions with your repositories. Thank you for reading the DevopsRoles page!
In this tutorial, I will guide you through setting up an Vagrant ssh key pair. We’ll generate the SSH keys, where vagrant_rsa will the private key and vagrant_rsa.pub will serve as the public key. This allows you to log into the Virtual Machine without needing a password. Setting up Vagrant is crucial for those in DevOps roles.
Understanding SSH Key Management in Vagrant
When working with Vagrant, a tool that streamlines the creation and management of virtual development environments, it’s crucial to understand how SSH keys are handled. SSH keys play a vital role in securing access to your Vagrant virtual machines (VMs).
Vagrant SSH Key Location
By default, when you initiate a new Vagrant environment, Vagrant automatically generates an SSH key pair if none exists. This is done to ensure secure, password-less access to the created VM. The location of these SSH keys is typically within the Vagrant project directory .vagrant/machines/<machine-name>/virtualbox/private_key for VirtualBox users. This path might vary slightly depending on the provider you are using, such as VMware or Hyper-V.
Managing Vagrant SSH Keys
It’s important to know that Vagrant configures its VMs to use these automatically generated keys. However, for enhanced security or personal preference, you can configure Vagrant to use a custom SSH key pair. This involves specifying your private key in the Vagrantfile and ensuring the corresponding public key is authorized in the VM. Managing these keys properly ensures that access to your VM is both secure and restricted to authorized users only.
Below is the folder structure for the Vagrant project:
/home/huupv/project
/home/huupv/project/keys/.ssh
Vagrant SSH key pair
The first is to create a vagrant SSH key
Using the ssh-keygen command to create the private key and public key for a vagrant.
ssh-keygen
The output private key and public key files in “/home/huupv/project/keys/.ssh” folder as below:
vagrant_rsa vagrant_rsa.pub
To configure vagrant ssh key in Vagrantfile
To add the lines in the Vagrantfile file as below:
~/.vagrant.d/insecure_private_key: You should append this default key. The use config.ssh.insert_key = false to Vagrant not generate a random key.
config.ssh.private_key_path: Changing Insecure Key To My Own Key On Vagrant box.
Conclusion
Finishing, We are customizing the vagrant SSH key with a Private/Public key. What you need to Private key saves in the host and the Public key copies authorized_keys into a vagrant box for Virtual Machine. Reference to configure vagrant SSH of the vagrant main site. Thank you for reading the DevopsRoles page!
Setting up WordPress with Vagrant has become a go-to solution for developers seeking a reliable, consistent, and portable environment for web development. Vagrant simplifies the process of creating and configuring virtual environments, ensuring that your WordPress projects are not only portable but also identical across various systems. This guide walks you through the step-by-step process of setting up WordPress Vagrant, from basic installation to advanced configurations.
In this tutorial, I’m set up a WordPress Vagrant, using vagrant box ubuntu with Nginx + MariaDB + WordPress. Vagrant the essential for DevOps Roles.
Benefits of Using Vagrant for WordPress Development
1. Consistent Environments
Ensures uniformity between development, staging, and production environments.
Avoids the common “works on my machine” problem.
2. Portable and Reproducible
Easily share development environments across teams.
Rapidly recreate environments in case of errors or new projects.
3. Integration with Popular Tools
Works seamlessly with VirtualBox, Docker, and other virtualization tools.
Supports provisioning tools like Ansible, Chef, and Puppet.
Prerequisites
Before diving into the setup, ensure you have the following:
#!/usr/bin/env bash
if [ ! -z "wordpress" ] ; then
echo "creating database"
 sudo mysql -u root -p'root' -e "CREATE DATABASE IF NOT EXISTS wordpress;"
if [ ! -z "wp_db_user" ]; then
 echo " adding custom user"
 sudo mysql -u root -p'root' -e "GRANT ALL ON wordpress.* TO 'wp_db_user'@'localhost' IDENTIFIED BY '123456789'"
 sudo mysql -u root -p'root' -e "FLUSH PRIVILEGES;"
 sudo mysql -u root -p'root' -e 'show databases;'
 fi
else
 echo "No database name specified - skipping db creation"
fi
To configure file wp-config.php for WordPress vagrant
vim wp/wp-config.php
The content as below:
<?php
define('DB_NAME', 'wordpress');
/** MySQL database username */
 define('DB_USER', 'wp_db_user');
/** MySQL database password */
 define('DB_PASSWORD', '123456789');
/** MySQL hostname */
 define('DB_HOST', 'localhost');
/** Database Charset to use in creating database tables. */
 define('DB_CHARSET', 'utf8');
/** The Database Collate type. Don't change this if in doubt. */
 define('DB_COLLATE', '');
 define('AUTH_KEY', 'put your unique phrase here');
 define('SECURE_AUTH_KEY', 'put your unique phrase here');
 define('LOGGED_IN_KEY', 'put your unique phrase here');
 define('NONCE_KEY', 'put your unique phrase here');
 define('AUTH_SALT', 'put your unique phrase here');
 define('SECURE_AUTH_SALT', 'put your unique phrase here');
 define('LOGGED_IN_SALT', 'put your unique phrase here');
 define('NONCE_SALT', 'put your unique phrase here');
 $table_prefix = 'wp_';
 define('WP_DEBUG', false);
 /** Absolute path to the WordPress directory. */
 if ( !defined('ABSPATH') )
 define('ABSPATH', dirname(__FILE__) . '/');
/** Sets up WordPress vars and included files. */
 require_once(ABSPATH . 'wp-settings.php');
 define('FS_METHOD', 'direct');
[huupv@localhost ~]$ cd /home/huupv/project/
[huupv@localhost project]$ vagrant up
FAQs
Q1: Why use Vagrant over Docker for WordPress?
While Docker is lightweight, Vagrant provides a full virtualized environment, making it suitable for developers needing an environment closer to production.
Q2: Can I use a different Linux distribution?
Yes, replace ubuntu/bionic64 in the Vagrantfile with the desired box name from Vagrant Cloud.
Q3: How do I update the Vagrant environment?
Use the following commands:
To apply updates: vagrant provision
To rebuild the environment: vagrant destroy -f && vagrant up
You have to set up a Vagrant WordPress Nginx + MariaDB. Setting up WordPress with Vagrant is a powerful way to ensure consistency and efficiency in web development. By following this guide, you can create a robust development environment tailored to your needs. Whether you’re a solo developer or part of a team, Vagrant offers the flexibility and reliability to elevate your WordPress projects. I hope will this your helpful. Thank you for reading the DevopsRoles page!
Master the essentials of Useful vagrant commands line. Whether you’re starting, stopping, or managing virtual machines, this article provides the necessary commands to efficiently control your Vagrant environments. Ideal for developers and IT professionals looking to streamline their workflow in virtual machine management.
In this tutorial, I guide using the useful Vagrant commands line for Virtual Machines such as: Starting and Stopping a VM so forth. Vagrant the essential for DevOps Roles.
Useful vagrant commands line
Vagrant commands for Virtual Machine
Initialize Vagrant with a Vagrantfile
# vagrant init
Initialize the vagrant with a specific box. To find a box, https://app.vagrantup.com/boxes/search Vagrant commands for starting a Virtual Machine To run the first vagrant up a Virtual Machine, to start vagrant environment
# vagrant up
To resume a Virtual Machine
# vagrant resume
Restarting a Virtual Machine
# vagrant reload
Vagrant commands for stopping a Virtual Machine To stop a Virtual Machine
# vagrant halt
To suspend a Virtual Machine
# vagrant suspend
Vagrant commands cleaning up a Virtual Machine To stop and delete all traces of the Virtual Machine
# vagrant destroy
Vagrant commands for Boxes To list all installed boxes on your computer
# vagrant box list
To download a box image to your computer
# vagrant box add
Checking for updates vagrant box update
# vagrant box outdated
To delete a box from the machine
# vagrant boxes remove
The packages a running Virtualbox environment in a reusable box
# vagrant package
To snapshot a Virtual Machine The VM-name often defaults. To roll back at a later time.
# vagrant snapshot save [options] [vm-name]
The useful vagrant commands To get the vagrant version
# vagrant -v
The output status of the vagrant machine
# vagrant status
The output status of all vagrant machines
# vagrant global-status
The same as above, but prunes invalid entries
# vagrant global-status --prune
To use the debug flag to increase the verbosity of the output
# vagrant provision --debug
Vagrant can be configured to deploy code!
# vagrant push
To Runs vagrant up, forces provisioning and logs all output to a file
# vagrant up --provision | tee provision_2017.log
Conclusion
This compilation of useful Vagrant commands will empower you to manage your virtual machines more effectively. By familiarizing yourself with these commands, you can optimize your development environment and enhance your productivity. For a detailed exploration of each command, refer to the full guide. I hope will this your helpful. Thank you for reading the DevopsRoles page!