Learn Ansible with DevOpsRoles.com. Access detailed guides and tutorials to automate IT tasks and manage configurations efficiently using Ansible for DevOps.
In this tutorial, How to use Ansible get IP address remote server. There are many methods to obtain the IP address the current of remote hosts. so let us learn how to use Ansible to get an IP address to remote hosts’ servers.
Structure file and folder Ansible get IP address remote server
To retrieve the IP address of a remote server using Ansible, you can use the ansible_default_ipv4variable. This variable provides information about the default IPv4 address of the target host.
For example the content file getIP.yml as below
[vagrant@ansible_controller ~]$ cat getIP.yml
---
- hosts: servers
  tasks:
  - name: Test hosts list
    debug:
      msg: "{{ hostvars[inventory_hostname]['ansible_default_ipv4']['address'] }}"
Vagrant is a Configuration management tool. In this tutorial, I will use Vagrant to create an Ansible practice environment. Quickstart Vagrant create ansible your environment developer.
Through the article, you can create a structured Ansible playbook simple. I hope will this your helpful. For more details, Ansible refers to Ansible tutorial.
In this tutorial, How to fix run ansible“[Errno 32] Broken pipe\r\n”. I have enabled the EPEL repositories and installed the required dependencies for Python. Running Ansible on RHEL/CentOS 5 can sometimes lead to a broken pipe error. This guide provides a detailed solution to this issue, ensuring your automation processes run smoothly fix ansible python broken pipe.
The Problem
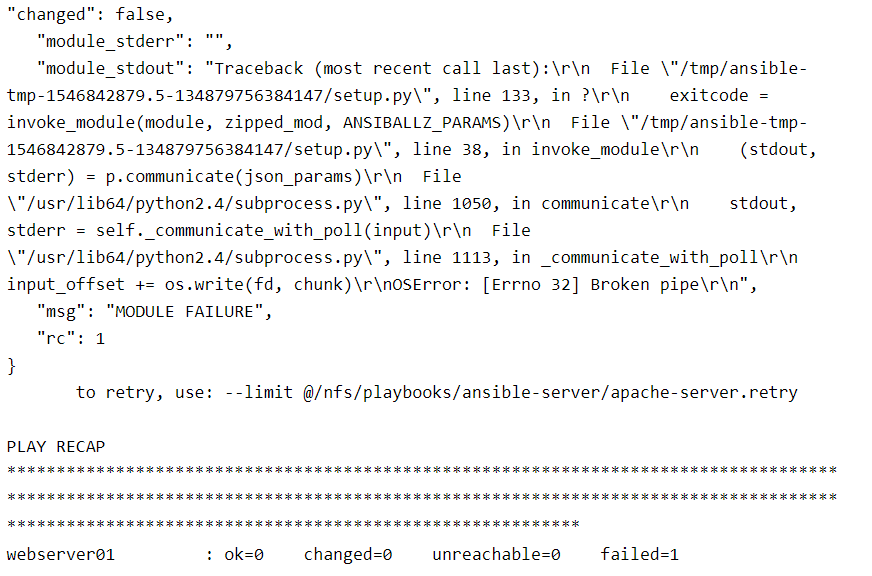
When using Ansible with Python on RHEL/CentOS 5, you might encounter a broken pipe error. This occurs due to compatibility issues between the versions of Python and Ansible. The error message typically looks like this:
Ansible python broken pipe running error
"changed": false,
   "module_stderr": "",
   "module_stdout": "Traceback (most recent call last):\r\n  File \"/tmp/ansible-tmp-1546842879.5-134879756384147/setup.py\", line 133, in ?\r\n    exitcode = invoke_module(module, zipped_mod, ANSIBALLZ_PARAMS)\r\n  File \"/tmp/ansible-tmp-1546842879.5-134879756384147/setup.py\", line 38, in invoke_module\r\n    (stdout, stderr) = p.communicate(json_params)\r\n  File \"/usr/lib64/python2.4/subprocess.py\", line 1050, in communicate\r\n    stdout, stderr = self._communicate_with_poll(input)\r\n  File \"/usr/lib64/python2.4/subprocess.py\", line 1113, in _communicate_with_poll\r\n    input_offset += os.write(fd, chunk)\r\nOSError: [Errno 32] Broken pipe\r\n",
   "msg": "MODULE FAILURE",
   "rc": 1
}
       to retry, use: --limit @/nfs/playbooks/ansible-server/apache-server.retry

PLAY RECAP **********************************************************************************************************************************************************************************************************************************
webserver01         : ok=0    changed=0    unreachable=0    failed=1
My Ansible uses Python 2.6 and a remote server is a Virtual Machine OS Centos 5 use Python 2.4
After you install Python 2.6 on the remote server ( Centos 5). Then configure in the PATH for Python 2.6
For example, In my configuration in PATH as below
$ echo $PATH
/usr/local/bin:/bin:/usr/bin
$ which python
/usr/bin/python
Configure symbolic link for Python 2.6 on the remote server Centos 5
python 2.6 is in “//local/bin” *which is before “//bin” in the PATH
python 2.4 is in “//bin“
And both are in the PATH
And you running the ansible-playbook command again.
FAQs
Q: Why do I need to update Python? A: The default Python version on RHEL/CentOS 5 is outdated and incompatible with newer Ansible versions, causing the broken pipe error.
Q: Can I use a different Python version? A: Yes, you can use any compatible Python version, but Python 2.7 is recommended for compatibility.
Q: What if I still encounter issues? A: Ensure all steps are followed correctly. Check the Ansible and Python versions, and verify the ANSIBLE_PYTHON_INTERPRETER path.
Conclusion
Fixing the Ansible Python broken pipe issue on RHEL/CentOS 5 involves updating Python, creating a virtual environment, installing Ansible in that environment, and configuring Ansible to use the correct Python interpreter. By following these steps, you can ensure the smooth operation of your Ansible automation tasks on older systems.
Through the article, you can use Fixing Ansible Python broken pipe for RHEL Centos 5. I hope this will be helpful for you. For more details, refer to the Ansible tutorial.
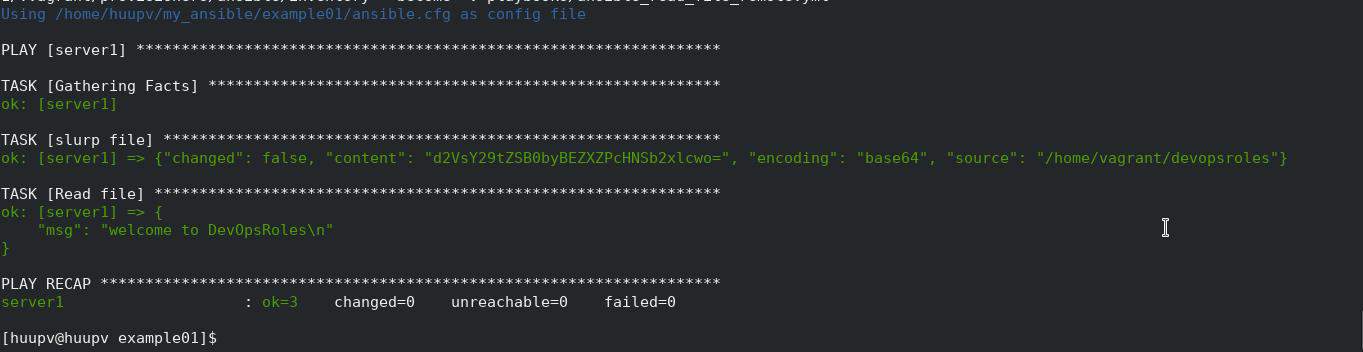
To read a remote file using Ansible, you can use the fetch module. The fetch module allows you to retrieve files from remote hosts and store them locally on the Ansible control machine.
In this example, replace your_host with the target host or group of hosts where the remote file is located. Set the src parameter to the path of the remote file you want to read. Set the dest parameter to the local directory path where you want to store the fetched file.
Conclusion
Make sure you have proper SSH access and permissions to read the remote file on the target host(s) before running this playbook.
Through the article, you can use Ansible read remote file. I hope will this your helpful. For more details refer to Ansible tutorial.
In this tutorial, find out the ansible task type of state. In Ansible, the state attribute is used to define the desired state of a resource or module. It is commonly used in tasks that involve package management, service management, configuration file management, and more.
The state the attribute accepts different values depending on the module being used. Ansible the essential for DevOps Roles.
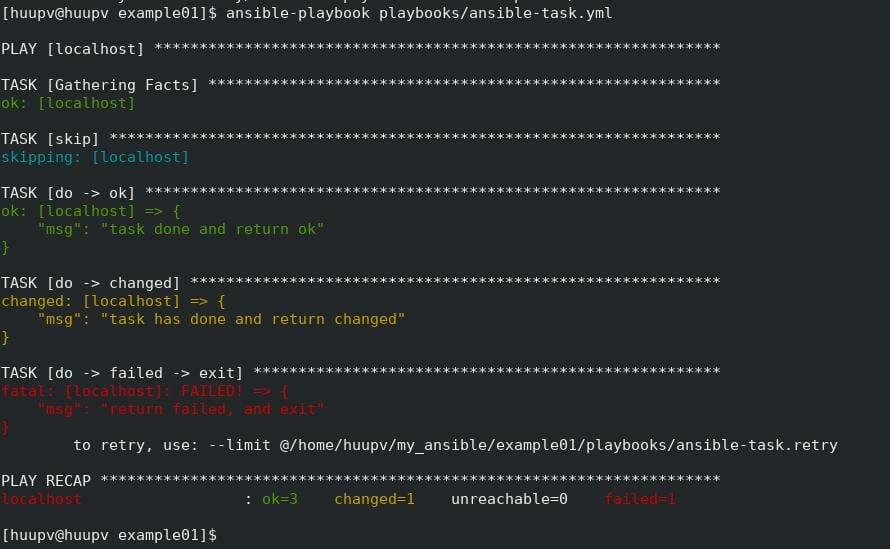
Ansible task type of state
skip
– The skip task and nothing. using when: false
do –> ok
– The task is successful.
do -> changed
– The status when a change occurred in the task. Using “changed_when: yes”
do -> failed -> exit
– Using “failed_when: yes”. This task returned failed and exited.
Ansible playbook task
- hosts:
    - localhost
  tasks:
    - name: skip
      debug:
        msg: skipped
      when: false

    - name: do -> ok
      debug:
        msg: task done and return ok

    - name: do -> changed
      debug:
        msg: task has done and return changed
      changed_when: yes

    - name: do -> failed -> exit
      debug:
        msg: return failed, and exit
      failed_when: yes
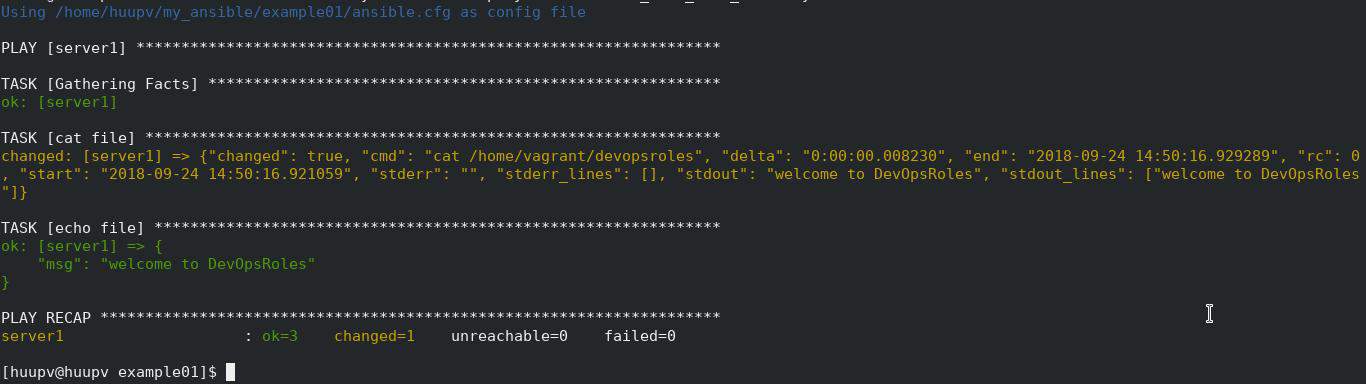
The terminal output as below
These are just a few examples of the different states that can be used with Ansible modules.
The available states can vary depending on the module being used. It’s important to refer to the documentation of the specific module you’re working with to understand the available states and their behaviors.
Conclusion
Through the article, you can use the Ansible task type of state. I hope will this your helpful. For more details refer to Ansible tutorial.
Step 3: Build infrastructure with Vagrant for testing. Define two servers: an app server and a database server in the Vagrantfiles file.
Vagrant init creates Vagrantfiles minimal file
[huupv@huupv example01]$ vagrant init --minimal
The terminal output as below
==> vagrant: A new version of Vagrant is available: 2.1.5!
==> vagrant: To upgrade visit: https://www.vagrantup.com/downloads.html

A `Vagrantfile` has been placed in this directory. You are now
ready to `vagrant up` your first virtual environment! Please read
the comments in the Vagrantfile as well as documentation on
`vagrantup.com` for more information on using Vagrant.
The content in Vagrantfile for the app server and DB server as below
[huupv@huupv example01]$ cat Vagrantfile
The terminal output as below
Vagrant.configure("2") do |config|
config.ssh.insert_key = false
config.vm.provider :virtualbox do |vb|
   vb.customize ["modifyvm", :id, "--memory", "256"]
end
# Application server 1.
config.vm.define "app1" do |app1|
  app1.vm.hostname = "app1.dev"
  app1.vm.box = "centos/7"
  app1.vm.network :private_network, ip: "192.168.3.4"
end
# Database server.
config.vm.define "db" do |db|
  db.vm.hostname = "db.dev"
  db.vm.box = "centos/7"
  db.vm.network :private_network, ip: "192.168.3.5"
end

config.vm.provision "ansible" do |ansible|
  ansible.playbook = "playbooks/ntp.yml"
  ansible.verbose  = true
  ansible.limit = "all" # or only "nodes" group, etc.
  # Run commands as root.
  ansible.sudo = true
end
end
Ansible playbook for NTP server
Creating an inventory file for multiple servers
# Application servers
[app]
192.168.3.4
# Database server
[db]
192.168.3.5
# Group ‘multi’ with all servers
[multi:children]
app
db
# Variables that will be applied to all servers
- hosts: all
  tasks:
  - name: Ensure NTP (for time synchronization) is installed.
    yum: name=ntp state=installed
  - name: Configure NTP
    template: src=ntp.conf.j2 dest=/etc/ntp.conf
    notify:
           - restart ntpd
  - name: Ensure NTP is running.
    service: name=ntpd state=started enabled=yes
Create ntp.conf.j2 file template
statistics loopstats peerstats clockstats
filegen loopstats file loopsstats type day enable
filegen peerstats file peerstats type day enable
filegen clockstats file clockstats type day enable

#server your_NTP_server_IP
server 0.rhel.pool.ntp.org iburst
server 1.rhel.pool.ntp.org iburst
server 2.rhel.pool.ntp.org iburst
server 3.rhel.pool.ntp.org iburst

restrict -4 default kod notrap nomodify nopeer noquery
restrict -6 default kod notrap nomodify nopeer noquery
restrict 127.0.0.1
restrict ::1
Vagrant run ansible local
Running vagrant up the first time. Vagrant automatically provisions the newly-minted VM. Run “vagrant provision” again after the VM has been created.
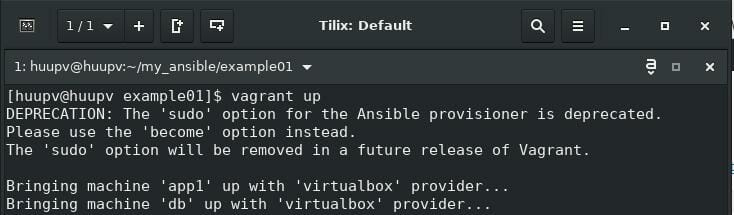
The first run vagrant up
[huupv@huupv example01]$ vagrant up
The terminal output as below
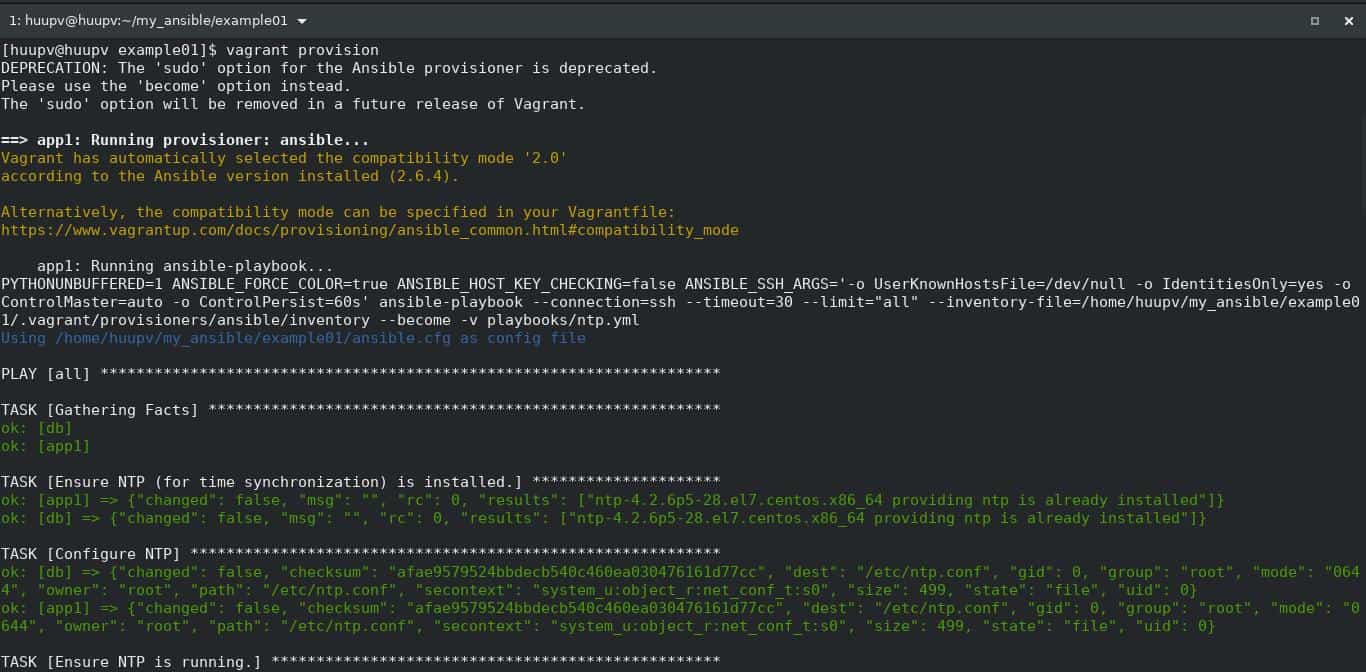
Run vagrant provision again.
[huupv@huupv example01]$ vagrant provision
The terminal output as below
The result Vagrant Ansible example, The terminal output as below
[huupv@huupv example01]$ vagrant ssh app1
Last login: Sat Sep 15 06:26:42 2018 from 10.0.2.2
[vagrant@app1 ~]$ cat /etc/ntp.conf
statistics loopstats peerstats clockstats
filegen loopstats file loopsstats type day enable
filegen peerstats file peerstats type day enable
filegen clockstats file clockstats type day enable

#server your_NTP_server_IP
server 0.rhel.pool.ntp.org iburst
server 1.rhel.pool.ntp.org iburst
server 2.rhel.pool.ntp.org iburst
server 3.rhel.pool.ntp.org iburst

restrict -4 default kod notrap nomodify nopeer noquery
restrict -6 default kod notrap nomodify nopeer noquery
restrict 127.0.0.1
restrict ::1
[vagrant@app1 ~]$ exit
logout
Connection to 127.0.0.1 closed.
[huupv@huupv example01]$ vagrant ssh db
Last login: Sat Sep 15 06:26:42 2018 from 10.0.2.2
[vagrant@db ~]$ cat /etc/ntp.conf
statistics loopstats peerstats clockstats
filegen loopstats file loopsstats type day enable
filegen peerstats file peerstats type day enable
filegen clockstats file clockstats type day enable

#server your_NTP_server_IP
server 0.rhel.pool.ntp.org iburst
server 1.rhel.pool.ntp.org iburst
server 2.rhel.pool.ntp.org iburst
server 3.rhel.pool.ntp.org iburst

restrict -4 default kod notrap nomodify nopeer noquery
restrict -6 default kod notrap nomodify nopeer noquery
restrict 127.0.0.1
restrict ::1
[vagrant@db ~]$ exit
logout
Connection to 127.0.0.1 closed.
[huupv@huupv example01]$
Conclusion
Through the article, you can use Vagrant Ansible example of best practice. I hope will this your helpful. For more details refer to Ansible tutorial.
[root@DevopsRoles ~]# mkdir ansible-nginx/roles
[root@DevopsRoles ~]# cd ansible-nginx/roles
[root@DevopsRoles roles]#
create the role for Nginx and PHP. Using ansible-galaxy creates a template
[root@DevopsRoles roles]# ansible-galaxy init nginx
- nginx was created successfully
[root@DevopsRoles roles]# ansible-galaxy init php
- php was created successfully
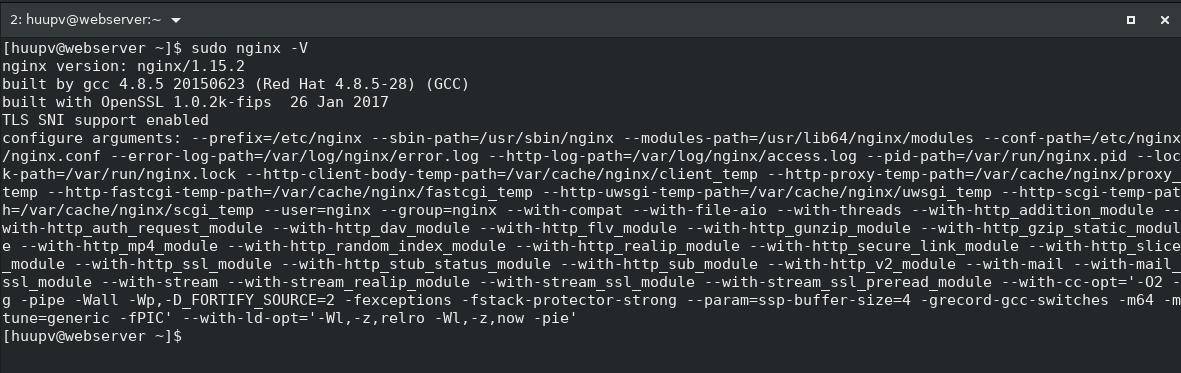
The confirm installed Nginx and PHP on a host web server
Nginx version
PHP version
Remember to customize the playbook and PHP-FPM configuration based on your specific requirements.
Conclusion
Through the article, you can use the Ansible playbook NGINX + PHP as above. I hope will this your helpful. For more details refer to the Ansible tutorial.
#This is a jinja template file.
{{ message }}
#jinja template can extract variables. like, ...
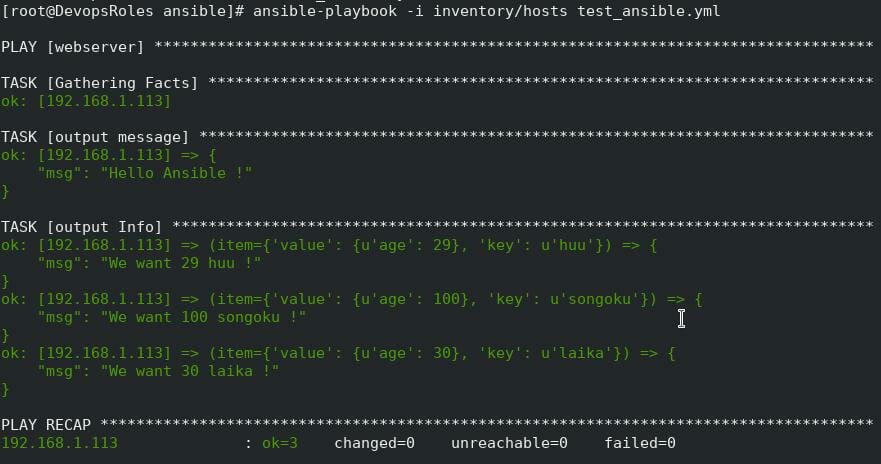
{% for key,value in Info.iteritems() %}
I am {{ value.age }} {{ key }} !
{% endfor %}
In the jinja template, you can also use variables in almost the same way as in Playbook. I can also iterate with for statement like with_dict, but here you can use it without putting the item.
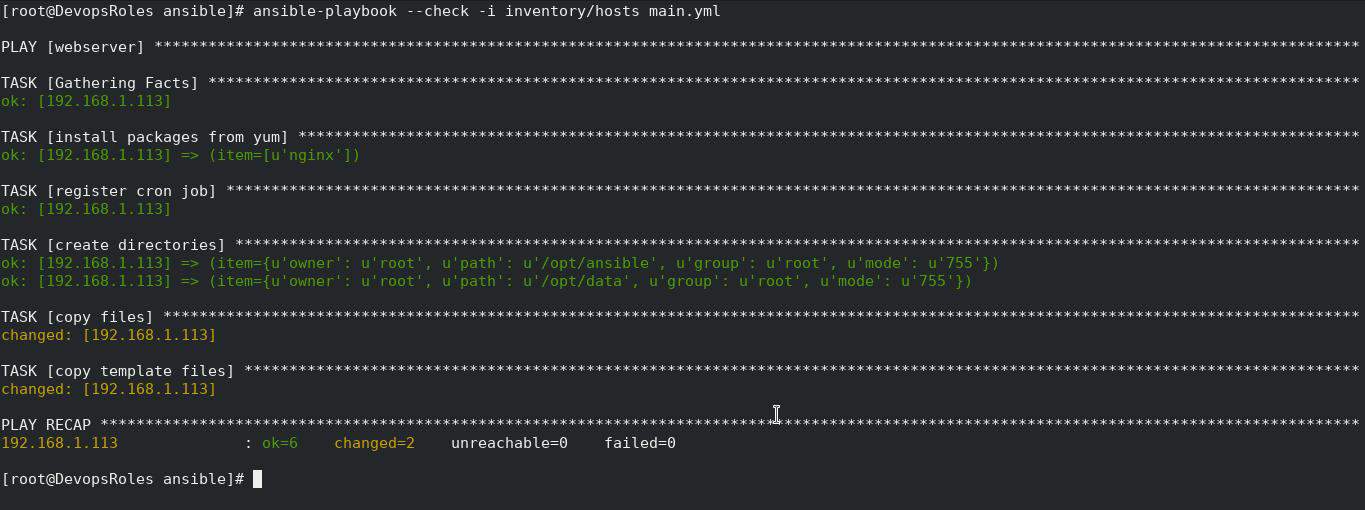
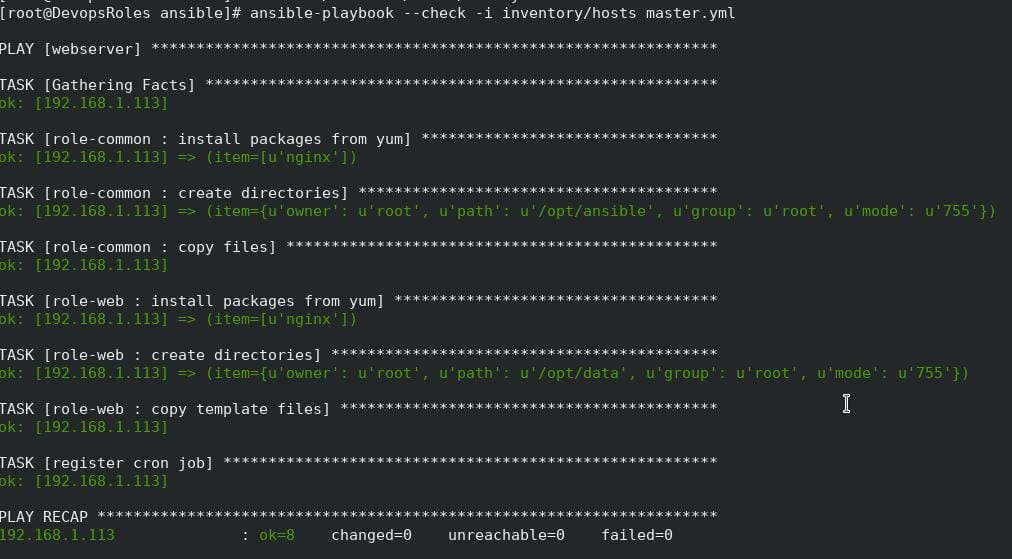
Check Mode is a mode that does not actually change, you can check which part will be changed when you run Playbook. Generally, it is called Dry run mode for Ansible. If you give –check as an option, it works in Check Mode.
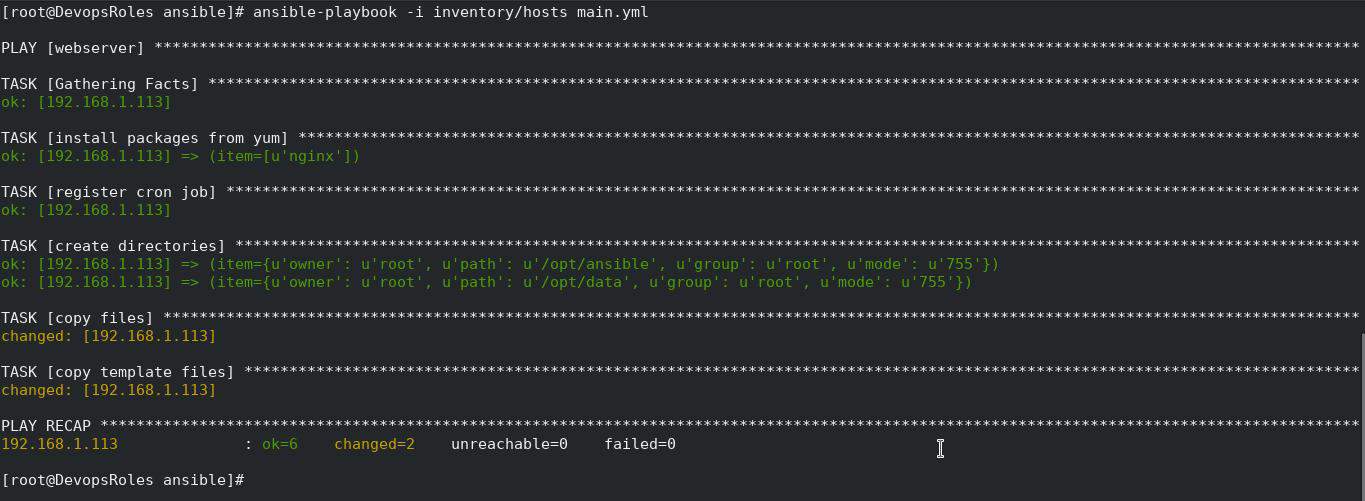
The tasks are described collectively in one YAML file so far, but this does not work well when creating similar hosts. Let’s cut out some of the tasks as roles and try to make them into parts.
Do not say that handling with_items is not good just because I just cut out (lol)
The role called by roles is searched under the name under the roles directory, and main.yml directly under tasks is executed. You can use dependencies etc to have a dependency on the role, but we will not handle it this time.
This tutorial provides a basic introduction to get you started with the Ansible tutorial. As you gain more experience, you can explore advanced topics like inventory management, playbook organization, and integration with other tools and systems.
Through the article, you can use Ansible tutorial beginners as above. I hope will this your helpful. For more details refer to Ansible tutorial.
In this tutorial, I guide how to install Ansible on Centos 7/ Ubuntu 14.04 / Fedora. Ansible is an Automation tool for IT Management. It’s useful for System Admin, and DevOps to build Automation Configure Management. Ansible the essential for DevOps Roles.
To install Ansible on CentOS, Ubuntu, or Fedora, you can follow the instructions below for each respective operating system:
Requirements
Control Machine: Run Ansible.
Remote server: Deploy and Configure such as Tomcat, Nginx, Apache, and so forth from Control Machine.
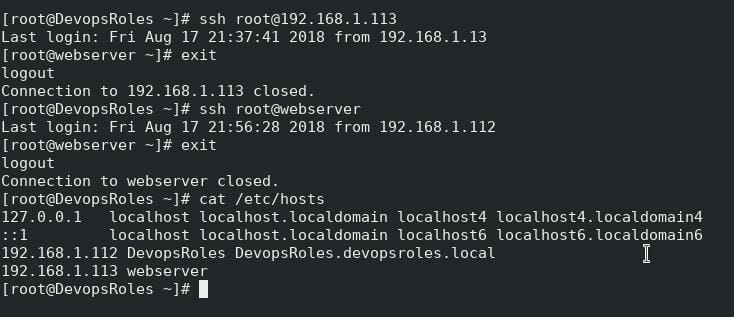
Control Machine and remote server communication through SSH key Authentication.
That’s it! Ansible should now be installed on your CentOS, Ubuntu, or Fedora machine. You can start using Ansible to automate your IT infrastructure tasks.
Conclusion
Thought this article, How to install Ansible on Centos/Ubuntu and Fedora. In the next post, I installed and configured Nginx automation from Control Machine for the Remote server. Thank you for reading the DevopsRoles page!