Table of Contents
- 1 Introduction
- 2 Prerequisites
- 3 Memcached tutorial
- 3.1 Creating a Memcached cluster with AWS CLI
- 3.2 Modifying a Memcached cluster with AWS CLI
- 3.3 Viewing the elements in a Memcached cluster with AWS CLI
- 3.4 Rebooting a Memcached cluster with AWS CLI
- 3.5 Discovering the endpoints of the Memcached cluster with AWS CLI
- 3.6 Adding nodes to a Memcached cluster with AWS CLI
- 3.7 Removing nodes from a Memcached cluster with AWS CLI
- 3.8 Scaling Memcached vertically
- 3.9 Deleting a Memcached cluster with AWS CLI
- 4 Conclusion
Introduction
In this Memcached tutorial, you will create an Amazon ElastiCache for the Memcached cluster in your default Amazon Virtual Private Cloud. Operations on the cluster using CLI commands and node management using CLI commands. For more information about Amazon ElastiCache, see Amazon ElastiCache.
Prerequisites
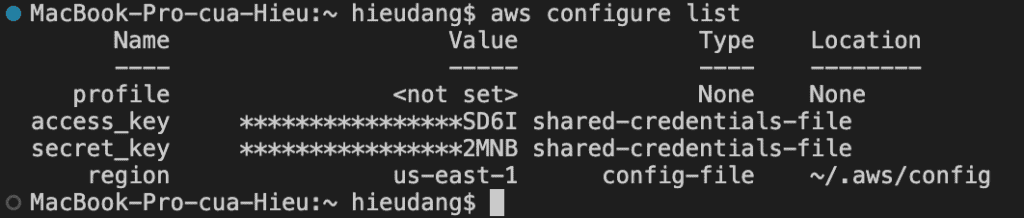
Before starting, you should have the following prerequisites configured
- An AWS account
- AWS CLI on your computer
Memcached tutorial
- Creating a Memcached cluster with AWS CLI
- Modifying a Memcached cluster with AWS CLI
- Viewing the elements in a Memcached cluster with AWS CLI
- Rebooting a Memcached cluster with AWS CLI
- Discovering the endpoints of Memcached cluster with AWS CLI
- Adding nodes to a Memcached cluster with AWS CLI
- Removing nodes from a Memcached cluster with AWS CLI
- Scaling Memcached vertically
- Configuring a Lambda function to access Amazon ElastiCache in an Amazon VPC
- Deleting a Memcached cluster with AWS CLI
Creating a Memcached cluster with AWS CLI
Before you begin, If you have not installed the AWS CLI, see Setting up the Amazon Redshift CLI. This tutorial uses the us-ease-1 region.
Now we’re ready to launch a Memcached cluster by using the AWS CLI.
You can set up a cluster with a specific number of nodes and a parameter group that controls the properties for each node. All nodes within a cluster are designed to be of the same node type and have the same parameter and security group settings.
Every cluster must have a cluster identifier. The cluster identifier is a customer-supplied name for the cluster. This identifier specifies a particular cluster when interacting with the ElastiCache API and AWS CLI commands. The cluster identifier must be unique for that customer in an AWS Region. For more information, see create-cache-cluster
- Supported –engine-version
- –cache-parameter-group-name: If this argument is omitted, the default parameter group for the specified engine is used. Or you can use create-cache-parameter-group command to create a parameter group.
- If you’re going to launch your cluster in a VPC, make sure to create a subnet group in the same VPC before you start creating a cluster.
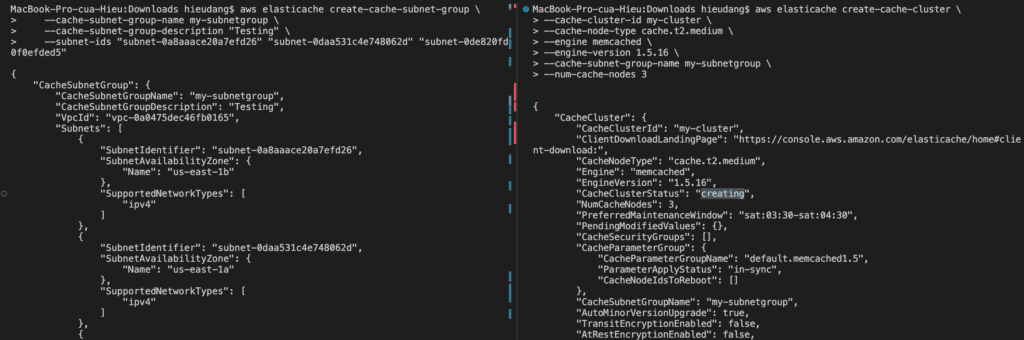
The following CLI code creates a Memcached cache cluster with 3 nodes.
#Creating a subnet group
aws elasticache create-cache-subnet-group \
    --cache-subnet-group-name my-subnetgroup \
    --cache-subnet-group-description "Testing" \
    --subnet-ids "subnet-0a8aaace20a7efd26" "subnet-0daa531c4e748062d" "subnet-0de820fd0f0efded5"

#Creating cluster
aws elasticache create-cache-cluster \
--cache-cluster-id my-cluster \
--cache-node-type cache.t2.medium \
--engine memcached \
--engine-version 1.5.16 \
--cache-subnet-group-name my-subnetgroup
--num-cache-nodes 3
This command returns the following result.
Modifying a Memcached cluster with AWS CLI
In addition to adding or removing nodes from a cluster, there can be times when you need to make other changes to an existing cluster, such as, adding a security group, changing the maintenance window, or a parameter group.
You can modify an existing cluster using the AWS CLI modify-cache-cluster operation. To modify a cluster’s configuration value, specify the cluster’s ID, the parameter to change, and the parameter’s new value.
The --apply-immediately parameter applies only to modifications in the engine version and changing the number of nodes in a cluster. If you want to apply any of these changes immediately, use the --apply-immediately parameter. If you prefer postponing these changes to your next maintenance window, use the --no-apply-immediately parameter. Other modifications, such as changing the maintenance window, are applied immediately.
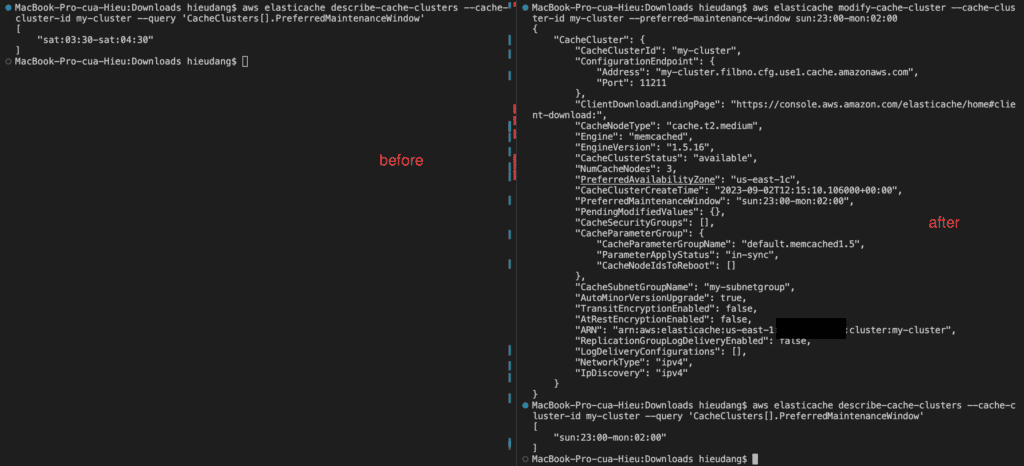
The following example changes the maintenance window for a cluster named my-cluster and applies the change immediately.
aws elasticache modify-cache-cluster \
    --cache-cluster-id my-cluster \
    --preferred-maintenance-window sun:23:00-mon:02:00
This command returns the following result.
Viewing the elements in a Memcached cluster with AWS CLI
You can view detailed information about one or more clusters using describe-cache-clusters
By default, abbreviated information about the clusters is returned. You can use the optional ShowCacheNodeInfo flag to retrieve detailed information about the cache nodes associated with the clusters. These details include the DNS address and port for the cache node endpoint.
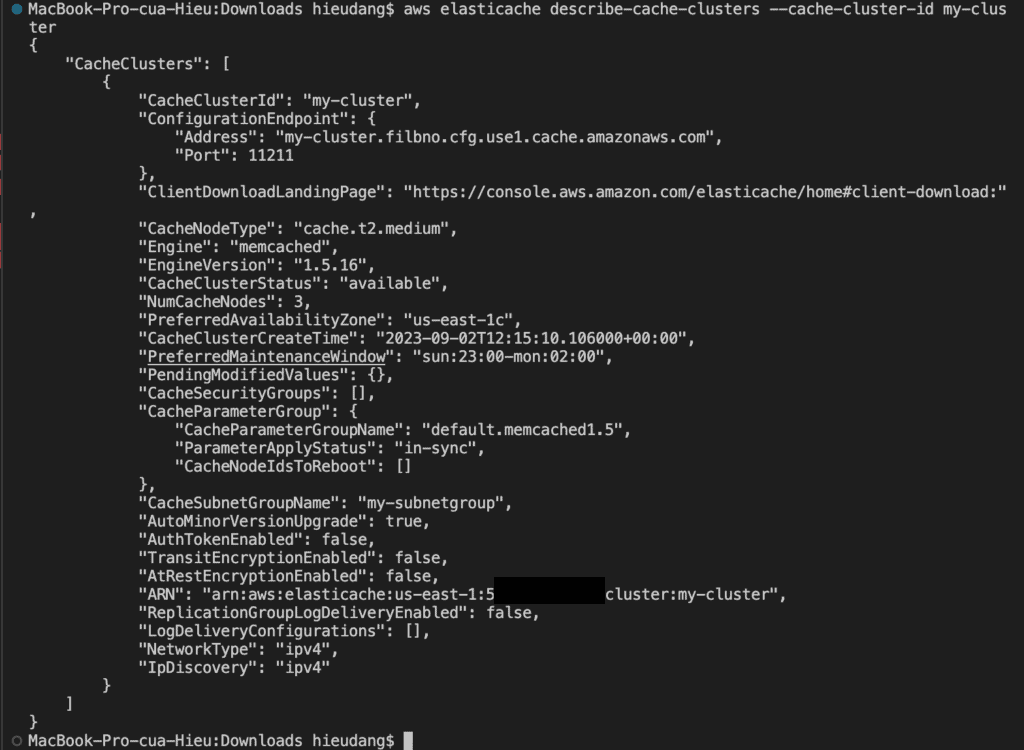
The following code lists the details for my-cluster
aws elasticache describe-cache-clusters --cache-cluster-id my-clusterThis command returns the following result.
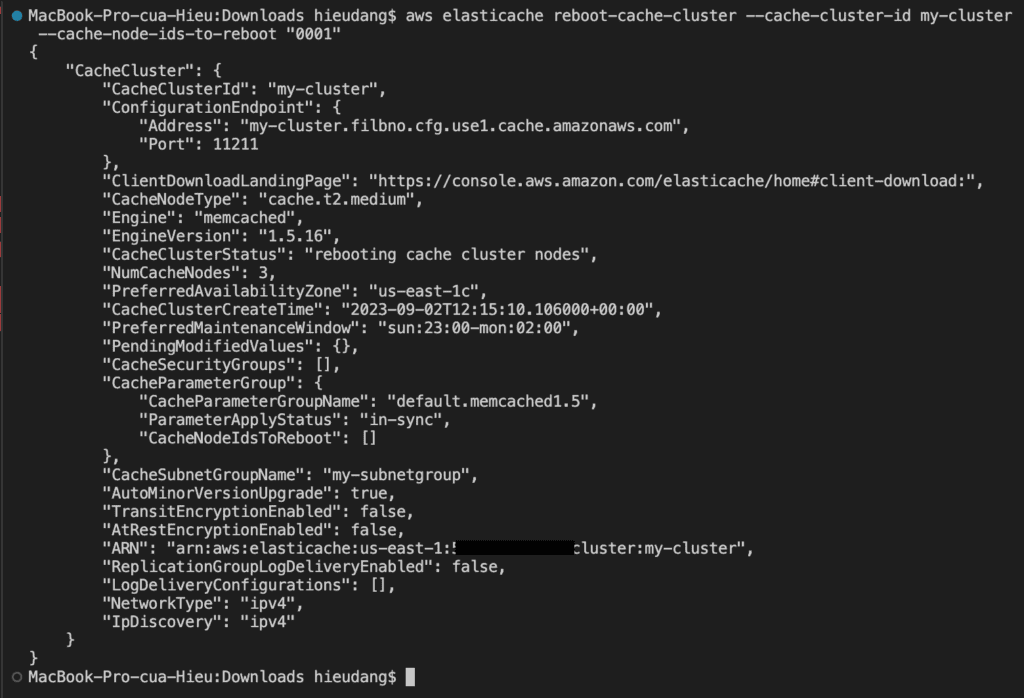
Rebooting a Memcached cluster with AWS CLI
Some changes require that the cluster be rebooted for the changes to be applied. For example, for some parameters, changing the parameter value in a parameter group is only applied after a reboot.
When you reboot a cluster, the cluster flushes all its data and restarts its engine. During this process, you cannot access the cluster. Because the cluster flushed all its data, when it is available again, you start with an empty cluster.
To reboot specific nodes in the cluster, use the --cache-node-ids-to-reboot to list the specific clusters to reboot.
To reboot a cluster (AWS CLI), use the reboot-cache-cluster CLI operation.
Run the following command to reboot a cluster.
aws elasticache reboot-cache-cluster --cache-cluster-id my-cluster --cache-node-ids-to-reboot "0001"This command returns the following result.
Discovering the endpoints of the Memcached cluster with AWS CLI
Your application connects to your cluster using endpoints. An endpoint is a node or cluster’s unique address. Which endpoints to use
- If you use Automatic Discovery, you can use the cluster’s configuration endpoint to configure your Memcached client. This means you must use a client that supports Automatic Discovery.
- If you don’t use Automatic Discovery, you must configure your client to use the individual node endpoints for reads and writes. You must also keep track of them as you add and remove nodes.
You can use the AWS CLI to discover the endpoints for a cluster and its nodes with the describe-cache-clusterscommand. For more information, see the topic describe-cache-clusters.
The following command retrieves the configuration endpoint (ConfigurationEndpoint)
aws elasticache describe-cache-clusters \
    --cache-cluster-id my-cluster --query 'CacheClusters[].ConfigurationEndpoint'
This command returns the following result.

For Memcached clusters, the command returns the configuration endpoint. If you include the optional parameter --show-cache-node-info, the following command retrieves the configuration endpoint (ConfigurationEndpoint) and individual node endpoints (Endpoint) for the Memcached cluster.
aws elasticache describe-cache-clusters \
    --cache-cluster-id my-cluster \
    --show-cache-node-info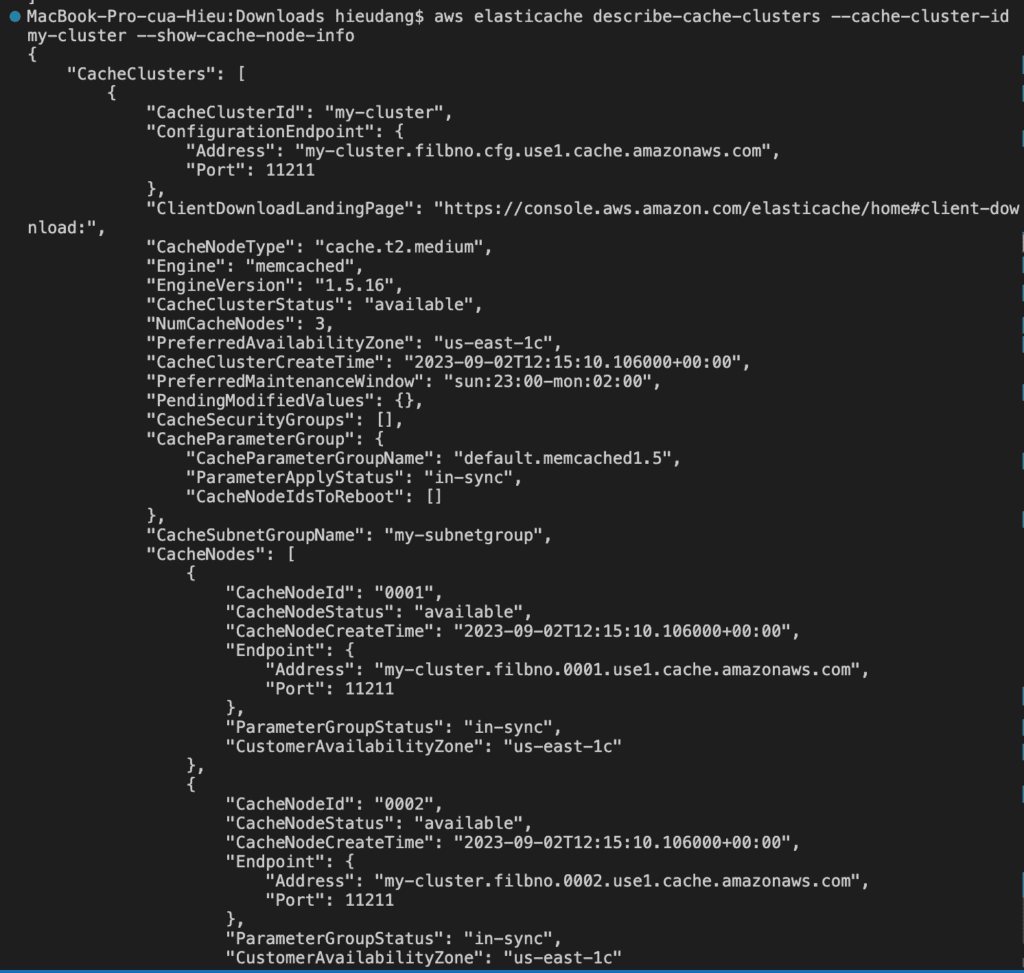
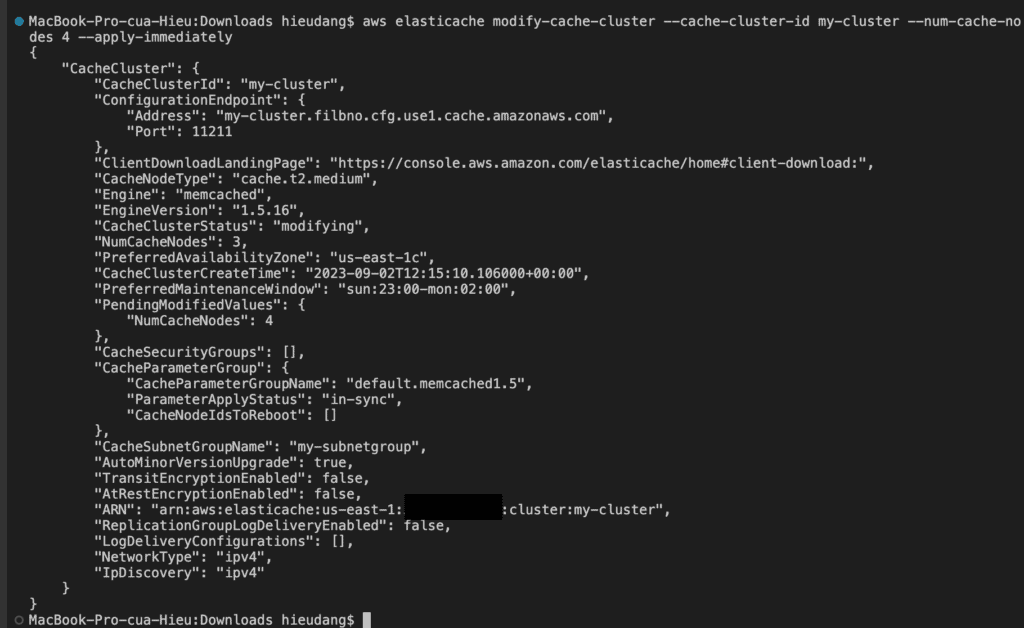
Adding nodes to a Memcached cluster with AWS CLI
Adding nodes to a Memcached cluster increases the number of your cluster’s partitions.
To add nodes to a cluster using the AWS CLI, use the AWS CLI operation modify-cache-cluster. For more information, see the AWS CLI topic modify-cache-cluster.
Run the following command to add nodes to a cluster
aws elasticache modify-cache-cluster \
    --cache-cluster-id my-cluster \
    --num-cache-nodes 4 \
    --apply-immediately
This command returns the following result.
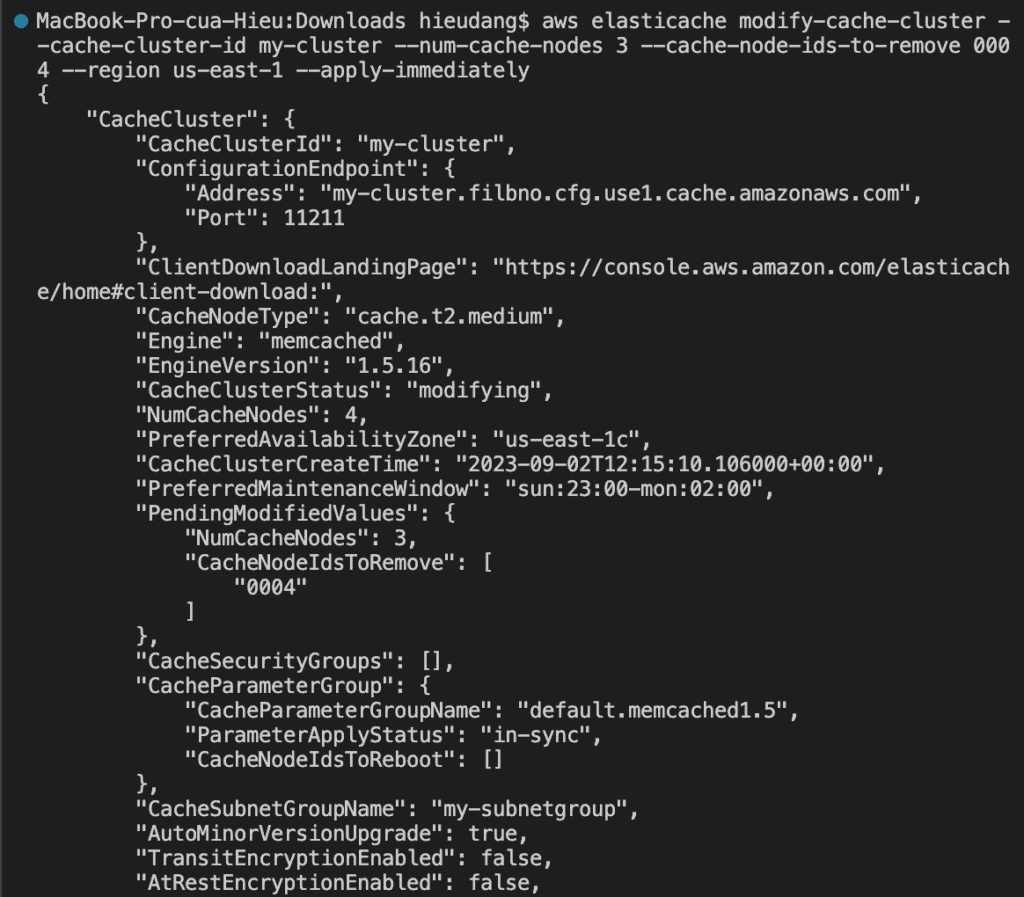
Removing nodes from a Memcached cluster with AWS CLI
To remove nodes from a cluster using the command-line interface, use the command modify-cache-cluster with the following parameters:
--cache-cluster-idThe ID of the cache cluster that you want to remove nodes from.--num-cache-nodesThe--num-cache-nodesparameter specifies the number of nodes that you want in this cluster after the modification is applied.--cache-node-ids-to-removeA list of node IDs that you want removed from this cluster.--apply-immediatelyor--no-apply-immediatelySpecifies whether to remove these nodes immediately or at the next maintenance window.--regionSpecifies the AWS Region of the cluster that you want to remove nodes from.
The following example immediately removes node 0004 from the cluster my-cluster.
aws elasticache modify-cache-cluster \
    --cache-cluster-id my-cluster \
    --num-cache-nodes 3 \
    --cache-node-ids-to-remove 0004 \
    --region us-east-1 \
    --apply-immediately
This command returns the following result.
Scaling Memcached vertically
To scale a Memcached cache cluster vertically
- Create a new cache cluster with the new node type.
- In your application, update the endpoints to the new cluster’s endpoints.
- Delete the old cache cluster.
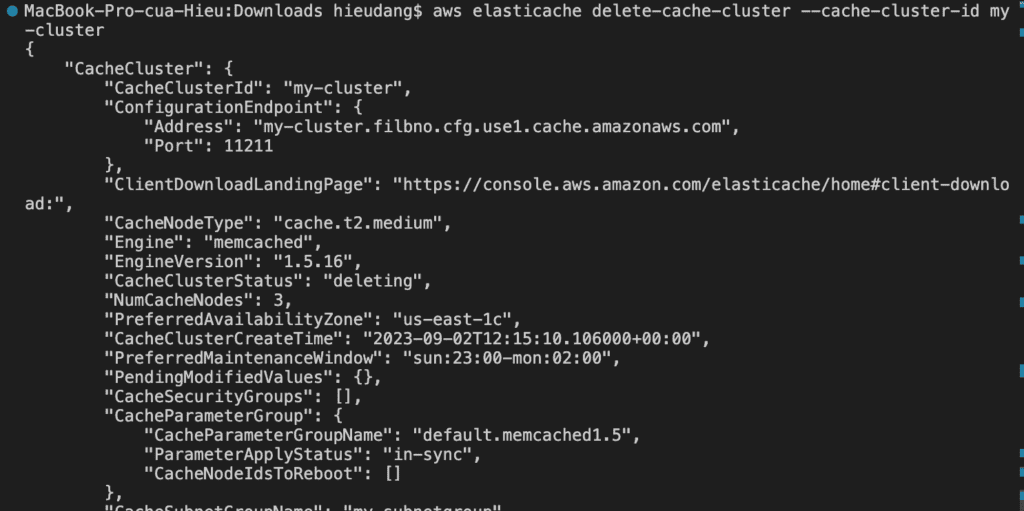
Deleting a Memcached cluster with AWS CLI
For more information, see the AWS CLI for ElastiCache topic delete-cache-cluster
Run the following command to delete a cluster.
aws elasticache delete-cache-cluster --cache-cluster-id my-clusterThis command returns the following result.
Conclusion
These steps provide an example to manage the Memcached cluster. The specific configuration details may vary depending on your environment and setup. It’s recommended to consult the relevant documentation from AWS for detailed instructions on setting up. I hope will this be helpful. Thank you for reading the DevopsRoles page!
Refer
https://docs.aws.amazon.com/AmazonElastiCache/latest/mem-ug/WhatIs.html
https://docs.aws.amazon.com/lambda/latest/dg/services-elasticache-tutorial.html

2 thoughts on “Memcached tutorial”