Table of Contents
Introduction
Kubernetes has emerged as the go-to solution for container orchestration and management. If you’re looking to set up a Kubernetes cluster on a Ubuntu server, you’re in the right place. In this step-by-step guide, we’ll walk you through the process of installing Kubernetes using Kubeadm on Ubuntu.
Prerequisites
I have created 3 VMs for Kubernetes Cluster Nodes to Cloud Google Compute Engine (GCE)
- Master(1): 2 vCPUs – 4GB Ram
- Worker(2): 2 vCPUs – 2GB RAM
- OS: Ubuntu 16.04 or CentOS/RHEL 7
I have configured Firewall Rules Ingress in Google Compute Engine (GCE)
- Master Node: 2379,6443,10250,10251,10252
- Worker Node: 10250,30000-32767
Installing Kubernetes using Kubeadm on Ubuntu
Set hostname on Each Node
# hostnamectl set-hostname "k8s-master"    // For Master node
# hostnamectl set-hostname "k8s-worker1"   // For 1st worker node
# hostnamectl set-hostname "k8s-worker2"   // For 2nd worker node
Add the following entries in /etc/hosts file on each node
192.168.1.14   k8s-master
192.168.1.16   k8s-worker1
192.168.1.17   k8s-worker2
Disable Swap and Bridge Traffic
Kubernetes does not work well with swap enabled. Run it on MASTER & WORKER Nodes
Disable SWAP
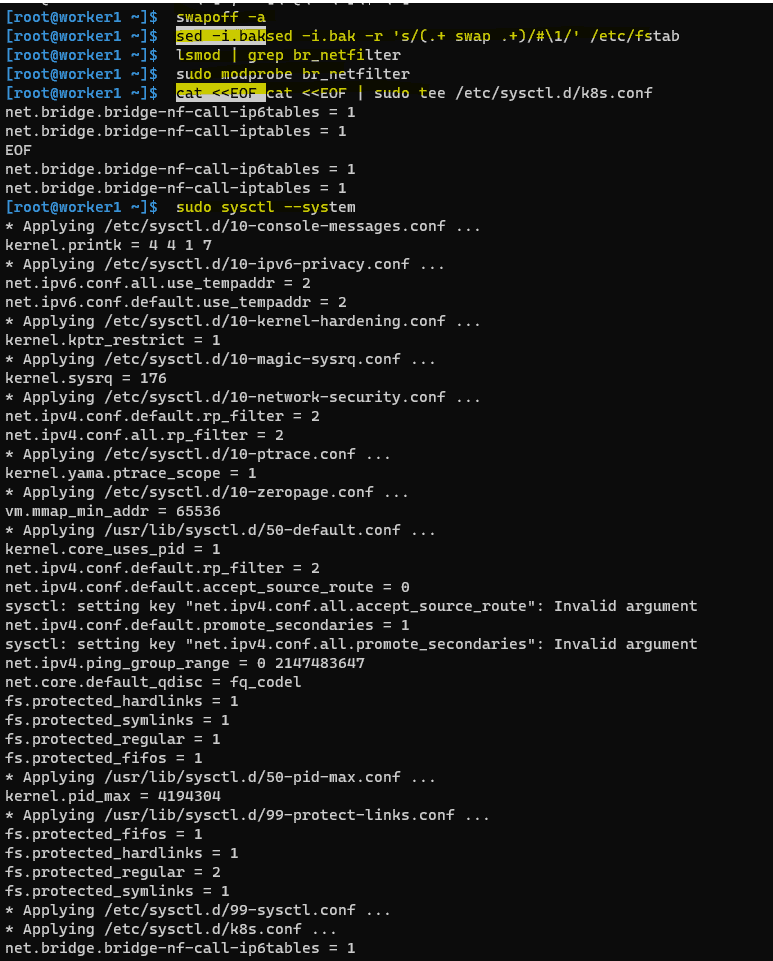
# swapoff -a
# sed -i.bak -r 's/(.+ swap .+)/#\1/' /etc/fstab
Load the following kernel modules on all the nodes,
# tee /etc/modules-load.d/containerd.conf <<EOF
overlay
br_netfilter
EOF
# modprobe overlay
# modprobe br_netfilter
Set the following Kernel parameters for Kubernetes, run beneath tee command
# tee /etc/sysctl.d/kubernetes.conf <<EOF
net.bridge.bridge-nf-call-ip6tables = 1
net.bridge.bridge-nf-call-iptables = 1
net.ipv4.ip_forward = 1
EOF
Reload the above changes
# sysctl --systemFor example, The output terminal of worker1.
Installing Docker
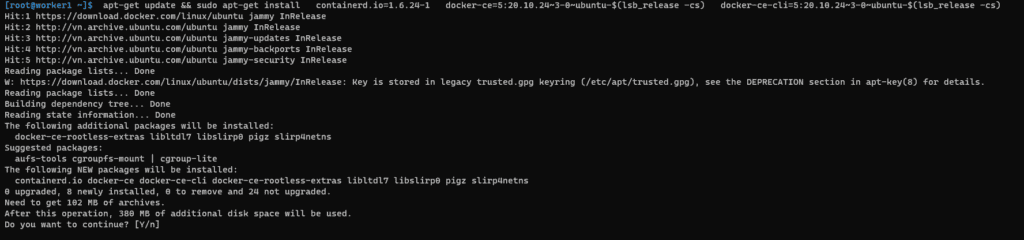
Run it on MASTER & WORKER Nodes. Kubernetes requires a container runtime, and Docker is a popular choice. To install Docker, run the following commands:
apt-get update
apt-get install -y  apt-transport-https ca-certificates curl software-properties-common gnupg2

curl -fsSL https://download.docker.com/linux/ubuntu/gpg | sudo apt-key add -

sudo add-apt-repository "deb [arch=amd64] https://download.docker.com/linux/ubuntu \
  $(lsb_release -cs) \
  stable"
Installing Docker
apt-get update && sudo apt-get install \
  containerd.io=1.6.24-1 \
  docker-ce=5:20.10.24~3-0~ubuntu-$(lsb_release -cs) \
  docker-ce-cli=5:20.10.24~3-0~ubuntu-$(lsb_release -cs)
For example, The output terminal is as below:
Setting up the Docker daemon
cat <<EOF | sudo tee /etc/docker/daemon.json
{
  "exec-opts": ["native.cgroupdriver=systemd"],
  "log-driver": "json-file",
  "log-opts": {
    "max-size": "100m"
  },
  "storage-driver": "overlay2"
}
EOF

mkdir -p /etc/systemd/system/docker.service.d
Start and enable the docker
systemctl daemon-reload
systemctl enable docker
systemctl restart docker
systemctl status docker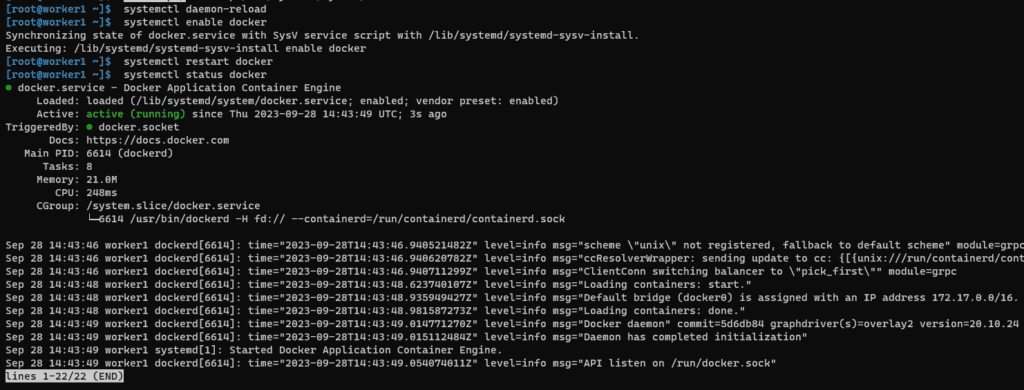
Install Kubeadm, Kubelet, and Kubectl
Add the Kubernetes repository and install Kubeadm, Kubelet, and Kubectl
apt-get update && sudo apt-get install -y apt-transport-https curl

curl -s https://packages.cloud.google.com/apt/doc/apt-key.gpg | sudo apt-key add -

cat <<EOF | sudo tee /etc/apt/sources.list.d/kubernetes.list
deb https://apt.kubernetes.io/ kubernetes-xenial main
EOF
Installing Kubeadm, Kubelet, Kubectl
apt-get update
apt-get install -y kubelet kubeadm kubectl

apt-mark hold kubelet kubeadm kubectl
Start and enable Kubelet
systemctl daemon-reload
systemctl enable kubelet
systemctl restart kubelet
systemctl status kubelet
Initializing CONTROL-PLANE
Run it on MASTER Node only. On your master node, initialize the Kubernetes cluster with the command below:
kubeadm init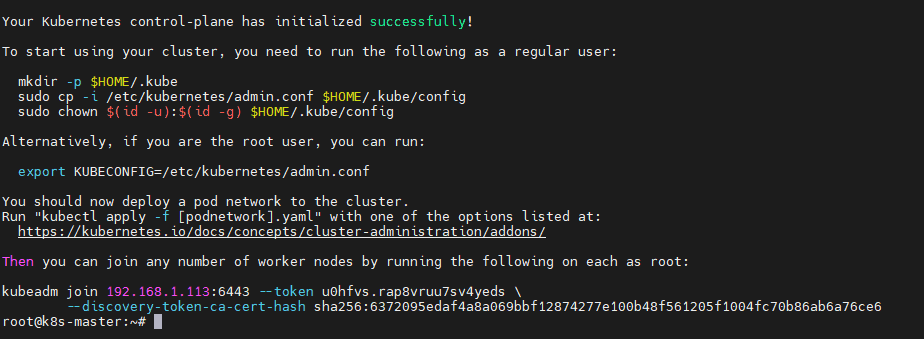
Make note of the kubeadm join command that’s provided at the end; you’ll need it to join worker nodes.
Installing POD-NETWORK add-on
Run it on MASTER Node only
For kubectl
mkdir -p $HOME/.kube
cp -i /etc/kubernetes/admin.conf $HOME/.kube/config
chown $(id -u):$(id -g) $HOME/.kube/config
Installing “Weave CNI” (Pod-Network add-on)
kubectl apply -f "https://cloud.weave.works/k8s/net?k8s-version=$(kubectl version | base64 | tr -d '\n')"NOTE: There are multiple CNI Plug-ins available. You can install a choice of yours. In the case above commands don’t work, try checking the below link for more info
Joining Worker Nodes
Run it on WORKER Node only
On your worker nodes, use the kubeadm join command from above kubeadm init output to join them to the cluster.
kubeadm join <...>Run this command IF you do not have the above join command and/or create a NEW one.
kubeadm token create --print-join-commandVerify the Cluster
On the master node, ensure your cluster is up and running
kubectl get nodesYou should see the master node marked as “Ready” and any joined worker nodes.
Conclusion
Congratulations! You’ve successfully installed Kubernetes using Kubeadm on Ubuntu. With your Kubernetes cluster up and running, you’re ready to deploy and manage containerized applications and services at scale.
Kubernetes offers vast capabilities for container orchestration, scaling, and management. As you become more familiar with Kubernetes, you can explore advanced configurations and features to optimize your containerized environment.
I hope will this your helpful. Thank you for reading the DevopsRoles page!
Additional Resources:
- Kubernetes Documentation
- Kubeadm Documentation
- Docker Documentation
- Calico Documentation


1 thought on “Installing Kubernetes using Kubeadm on Ubuntu: A Step-by-Step Guide”