In this tutorial, How to install Oracle client 18.3 on Centos 7.
Bach server (sqlplus,sqlldr, etc) <–> Oracle server
Table of Contents
Your environment
On server
- OS: Centos 7 (Batch server)
- Oracle client 18.3
On My PC
- OS: Windows
- Putty
- Xming server
Install Oracle client 18.3 on centos 7
On server
Install the packages
$ sudo yum install zip libaio wget unzip
$ sudo yum install  xorg-x11-server-Xorg xorg-x11-xauth xorg-x11-apps -y
Download Oracle client 18.3 Here
To change to folder Oracle client
$ cd /opt/
$ unzip LINUX.X64_180000_client.zip
Create Account for Oracle
$ sudo groupadd -g 501 oinstall
$ sudo groupadd -g 502 dba
$ sudo useradd -u 501 -g 501 -G 502 -s /bin/bash -d /home/oracle oracle -m
Enable X11Forwarding in sshd_config file. The content as below
X11Forwarding yes
X11DisplayOffset 10
X11UseLocalhost yes
On PC
Install Xming server link download here. After you have to install Xming server then start it.
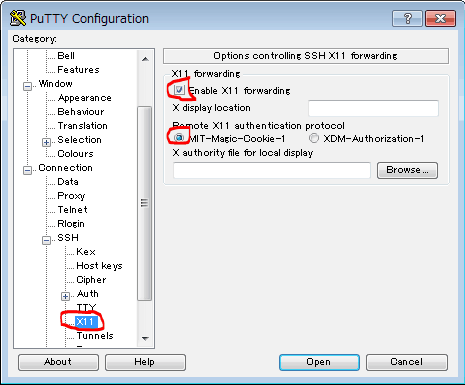
Configure Putty enable X11Forwarding as the picture below
Install Oracle client 18.3
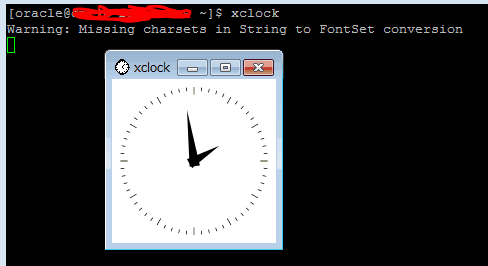
[oracle@batch-server ~]$ cd /opt/client/
[oracle@batch-server ~]$ xclock
The result as the picture below
Run Oracle client 🙂
[oracle@batch-server ~]$ ./runInstaller
Confirm after install Oracle client 18.3
How to create variable $ORACLE_HOME for oracle user. For example as below
[oracle@batch-server ~]$ cat .bash_profile

 #The content as below
 PATH=$PATH:$HOME/.local/bin:$HOME/bin
 export ORACLE_HOME=/opt/oraInventory/product/18.0.0/client_1
 export PATH=$PATH:$ORACLE_HOME/bin

 [oracle@batch-server ~]$ source .bash_profile
Create new file tnsnames.ora
[oracle@batch-server ~]$ $ORACLE_HOME/network/admin/tnsnames.ora
The following is a reference example.
devopsroles_01 =
   (DESCRIPTION =
     (ENABLE = BROKEN)
     (LOAD_BALANCE = ON)
     (FAILOVER = ON)
     (ADDRESS_LIST =
       (ADDRESS = (PROTOCOL = TCP)(HOST = 10.0.2.15)(PORT = 1534))
       (ADDRESS = (PROTOCOL = TCP)(HOST = 10.0.2.15)(PORT = 1535))
     )
     (CONNECT_DATA =
       (SERVICE_NAME = DBB_DEVOPSROLES)
       (SERVER = DEDICATED)
     )
   )
Add end line in file sqlnet.ora
[oracle@batch-server ~]$ $ORACLE_HOME/network/admin/sqlnet.ora
The content as below
NAMES.DIRECTORY_PATH= (TNSNAMES, EZCONNECT)
ADR_BASE = /opt/oracle
Connection check from Batch server to Oracle database.
[oracle@batch-server ~]$ sqlplus /nolog
 SQL> conn username/password
 SQL> set head off
 SQL> select * from v$instance ;
 SQL> quit
You have installed Oracle client 18.3 on Centos 7. If during setup error you can Q&A. Thank you for reading!