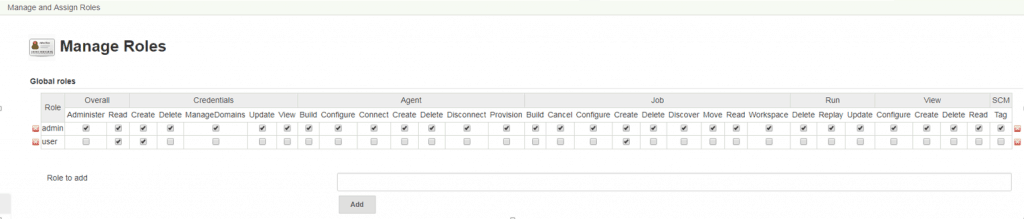
In Global roles –> Role to add. For example, Add new admin, user
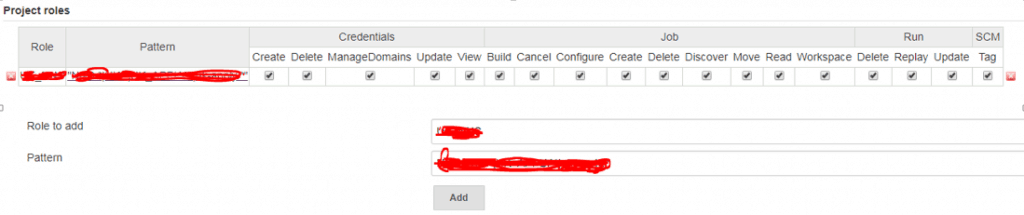
In “Project roles” –> Add “Role to add” and “Pattern”. For example, Multiple Pattern for NGINX. Role to add: NGINX Pattern: startnginx.|stopnginx.|buildnginx.*
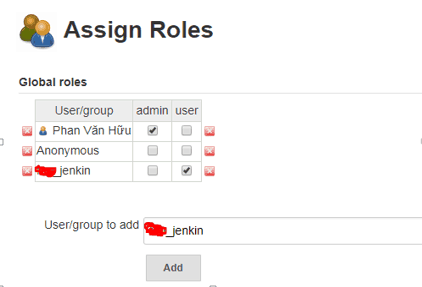
In “Global roles” –> Add “User/group to add”. For example: “User/group to add”add new xxx_jenkins account and chose “user” role. Account HuuPV chose the “admin” role as in the picture below.
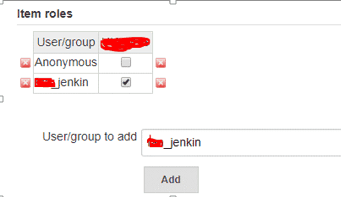
In “Item roles” –> Add “User/group to add”.
For example: choose xxx_jenkin account with role “ NGINX “ have created above step 2 as the picture below.
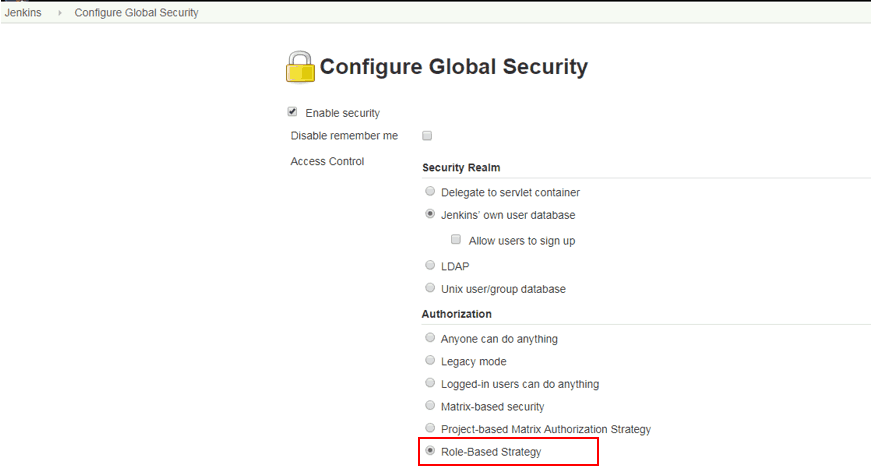
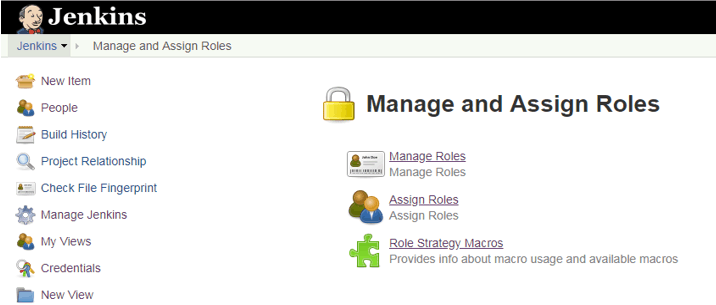
Plugin Manage and Asign Roles.
Conclusion
Thought the article, How to use “How to Manage Users and Roles in Jenkins” as above. I hope will this your helpful. Thank you for reading the DevopsRoles page!
Good morning, I am working and changing the ownership folder of my home, but I cannot run chown command. It is Error “Invalid argument”. This is indeed an NFS4 issue. The error chown Invalid argument as following below:
[root@Client ~]# chown -R huupv:huupv /home/huupv
chown: changing ownership of `huupv/.bashrc': Invalid argument
chown: changing ownership of `huupv': Invalid argument
[root@DevopsRoles ~]# cat /etc/exports

The Content in file exports

#Data Volume Share
/mnt/data 192.168.1.12(rw,sync,no_root_squash,no_subtree_check)
Solve Problem
From the Client, we will umount and mount as below
[root@Client ~]# umount /mnt/data # if umount is busy then you need run umount -lf /mnt/data
[root@Client ~]# mount -t nfs -o vers=3 192.168.1.13:/mnt/data  /mnt/data
[root@Client ~]# chown -R huupv:huupv /home/huupv
You have solved the problem “chown Invalid argument centos” Thank you for reading the DevopsRoles page!
In this tutorial, How to run Spring Boot Application as a service in Linux. Spring boot preferred deployment method via an executable jar file that contains tomcat inside.
In this tutorial, How to install Gradle on CentOS. Gradle is a free and Open Source that helps your build, automate and deliver better software, faster.
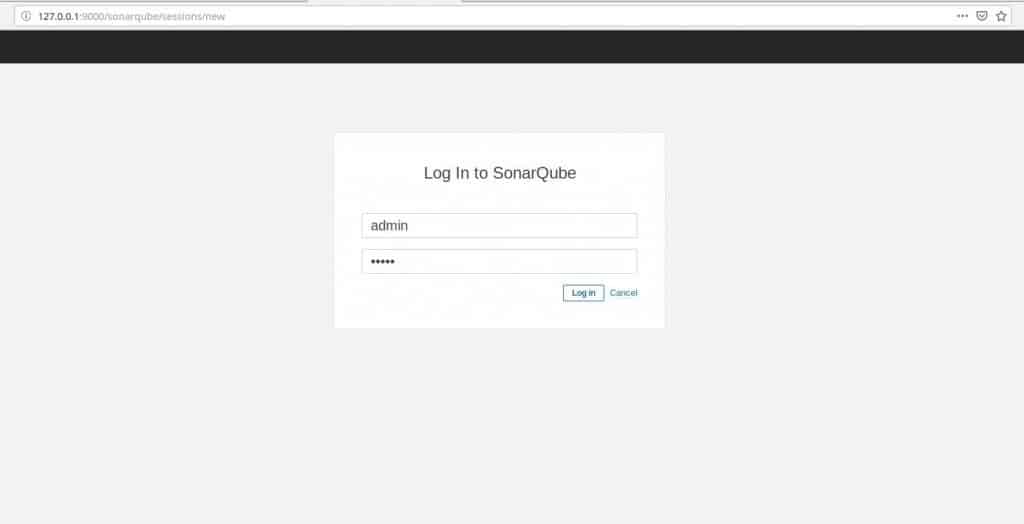
Create the database with “./mysql/init/1_create_db.sql” file.
-- For WebApp
CREATE DATABASE IF NOT EXISTS items DEFAULT CHARACTER SET UTF8;
-- For SonarQube
CREATE DATABASE IF NOT EXISTS sonar DEFAULT CHARACTER SET UTF8;
User for SonarQube
Create a user with “./mysql/init/2_create_user.sql” file
CREATE USER 'sonar' IDENTIFIED BY 'sonar';
Grant user
Grant user for sonar with “./mysql/init/3_grant.sql” file.
GRANT ALL ON sonar.* TO 'sonar'@'%' IDENTIFIED BY 'sonar';
GRANT ALL ON sonar.* TO 'sonar'@'localhost' IDENTIFIED BY 'sonar';
FLUSH PRIVILEGES;
This tutorial is a Step-by-Step Guide to Redis Install and Configure. Now, let’s go Redis Install and Configure.
Dive into the efficient world of Redis with this detailed guide on installation and configuration on Linux systems. Whether you’re setting up Redis for the first time or optimizing an existing installation, this tutorial offers clear, step-by-step instructions to get Redis up and running smoothly on your server.
Redis
It is an Open Source.
In-memory data structure store.
Used as Database.
Cache and message broker.
Redis is a key-value pair cache and store
Redis is perfect for storing sessions. All operations are performed in memory, so reading and writing will be fast
$ cd /opt
$ wget http://download.redis.io/releases/redis-5.0.5.tar.gz
$ sudo tar zxvf redis-5.0.5.tar.gz
$ cd redis-5.0.5
Install Redis
$ sudo make test
$ sudo make
$ sudo make install
If the following error is in make test command as below.
You need tcl 8.5 or newer in order to run the Redis test
make[1]: *** [test] Error 1
make[1]: Leaving directory `/opt/redis-5.0.5/src'
make: *** [test] Error 2
You need to install tcl
$ sudo yum install -y tcl
Again install Redis
$ sudo make test
Error
Executing test client: couldn’t execute “src/redis-benchmark”: no such file or directory.
Then perform the following steps
$ sudo make distclean
$ sudo make
$ sudo make install
For more advanced details the “redis.conf” file configuration item is described as follows:
When the client is idle for a long time, close the connection
timeout 300
Specify the logging level. Redis supports four levels: debug, verbose, notice, and warning. The default is verbose.
loglevel verbose
Set the number of databases, the default database is 0, you can use the “select DBID from v$database;” command to specify the database ID on the connection
databases 16
Set the IP address and port of the master service when the machine is slav service. When Redis starts, it will automatically synchronize data from the master.
slaveof <masterip> <masterport>
When the master service is password protected, the slav service connects to the master password.
masterauth <master-password>
Set the Redis connection password. If the connection password is configured, the client needs to provide the password through the AUTH command when connecting to Redis. The default is off.
requirepass abc
Set the maximum number of client connections at the same time. The default is unlimited.
maxclients 128
Specify the maximum memory limit of Redis. Redis will load the data into the memory at startup. After the maximum memory is reached, Redis will first try to clear the expired or expired Key. When this method is processed, the maximum memory setting is still reached. The write operation will no longer be possible, but the read operation will still be possible. Redis’ new VM mechanism will store the Key in memory and the value will be stored in the swap area.
maxmemory <bytes>
You can use the same configuration file between multiple Redis instances on the same host, and each instance has its own specific configuration file.
include /path/to/local.conf
Conclusion
Successfully installing and configuring Redis enhances your application’s performance by providing rapid data access. This guide aims to equip you with the knowledge to seamlessly integrate Redis into your system, ensuring optimal setup for a robust data management solution. Thank you for reading the DevopsRoles page!
In the ever-evolving landscape of technology, mastering the skills and knowledge of AWS solution architecture is more crucial than ever. Understanding and practicing exercises related to Amazon Virtual Private Cloud (VPC) is a key component in becoming an AWS Certified Solutions Architect. This article, the third installment in our series, will guide you through essential exercises involving Amazon VPC. We will help you grasp how to set up and manage VPCs, understand their core components, and create a secure, flexible networking environment for your applications.
In this article, we’ll learn about Amazon VPC, the best way to become familiar with Amazon VPC is to build your own custom Amazon VPC and then deploy Amazon EC2 instances into it. AWS Certified Solutions Architect Exercises- part 3 Amazon VPC
1. Today’s tasks
Create a Custom Amazon VPC
Create Two Subnets for Your Custom Amazon VPC
Connect Your Custom Amazon VPC to the Internet and Establish Routing
Launch an Amazon EC2 Instance and Test the Connection to the Internet.
2. Before you begin AWS Certified Solutions Architect
Command-line tool to SSH into the Linux instance.
3. Let’s do it
EXERCISE 1:
Create a Custom Amazon VPC
1. Open the Amazon VPC console
2. In the navigation pane, choose Your VPCs, and Create VPC.
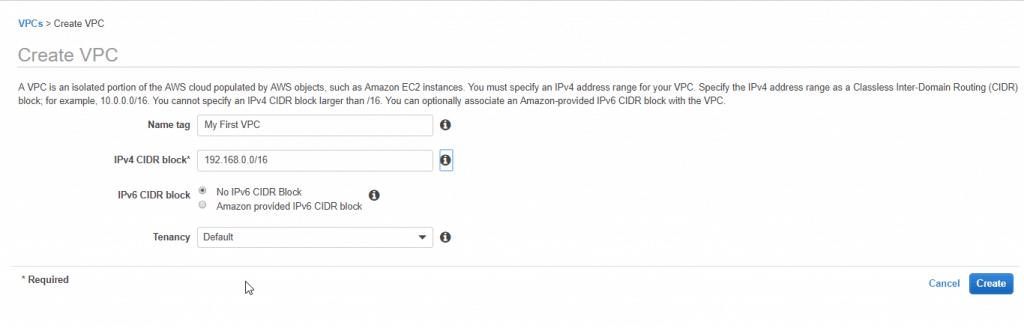
3. Specify the following VPC details as necessary and choose to Create.
Name tag: My First VPC
IPv4 CIDR block: 192.168.0.0/16
IPv6 CIDR block: No IPv6 CIDR Block
Tenancy: Default
EXERCISE 2:
Create Two Subnets for Your Custom Amazon VPC
To add a subnet to your VPC using the console
1. Open the Amazon VPC console
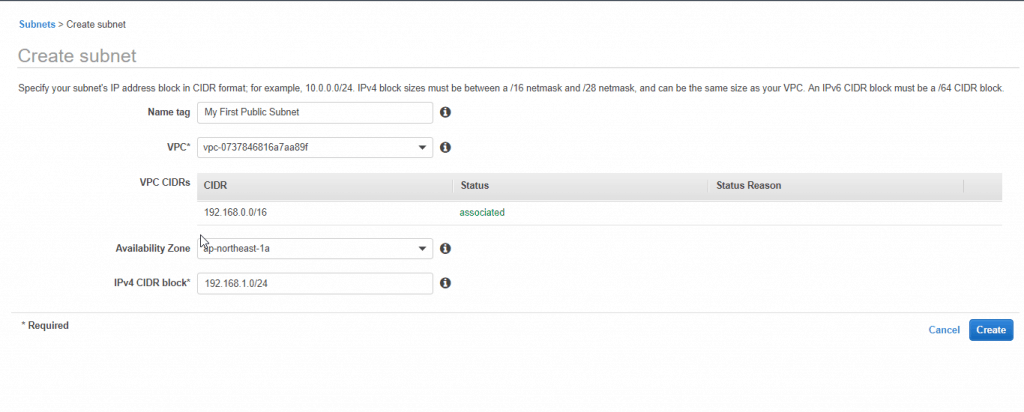
2. In the navigation pane, choose Subnets, Create subnet.
3. Specify the subnet details as necessary and choose to Create.
Name tag: My First Public Subnet.
VPC: Choose the VPC from Exercise 1.
Availability Zone: Optionally choose an Availability Zone in which your subnet will reside, or leave the default No Preference to let AWS choose an Availability Zone for you.
IPv4 CIDR block: 192.168.1.0/24.
4. Create a subnet with a CIDR block equal to 192.168.2.0/24 and a name tag of My First Private Subnet. Create the subnet in the Amazon VPC from Exercise 1, and specify a different Availability Zone for the subnet than previously specified (for example, ap-northeast-1c). You have now created two new subnets, each in its own Availability Zone.
EXERCISE 3:
Connect Your Custom Amazon VPC to the Internet and Establish Routing
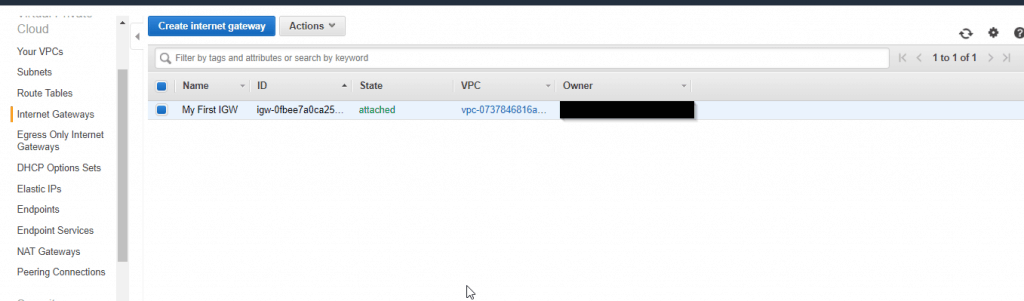
1. Create an IGW with a name tag of My First IGW and attach it to your custom Amazon VPC.
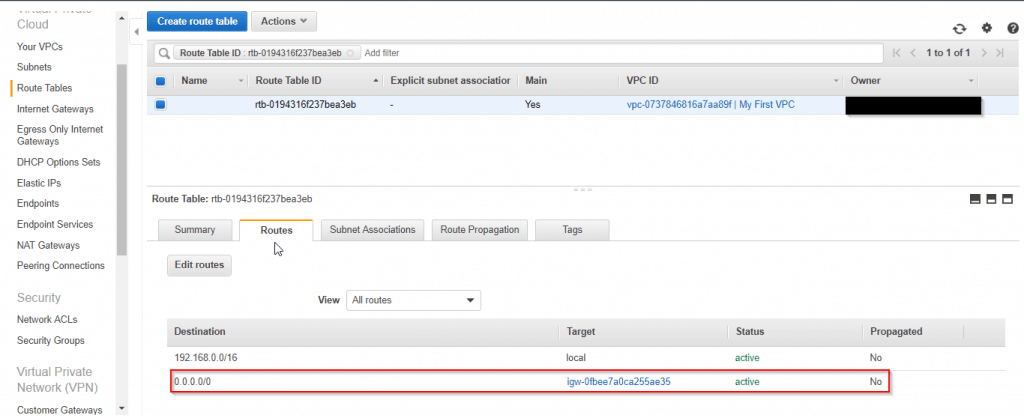
2. Add a route to the main route table for your custom Amazon VPC that directs Internet traffic (0.0.0.0/0) to the IGW.
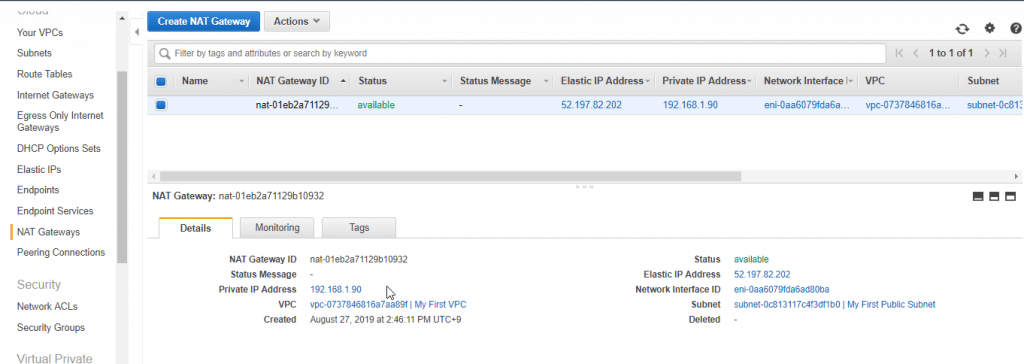
3. Create a NAT gateway, place it in the public subnet of your custom Amazon VPC, and assign it an EIP.
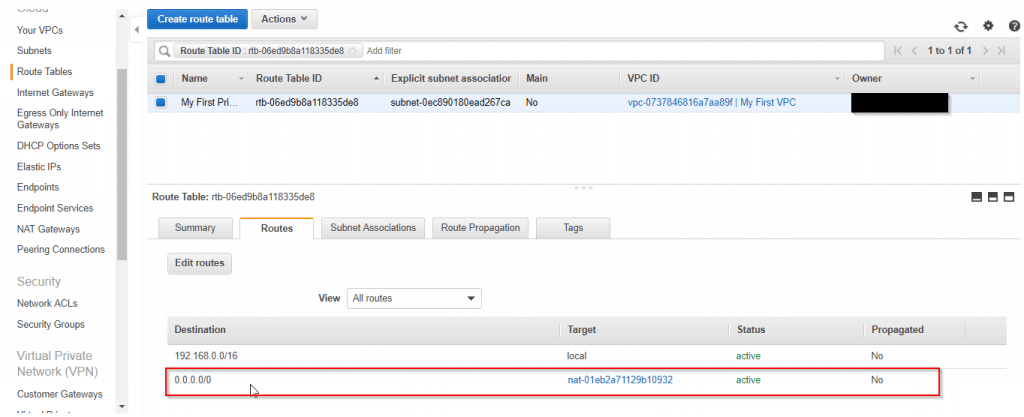
4. Create a new route table with a name tag of My First Private Route Table and place it within your custom Amazon VPC. Add a route to it that directs Internet traffic (0.0.0.0/0) to the NAT gateway and associate it with the private subnet.
EXERCISE 4:
Launch an Amazon EC2 Instance and Test the Connection to the Internet
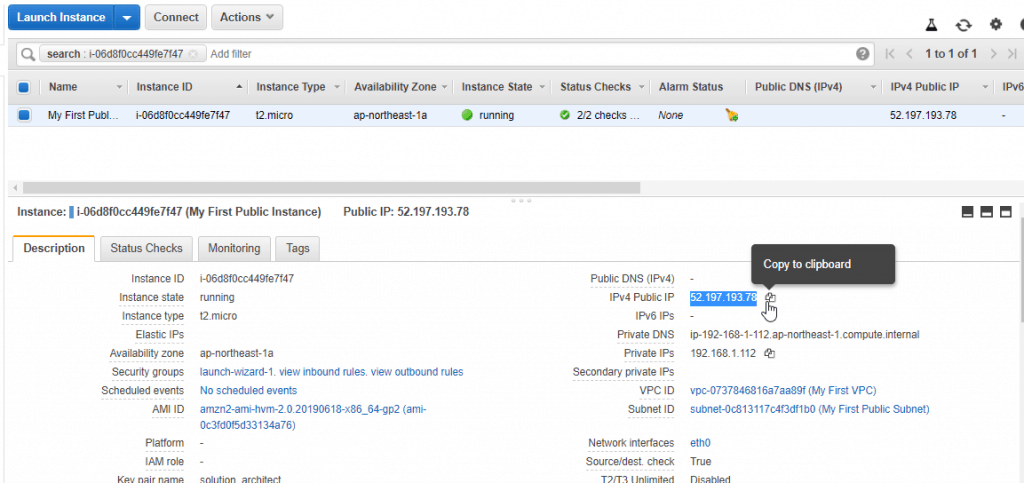
1. Launch a t2.micro Amazon Linux AMI as an Amazon EC2 instance into the public subnet of your custom Amazon VPC, give it a name tag of My First Public Instance and select your key pair for secure access to the instance.
2. Securely access the Amazon EC2 instance in the public subnet via SSH with a key pair.
3. Execute an update to the operating system instance libraries by executing the following command:
sudo yum update -y
4. You should see an output showing the instance downloading software from the Internet and installing it.
5. Delete all resources created in this exercise.
Conclusion
Mastering exercises related to Amazon VPC not only prepares you better for the AWS Certified Solutions Architect exam but also equips you with vital skills for deploying and managing cloud infrastructure effectively. From creating and configuring VPCs to setting up route tables and network ACLs, each step in this process contributes to building a robust and secure network system. We hope this article boosts your confidence in applying the knowledge gained and continues your journey toward becoming an AWS expert.
If you have any questions or need further assistance, don’t hesitate to reach out to us. Best of luck on your path to becoming an AWS Certified Solutions Architect! AWS Certified Solutions Architect Exercises- part 3 Amazon VPC. Happy Clouding!!! Thank you for reading the DevopsRoles page!
The sed command is a stream editor for filtering and transforming text. In this tutorial, How to sed command in Linux with Examples.
The sed command-Line in Linux, which stands for “stream editor,” is a powerful text processing tool used for performing various text manipulations and transformations. It reads input line by line, applies specified operations, and outputs the result. Here are a few examples of how to use the sed command line:
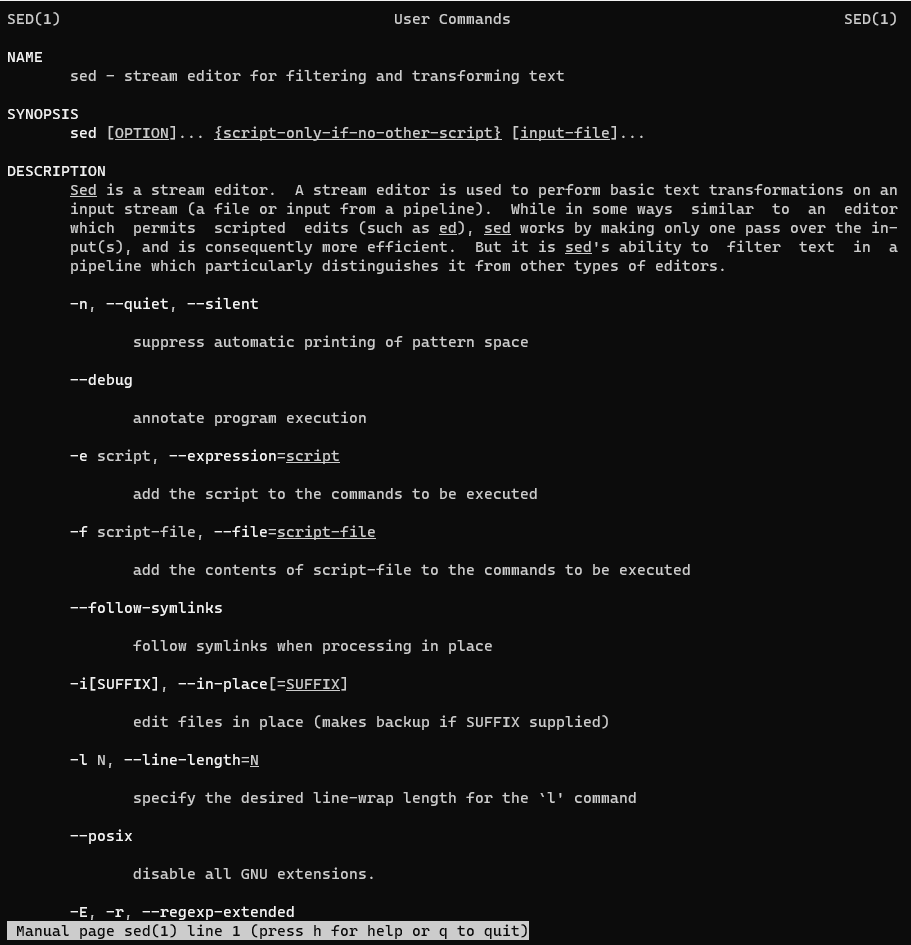
sed [OPTION]... {script-only-if-no-other-script} [input-file]...
On the man page, the describes it
sed – modifies lines from the specified File parameter according to an edit script and writes them to standard output.
man sed – More details information about the sed command.
The sed command in Linux with Examples
For example, the file sed_test.txt as below
[huupv@DevopsRoles vagrant]$ cat sed_test.txt
# /etc/ntp.conf, configuration for ntpd; see ntp.conf(5) for help

driftfile /var/lib/ntp/ntp.drift

# Enable this if you want statistics to be logged.
#statsdir /var/log/ntpstats/

statistics loopstats peerstats clockstats
filegen loopstats file loopstats type day enable
filegen peerstats file peerstats type day enable
filegen clockstats file clockstats type day enable

# Specify one or more NTP servers.

# Use servers from the NTP Pool Project. Approved by Ubuntu Technical Board
# on 2011-02-08 (LP: #104525). See http://www.pool.ntp.org/join.html for
# more information.
pool 0.ubuntu.pool.ntp.org iburst
pool 1.ubuntu.pool.ntp.org iburst
pool 2.ubuntu.pool.ntp.org iburst
pool 3.ubuntu.pool.ntp.org iburst
Append line
$ sed '/^pool 3/ a server ntp.devopsroes.com' sed_test.txt
Insert line
It will be added lines before the matching line.
$ sed '/^pool 3/i server ntp.devopsroles.com' sed_test.txt
Delete line
used d to delete matching lines. \s is escaped for regular expressions.
$ sed ' /^pool\s[0-9]\.ubuntu/d' sed_test.txt
How to write multi-line
There are two ways, use {} or other files.
Use {}
$ sed ' {
 /^pool 0/i server ntp.devopsroles.com
 /^pool\s[0-9]/d
 } ' ./sed_test.txt
create a ntp.sed file and read with the -f option.
The content ntp.sed file.
/^$/d
/^\s*#/d
/^pool 0/ i server ntp.devopsroles.com prefer
/^pool\s[0-9]\.ubuntu/d
Explain the above line.
/^$/d - Delete blank lines.
/^\s*#/d - Delete the line following # after any space including 0 (Delete comment line of #)
As a result
$ sed -f ntp.sed sed_test.txt
The backup file before changing the original file has been modified.
$ sed -i.bak -f ntp.sed ntp.conf
Print specific lines from a file
sed -n '2,5p' input_file
Delete lines matching a pattern
sed '/pattern/d' input_file
Append text after a specific line
sed '/pattern/a\new_line' input_file
Conclusion
sed Linux is a simple command in Linux. It uses the number of lines of files. These are just a few examples of how to use the sed command in Linux.
The sed command offers a wide range of text manipulation capabilities, including search and replace, insertions, deletions, and more. Thank you for reading the DevopsRoles page!