Kubernetes has revolutionized how we deploy and manage applications, but its power and flexibility come with significant complexity, especially regarding security. For developers and DevOps engineers, navigating the myriad of security controls can be daunting. This is where a Kubernetes Security Diagram becomes an invaluable tool. It provides a mental model and a visual cheatsheet to understand the layered nature of K8s security, helping you build more resilient and secure applications from the ground up. This article will break down the components of a comprehensive security diagram, focusing on practical steps you can take at every layer.
Table of Contents
Why a Kubernetes Security Diagram is Essential
A secure system is built in layers, like an onion. A failure in one layer should be contained by the next. Kubernetes is no different. Its architecture is inherently distributed and multi-layered, spanning from the physical infrastructure to the application code running inside a container. A diagram helps to:
- Visualize Attack Surfaces: It allows teams to visually map potential vulnerabilities at each layer of the stack.
- Clarify Responsibilities: In a cloud environment, the shared responsibility model can be confusing. A diagram helps delineate where the cloud provider’s responsibility ends and yours begins.
- Enable Threat Modeling: By understanding how components interact, you can more effectively brainstorm potential threats and design appropriate mitigations.
- Improve Communication: It serves as a common language for developers, operations, and security teams to discuss and improve the overall K8s security posture.
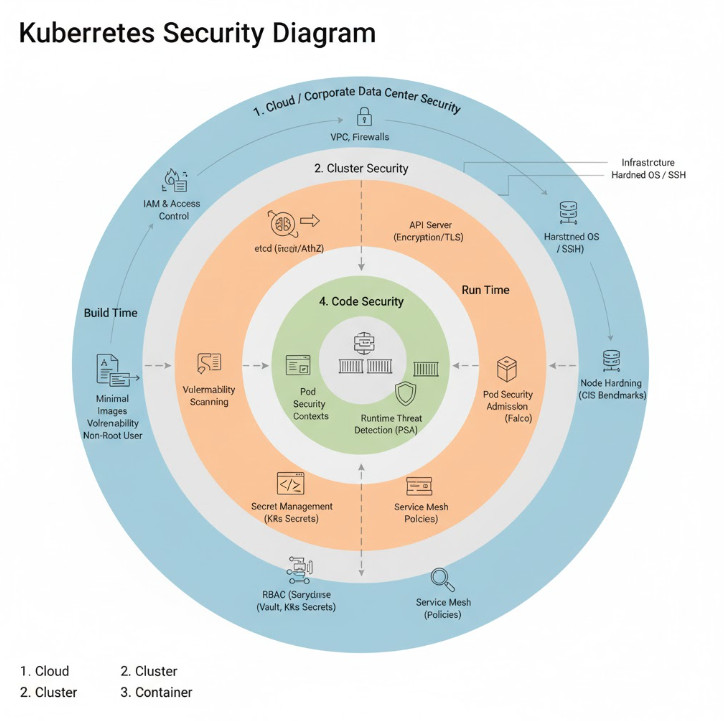
The most effective way to structure this diagram is by following the “4Cs of Cloud Native Security” model: Cloud, Cluster, Container, and Code. Let’s break down each layer.
Deconstructing the Kubernetes Security Diagram: The 4Cs
Imagine your Kubernetes environment as a set of concentric circles. The outermost layer is the Cloud (or your corporate data center), and the innermost is your application Code. Securing the system means applying controls at each of these boundaries.
Layer 1: Cloud / Corporate Data Center Security
This is the foundation upon which everything else is built. If your underlying infrastructure is compromised, no amount of cluster-level security can save you. Security at this layer involves hardening the environment where your Kubernetes nodes run.
Key Controls:
- Network Security: Isolate your cluster’s network using Virtual Private Clouds (VPCs), subnets, and firewalls (Security Groups in AWS, Firewall Rules in GCP). Restrict all ingress and egress traffic to only what is absolutely necessary.
- IAM and Access Control: Apply the principle of least privilege to the cloud provider’s Identity and Access Management (IAM). Users and service accounts that interact with the cluster infrastructure (e.g., creating nodes, modifying load balancers) should have the minimum required permissions.
- Infrastructure Hardening: Ensure the virtual machines or bare-metal servers acting as your nodes are secure. This includes using hardened OS images, managing SSH key access tightly, and ensuring physical security if you’re in a private data center.
- Provider-Specific Best Practices: Leverage security services offered by your cloud provider. For example, use AWS’s Key Management Service (KMS) for encrypting EBS volumes used by your nodes. Following frameworks like the AWS Well-Architected Framework is crucial.
Layer 2: Cluster Security
This layer focuses on securing the Kubernetes components themselves. It’s about protecting both the control plane (the “brains”) and the worker nodes (the “muscle”).
Control Plane Security
- API Server: This is the gateway to your cluster. Secure it by enabling strong authentication (e.g., client certificates, OIDC) and authorization (RBAC). Disable anonymous access and limit access to trusted networks.
- etcd Security: The `etcd` datastore holds the entire state of your cluster, including secrets. It must be protected. Encrypt `etcd` data at rest, enforce TLS for all client communication, and strictly limit access to only the API server.
- Kubelet Security: The Kubelet is the agent running on each worker node. Use flags like
--anonymous-auth=falseand--authorization-mode=Webhookto prevent unauthorized requests.
Worker Node & Network Security
- Node Hardening: Run CIS (Center for Internet Security) benchmarks against your worker nodes to identify and remediate security misconfigurations.
- Network Policies: By default, all pods in a cluster can communicate with each other. This is a security risk. Use
NetworkPolicyresources to implement network segmentation and restrict pod-to-pod communication based on labels.
Here’s an example of a NetworkPolicy that only allows ingress traffic from pods with the label app: frontend to pods with the label app: backend on port 8080.
apiVersion: networking.k8s.io/v1
kind: NetworkPolicy
metadata:
  name: backend-allow-frontend
  namespace: default
spec:
  podSelector:
    matchLabels:
      app: backend
  policyTypes:
  - Ingress
  ingress:
  - from:
    - podSelector:
        matchLabels:
          app: frontend
    ports:
    - protocol: TCP
      port: 8080
Layer 3: Container Security
This layer is all about securing the individual workloads running in your cluster. Security must be addressed both at build time (the container image) and at run time (the running container).
Image Security (Build Time)
- Use Minimal Base Images: Start with the smallest possible base image (e.g., Alpine, or “distroless” images from Google). Fewer packages mean a smaller attack surface.
- Vulnerability Scanning: Integrate image scanners (like Trivy, Clair, or Snyk) into your CI/CD pipeline to detect and block images with known vulnerabilities before they are ever pushed to a registry.
- Don’t Run as Root: Define a non-root user in your Dockerfile and use the
USERinstruction.
Runtime Security
- Security Contexts: Use Kubernetes
SecurityContextto define privilege and access control settings for a Pod or Container. This is your most powerful tool for hardening workloads at runtime. - Pod Security Admission (PSA): The successor to Pod Security Policies, PSA enforces security standards (like Privileged, Baseline, Restricted) at the namespace level, preventing insecure pods from being created.
- Runtime Threat Detection: Deploy tools like Falco or other commercial solutions to monitor container behavior in real-time and detect suspicious activity (e.g., a shell spawning in a container, unexpected network connections).
This manifest shows a pod with a restrictive securityContext, ensuring it runs as a non-root user with a read-only filesystem.
apiVersion: v1
kind: Pod
metadata:
  name: secure-pod-example
spec:
  containers:
  - name: nginx
    image: nginx:1.21
    securityContext:
      runAsNonRoot: true
      runAsUser: 1001
      allowPrivilegeEscalation: false
      readOnlyRootFilesystem: true
      capabilities:
        drop:
        - "ALL"
  # You need a writable volume for temporary files
  volumes:
  - name: tmp
    emptyDir: {}
Layer 4: Code Security
The final layer is the application code itself. A secure infrastructure can still be compromised by a vulnerable application.
Key Controls:
- Secret Management: Never hardcode secrets (API keys, passwords, certificates) in your container images or manifests. Use Kubernetes Secrets, or for more robust security, integrate an external secrets manager like HashiCorp Vault or AWS Secrets Manager.
- Role-Based Access Control (RBAC): If your application needs to talk to the Kubernetes API, grant it the bare minimum permissions required using a dedicated
ServiceAccount,Role, andRoleBinding. - Service Mesh: For complex microservices architectures, consider using a service mesh like Istio or Linkerd. A service mesh can enforce mutual TLS (mTLS) for all service-to-service communication, provide fine-grained traffic control policies, and improve observability.
Here is an example of an RBAC Role that only allows a ServiceAccount to get and list pods in the default namespace.
apiVersion: rbac.authorization.k8s.io/v1
kind: Role
metadata:
  namespace: default
  name: pod-reader
rules:
- apiGroups: [""] # "" indicates the core API group
  resources: ["pods"]
  verbs: ["get", "list", "watch"]
---
apiVersion: rbac.authorization.k8s.io/v1
kind: RoleBinding
metadata:
  name: read-pods
  namespace: default
subjects:
- kind: ServiceAccount
  name: my-app-sa # The ServiceAccount used by your application
  apiGroup: ""
roleRef:
  kind: Role
  name: pod-reader
  apiGroup: rbac.authorization.k8s.io
Frequently Asked Questions
What is the most critical layer in Kubernetes security?
Every layer is critical. A defense-in-depth strategy is essential. However, the Cloud/Infrastructure layer is the foundation. A compromise at this level can undermine all other security controls you have in place.
How do Network Policies improve Kubernetes security?
They enforce network segmentation at Layer 3/4 (IP/port). By default, Kubernetes has a flat network where any pod can talk to any other pod. Network Policies act as a firewall for your pods, ensuring that workloads can only communicate with the specific services they are authorized to, drastically reducing the “blast radius” of a potential compromise.
What is the difference between Pod Security Admission (PSA) and Security Context?
SecurityContext is a setting within a Pod’s manifest that defines the security parameters for that specific workload (e.g., runAsNonRoot). Pod Security Admission (PSA) is a cluster-level admission controller that enforces security standards across namespaces. PSA acts as a gatekeeper, preventing pods that don’t meet a certain security standard (e.g., those requesting privileged access) from even being created in the first place.
Conclusion
Securing Kubernetes is not a one-time task but an ongoing process that requires vigilance at every layer of the stack. Thinking in terms of a layered defense model, as visualized by a Kubernetes Security Diagram based on the 4Cs, provides a powerful framework for developers and operators. It helps transform a complex ecosystem into a manageable set of security domains. By systematically applying controls at the Cloud, Cluster, Container, and Code layers, you can build a robust K8s security posture and confidently deploy your applications in production. Thank you for reading the DevopsRoles page!