In the world of machine learning operations (MLOps), deploying models is only half the battle. A critical, and often recurring, task is running predictions on large volumes of data—a process known as batch prediction. Traditionally, this required provisioning and managing dedicated servers or complex compute clusters, leading to high operational overhead and inefficient resource utilization. This article tackles this challenge head-on by providing a comprehensive guide to building a robust, cost-effective, and fully automated pipeline for Serverless Batch Prediction using Google Cloud Run Jobs and Terraform.
By leveraging the power of serverless computing with Cloud Run and the declarative infrastructure-as-code (IaC) approach of Terraform, you will learn how to create a system that runs on-demand, scales to zero, and is perfectly reproducible. This eliminates the need for idle infrastructure, drastically reduces costs, and allows your team to focus on model development rather than server management.
Table of Contents
- 1 Understanding the Core Components
- 2 Architecting a Serverless Batch Prediction Pipeline
- 3 Building and Containerizing the Prediction Application
- 4 Implementing the Infrastructure with Terraform for Serverless Batch Prediction
- 5 Executing and Monitoring the Batch Job
- 6 Frequently Asked Questions
- 7 Conclusion
Understanding the Core Components
Before diving into the implementation, it’s essential to understand the key technologies that form the foundation of our serverless architecture. Each component plays a specific and vital role in creating an efficient and automated prediction pipeline.
What is Batch Prediction?
Batch prediction, or offline inference, is the process of generating predictions for a large set of observations simultaneously. Unlike real-time prediction, which provides immediate responses for single data points, batch prediction operates on a dataset (a “batch”) at a scheduled time or on-demand. Common use cases include:
- Daily Fraud Detection: Analyzing all of the previous day’s transactions for fraudulent patterns.
- Customer Segmentation: Grouping an entire customer database into segments for marketing campaigns.
- Product Recommendations: Pre-calculating recommendations for all users overnight.
- Risk Assessment: Scoring a portfolio of loan applications at the end of the business day.
The primary advantage is computational efficiency, as the model and data can be loaded once to process millions of records.
Why Google Cloud Run for Serverless Jobs?
Google Cloud Run is a managed compute platform that enables you to run stateless containers. While many associate it with web services, its “Jobs” feature is specifically designed for containerized tasks that run to completion. This makes it an ideal choice for batch processing workloads.
Key benefits of Cloud Run Jobs include:
- Pay-per-use: You are only billed for the exact CPU and memory resources consumed during the job’s execution, down to the nearest 100 milliseconds. When the job isn’t running, you pay nothing.
- Scales to Zero: There is no underlying infrastructure to manage or pay for when your prediction job is idle.
- Container-based: You can package your application, model, and all its dependencies into a standard container image, ensuring consistency across environments. This gives you complete control over your runtime and libraries (e.g., Python, R, Go).
- High Concurrency: A single Cloud Run Job can be configured to run multiple parallel container instances (tasks) to process large datasets faster.
The Role of Terraform for Infrastructure as Code (IaC)
Terraform is an open-source tool that allows you to define and provision infrastructure using a declarative configuration language. Instead of manually clicking through the Google Cloud Console to create resources, you describe your desired state in code. This is a cornerstone of modern DevOps and MLOps.
Using Terraform for this project provides:
- Reproducibility: Guarantees that the exact same infrastructure can be deployed in different environments (dev, staging, prod).
- Version Control: Your infrastructure configuration can be stored in Git, tracked, reviewed, and rolled back just like application code.
- Automation: The entire setup—from storage buckets to IAM permissions and the Cloud Run Job itself—can be created or destroyed with a single command.
- Clarity: The Terraform files serve as clear documentation of all the components in your architecture.
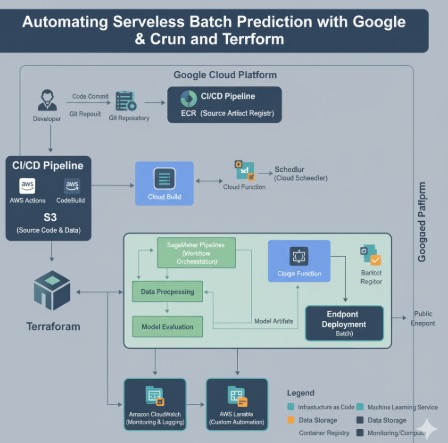
Architecting a Serverless Batch Prediction Pipeline
Our goal is to build a simple yet powerful pipeline that can be triggered to perform predictions on data stored in Google Cloud Storage (GCS).
System Architecture Overview
The data flow for our pipeline is straightforward:
- Input Data: Raw data for prediction (e.g., a CSV file) is uploaded to a designated GCS bucket.
- Trigger: The process is initiated. This can be done manually via the command line, on a schedule using Cloud Scheduler, or in response to an event (like a file upload). For this guide, we’ll focus on manual and scheduled execution.
- Execution: The trigger invokes a Google Cloud Run Job.
- Processing: The Cloud Run Job spins up one or more container instances. Each container runs our Python application, which:
- Downloads the pre-trained ML model and the input data from GCS.
- Performs the predictions.
- Uploads the results (e.g., a new CSV with a predictions column) to a separate output GCS bucket.
- Completion: Once the processing is finished, the Cloud Run Job terminates, and all compute resources are released.
Prerequisites and Setup
Before you begin, ensure you have the following tools installed and configured:
- Google Cloud SDK: Authenticated and configured with a default project (`gcloud init`).
- Terraform: Version 1.0 or newer.
- Docker: To build and test the container image locally.
- Enabled APIs: Ensure the following APIs are enabled in your GCP project: Cloud Run API (`run.googleapis.com`), Artifact Registry API (`artifactregistry.googleapis.com`), Cloud Build API (`cloudbuild.googleapis.com`), and IAM API (`iam.googleapis.com`). You can enable them with `gcloud services enable [API_NAME]`.
Building and Containerizing the Prediction Application
The core of our Cloud Run Job is a containerized application that performs the actual prediction. We’ll use Python with Pandas and Scikit-learn for this example.
The Python Prediction Script
First, let’s create a simple prediction script. Assume we have a pre-trained logistic regression model saved as `model.pkl`. This script will read a CSV from an input bucket, add a prediction column, and save it to an output bucket.
Create a file named main.py:
import os
import pandas as pd
import joblib
from google.cloud import storage

# --- Configuration ---
# Get environment variables passed by Cloud Run
PROJECT_ID = os.environ.get('GCP_PROJECT')
INPUT_BUCKET = os.environ.get('INPUT_BUCKET')
OUTPUT_BUCKET = os.environ.get('OUTPUT_BUCKET')
MODEL_FILE = 'model.pkl' # The name of your model file in the input bucket
INPUT_FILE = 'data.csv'   # The name of the input data file

# Initialize GCS client
storage_client = storage.Client()

def download_blob(bucket_name, source_blob_name, destination_file_name):
    """Downloads a blob from the bucket."""
    bucket = storage_client.bucket(bucket_name)
    blob = bucket.blob(source_blob_name)
    blob.download_to_filename(destination_file_name)
    print(f"Blob {source_blob_name} downloaded to {destination_file_name}.")

def upload_blob(bucket_name, source_file_name, destination_blob_name):
    """Uploads a file to the bucket."""
    bucket = storage_client.bucket(bucket_name)
    blob = bucket.blob(destination_blob_name)
    blob.upload_from_filename(source_file_name)
    print(f"File {source_file_name} uploaded to {destination_blob_name}.")

def main():
    """Main prediction logic."""
    local_model_path = f"/tmp/{MODEL_FILE}"
    local_input_path = f"/tmp/{INPUT_FILE}"
    local_output_path = f"/tmp/predictions.csv"

    # 1. Download model and data from GCS
    print("--- Downloading artifacts ---")
    download_blob(INPUT_BUCKET, MODEL_FILE, local_model_path)
    download_blob(INPUT_BUCKET, INPUT_FILE, local_input_path)

    # 2. Load model and data
    print("--- Loading model and data ---")
    model = joblib.load(local_model_path)
    data_df = pd.read_csv(local_input_path)

    # 3. Perform prediction (assuming model expects all columns except a target)
    print("--- Performing prediction ---")
    # For this example, we assume all columns are features.
    # In a real scenario, you'd select specific feature columns.
    predictions = model.predict(data_df)
    data_df['predicted_class'] = predictions

    # 4. Save results locally and upload to GCS
    print("--- Uploading results ---")
    data_df.to_csv(local_output_path, index=False)
    upload_blob(OUTPUT_BUCKET, local_output_path, 'predictions.csv')

    print("--- Batch prediction job finished successfully! ---")

if __name__ == "__main__":
    main()
And a requirements.txt file:
pandas
scikit-learn
joblib
google-cloud-storage
gcsfs
Creating the Dockerfile
Next, we need to package this application into a Docker container. Create a file named Dockerfile:
# Use an official Python runtime as a parent image
FROM python:3.9-slim

# Set the working directory
WORKDIR /app

# Copy the requirements file into the container
COPY requirements.txt .

# Install any needed packages specified in requirements.txt
RUN pip install --no-cache-dir -r requirements.txt

# Copy the content of the local src directory to the working directory
COPY main.py .

# Define the command to run the application
CMD ["python", "main.py"]
Building and Pushing the Container to Artifact Registry
We’ll use Google Cloud Build to build our Docker image and push it to Artifact Registry, Google’s recommended container registry.
- Create an Artifact Registry repository:
gcloud artifacts repositories create batch-prediction-repo --repository-format=docker --location=us-central1 --description="Repo for batch prediction jobs"
- Build and push the image using Cloud Build:
Replace `[PROJECT_ID]` with your GCP project ID.
gcloud builds submit --tag us-central1-docker.pkg.dev/[PROJECT_ID]/batch-prediction-repo/prediction-job:latest .
This command packages your code, sends it to Cloud Build, builds the Docker image, and pushes the tagged image to your repository. Now your container is ready for deployment.
Implementing the Infrastructure with Terraform for Serverless Batch Prediction
With our application containerized, we can now define the entire supporting infrastructure using Terraform. This section covers the core resource definitions for achieving our Serverless Batch Prediction pipeline.
Create a file named main.tf.
Setting up the Terraform Provider
First, we configure the Google Cloud provider.
terraform {
  required_providers {
    google = {
      source  = "hashicorp/google"
      version = "~> 4.50"
    }
  }
}

provider "google" {
  project = "your-gcp-project-id" # Replace with your Project ID
  region  = "us-central1"
}
Defining GCP Resources
Now, let’s define each piece of our infrastructure in code.
Service Account and IAM Permissions
It’s a best practice to run services with dedicated, least-privilege service accounts.
# Service Account for the Cloud Run Job
resource "google_service_account" "job_sa" {
  account_id   = "batch-prediction-job-sa"
  display_name = "Service Account for Batch Prediction Job"
}

# Grant the Service Account permissions to read/write to GCS
resource "google_project_iam_member" "storage_admin_binding" {
  project = provider.google.project
  role    = "roles/storage.objectAdmin"
  member  = "serviceAccount:${google_service_account.job_sa.email}"
}
Google Cloud Storage Buckets
We need two buckets: one for input data and the model, and another for the prediction results. We use the random_pet resource to ensure unique bucket names.
resource "random_pet" "suffix" {
  length = 2
}

resource "google_storage_bucket" "input_bucket" {
  name          = "batch-pred-input-${random_pet.suffix.id}"
  location      = "US"
  force_destroy = true # Use with caution in production
}

resource "google_storage_bucket" "output_bucket" {
  name          = "batch-pred-output-${random_pet.suffix.id}"
  location      = "US"
  force_destroy = true # Use with caution in production
}
The Cloud Run Job Resource
This is the central part of our Terraform configuration. We define the Cloud Run Job, pointing it to our container image and configuring its environment.
resource "google_cloud_run_v2_job" "batch_prediction_job" {
  name     = "batch-prediction-job"
  location = provider.google.region

  template {
    template {
      service_account = google_service_account.job_sa.email
      containers {
        image = "us-central1-docker.pkg.dev/${provider.google.project}/batch-prediction-repo/prediction-job:latest"

        resources {
          limits = {
            cpu    = "1"
            memory = "512Mi"
          }
        }

        env {
          name  = "INPUT_BUCKET"
          value = google_storage_bucket.input_bucket.name
        }

        env {
          name  = "OUTPUT_BUCKET"
          value = google_storage_bucket.output_bucket.name
        }
      }
      # Set a timeout for the job to avoid runaway executions
      timeout = "600s" # 10 minutes
    }
  }
}
Applying the Terraform Configuration
With the `main.tf` file complete, you can deploy the infrastructure:
- Initialize Terraform:
terraform init - Review the plan:
terraform plan - Apply the configuration:
terraform apply
After you confirm the changes, Terraform will create the service account, GCS buckets, and the Cloud Run Job in your GCP project.
Executing and Monitoring the Batch Job
Once your infrastructure is deployed, you can run and monitor the prediction job.
Manual Execution
- Upload data: Upload your `model.pkl` and `data.csv` files to the newly created input GCS bucket.
- Execute the job: Use the `gcloud` command to start an execution.
gcloud run jobs execute batch-prediction-job --region=us-central1
This command will trigger the Cloud Run Job. You can monitor its progress in the Google Cloud Console or via the command line.
Monitoring and Logging
You can find detailed logs for each job execution in Google Cloud’s operations suite (formerly Stackdriver).
- Cloud Logging: Go to the Cloud Run section of the console, find your job, and view the “LOGS” tab. Any `print` statements from your Python script will appear here, which is invaluable for debugging.
- Cloud Monitoring: Key metrics such as execution count, failure rate, and execution duration are automatically collected and can be viewed in dashboards or used to create alerts.
For more details, you can refer to the official Google Cloud Run monitoring documentation.
Frequently Asked Questions
What is the difference between Cloud Run Jobs and Cloud Functions for batch processing?
While both are serverless, Cloud Run Jobs are generally better for batch processing. Cloud Functions have shorter execution timeouts (max 9 minutes for 1st gen, 60 minutes for 2nd gen), whereas Cloud Run Jobs can run for up to 60 minutes by default and can be configured for up to 24 hours (in preview). Furthermore, Cloud Run’s container-based approach offers more flexibility for custom runtimes and heavy dependencies that might not fit easily into a Cloud Function environment.
How do I handle secrets like database credentials or API keys in my Cloud Run Job?
The recommended approach is to use Google Secret Manager. You can store your secrets securely and then grant your Cloud Run Job’s service account permission to access them. Within the Terraform configuration (or console), you can mount these secrets directly as environment variables or as files in the container’s filesystem. This avoids hardcoding sensitive information in your container image.
Can I scale my job to process data faster?
Yes. The `google_cloud_run_v2_job` resource in Terraform supports `task_count` and `parallelism` arguments within its template. `task_count` defines how many total container instances will be run for the job. `parallelism` defines how many of those instances can run concurrently. By increasing these values, you can split your input data and process it in parallel, significantly reducing the total execution time for large datasets. This requires your application logic to be designed to handle a specific subset of the data.
For more details, see the Terraform documentation for `google_cloud_run_v2_job`.
Conclusion
By combining Google Cloud Run Jobs with Terraform, you can build a powerful, efficient, and fully automated framework for Serverless Batch Prediction. This approach liberates you from the complexities of infrastructure management, allowing you to deploy machine learning inference pipelines that are both cost-effective and highly scalable. The infrastructure-as-code model provided by Terraform ensures your deployments are repeatable, version-controlled, and transparent.
Adopting this serverless pattern not only modernizes your MLOps stack but also empowers your data science and engineering teams to deliver value faster. You can now run complex prediction jobs on-demand or on a schedule, paying only for the compute you use, and scaling effortlessly from zero to thousands of parallel tasks. This is the future of operationalizing machine learning models in the cloud. Thank you for reading the DevopsRoles page!