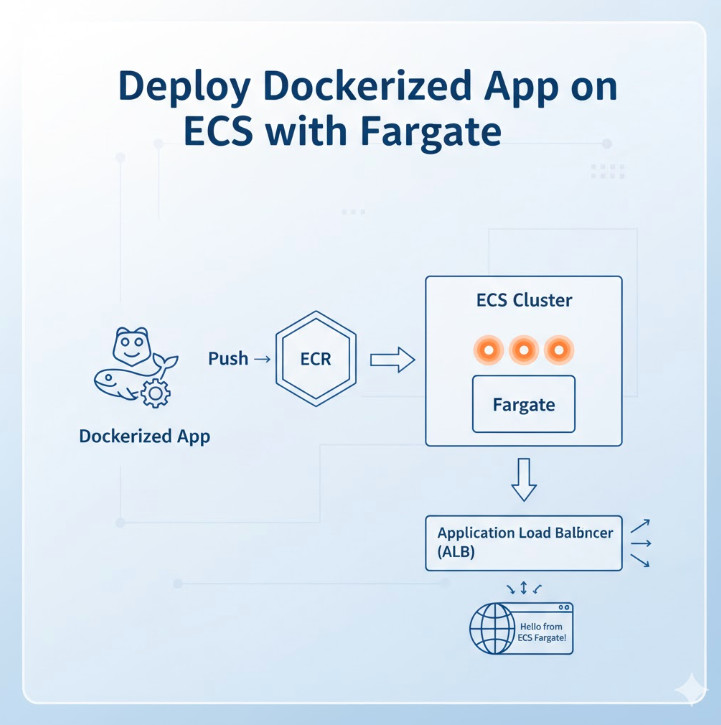
Welcome to the definitive guide for DevOps engineers, SREs, and developers looking to master container orchestration on AWS. In today’s cloud-native landscape, running containers efficiently, securely, and at scale is paramount. While Kubernetes (EKS) often grabs the headlines, Amazon’s Elastic Container Service (ECS) paired with AWS Fargate offers a powerfully simple, serverless alternative. This article provides a deep, step-by-step tutorial to Deploy Dockerized App ECS Fargate, transforming your application from a local Dockerfile to a highly available, scalable service in the AWS cloud.
We’ll move beyond simple “click-ops” and focus on the “why” behind each step, from setting up your network infrastructure to configuring task definitions and load balancers. By the end, you’ll have a production-ready deployment pattern you can replicate and automate.
Table of Contents
Why Choose ECS with Fargate?
Before we dive into the “how,” let’s establish the “why.” Why choose ECS with Fargate over other options like ECS on EC2 or even EKS?
The Serverless Container Experience
The primary advantage is Fargate. It’s a serverless compute engine for containers. When you use the Fargate launch type, you no longer need to provision, manage, or scale a cluster of EC2 instances to run your containers. You simply define your application’s requirements (CPU, memory), and Fargate launches and manages the underlying infrastructure for you. This means:
- No Patching: You are not responsible for patching or securing the underlying host OS.
- Right-Sized Resources: You pay for the vCPU and memory resources your application requests, not for an entire EC2 instance.
- Rapid Scaling: Fargate can scale up and down quickly, launching new container instances in seconds without waiting for EC2 instances to boot.
- Security Isolation: Each Fargate task runs in its own isolated kernel environment, enhancing security.
ECS vs. Fargate vs. EC2 Launch Types
It’s important to clarify the terms. ECS is the control plane (the orchestrator), while Fargate and EC2 are launch types (the data plane where containers run).
| Feature | ECS with Fargate | ECS on EC2 |
|---|---|---|
| Infrastructure Management | None. Fully managed by AWS. | You manage the EC2 instances (patching, scaling, securing). |
| Pricing Model | Per-task vCPU and memory/second. | Per-EC2 instance/second (regardless of utilization). |
| Control | Less control over the host environment. | Full control. Can use specific AMIs, daemonsets, etc. |
| Use Case | Most web apps, microservices, batch jobs. | Apps with specific compliance, GPU, or host-level needs. |
For most modern applications, the simplicity and operational efficiency of Fargate make it the default choice. You can learn more directly from the official AWS Fargate page.
Prerequisites for Deployment
Before we begin the deployment, let’s gather our tools and assets.
1. A Dockerized Application
You need an application containerized with a Dockerfile. For this tutorial, we’ll use a simple Node.js “Hello World” web server. If you already have an image in ECR, you can skip to Step 2.
Create a directory for your app and add these three files:
Dockerfile
# Use an official Node.js runtime as a parent image
FROM node:18-alpine

# Set the working directory in the container
WORKDIR /usr/src/app

# Copy package.json and package-lock.json
COPY package*.json ./

# Install app dependencies
RUN npm install

# Bundle app's source
COPY . .

# Expose the port the app runs on
EXPOSE 8080

# Define the command to run the app
CMD [ "node", "index.js" ]
index.js
const http = require('http');

const port = 8080;

const server = http.createServer((req, res) => {
  res.statusCode = 200;
  res.setHeader('Content-Type', 'text/plain');
  res.end('Hello from ECS Fargate!\n');
});

server.listen(port, () => {
  console.log(`Server running at http://localhost:${port}/`);
});
package.json
{
  "name": "ecs-fargate-demo",
  "version": "1.0.0",
  "description": "Simple Node.js app for Fargate",
  "main": "index.js",
  "scripts": {
    "start": "node index.js"
  },
  "dependencies": {}
}
2. AWS Account & CLI
You’ll need an AWS account with IAM permissions to manage ECS, ECR, VPC, IAM roles, and Load Balancers. Ensure you have the AWS CLI installed and configured with your credentials.
3. Amazon ECR Repository
Your Docker image needs to live in a registry. We’ll use Amazon Elastic Container Registry (ECR).
Create a new repository:
aws ecr create-repository \
    --repository-name ecs-fargate-demo \
    --region us-east-1
Make a note of the repositoryUri in the output. It will look something like 123456789012.dkr.ecr.us-east-1.amazonaws.com/ecs-fargate-demo.
Step-by-Step Guide to Deploy Dockerized App ECS Fargate
This is the core of our tutorial. Follow these steps precisely to get your application running.
Step 1: Build and Push Your Docker Image to ECR
First, we build our local Dockerfile, tag it for ECR, and push it to our new repository.
# 1. Get your AWS Account ID
AWS_ACCOUNT_ID=$(aws sts get-caller-identity --query Account --output text)

# 2. Define repository variables
REPO_NAME="ecs-fargate-demo"
REGION="us-east-1"
REPO_URI="${AWS_ACCOUNT_ID}.dkr.ecr.${REGION}.amazonaws.com/${REPO_NAME}"

# 3. Log in to ECR
aws ecr get-login-password --region ${REGION} | docker login --username AWS --password-stdin ${REPO_URI}

# 4. Build the Docker image
# Make sure you are in the directory with your Dockerfile
docker build -t ${REPO_NAME} .

# 5. Tag the image for ECR
docker tag ${REPO_NAME}:latest ${REPO_URI}:latest

# 6. Push the image to ECR
docker push ${REPO_URI}:latest
Your application image is now stored in ECR, ready to be pulled by ECS.
Step 2: Set Up Your Networking (VPC)
A Fargate task *always* runs inside a VPC (Virtual Private Cloud). For a production-ready setup, we need:
- A VPC.
- At least two public subnets for our Application Load Balancer (ALB).
- At least two private subnets for our Fargate tasks (for security).
- An Internet Gateway (IGW) attached to the VPC.
- A NAT Gateway in a public subnet to allow tasks in private subnets to access the internet (e.g., to pull images or talk to external APIs).
- Route tables to connect everything.
Setting this up manually is tedious. The easiest way is to use the “VPC with public and private subnets” template in the AWS VPC Wizard or use an existing “default” VPC for simplicity (though not recommended for production).
For this guide, let’s assume you have a default VPC. We will use its public subnets for both the ALB and the Fargate task for simplicity. In production, always place tasks in private subnets.
We need a Security Group for our Fargate task. This acts as a virtual firewall.
# 1. Get your default VPC ID
VPC_ID=$(aws ec2 describe-vpcs --filters "Name=isDefault,Values=true" --query "Vpcs[0].VpcId" --output text)

# 2. Create a Security Group for the Fargate task
TASK_SG_ID=$(aws ec2 create-security-group \
    --group-name "fargate-task-sg" \
    --description "Allow traffic to Fargate task" \
    --vpc-id ${VPC_ID} \
    --query "GroupId" --output text)

# 3. Add a rule to allow traffic on port 8080 (our app's port)
# We will later restrict this to only the ALB's Security Group
aws ec2 authorize-security-group-ingress \
    --group-id ${TASK_SG_ID} \
    --protocol tcp \
    --port 8080 \
    --cidr 0.0.0.0/0
Step 3: Create an ECS Cluster
An ECS Cluster is a logical grouping of tasks or services. For Fargate, it’s just a namespace.
aws ecs create-cluster --cluster-name "fargate-demo-cluster"
That’s it. No instances to provision. Just a simple command.
Step 4: Configure an Application Load Balancer (ALB)
We need an ALB to distribute traffic to our Fargate tasks and give us a single DNS endpoint. This is a multi-step process.
# 1. Get two public subnet IDs from your default VPC
SUBNET_IDS=$(aws ec2 describe-subnets \
    --filters "Name=vpc-id,Values=${VPC_ID}" "Name=map-public-ip-on-launch,Values=true" \
    --query "Subnets[0:2].SubnetId" \
    --output text)

# 2. Create a Security Group for the ALB
ALB_SG_ID=$(aws ec2 create-security-group \
    --group-name "fargate-alb-sg" \
    --description "Allow HTTP traffic to ALB" \
    --vpc-id ${VPC_ID} \
    --query "GroupId" --output text)

# 3. Add ingress rule to allow HTTP (port 80) from the internet
aws ec2 authorize-security-group-ingress \
    --group-id ${ALB_SG_ID} \
    --protocol tcp \
    --port 80 \
    --cidr 0.0.0.0/0

# 4. Create the Application Load Balancer
ALB_ARN=$(aws elbv2 create-load-balancer \
    --name "fargate-demo-alb" \
    --subnets ${SUBNET_IDS} \
    --security-groups ${ALB_SG_ID} \
    --query "LoadBalancers[0].LoadBalancerArn" --output text)

# 5. Create a Target Group (where the ALB will send traffic)
TG_ARN=$(aws elbv2 create-target-group \
    --name "fargate-demo-tg" \
    --protocol HTTP \
    --port 8080 \
    --vpc-id ${VPC_ID} \
    --target-type ip \
    --health-check-path / \
    --query "TargetGroups[0].TargetGroupArn" --output text)

# 6. Create a Listener for the ALB (listens on port 80)
aws elbv2 create-listener \
    --load-balancer-arn ${ALB_ARN} \
    --protocol HTTP \
    --port 80 \
    --default-actions Type=forward,TargetGroupArn=${TG_ARN}

# 7. (Security Best Practice) Now, update the Fargate task SG
# to ONLY allow traffic from the ALB's security group
aws ec2 revoke-security-group-ingress \
    --group-id ${TASK_SG_ID} \
    --protocol tcp \
    --port 8080 \
    --cidr 0.0.0.0/0

aws ec2 authorize-security-group-ingress \
    --group-id ${TASK_SG_ID} \
    --protocol tcp \
    --port 8080 \
    --source-group ${ALB_SG_ID}
Step 5: Create an ECS Task Definition
The Task Definition is the blueprint for your application. It defines the container image, CPU/memory, ports, and IAM roles.
First, we need an ECS Task Execution Role. This role grants ECS permission to pull your ECR image and write logs to CloudWatch.
# 1. Create the trust policy for the role
cat > ecs-execution-role-trust.json <
Now, create the Task Definition JSON file. Replace YOUR_ACCOUNT_ID and YOUR_REGION or use the variables from Step 1.
task-definition.json
{
"family": "fargate-demo-task",
"networkMode": "awsvpc",
"requiresCompatibilities": [
"FARGATE"
],
"cpu": "1024",
"memory": "2048",
"executionRoleArn": "arn:aws:iam::YOUR_ACCOUNT_ID:role/ecs-task-execution-role",
"containerDefinitions": [
{
"name": "fargate-demo-container",
"image": "YOUR_ACCOUNT_ID.dkr.ecr.YOUR_REGION.amazonaws.com/ecs-fargate-demo:latest",
"portMappings": [
{
"containerPort": 8080,
"hostPort": 8080,
"protocol": "tcp"
}
],
"essential": true,
"logConfiguration": {
"logDriver": "awslogs",
"options": {
"awslogs-group": "/ecs/fargate-demo-task",
"awslogs-region": "YOUR_REGION",
"awslogs-stream-prefix": "ecs"
}
}
}
]
}
Note: cpu: "1024" (1 vCPU) and memory: "2048" (2GB RAM) are defined. You can adjust these. Fargate has specific valid CPU/memory combinations.
Now, register this task definition:
# Don't forget to replace the placeholders in the JSON file first!
# You can use sed or just manually edit it.
# Example using sed:
# sed -i "s/YOUR_ACCOUNT_ID/${AWS_ACCOUNT_ID}/g" task-definition.json
# sed -i "s/YOUR_REGION/${REGION}/g" task-definition.json
aws ecs register-task-definition --cli-input-json file://task-definition.json
Step 6: Create the ECS Service
The final step! The ECS Service is responsible for running and maintaining a specified number (the "desired count") of your tasks. It connects the Task Definition, Cluster, ALB, and Networking.
# 1. Get your public subnet IDs again (we'll use them for the task)
# In production, these should be PRIVATE subnets.
SUBNET_ID_1=$(echo ${SUBNET_IDS} | awk '{print $1}')
SUBNET_ID_2=$(echo ${SUBNET_IDS} | awk '{print $2}')
# 2. Create the service
aws ecs create-service \
--cluster "fargate-demo-cluster" \
--service-name "fargate-demo-service" \
--task-definition "fargate-demo-task" \
--desired-count 2 \
--launch-type "FARGATE" \
--network-configuration "awsvpcConfiguration={subnets=[${SUBNET_ID_1},${SUBNET_ID_2}],securityGroups=[${TASK_SG_ID}],assignPublicIp=ENABLED}" \
--load-balancers "targetGroupArn=${TG_ARN},containerName=fargate-demo-container,containerPort=8080" \
--health-check-grace-period-seconds 60
# Note: assignPublicIp=ENABLED is only needed if tasks are in public subnets.
# If in private subnets with a NAT Gateway, set this to DISABLED.
Step 7: Verify the Deployment
Your service is now deploying. It will take a minute or two for the tasks to start, pass health checks, and register with the ALB.
You can check the status in the AWS ECS Console, or get the ALB's DNS name to access your app:
# Get the ALB's public DNS name
ALB_DNS=$(aws elbv2 describe-load-balancers \
--load-balancer-arns ${ALB_ARN} \
--query "LoadBalancers[0].DNSName" --output text)
echo "Your app is available at: http://${ALB_DNS}"
# You can also check the status of your service's tasks
aws ecs list-tasks --cluster "fargate-demo-cluster" --service-name "fargate-demo-service"
Open the http://... URL in your browser. You should see "Hello from ECS Fargate!"
Advanced Configuration and Best Practices
Managing Secrets with AWS Secrets Manager
Never hardcode secrets (like database passwords) in your Dockerfile or Task Definition. Instead, store them in AWS Secrets Manager or SSM Parameter Store. You can then inject them into your container at runtime by modifying the containerDefinitions in your task definition:
"secrets": [
{
"name": "DB_PASSWORD",
"valueFrom": "arn:aws:secretsmanager:us-east-1:123456789012:secret:my-db-password-AbCdEf"
}
]
This will inject the secret as an environment variable named DB_PASSWORD.
Configuring Auto Scaling for Your Service
A major benefit of ECS is auto-scaling. You can scale your service based on metrics like CPU, memory, or ALB request count.
# 1. Register the service as a scalable target
aws application-autoscaling register-scalable-target \
--service-namespace ecs \
--scalable-dimension ecs:service:DesiredCount \
--resource-id service/fargate-demo-cluster/fargate-demo-service \
--min-capacity 2 \
--max-capacity 10
# 2. Create a scaling policy (e.g., target 75% CPU utilization)
aws application-autoscaling put-scaling-policy \
--service-namespace ecs \
--scalable-dimension ecs:service:DesiredCount \
--resource-id service/fargate-demo-cluster/fargate-demo-service \
--policy-name "ecs-cpu-scaling-policy" \
--policy-type TargetTrackingScaling \
--target-tracking-scaling-policy-configuration '{"TargetValue":75.0,"PredefinedMetricSpecification":{"PredefinedMetricType":"ECSServiceAverageCPUUtilization"},"ScaleInCooldown":300,"ScaleOutCooldown":60}'
CI/CD Pipelines for Automated Deployments
Manually running these commands isn't sustainable. The next step is to automate this entire process in a CI/CD pipeline using tools like AWS CodePipeline, GitHub Actions, or Jenkins. A typical pipeline would:
- Build: Run
docker build.
- Test: Run unit/integration tests.
- Push: Push the new image to ECR.
- Deploy: Create a new Task Definition revision and update the ECS Service to use it, triggering a rolling deployment.
Frequently Asked Questions
What is the difference between ECS and EKS?
ECS is Amazon's proprietary container orchestrator. It's simpler to set up and manage, especially with Fargate. EKS (Elastic Kubernetes Service) is Amazon's managed Kubernetes service. It offers the full power and portability of Kubernetes but comes with a steeper learning curve and more operational overhead (even with Fargate for EKS).
Is Fargate more expensive than EC2 launch type?
On paper, Fargate's per-vCPU/GB-hour rates are higher than an equivalent EC2 instance. However, with the EC2 model, you pay for the *entire instance* 24/7, even if it's only 30% utilized. With Fargate, you pay *only* for the resources your tasks request. For spiky or under-utilized workloads, Fargate is often cheaper and always more operationally efficient.
How do I monitor my Fargate application?
Your first stop is Amazon CloudWatch Logs, which we configured in the task definition. For metrics, ECS provides default CloudWatch metrics for service CPU and memory utilization. For deeper, application-level insights (APM), you can integrate tools like AWS X-Ray, Datadog, or New Relic.
Can I use a private ECR repository?
Yes. The ecs-task-execution-role we created grants Fargate permission to pull from your ECR repositories. If your task is in a private subnet, you'll also need to configure a VPC Endpoint for ECR (com.amazonaws.us-east-1.ecr.dkr) so it can pull the image without going over the public internet.
Conclusion
Congratulations! You have successfully mastered the end-to-end process to Deploy Dockerized App ECS Fargate. We've gone from a local Dockerfile to a secure, scalable, and publicly accessible web service running on serverless container infrastructure. We've covered networking with VPCs, image management with ECR, load balancing with ALB, and the core ECS components of Clusters, Task Definitions, and Services.
By leveraging Fargate, you've removed the undifferentiated heavy lifting of managing server clusters, allowing your team to focus on building features, not patching instances. This pattern is the foundation for building robust microservices on AWS, and you now have the practical skills and terminal-ready commands to do it yourself.
Thank you for reading the DevopsRoles page!