In today’s fast-paced software development landscape, automation isn’t a luxury; it’s a necessity. The ability to automatically build, test, and deploy applications allows development teams to release features faster, reduce human error, and improve overall product quality. This is the core promise of CI/CD (Continuous Integration and Continuous Delivery/Deployment). This guide will provide a comprehensive walkthrough on how to build a robust AWS CI/CD Pipeline using the powerful suite of AWS developer tools, seamlessly integrated with your GitHub repository.
We’ll go from a simple Node.js application on your local machine to a fully automated deployment onto an EC2 instance every time you push a change to your code. This practical, hands-on tutorial is designed for DevOps engineers, developers, and system administrators looking to master automation on the AWS cloud.
Table of Contents
What is an AWS CI/CD Pipeline?
Before diving into the “how,” let’s clarify the “what.” A CI/CD pipeline is an automated workflow that developers use to reliably deliver new software versions. It’s a series of steps that code must pass through before it’s released to users.
- Continuous Integration (CI): This is the practice of developers frequently merging their code changes into a central repository (like GitHub). After each merge, an automated build and test sequence is run. The goal is to detect integration bugs as quickly as possible.
- Continuous Delivery/Deployment (CD): This practice extends CI. It automatically deploys all code changes that pass the CI stage to a testing and/or production environment. Continuous Delivery means the final deployment to production requires manual approval, while Continuous Deployment means it happens automatically.
An AWS CI/CD Pipeline leverages AWS-native services to implement this workflow, offering a managed, scalable, and secure way to automate your software delivery process.
Core Components of Our AWS CI/CD Pipeline
AWS provides a suite of services, often called the “CodeSuite,” that work together to create a powerful pipeline. For this tutorial, we will focus on the following key components:
AWS CodePipeline
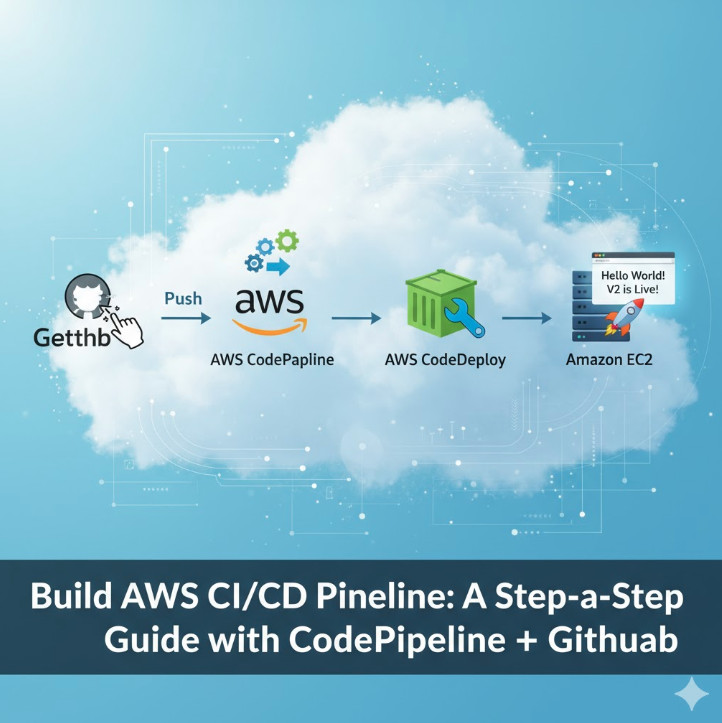
Think of CodePipeline as the orchestrator or the “glue” for our entire pipeline. It models, visualizes, and automates the steps required to release your software. You define a series of stages (e.g., Source, Build, Deploy), and CodePipeline ensures that your code changes move through these stages automatically upon every commit.
GitHub (Source Control)
While AWS offers its own Git repository service (CodeCommit), using GitHub is incredibly common. CodePipeline integrates directly with GitHub, allowing it to automatically pull the latest source code whenever a change is pushed to a specific branch.
AWS CodeBuild
CodeBuild is a fully managed continuous integration service that compiles source code, runs tests, and produces software packages that are ready to deploy. You don’t need to provision or manage any build servers. You simply define the build commands in a buildspec.yml file, and CodeBuild executes them in a clean, containerized environment. It scales automatically to meet your build volume.
AWS CodeDeploy
CodeDeploy is a service that automates application deployments to a variety of compute services, including Amazon EC2 instances, on-premises servers, AWS Fargate, or AWS Lambda. It handles the complexity of updating your applications, helping to minimize downtime during deployment and providing a centralized way to manage and monitor the process.
Prerequisites for Building Your Pipeline
Before we start building, make sure you have the following ready:
- An AWS Account with administrative privileges.
- A GitHub Account where you can create a new repository.
- Basic familiarity with the AWS Management Console and Git commands.
- A simple application to deploy. We will provide one below.
Step-by-Step Guide: Building Your AWS CI/CD Pipeline
Let’s get our hands dirty and build the pipeline from the ground up. We will create a simple “Hello World” Node.js application and configure the entire AWS stack to deploy it.
Step 1: Preparing Your Application and GitHub Repository
First, create a new directory on your local machine, initialize a Git repository, and create the following files.
1. `package.json` – Defines project dependencies.
{
      "name": "aws-codepipeline-demo",
      "version": "1.0.0",
      "description": "Simple Node.js app for CodePipeline demo",
      "main": "index.js",
      "scripts": {
        "start": "node index.js"
      },
      "dependencies": {
        "express": "^4.18.2"
      },
      "author": "",
      "license": "ISC"
    }
2. `index.js` – Our simple Express web server.
const express = require('express');
const app = express();
const port = 3000;
app.get('/', (req, res) => {
res.send('Hello World from our AWS CI/CD Pipeline! V1
');
});
app.listen(port, () => {
console.log(`App listening at http://localhost:${port}`);
});3. `buildspec.yml` – Instructions for AWS CodeBuild.
This file tells CodeBuild how to build our project. It installs dependencies and prepares the output artifacts that CodeDeploy will use.
version: 0.2

    phases:
      install:
        runtime-versions:
          nodejs: 18
        commands:
          - echo Installing dependencies...
          - npm install
      build:
        commands:
          - echo Build started on `date`
          - echo Compiling the Node.js code...
          # No actual build step needed for this simple app
      post_build:
        commands:
          - echo Build completed on `date`
    artifacts:
      files:
        - '**/*'
4. `appspec.yml` – Instructions for AWS CodeDeploy.
This file tells CodeDeploy how to deploy the application on the EC2 instance. It specifies where the files should be copied and includes “hooks” to run scripts at different stages of the deployment lifecycle.
version: 0.0
    os: linux
    files:
      - source: /
        destination: /var/www/html/my-app
        overwrite: true
    hooks:
      BeforeInstall:
        - location: scripts/before_install.sh
          timeout: 300
          runas: root
      ApplicationStart:
        - location: scripts/application_start.sh
          timeout: 300
          runas: root
      ValidateService:
        - location: scripts/validate_service.sh
          timeout: 300
          runas: root
5. Deployment Scripts
Create a `scripts` directory and add the following files. These are referenced by `appspec.yml`.
`scripts/before_install.sh`
    #!/bin/bash
    # Install Node.js and PM2
    curl -fsSL https://deb.nodesource.com/setup_18.x | sudo -E bash -
    sudo apt-get install -y nodejs
    sudo npm install pm2 -g

    # Create deployment directory if it doesn't exist
    DEPLOY_DIR="/var/www/html/my-app"
    if [ ! -d "$DEPLOY_DIR" ]; then
      mkdir -p "$DEPLOY_DIR"
    fi
`scripts/application_start.sh`
    #!/bin/bash
    # Start the application
    cd /var/www/html/my-app
    pm2 stop index.js || true
    pm2 start index.js
`scripts/validate_service.sh`
    #!/bin/bash
    # Validate the service is running
    sleep 5 # Give the app a moment to start
    curl -f http://localhost:3000
Finally, make the scripts executable, commit all files, and push them to a new repository on your GitHub account.
Step 2: Setting Up the Deployment Environment (EC2 and IAM)
We need a server to deploy our application to. We’ll launch an EC2 instance and configure it with the necessary permissions and software.
1. Create an IAM Role for EC2:
- Go to the IAM console and create a new role.
- Select “AWS service” as the trusted entity type and “EC2” as the use case.
- Attach the permission policy:
AmazonEC2RoleforAWSCodeDeploy. This allows the CodeDeploy agent on the EC2 instance to communicate with the CodeDeploy service. - Give the role a name (e.g.,
EC2CodeDeployRole) and create it.
2. Launch an EC2 Instance:
- Go to the EC2 console and launch a new instance.
- Choose an AMI, like Ubuntu Server 22.04 LTS.
- Choose an instance type, like
t2.micro(Free Tier eligible). - In the “Advanced details” section, select the
EC2CodeDeployRoleyou just created for the “IAM instance profile.” - Add a tag to the instance, e.g.,
Key: Name, Value: WebServer. We’ll use this tag to identify the instance in CodeDeploy. - Configure the security group to allow inbound traffic on port 22 (SSH) from your IP and port 3000 (HTTP) from anywhere (0.0.0.0/0) for our app.
- In the “User data” field under “Advanced details”, paste the following script. This will install the CodeDeploy agent when the instance launches.
#!/bin/bash
    sudo apt-get update
    sudo apt-get install ruby-full wget -y
    cd /home/ubuntu
    wget https://aws-codedeploy-us-east-1.s3.us-east-1.amazonaws.com/latest/install
    chmod +x ./install
    sudo ./install auto
    sudo service codedeploy-agent start
    sudo service codedeploy-agent status
Launch the instance.
Step 3: Configuring AWS CodeDeploy
Now, we’ll set up CodeDeploy to manage deployments to our new EC2 instance.
1. Create a CodeDeploy Application:
- Navigate to the CodeDeploy console.
- Click “Create application.”
- Give it a name (e.g.,
MyWebApp) and select EC2/On-premises as the compute platform.
2. Create a Deployment Group:
- Inside your new application, click “Create deployment group.”
- Enter a name (e.g.,
WebApp-Production). - Create a new service role for CodeDeploy or use an existing one. This role needs permissions to interact with AWS services like EC2. The console can create one for you with the required
AWSCodeDeployRolepolicy. - For the environment configuration, choose “Amazon EC2 instances” and select the tag you used for your instance (
Key: Name, Value: WebServer). - Ensure the deployment settings are configured to your liking (e.g.,
CodeDeployDefault.OneAtATime). - Disable the load balancer for this simple setup.
- Create the deployment group.
Step 4: Creating the AWS CodePipeline
This is the final step where we connect everything together.
- Navigate to the AWS CodePipeline console and click “Create pipeline.”
- Stage 1: Pipeline settings – Give your pipeline a name (e.g.,
GitHub-to-EC2-Pipeline). Let AWS create a new service role. - Stage 2: Source stage – Select GitHub (Version 2) as the source provider. Click “Connect to GitHub” and authorize the connection. Select your repository and the branch (e.g.,
main). Leave the rest as default. - Stage 3: Build stage – Select AWS CodeBuild as the build provider. Select your region, and then click “Create project.” A new window will pop up.
- Project name: e.g.,
WebApp-Builder. - Environment: Managed image, Amazon Linux 2, Standard runtime, and select a recent image version.
- Role: Let it create a new service role.
- Buildspec: Choose “Use a buildspec file”. This will use the
buildspec.ymlin your repository. - Click “Continue to CodePipeline.”
- Project name: e.g.,
- Stage 4: Deploy stage – Select AWS CodeDeploy as the deploy provider. Select the application name (
MyWebApp) and deployment group (WebApp-Production) you created earlier. - Stage 5: Review – Review all the settings and click “Create pipeline.”
Triggering and Monitoring Your Pipeline
Once you create the pipeline, it will automatically trigger its first run, pulling the latest code from your GitHub repository. You can watch the progress as it moves from the “Source” stage to “Build” and finally “Deploy.”
If everything is configured correctly, all stages will turn green. You can then navigate to your EC2 instance’s public IP address in a web browser (e.g., http://YOUR_EC2_IP:3000) and see your “Hello World” message!
To test the automation, go back to your local `index.js` file, change the message to “Hello World! V2 is live!”, commit, and push the change to GitHub. Within a minute or two, you will see CodePipeline automatically detect the change, run the build, and deploy the new version. Refresh your browser, and you’ll see the updated message without any manual intervention.
Frequently Asked Questions (FAQs)
- Can I deploy to other services besides EC2?
- Absolutely. CodeDeploy and CodePipeline support deployments to Amazon ECS (for containers), AWS Lambda (for serverless functions), and even S3 for static websites. You would just configure the Deploy stage of your pipeline differently.
- How do I manage sensitive information like database passwords?
- You should never hardcode secrets in your repository. The best practice is to use AWS Secrets Manager or AWS Systems Manager Parameter Store. CodeBuild can be given IAM permissions to fetch these secrets securely during the build process and inject them as environment variables.
- What is the cost associated with this setup?
- AWS has a generous free tier. You get one active CodePipeline for free per month. CodeBuild offers 100 build minutes per month for free. Your primary cost will be the running EC2 instance, which is also covered by the free tier for the first 12 months (for a
t2.microinstance). - How can I add a manual approval step?
- In CodePipeline, you can add a new stage before your production deployment. In this stage, you can add an “Approval” action. The pipeline will pause at this point and wait for a user with the appropriate IAM permissions to manually approve or reject the change before it proceeds.
Conclusion
Congratulations! You have successfully built a fully functional, automated AWS CI/CD Pipeline. By integrating GitHub with CodePipeline, CodeBuild, and CodeDeploy, you’ve created a powerful workflow that dramatically improves the speed and reliability of your software delivery process. This setup forms the foundation of modern DevOps practices on the cloud. From here, you can expand the pipeline by adding automated testing stages, deploying to multiple environments (staging, production), and integrating more advanced monitoring and rollback capabilities. Mastering this core workflow is a critical skill for any cloud professional looking to leverage the full power of AWS. Thank you for reading the DevopsRoles page!