This comprehensive guide is designed for Senior DevOps, MLOps, SecOps, and AI Engineers. We will move far beyond surface-level definitions. We will dive deep into the underlying state graph, the operational mechanics of the plan execution, and the advanced CI/CD patterns required to treat Terraform Plan vs Apply as a robust, auditable workflow.
In the modern DevOps landscape, Infrastructure as Code (IaC) is not merely a best practice—it is the foundational pillar of reliable, scalable, and repeatable operations. Among the most critical tools in this arsenal is HashiCorp Terraform.
However, even seasoned engineers often encounter confusion regarding the fundamental difference between two core commands: terraform plan and terraform apply. Misunderstanding this distinction can lead to unintended resource destruction, state drift, or, worse, security vulnerabilities in production environments.
By the end of this article, you will not only understand what the commands do, but why they behave the way they do, enabling you to build truly resilient infrastructure pipelines.
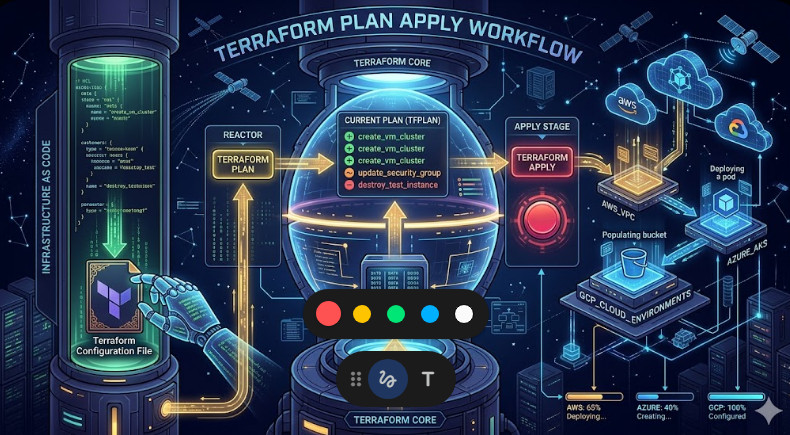
Table of Contents
Phase 1: Core Architecture – Understanding the State Machine
To grasp the difference between plan and apply, one must first understand the central component of Terraform: the state file (terraform.tfstate). This file is the single source of truth that maps the declared desired state (in your .tf files) to the actual existing state (in your cloud provider).
The Role of terraform plan (The Auditor)
The terraform plan command is fundamentally a read-only, non-destructive audit. It acts as a sophisticated diff engine.
When you run plan, Terraform performs the following sequence of actions:
- State Reading: It reads the current state from the backend (e.g., S3, Azure Blob).
- Configuration Parsing: It parses the desired state defined in your HCL configuration files.
- Provider Interaction (Dry Run): It communicates with the cloud provider’s API (e.g., AWS, GCP) to determine the current attributes of the resources listed in the state.
- Delta Calculation: It compares the desired configuration against the actual state and the current live state. This comparison generates a detailed execution plan—the delta.
Crucially, terraform plan does not modify any resources. Its output is a textual representation of the changes that will occur, including the specific actions (+, ~, ?, -) and the associated resource attributes.
The Role of terraform apply (The Executor)
The terraform apply command is the execution phase. It is the mechanism that translates the calculated delta into reality.
When you run apply, Terraform first checks if a plan has been generated. If not, it implicitly runs a plan. It then takes the calculated plan and sends the necessary API calls to the respective cloud provider.
The execution flow involves:
- Plan Retrieval: It retrieves the plan (either generated interactively or passed from a CI/CD system).
- Resource Modification: For every resource marked for change, it calls the provider’s API to modify, create, or delete the resource in the cloud.
- State Update: Upon successful completion of all API calls, Terraform updates the
terraform.tfstatefile to reflect the new, actual state of the infrastructure.
The Key Takeaway: plan is the blueprint; apply is the construction crew.
Phase 2: Practical Implementation – Workflow Walkthrough
Let’s solidify this understanding with a practical example involving creating a new networking resource.
Imagine you have a module defining a VPC and you need to add a new subnet.
Step 1: Generating the Plan
You modify your configuration files (main.tf) to include the new subnet resource block. Before committing, you run the plan:
terraform plan -out=tfplan
Analysis: Terraform connects to the cloud provider, sees the new resource block, and calculates that it needs to create a new resource. It outputs a plan file (tfplan) detailing this addition. No API calls are made to create the resource yet.
Step 2: Reviewing the Plan Output
The output will clearly show: Plan: 1 to add, 0 to change, 0 to destroy.
This output is your safety net. You can manually review the resource type, the intended parameters, and the associated cost implications before proceeding.
Step 3: Applying the Plan
Once satisfied with the plan, you execute the apply command, referencing the plan file:
terraform apply tfplan
Analysis: Terraform reads the tfplan file. It knows exactly which resources need to be created and what parameters to use. It then executes the necessary API calls, creating the subnet in the cloud. Finally, it updates the state file, recording the new subnet’s ID and attributes.
This separation of concerns—plan first, apply second—is the cornerstone of reliable IaC practices.
💡 Pro Tip: Always use the -out flag when generating a plan (terraform plan -out=tfplan). This captures the exact plan artifact, preventing Terraform from potentially recalculating or altering the plan parameters during the apply phase, which is critical for debugging and auditing.
Phase 3: Senior-Level Best Practices and Advanced Operations
For senior engineers managing complex, multi-region, or highly regulated environments, the Terraform Plan Apply workflow must be integrated into a robust CI/CD pipeline.
1. Implementing Remote State and Locking
In any collaborative environment, local state files are a massive liability. You must use a remote backend (e.g., AWS S3 with DynamoDB locking, Azure Storage, or HashiCorp Consul).
Remote state ensures that:
- All team members read and write to the same, consistent source of truth.
- The locking mechanism prevents two engineers from running conflicting
applycommands simultaneously, which would lead to a race condition and state corruption.
2. CI/CD Integration: The GitOps Workflow
The most secure and auditable way to use Terraform is through a GitOps model. The pipeline should enforce the following sequence:
- Commit: A developer commits changes to the
mainbranch. - CI Trigger (Plan): The CI system (e.g., GitHub Actions, GitLab CI) automatically checks out the code and runs
terraform plan. - Review/Approval: The plan output is posted as a comment or artifact, requiring a manual approval gate from a senior engineer or automated policy engine.
- CD Trigger (Apply): Upon approval, the CD system executes
terraform applyusing the plan artifact generated in the previous step.
This pattern ensures that the plan that was reviewed is the plan that gets applied, eliminating guesswork and unauthorized changes.
3. Handling State Drift and Dependency Management
State Drift occurs when the actual state of the infrastructure deviates from the state recorded in the terraform.tfstate file. This usually happens when a resource is manually modified through the cloud console (out-of-band changes).
- Detection: Running
terraform planis the primary method of detecting drift. If the plan output shows changes that were not reflected in your HCL, drift is present. - Remediation: The safest remediation is to update the HCL to reflect the desired state and then run
apply. If the drift is due to an unauthorized manual change, you must decide whether to accept the change (and update the state) or revert the resource (and potentially lose the manual changes).
4. Advanced Use Case: Blue/Green Deployments
For mission-critical services, simply applying changes is insufficient. Advanced teams use Terraform to manage Blue/Green deployments.
Instead of modifying the existing (Blue) stack, the pipeline provisions an entirely new, identical stack (Green) using the same plan and apply process. Once Green is fully validated, the final step is a simple, controlled traffic switch (e.g., updating a Load Balancer target group or DNS record) that directs traffic from Blue to Green. This minimizes downtime and risk associated with in-place modifications.
This level of orchestration requires deep knowledge of how to manage multiple, interdependent state files and often involves utilizing tools like Terragrunt to manage the boilerplate state configuration. For more advanced roles, understanding the nuances of infrastructure state management is key to mastering your career path, whether that is in general DevOps or specialized areas like DevOps roles.
Summary Table: Plan vs Apply
| Feature | terraform plan | terraform apply |
| Function | Audit / Calculate Delta | Execute / Modify State |
| State Change | None (Read-Only) | Writes to Cloud API & State File |
| Output | Textual plan of changes (+, ~, -) | Confirmation of successful execution |
| Risk Level | Low (Zero risk) | High (Requires careful review) |
| Goal | Review and Validate | Implement and Commit |
By mastering the distinct roles of plan and apply, you transition from merely writing Infrastructure as Code to architecting reliable, auditable, and resilient cloud systems. This knowledge is non-negotiable for any engineer managing production workloads.