Category Archives: Programming

Enhance your programming skills with DevOpsRoles.com. Access expert guides and tutorials on various programming languages and techniques to boost your DevOps capabilities.

Learning Flutter part 1

In this series, let together learning flutter dart part 1.

What is Flutter

Flutter is a Google UI toolkit for building, natively compiled applications for mobile, web and desktop from a single codebase.

  • Fast Development
    • with Stateful Hot Reload helps Paint your app to life in milliseconds. realtime!
  • Expressive and Flexible UI
    • The layered architecture allows for full customization, which results in incredibly fast rendering and expressive and flexible designs.
  • Native performance
    • Full native performance on both IOS and Android.

Flutter System Overview

Architectural Overview Platform channels

Why flutter use Dart?

Flutter is a Framework. It uses Dart to build a layer Framework.

  • Support build, compile AOT(Ahead Of Time) and JIT(Just In Time).
  • OOP Language.
  • Flutter aims to provide 60 frames per second fps performance.

JIT and AOT work

How does Dart work?

Dart programming language basic

  • Dart is a programming language OOP ( Example: null, functions, number… is Object ).
  • All Objects inherits from the Object Dart class.
  • Support Generic types. For example, List
  • There are no keywords public, protected and private.
  • Dart is programming language strongly typed but type annotation is optional. For example, var number = 30 -> number = int )

Install the Dart SDK

Link here: https://dart.dev/get-dart

I will use IntelliJIDEA to code :). Link here

Add plugin Dart for IntelliJIDEA

Choice Configure –> Plugins.

Click Marketplace –> search dart —> click Installed.

Create a New Project for Dart

Select Dart –> Console Application – a Command-line application sample.

For example, Project name: Dart-Study and Project location as the picture below

Now we will code hello with a dart programming language 🙂

void main(){
  print("Hello, I am Dart");
}

Conclusion

Through the article, we learn “Learning Flutter dart part 1” as above. I hope will this your helpful. Thank you for reading the DevopsRoles page!

How to Install Ruby on Rails 5 on CentOS/RHEL

In this tutorial, How to install Ruby on Rails 5 on Centos . Ruby on Rails is a web application framework.

Ruby on Rails Installation

The first, Have install Ruby refer to here and Install MariaDB database.

The second, Installing other required packages as below.

[vagrant@DevopsRoles ~]# yum --enablerepo=epel,centos-sclo-rh -y install rh-ruby23-ruby-devel nodejs gcc make libxml2 libxml2-devel mariadb-devel zlib-devel libxslt-devel

Install Ruby on Rails 5.

[vagrant@DevopsRoles ~]# gem install bundler 
[vagrant@DevopsRoles ~]# gem install nokogiri -- --use-system-libraries 
[vagrant@DevopsRoles ~]# gem install rails --no-ri --no-rdoc 
[vagrant@DevopsRoles ~]# rails -v 

Example, create an application.

[vagrant@DevopsRoles ~]# gem install mysql2 --no-ri --no-rdoc -- --with-mysql-config=/usr/bin/mysql_config 
[vagrant@DevopsRoles ~]# rails new SampleApp -d mysql 
[vagrant@DevopsRoles ~]# cd SampleApp 
[vagrant@DevopsRoles SampleApp]# vi config/database.yml

The content in file “database.yml” as below

default: &default
  adapter: mysql2
  encoding: utf8
  pool: 5
  username: root
  password: password   # MariaDB password
  socket: /var/lib/mysql/mysql.sock

Create a test application

[vagrant@DevopsRoles SampleApp]# rails db:create 
[vagrant@DevopsRoles SampleApp]# rails generate scaffold devapp name:string title:string body:text 
[vagrant@DevopsRoles SampleApp]# rails db:migrate 
[vagrant@DevopsRoles SampleApp]# rails server --binding=0.0.0.0 

The result, Access to the “http://(server’s hostname or IP address):3000/ and “http://(server’s hostname or IP address):3000/testapps/

You have installed Ruby on Rails 5 on CentOS/RHEL ? . Now let us begin Programming Ruby 🙂

How to Install Ruby on CentOS/RHEL

In this tutorial, How to Install Ruby on CentOS/RHEL. The default in CentOS 7 repository is ruby version 2.0. You can install 2.5 with the RPM package if you need it.

Install Ruby on CentOS/RHEL

Add CentOS SCLo Repository

[vagrant@DevopsRoles ~]# yum -y install centos-release-scl-rh centos-release-scl

Install and configure Ruby 2.5

# Packages installed uder the /opt directory
[vagrant@DevopsRoles ~]# yum --enablerepo=centos-sclo-rh -y install rh-ruby25
# load environment variables
[vagrant@DevopsRoles ~]# scl enable rh-ruby25 bash
[vagrant@DevopsRoles ~]# ruby -v 
[vagrant@DevopsRoles ~]# which ruby

Note: If you like to enable Ruby 2.5 auto at login time, Configure as below

[vagrant@DevopsRoles ~]# vi /etc/profile.d/rh-ruby25.sh
# create new the content as below

#!/bin/bash
source /opt/rh/rh-ruby25/enable
export X_SCLS="$(scl enable rh-ruby25 'echo $X_SCLS')"

You have installed Ruby On CentOS/RHEL. Thank you for reading the DevopsRoles page!

Angular build production Deployment on Linux Servers

Introduction

How to use Angular build production on server Linux VPS. Deploying Angular applications in a production environment requires a strategic approach to optimization and server configuration. This guide will delve into best practices for building Angular apps for production, emphasizing effective command-line techniques and server setup to enhance performance and stability.

Angular build production

In development, you have run the ng serve command for your application. What about Angular production? If you look at package.json the file below

Now, To build the script use the Angular CLI ng build with the –prod flag as below

$ ng build --prod

The during run “build –prod” also creates a new folder called dist folder. You need to have server Nginx or Apache for all requests to this index.html

How to configure Nginx in production to serve an Angular app

server {
listen 80;
listen [::]:80 ipv6only=on;
if ($host = www.devopsroles.com) {
return 301 https://$host$request_uri;
}
if ($host = devopsroles.com) {
return 301 https://$host$request_uri;
}
server_name www.devopsroles.com devopsroles.com;
return 444;
}

server {
server_name www.devopsroles.com devopsroles.com;
root /var/www/devopsroles.com/dist/devopsroles;
index index.html index.htm;
access_log off;
error_log /var/www/devopsroles.com/logs/error.log;

location / {
try_files $uri $uri/ index.html;
}
location ~ ^/(scripts.*js|styles|images) {
gzip_static on;
expires 1y;
add_header Cache-Control public;
add_header ETag "";

break;
}
listen 443 ssl http2 ; # managed by Certbot
listen [::]:443 ssl http2;
ssl_certificate /etc/letsencrypt/live/devopsroles.com/fullchain.pem; # managed by Certbot
ssl_certificate_key /etc/letsencrypt/live/devopsroles.com/privkey.pem; # managed by Certbot
}

Conclusion

With the right setup and commands, you can seamlessly transition your Angular application from development to a production-ready state on Linux servers. By adhering to the outlined strategies, developers can ensure their applications are optimized for efficiency and ready for real-world deployment.

Through the article, You can use “Angular build production” as above. I hope this will be helpful to you. Thank you for reading the DevopsRoles page!

How to install NodeJS NPM and Angular on Centos 7x

In this tutorial, How to install nodejs npm and Angular on Centos 7.

  • NodeJS is a cross-platform, opensource Javascript for server-side.
  • npm is the package management utility for Javascript.
  • Angular is an opensource Javascript front-end web.

Install NodeJS NPM and Angular

The prerequisite for NodeJS NPM and Angular.

$ sudo yum update
$ sudo yum -y install epel-release
$ sudo yum -y install gcc c++ make

Install NodeJS

$ sudo yum -y install nodejs

To install Angular

$ npm install -g @angular/cli

To start a Angular project

$ ng new <your-project>

Staring the development server

$ cd <your-project>
$ ng serve

The Angular app is access via http://localhost:8005 on your browser.

Conclusion

Thought the article, You can “install NodeJS NPM and Angular on Centos 7x” as above . I hope will this your helpful. Thank you for reading the DevopsRoles page!

How to Concatenate and Split Strings in Python

Introduction

Python is a versatile and powerful programming language widely used for various applications, from web development to data analysis. One of the fundamental skills in Python is string manipulation, particularly concatenating and splitting strings. This article will guide you through the basics and more advanced techniques for concatenate and Split Strings in Python, complete with practical examples and frequently asked questions.

What is String Concatenation?

String concatenation is the process of joining two or more strings end-to-end to form a single string. This operation is common in programming when constructing messages, creating paths, or merging data.

Basic String Concatenation in Python

In Python, there are several ways to concatenate strings. Let’s start with the most basic methods:

Using the + Operator

The + operator is the simplest way to concatenate strings in Python.

str1 = "Hello"
str2 = "World"
result = str1 + " " + str2
print(result) # Output: Hello World

Using the join() Method

The join() method is useful when you need to concatenate multiple strings from a list or tuple.

words = ["Hello", "World"]
result = " ".join(words)
print(result) # Output: Hello World

Using Formatted String Literals (f-strings)

Introduced in Python 3.6, f-strings provide a readable and concise way to concatenate strings.

name = "Alice"
greeting = f"Hello, {name}!"
print(greeting) # Output: Hello, Alice!

Advanced String Concatenation Techniques

Using the % Operator

The % operator, also known as the string formatting operator, is an older method for concatenating strings.

name = "Bob"
age = 25
result = "My name is %s and I am %d years old." % (name, age)
print(result) # Output: My name is Bob and I am 25 years old.

Using the format() Method

The format() method allows for more complex string formatting and concatenation.

name = "Carol"
age = 30
result = "My name is {} and I am {} years old.".format(name, age)
print(result) # Output: My name is Carol and I am 30 years old.

What is String Splitting?

String splitting is the process of breaking down a string into a list of substrings based on a delimiter. This is particularly useful when parsing data from files, user input, or network responses.

Basic String Splitting in Python

Using the split() Method

The split() method is the most common way to split strings in Python.

sentence = "Hello World"
words = sentence.split()
print(words) # Output: ['Hello', 'World']

Splitting with a Specific Delimiter

You can specify a delimiter to split the string by passing it as an argument to the split() method.

data = "apple,banana,cherry"
fruits = data.split(',')
print(fruits) # Output: ['apple', 'banana', 'cherry']

Advanced String Splitting Techniques

Using Regular Expressions

For more complex splitting patterns, you can use the re module.

import re

text = "one1two2three3"
result = re.split(r'\d', text)
print(result) # Output: ['one', 'two', 'three', '']

Limiting Splits

You can limit the number of splits by passing a second argument to the split() method.

data = "apple,banana,cherry,dates"
fruits = data.split(',', 2)
print(fruits) # Output: ['apple', 'banana', 'cherry,dates']

Practical Example

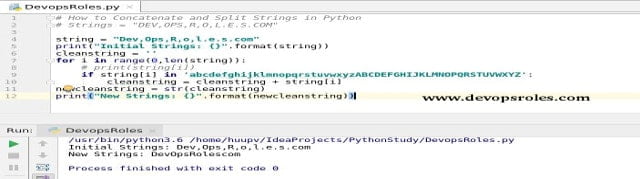
In this tutorial, we will demonstrate how to split and concatenate a string in Python using a practical example.

Example

Given an initial string Dev,Ops,R,o,l.e.s.com, we will split it and then concatenate the parts to form a new string "DevOpsRolescom".

string = "Dev,Ops,R,o,l.e.s.com"
print("Initial Strings: {}".format(string))

cleanstring = ''
for i in range(len(string)):
if string[i].isalpha():
cleanstring += string[i]

newcleanstring = str(cleanstring)
print("New Strings: {}".format(newcleanstring))

Output:

Initial Strings: Dev,Ops,R,o,l.e.s.com
New Strings: DevOpsRolescom

This example shows how to filter out only the alphabetic characters from the initial string and concatenate them to form a clean string.

The result is the picture below:

Common Issues and Solutions

Issue: Leading and Trailing Spaces

When concatenating strings, you may encounter unwanted spaces. Use the strip() method to remove them.

str1 = " Hello "
str2 = " World "
result = (str1 + str2).strip()
print(result) # Output: Hello World

Issue: Handling None Values

When concatenating strings that might include None values, use conditional expressions or the or operator.

str1 = "Hello"
str2 = None
result = str1 + (str2 or "")
print(result) # Output: Hello

Frequently Asked Questions

How do you concatenate multiple strings efficiently?

For concatenating a large number of strings, use the join() method with a list of strings for better performance.

Can you concatenate strings with different data types?

Yes, but you need to convert non-string data types to strings using the str() function.

num = 100
result = "The number is " + str(num)
print(result) # Output: The number is 100

How do you split a string into characters?

Use the list() function to split a string into a list of characters.

word = "hello"
characters = list(word)
print(characters) # Output: ['h', 'e', 'l', 'l', 'o']

Conclusion

Concatenating and splitting strings are fundamental skills in Python programming. This guide has covered both basic and advanced techniques to help you manipulate strings efficiently. Whether you are building a simple script or a complex application, mastering these techniques will enhance your coding capabilities.

By understanding and utilizing the methods and examples provided, you’ll be able to handle various string manipulation tasks in Python with confidence. Keep practicing, and soon these techniques will become second nature.

Thank you for reading the DevopsRoles page!

How to install erlang on ubuntu 16.04

Introduction

Erlang is a programming language used to build massively scalable soft real-time systems with requirements on high availability. In this tutorial, i will help you “how to install erlang on ubuntu 16.04 operating system.

Adding repository for erlang

$ cd /opt/
$ wget https://packages.erlang-solutions.com/erlang-solutions_1.0_all.deb
$ sudo dpkg -i erlang-solutions_1.0_all.deb

Update repository

$ sudo apt-get update

Install erlang on ubuntu

$ sudo apt-get install erlang

Alternatively, you can to install erlang on ubuntu with specify version

To search for erlang package version on ubuntu with apt-cache command as below:

$ sudo apt-cache show erlang

installing erlang package version

$ sudo apt-get install erlang=version-number

Conclusion

Thought the article, you have installed erlang on ubuntu server. Thank you for reading the DevopsRoles page!

Ref to link https://www.erlang.org/course.