tail command means Print the last 10 lines of each FILE to standard output.
Syntax
tail [OPTION]… [FILE]…
On the man page, the describes it
tail – output the last part of files.
man tail– More details information about tail command.
tail command in Linux with Examples
$ tail devopsroles.log
$ tail -f devopsroles.log
Conclusion
tail command is a simple command in Linux. It is the most popular in use terminal Linux output the last part of files. Thank you for reading the DevopsRoles page!
cat command means Concatenate file(s), or standard input, to standard output.
Syntax
cat [OPTION]… [FILE]…
On the man page, the describes it
cat – concatenate files and print on the standard output.
man cat – More details information about cat command.
cat command in Linux with Examples
$ cat devopsroles.txt
$ cat -n devopsroles.txt
Conclusion
cat command is a simple command in Linux. It is the most popular in use terminal Linux concatenate files and print on the standard output. Thank you for reading the DevopsRoles page!
vi – Vi has three main modes Command mode, Insert mode and Command-Line mode.
man vi – More details information about vi command.
vi command in Linux with Examples
$ vi devopsroles.txt
Conclusion
vi is a simple command in Linux. It is the most popular in use terminal Linux Vi has three main modes Command mode, Insert mode and Command-Line mode. Thank you for reading the DevopsRoles page!
man – More details information about sudo command.
sudo command in Linux with Examples
$ sudo yum install nginx
Conclusion
sudo is a simple command in Linux. It is the most popular in use terminal Linux execute a command as another user. Thank you for reading the DevopsRoles page!
This guide will walk you through the ins and outs of using the man command in Linux, complete with examples, tips, and answers to common questions.
Linux is a versatile operating system that caters to users of all skill levels, from beginners to seasoned experts. One of its most powerful tools for understanding and utilizing commands effectively is the man command. Short for “manual,” the man command provides comprehensive documentation for nearly every tool and command in Linux. Whether you’re troubleshooting, exploring new commands, or fine-tuning your workflow, mastering the man command is essential.
What Is the man Command?
The man command is a built-in tool in Linux that displays the manual pages (man pages) for other commands and utilities. It serves as a comprehensive reference, offering detailed information about a command’s syntax, options, and examples.
Key Features of the man Command:
Provides detailed documentation for commands and utilities.
Offers multiple sections, covering user commands, system calls, configuration files, and more.
Helps users understand command usage, options, and examples.
man is a simple command in Linux. It is the most popular in use terminal Linux format and displays the on-line manual pages. Thank you for reading the DevopsRoles page!
The free command in Linux is a fundamental tool, providing an instant snapshot of system memory usage. Whether you’re a system administrator troubleshooting performance issues or a curious user monitoring resource allocation, mastering the free command is essential. In this guide, we will explore its functionality, explain its output, and provide practical examples to make you proficient in using this powerful tool.
What Is the free Command in Linux?
The free command is part of the GNU core utilities, offering a concise view of memory usage, including:
Total system memory
Used memory
Free memory
Buffers and cache
Swap memory
By interpreting its output, you can make informed decisions about memory optimization, application performance, and system health.
Key Features of the free Command
Memory Metrics Explained
When you run the free command, you’ll see several important metrics:
Total Memory: The total amount of RAM available on your system.
Used Memory: The amount of memory currently in use.
Free Memory: The unused memory ready for applications.
Buffers/Cache: Memory allocated for system processes but available if needed.
Swap Memory: Space on the disk used when RAM is full.
Why Use the free Command?
Quickly assess memory utilization.
Identify memory bottlenecks.
Plan upgrades based on resource demands.
Monitor system performance during high workloads.
How to Use the free Command
Basic Syntax
The basic syntax for the free command is straightforward:
free [options]
On the man page, the describes it
free – Display amount of free and used memory in the system.
man free – More details information about command.
Common Options
Here are the most commonly used options with the free command:
-b, -k, -m, -g: Display output in bytes, kilobytes, megabytes, or gigabytes.
-h: Human-readable format (e.g., “2.5G” instead of “2621440”).
-s [seconds]: Continuously display memory usage at specified intervals.
-t: Show total memory, including swap and physical memory.
Examples of the free Command in Action
1. Viewing Memory in Human-Readable Format
To display memory usage in a readable format:
free -h
Output:
              total        used        free      shared  buff/cache   available
Mem:          15Gi       8Gi       2Gi       1Gi        4Gi        6Gi
Swap:         4Gi       1Gi       3Gi
2. Monitoring Memory Over Time
To track memory usage every 2 seconds:
free -h -s 2
3. Displaying Total Memory
Include the total memory line with:
free -t
4. Checking Memory in Gigabytes
View memory statistics in gigabytes for clarity:
free -g
Advanced Usage
Automating Memory Monitoring with Scripts
Create a script to log memory usage:
#!/bin/bash
while true
do
    free -h >> memory_log.txt
    sleep 60
done
Save this script as memory_monitor.sh, make it executable, and run it in the background:
chmod +x memory_monitor.sh
./memory_monitor.sh &
Integrating free with System Monitoring Tools
Combine free with tools like top or htop for a holistic view of system performance. For example:
watch -n 1 free -h
FAQ: Common Questions About the free Command
What does “available” mean in the output?
The “available” column shows the amount of memory that applications can use without swapping. It’s a more reliable indicator than “free” for assessing system health.
Why is “used” memory high even with few applications running?
Linux uses free memory for buffers and cache to improve performance. This memory is available for applications if needed.
How can I clear cache memory?
Use the following command to free up cache memory (requires root privileges):
sync; echo 3 > /proc/sys/vm/drop_caches
Is the free command available on all Linux distributions?
Yes, the free command is part of the procps-ng package, which is included in all major Linux distributions.
External Resources
For further reading and advanced configurations, check out the following authoritative sources:
free command is a simple command in Linux. It is the most popular in use terminal Linux Display amount of free and used memory in the system. Thank you for reading the DevopsRoles page!
man du – More details information about du command.
du command in Linux with Examples
$ du -sh
Conclusion
du command is a simple command in Linux. It is the most popular in using terminal Linux estimate file space usage. Thank you for reading the DevopsRoles page!
In this tutorial, How to use the ls command in Linux with Examples. In the Linux ecosystem, the ls command is a cornerstone utility for managing and navigating files and directories. Whether you are a beginner exploring the Linux command line or a seasoned sysadmin managing complex systems, understanding how to leverage ls effectively is essential. This article provides a comprehensive look at the ls command, ranging from basic usage to advanced options, making it a must-read for anyone seeking to enhance their Linux expertise.
What is the ls Command?
The ls command is used to list files and directories in Linux. Its simplicity and versatility make it one of the most commonly used commands in the Linux shell. By displaying directory contents, ls helps users manage files, analyze storage structures, and perform quick verifications of directory states.
Why Use the ls Command?
File and Directory Management: Easily view and organize directory contents.
Permission Insights: Quickly identify file permissions and ownership.
Efficiency: Navigate large directory structures with advanced filtering.
Syntax
ls [OPTION]… [FILE]…
On the man page, the describes it
ls – list directory contents.
man ls – More details information about ls command.
ls command in Linux with Examples
$ ls -l
$ ls -a
$ ls
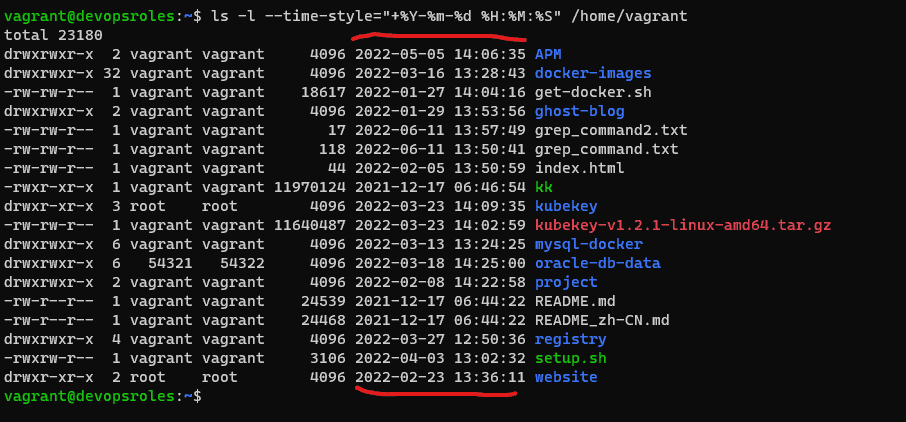
How to display file timestamps use the option ‘–time-style’
ls -l --time-style="+%Y-%m-%d %H:%M:%S" /home/vagrant
List only directory with option ‘-ld’
ls -ld /home/vagrant
List file recursively
ls -lR /home/vagrant/kubekey
List files with size.
ls -s /home/vagrant/
FAQ Section
1. What does the ls command stand for?
ls stands for “list” and is used to display the contents of a directory.
2. Can I use ls to list files in another directory?
Yes, specify the directory path:
ls /path/to/directory
3. How do I colorize output for better readability?
Use the --color option:
ls --color=auto
4. What are hidden files in Linux?
Files starting with a dot (.) are hidden. Use ls -a to view them.
5. How do I list files sorted by modification date?
Use:
ls -lt
Additional Tips and Tricks
Aliases: Create custom shortcuts for frequently used ls options in your shell configuration file (e.g., .bashrc):
alias ll='ls -lh'
Integration with Other Commands: Combine ls with other utilities like grep or awk for advanced processing.
ls command is a simple command in Linux. It is the most popular in use terminal Linux list directory contents. Thank you for reading the DevopsRoles page!
chown command is a simple command in Linux. It is the most popular in use terminal Linux change file owner and group. Thank you for reading the DevopsRoles page!
chgrp command means Changes the group association of the files and directories.
Syntax
chgrp [OPTION]… GROUP FILE… chgrp [OPTION]… –reference=RFILE FILE…
On the man page, the describes it
– change group ownership.
man – More details information about command.
chgrp command in Linux with Examples
$ chgrp -hR huupv mydevops.txt
Conclusion
chgrp command is a simple command in Linux. It is the most popular in use terminal Linux remove files or directories. Thank you for reading the DevopsRoles page!